How to Manage Certificates on OPNsense?
Certificates on OPNsense are used to establish confidence between peers. OPNsense enables the creation of certificates directly from the front-end to simplify their use. Furthermore, it enables the creation of certificates for many uses without using the openssl command line program. The following OPNsense components use certificates:
- Captive Portal
- Web Proxy
- OpenVPN
- IPsec
- Web GUI
The Certificate Manager under the System → Trust section is responsible for generating and managing certificate authority (CA), certificate, and certificate revocation list (CRL) entries that are used by the OPNsense firewall. You may manage OPNsense certificates by navigating to System → Trust → Certificates on the OPNsense web UI.
In this guide, we outline the following topics on OPNsense certificate management:
- What are the Certificate Types on OPNsense?
- What is PKI Infrastructure?
- What are Certificate Properties?
- How to Manage Root Certificate Authority (CA)?
- How to Manage Certificates?
- How to Manage Certificate Revocation Lists (CRL)?
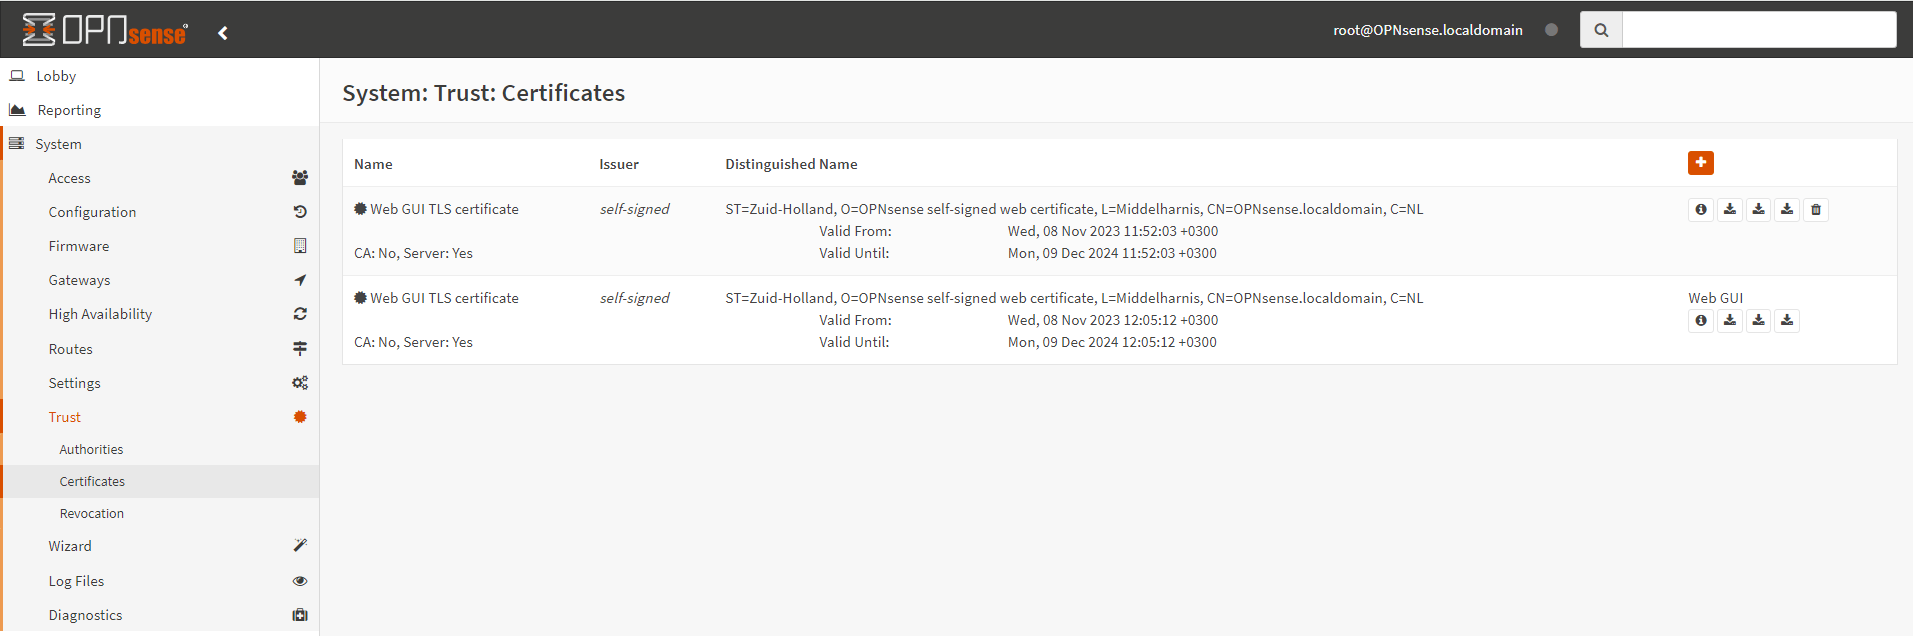
Figure 1. Certificates on OPNsense

What are the Certificate Types on OPNsense?
You may create the following sorts of certificates on your OPNsense firewall:
- Certificate Authority
- Client
- Server
- Combined Client/Server
Furthermore, OPNsense has the capability to create a Certificate Signing Request (CSR). This may be used to generate a certificate signed by an external Certificate Authority (CA).
Ensure you use the appropriate certificate type to avoid connection issues or problems with customers. You may use a server certificate or a combined client/server certificate to protect the connection to the web interface, but not a CA or client certificate.
What is PKI Infrastructure?
In PKI (Public Key Infrastructure), a Certificate Authority (CA) is the trusted institution that initiates the PKI framework. Subsequently, this Certificate Authority signs all the individual certificates inside a group. The CA certificate is used on servers and clients to authenticate the legitimacy of server and client certificates. The CA certificate can validate signatures on certificates but cannot be used to sign certificates. To sign certificates, the private key for the Certificate Authority (CA) is needed. The confidentiality of the CA private key is essential for maintaining the security of a PKI. Access to the CA private key allows for the generation of certificates for a PKI, hence it must be securely maintained. This key is not shared with clients or servers.
A certificate is deemed valid if it has been authenticated by a certain CA. For a VPN, a certificate issued by a particular Certificate Authority (CA) is deemed valid for any VPN that uses that CA. It is advisable to generate a distinct Certificate Authority (CA) for each VPN with varying security levels. If two mobile access VPNs have identical security access, it is acceptable to use the same Certificate Authority (CA) for both VPNs. If one VPN is designated for users and another VPN is intended for remote administration, each with distinct limitations, it is advisable for each VPN to possess a separate Certificate Authority (CA).
What are Certificate Properties?
Certificate authority and certificate entries share similar attributes. Shared characteristics of both categories are discussed below.
Keys
The certificate's public and private keys are used for cryptographic functions.
-
Key Type: The certificate key type might be RSA or Elliptic Curve.
- RSA: RSA keys are more prevalent and widely accepted compared to ECDSA, and they also provide some performance advantages.
- Elliptic Curve: Elliptic Curve Digital Signature Algorithm (ECDSA) is a more recent technique that has not been generally embraced. Its primary benefit is the ability to achieve the same security levels as RSA with fewer keys. ECDSA is less efficient in validating signatures compared to RSA, but it has higher scalability.
-
Key Length: The security level of RSA keys increases with the key size. Greater keys provide enhanced security, although they need more time for generation and are slower in operation. The performance of RSA deteriorates significantly with larger key sizes.
It is recommended to avoid using keys less than 2048 bits wherever feasible. Legacy and embedded systems may lack compatibility with bigger keys.

Figure 2. RSA key
-
Curve Name: Several ECDSA curves are available, however only a select handful have been verified to be compatible with different services on the firewall. Each curve is accompanied by a list of the services that support it. Select the curve depending on the services that will use this certificate authority or certificate.

Figure 3. ECDSA curves
Digest Algorithm
Digest Algorithms, sometimes referred to as Message Digest Algorithms and Hash Algorithms, are used to generate a consistent-length hash of material for signing purposes.
A bigger hash size indicates greater strength and less susceptibility to collisions, which may jeopardize the hash's integrity. The current best practice is to use a minimum of SHA-256.

Figure 4. Digest Algorithm
Lifetime
The lifespan of a certificate authority or certificate is the duration, measured in days, during which the certificate remains valid. Shorter lives enhance security but need more frequent renewal or replacement of certificates.
Certificate authorities find a longer lifespan, such as 3650 days (10 years), to be suitable.
User certificates often have a lengthy duration, with particular durations varying based on the organization's requirements. The GUI defaults to 3650 days for User Certificates, however it is advisable to select a lower amount when feasible.
Server certificates have more stringent criteria regarding their lifespan. The current maximum validity period for server certificates is 398 days. Many browsers and software programs no longer support server certificates with extended durations.
Another unique scenario involves server certificates acquired using ACME from Let's Encrypt. These have a lifespan of 90 days, however, they are automatically renewed before expiration, minimizing further administrative tasks after the first setup.
Distinguished Name
The entity associated with a certificate authority or certificate, referred to as the Subject, is distinguished by the distinct elements of the certificate. The main element for this purpose is the Distinguished Name (DN). These forms are usually completed with an organization's details or, in the case of an individual, personal information. This data is mostly superficial, used to confirm the CA's precision and differentiate it from other CAs.
A DN consists of many fields that hold information on the subject. Only the Common Name box is mandatory; the other fields may be left empty.
A domain name with little distinctive data may lead to misidentification during certificate subject comparisons in the future. Always provide sufficient information to properly identify the topic.
- Common Name: A brief designation, such as a username or hostname. Avoid using spaces or punctuation, save for those often present in a hostname. Modern systems do not directly utilize this name for certificate checking; instead, they focus on Subject Alternative Name values.
- Country Code: The two-letter ISO country code for the certificate subject location. The ISO country code differs from the top-level domain (TLD) code for a nation.
- State or Province: The name of the state or province where the certificate subject is located. Spell out this number without using an abbreviation or code.
- City: The city where the certificate topic is located.
- Organization: The name of the organization to which the individual is affiliated. For instance, a corporate name, government agency name, or equivalent.
- OCSP URI: Uniform Resource Identifier(URI) is an identifier for the certificate. Typically used as an alternative method to identify the hostname during server communication. The certificate validity is not limited to certain URIs on a server.
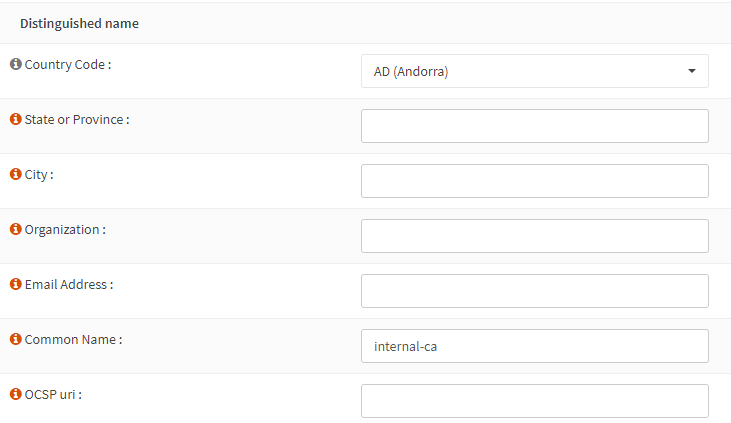
Figure 5. Distinguished Name
When generating a certificate, the graphical user interface automatically fills in most of the fields with the data from the selected certificate authority for signature. The fields' contents may be modified prior to executing the signature procedure.
Subject Alternative Name
Subject Alternative Name (SAN) list is exclusive to certificates. It includes data necessary for verifying the authenticity of the certificate. When a system connects to a device on the network, it may verify the hostname or IP address it is connected to against the values in the certificate's SAN list. By using this method, it can verify that it is connecting with the correct host and not a fraudulent one.
The Common Name value from a certificate is automatically included in the SAN list internally according to current standards.
The following SAN entries may be included in a certificate:
- FQDN or Hostname: An example of a fully qualified domain name (FQDN) is
host.domain.tld, or simply a hostname likehost. Typically, this hostname would be present in the Domain Name System (DNS). User certificates may function as a username. - IP Address: An IP address (e.g. x.x.x.x) is usually the address of a network device associated with this certificate. Clients must check the certificate correctly when connecting by IP address rather than hostname.
- URI: Uniform Resource Identifier(URI) is an identifier for the certificate topic. Typically used as an alternative method to identify the hostname during server communication. The certificate validity is not limited to certain URIs on a server.
- Email Address: An email address for the recipient of the certificate.

Figure 6. SAN settings
How to Manage Root Certificate Authority (CA)?
You may manage your Certificate Authority (CA) entries on OPNsense by navigating to System → Trust → Authorities on the OPNsense web UI. When generating or editing a CA entry, the following options are available:
-
Descriptive name: You should type a descriptive name for your new certificate here.
-
Certificate data: You must paste a certificate in X.509 PEM format here. Certificate data is usually found in a file with the extension
.crtor.pem. The text would be plain and contained inside a block, like this:-----BEGIN CERTIFICATE-----
[A bunch of random-looking base64-encoded data]
-----END CERTIFICATE----- -
Certificate Private Key: The private key for the certificate authority encoded in PEM format. This is optional in most cases but required if you need to generate a Certificate Revocation List (CRL). Without this, the CA cannot sign certificates or CRLs, but it remains functional for other tasks. When empty, the CA is labeled as "External". The key may be completed later to allow signing and to designate the CA as "Internal". The Private Key data is usually included in a file with a
.keyextension. The data would be in plain text format and surrounded inside a block, like this:-----BEGIN RSA PRIVATE KEY-----
[A bunch of random-looking base64-encoded data]
-----END RSA PRIVATE KEY----- -
Serial for next certificate: The serial number of the next certificate, used when the Certificate Authority does not randomize serial numbers. Each certificate must possess a distinct serial number to avoid complications during certificate revocation. If the next serial number is not known, try to approximate the total number of certificates issued by the Certificate Authority (CA) and then set the serial number sufficiently high to minimize the likelihood of a collision.
How to Generate New Certificate Authority (CA) Entry?
You may easily add a new CA entry on OPNsense by following the next steps:
-
Navigate to System → Trust → Authorities on OPNsense web UI.
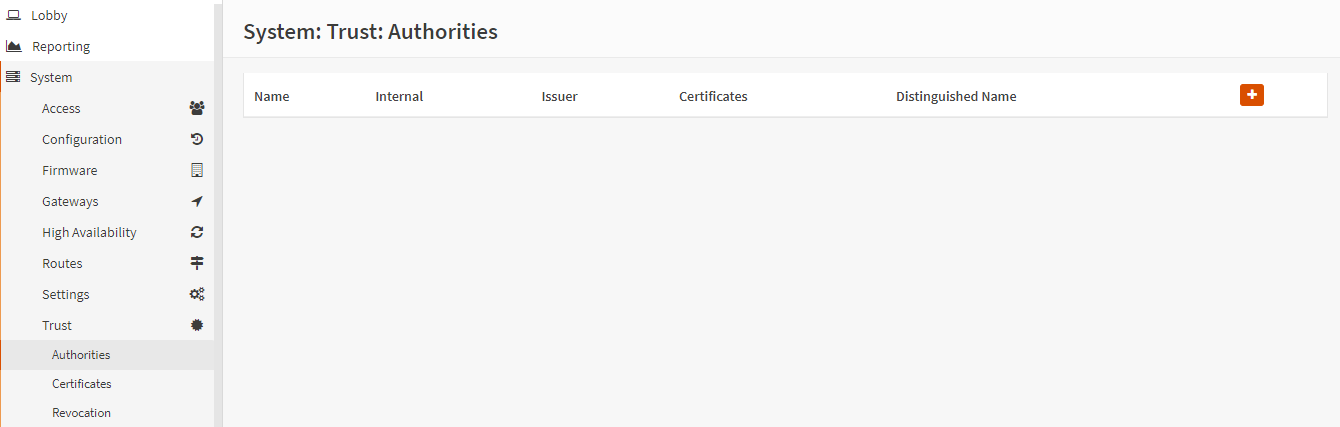
Figure 7. Trust Authorities on OPNsense
-
Click Add button with
+icon at the right of the page. -
Type a Descriptive name for the CA. This serves as the label for this Certificate Authority throughout the Graphical User Interface.
-
Choose the most suitable Method for generating the CA.
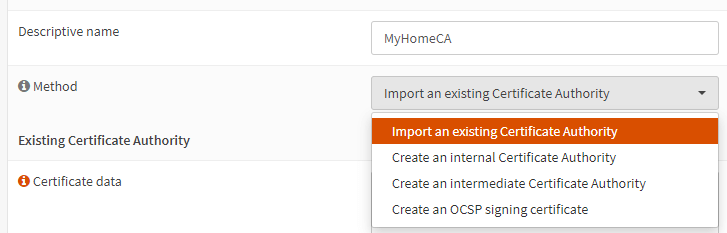
Figure 8. Selecting CA Method
-
Fill in the required fields depending on the CA generation method you selected.
-
Click Save.
What are the CA Generation Methods on OPNsense?
While adding a new Certificate Authority on your OPNsense firewall, you may apply one of the available methods listed below:
-
Import an Existing Certificate Authority: Export a CA certificate generated on a different host, with or without a private key. This may be beneficial in two scenarios: Firstly, for CAs generated using a different technology, and secondly, for CAs created by third parties that need confidence.
To import a CA signed by an intermediate instead of directly by a root CA, import each step in the chain independently, beginning with the root CA.
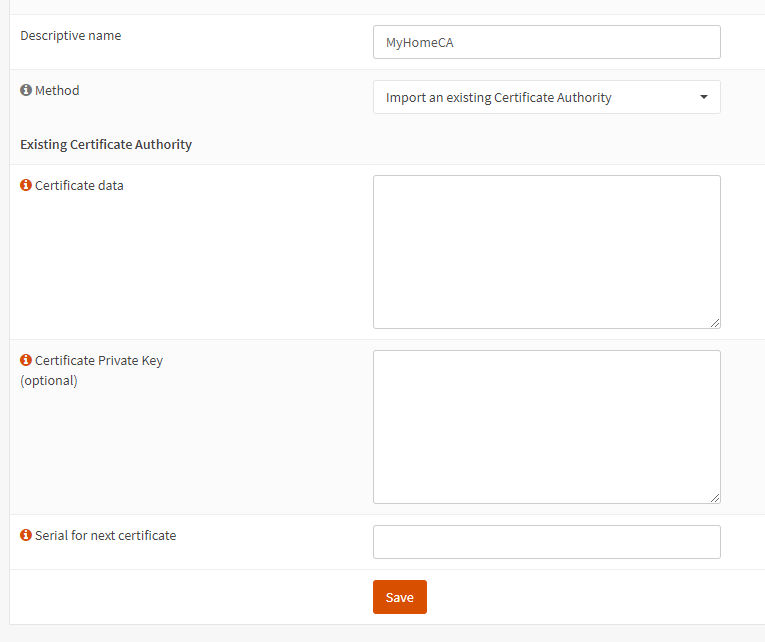
Figure 9. Import an Existing Certificate Authority
-
Create an Internal Certificate Authority: This method is used to create a new root CA.
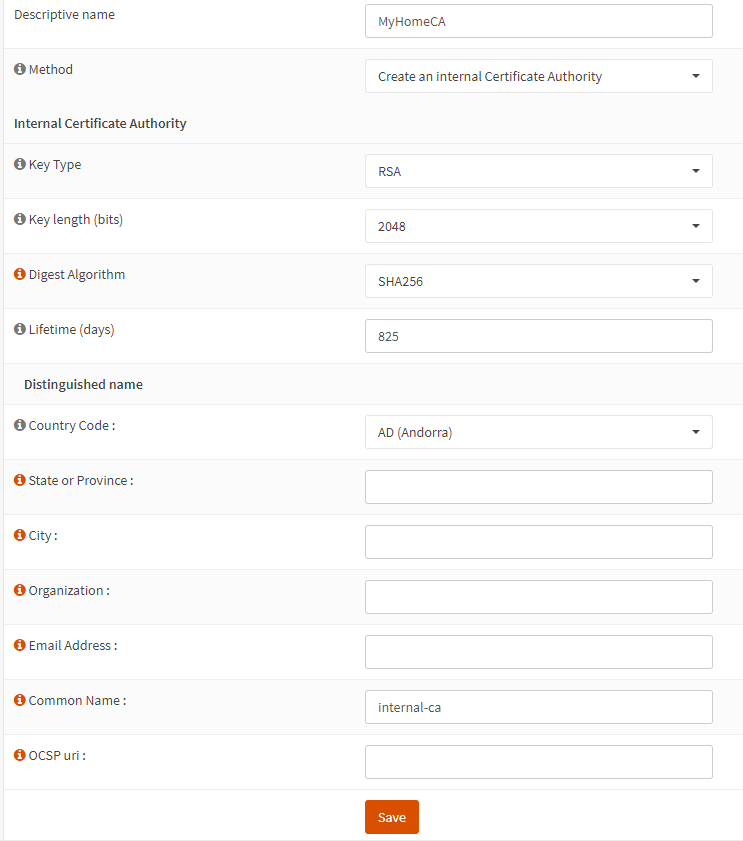
Figure 10. Create an Internal Certificate Authority
-
Create an Intermediate Certificate Authority: Generates a new intermediate Certificate Authority (CA) to be authenticated by another internal CA on this firewall.
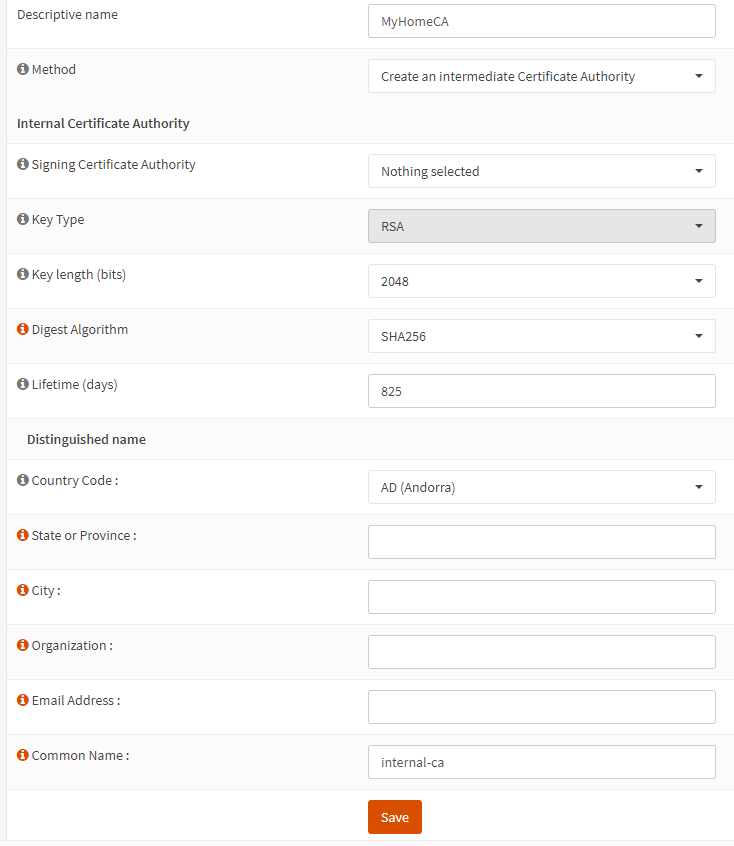
Figure 11. Create an Intermediate Certificate Authority
-
Create an OCSP Signing Certificate:
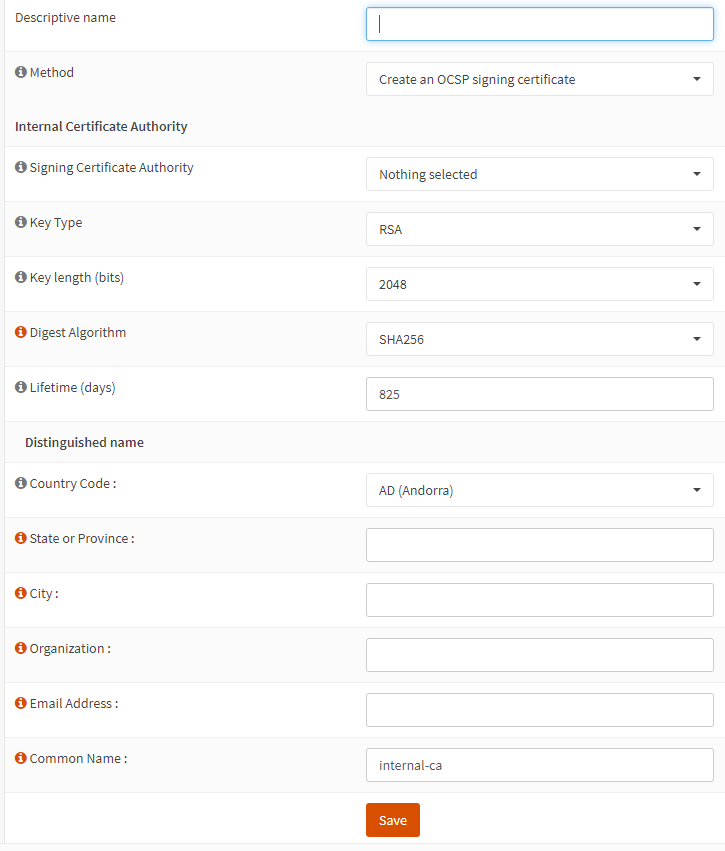
Figure 12. Add OCSP Signing Certificate
After creating a new CA root certificate, you may view it on the Authorities page as given below:

Figure 13. Authorities
How to View Certificate Authority (CA)?
You may easily view the details of an existing CA certificate on OPNsense by following the next steps:
-
Navigate to System → Trust → Authorities on OPNsense web UI.
-
Click on the Show certificate Info button with an
iicon at the end of the certificate row. This will open a window displaying the certificate information.
Figure 14. CA List
-
Scroll down to the window to view the certificate.
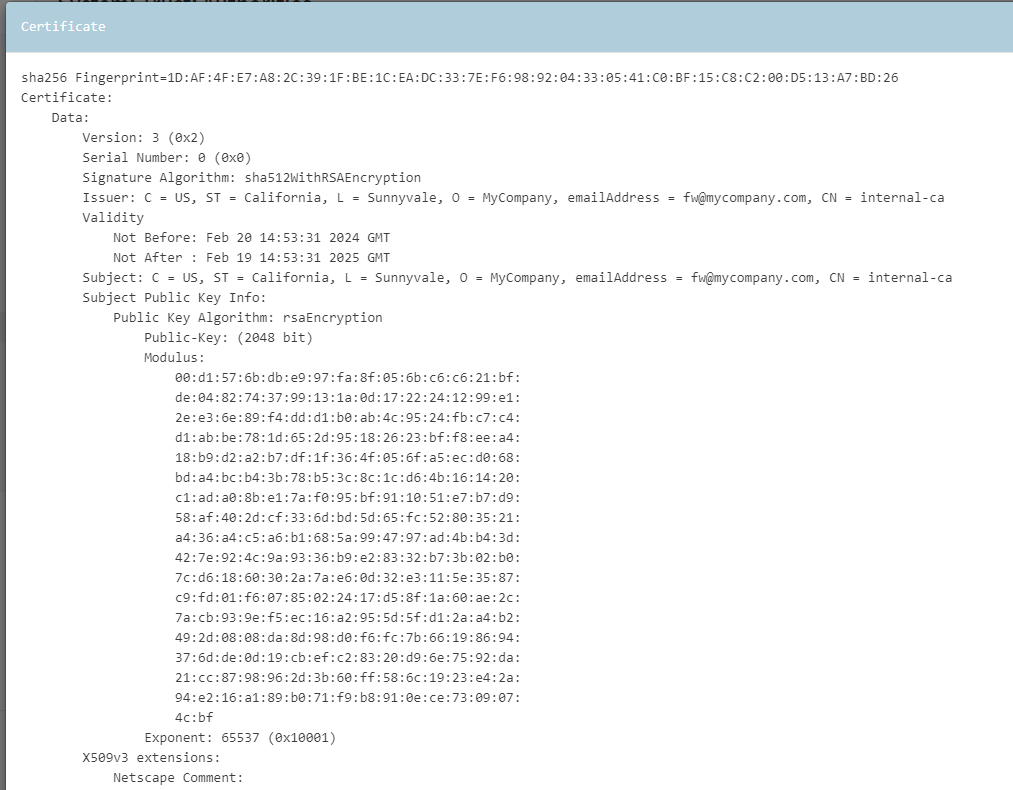
Figure 15. View Certificate Authority (CA) Details
How to Edit Certificate Authority (CA)?
You may easily edit the existing CA entry on OPNsense by following the next steps:
-
Navigate to System → Trust → Authorities on OPNsense web UI.
-
Click on the Edit button with a pen icon at the end of the certificate row.
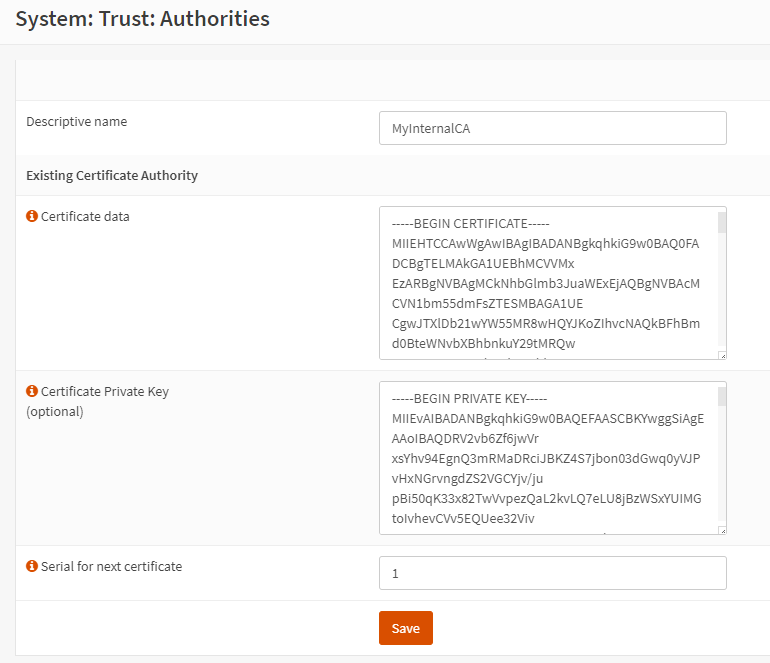
Figure 16. Edit Certificate Authority (CA)
The GUI's edit panel enables the modification of fields as if the CA were being imported.
How to Export Certificate Authority (CA)?
You may easily export the existing CA certificate on OPNsense by following the next steps:
-
Navigate to System → Trust → Authorities on OPNsense web UI.
-
Click on the Export CA cert button with a download icon at the end of the certificate row. This will open a file explorer on your local computer.

Figure 17. Export Certificate Authority (CA)
-
Click Save. CA certificate file will be downloaded with the extension
.crtby default.
How to Export Certificate Authority (CA) Private Key?
You may easily export the private key of an existing CA certificate on OPNsense by following the next steps:
-
Navigate to System → Trust → Authorities on OPNsense web UI.
-
Click on the Export CA private key button with a download icon at the end of the certificate row. This will open a file explorer on your local computer.

Figure 18. Export Certificate Authority (CA) Private Key
-
Click Save. CA private key file will be downloaded with the extension
.key.
Typically, the private key of a Certificate Authority (CA) is not exported unless the CA is being relocated or a backup is being created. When using the Certificate Authority (CA) for a VPN or other functions, export just the CA certificate and refrain from exporting the key.
Unauthorized possession of a CA's private key might enable a malicious actor to create legitimate certificates that are recognized by the CA.
How to Delete Certificate Authority (CA)?
You may easily delete the existing CA certificate on OPNsense by following the next steps:
-
Examine sections that might benefit from a Certificate Authority, such as IPsec, OpenVPN, and software packages. Because, to remove a Certificate Authority (CA), it must first be deactivated.
-
Navigate to System → Trust → Authorities on OPNsense web UI.
-
Click on the Delete CA button with a trash icon at the end of the certificate row. This will open a dialog box for confirmation.

Figure 19. Delete Certificate Authority (CA)
-
Click Yes to remove the Certificate Authority and its CRLs, and unreference any associated certificates from the firewall.
What is Online Certificate Status Protocol?
OCSP is an Internet protocol designed to check the revocation status of an X.509 digital certificate. It is detailed in RFC 6960 and is part of the Internet standards track. It was developed as a substitute for certificate revocation lists (CRLs) to explicitly tackle issues related to utilizing CRLs in a public key infrastructure (PKI).
OCSP provides comparable features to CRLs but verifies certificates in real-time and uses a whitelisting approach instead of blacklisting. After checking certificates against a predefined online set, the server will reply with 'good', 'revoked', or 'unknown'. Only positive replies are deemed acceptable.
To validate a certificate's validity, the AuthorityInfoAccess extension needs to be included in the certificate authority. The OCSP URI argument does this in OPNsense.
To verify the 'OCSP request', the OCSP responder requires a specific signing certificate. This certificate may be generated in OPNsense under System → Trust → Authorities, and should be provided by the same Certificate Authority that issued the user and/or server certificates.
OPNsense does not provide an OCSP responder, but to test the notion, we may use the openssl-ocsp command.
To test the OCSP notion, you need the following components:
- The CA certificate chain which signed the certificates (export "cert" from Authorities page)
- The OCSP signer certificate (export "cert" and "key" from Authorities page for the signer)
- A serial number of a revoked certificate (you may use the info button to find the serial number)
- A serial number of a non expired or revoked certificate
- An index file for openssl-ocsp (export index from Revocation menu) as specified in
https://pki-tutorial.readthedocs.io/en/latest/cadb.html
By following the next steps, you may test OCSP on OPNsense:
-
Start the server in a console by running the next command:
openssl ocsp -index index.txt -port 8081 -rsigner ocsp_signer.crt -rkey ocsp_signer.key -CA ca.crt -ignore_err -text -
Run the next command to verify the certificate with serial number
1:openssl ocsp -url http://127.0.0.1:8081 -CAfile ca.crt -issuer ca.crt -serial 1You should see the following output for a good certificate:
Response verify OK
1: good
This Update: Feb 22  10:34:59  2024 GMT
You should see the following output for a revoked certificate:
Response verify OK
2: revoked
This Update: Feb 22  10:34:59  2024 GMT
Revocation Time: Jan 10  11:30:08  2024 GMT
You should see the following output for an unknown certificate:
Response verify OK
9999: unknown
This Update: Feb 22  10:34:59  2024 GMT
How to Manage Certificates?
You can manage your certificates by navigating to System → Trust → Certificates on OPNsense web UI.
The process of generating a certificate on a given platform typically adheres to the subsequent sequence:
- A set of keys and a certificate signing request (CSR) are generated by the user. The private key is distinct from the CSR, which includes the public key.
- The user transmits the CSR to the CA and keeps the private key confidential.
- The CSR, which is signed by the CA, generates a certificate.
- The certificate is transmitted to the consumer by the CA.
- The user now has a certificate trusted by the CA and the private key for the certificate.
The OPNsense web user interface manages the majority of this procedure automatically, but individual steps can also be executed manually. When generating an internal certificate, for instance, generating and signing a CSR are both unnecessary as the graphical user interface (GUI) streamlines and automates this process into a single step. Aside from that, the GUI also supports the signature of CSRs and the creation of CSRs that can be sent to a distinct CA.
How to Create a New Certificate?
You may easily add a new certificate on the OPNsense firewall by following the next steps:
- Navigate to System → Trust → Certificates on the OPNsense web UI.
- Click on the Add button with
+icon at the top right of the page. - Type a name that is descriptive of the certificate into the Descriptive name field. This is utilized throughout the GUI as a label for this certificate.
- Select Method that is most suitable for the generation of the certificate from the drop-down menu. The following options are available:
- Import an Existing Certificate
- Create an Internal Certificate
- Create a Certificate Signing Request
- Sign a Certificate Signing Request
- Complete the instructions for the selected method.
- Click Save.
How to Create an Internal Certificate?
The most prevalent approach for certificate creation is to generate an internal certificate. Consequently, a new certificate will be generated by one of the current certificate authorities.
You may easily add an internal certificate on the OPNsense firewall by following the next steps:
-
Navigate to System → Trust → Certificates on the OPNsense web UI.
-
Click on the Add button with
+icon at the top right of the page. -
Type a name that is descriptive of the certificate into the Descriptive name field.
-
Select the
Create an internal certificateoption from the Method drop-down menu. This will display the internal certificate settings below. -
Determine which Certificate Authority will be utilized to sign this certificate. The private key is a prerequisite for the CA to sign a certificate, so membership in this list is restricted to CAs that possess it.
-
Select the Type of certificate to generate, the type defines its constraints. Available certificate types are as follows:
- Client certificate
- Server certificate
- Combined Client/Server certificate
- Certificate Authority
-
Set the properties of the certificate.
-
Click Save.
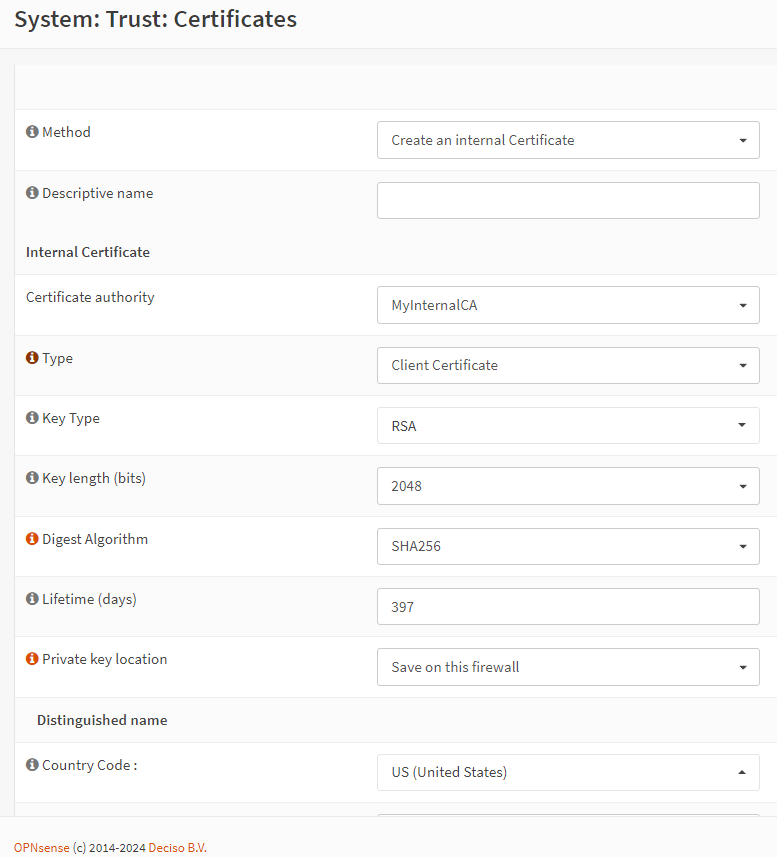
Figure 20. Create an Internal Certificate
How to Import an Existing Certificate?
The feature of importing an existing certificate is advantageous when dealing with certificates generated by a different system or those supplied by a third party.
You may easily import an existing certificate on the OPNsense firewall by following the next steps:
-
Navigate to System → Trust → Certificates on the OPNsense web UI.
-
Click on the Add button with
+icon at the top right of the page. -
Select
Import an existing certificateoption from the Method drop-down menu. This will display the existing certificate settings below. -
Type a name that is descriptive of the certificate into the Descriptive name field.
-
Enter the Certificate data in X.509 PEM format.
-
Enter the Private key data in X.509 PEM format.
-
Click Save.

Figure 21. Import an Existing Certificate
The most frequent mistake is failing to correctly paste the designated section of the certificate or private key. Ensure that the encoded data is included inside the whole block, including the initial header and final footer.
How to Create a Certificate Signing Request?
When selecting a Certificate Signing Request method, a new request file is generated, which may be signed by a Certification Authority (CA) at a later time, even by a third-party CA not currently on the firewall. This is often used to get a certificate from a reputable root certificate authority.
To generate a Certificate Signing Request on the OPNsense firewall, you may follow the next steps:
-
Navigate to System → Trust → Certificates on the OPNsense web UI.
-
Click on the Add button with
+icon at the top right of the page. -
Type a name that is descriptive of the certificate into the Descriptive name field.
-
Select the
Create Certificate Signing Requestoption from the Method drop-down menu. This will display the certificate settings below. -
Set the properties of the certificate.
-
Click Save.
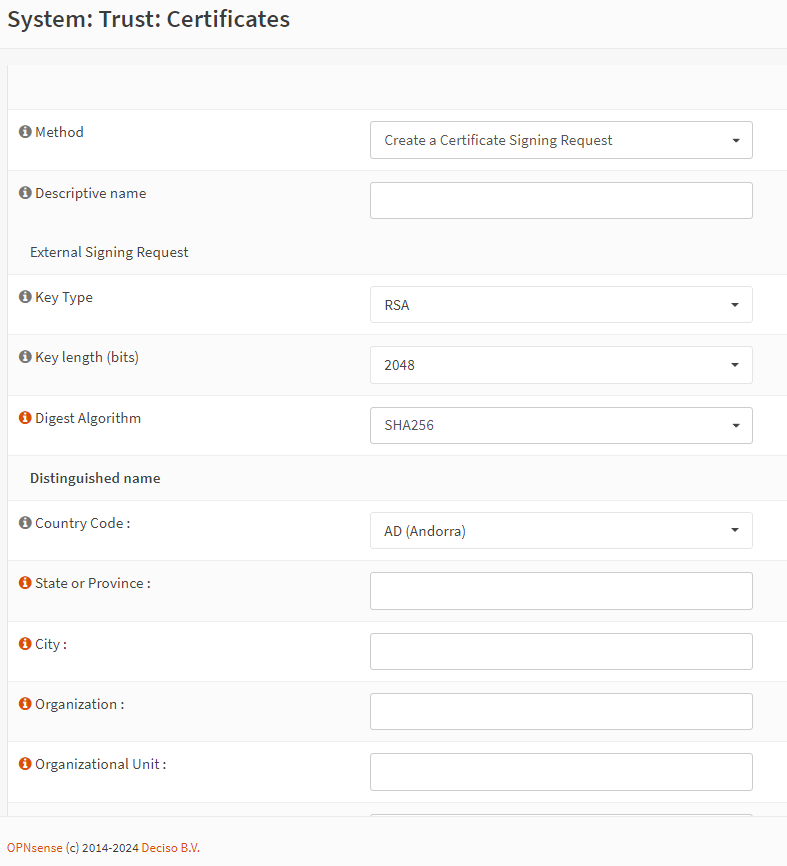
Figure 22. Create a Certificate Signing Request
The GUI displays fields for Certificate Type and Alternative Names, although these serve as recommendations for the CA. The signing CA has the authority to disregard these alternatives and substitute them with its own values.
How to Sign a Certificate Signing Request?
Signing a certificate signing request (CSR) involves using an internal Certificate Authority (CA) on the firewall to sign the CSR and convert it into a complete certificate.
To sign a certificate signing request on the OPNsense firewall, you may follow the next steps:
-
Navigate to System → Trust → Certificates on the OPNsense web UI.
-
Click on the Add button with
+icon at the top right of the page. -
Type a name that is descriptive of the certificate into the Descriptive name field.
-
Select the
Sign a Certificate Signing Requestoption from the Method drop-down menu. This will display the certificate settings below. -
Select the Certificate authority on the firewall which will sign the CSR. It must be an internal CA and private key present.
-
Select the Digest Algorithm for the new certificate.
-
Set the Lifetime of the new certificate.
-
Paste the CSR data encoded in PEM format into CSR file field. CSR data is often found in a file with the extension
.reqor.pem. The text would be unadorned and contained inside a block like below:-----BEGIN CERTIFICATE REQUEST-----
[A bunch of random-looking base64-encoded data]
-----END CERTIFICATE REQUEST----- -
Click Next. This will open Subject of the certificate options.
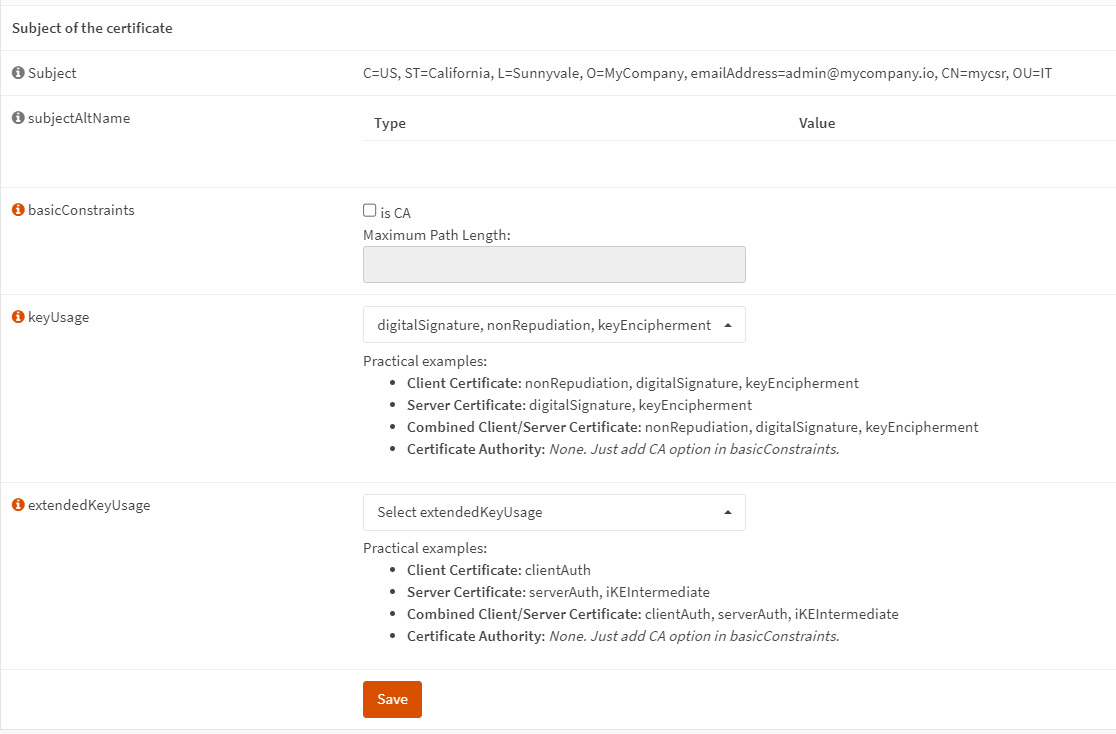
Figure 23. Subject of Certificate
-
Set the certificate settings depending on your needs.
-
Click Save. Once you finish the steps, a certificate entry is generated in the list, ready to be used or exported.
How to View Certificates?
You may easily view the details of an existing certificate on OPNsense by following the next steps:
-
Navigate to System → Trust → Certificates on OPNsense web UI.
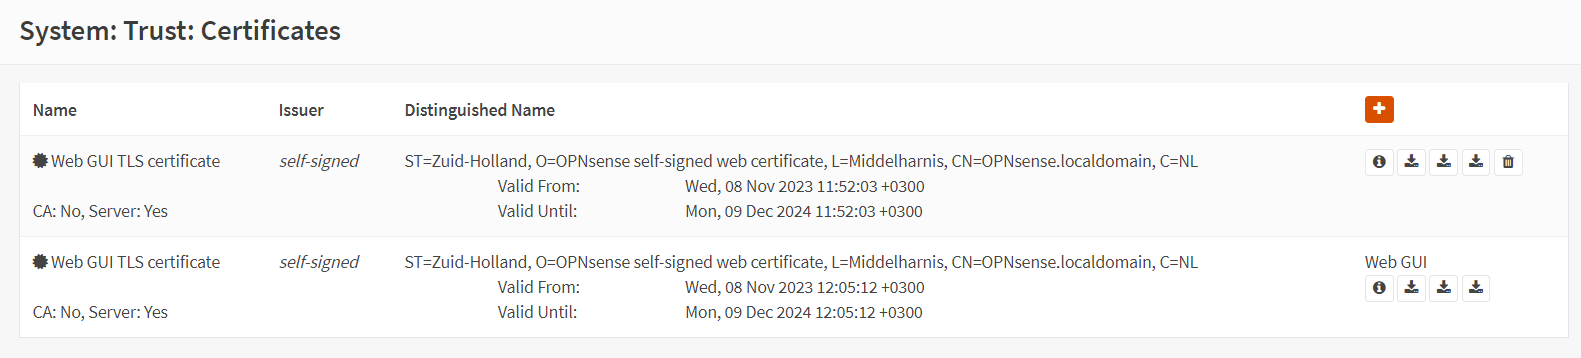
Figure 24. View Certificates
-
Click on the Show certificate Info button with an
iicon at the end of the certificate row. This will open a window displaying the certificate information. -
Scroll down to the window to view the certificate.
Figure 25. View Certificate Details
How to Export Certificate?
You may easily export the existing certificate on OPNsense by following the next steps:
- Navigate to System → Trust → Certificates on OPNsense web UI.
- Click on the Export user cert button with a download icon at the end of the certificate row. This will open a file explorer on your local computer.
- Click Save. The certificate file will be downloaded with the name
Web+GUI+TLS+certificateand extension.crtby default.
How to Export Certificate Private Key?
You may easily export the private key of an existing certificate on OPNsense by following the next steps:
- Navigate to System → Trust → Certificates on OPNsense web UI.
- Click on the Export user key button with a download icon at the end of the certificate row. This will open a file explorer on your local computer.
- Click Save. Certificate private key file will be downloaded with the name
Web+GUI+TLS+certificateand extension.keyby default.
How to Export Certificate and Certificate Private Key in .p12 Format?
You may easily export the certificate file and the private key of an existing certificate in .p12 format on OPNsense by following the next steps:
- Navigate to System → Trust → Certificates on OPNsense web UI.
- Click on the Export ca+user cert+user key in .p12 format button with a download icon at the end of the certificate row. This will open a dialog box asking for a password.
- You may optionally type a password to protect the exported file.
- Click Download. This will open a file explorer on your local computer.
- Click Save. The certificate and private key files in
.p12format will be downloaded with the nameWeb+GUI+TLS+certificateand extension.p12by default.
How to Delete Certificate?
You may easily delete the existing certificate on OPNsense by following the next steps:
- Navigate to System → Trust → Certificates on OPNsense web UI.
- Click on the Delete cert button with a trash icon at the end of the certificate row. This will open a dialog box for confirmation.
- Click Yes to remove the certificate from the firewall.
How to Manage Certificate Revocation Lists (CRL)?
A Certificate Revocation List (CRL) is a compilation of certificates that have been revoked by the certificate authority. These certificates may have been hacked or need invalidation. Some services on OPNsense may use these to verify whether a certificate is still valid for usage, even if it has not yet expired. Revoking a certificate will result in it being deemed untrustworthy as long as the application using the Certificate Authority also employs a Certificate Revocation List (CRL). CRLs are created and signed using a CA's private key. To produce or include certificates in a CRL via the GUI, the CA's private key is required.
An application using a Certification Authority (CA), like OpenVPN, may choose to use a Certificate Revocation List (CRL) to authenticate connected client certificates. To create or add certificates to a CRL via the GUI, the private key of the CA must be available for generating and signing the CRL. If the Certificate Authority (CA) is externally maintained and its private key is not stored on the firewall, a Certificate Revocation List (CRL) may nevertheless be created outside the firewall and then imported.
Traditionally, a single Certificate Revocation List (CRL) is assigned to each Certificate Authority (CA), and only invalid certificates are included in that CRL. However, the graphical user interface allows for the use of numerous certificate revocation lists for a single certificate authority. OpenVPN allows the selection of distinct Certificate Revocation Lists (CRLs) for each VPN instance. This may be used to restrict a certain certificate from connecting to one instance while permitting it to connect to another. IPsec consults all Certificate Revocation Lists (CRLs) without the ability to choose specific ones as in OpenVPN.
To define a Certificate Revocation List (CRL) on OPNsense, go to System → Trust → Revocation and click on the [+] sign next to your (local) certificate authority to generate a new CRL. You may modify a Certificate Revocation List (CRL) by adding or removing certificates from it using the pencil icon.
To use a Certificate Revocation List (CRL) for external tools, you may download it by clicking the Download button.
CRLs have a limitation in scalability since each user must download the whole list to verify the trustworthiness of a certificate. Information may be less precise since these lists are often only created at certain periods.
When implementing a Certificate Revocation List (CRL) for a local authority on OPNsense, scalability is often not a significant problem since the number of certificates is normally restricted, such as to the number of workers in the organization.
How to Create a New Certificate Revocation List?
To define a Certificate Revocation List (CRL) on OPNsense, you may follow the next steps:
-
Go to System → Trust → Revocation on OPNsense web UI.
-
Click on the Add/Import CRL button with
+icon next to your (local) certificate authority to generate a new CRL.
Figure 26. Certificate Revocation List
-
Select
Create an Internal Certificate Revocation Listfrom the Method drop-down menu. -
Type a Descriptive name. This is used to distinguish this Certificate Revocation List in various lists inside the graphical user interface. It is advisable to provide the name of the Certificate Authority (CA) and/or the purpose of the Certificate Revocation List (CRL).
-
Select the Certificate Authority.
-
Set Lifetime that is 9999 by default
-
Specify Serial number that is
0by default. -
Click Save. The browser will return to the Certificate Revocation List (CRL) and display the updated item.

Figure 27. Create a New Certificate Revocation List
How to Import an Existing Certificate Revocation List?
To import an existing Certificate Revocation List (CRL) on OPNsense, you may follow the next steps:
-
Go to System → Trust → Revocation on OPNsense web UI.
-
Click on the Add/Import CRL button with
+icon next to your (local) certificate -
Select
Import an existing Certificate Revocation Listfrom the Method drop-down menu. -
Type a Descriptive name. This is used to distinguish this Certificate Revocation List in various lists inside the graphical user interface. It is advisable to provide the name of the Certificate Authority (CA) and/or the purpose of the Certificate Revocation List (CRL).
-
Select the Certificate Authority.
-
Paste a Certificate Revocation List in X.509 CRL format into CRL data field. It would be plain text data enclosed in a block such as:
-----BEGIN X509 CRL-----
[A bunch of random-looking base64-encoded data]
-----END X509 CRL----- -
Click Save.
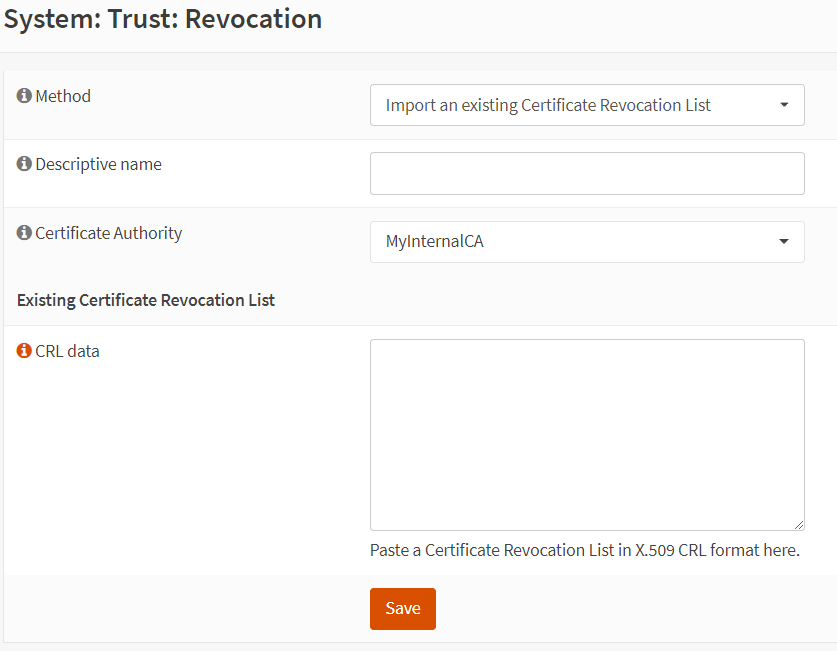
Figure 28. Import an Existing Certificate Revocation List
How to Export Certificate Revocation List?
To export a Certificate Revocation List (CRL) on OPNsense, you may follow the next steps:
-
Go to System → Trust → Revocation on OPNsense web UI.
-
Click
Export CRLbutton with the download icon at the end of the CRL row. This will open a file explorer on your local computer.
Figure 29. Export Certificate Revocation List
-
Click Save. The Certificate Revocation List (CRL) file will be downloaded with the extension
.crlby default.
How to Delete Certificate Revocation List?
You may easily delete the Certificate Revocation List (CRL) on OPNsense by following the next steps:
- Examine sections that might benefit from Certificate Revocation List, such as IPsec, OpenVPN, and software packages. Because, to remove a Certificate Revocation List, it must first be deactivated.
- Navigate to System → Trust → Revocation on OPNsense web UI.
- Click on the Delete CRL button with a trash icon at the end of the CRL row. This will open a dialog box for confirmation.
- Click Yes to remove the CRL from the firewall.
How to Revoke a Certificate?
A certificate is revoked by adding the certificate to a CRL. You may easily revoke a certificate on OPNsense by following the next steps:
-
Go to System → Trust → Revocation on OPNsense web UI.
-
Click on the Edit CRL button with a pen icon next to your (local) certificate. This page displays all revoked certificates on the Certificate Revocation List (CRL) and provides a feature to add new certificates.
-
Select the certificate that will be revoked from the Choose a Certificate to Revoke drop-down menu.
-
Type a Descriptive name. This is used to distinguish this Certificate Revocation List in various lists inside the graphical user interface. It is advisable to provide the name of the Certificate Authority (CA) and/or the purpose of the Certificate Revocation List (CRL).
-
Select the Reason from the drop-down menu to indicate why the certificate is being revoked.
-
Click Add. When a certificate is added, the Certificate Revocation List (CRL) will be updated if it is already being used by any VPN instances, ensuring that the changes take effect instantly.

Figure 30. Revoke a Certificate
How to Remove a Certificate from a CRL?
You may easily remove a certificate from CRL on OPNsense by following the next steps:
-
Go to System → Trust → Revocation on OPNsense web UI.
-
Click on the Edit CRL button with a pen icon next to your (local) certificate. This page displays all revoked certificates on the Certificate Revocation List (CRL).
-
Click Delete this certificate from the CRL button with a trash icon at the end of the certificate row.

Figure 31. Remove a Certificate from a CRL
-
Click Yes to confirm the certificate removal.