How to Create Snapshots on OPNsense
As of release 24.7.3, OPNsense offers Snapshots, also known as Boot Environments, feature. Boot Environments are fundamental components of the FreeBSD operating system. Sheridan Computers, integrated this capability into OPNsense web UI. Snapshots provides a user-friendly and efficient method for users to build, maintain, and transition between boot environments, hence improving system administration and recovery capabilities.
In this tutorial, we explain the main advantages of the snapshots feature and how you can manage snapshots on the OPNsense firewall.

What are Snapshots on OPNsense?
Snapshots record the state of blocks and files in system storage at a certain point in time. Snapshots show the existence of certain blocks and/or files, enabling the modification of storage units to a previous state via the removal and relocation of blocks, as well as the reintegration of deleted items.
They are beneficial for administration since they provide a backup boot option when more hazardous activities, such as significant upgrades or experimental settings, fail. In the event of an error, reverting to the prior functional state is straightforward. Organizations that have reliable backup and recovery strategies often use snapshots as a crucial element of their short-term data preservation processes to limit risks from natural disasters, human error, or cyber threats.
Snapshots on OPNsense use ZFS capabilities, making them space-efficient and manageable. During the boot process, by selecting Option 8, you may choose the newest and previously stored snapshots, hence facilitating the transition between various system states.
OPNsense snapshots are differential. A new snapshot consistently represents the most recent running state. Therefore, there are no incremental Snapshot chains, unlike other implementations such as hypervisors.
Each snapshot may be independently produced and destroyed as a self-contained object without any dependencies. The size of each snapshot will increase over time as the byte distance between the current active snapshot and all stored inactive snapshots expands.
Snapshots need the ZFS filesystem. UFS is incompatible since it lacks functionality for file system-level snapshots.
What are the Benefits of Snapshosts?
Snapshots enable the creation and management of various iterations of your OPNsense system. Snapshots provide several advantages. They offer a rapid restore to a prior temporal state and enable far more frequent safeguarding than backups without impacting production systems. The main benefits of the snapshots feature are as follows.
- Disaster Recovery: Snapshots enable rapidly restoring your system to a verified operational condition in the event of unforeseen complications. It provides more frequent data protection than conventional backups, enabling users to easily revert to a prior state.
- Experimentation and Configurations Changes: Snapshots allow you to test novel configurations or packages without jeopardizing your reliable production system. Snapshots may be used to protect against regressions caused by configuration modifications. Generating a fresh snapshot and activating it immediately will cause the system to revert automatically to the latest known good configuration upon reboot or power cycle.
- Testing Updates: You may generate a snapshot prior to implementing a significant change. In the event of an error, you may effortlessly restore the prior functional condition.
Snapshots are especially beneficial for bare-metal installations and hardware appliances. A virtualized OPNsense will possess additional recovery options that use the capabilities of the hypervisor, such as the creation of VM-level snapshots. For example, you may easily create a clone of a virtual machine on your Proxmox VE.
What are the Snapshot States on OPNsense?
On OPNsense, snapshots may have the following states.
- N: Snapshot is active now.
- R: Snapshot will be active after the firewall reboots.
- NR: Snapshot is active now and remains to be active after the firewall reboots.
- -: Snapshot is not active.
What is the Recommended Workflow for Using Snaphots on OPNsense?
You may simply follow the steps below as a best practice for efficient snapshot deployment on OPNsense.
- Create a new Snapshot for the stable state of your OPNsense platform. You may use a descriptive name, such as stable.
- Make administrative changes to your firewall, like upgrading firmware.
- Reboot and test your firewall to ensure that all functions are functioning properly after the changes.
- If your OPNsense firewall works smoothly, you may delete the Snapshot created in Step 1 and keep using your default Snapshot.
- If your tests fail and there are some issues on OPNsense, you may roll back your firewall by following these steps.
- Activate the snapshot created in Step 1 either via the web UI or the OPNsense boot menu.
- Remove the bad snapshot with the name default after rebooting your firewall with the stable snapshot.
- Rename the snapshot created in Step 1 back to default.
How to Add Snapshots via OPNsense UI
In this section, we assume that we have an OPNsense firewall running smoothly, release 24.7.12, and we wish to upgrade it to the latest version, 25.1. The most effective approach for this major upgrade is to generate a snapshot prior to making the modifications in order to facilitate a swift rollback if the results do not meet expectations. To create a snapshot via the OPNsense web UI, you may follow the next steps.
-
Navigate to the System > Snapshots on OPNsense web UI.
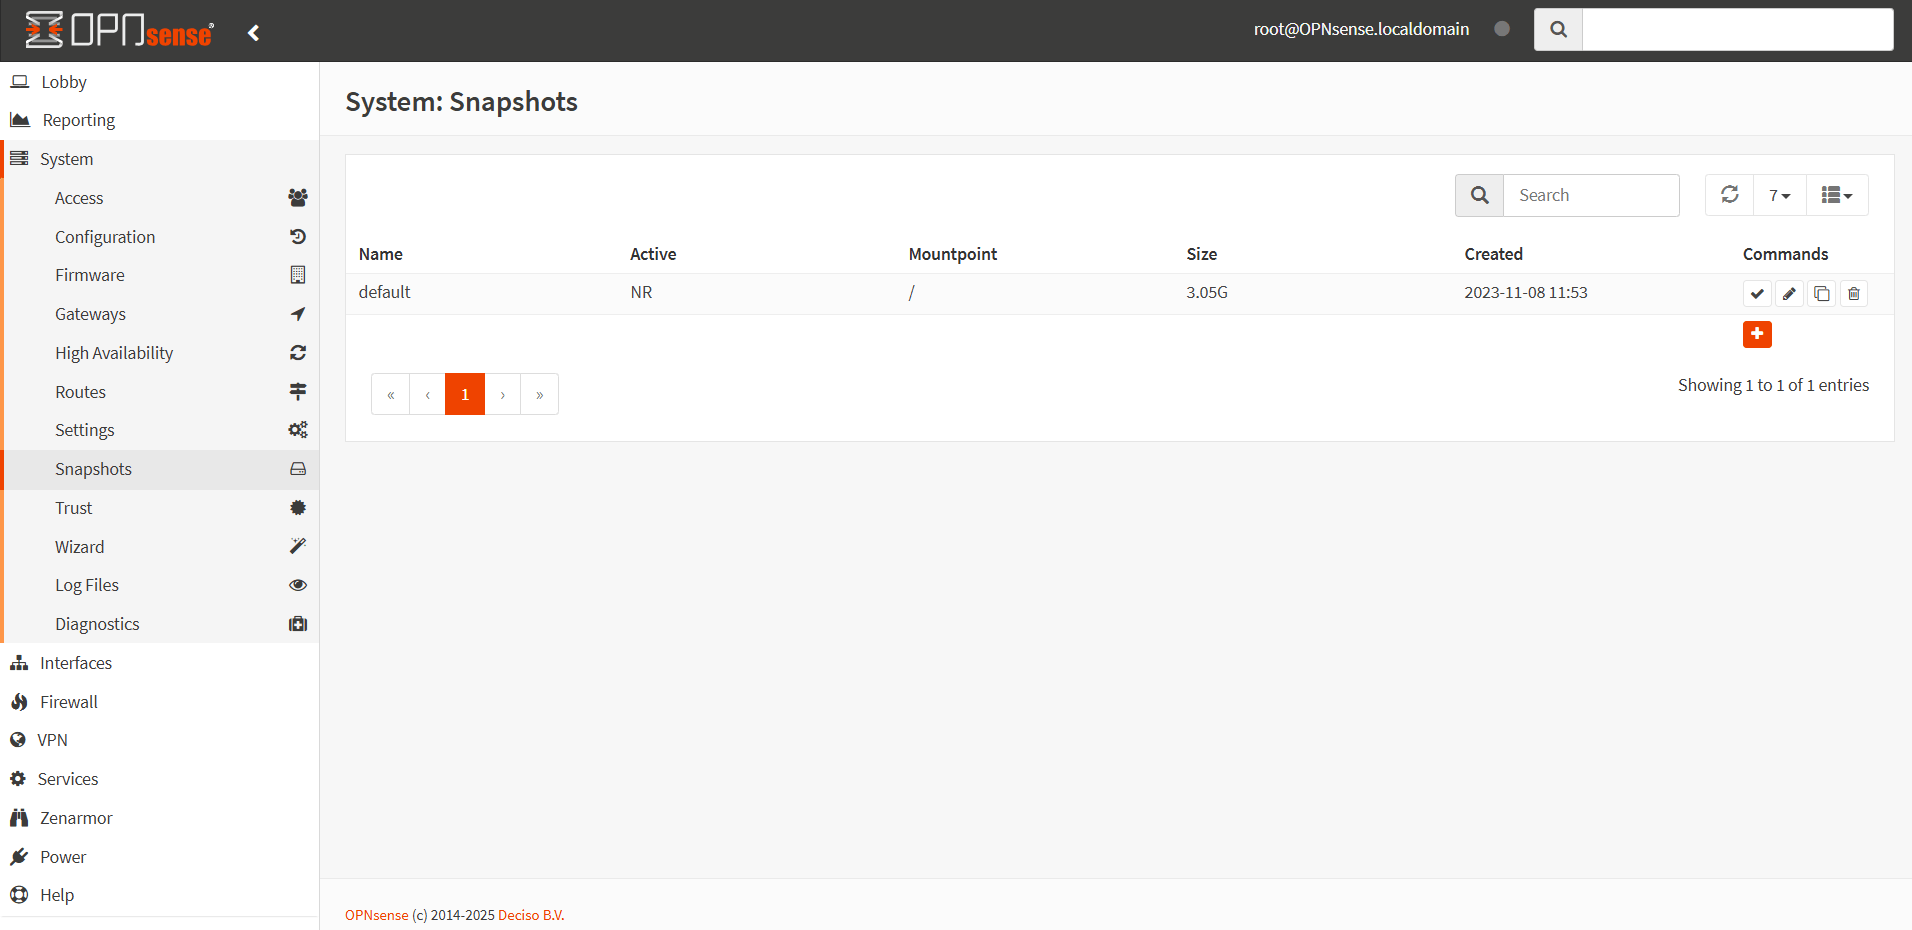
Figure 1. Snapshots Page
-
Click on the Add button with a
+icon at the right bottom of the page.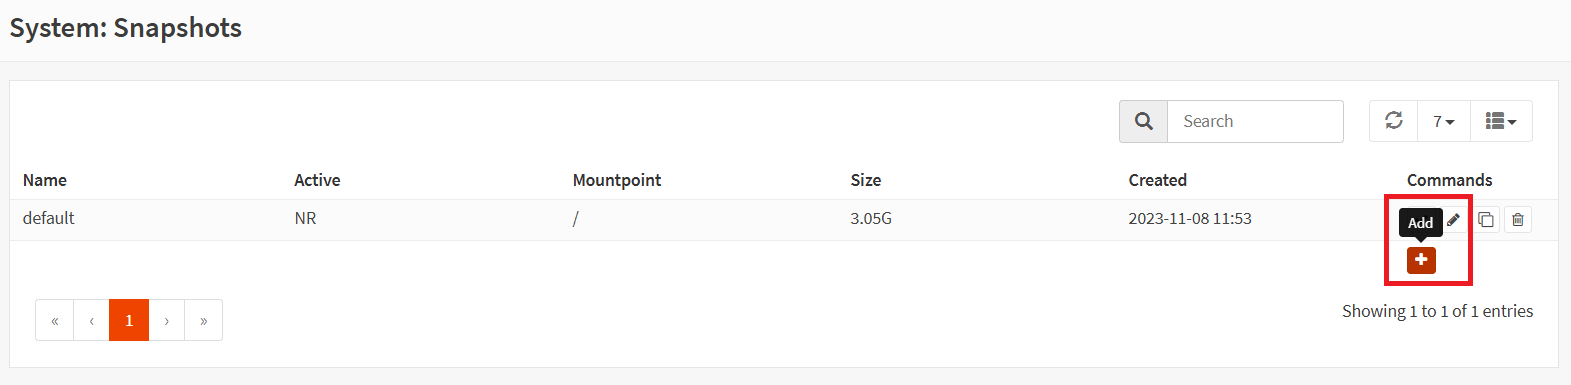
Figure 2. Adding Snapshots
-
You may type a Name, such as
24.7.12. By default, a timestamp is assigned to the name of the snapshot.
Figure 3. Editing Snapshot Name

Figure 4. Renaming Snapshot
-
Click Save to create a new snapshot. This will automatically reload the Snapshots page, showing the available snapshots. In our example, there are two Boot Environments or Snapshots, with the names
defaultand24.7.12. The default snapshot is active now (N) and also will be used after the reboot (R) as indicated in the Active column.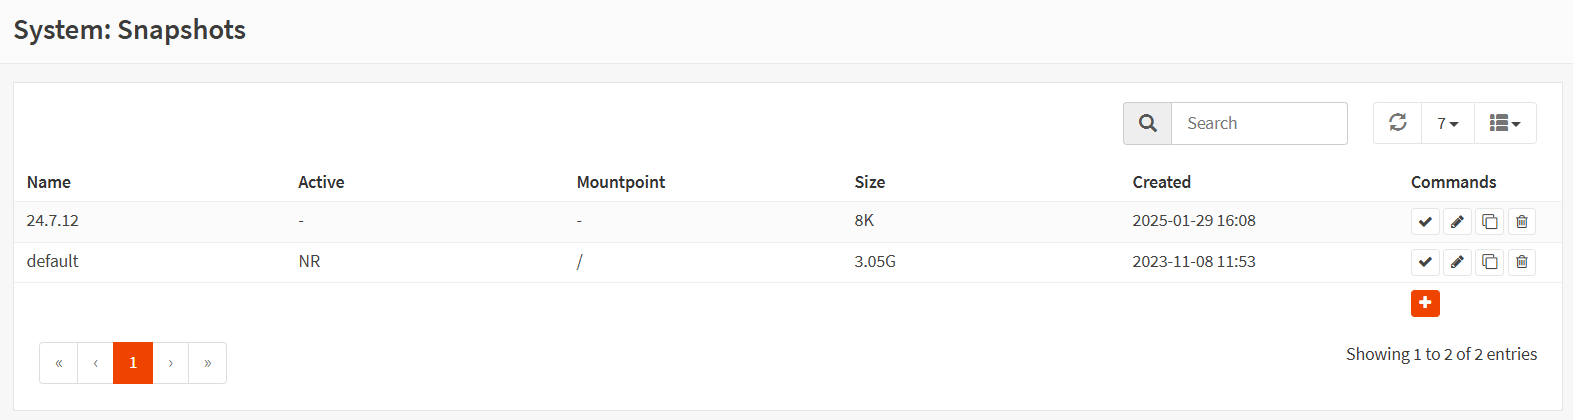
Figure 5. Viewing Snapshots
-
Update your OPNsense firewall to the latest version, such as
25.1. In our example, you need to reboot the firewall since it is a major upgrade. The snapshot with the name24.7.12will serve as the last known stable firewall configuration, as all of these modifications will occur in the current active snapshot with the namedefault.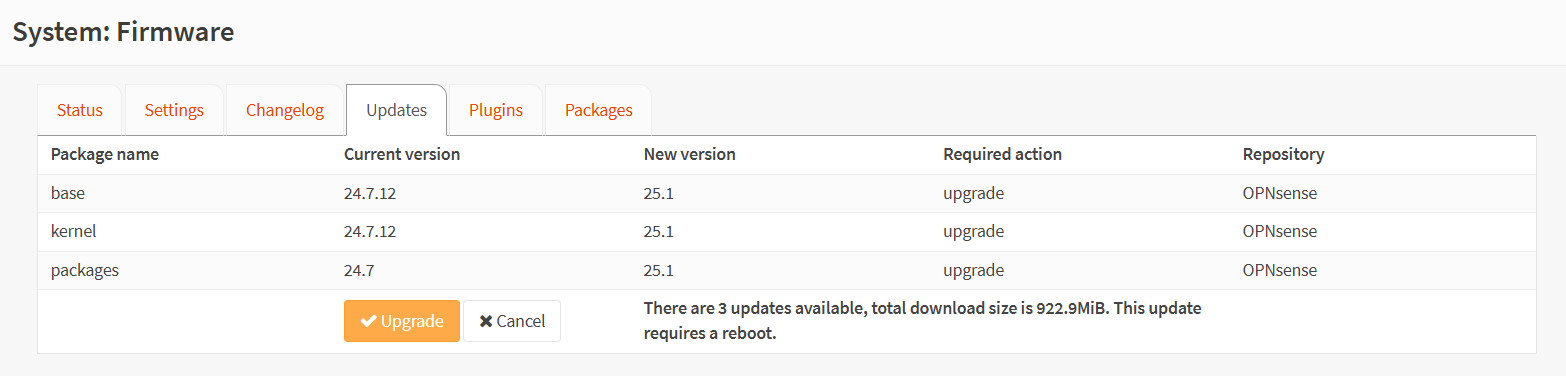
Figure 6. Upgrading OPNsense 25.1
-
After rebooting your firewall on the latest release, for our example
25.1, make your testS to verify that your firewall is working as expected.
How to Boot a Snapshot via OPNsense UI
If the default boot environment fails and your OPNsense firewall does not work properly after upgrading the OPNsense firewall or making configuration changes to it, you may easily reboot the firewall using the last stable snapshot, 24.7.12 in our example. To roll back your firewall to a working snapshot, you may follow the next steps.
-
Navigate to the System > Snapshots page.
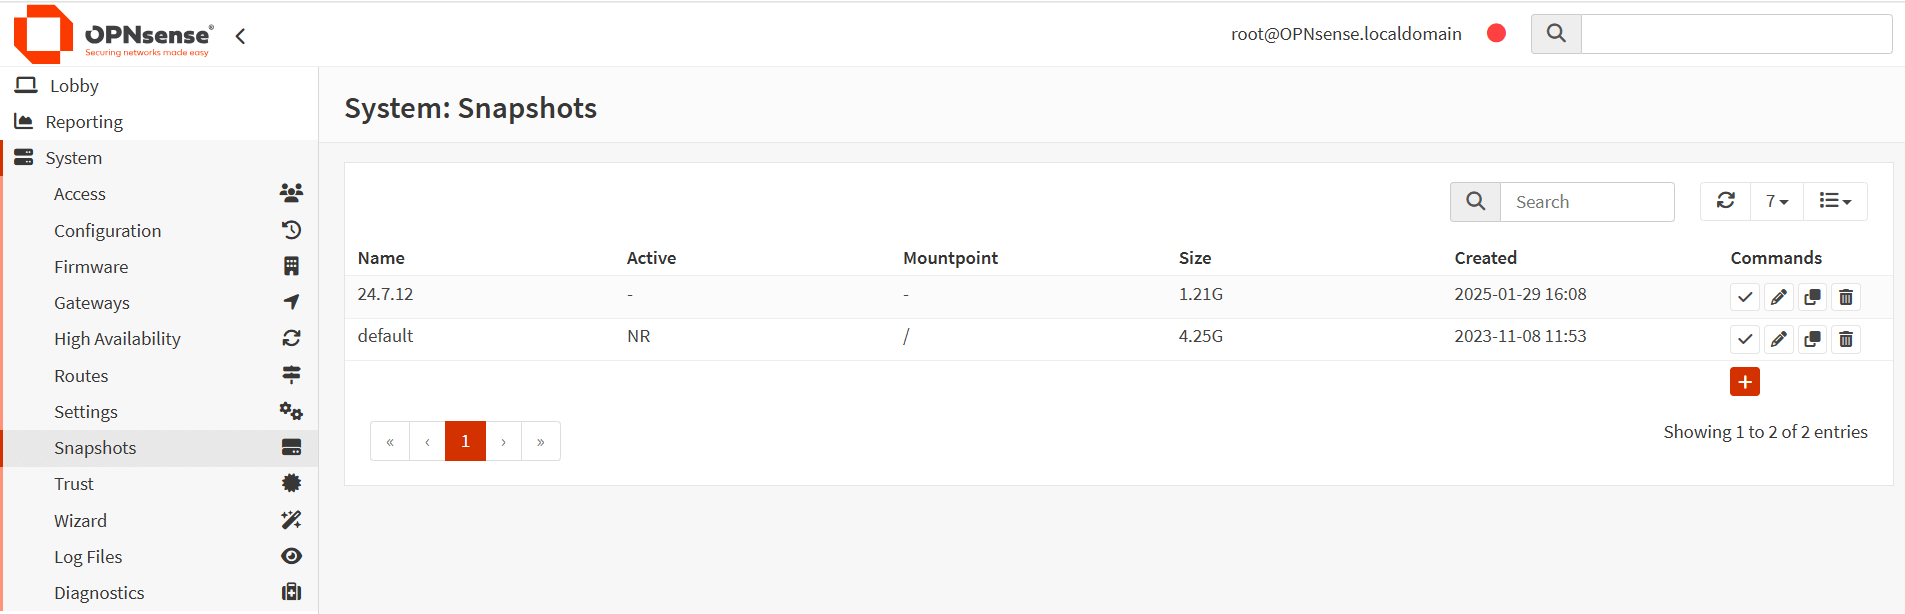
Figure 7. Viewing Snapshots After Upgrade
-
Find the snapshot on which the firewall is working properly, such as
24.7.12. -
Click on the Activate button with a
checkicon under the Commands column. This will change the status of the snapshots displayingRunder the Active column of the snapshot, which is known as stable.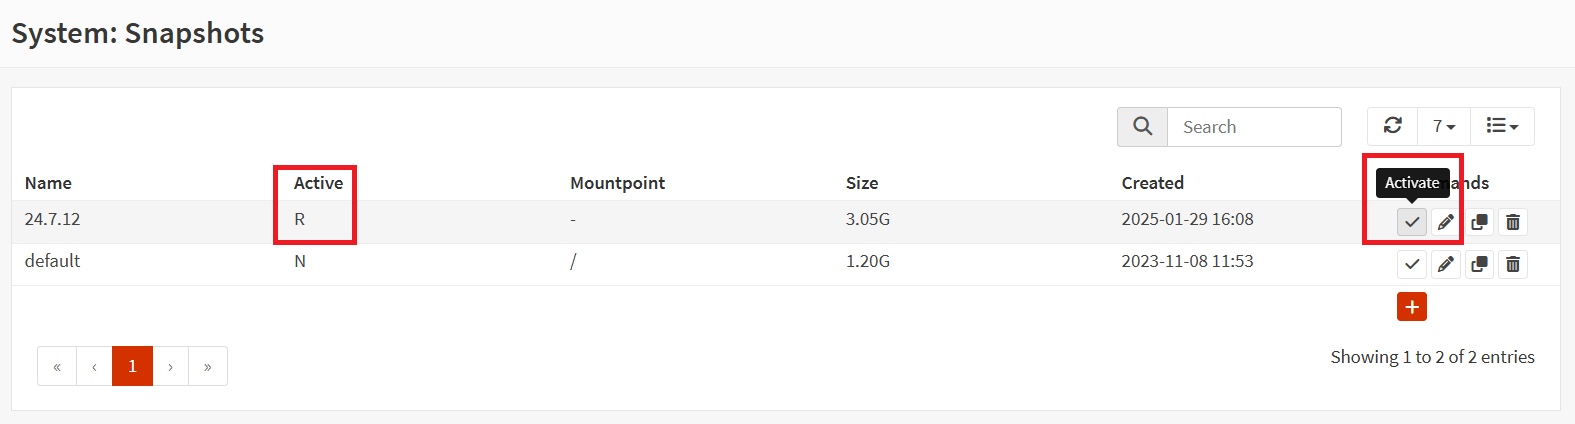
Figure 8. Changing Active Snapshot
-
Reboot your firewall to load the activated snapshot, such as
24.7.12.
How to Boot a Snapshot via OPNsense CLI
In some instances, if OPNsense fails to boot to the Web UI due to a software malfunction, the Boot Menu may be used to revert to a previous state. If a hardware appliance lacks VGA, the serial console is the optimal option. To boot a snapshot via OPNsense CLI, you may follow the next steps.
-
Boot your OPNsense firewall. You should see the Boot Menu at the start of the boot sequence.
-
Press the space bar to pause the boot process.
-
Press 8 to select the
8. Boot Environmentsmenu which displays available Snapshots. -
Press 2 to change active Snapshot. It should display as given below.
zfs:zroot/ROOT/24.7.12tipIf there are more than 2 snapshots on your firewall, you may press 2 repeatedly to cycle through the Snapshots.
-
Press 1 to return back to the main menu.
-
Press ENTER to choice
1. Boot Multi user [ENTER]
How to Clone a Snapshot via OPNsense UI
To clone a snapshot on which your firewall is working properly, you may follow the next steps.
-
Navigate to the System > Snapshots page on the OPNsense web UI.
-
Find the snapshot that you want to clone, such as
24.7.12. -
Click on the Clone button under the Commands column.
-
You may type a Name, such as
25.1-working. By default, a timestamp is assigned to the name of the snapshot.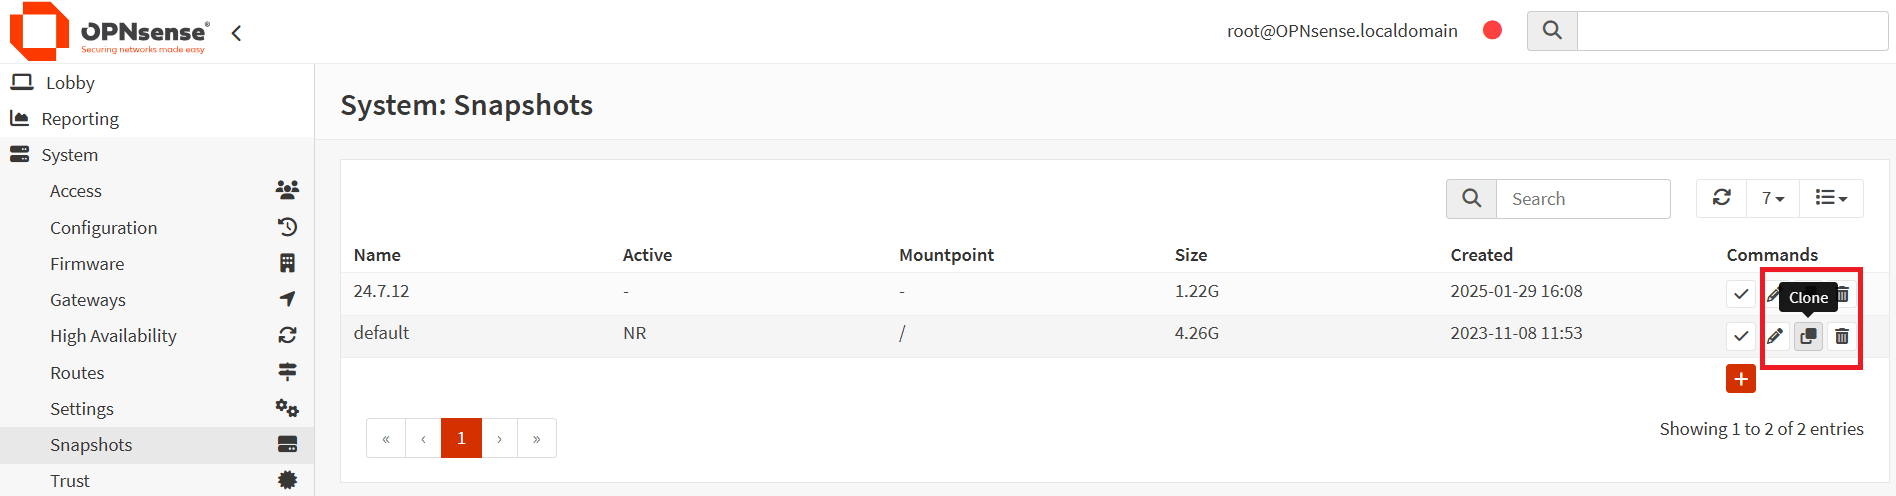
Figure 9. Clone a Snapshot
How to Remove a Snapshot via OPNsense UI
To delete a snapshot that is not needed anymore, you may follow the next steps.
-
Navigate to the System > Snapshots page on the OPNsense web UI.
-
Find the snapshot that you want to delete, such as
24.7.12. -
Click on the Delete button with a trash icon under the Commands column.
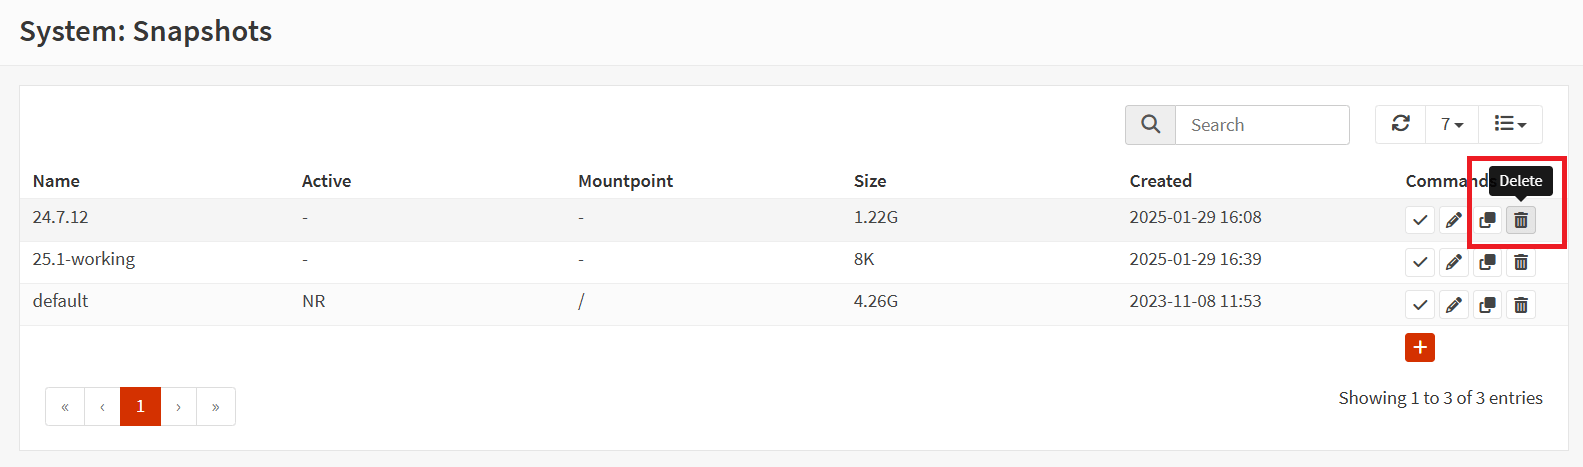
Figure 10. Deleting Snapshot
tipIf your default snapshot fails and does not work properly, it is recommended to delete it and rename the stable snapshot known in an expected good state as
defaultby clicking on the Edit button with a pen icon under the Commands column.tipAfter an upgrade, snapshots can be retained for a period of time to allow for the possibility of rolling back after a few days of production testing. It is important to remember that any configuration modifications made during that period will be irrevocably lost when the system is rolled back. Consequently, it may be necessary to generate a configuration backup and integrate it into the previous system state.
How to Manage Snapshots on OPNsense CLI
You may manage snapshots or boot environments on OPNsense CLI using the bectl tool. You may easily view, add, remove, or rename your snapshots with the help of bectl.
To view the current boot environments, run the following command on OPNsense CLI.
bectl list
When you have never previously utilized boot environments, you should observe an output similar to the one below.
BE Active Mountpoint Space Created
default NR / 3.05G 2023-11-08 11:53
To create a new snapshot or boot environment with the name 24.7.12, run the following command.
bectl create 24.7.12
Now, your boot environments look like this.
root@OPNsense:~ # bectl list
BE Active Mountpoint Space Created
24.7.12 - - 8K 2025-01-29 16:08
default NR / 3.05G 2023-11-08 11:53
To activate a snapshot, you may run the next command with replacing snapshotname with the correct one.
bectl activate snapshotname
In our example, we may activate the snapshot with the name 24.7.12 if the default snapshot fails after an upgrade by running the next command.
bectl activate 24.7.12
Now, your boot environments look like this.
root@OPNsense:~ # bectl list
BE Active Mountpoint Space Created
24.7.12 R - 3.05G 2025-01-29 16:08
default N / 1.20G 2023-11-08 11:53
You may rename a snapshot by running the following command.
bectl rename old_snapshot_name new_snapshot_name