How to Setup DHCP Server on OPNsense
The Dynamic Host Configuration Protocol (DHCP) is a critical network administration protocol that facilitates the automatic assignment of IP addresses and other network configuration parameters to devices within a network. In current networking, the number of connected devices is expanding at a rapid pace, and DHCP is essential for facilitating network administration. In the absence of DHCP, network connectivity issues, manual IP address assignments, and potentially lengthy hours spent troubleshooting configuration errors would occur. By automating the allocation of IP addresses, DHCP eliminates these. It simplifies the process of connecting devices to networks and accessing the internet.
OPNsense firewall offers DHCP service for IPv4 and IPv6 clients, referred to as ISC DHCPv4 and ISC DHCPv6, respectively. By default, OPNsense employs the extensively used ISC DHCP server. However, as of version 24.1, KEA is now available as an alternative due to the ISC DHCP's end-of-life. The long-term ISC will be removed from OPNsense in the future.
In this tutorial, we will explain how you can set up ISC DHCP and KEA DHCP servers on the OPNsense firewall.
Zenarmor NGFW Plug-in for OPNsense is one of the most popular OPNsense plug-ins and allows you to easily upgrade your firewall to a Next Generation Firewall in seconds. NG Firewalls empower you to combat modern-day cyber attacks that are becoming more sophisticated every day.
Some of the capabilities are layer-7 application/user aware blocking, granular filtering policies, commercial-grade web filtering utilizing cloud-delivered AI-based Threat Intelligence, parental controls, and the industry's best network analytics and reporting.
Zenarmor Free Edition is available at no cost for all OPNsense users.

Configuring ISC DHCP
OPNsense allows you to configure DHCP servers for both IPv4 and IPv6 clients easily.
ISC DHCPv4
You may configure ISC DHCPv4 on your OPNsense firewall by navigating to Services > ISC DHCPv4 on the web UI. The DHCPv4 settings menu has the following submenus.
-
Interfaces: A list of available interfaces is displayed. Each interface has its own distinct DHCP server configuration, and they can be enabled or disabled independently of one another.
-
Leases: All IP addresses assigned to clients are displayed.
-
Logs: The log file of the DHCPv4 server.
Figure 1. ISC DHCPv4 menu
What are the ISC DHCPv4 options on OPNsense?
You may configure the following options for the ISC DHCPv4 server on the OPNsense firewall.
-
Enable: Enables or disables the DHCP service for the interface. To activate DHCP for the interface, select the Enable DHCP server on the [interface name] interface option. You may uncheck the checkbox to disable the service.
-
Deny unknown clients: This server will issue DHCP leases exclusively to the clients specified below if this option is enabled.
tipThis will keep out people who don't know what they're doing and people who just plug things in without thinking. But keep in mind that a person who knows how the network works could hardcode an IP address, subnet mask, gateway, and DNS that will still let them in. They could also fake their MAC address to look like a real customer and still get a loan. To make things safer, you should use this setting along with static ARP entries, access control in a switch that limits MAC addresses to certain switch ports, and turning off or disabling switch ports that aren't being used.
-
Ignore Client UIDs: By default, if different UIDs are used for each request, the same MAC can get more than one lease. If you check this box, client UIDs will not be used, so this action will not happen.
-
Subnet: It is a read-only field with the current subnet on the interface.
-
Subnet mask: It is a read-only field with the current subnetmask on the interface.
-
Available range: For reference and to help figure out the range that DHCP customers want, the range of addresses that are available in the interface area. The network address and the broadcast address are not included, but the interface address and the virtual IP address are.
-
Range: This sets the DHCP address range, which is also called the Scope or Pool. The network can make this area as big or small as it needs, but it has to stay inside the subnet. Clients that ask for addresses through DHCP will be given addresses between the numbers you entered, inclusive.
- From: The starting address of the pool.Needs to be less than the To address.
- To: The ending address of the pool. It has to be greater than the From address.
-
Additional Pools: Extra groups of addresses in the same range are set up in the Additional Pools part. With these pools, you can make sets of IP addresses just for certain clients, handle overflow from a smaller pool, or divide the main pool into smaller pieces with a GAP of non-DHCP IP addresses in the middle of what used to be the pool. You can use a mix of the MAC Address Control tools to put VoIP phones and other clients from the same vendor into a certain pool.
-
WINS servers: You may set up to two WINS (Windows Internet Name Service) servers that the server gives clients access to.
-
DNS servers: You may define up to two DNS server IP addresses that the server provides to clients. To utilize custom DNS servers in place of automatic selections, type the IP addresses of the DNS servers. The firewall will automatically determine which addresses to supply to clients based on the DNS configuration on this firewall when the configuration is left empty:
- If the firewall is employing the built-in DNS Resolver or DNS Forwarder to manage DNS, it will automatically designate itself as the DNS server for client devices if these fields are left empty.
- If the DNS Resolver or Forwarder is disabled and these fields are left blank, the firewall will forward traffic to the DNS servers defined on the System > Settings > General page.
tipIt is recommended to utilize Windows servers, particularly those that utilize Active Directory, for client DNS purposes in networks.
-
Gateway: This may also be left empty if the firewall is serving as the network's gateway on this interface. If that is not the case, please provide the IP address of the gateway that clients will use on this interface. Fill in the CARP Virtual IP address on this interface when utilizing CARP.
-
Domain name: Specifies the domain name supplied to the client to generate its fully qualified hostname. The default setting is to utilize the domain name of this system as the preset domain name provided by DHCP. An alternative domain name may be specified in this field.
-
Domain search list: Manages the DNS search domains assigned to the client through DHCP. If there are multiple domains and you wish to have short hostnames, you may provide a list of domain names separated by a semicolon (
;). Clients will try to resolve hostnames by adding the domains in sequence from this list before attempting to locate them externally. The Domain Name option is implemented when the field is left unfilled. -
Default lease time (seconds): Regulates the duration of a lease in the event that a client does not specify a specific lease length. The default value is 7200 seconds (2 hours), which is specified in seconds.
-
Maximum lease time (seconds): Limits the requested lease duration to a specified maximum. The default value is 86400 seconds, which is equivalent to one day.
-
Response delay (seconds): This is the minimum number of seconds that a client must wait after attempting to acquire a new lease before the DHCP server responds to its request. The default value is 0 seconds, which indicates that there is no delay.
-
Interface MTU: The MTU to be employed on this interface is specified by this option. The MTU's minimal legal value is 68.
-
Failover peer IP: You may enter the actual IP address of the other node in this subnet if this firewall is a part of a High Availability failover cluster. Please avoid inputting a CARP Virtual IP address. Guarantee that the advskew of one machine is less than 20 and that of the other is greater than 20. Please be advised that modifying this value will result in the deletion of the present leases-database.
-
Failover split: This value is exclusively utilized on the primary peer; the secondary peer should be left empty. To utilize the default value of 128, which is suitable for the majority of scenarios, leave the field blank. To specify the load-balancing divide between the failover peers, enter a number between 0 and 256. The default value of 128 indicates that both peers will handle approximately 50% of the clients, while 256 will ensure that the primary peer handles all of the clients.
-
Static ARP: This checkbox functions similarly to the one that prevents unknown MAC addresses from obtaining leases, but it goes one step further by also limiting the communication between any unknown MAC address and this firewall. This prevents potential perpetrators from hardcoding an inactive address on this subnet, thereby circumventing DHCP restrictions.
NoteBefore activating static ARP, it is necessary to identify all systems that require communication with the firewall in static mappings, particularly the system that is being used to connect to the firewall GUI. Please be advised that this option may impede the ability to hardcode an IP address and communicate with the firewall; however, it does not prohibit them from communicating with each other on the local network segment.
-
Dynamic DNS: For Dynamic DNS settings, you may click Advanced button to the right of the option.
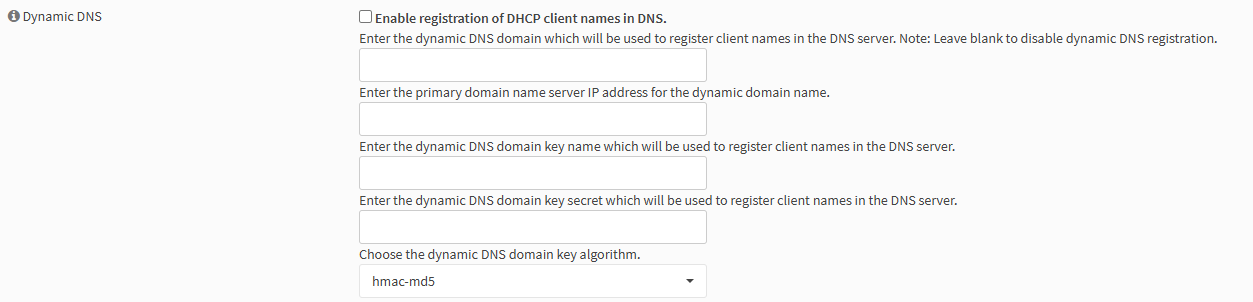
Figure 2. Dynamic DNS settings
-
MAC Address Control: The lists of allowed and denied client MAC addresses are displayed by clicking on Advanced button in the MAC Address Control option. Commas are used to separate each enumeration, which includes portions of MAC addresses. For instance, the MAC address
aa:bb:ccmay be used to identify a collection of VoIP phones from the same manufacturer. This can be exploited to provide distinct DHCP options to groupings of devices or users.MAC addresses that are permitted to be included in the first field, allow box. If a MAC address is included in the allow box, all other MAC addresses will be denied, with the exception of the MAC address specified in the allow box. If a MAC address is included in the deny list, second filed, all other addresses are permitted.

Figure 3. MAC Address Control
-
NTP servers: To specify NTP Servers (Network Time Protocol Servers), you may click the Advanced button to the right of the option, and enter IP addresses for up to two NTP servers.
-
TFTP server: To access the TFTP server option, click the Advanced button located adjacent to the "TFTP server" option. If desired, the TFTP Server field should contain the IP address or hostname of a TFTP server. This is most frequently employed for VoIP phones and may be referred to as "option 66" in other VoIP and DHCP documentation.

Figure 4. TFTP server
-
LDAP URI: To access the LDAP Server URI option, click the Advanced button located adjacent to the "LDAP URI" option. If requested, the LDAP Server URI will transmit the LDAP server URI to the client. This is also known as DHCP option 95. It is represented as a fully qualified LDAP URI, such as
ldap://ldap.example.com/dc=example,dc=com. This option can assist clients who are utilizing specific types of systems, such as OpenDirectory, in locating their servers. -
Network booting: The DHCP server's ability to direct clients to launch over the network (e.g., PXE) is determined by these parameters. To ensure that this functions correctly, both a filename and a launch server must be configured. A configured boot server and all five filenames are necessary for the correct booting of UEFI & ARM.
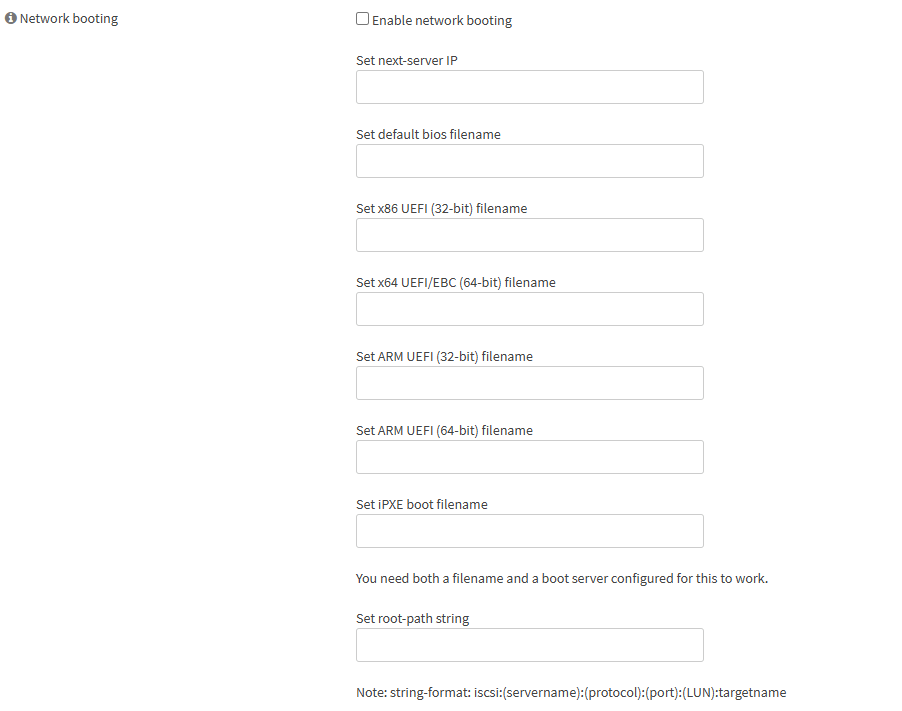
Figure 5. Network Booting Settings
-
WPAD: You may click the Advanced button and then select the checkbox to enable Web Proxy Auto Discovery.
-
Enable OMAPI: You may click the Advanced button to view OMAPI service options provided by the DHCP server, which allows querying and controlling the DHCP server remotely.
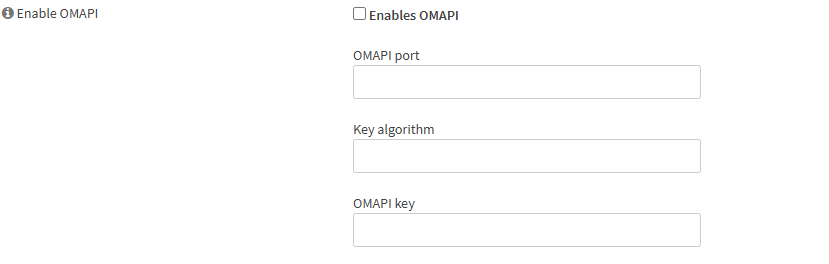
Figure 6. Enable OMAPI
-
Additional Options: You may provide the DHCP option number and the value of each item you wish to include in the DHCP lease information. Please refer to
https://www.iana.org/assignments/bootp-dhcp-parameters/bootp-dhcp-parameters.xhtmlfor a comprehensive list of available alternatives.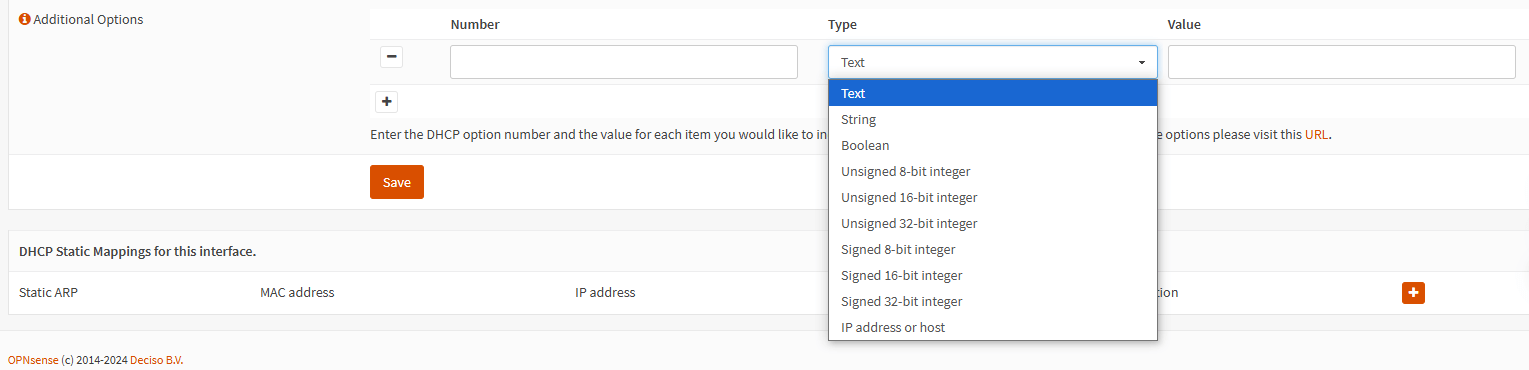
Figure 7. Additional Options
How to Configure ISC DHCPv4
You may easily configure ISC DHCPv4 for your networks on the OPNsense firewall by following the next steps.
-
Navigate to the Services > ISC DHCPv4 on your OPNsense web UI.
-
Select the interfaces to listen on for DHCPv4 requests from the Interfaces list on the left-side bar menu, like
DMZ. -
Activate the Enable option by clicking Enable DHCP server on the DMZ interface checkbox checkbox.
-
Specify the Range from and Range to fields. In our example, DHCP server will offer IP addresses from
172.21.2.10to172.21.2.10. -
You may define up to 2 DNS servers, like
8.8.8.8and4.4.4.4. Also, you may leave blank to use the system default DNS servers. -
You may leave other options as default.
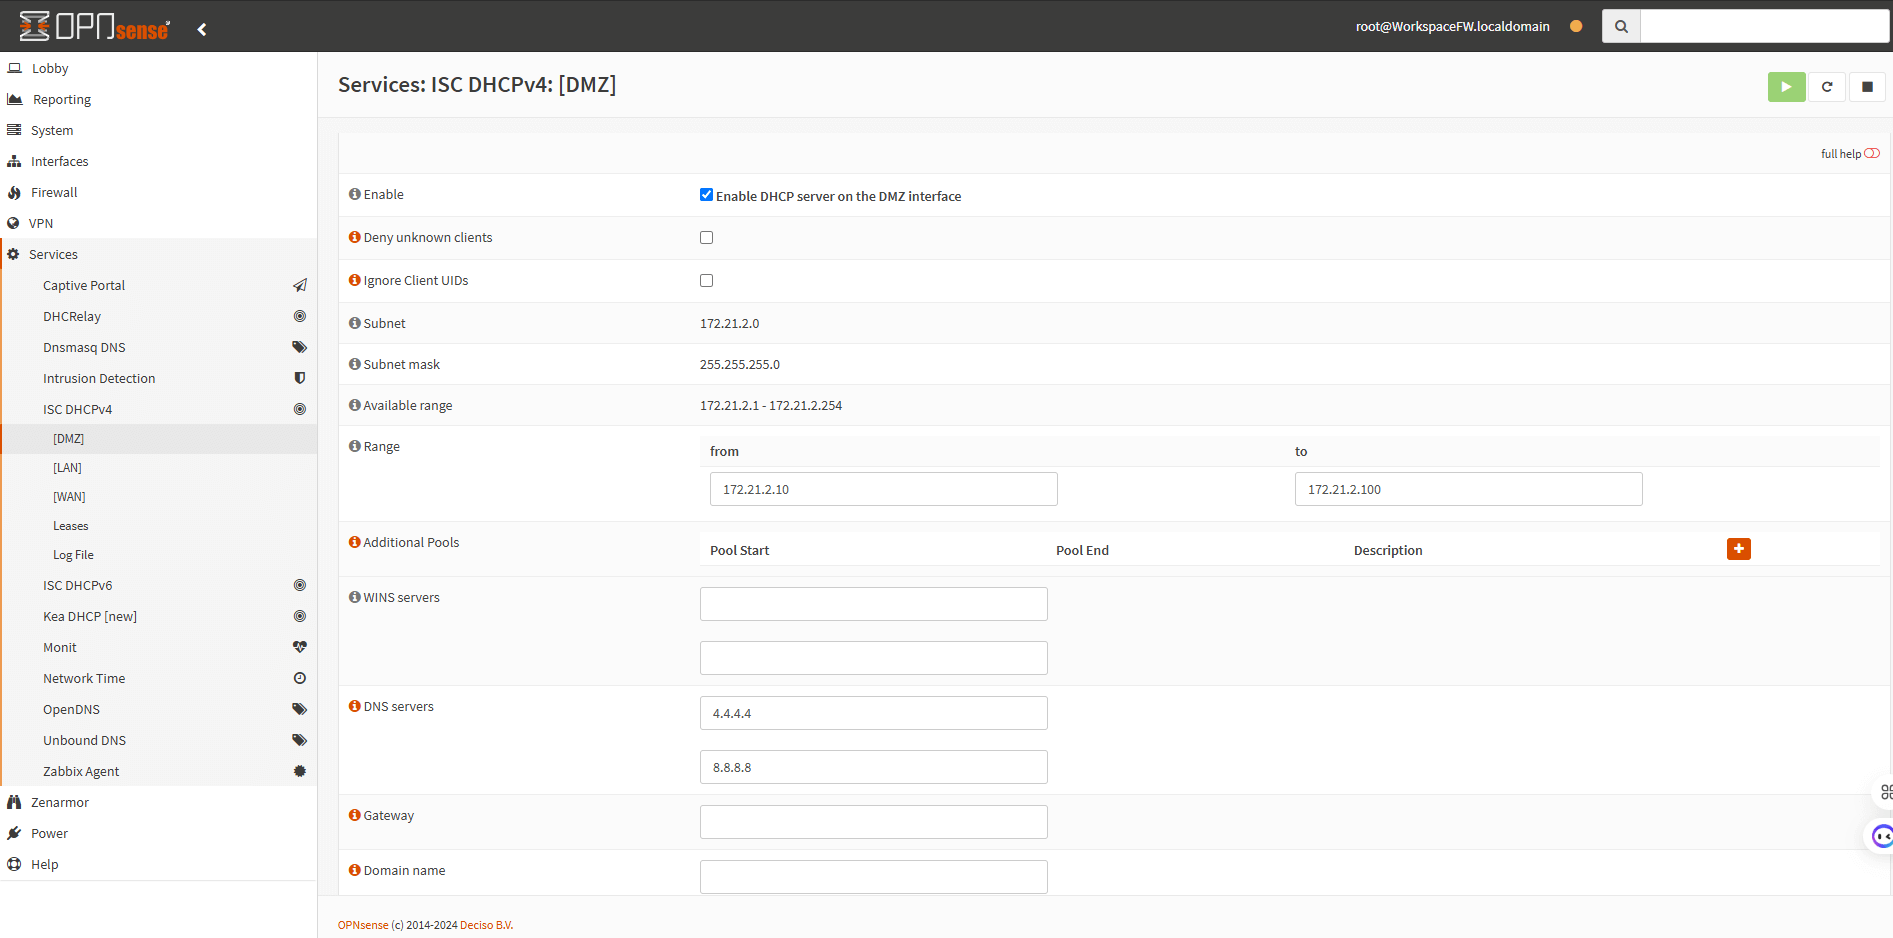
Figure 8. Configuring ISC DHCPv4
-
Click Save.
-
Click Apply Changes to activate the settings.
How to Restart ISC DHCPv4 Server
You may easily restart the ISC DHCPv4 service for your networks on the OPNsense firewall by following the next steps.
-
Navigate to the Services > ISC DHCPv4 on your OPNsense web UI.
-
Select the interfaces to listen on for DHCPv4 requests from the Interfaces list on the left-side bar menu, like
OPT1. -
Click on the Restart button at the top right of the page.
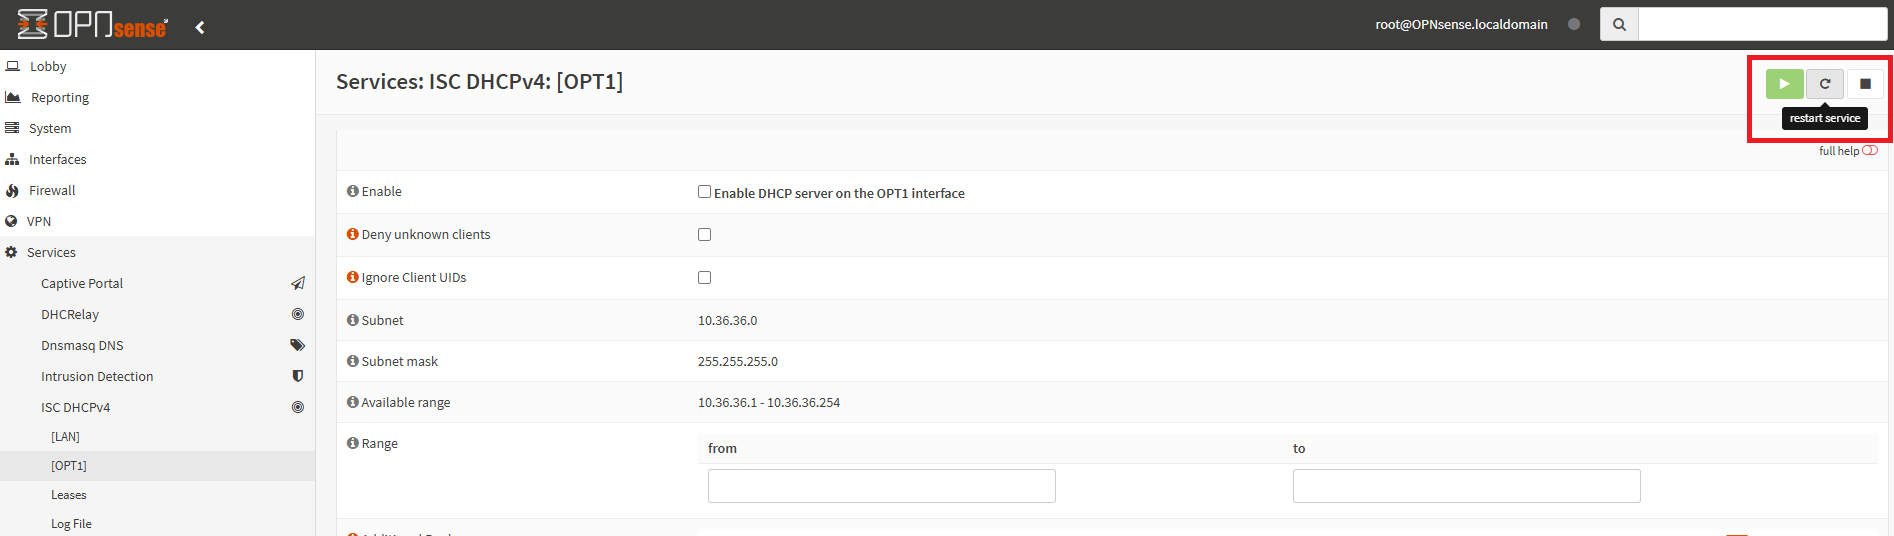
Figure 9. Restart DHCP
How to Start/Stop ISC DHCPv4 Server
You may easily start or stop ISC DHCPv4 service for your networks on the OPNsense firewall by following the next steps.
-
Navigate to the Services > ISC DHCPv4 on your OPNsense web UI.
-
Select the interfaces to listen on for DHCPv4 requests from the Interfaces list on the left-side bar menu, like
OPT1. -
Click on the Stop button at the top right of the page. This will immediately stop the service.
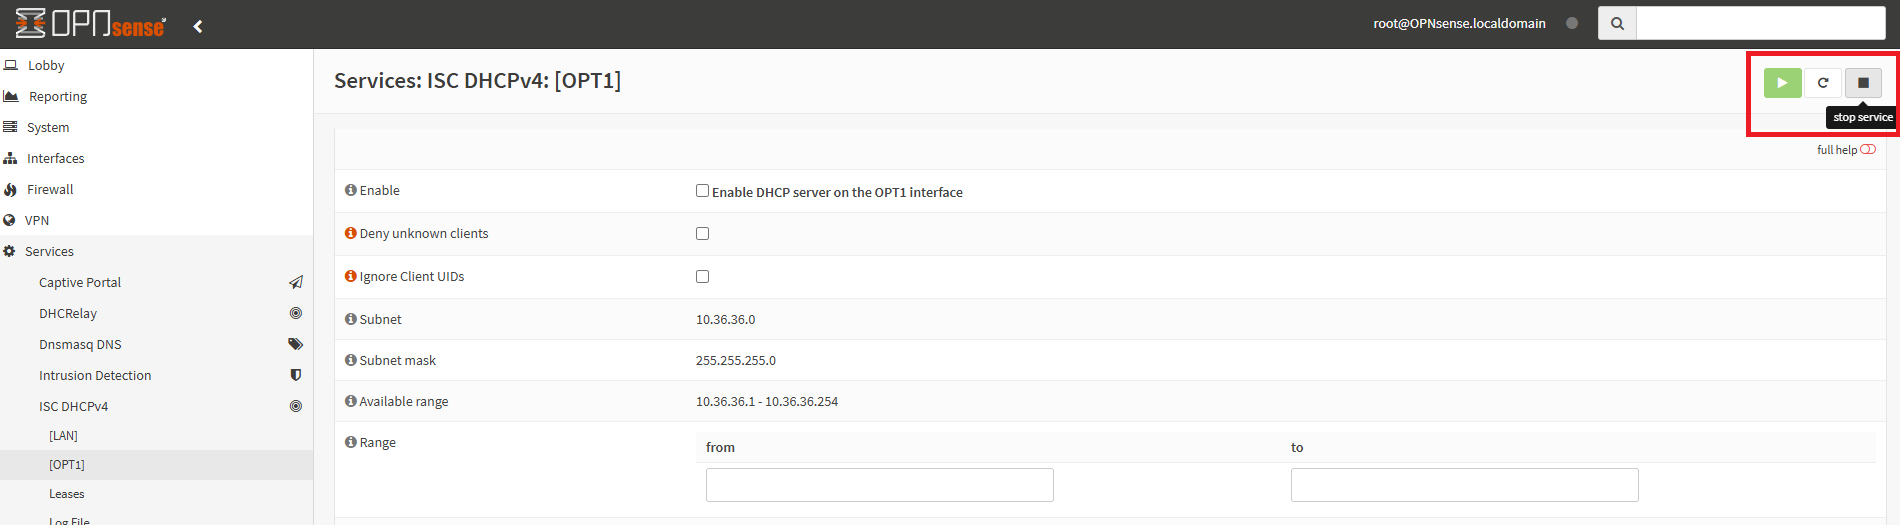
Figure 10. Stop DHCP
-
Click on the Start button at the top right of the page to start the DHCPv4 service. This will immediately start the server.

Figure 11. Start DHCP
You may view or start/stop/restart DHCP services by navigating to the System > Diagnostics > Services page on OPNsense web UI.
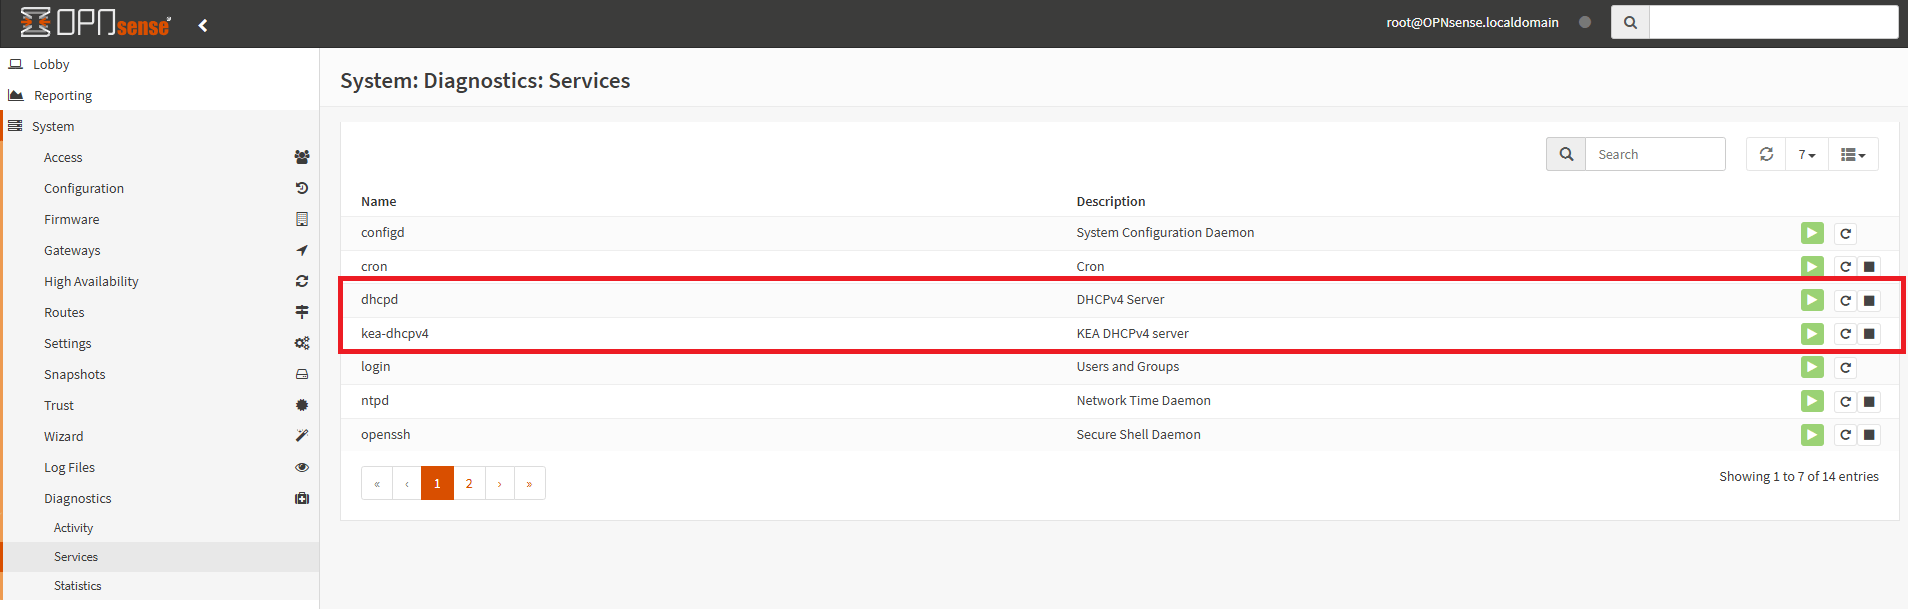
Figure 12. Diagnostic Services
DHCP Static Mappings
Static DHCP mappings indicate a preference for the IP address that will be assigned to a specific client based on its MAC address. In a network where unidentified clients are denied, this also functions as a list of "known" clients that are permitted to receive leases or maintain static ARP entries.
Reporting and log files may be simpler to interpret when fixed IP addresses are the only device addresses that appear in the records.
Another benefit of establishing static DHCP settings is the ability to modify specific settings for each device. For example, you can configure a distinct DHCP server for a device in order to circumvent DNS filtering. Furthermore, the necessity of manually configuring each IP address at each device is eliminated by employing static DHCP mappings. You possess a centralized location for the management of all static IP addresses.
You may view the following details in the DHCP Static Mappings pane.
-
Static ARP: The OS will assign a static ARP entry to this entry, which will link the IP address to the MAC address if it is selected.
tipThe use of this option, as opposed to the global static ARP option, does not prevent the MAC address from accessing other IP addresses; rather, it prevents other MAC addresses from accessing this IP address. In other words, it prevents another machine from accessing the firewall by using that IP address, but it does not prevent the user from modifying their own IP address to a different one.
-
MAC address: The MAC address of the client that identifies a host. This can be employed to provide personalized options on this page. Alternatively, the MAC address can be entered to add the device to the list of known clients for use when the Deny unknown clients option is enabled.
-
IP address: The IP address part is required if this is to be a static IP address mapping, as opposed to merely informing the DHCP server that the client is legitimate.
-
Hostname: The client's hostname. This is not required to correspond with the hostname specified on the client. When enrolling DHCP addresses in the DNS resolver, the hostname specified here will be employed.
-
Description: This item is intended to assist in tracking any supplementary information regarding this entry. The name of the individual who utilizes the computer, its purpose, the reason for its static address, or the administrator who added the entry are all potential candidates. It may also be left unfilled.
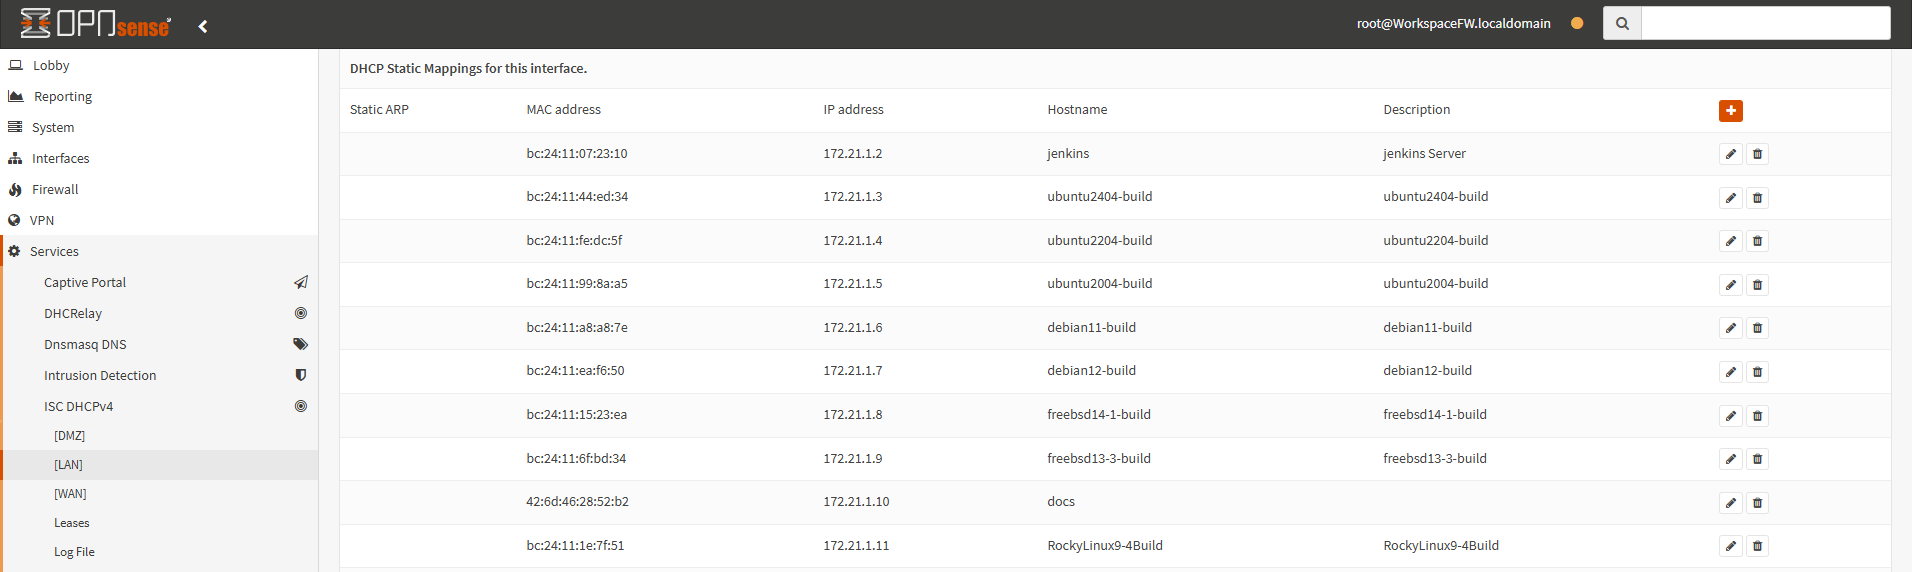
Figure 13. DHCP Static Mappings Page
How to Add DHCP Static Mappings
There are two methods by which static mappings can be incorporated.
-
Via ISC DHCPv4 Interface page
-
Via ISC DHCPv4 Leases page
Via ISC DHCPv4 Interface page
You may easily add DHCP static mappings by following the next steps.
-
Navigate to the Services > ISC DHCPv4 on your OPNsense web UI.
-
Select the interfaces to which you want to add static mapping on the left sidebar.
-
Scroll down to the DHCP Static Mappings for this interface pane at the bottom of the page.
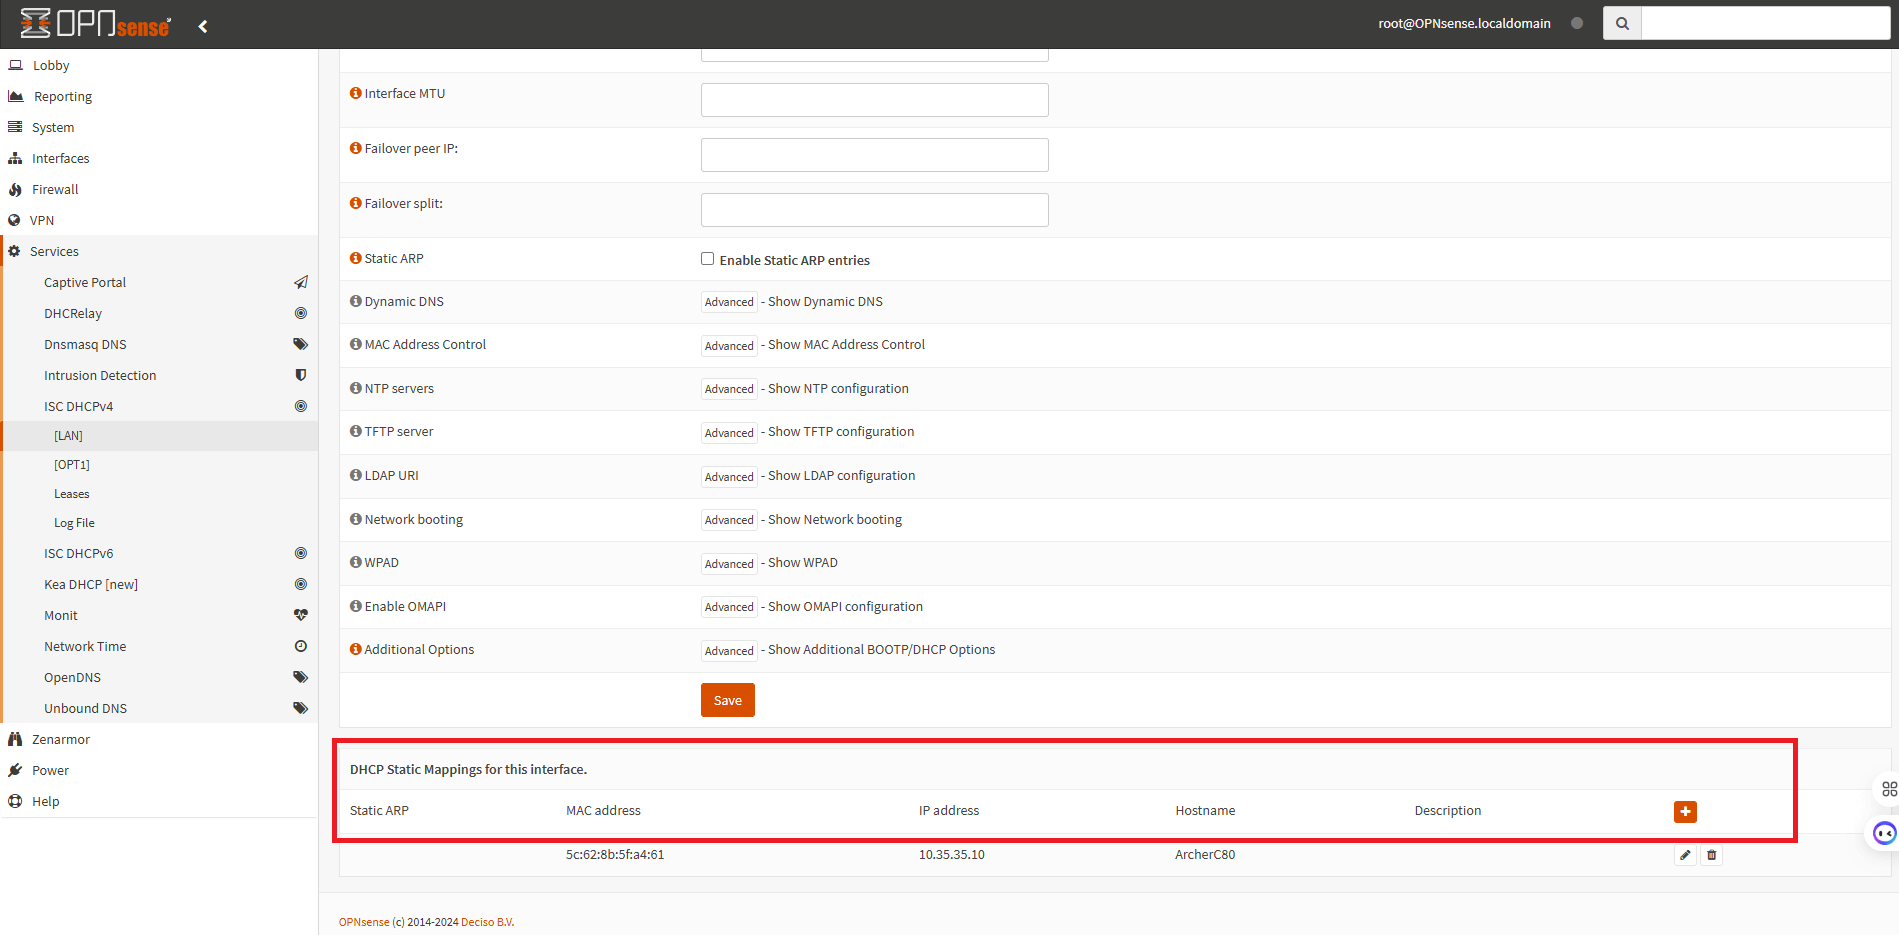
Figure 14. DHCP Static Mappings on Interface
-
Click Add button with a
+icon at the top right corner of the pane. This will open Static DHCP Mapping configuration page. -
Specify the MAC address of the client.
-
Specify the IP address of the client.
-
You may leave other options as default.
-
Click Save button on the page. Static mapping configuration will be listed at the bottom of the ISC DHCPv4 Interface page.
-
Click Apply Changes to activate settings.
Via ISC DHCPv4 Leases page
You may easily add DHCP static mappings by following the next steps.
-
Navigate to the Services > ISC DHCPv4 > Leases on your OPNsense web UI.

Figure 15. Adding Static Map via Leases
-
Find the client device for which you want to define a static map.
-
Click Add button with a
+icon at the end of the row. This will open Static DHCP Mapping configuration page. -
Specify the IP address of the client.
-
You may leave other options as default.
-
Click Save button on the page. Static mapping configuration will be listed at the bottom of the ISC DHCPv4 Interface page.
-
Click Apply Changes to activate settings.
ISC DHCPv6
You may configure DHCPv6 on your OPNsense firewall by navigating to Services > ISC DHCPv6 on the web UI. The DHCPv6 settings menu has the Leases submenu. The Leases submenu displays all IPv6 addresses assigned to clients.

Figure 16. ISC DHCPv6 Menu
In this section, you have the option to specify a range, provide default DNS servers, and generate static assignments based on the unique DHCP identifier (DUID) of the client.
Before debugging DHCPv6 issues, it is imperative to ensure that Router advertisements are properly configured, as these two daemons are interdependent.
Downstream routers may request prefixes (IA_PD) if a Prefix Delegation Range is specified. In order to route a delegated prefix to a downstream router, OPNsense must be cognizant of the router's IPv6 WAN address. There are two methods by which this can be accomplished:
-
DHCPv6 dynamic address lease: In the event that the downstream router requests both an address (IA_NA) and a prefix (IA_PD) and an address range is specified in the DHCPv6 service settings, the prefix will be routed to the leased address.
-
Static mapping: The delegated prefix will be unconditionally routed to the IPv6 address of the static mapping if the DUID of an active prefix lease matches the DUID of a DHCPv6 static mapping. The downstream router is not required to request an address, and the DHCPv6 service does not require an address range to be configured. The static mapping may contain a GUA, ULA, or link-local address. This enables the delegation of downstream prefixes to routers that only request a prefix, not an address.
Advanced Settings
Custom configuration files can be added to the firewall to configure options that are not accessible through the GUI. To include files in /usr/local/etc/dhcpd.opnsense.d/ for IPv4 and /usr/local/etc/dhcpd6.opnsense.d/ for IPv6, use the .conf extension (e.g. custom-options.conf). All files will be included in alphabetical order when additional files are added to the directory.
How to Troubleshoot DHCP Server
The Leases page displays the current leased IP addresses for diagnostic purposes. IPv4 and IPv6 each have their own leases page. This page displays the most recent information as reported by DHCPd in the /var/dhcpd/var/db/dhcpd(6).leases database. The current active leases are the only ones displayed on this page by default. To display all configured leases, select the "inactive" checkbox. The "All Interfaces" submenu allows for interface filtering. The following information may be useful for DHCP troubleshooting.
-
The local time is used to report all times, as specified in the Administration.
-
Clients are regarded to be online if they are present in the ARP table for IPv4 or the NDP table for IPv6.
-
The dhcpd.leases page contains a comprehensive list of the various potential conditions in which a lease may be in. Checking the "inactive" selection will disclose all IP addresses that are presently reserved by DHCPd with a fallback state if failover is enabled. The failover secondary has the ability to allocate these leases. The quantity displayed will fluctuate in accordance with the configured failover split value or range.
-
The lease type may be either static or dynamic. This is included to facilitate the process of categorizing.
-
By selecting the plus sign in a sequence, it is possible to establish a static mapping for a dynamic lease.
-
It is feasible to remove a lease from the leases database directly via Leases page.
-
If the client specifies their hostname as part of the protocol, DHCPv4 will display their hostname.
-
A MAC address will be displayed for DHCPv6 if it is present in the NDP table or the DUID, provided that it corresponds to a recognized vendor. This is due to the fact that a DUID is unable to reliably retrieve a MAC address.
-
The delegated prefixes are displayed in a distinct pane on the DHCPv6 leases page.
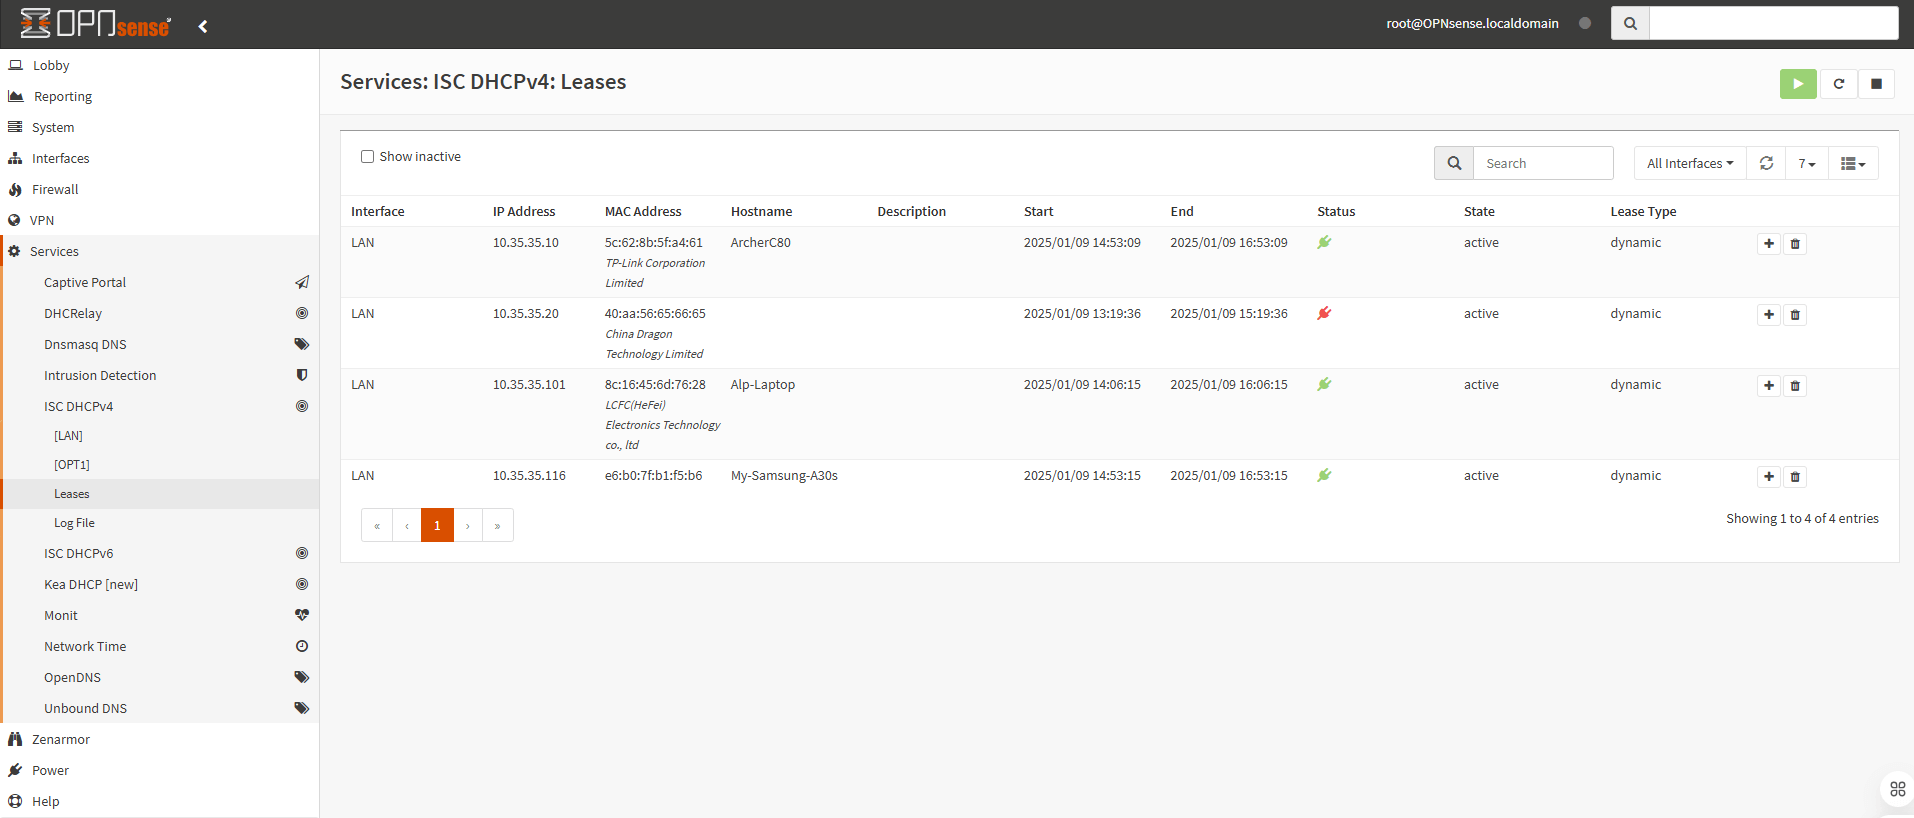
Figure 17. DHCPv4 Leases Page
Configuring KEA DHCPv4
Kea DHCP is a modern, open-source DHCP server that was developed by the Internet Systems Consortium and is licensed under MPL2.0. It is intended to replace ISC DHCP and offers features that are in line with the contemporary needs of the networking industry. KEA DHCP is adaptable to a variety of network environments due to its support for Dynamic DNS, REST API, DHCPv4, and DHCPv6, as well as database integrations with MySQL and PostgreSQL.
You may configure KEA DHCPv4 on your OPNsense firewall by navigating to Services > KEA DHCP on the web UI. The KEA DHCP settings menu has the following submenus.
-
Control Agent: The Kea Control Agent (CA) is a daemon that provides a RESTful control interface for the management of Kea servers.
-
Kea DHCPv4: The DHCPv4 server process that responds to DHCPv4 queries from clients.
-
Leases DHCPv4: All IP addresses assigned to clients are displayed.
-
Log File: The log file of the Kea DHCPv4 server.
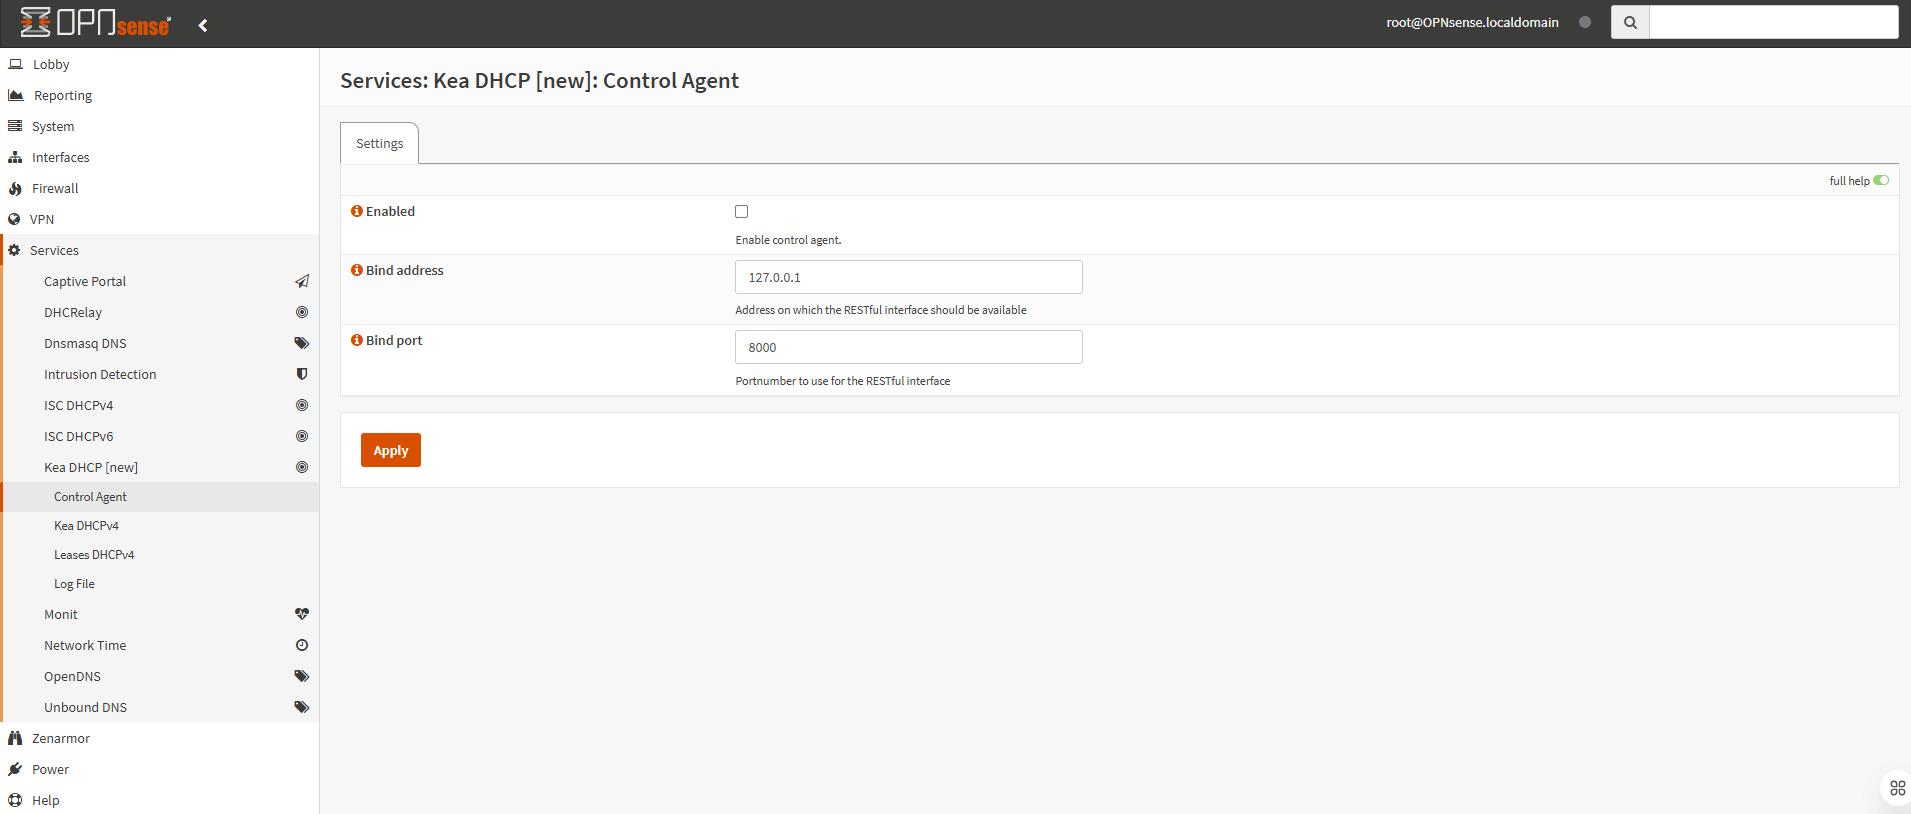
Figure 18. KEA DHCPv4
Enabling Control Agent
You may enable KEA DHCP Control Agent by following the next steps.
- Navigate to the Services > KEA DHCP > Control Agent on your OPNsense web UI.
- Click Enabled checkbox to enable control agent.
- You may leave Bind Address field on which the RESTful interface should be available as default,
127.0.0.1. - You may leave Bind Port field as default or set it to an unused port for communication.
- Click Apply
Configuring KEA DHCPv4
You may configure KEA DHCPv4 by navigating to the Services > KEA DHCP > Kea DHCPv4 on your OPNsense web UI. This page has the following tabs for management.
-
Settings: Generic settings for KEA DHCPv4 service
-
Subnets: You may configure subnets and associated pools.
-
Reservations: You may configure machine static reservations.
-
HA Peers: You may define HA peers for the OPNsense cluster. All nodes should contain the exact same definitions (usually two hosts, a
primaryand astandbyhost).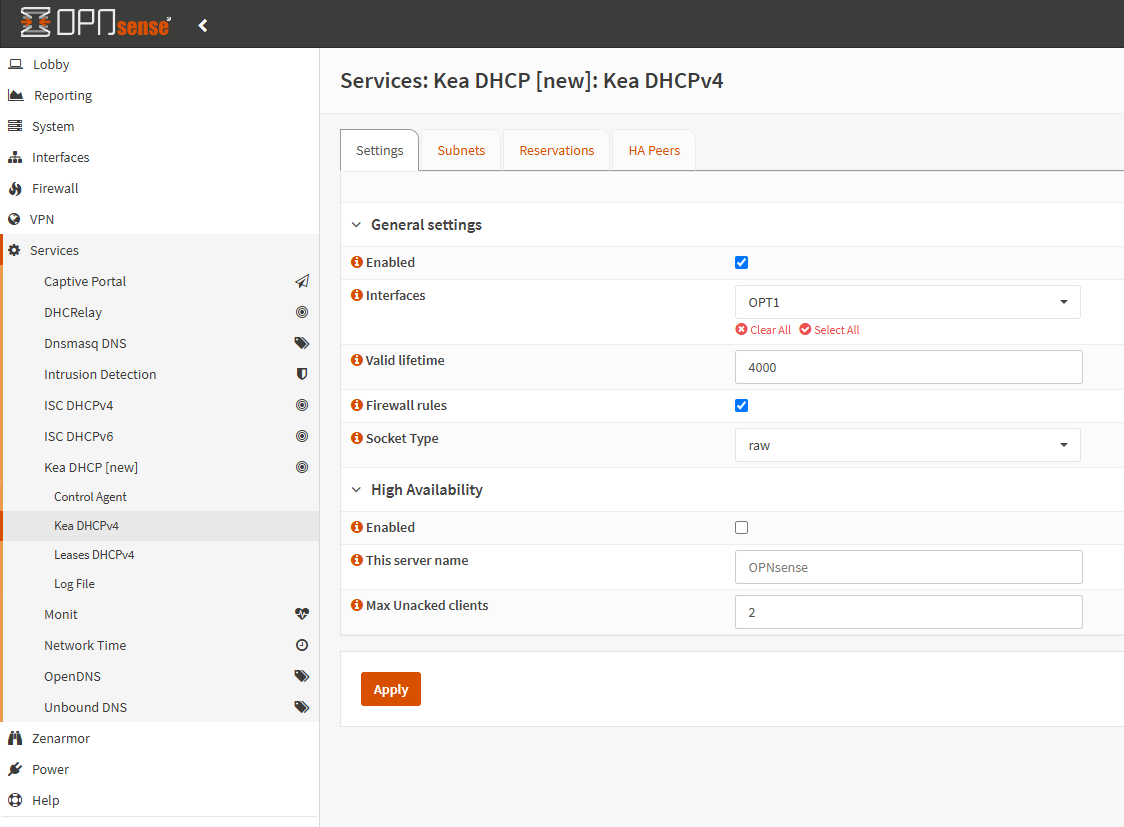
Figure 19. KEA DHCPv4 Settings
Enabling KEA DHCPv4
You may enable KEA DHCPv4 by following the next steps.
- Navigate to the Services > KEA DHCP > KEA DHCPv4 > Settings on your OPNsense web UI.
- Click Enabled checkbox to enable DHCPv4 service
- Select the interfaces to listen on for dhcpv4 requests from the Interfaces drop-down menu.
- You may leave Valid lifetime option that defines how long the addresses (leases) given out by the server are valid (in seconds) as default,
4000. - You may leave Firewall rules checkbox option checked for automatically adding a basic set of firewall rules to allow dhcp traffic. More fine-grained controls can be offered manually when disabling this option.
- You may leave Socket type used for DHCP communication as default,
raw. - You may select Enabled option for High Availability. Beware that it requires an active control agent.
- You may leave This server name as default.
- You may leave Max Unacked clients as default. This indicates the number of clients who transmit communications to the partner but do not appear to receive a response. When the value is set to 0, any network disruption will result in a failover, as a higher value necessitates a congested environment to consider a member down.
- Click Apply
Defining Subnets
You may define subnets for KEA DHCPv4 by following the next steps.
-
Navigate to the Services > KEA DHCP > KEA DHCPv4 > Subnets on your OPNsense web UI.
-
Specify the Subnet to use in CIDR representation, should be large enough to hold the specified pools and reservations
-
You may enter a Description.
-
Type the list of available addresses, one per line in range or subnet format (e.g. 192.168.0.100 - 192.168.0.200 , 192.0.2.64/26) into the Pools field.
-
You may leave Auto collect option data checkbox as checked to automatically update option data for relevant attributes such as routers, DNS servers, and NTP servers when applying settings from the GUI.
-
You may type Static routes that the client should install in its routing cache, defined as
dest-ip1,router-ip1;dest-ip2,router-ip2. -
You may enter the Domain name to offer to the client, set to this firewall's domain name when left empty.
-
You may specify a ´search list´ of Domain Names to be used by the client to locate not-fully-qualified domain names in Domain search field.
-
You may specify a list of RFC 868 time servers available to the client in Time servers field.
-
You may specify Next server IP address.
-
You may specify TFTP server IP address to offer the client
-
You may specify TFTP boot filename to use.
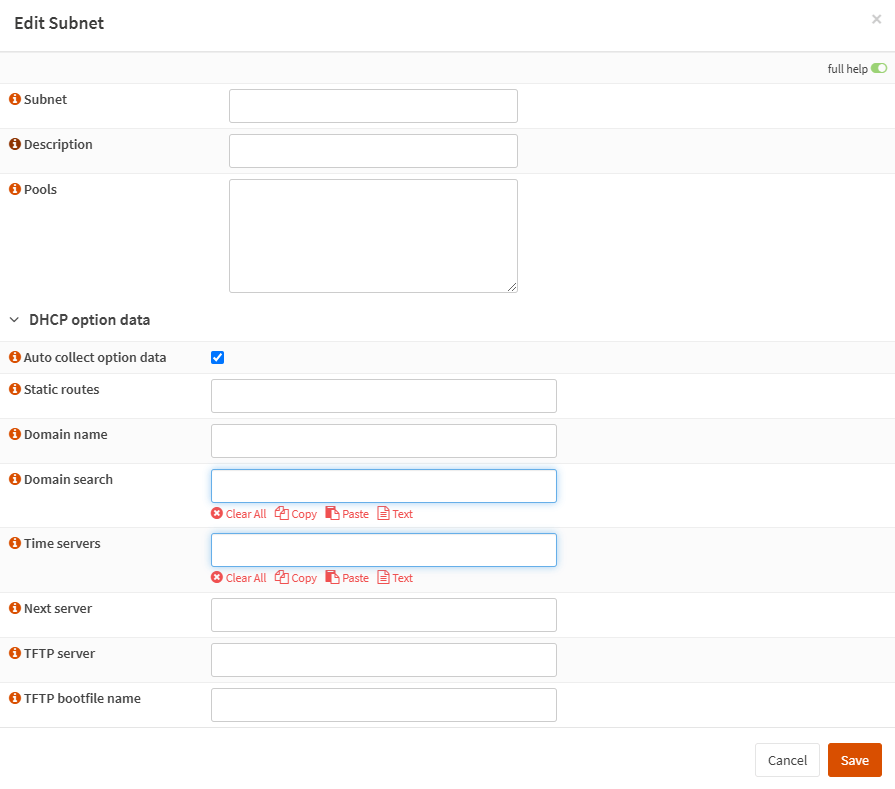
Figure 20. Defining Subnets
-
Click Save.
-
Click Apply to activate the settings.
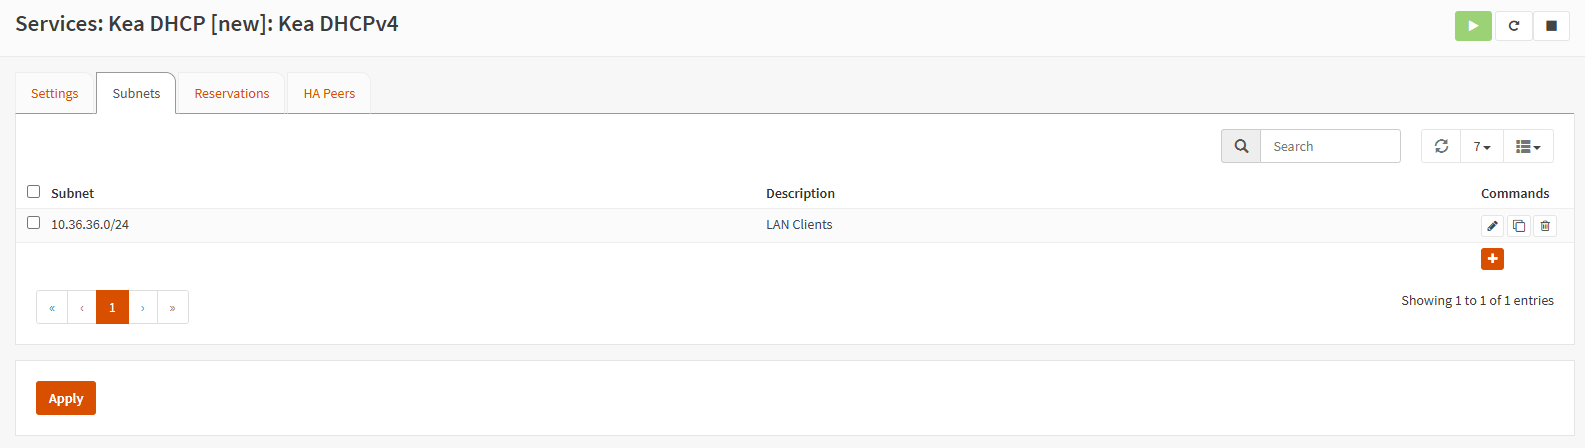
Figure 21. Applying Subnets
Adding Reservations
You may add reservations for KEA DHCPv4 by following the next steps.
-
Navigate to the Services > KEA DHCP > KEA DHCPv4 > Reservations on your OPNsense web UI.
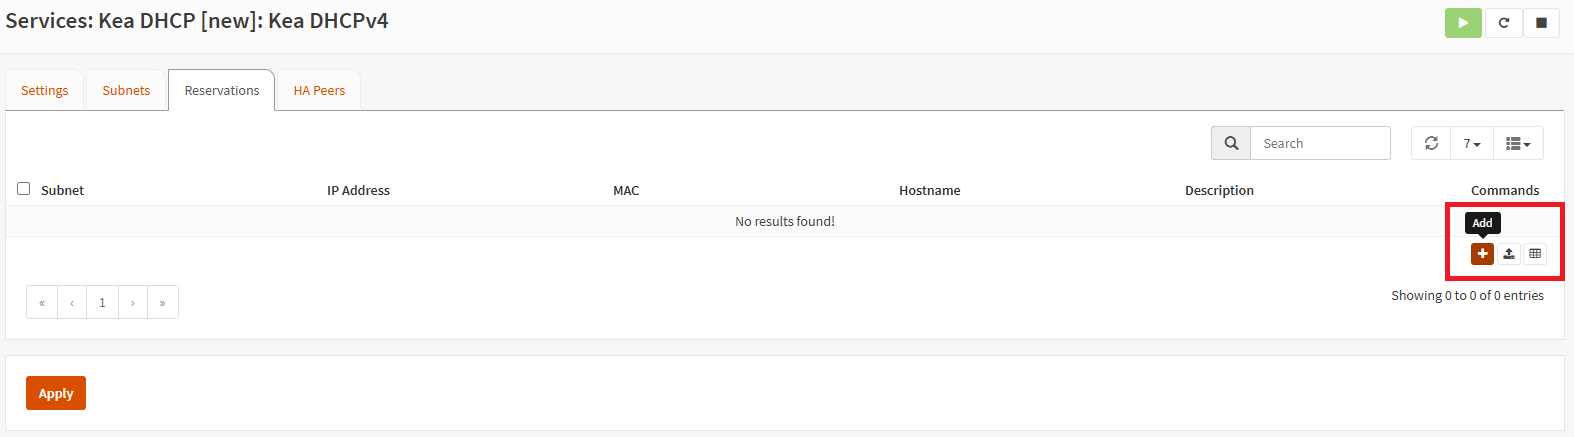
Figure 22. KEA Reservations
-
Click Add button with
+icon at the right of the page.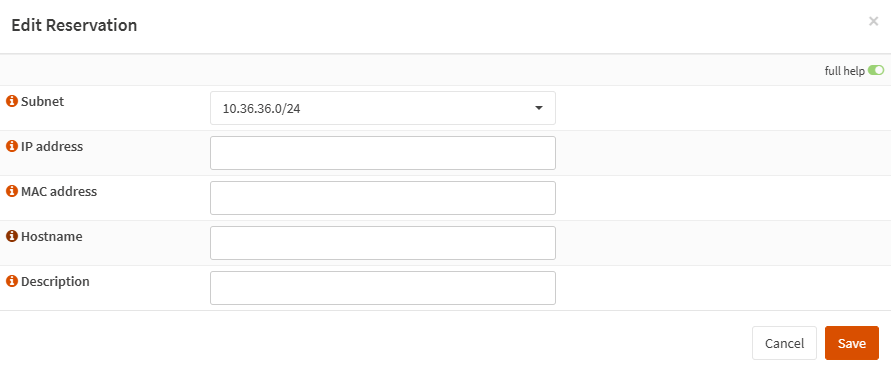
Figure 23. Edit KEA Reservations
-
Select the Subnet that the reservation belongs to.
-
Type IP address to offer to the client.
-
Type MAC address of the client.
-
You may specify a Hostname to offer to the client.
-
You may type a DEscription.
-
Click Save
-
Click Apply to activate the settings.

Figure 24. Applying KEA Reservations
Adding HA Peers
You may add HA peers for KEA DHCPv4 by following the next steps.
-
Navigate to the Services > KEA DHCP > KEA DHCPv4 > HA Peers on your OPNsense web UI.
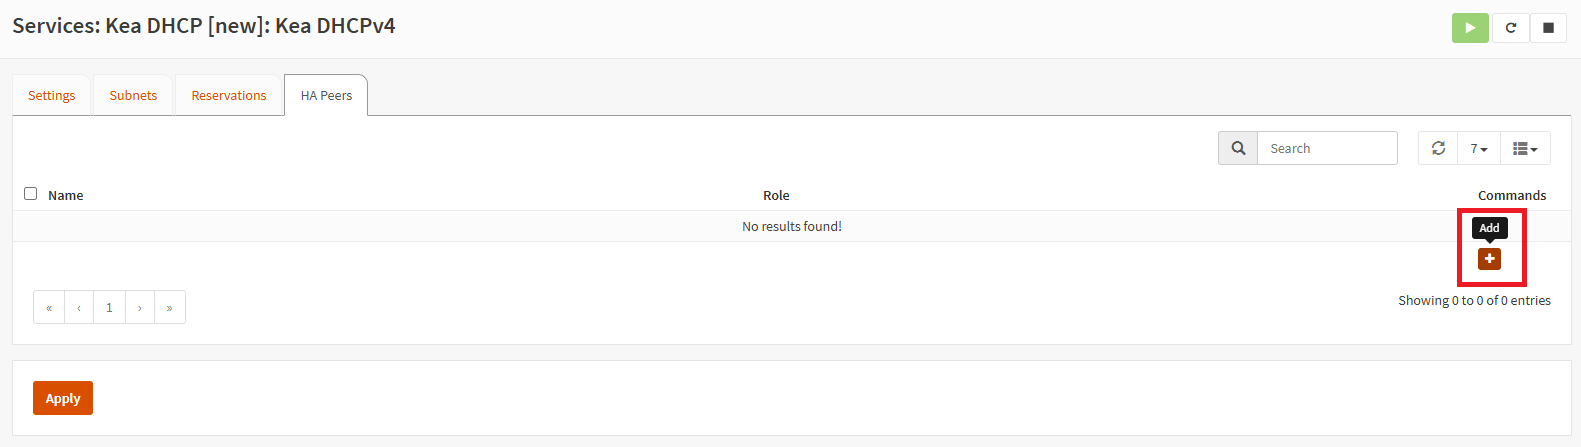
Figure 25. HA Peers
-
Click Add button with
+icon at the right of the page. -
Type the Name for the peer name. There should be one entry matching this machine, "This server name".
-
Select the Role,
primaryorstandby, for the peer. -
Specify the URL for the server instance, which should use a different port than the control agent. For example,
http://192.0.2.1:8001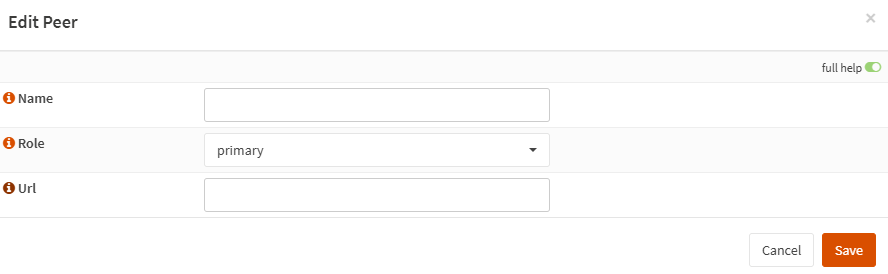
Figure 26. Adding HA Peers
-
Click Save
-
Click Apply to activate the settings.
What are the Advantages of DHCPv6?
The Dynamic Host Configuration Protocol for IPv6 (DHCPv6) provides many benefits in the administration of IPv6 network configurations:
- Centralized Control: It enables administrators to oversee IP address allocations and other network settings (such as DNS servers) from a single place, enhancing control and efficiency.
- Streamlined Address Management: DHCPv6 automates the allocation of IPv6 addresses, obviating the need for manual setup and reducing administrative burden.
- Flexibility: It accommodates both stateful and stateless systems. Stateful DHCPv6 allocates and monitors IP addresses, while stateless DHCPv6 supplies configuration settings without allocating addresses.
- Scalability: DHCPv6 accommodates extensive networks, making it appropriate for business settings that need several IP addresses for devices.
- Improved Security Features: DHCPv6 incorporates measures such as authentication to bolster security throughout the address allocation process.
- Facilitation of Network Modifications: Upon the occurrence of network alterations, such as the upgrading of DNS server addresses, DHCPv6 may disseminate these modifications immediately, obviating the need for manual reconfiguration on each device.
- Assistance for Non-SLAAC Devices: Certain devices may lack support for Stateless Address Autoconfiguration (SLAAC). DHCPv6 guarantees that these devices may continue to get network configuration information.
These benefits provide DHCPv6 an essential instrument for effective and scalable IPv6 network administration.