How to Configure Dynamic DNS on OPNsense?
When the local IP address changes, DNS registrations can be updated with the assistance of a dynamic DNS service provider. OPNsense has os-ddclient plugin provides assistance for a multitude of services that utilize the ddclient software.
DDclient is a Perl client that is used to update dynamic DNS entries for accounts on a Dynamic DNS Network Service Provider. DDclient originally created by Paul Burry, it has since been largely revised by a wimpunk. The software operates on a wide range of UNIX operating systems and has undergone testing on GNU/Linux and FreeBSD. The supported capabilities include functioning as a daemon, both manual and automated updates, static and dynamic updates, optimized updates for multiple addresses, MX records, wildcards, abuse avoidance, retrying unsuccessful updates, and transmitting update status to syslog and via e-mail.
In this tutorial, we will guide you through dynamic DNS configuration on the OPNsense firewall using ddclient plugin and Cloudflare.
You may easily configure Dynamic DNS (DDNS) service on your OPNsense firewall by following the 3 main steps:
- Installing Dynamic DNS Plugin
- Configuring Dynamic DNS Plugin
- Configuring Dynamic DNS Provider Account

What is Dynamic DNS and Why Do You Need It?
Dynamic DNS (DDNS) refers to a method of automatically updating and managing the mapping of domain names to IP addresses in a dynamic and real-time manner.
ISPs provide clients with two sorts of external IP addresses: static and dynamic. The nature of your external IP address is contingent upon the Internet Service Provider (ISP) you are using and the allocation they have determined for you based on your subscribed plan. The majority of corporate setups use static external IP addresses, which are crucial for tasks such as service whitelisting and firewall configurations.
Nevertheless, there are instances (particularly with home ISP services) where dynamic IP addresses are allocated. Consequently, the external IP address given will vary at regular intervals. In such scenarios, the functionality of VPNs, online services (employing port forwarding), and other tools might be disrupted due to the change in the external IP address. Consequently, clients attempting to establish a connection to the previous IP address do not get a response.
To resolve this problem, you may establish a domain name by using a dynamic DNS service. This will enable your router or any other device on the network to regularly update the DNS record for that domain name with your IP address. Each time you use that domain name to visit your network, it should consistently display the accurate and current IP address for your network.
Enabling Dynamic DNS hostname configuration ensures that the external IP address you are connected to is consistently updated. OPNsense will automatically update the DDNS hostname if there are any changes to the external IP address.
Prerequisites
You should sign up for an account with one of the supported dynamic DNS services prior to installing and utilizing this plugin.
1. Installing Dynamic DNS Plugin
The installation of the Dynamic DNS plugin, os-ddclient, is straightforward and speedy. To install the Dynamic DNS plugin, follow the steps below:
-
Login to your OPNsense Web GUI using an account with administrative access such as
root. -
Navigate to
System→Firmware→Plugins. -
Type
os-ddclientin the search field to find the Dynamic DNS plugin -
Click on the
+icon next toos-ddclientto install the plugin. Then you will be redirected to the Update menu tab.
Figure 1.
os-ddclientplugin installation on OPNsense -
Click on the
Pluginstab. You should see thatos-ddclientDynamic DNS plugin is installed
2. Configuring Dynamic DNS Plugin
You may quickly configure dynamic DNS plugin on your OPNsense firewall by following the next steps:
-
Navigate to Services → Dynamic DNS → Settings to configure one or more Dynamic DNS services.
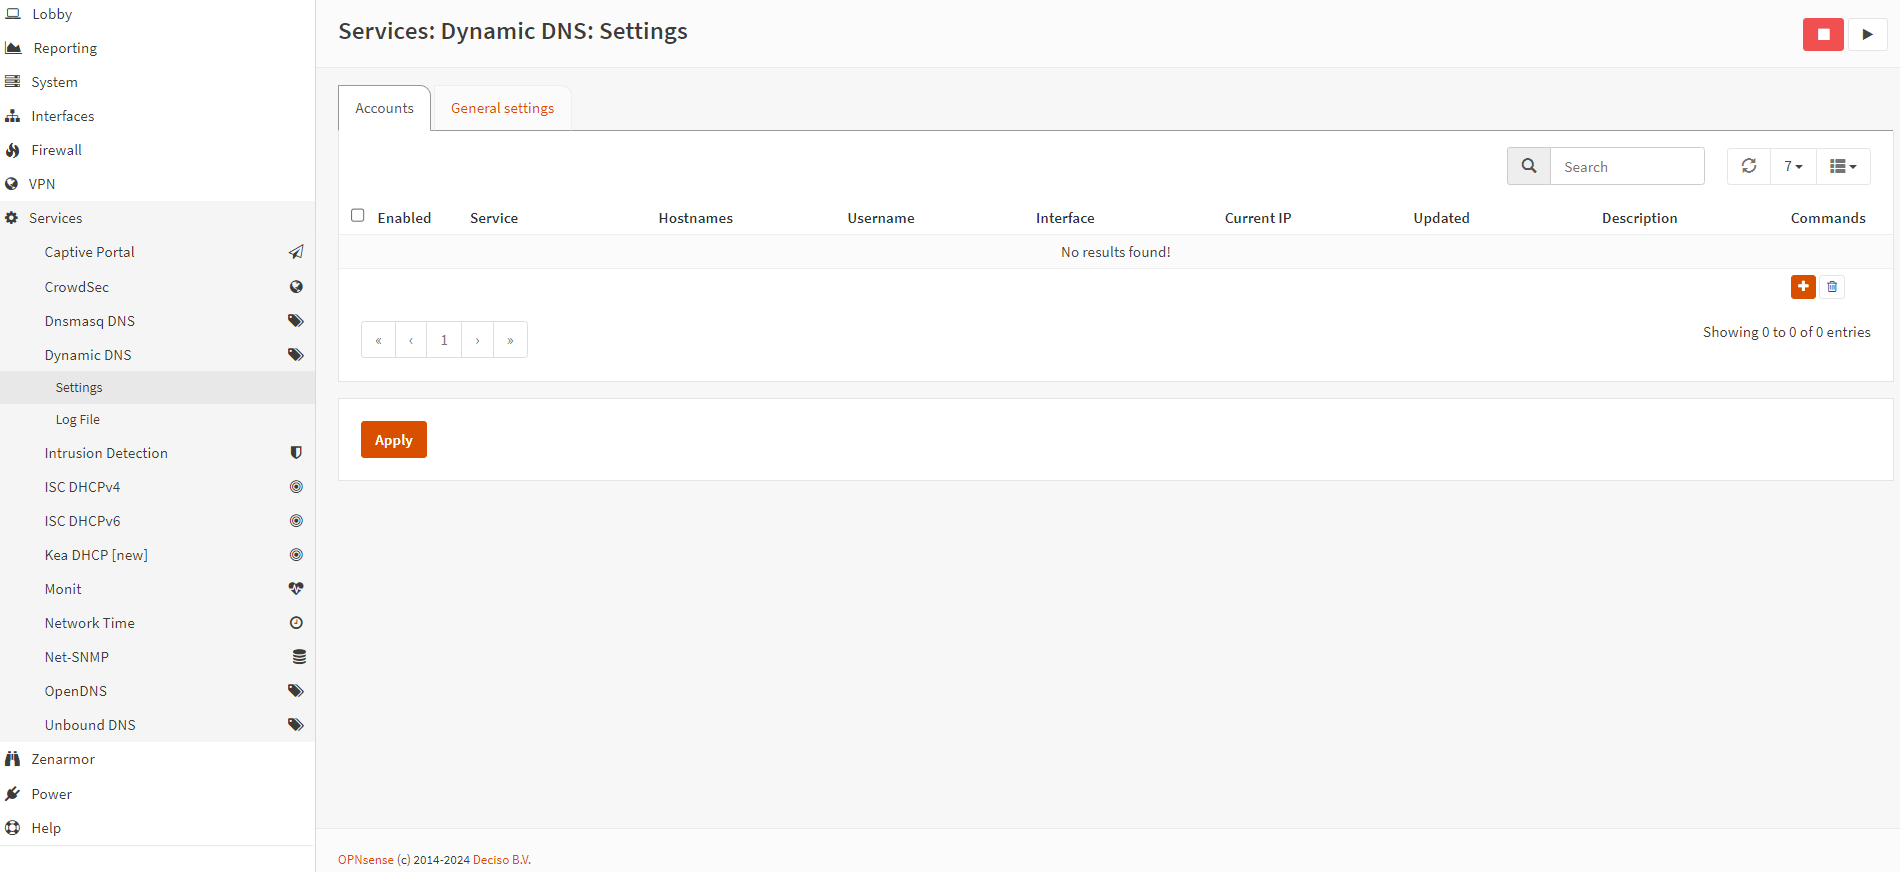
Figure 2. Dynamic DNS Settings on OPNsense
-
Select the General Settings tab to access the default configurations for all dynamic DNS services that have been configured on the firewall.
-
You may click advanced mode toggle bar to view advanced settings.
-
Ensure that Enable option is checked.
-
You may enable Verbose logging option or leave it unchecked.
-
You may Interval option as default, 300 sec.. It is the the duration in seconds during which address changes will be queried
-
Set Backend to
ddclient. Or you may select the 'native' setting for this option to enable support for custom HTTP requests.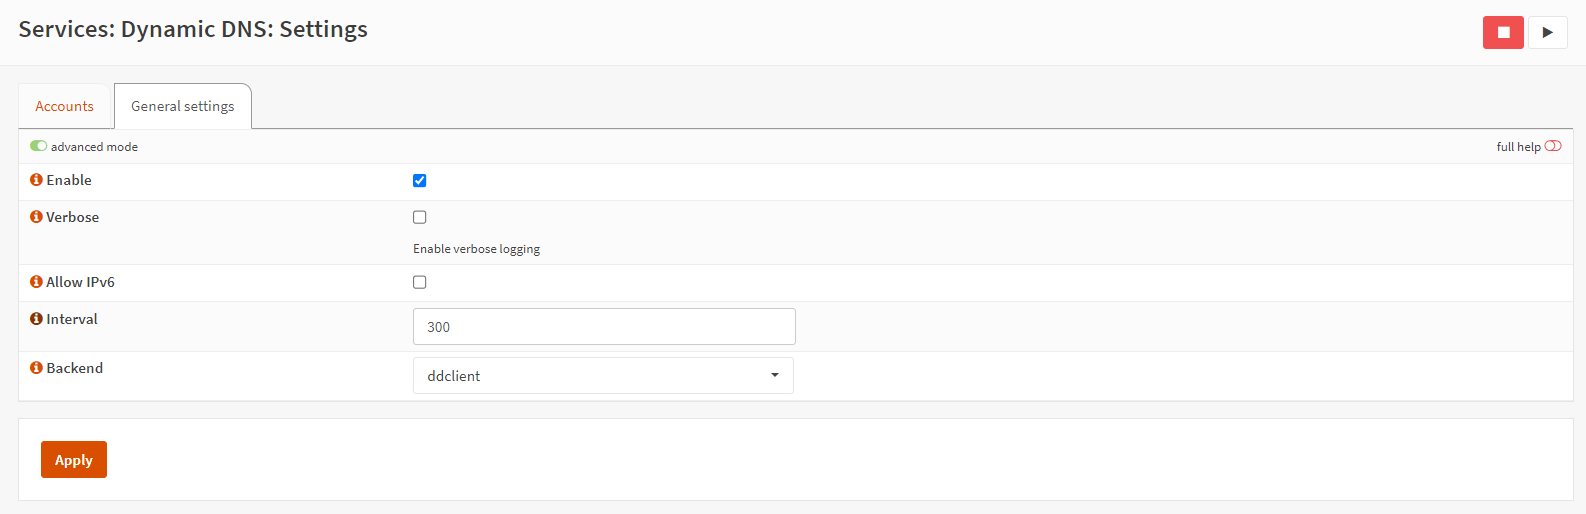
Figure 3. Dynamic DNS General Settings on OPNsense
-
Click Apply to activate the settings.
3. Configuring Dynamic DNS Provider Account
One or more dynamic DNS providers may be registered. These providers will be utilized to update DNS registrations via an HTTP API call to the specified service. To configure dynamic DNS provider account on the OPNsense firewall, you may follow the next steps:
- Navigate to Services → Dynamic DNS → Settings.
- Click Add button with
+icon at the right bottom of the Accounts tab. - Ensure that Enabled option is checked.
- Type a Description, such as
My dynamic DNS from Cloudflare. - Select the dynamic DNS provider from the Service drop-down menu.
- You may need to set the resourceId option which is a pointer to the service to be updated if you are using Azure dynamic DNS service. Otherwise, leave it empty.
- You may need to specify the Username but it could be empty for token-based authentication, such as Cloudflare service.
- Type Password or specify the security token depending on your service provider.
- Type the fully qualified domain names into Hostname field to update via the selected service.
- Select Check ip method to specify the method used for determining the IP address of the host. You can set this option to
Interface, if your firewall is directly connected to the Internet - Select WAN for the Interface to monitor option. You may choose the suitable interface from the dropdown menu, if you own several WAN interfaces.
- You may leave Check ip timeout option as default. It determines how long to wait before the checkip process times out.
- You may select the Force SSL option depending on your dynamic DNS provider. You must disable this option if your provider is using HTTP.
- Click Save.
- Click Apply to activate the settings.
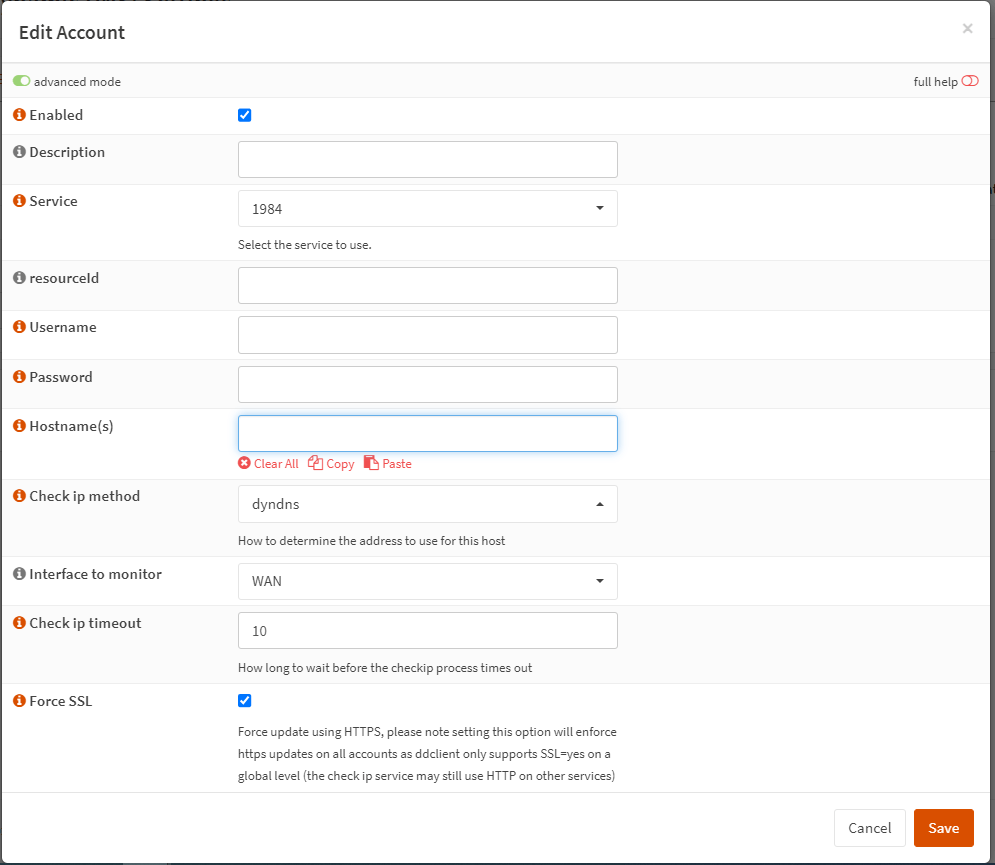
Figure 4. Dynamic DNS Account Settings on OPNsense
To verify the successful updating of the IP address, you may go to the Services → Dynamic DNS → Log File page.
What are Dynamic DNS Providers?
Several free dynamic DNS providers are available, however they have a restriction on utilizing just a few generic domain names. Certain providers offer the possibility to pay for using a personalized domain name in case your registrar lacks the capability to automatically update DNS records using a script or API.
If your registrar provides an API, you may use a dynamic DNS client to modify the DNS record(s) directly, eliminating the requirement for a third-party service to handle the management and updating of the DNS records. The advantage of this feature is that it eliminates the need to incur expenses for a domain name and a dynamic DNS service that is compatible with custom domain names. Cloudflare and DreamHost are two domain registrars that provide an API.
- 1984
- AzureDNS
- Changeip
- ClouDNS
- Cloudflare
- Digitalocean
- Dinahosting
- DNS Made Easy
- DNS-O-Matic
- DNSExit
- DynDNS
- DNSPark
- DSLReports
- DonDomino
- DuckDNS
- Dynu
- EasyDNS
- FreeDNS
- FreeMyIP
- Gandi
- godaddy
- HE.net
- HE.net TunnelBroker
- Hetzner DNS Console
- INWX
- Key-Systems
- Loopia
- NameCheap
- NearlyFreeSpeech.NET
- Njal.la
- No-ip
- Nsupdate.info
- OVH DynHost
- Porkbun
- Regfish.de
- Servercow
- sitelutions
- spDyn
- STRATO
- FreeDNS
- woima
- Yandex
- Zonedit
Configuring a DDNS service on your OPNsense has similar steps for all DDNS providers:
- Choose a provider.
- Go to their website
- Create an account
- Establish a DNS record for the hostname.
- Create a token for some providers.
- Configure DDNS settings on your firewall.
Procedures differ across providers, however they all give instructions on their websites. Once you have set up a hostname with a provider, adjust the firewall settings to match.
How to Configure DDNS on Cloudflare?
You may configure dynamic DNS using the following steps on Cloudflare dashboard:
-
Add a
ADNS entry for your domain, such asvpn.myhome.netwith the following settings: IP 0.0.0.0, disabled proxy, and TTL of 5 minutes.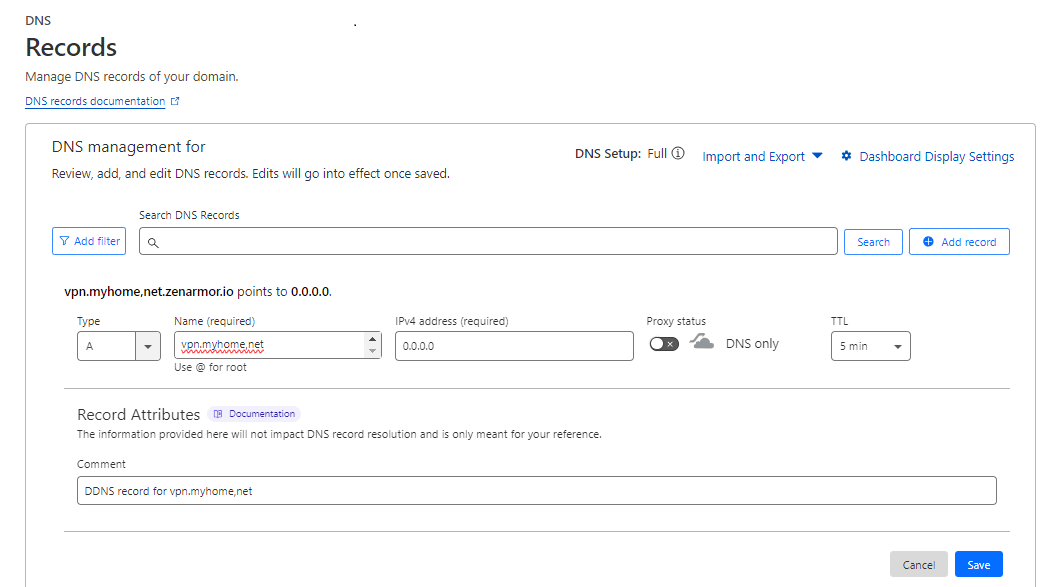
Figure 5. Adding DNS record on Cloudflare
-
Go back to Overview.
-
Select Get your API token at the right bottom of the page.
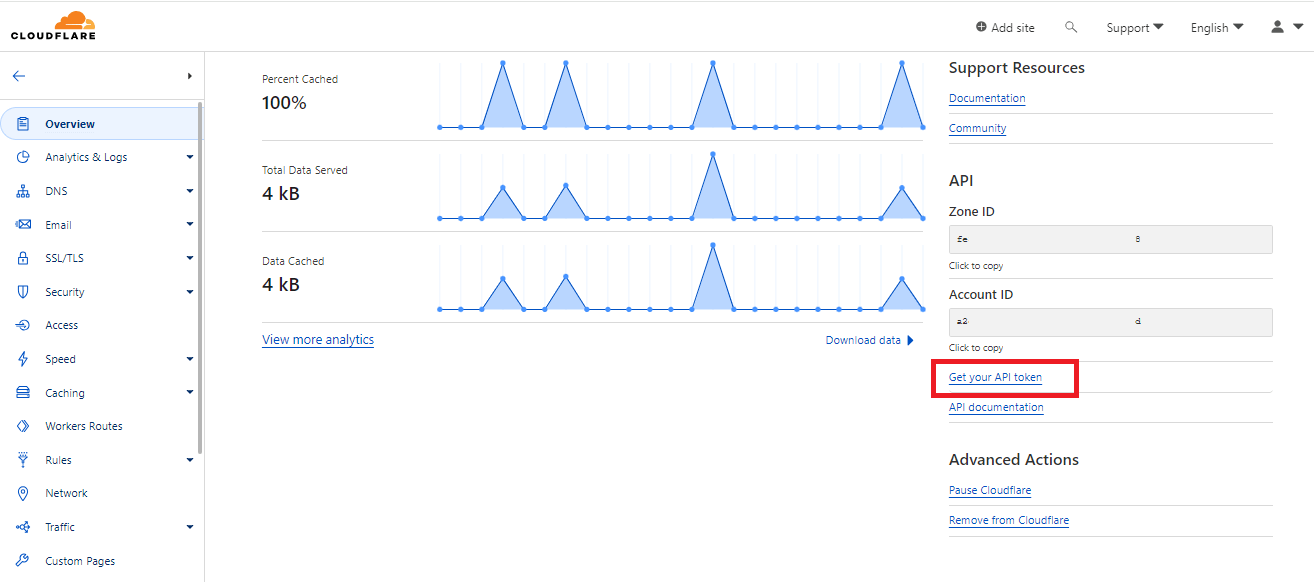
Figure 6. Get API token on Cloudflare
-
Click Create Token button.
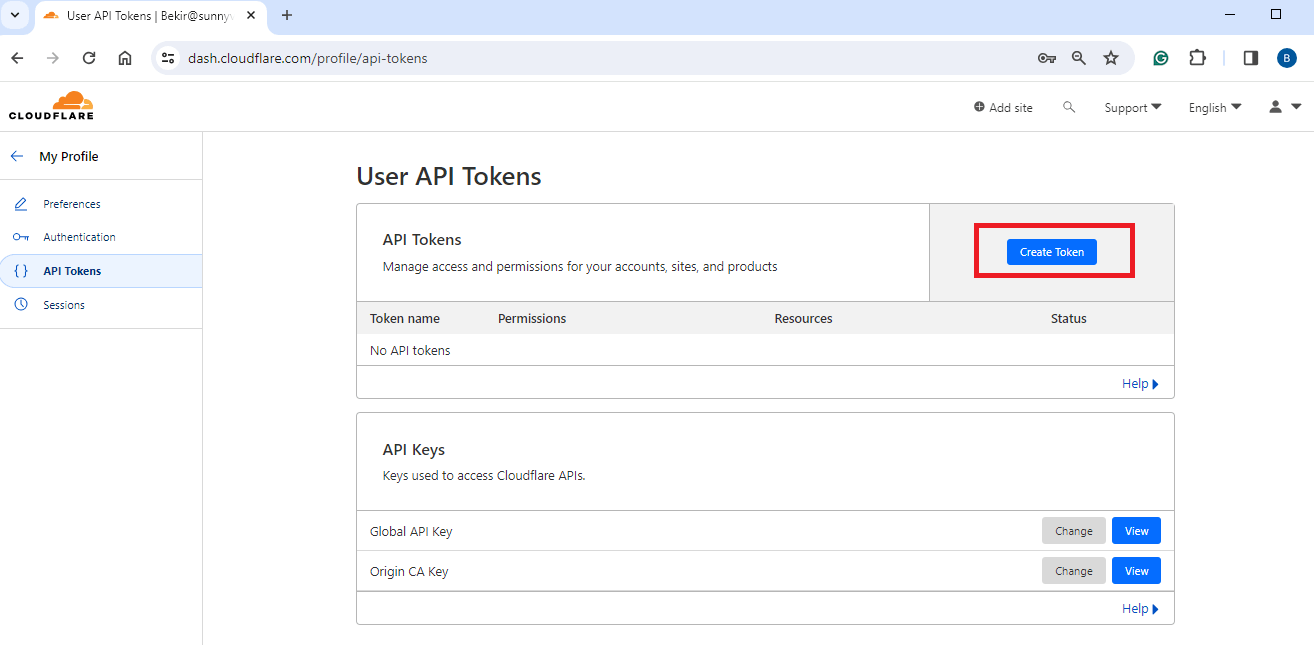
Figure 7. Viewing API Keys on Cloudflare
-
Select Use template next to the Edit Zone DNS option.

Figure 8. Edit zone DNS on Cloudflare
-
Select the correct Zone for your domain in the Zone Resources option, such as
myhome.net.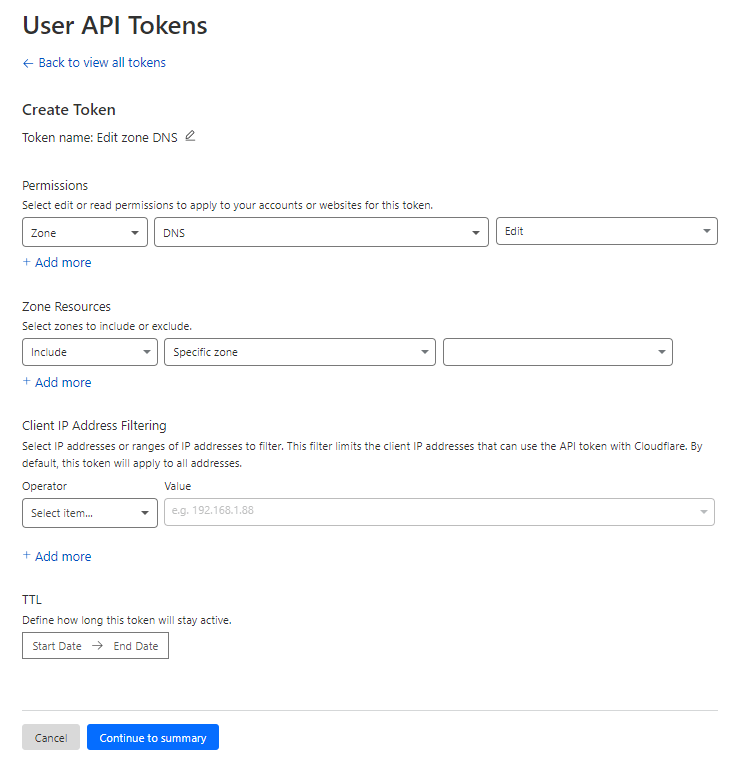
Figure 9. Creating API Token on CLoudflare
-
Click Continue to Summary button at the bottom of the page.
-
Click Create Token to generate the API key.
-
Copy the API key into your clipboard. Paste it temporarily to a text file or a sticky note. For security reasons, the token will not be shown again.
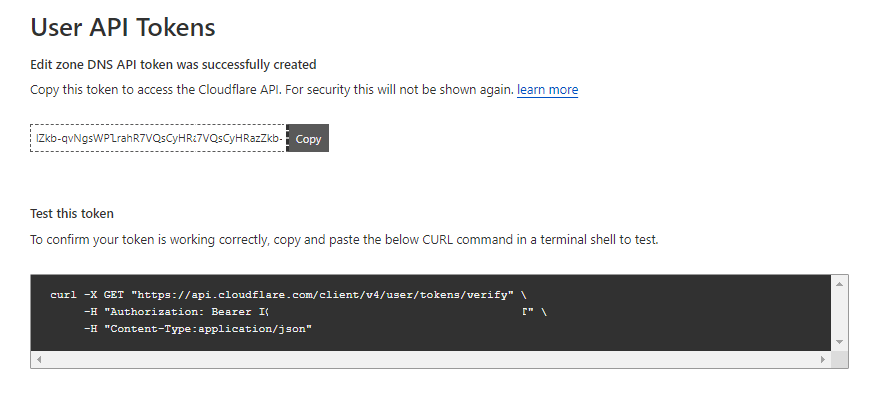
Figure 10. Copying API key on CLoudflare
-
Navigate to Services → Dynamic DNS → Settings on your OPNsense firewall.
-
Click Add button with
+icon at the right bottom of the Accounts tab. -
Ensure that Enabled option is checked.
-
Type a Description, such as
My DDNS from Cloudflare. -
Select the
Cloudflarefrom the Service drop-down menu. -
Leave the Username empty.
-
Paste the
Global API Keythat were copied from Cloudflare into the Password field. -
You may leave Wildcard unchecked. Enabling wildcard DNS on a dynamic DNS name will cause any host name searches inside the specified domain to resolve to the IP address of the dynamic DNS host name.
-
Type the domain part of the full hostname into the Zone, such as
myhome.net. -
Type the fully qualified domain names into the Hostname field, such as
vpn.myhome.net. -
Select Check ip method to specify the method used for determining the IP address of the host. You can set this option to
Interface, if your firewall is directly connected to the Internet. If your WAN interface has a private IP address, you may selectip4only.meoption. -
Select WAN for the Interface to monitor option. You may choose the suitable interface from the dropdown menu, if you own several WAN interfaces.
-
You may leave Check ip timeout option as default. It determines how long to wait before the checkip process times out.
-
You may select the Force SSL option depending on your dynamic DNS provider. You must disable this option if your provider is using HTTP.
-
Click Save.
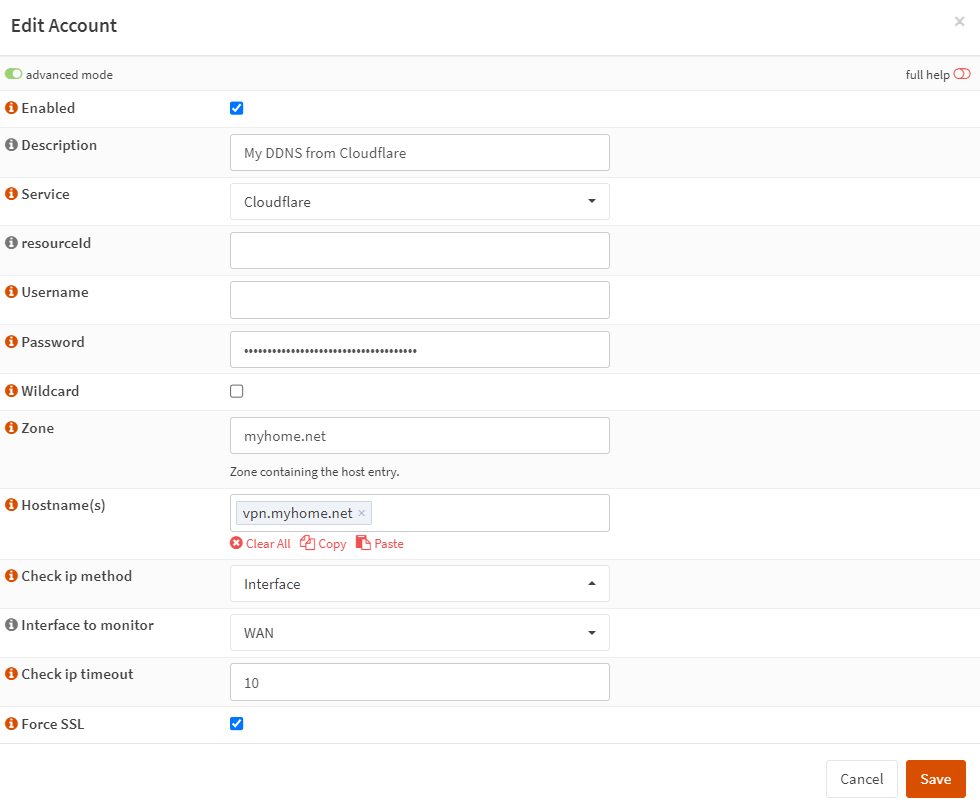
Figure 11. Dynamic DNS Account settings for Cloudflare on OPNsense
-
Click Apply to activate the settings.
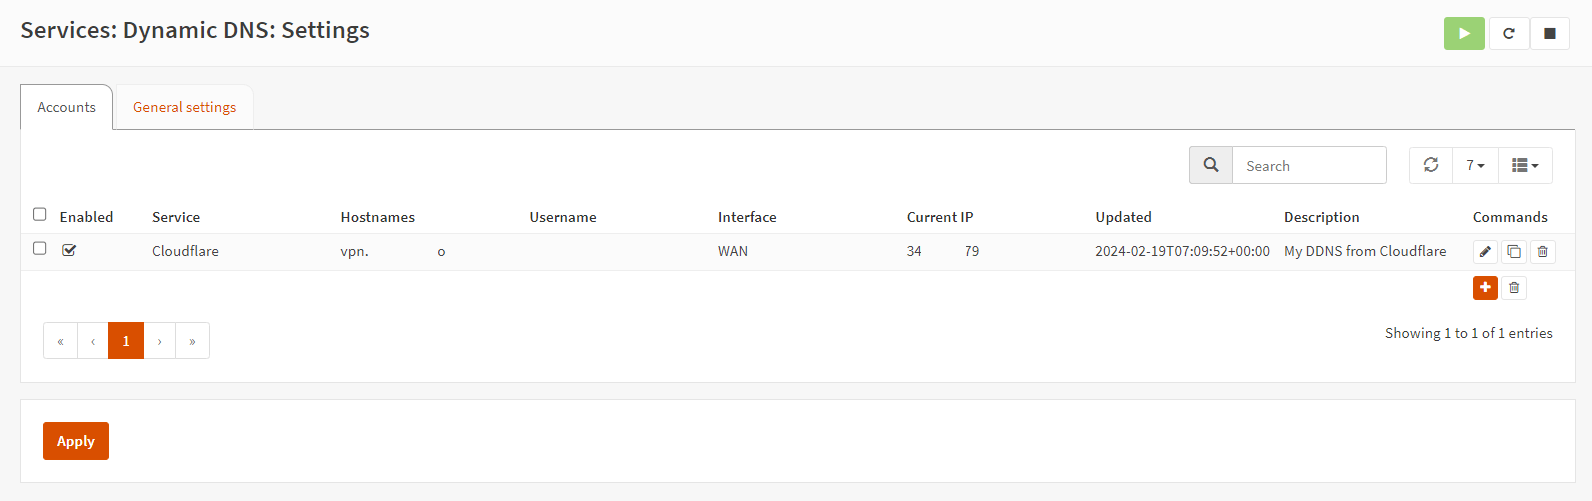
Figure 12. Viewing DDNS on OPNsense
OPNsense will verify the consistency of your IP and DNS entries every 5 minutes. If they are not the same, the DNS entry will be modified. You should see that Current IP field in Dynamic DNS Accounts page of your OPNsense is updated.
Also, Content field of your DNS record on Cloudflare will be updated.

Figure 13. Viewing DNS record on Cloudflare