How To Configure OPNsense Network Address Translation
Network address translation is the process of mapping one [Internet Protocol (IP) address] to another by modifying the header of IP packets while they are in transit across a router. As part of this technique, NAT settings can expose only one IP address for an entire network to the outside world, effectively masking the entire internal network and increasing security. Network address translation is widely used in remote-access scenarios because it conserves addresses while also increasing security. This improves security while also reducing the number of IP addresses required by a business.
Network Address Translation (NAT) is a method of separating external and internal networks (WANs and LANs) and sharing an external IP address among clients on the internal network. NAT can be used on both IPv4 and IPv6 networks. Network Prefix Translation is also available for IPv6.
In addition the its NAT features, OPNsense also provides next-generation firewall capabilities such as web control and application control. This is provided by an external tool called Zenarmor.
Zenarmor NGFW Plug-in for OPNsense is one of the most popular OPNsense plug-ins and allows you to easily upgrade your firewall to a Next Generation Firewall in seconds. NG Firewalls empower you to combat modern-day cyber attacks that are becoming more sophisticated every day.
Some of the capabilities are layer-7 application/user aware blocking, granular filtering policies, commercial-grade web filtering utilizing cloud-delivered AI-based Threat Intelligence, parental controls, and the industry's best network analytics and reporting.
Zenarmor Free Edition is available at no cost for all OPNsense users.
The majority of the options below make use of three distinct addresses: the source, destination, and redirect address. These addresses will be used for the following purposes:
| Address | Description |
|---|---|
| Source | From where the traffic is coming. This is frequently left on "any". |
| Destination | Where the traffic is going. This is typically your external IP address for incoming traffic from the outside world. |
| Redirect | Where traffic should be rerouted |
Disabling pf disables NAT on OPNsense.
-
BINAT: NAT typically operates in only one direction. But, if your networks are of equal size, you can also use bidirectional BINAT. This can help to simplify your setup. You can only use regular NAT if your networks are not of equal size.
-
NAT reflection: When a user on the internal network attempts to connect to a local server by using the external IP address rather than the internal one, NAT reflection can rewrite the request to use the internal IP address, avoiding a detour and applying rules designed for actual outside traffic.
-
Pool Options: When there are multiple IPs to choose from, this option allows you to control which IP is used. The default, Round Robin, simply sends packets to one server after another. This option has no effect if you only have one external IP address.
OPNsense firewall provides the following types of NAT configurations:
-
Port Forwarding NAT (DNAT)
-
One-to-One NAT (1:1 NAT)
-
Outbound NAT (SNAT)
In this article, we will cover all these NAT configurations on OPNsense shortly and give the following real-world examples.
-
Port forwarding configuration in OPNsense for a web server accessible from the Internet.
-
Port forwarding configuration in OPNsense for ssh and RDP servers accessible by a specific IP
-
Outbound NAT configuration in OPNsense for allowing specific local servers to access a remote service.
Configure Port Forwarding (DNAT)
OPNsense Port Forwarding is a utility that facilitates the routing of incoming internet traffic from external sources to particular devices on your local network. It enables you to provide hosting services for websites or games, allowing them to be accessed outside. Any connections to the internal network from the Internet are blocked on the OPNsense firewall by default. When an internal system behind a firewall needs to be configured for remote access, port forwarding NAT should be configured. You may use the OPNsense port forwarding feature to allow certain services(ports) from the external network.
Port forwarding is a method that allows for the configuration of certain destination ports to always be directed to specific nodes. Port forwarding approach enables full IP masquerading while maintaining the ability for services to respond to incoming traffic.
Port forwarding is also known as "Destination NAT" or "DNAT." When multiple servers in a LAN share the same external IP address, any connection that is not initiated by one of the servers will fail because the firewall will not know where to send the traffic. This can be remedied by establishing port forwarding rules. For example, to make your organization's web server behind the firewall accessible from the internet, you must redirect HTTP(s) ports (80/443) to the server.
To configure the port forwarding in OPNsense you may navigate to Firewall → NAT → Port Forward. An overview of port forwarding rules can be found here.

Figure 1. Port forwarding configuration in OPNsense
To add new port forwarding rules, you may click the + button in the upper right corner.
The following fields are available when adding a port forwarding rule on OPNsense:
| Option | Description |
|---|---|
| Disabled | Check this option to disable the rule without removing it. |
| No RDR (NOT) | Enabling this option prevents traffic matching this rule from being redirected and a redirect rule is not created. Hint: this option is rarely used; don't use it unless you're sure you know what you're doing. |
| Interface | Which interface the rule should apply to. The majority of the time, this will be WAN. |
| TCP/IP version | IPv4, IPv6 or both. |
| Protocol | In typical scenarios, this will be TCP |
| Source | Where the traffic comes from. Click Advanced to see the other source settings |
| Source / Invert | Invert match in Source field. |
| Source port range | When applicable, the source port on which we should match. This is almost always random and almost never equals the destination port range (and should almost always be 'any'). |
| Destination / Invert | Invert match in Destination field. |
| Destination | Where the traffic is going |
| Destination port range | Service port(s) the traffic is using. For this mapping, specify the port or port range for the packet's destination when using the TCP or UDP protocols. |
| Redirect target IP | Where to redirect the traffic to. Enter the internal IP address of the server to which the ports will be mapped. |
| Redirect target port | Which port to use (when using TCP and/or UDP). Enter the port number for the machine with the IP address you entered above. In the case of a port range, specify the range's starting port (the end port will be calculated automatically). |
| Pool Options | This option is explained in the previous section. The default is to use Round robin. Only Round Robin types are compatible with Host Aliases. Subnets of any type can be used. Round Robin: Iterates over the translation addresses. Random: Chooses an address at random from the translation address pool Source Hash: Determines the translation address by hashing the source address, ensuring that the redirection address is always the same for a given source. Bitmask: Uses the subnet mask while keeping the last portion the same; 172.16.10.50 → x.x.x.50. Sticky Address: When using the Random or Round Robin pool types, the Sticky Address option ensures that a specific source address is always mapped to the same translation address. |
| Description | A description to easily find the rule in the overview. |
| Set local tag | You can mark a packet matching this rule and use this mark to match on other NAT/filter rules. |
| Match local tag | Check for a tag set by another rule. |
| No XMLRPC sync | Prevent this rule from being synced to a backup host. (Checking this on the backup host has no effect.) |
| NAT reflection | This option is explained in the previous section. Leave this on the default unless you have a good reason not to. |
| Filter rule association | Associate this with a regular firewall rule. |

Configure One-to-one NAT
One-to-one NAT, as the name suggests, will translate two IP addresses one-to-one rather than one-to-many, as is more common.
To configure the One-to-One NAT in OPNsense you may navigate to Firewall → NAT → One-to-One. An overview of 1:1 NAT rules can be found here.

Figure 2. One-to-One NAT configuration in OPNsense
To add new One-to-One NAT rules, you may click the + button in the upper right corner.
The following fields are available when adding a 1:1 mapping rule:
| Option | Description |
|---|---|
| Disabled | Check this option to disable the rule without removing it. |
| Interface | Which interface the rule should apply to. The majority of the time, this will be WAN. |
| Type | BINAT (default) or NAT. |
| External network | Enter the starting address of the external subnet for the 1:1 mapping or network. If no subnet mask is provided, the subnet mask from the internal address below will be applied to this IP address. This is the address or network to/from which traffic will be translated. |
| Protocol | In typical scenarios, this will be TCP |
| Source | Enter the internal subnet for the 1:1 mapping. The subnet size specified for the source will be applied to the external subnet, when none is provided. |
| Source / Invert | Invert match in Source field. |
| Destination / Invert | Invert match in Destination field. |
| Destination | The destination network packages should match, when used to map external networks, this is usually any |
| Description | A description to easily find the rule in the overview. |
| NAT reflection | This option is explained in the previous section. Leave this on the default unless you have a good reason not to. |
Configure Outbound NAT (SNAT)
Outbound NAT is also known as Source NAT or SNAT. When a client on an internal network sends an outbound request, the gateway must change the source IP to the gateway's external IP, because the outside server will be unable to respond otherwise.
If you only have one external IP address, you should leave the Outbound NAT options set to automatic. If you have multiple IP addresses, however, you may want to change the settings and add some custom rules.
To configure the Outbound NAT in OPNsense you may navigate to Firewall → NAT → Outbound . An overview of outbound rules can be found here.

Figure 3. Outbound NAT configuration in OPNsense
The following modes are available for outbound NAT configuration in OPNsense:
| Outbound NAT Mode | Description |
|---|---|
| Automatic outbound NAT rule generation | The default and is good for most cases. |
| Manual outbound NAT rule generation | No automatic rules are generated. Outbound NAT rules are created manually. |
| Hybrid outbound NAT rule generation | Automatic rules are added, but manual rules can also be added. |
| Disable outbound NAT rule generation | Disables outbound NAT. This is used for transparent bridges, for example. |
To add new Outbound NAT rules, you may select either the Manual outbound NAT rule generation or Hybrid outbound NAT rule generation option and then click Save button.
New rules can be added, by clicking the + button in the upper right corner.
The following fields are available when adding an outbound rule:
| Option | Description |
|---|---|
| Disabled | Check this option to disable the rule without removing it. |
| Do not NAT | Enabling this option will disable NAT for traffic matching this rule and stop processing Outbound NAT rules.Hint: this option is rarely used; don't use it unless you're sure you know what you're doing. |
| Interface | Which interface the rule should apply to. The majority of the time, this will be WAN. |
| TCP/IP version | IPv4 or IPv6. |
| Protocol | In typical scenarios, this will be TCP |
| Source | The source network to match |
| Source / Invert | Invert match in Source field. |
| Source port range | When applicable, the source port on which we should match. This is almost always random and almost never equals the destination port range (and should almost always be 'any'). |
| Destination / Invert | Invert match in Destination field. |
| Destination | Enter the destination network for the outbound NAT mapping. |
| Destination port range | Service port the traffic is using. |
| Translation / target | Packets matching this rule will be mapped to the IP address given here.If you want this rule to apply to another IP address rather than the IP address of the interface chosen above, select it here (you will need to define Virtual IP addresses on the interface first). |
| Log | Put packets matching this rule in the logs. Use this sparingly to avoid overflowing the logs. |
| Pool Options | This option is explained in the previous section. The default is to use Round robin. Only Round Robin types are compatible with Host Aliases. Subnets of any type can be used. Round Robin: Iterates over the translation addresses.** Random:** Chooses an address at random from the translation address pool. Source Hash: Determines the translation address by hashing the source address, ensuring that the redirection address is always the same for a given source. Bitmask: Uses the subnet mask while keeping the last portion the same; 172.16.10.50 → x.x.x.50. Sticky Address: When using the Random or Round Robin pool types, the Sticky Address option ensures that a specific source address is always mapped to the same translation address. |
| Translation / port | Which port to use on the target |
| Static-port | Prevents pf(4) from modifying the source port on TCP and UDP packets. |
| Set local tag | Set a tag that other NAT rules and filters can check for. |
| Match local tag | Check for a tag set by another rule |
| No XMLRPC sync | Prevent this rule from being synced to a backup host. (Checking this on the backup host has no effect.) |
| Description | A description to easily find the rule in the overview. |
Configure NPTv6 for IPv6 Networks
Network Prefix Translation, abbreviated as NPTv6, is used to convert IPv6 addresses. A prevalent use for this is to convert global ("WAN") IP addresses to local ones. In this context, it resembles NAT; however, NPTv6 only allows one-to-one address mapping, in contrast to NAT, which often converts one external IP to several internal addresses.
NPTv6 routes may be found under Firewall > NAT > NPTv6. New regulations may be included by selecting Add in the top right corner. A brief summary of the fields for NPTv6 NAT is given below.
| Field | Description |
|---|---|
| Disabled | Deactivates this rule without necessitating its removal. |
| Interface | To which interface should this rule be applied? This will often be a WAN interface. |
| Internal IPv6 Prefix | The internal IPv6 prefix used inside the local area network(s). This will substitute the prefix of the destination address in incoming packets. The chosen prefix size will be applied to the external prefix. |
| External IPv6 Prefix | The external IPv6 prefix. This will substitute the prefix of the source address in outgoing packets. |
| Category | The category to which this rule pertains may serve as a filter in the overview. |
| Description | A description that enables the reader to quickly ascertain the purpose of this rule in the overview. |

Figure 4. Configuring NPTv6 for IPv6 Networks in OPNsense
Real-World Examples for NAT Configurations in OPNsense
In this section we will give some real world scenarios for NAT configuration on OPNsense firewall:
- Port Forwarding for Web Servers
- Port Forwarding for SSH and RDP Services on Custom Ports
- Outbound NAT for Accessing a Remote Service via External IP
How to Configure Port Forwarding For Web Services
Businesses that provide a service to their customers via the Internet must make their applications or web servers accessible from the Internet. Assume your company has two separate web servers in the DMZ network and one public IP address. Both the HTTP and HTTPS ports on these web servers should be accessible from anywhere in the world using the same public IP address. To accomplish this, you may define the port forwarding rules in your OPNsense. You may configure your rules in such a way that while requests coming to 80 and 443 ports are redirected to the first web server, the second web server is accessible via 81 and 8443 ports. For this configuration, you may follow the next steps below.
| Server Name | External IP | External Port | Local IP | Local Port |
|---|---|---|---|---|
| WebServer1 | Public Internet IP | 80 | 10.10.10.13 | 80 |
| WebServer1 | Public Internet IP | 443 | 10.10.10.13 | 443 |
| WebServer2 | Public Internet IP | 81 | 10.10.10.14 | 80 |
| WebServer2 | Public Internet IP | 8443 | 10.10.10.14 | 443 |

Figure 5. Port Forwarding topology for web services
After completing the port forwarding configurations on your OPNsense firewall, HTTP(80) and HTTPS(443) requests for your WAN IP will be redirected to the WebServer1(10.10.10.13), while port 81 and port 8443 requests for your WAN IP will be redirected to the WebServer2(10.10.10.14).
Port Forwarding For HTTPS(443) Service of WebServer1
You may follow the instructions below to add a port forwarding rule for HTTPS service of WebServer1.
-
Navigate to
Firewall→NAT→Port Forwardin your OPNsense Web UI. -
Click the
+button in the upper right corner. This will open the port forwarding configuration window.
Figure 5. Port forwarding rule configuration for HTTPS in OPNsense-1
-
Set the Interface to
WAN. -
Set the TCP/IP Version to
IPv4. -
Set the Protocol to
TCP. -
Set the Destination to
WAN Address. -
Set the Destination Port Range to
HTTPS. -
Select
Single Host or Networkfrom the Redirect Target IP dropdown menu. Then, set the field to the private IP address of the WebServer1, such as10.10.10.13. -
Set the Redirect Target Port to
HTTPS.
Figure 6. Port forwarding rule configuration for HTTPS in OPNsense-2
-
You may enable logging by clicking the check box in the Log option.
-
Fill in the Description field, such as
Allow HTTPS access to Webserver_10.10.10.13. -
Select
Add associated filter rulefrom the Filter rule association option. -
Leave other options as default.
-
Click
Savebutton at the bottom of the page.

Figure 7. Port forwarding rule configuration for HTTPS in OPNsense-3
Port Forwarding For HTTP(80) Service of WebServer1
To create a port forwarding rule for the HTTP(80) service of the WebServer1, you may clone the port forwarding rule for the HTTPS(443) service created above and change the related settings by following the step given below.

Figure 8. Port forwarding rules list in OPNsense
-
Click the clone icon to copy the port forwarding rule for the HTTPS(443) service created above.
-
Change the Destination Port Range option to
HTTP.
Figure 9. Port forwarding rule configuration for HTTP in OPNsense-1
-
Set the Redirect Target Port to
HTTP. -
Change the Description field to
Allow HTTP access to Webserver_10.10.10.13. -
Verify that the Filter rule association option is set to
Add associated filter rule -
Leave other options as they are.
-
Click
Savebutton at the bottom of the page.
Figure 10. Port forwarding rule configuration for HTTP in OPNsense-2
Port Forwarding For HTTP Service of WebServer2 on Custom External Port(81)
To create a port forwarding rule for the HTTP service of the WebServer2 on custom port(81), you may clone the port forwarding rule for the HTTP(80) service created above and change the related settings by following the step given below.
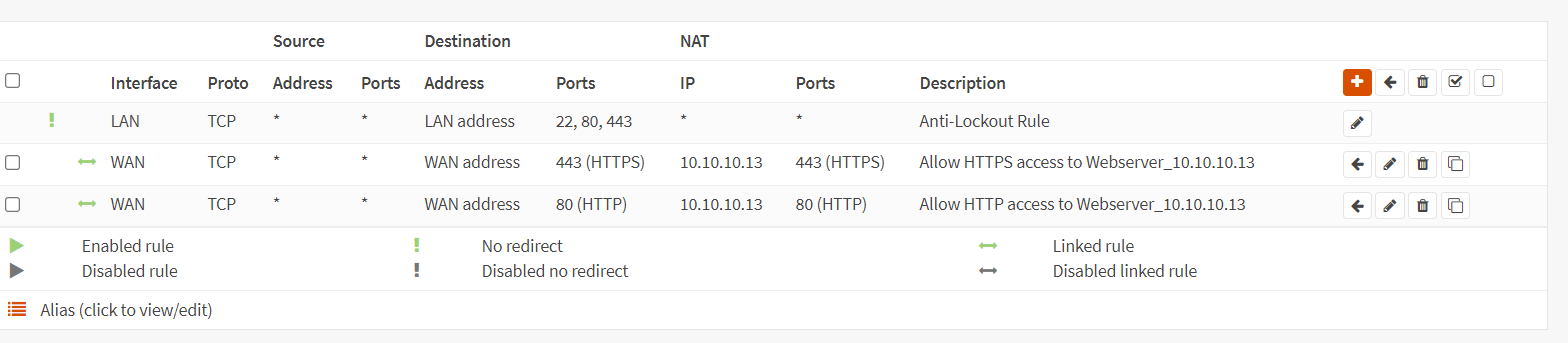
Figure 11. Port forwarding rules list in OPNsense
-
Click the clone icon to copy the port forwarding rule for the HTTP(80) service created above.
-
Change the Destination Port Range option to
otherand enter81to the related field.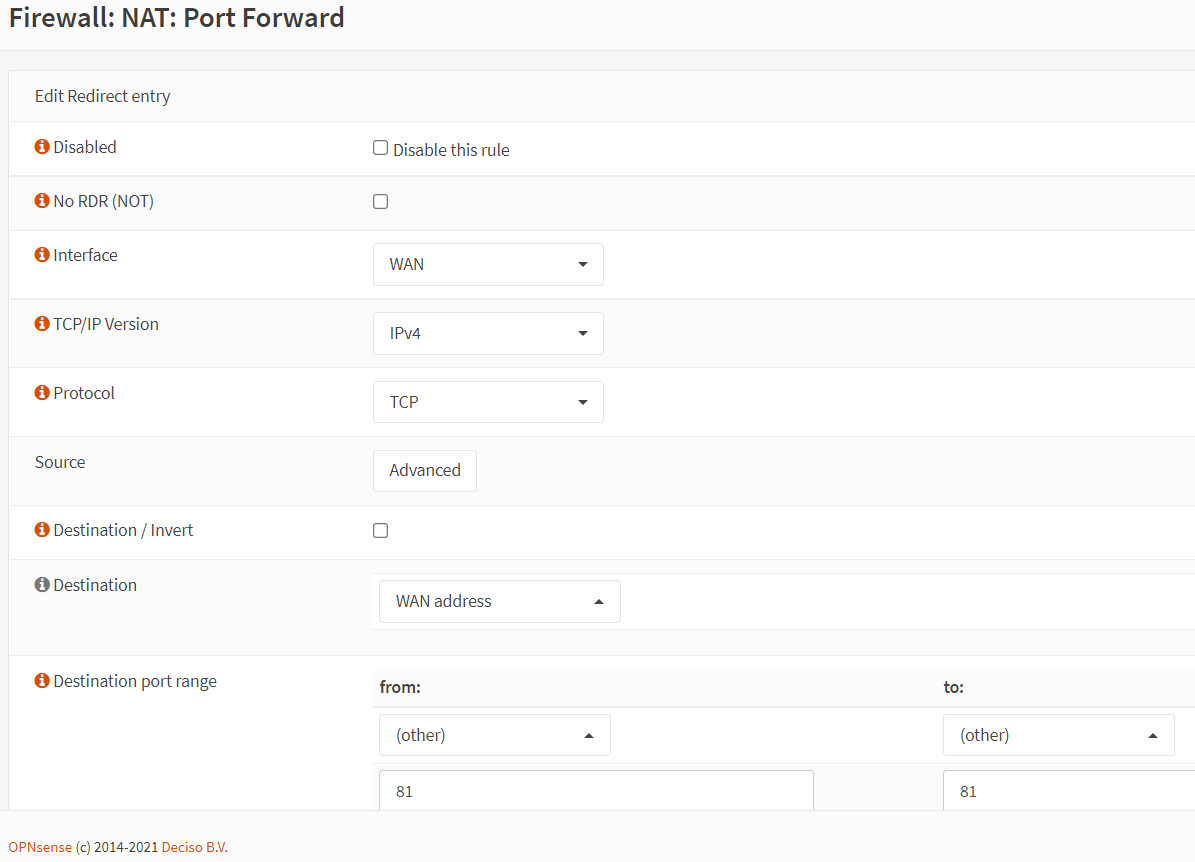
Figure 12. Port forwarding rule configuration for HTTP(81) in OPNsense-1
-
Set the Redirect Target IP to
10.10.10.14 -
Set the Redirect Target Port to
HTTP. -
Change the Description field to
Allow HTTP access to Webserver_10.10.10.14. -
Verify that the Filter rule association option is set to
Add associated filter rule -
Leave other options as they are.
-
Click
Savebutton at the bottom of the page. in OPNsense-2")
Figure 13. Port forwarding rule configuration for HTTP(81) in OPNsense-2
Port Forwarding For HTTPS Service of WebServer2 on Custom External Port (8443)
To create a port forwarding rule for the HTTPS service of the WebServer2 on a custom external port(8443), you may clone the port forwarding rule for the HTTP(81) service created above and change the related settings by following the step given below.

Figure 14. Port forwarding rules list in OPNsense
-
Click the clone icon to copy the port forwarding rule for the HTTP(81) service created above.
-
Change the Destination Port Range option to
8443. in OPNsense-1")
Figure 15. Port forwarding rule configuration for HTTP(8443) in OPNsense-1
-
Set the Redirect Target Port to
HTTPS. -
Change the Description field to
Allow HTTPS access to Webserver_10.10.10.14. -
Verify that the Filter rule association option is set to
Add associated filter rule -
Leave other options as they are.
-
Click
Savebutton at the bottom of the page. in OPNsense-2")
Figure 16. Port forwarding rule configuration for HTTP(8443) in OPNsense-2
Now, you have completed the port forwarding configurations of both web servers. Your port forwarding rules list should look like this.

Figure 17. Port forwarding rules list for web servers in OPNsense
-
Click
Apply Changesat the upper right of the page to activate the settings.infoSince we have selected the
Add associated filter ruleoption, the related firewall rules are created on the WAN interface automatically. To view the automatically added associated rules, navigate to theFirewall→Rules→WAN. Firewall rules list on WAN interfaces should look like this:
Figure 18. WAN firewall rules for web server port forwarding in OPNsense
tipAlthough internal users should access the web servers by connecting to the private IP address (local IP) of the servers, they may try to connect to a local server by using the public IP addresses. To allow local users to access the public IP addresses of these servers, you must allow the NAT reflection. For NAT reflection, first you should enable the NAT reflection by checking on the
Reflection for port forwardsoption on theFirewall→Settings→Advancedpage.
Figure 19. Enabling Reflection for port forwards
Then, you should select the interface where the local users are, such as LAN, as well as the WAN interface during the port forwarding rule configuration.

Figure 20. NAT reflection
Ensure that NAT reflection is enabled in the port forwarding rule configuration.

Figure 21. NAT reflection is enabled in port forwarding rule
How to Configure Port Forwarding For SSH and RDP Services on Custom Ports
Assume that a web administrator needs remote(SSH & RDP) access to the web servers from his home. He is using a static public IP address at home. Since management services such as SSH and RDP are critical and pose a high security risk, it is recommended that they are not accessible from the entire Internet. As a result, you will create a port forwarding rule to allow the web administrator's IP address to connect to the web servers. Also, because the default ports are already in use for accessing other servers, you must enable SSH and RDP services on custom ports.
| Server Name | External IP | External Port | Local IP | Local Port | Client IP |
|---|---|---|---|---|---|
| WebServer1 | Public Internet IP | 2222 | 10.10.10.13 | 22 | 1.1.1.1 |
| WebServer2 | Public Internet IP | 5555 | 10.10.10.14 | 3389 | 1.1.1.1 |

Figure 22. Port Forwarding topology for SSH and RDP services
After completing the port forwarding configurations in your OPNsense firewall, port 2222 requests coming from web administrator IP address(1.1.1.1) to your WAN IP will be redirected to the WebServer1(10.10.10.13), while port 5555 requests coming from web administrator IP address(1.1.1.1) to your WAN IP will be redirected to the WebServer2(10.10.10.14).
Port Forwarding For SSH Service of WebServer1 on Custom External Port(2222)
To create a port forwarding rule for the SSH service of the WebServer1 on custom port(2222), you may clone the port forwarding rule for the HTTP(80) service created above and change the related settings by following the step given below.
-
Click the clone icon to copy the port forwarding rule for the HTTP(80) service created above.
-
Click the
Advancedbutton in theSourceoption. This will displays the details of the Source option. -
Select
Single Host or Networkfrom the Source dropdown menu. -
Enter the Web Administrator's static public IP address, such as 1.1.1.1/32.
-
Leave Source Port Range as
any. in OPNsense-1")
Figure 23. Port forwarding rule configuration for SSH(2222) in OPNsense-1
-
Change the Destination Port Range option to
2222. -
Set the Redirect Target Port to
SSH. -
Change the Description field to
Allow SSH access to Webserver_10.10.10.13. in OPNsense-2")
Figure 24. Port forwarding rule configuration for SSH(2222) in OPNsense-2
-
Verify that the Filter rule association option is set to
Add associated filter rule -
Leave other options as they are.
-
Click
Savebutton at the bottom of the page. in OPNsense-3")
Figure 25. Port forwarding rule configuration for SSH(2222) in OPNsense-3
Port Forwarding For RDP Service of WebServer2 on Custom External Port(5555)
To create a port forwarding rule for the RDP service of the WebServer2 on custom port(5555), you may clone the port forwarding rule for the SSH(2222) service created above and change the related settings by following the step given below.
-
Click the clone icon to copy the port forwarding rule for the SSH(2222) service created above in the port forward rules list.
-
Change the Destination Port Range option to
5555. -
Set the Redirect Target IP to WebServer2 local IP address, such as 10.10.10.14.
-
Set the Redirect Target Port to
MS RDP. -
Change the Description field to
Allow RDP access to Webserver_10.10.10.14. in OPNsense-1")
Figure 26. Port forwarding rule configuration for MS-RDP(5555) in OPNsense-1
-
Verify that the Filter rule association option is set to
Add associated filter rule -
Leave other options as they are.
-
Click
Savebutton at the bottom of the page. in OPNsense-3")
Figure 27. Port forwarding rule configuration for SSH(2222) in OPNsense-3
Now, you have completed the port forwarding rule configurations of both management services. Your port forwarding rules list should look like this.

Figure 28. Port forwarding rules list for web servers in OPNsense
-
Click
Apply Changesat the upper right of the page to activate the settings.infoSince we have selected the
Add associated filter ruleoption, the related firewall rules are created on the WAN interface automatically. To view the automatically added associated rules, navigate to theFirewall→Rules→WAN. Firewall rules list on WAN interfaces should look like this:
Figure 29. WAN firewall rules for SSH and RDP access in OPNsense
Outbound NAT For Accessing a Remote Service Via Specific External IP Address
Assume that one of your application servers (WebServer1 with the IP address 10.10.10.13) needs to connect to a MySQL database on another company network via the Internet. However, in accordance with the agreements between your company and the other company, you must ensure that the remote MySQL DB server(public IP address: 3.3.3.3) is only accessible by WebServer1 and that no other devices in your LAN can access the remote DB.
To accomplish this, firstly you need a second public IP address which will be used for providing WebServer1 access to the remote MySQL database. Because, your first public IP address is being used for Internet access of the local users and servers. We will use the 2.2.2.2 as our second IP address and WebServer1 will connect to the remote MySQL database with this external IP address.
| Packet Type | Source IP Before NAT | Destination IP Before NAT | Source IP After NAT | Destination IP After NAT |
|---|---|---|---|---|
| MySQL Request | 10.10.10.13 | 3.3.3.3 | 2.2.2.2 | 3.3.3.3 |
| MySQL Reply | 3.3.3.3 | 2.2.2.2 | 3.3.3.3 | 10.10.10.13 |

Figure 30. Outbound NAT/SNAT topology for accessing remote Database server
You may follow the next steps given below:
-
Define an alias, such as
RemoteCompany_DB. For more information about creating an alias, please refer to How to Configure OPNsense Firewall article. -
To create a Virtual IP address for your second public IP address, navigate to the
Interfaces→Virtual IPs→Settings. -
Click the
+icon to add Virtual IP address.
Figure 31. Adding Virtual IP address in OPNsense
-
Select
IP Aliasas Mode. -
Select
WANas Interface. -
Set Address to your second public IP address which is used for accessing the database server by your WebServer1, such as
2.2.2.2/32 -
Enter
WAN VIP_2.2.2.2in the Description field. -
Leave other options as default.
-
Click
Save.
Figure 32. Setting Virtual IP address configuration in OPNsense
-
Click
Apply Changesto activate the VIPs settings.
Figure 33. Virtual IP address settings in OPNsense
-
Navigate to the
Firewall→NAT→Outboundto define Outbound NAT. -
Select
Hybrid outbound NAT rule generationoption. -
Click
Savebutton.
Figure 34. Setting Outbound NAT mode in OPNsense
-
Click
+icon to add a manual Outbound NAT rule. -
Set Interface to
WAN. -
Set TCP/IP Version to
IPv4. -
Set Protocol
TCP. -
Set Source add to
Single Host or Network -
Enter the WebServer1 IP address such as
10.10.10.13/32. -
Set Source Port to
any.
Figure 35. Defining Outbound NAT rule in OPNsense -1
-
Select Destination Address as
RemoteCompany_DB. -
Select Destination Port as
MySQL. -
Select
2.2.2.2 (WAN IP_2.2.2.2)for Translation / target -
Enable Logging.

Figure 36. Defining Outbound NAT rule in OPNsense -2
-
Enter
Remote MySQL DB accessin Description field. -
Click
Save -
Click
Apply Changesto activate the Outbound NAT rule.
Your Outbound NAT rules list should look something like this:
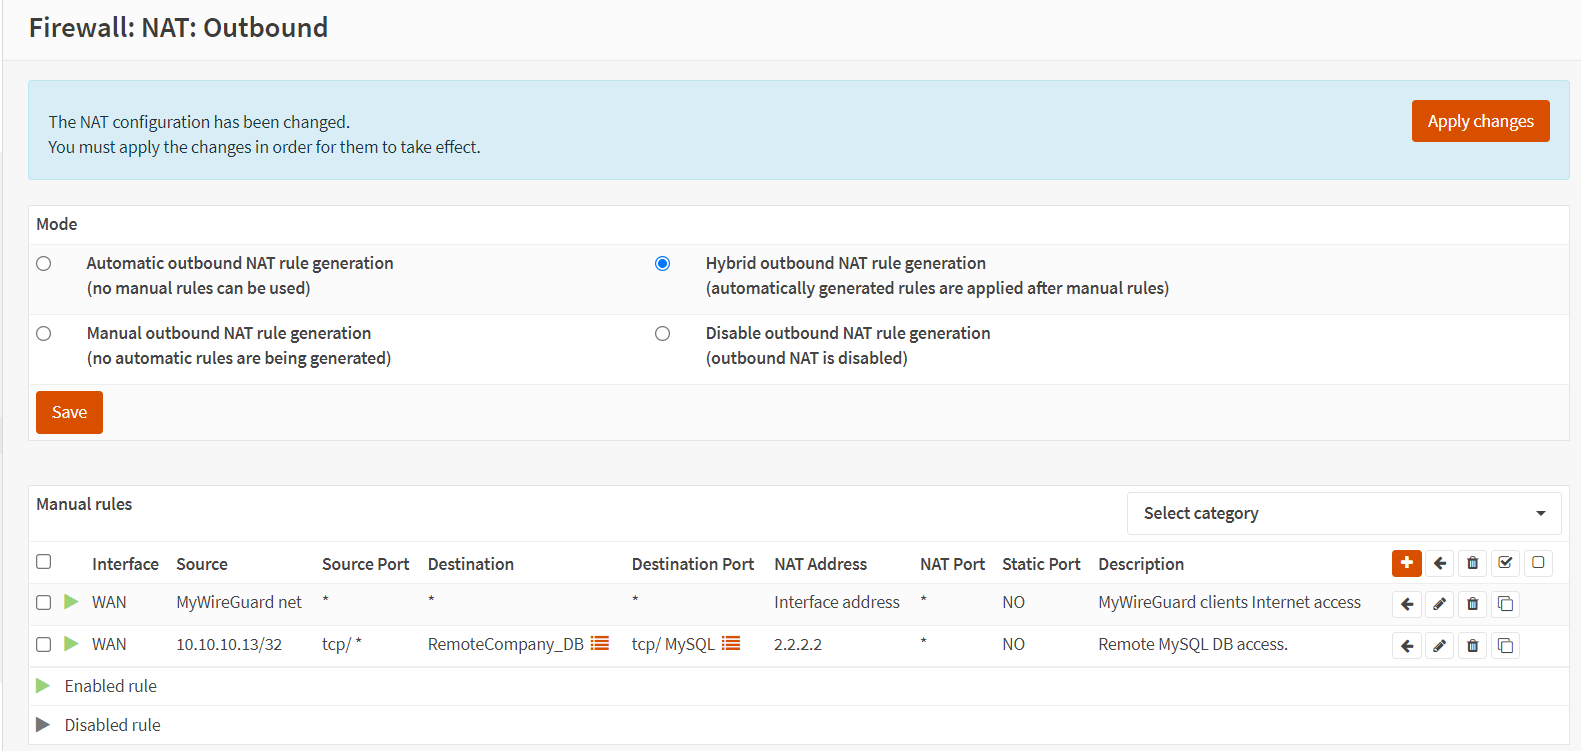
Figure 37. Manual Outbound NAT rules in OPNsense
When WebServer1 tries to connect to a remote database server, you should see that it connects the DB using 2.2.2.2 IP address in your firewall logs. To view the firewall logs navigate to Firewall → Log Files → Live View. Your logs look like this.

Figure 38. Firewall Live Log View in OPNsense
What is the Importance of the OPNSense NAT Configuration?
The configuration of NAT (Network Address Translation) in OPNsense is of the utmost importance, as it regulates the communication between your internal network and external networks (such as the Internet). Secure, reliable, and efficient network communication is guaranteed by the proper configuration of NAT.
The primary explanations for the significance of NAT configuration in OPNsense are given below.
- Enabling Internet Access for Internal Networks: NAT enables multiple devices within your internal network to share a single public IP address that is assigned by your Internet Service Provider (ISP). Each device would necessitate its own public IP address, which is both impractical and expensive in the absence of NAT.
- Service Accessibility and Port Forwarding: NAT allows for the establishment of Port Forwarding protocols, which enables external users to securely access services hosted internally (e.g., web servers, VPN servers, gaming servers). The proper configuration of NAT guarantees that only authorized traffic reaches your internal servers.
- Privacy and Security: NAT inherently offers a layer of security by concealing internal IP addresses from external networks. Your network is rendered less susceptible to external threats by the fact that attackers are unable to directly observe or access your internal devices.
- Streamlined Network Administration: NAT facilitates network management by reducing the intricacy of IP addressing schemes within your internal network. It simplifies the process of administering and maintaining your network infrastructure.
- Failover and Load Balancing: OPNsense's NAT feature can be configured to distribute network traffic across multiple WAN connections, thereby enhancing reliability and redundancy. It enables automatic failover, which guarantees uninterrupted internet connectivity in the event of a single connection failure.
- Policy Enforcement and Compliance: The NAT configuration enables the enforcement of network policies, the restriction of network access, and the fulfillment of regulatory or organizational requirements. Security and compliance can be improved by establishing policies that authorize or prohibit particular traffic.
- Network Traffic Management: NAT is responsible for the efficient management and routing of network traffic, ensuring that data messages reach their intended destinations. It enables the configuration of specific behaviors for inbound and outbound traffic, thereby enhancing the reliability and performance of the network.
- Monitoring and Logging: OPNsense's NAT feature offers network traffic visibility through archiving and monitoring capabilities. You can effectively troubleshoot network issues, identify potential security hazards, and monitor and audit network activity.
How does Port Forwarding Work in OPNSense?
In OPNsense, port forwarding enables you to redirect incoming network traffic from one port to another on your internal network, or from one IP address to another. It is frequently employed to facilitate external access to services that are operating on devices within your private network, including web servers, gaming servers, and remote desktop access. Port forwarding in OPNsense operates as follows:
-
Incoming Traffic: Traffic is directed to your public IP address on a specific port and arrives at your OPNsense firewall/router from the internet.
-
Firewall NAT Rules: OPNsense evaluates its NAT (Network Address Translation) rules to ascertain whether the incoming traffic corresponds to any configured port forwarding rule.
-
Port Forwarding Rule Matching: OPNsense forwards traffic to the specified internal IP address and port on your private network if a matching rule is found.
-
Traffic Routing: The internal device receives the traffic, processes the request, and responds to the firewall/router.
-
Reverse NAT: OPNsense subsequently performs reverse NAT, rewriting the source address of the reply packets to your public IP address before transmitting them back to the original external sender.
Assume that a web server is operating on your internal network at IP 192.168.1.100 and is listening on port 80. You desire that external users have access to this web server via port 8080 on your public IP address. Port forwarding would operate as follows in this scenario.
| Internal Server | OPNSense Firewall | External Request |
|---|---|---|
User > Public IP:8080 | > NAT Rule forwards traffic to > | 192.168.1.100:80 |
User < Response | < NAT Rule translates response < | 192.168.1.100 |
While configuring port forwarding on your OPNsense consider that OPNsense generates firewall rules for port forwarding automatically. Nevertheless, it is imperative to consistently confirm that the rules are being applied accurately by navigating to Firewall > Rules > WAN. Secondly, you should only forward ports that are required; superfluous open ports can pose security hazards.Lastly, utilize online tools or external networks to verify the port forwarding configuration.
How to Troubleshoot Outbound NAT Problems on OPNsense?
When your OPNsense Outbound NAT is not working as expected, you may consider the following troubleshooting steps:
- Check Firewall Rules: Ensure that the firewall rules for outbound traffic are correctly configured. Verify that the rules allow traffic from the desired source and destination, and that the correct outbound NAT mode is selected.
- Review NAT Configuration: Double-check the outbound NAT configuration, including the interface assignments and the source/destination rules. Ensure that the NAT mode is set to "Automatic" or "Manual" as needed.
- Verify Interface Configuration: Confirm that the interface settings for the WAN and LAN interfaces are accurate, including the IP addresses, subnet masks, and default gateways.
- Check DNS Resolution: Verify that DNS resolution is working correctly on the OPNsense firewall. If DNS is not resolving properly, outbound NAT may not function as expected.