How to Configure DoT on OPNsense Firewall?
OPNsense is a FreeBSD-based, open-source routing and firewall application that additionally functions as a DNS resolver for all your mobile devices and desktops. However, all DNS queries are routed in plaintext. Your ISP or a hacker can intercept transmissions via UDP and TCP protocol 53 in plaintext to compromise the site's DNS queries and responses. For this reason, we must encrypt our DNS queries for security purposes. DNS over TLS (DoT) is a security protocol that utilizes Transport Layer Security (TLS) to encrypt DNS traffic and one of the most common DNS security solutions. The primary aim is to enhance one's security and privacy. A few advantages of DNS over TLS are as follows:
- Prevent DNS manipulation.
- Eliminate man-in-the-middle attacks.
- Prevent espionage.

Figure 1. DNS over TLS
This tutorial will teach you how to configure the OPNsense DNS resolver to encrypt all DNS queries in order to prevent surveillance and enhance your online privacy and security. You may easily configure DoT on OPNsense firewall by following three main steps:
- Enabling DoT on OPNsense
- Configuring DNS and DHCP Server
- Verifying DoT Configuration
Many security experts recommend using your own recursive DNS resolver, such as the default setup of Unbound in OPNsense, to enhance privacy and security. It utilizes the decentralized structure of DNS.

1. Enabling DoT on OPNsense
The OPNSense firewall utilizes Unbound DNS, developed by NLnet Labs, as its default DNS provider, which is pre-installed and activated by default.
Unbound DNS is a comprehensive DNS resolver capable of establishing direct communication with DNS root servers on the internet. Unbound DNS provides validating, recursive, and caching DNS capabilities, which are superior to the standard DNS forwarders found in normal routers.
To configure and enable DoT on the OPNsense firewall, you may follow the next steps:
-
Navigate to the Services → Unbound DNS → DNS over TLS on your OPNsense web UI.
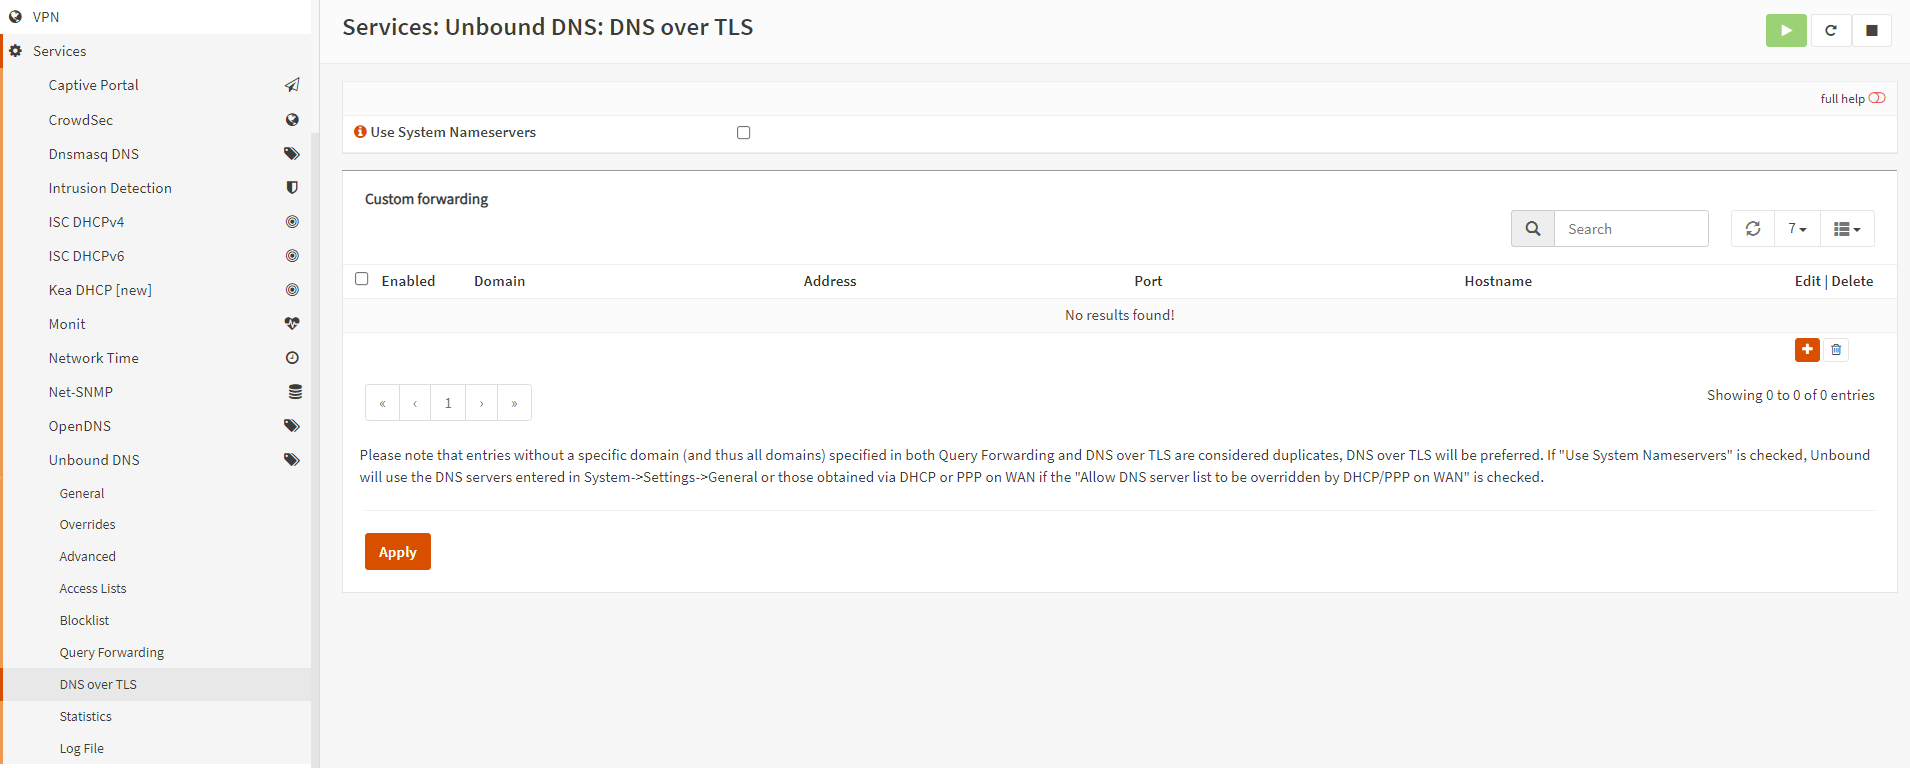
Figure . Unbound DNS: DNS over TLS settings
-
Click Add button with
+icon at the right bottom of the pane. -
Ensure that Enabled option is checked.
-
You may left Domain field empty. By default leaving this field empty will direct all queries to the designated server. Entering a domain in this field will result in directing inquiries for that particular domain to the selected server.
-
Enter the IP address of the DNS server to forward all requests, such as
8.8.8.8. -
Set Server Port to
853for DoT. -
Type the Common Name of the DNS server (e.g. dns.google.com) into to Verify CN field to verify its TLS certificate. DNS-over-TLS is vulnerable to man-in-the-middle attacks unless the authenticity of certificates can be confirmed. You may leave the field blank to accept self-signed certificates, which may be fraudulent.
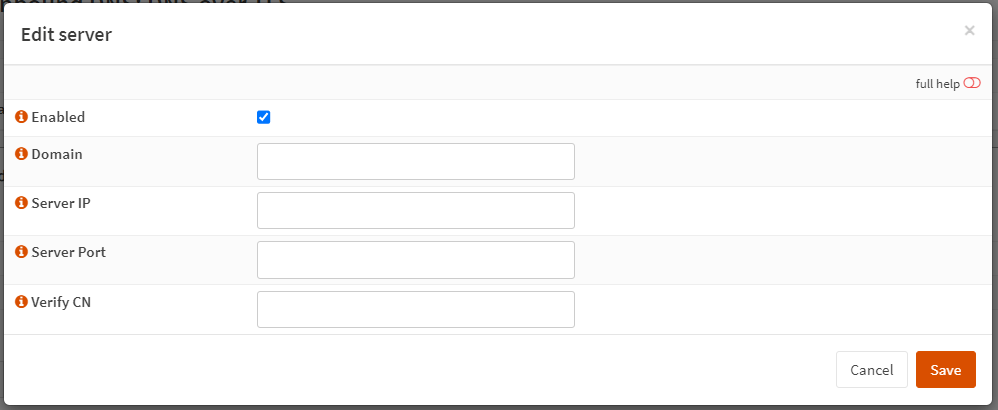
Figure 3. Adding DNS over TLS server
-
Click Save.
-
You may add an IPv6 DNS server as a secondary DNS resolver.
-
Click Apply to activate the settings.
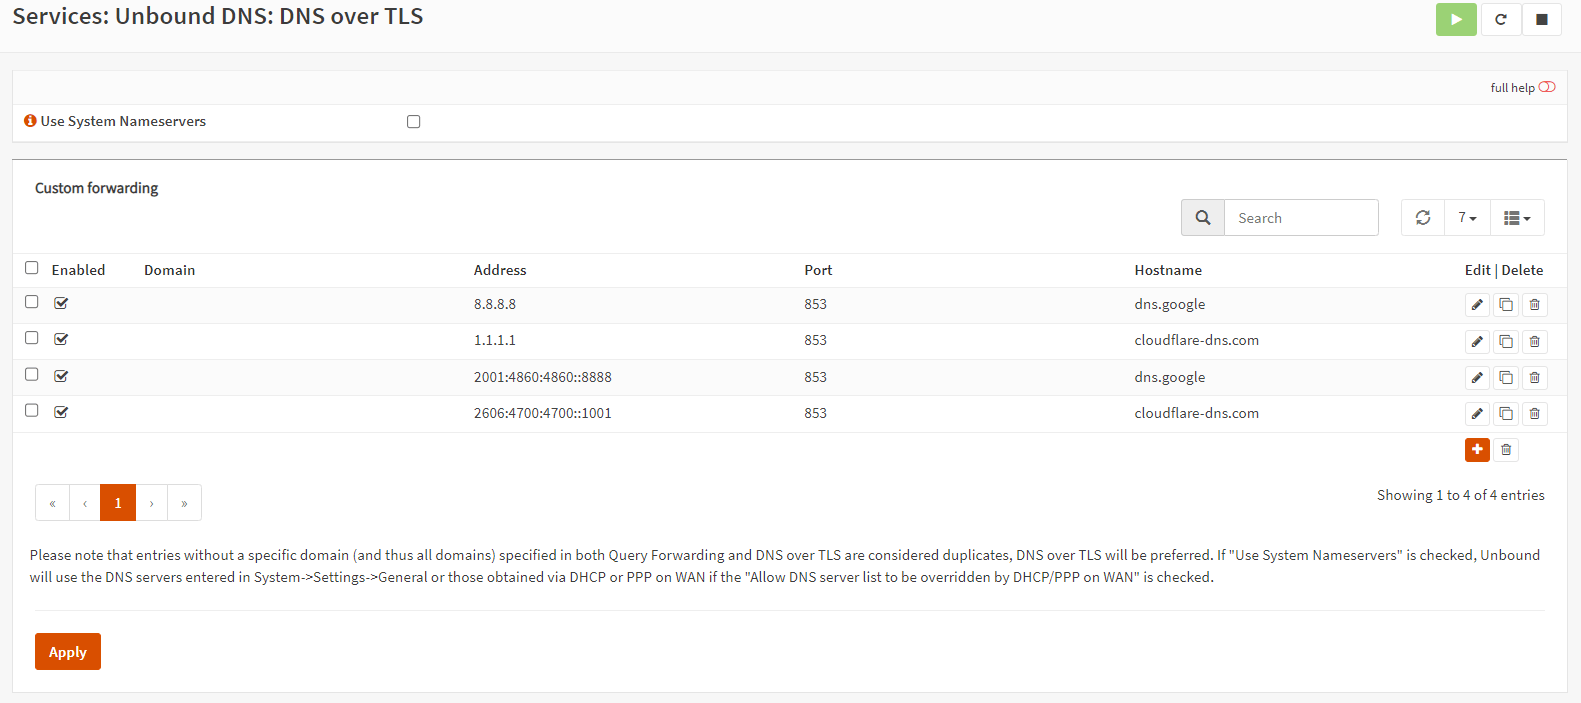
Figure 4. DNS over TLS servers list on OPNsense
2. Configuring DNS and DHCP Server
To able to force all clients on your network to use DoT servers you defined above, you must configure your DNS and DHCP servers properly. You may configure DNS and DHCP services on OPNsense by following the next steps:
-
Navigate to System → Settings → General on the left-side menu.
-
Make sure that all fields for DNS Servers are empty. This is done to guarantee that the DNS traffic is redirected back to the router.
-
Uncheck
Allow DNS server list to be overridden by DHCP/PPP on WANfor DNS server options. If this setting is enabled, the DNS servers provided by a DHCP/PPP server on the Wide Area Network (WAN) will be used for their intended functions, such as providing DNS services.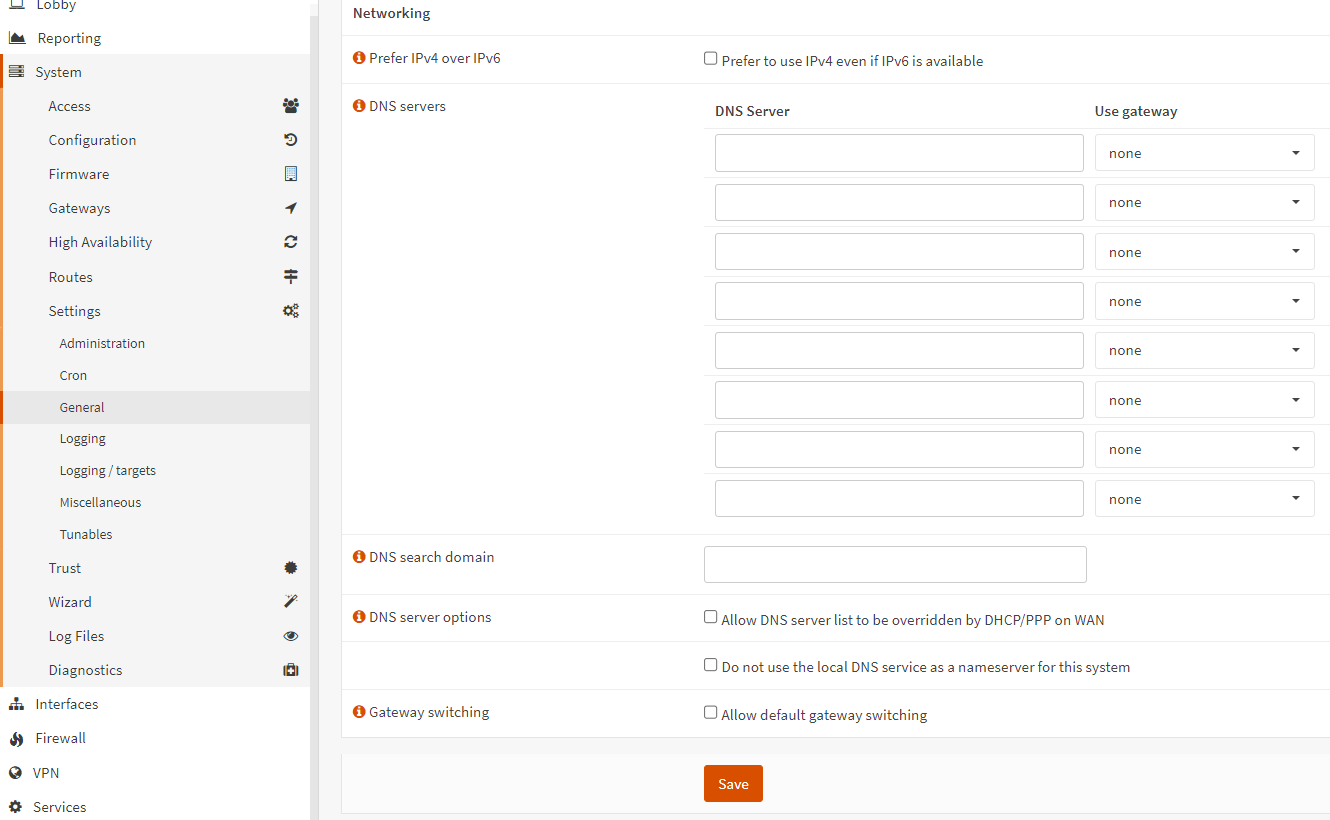
Figure 5. DNS servers settings on OPNsense
-
Click Save.
-
Navigate to the Services → ISC DHCPv4 → LAN on your OPNsense web UI.
-
Ensure that DNS Servers fields are empty. We must use the system default DNS servers.
-
Click Save and then click the refresh button at the top right corner if the setting is changed.
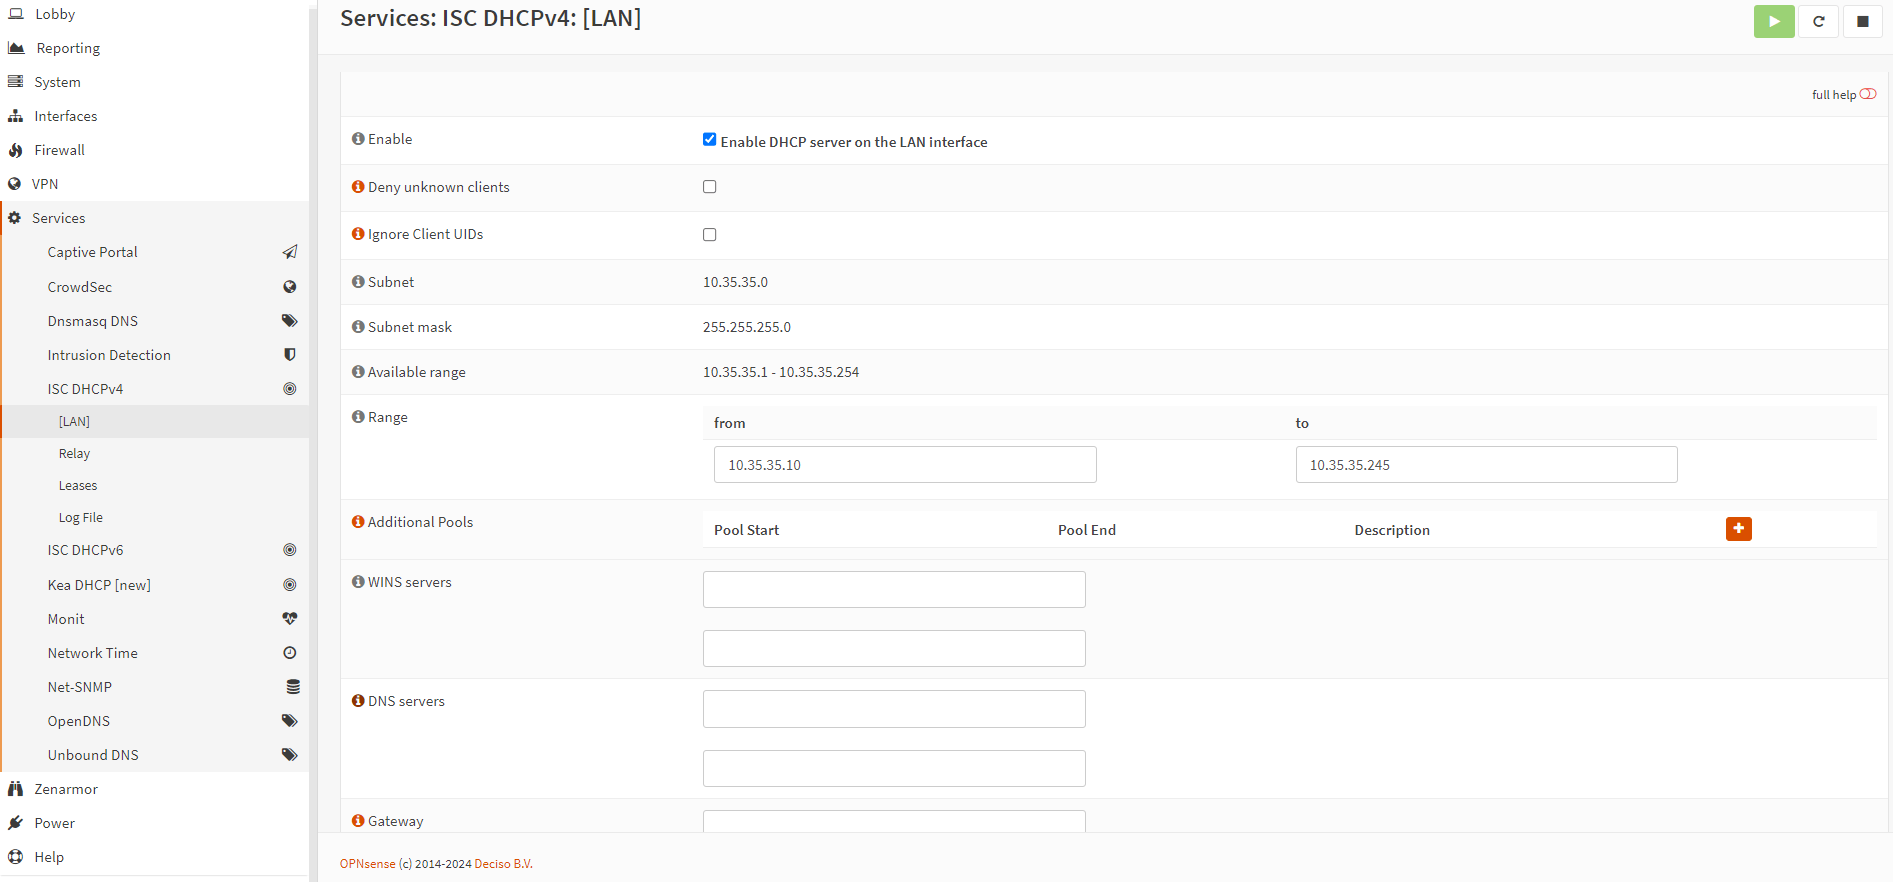
Figure 6. DHCP server settings on OPNsense
In order to provide a secure and verified environment, it is advisable to use a firewall rule to prohibit any outgoing DNS traffic on port 53 when using DNS over TLS. If clients choose to directly query other nameservers on their own, a NAT redirect rule can be used to send these requests to 127.0.0.1:53, which is the local Unbound service. This will ensure that these requests are sent over TLS.
What are the Public DNS Resolvers?
You may use the following Public DNS resolvers for your DoT configuration on OPNsense firewall.
| Hosted by | Server IP | Server Port | Verify CN |
|---|---|---|---|
| 8.8.8.8 | 853 | dns.google | |
| 8.8.4.4 | 853 | dns.google | |
| 2001:4860:4860::8888 | 853 | dns.google | |
| 2001:4860:4860::8844 | 853 | dns.google | |
| Cloudflare | 1.1.1.1 | 853 | cloudflare-dns.com |
| Cloudflare | 1.0.0.1 | 853 | cloudflare-dns.com |
| Cloudflare | 2606:4700:4700::1111 | 853 | cloudflare-dns.com |
| Cloudflare | 2606:4700:4700::1001 | 853 | cloudflare-dns.com |
| Cloudflare Security | 1.1.1.2 | 853 | security.cloudflare-dns.com |
| Cloudflare Security | 1.0.0.2 | 853 | security.cloudflare-dns.com |
| Cloudflare Security | 2606:4700:4700::1112 | 853 | security.cloudflare-dns.com |
| Cloudflare Security | 2606:4700:4700::1002 | 853 | security.cloudflare-dns.com |
| Cloudflare Family | 1.1.1.3 | 853 | family.cloudflare-dns.com |
| Cloudflare Family | 1.0.0.3 | 853 | family.cloudflare-dns.com |
| Cloudflare Family | 2606:4700:4700::1113 | 853 | family.cloudflare-dns.com |
| Cloudflare Family | 2606:4700:4700::1003 | 853 | family.cloudflare-dns.com |
| Quad9 | 9.9.9.9 | 853 | dns.quad9.net |
| Quad9 | 149.112.112.112 | 853 | dns.quad9.net |
| Quad9 | 2620:fe::fe | 853 | dns.quad9.net |
| Quad9 | 2620:fe::9 | 853 | dns.quad9.net |
| AdGuard DNS | 94.140.14.14 | 853 | dns.adguard-dns.com |
| AdGuard DNS | 94.140.15.15 | 853 | dns.adguard-dns.com |
| AdGuard Family Protection DNS | 94.140.14.15 | 853 | family.adguard-dns.com |
| AdGuard Family Protection DNS | 94.140.15.16 | 853 | family.adguard-dns.com |
| CleanBrowsing DNS | 185.228.168.168 | 853 | family-filter-dns.cleanbrowsing.org |
| CleanBrowsing DNS | 185.228.169.168 | 853 | family-filter-dns.cleanbrowsing.org |
Table 1. Public DoT DNS Resolvers
3. Verifying DoT Configuration
You may verify your DoT settings on OPNsense in 3 different ways:
- Using tcpdump
- Viewing Unbound DNS logs
- Connecting to Cloudflare DoT Test page
1. Using tcpdump
To verify that OPNsense is currently transmitting your queries using DNS over TLS, you may do a packet capture via the OPNsense command line:
tcpdump -i vtnet0 port 853
You should see the output similar to the below:
tcpdump: verbose output suppressed, use -v or -vv for full protocol decode
listening on vtnet0, link-type EN10MB (Ethernet), capture size 262144 bytes
12:11:49.725590 IP 192.168.0.31.61795 > dns.google.domain-s: Flags [P.], seq 462163878:462164030, ack 4235244077, win 519, options [nop,nop,TS val 2361809916 ecr 3152845993], length 152
12:11:49.756681 IP dns.google.domain-s > 192.168.0.31.61795: Flags [.], ack 152, win 1045, options [nop,nop,TS val 3152863341 ecr 2361809916], length 0
12:11:49.756697 IP 192.168.0.31.61795 > dns.google.domain-s: Flags [P.], seq 152:304, ack 1, win 519, options [nop,nop,TS val 2361809946 ecr 3152863341], length 152
12:11:49.787748 IP dns.google.domain-s > 192.168.0.31.61795: Flags [.], ack 304, win 1045, options [nop,nop,TS val 3152863373 ecr 2361809946], length 0
12:11:49.790739 IP dns.google.domain-s > 192.168.0.31.61795: Flags [P.], seq 1:493, ack 304, win 1045, options [nop,nop,TS val 3152863376 ecr 2361809946], length 492
12:11:49.790757 IP 192.168.0.31.61795 > dns.google.domain-s: Flags [.], ack 493, win 516, options [nop,nop,TS val 2361809986 ecr 3152863376], length 0
12:11:49.815496 IP dns.google.domain-s > 192.168.0.31.61795: Flags [P.], seq 493:985, ack 304, win 1045, options [nop,nop,TS val 3152863400 ecr 2361809946], length 492
12:11:49.815511 IP 192.168.0.31.61795 > dns.google.domain-s: Flags [.], ack 985, win 515, options [nop,nop,TS val 2361810006 ecr 3152863400], length 0
2. Viewing Unbound DNS logs
Moreover, you may check the Unbound DNS logs to see if DNS queries are being sent over port 853. You may follow the next steps to verify the DoT configuration on your OPNsense by viewing the Unbound DNS logs:
-
Navigate to the Services → Unbound DNS → Advanced on your OPNsense web UI.
-
Scroll down to the Logging Settings pane.
-
Enable Log Queries option. This will print one line per query to the log, with the log timestamp and IP address, name, type and class. Notably, the server becomes (substantially) slower as the printing of these lines requires time.
-
Select
Level 2for the Log Level Verbosity option that will give detailed operational information.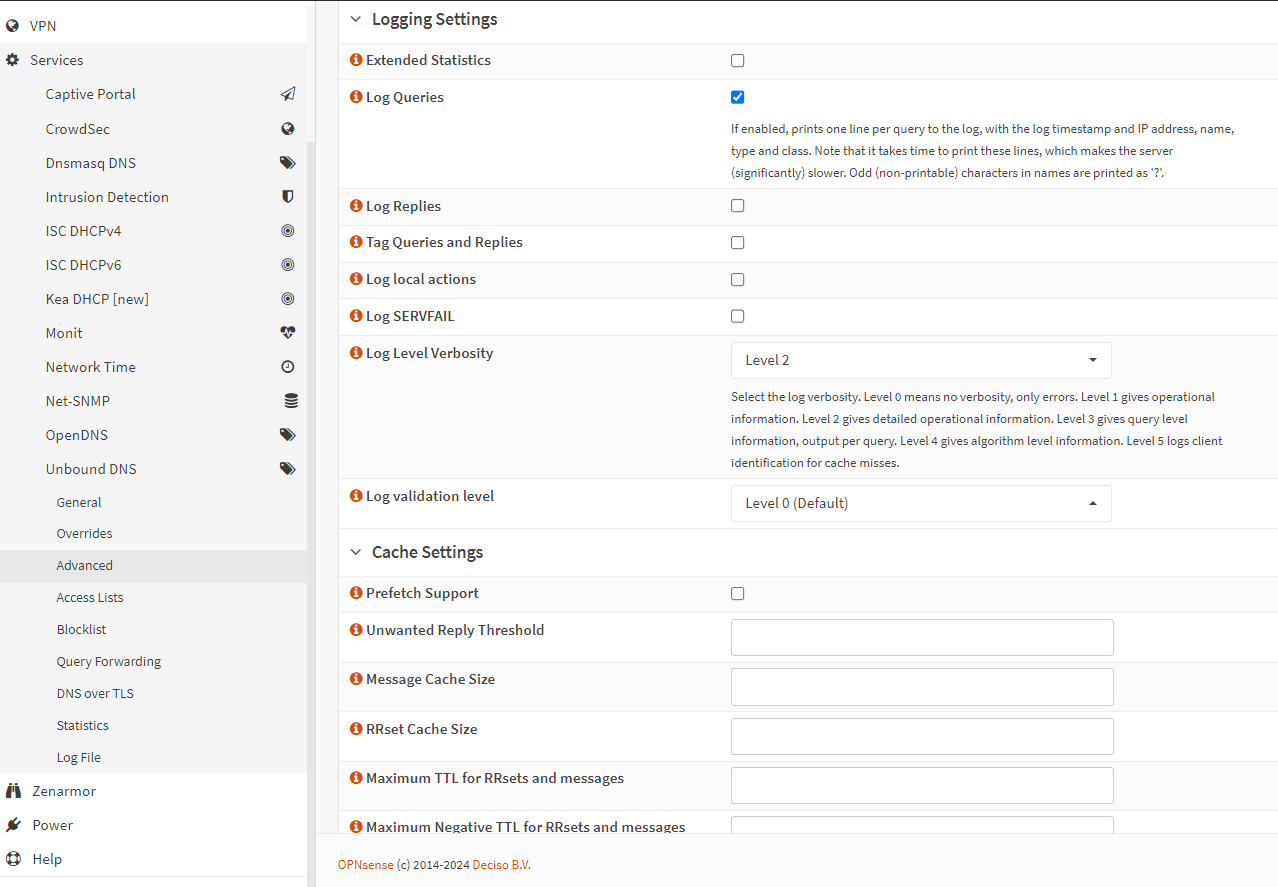
Figure 7. Unbound DNS Logging Settings on OPNsense
-
Click Apply at the bottom of the page to activate the settings.
-
Navigate to the Services → Unbound DNS → Log File.
-
You may type
853in to the search box. You should see the replies coming from the configured DNS resolver via port 853.
Figure 8. Viewing Unbound DNS Logs on OPNsense
3. Connecting to Cloudflare DoT Test Page
Lastly, Cloudflare provides a portal on their https://1.1.1.1/help website that allows Cloudflare users to verify whether they are presently utilizing DNS over TLS (DoT) or DNS over HTTPS (DoH). If you are using Cloudflare DoT servers, you may connect the test website and then should see the page similar to the below. Using DNS over TLS (DoT) option should be Yes in Debug Information table.

Figure 9. Cloudflare DoT Test Page