How to Change a Self-Signed Certificate with a CA-Signed Certificate on OPNsense?
Public Key Infrastructure utilizing X.509 (PKIX) certificates is implemented for various objectives, with domain name authentication being the most prominent among them. Therefore, within the Web PKI, the responsibility of ensuring that the applicant for a certificate accurately represents the domain names listed in the certificate is entrusted to certification authorities (CAs).
OPNsense generates a self-signed certificate for the web interface during installation. Although a self-signed certificate may suffice, particularly in a home network setting with restricted web interface access, there are better solutions than this.
OPNsense allows you to create Let's Encrypt certificates using the ACME client, a plugin included in the repository. Let's Encrypt certificates are advantageous due to their cost-free nature and the ease with which they can be created for your domains.
The primary aim of Let's Encrypt and the ACME protocol is to facilitate the establishment of an HTTPS server that acquires a browser-trusted certificate autonomously, without requiring any human intervention. This is achieved through the implementation of a certificate management agent on the web server.
In this tutorial, we will explain how you can change a self-signed certificate with a Let's Encrypt certificate on your OPNsense firewall. You may activate a Let's Encrypt CA-signed certificate on the OPNsense firewall by following the next 10 main steps:
- Update Domain Name
- Generate Cloudflare API Key
- Install ACME Client Plugin
- Register Account
- Select Challange Types
- Setup Automation (Optional)
- Add Certificate
- Enable ACME Client Plugin
- Change Test Certificate With Prod Certificate
- Updating Web UI Certificate
Moreover, we will outline the following topics in this tutorial:
- What is Let's Encrypt?
- What is ACME Client?
- What is a Self-Signed Certificate?
- What are the Advantages of a Self-Signed Certificate?
- What are the Risks of a Self-Signed Certificate?
To create an authentic certificate for your OPNsense web interface, you need to use a genuine domain name that you control or a dynamic DNS domain name.

1. Update Domain Name
The first step is to update your OPNsense domain by replacing the default "local" with your "registered domain name". To modify your domain name, you may follow the next steps:
-
Navigate to System → Settings → General on OPNsense web UI.
-
Specify Hostname, such as
myrouter. -
Specify Hostname, such as
myhome.net.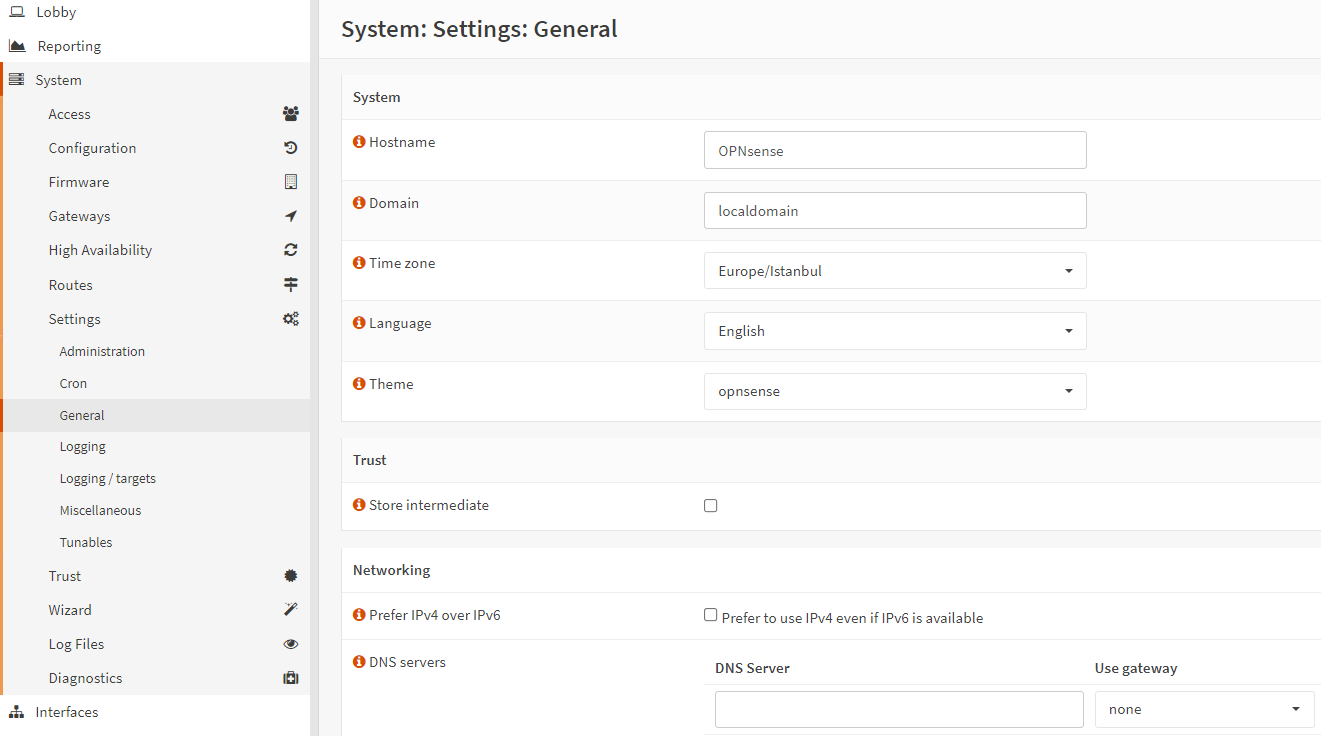
Figure 1. Update Domain Name on OPNsense
-
Click Save at the bottom of the page.
2. Generate Cloudflare API Key
To generate certificates, you must first establish an API token. Several DNS registrars, like Cloudflare, provide an API for handling DNS records. This is the most efficient method for generating certificates since it eliminates the need for manual DNS record updates to validate domain ownership in the absence of an API.
You may follow the next steps to add a DNS record and generate an API key on Cloudflare:
-
Add a
ADNS entry for your domain, such asmyrouter.myhome.netwith the following settings: IP (Your Public IP address), disabled proxy, and TTL of 5 minutes. -
Go back to Overview.
-
Select Get your API token at the bottom right of the page.
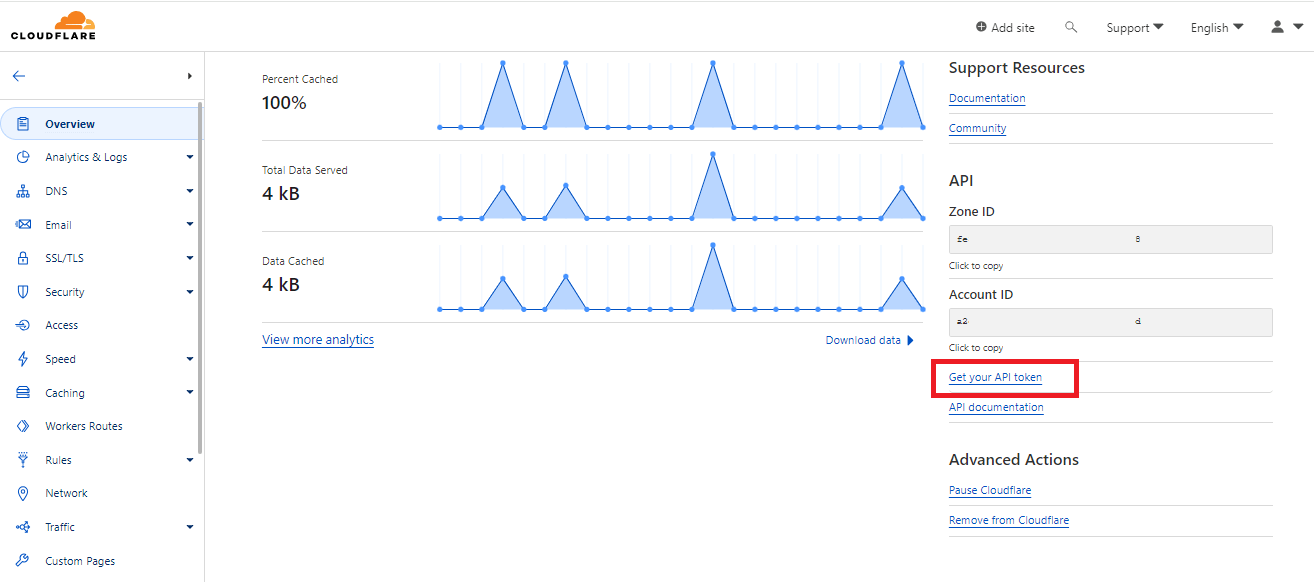
Figure 2. Get API token on Cloudflare
-
Click Create Token button.
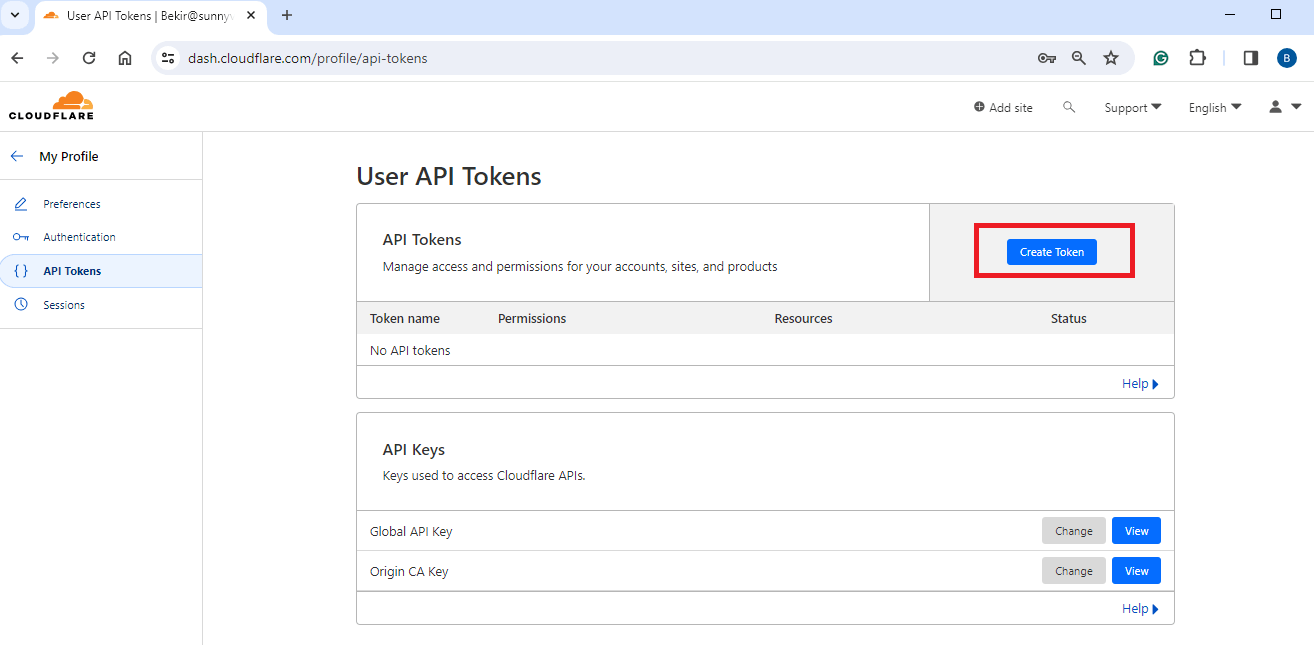
Figure 3. Viewing API Keys on Cloudflare
-
Select Use template next to the Edit Zone DNS option.

Figure 4. Edit zone DNS on Cloudflare
-
You may either select the correct Zone for your domain in the Zone Resources option, such as
myhome.net, orAll zones.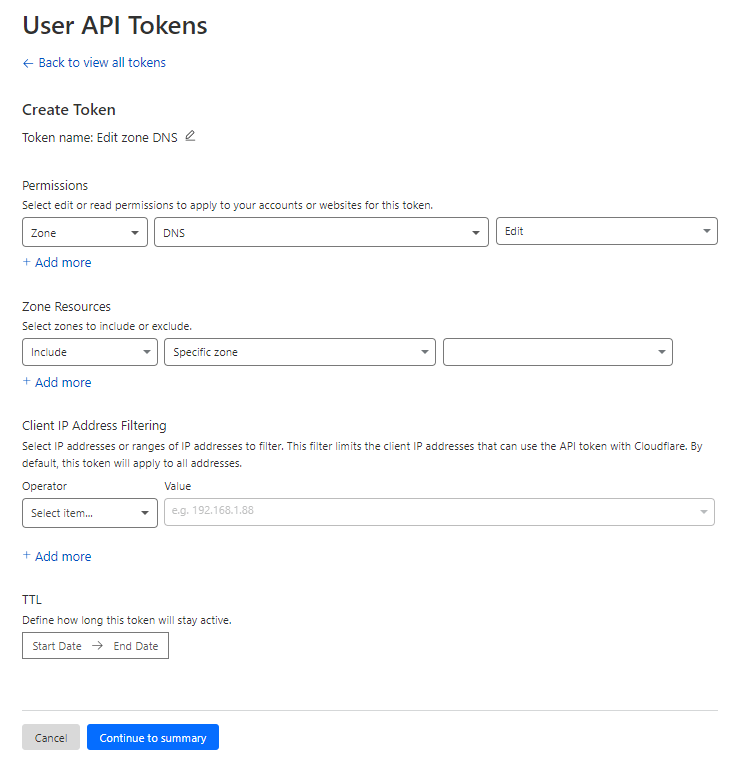
Figure 5. Creating API Token on CLoudflare
-
Click Continue to Summary button at the bottom of the page.
-
Click Create Token to generate the API key.
-
Copy the API key into your clipboard. Paste it temporarily to a text file or a sticky note. For security reasons, the token will not be shown again.
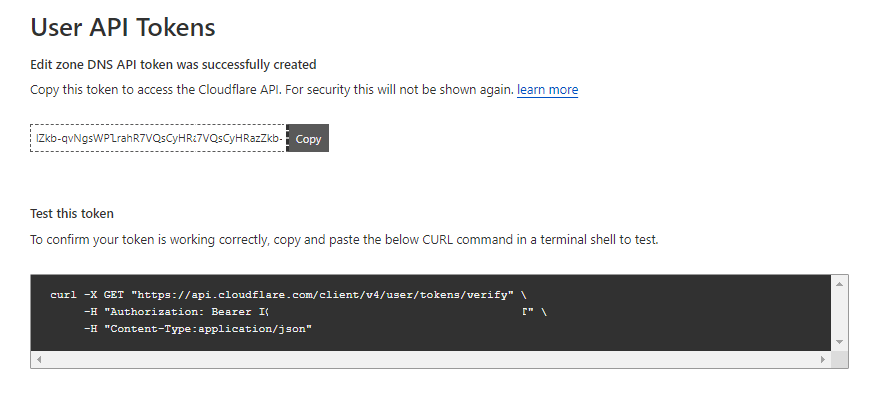
Figure 6. Copying API key on CLoudflare
-
Access the "Overview" page of the domain through the Cloudflare dashboard to determine the Account ID and Zone ID associated with the specified domain name. Since the Cloudflare account ID and the zone ID of the domain for which certificates are being generated are required.
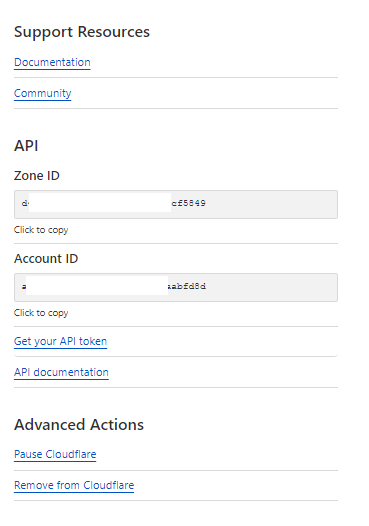
Figure 7. Cloudflare Account ID and Zone ID
3. Install ACME Client Plugin
The installation of the ACME Client plugin, os-acme-client, is straightforward and speedy. To install the ACME Client plugin, follow the steps below:
-
Login to your OPNsense Web GUI using an account with administrative access such as
root. -
Navigate to System → Firmware → Plugins.
-
Type
os-acme-clientin the search field to find the plugin -
Click on the
+icon next toos-acme-clientto install the plugin. Then you will be redirected to the Update menu tab.
Figure 8.
os-acme-clientplugin installation on OPNsense -
Click on the
Pluginstab to see thatos-acme-clientplugin is installed.
Now, you should see ACME Client menu under Services on the OPNsense web UI.
4. Register Account
Account information is also used to associate certificates with your identity, in addition to being used to notify you via email when your certificates are about to expire. Should you utilize Let's Encrypt for additional services on your network or website, it may be advantageous to retain the identical account credentials. You may register your account for ACME client by following the next steps:
-
Navigate to Services → ACME Client→ Accounts on OPNsense web UI.
-
Click Settings tab.
-
Click on the Add button with
+icon at right of the page.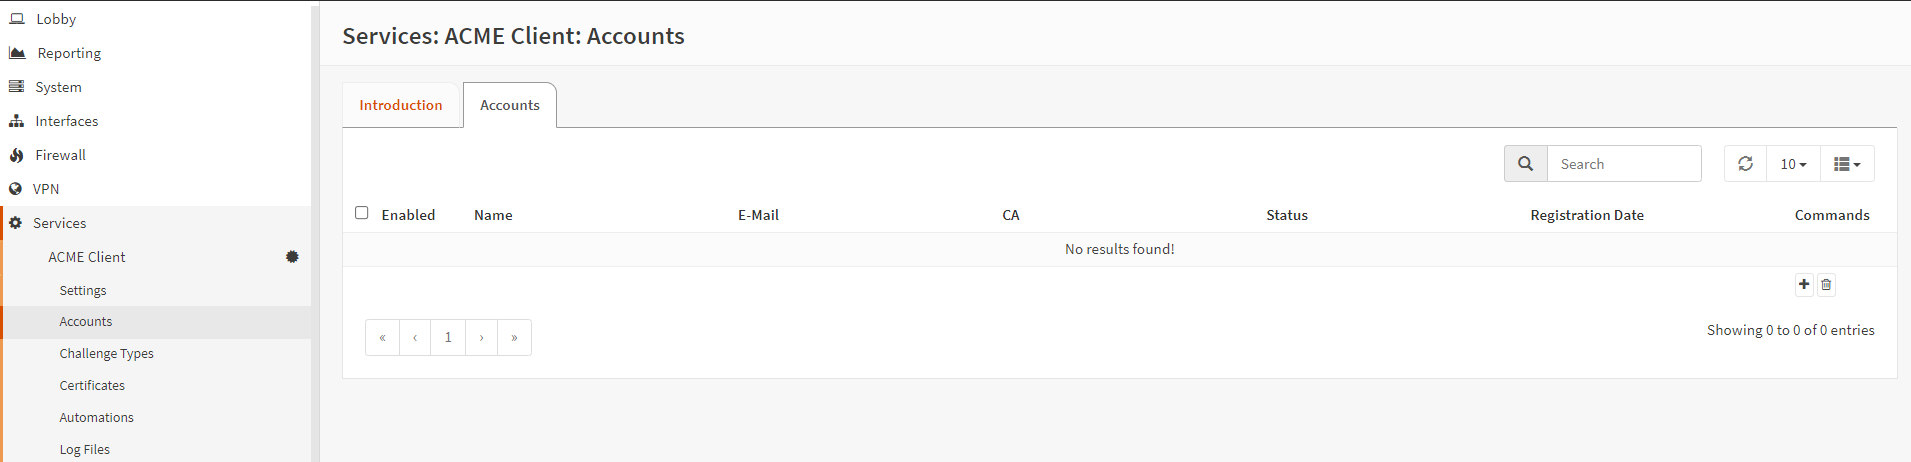
Figure 9. Acme Client Accounts
-
You may click advanced mode toggle bar at the top left of the pane.
-
Ensure that Enabled checkbox is checked.
-
Specify the Name to identify the account.
-
Type a descriptive name in to the Description field.
-
Optionally, you may type E-mail address for this account.
-
Select the ACME CA. Since the production Let's Encrypt CA has a Failed Validation restriction of 5 failures per account, per hostname, and per hour, it is advisable to verify your configuration on the Let's Encrypt Test CA beforehand. We will utilize the Let's Encrypt Test CA until we are certain that the ACME client has been configured properly.
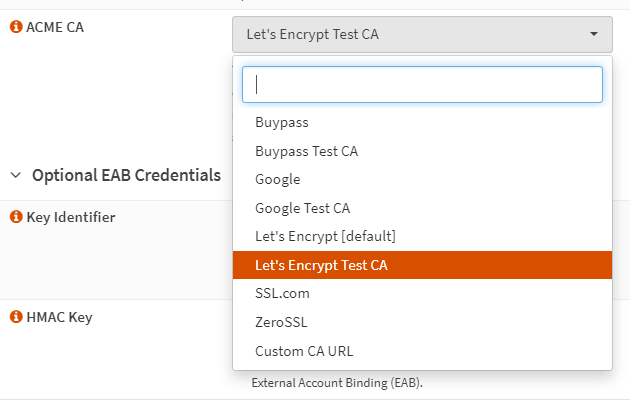
Figure 10. ACME CA Options
-
Optionally, you may type Key Identifier value provided by the CA when using ACME External Account Binding (EAB)
-
Optionally, you may type HMAC Key value provided by the CA when using ACME External Account Binding (EAB)
-
Click Save.

Figure 11. Edit ACME account
5. Select Challenge Types
Although there are various challenge types available, you may prefer the DNS challenge type due to its ability to issue wildcard certificates and its functionality without requiring port openings on your network. You may select a challenge type for the ACME client by following the next steps:
-
Navigate to Services → ACME Client→ Challenge Types on OPNsense web UI.
-
Click Challenge Types tab.
-
Click on the Add button with
+icon at right of the page.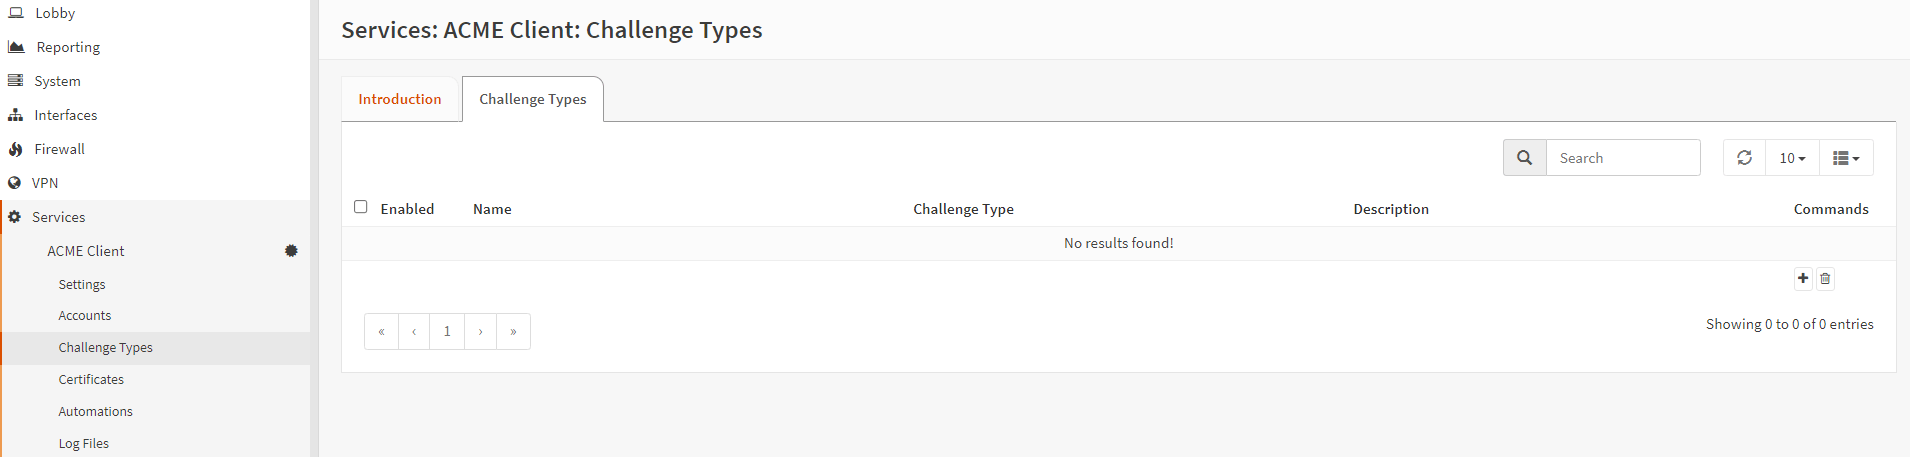
Figure 12. Challenge Types
-
Ensure that Enabled checkbox is checked.
-
Specify the Name to identify the account.
-
Type a descriptive name in to the Description field.
-
Set the ACME Challenge Type. You'll have to add configuration for the selected challenge type below. Since DNS-01 is the most dependable challenge variety, we will employ it.
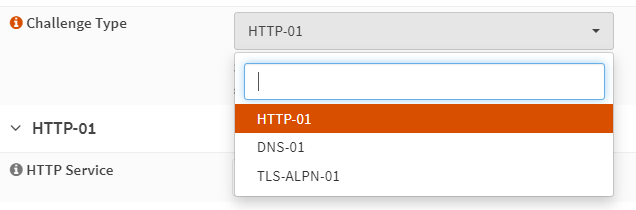
Figure 13. Selecting Challenge Types
Available options are as follows:
- DNS-01: This form of challenge is the most dependable and is therefore strongly advised when utilizing this plugin. It requires that you have authority over your domain name's DNS and that both
acme.shand this plugin support your DNS provider. - HTTP-01: Manual configuration is typically required for this challenge type. Therefore, it is not advised. The certificate's DNS name must correspond to the OPNsense host on which the ACME Client module is executing. Although the integrated web service will attempt to assume the correct configuration settings, this may not always function properly out of the box. Additionally, this challenge type is not compatible with Let's Encrypt for validating wildcard certificates.
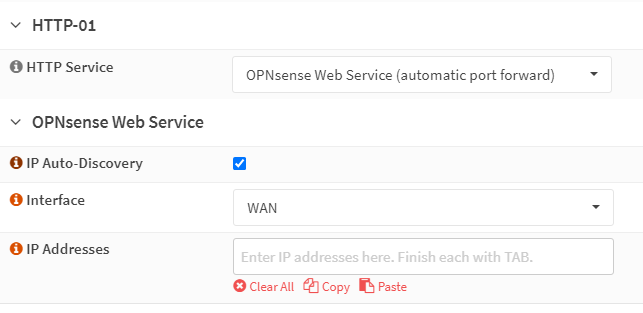
Figure 14. HTTP-01 Challenge Settings
- TLS-ALPN-01: This challenge type functions and has the same requirements as HTTP-01. It functions even if port 80 is closed. Alternative challenge formats ought to be favored. Let's Encrypt does not support the validation of wildcard certificates using this challenge type.
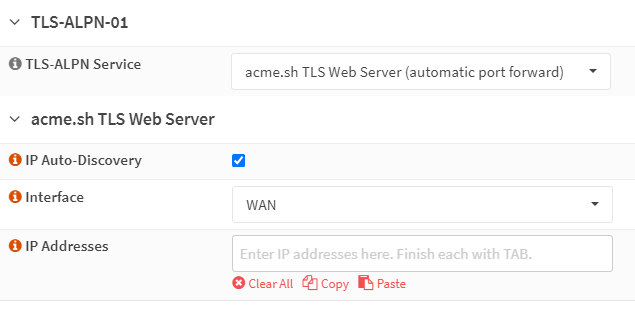
Figure 15. TLS-01 Challenge Settings
- DNS-01: This form of challenge is the most dependable and is therefore strongly advised when utilizing this plugin. It requires that you have authority over your domain name's DNS and that both
-
Select a DNS Service provider, such as
Cloudflare.com. You will need to enter your login credentials. -
You may leave DNS Sleep Time as default. This is the amount of time, in seconds, that must elapse before any TXT records added to the DNS API take effect. When this value is set to zero seconds, Acme Client will check for public DNS services every ten seconds for a maximum of twenty minutes. If set to a value other than zero, a fixed DNS dormancy time will be implemented and queries will be directed to the local DNS servers. Specific DNS APIs require a minimum slumber duration of 120 seconds.
-
If you are using Cloudflare you may enter ** E-Mail** and Key under Global API Key which will use your Cloudflare account with full privileges. Since this is less secure, a API token should be used instead.
-
To use the Restricted API Token type CF Account ID, CF API Token and CF Zone ID.
-
Click Save.
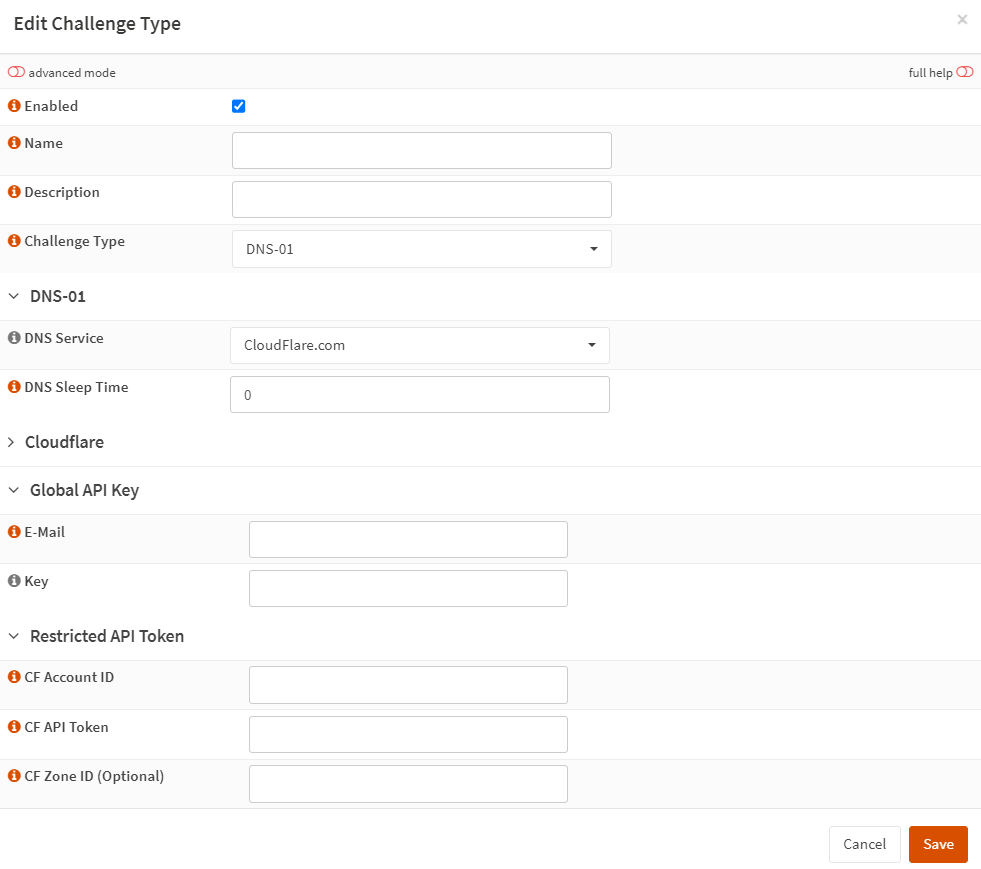
Figure 16. Challenge Types for Cloudflare
6. Setup Automation (Optional)
While automations are entirely discretionary, they have the potential to greatly simplify tasks, particularly when dealing with temporary certificates. In general, use cases for acme-client automation are outlined below:
- Deploying a certificate to an external service, such as a CDN provider.
- Restarting a service that has had its certificate renewed in order to verify the utilization of the most recent certificate. This feature proves to be particularly advantageous when an ACME certificate is utilized in conjunction with the OPNsense WebGUI, HAProxy, or NGINX modules. Restarting is possible for any OPNsense core service or plugin service.
- Making a certificate copy over to multiple hosts via the SFTP/SSH protocol. In this manner, OPNsense can function as a centralized authority for ACME certificates, while DNS provider secrets can be stored on a secure device.
You may configure automation for ACME clients by following the next steps:
-
Navigate to Services → ACME Client→ Automations on OPNsense web UI.
-
Click Automations tab.
-
Click on the Add button with
+icon at right of the page.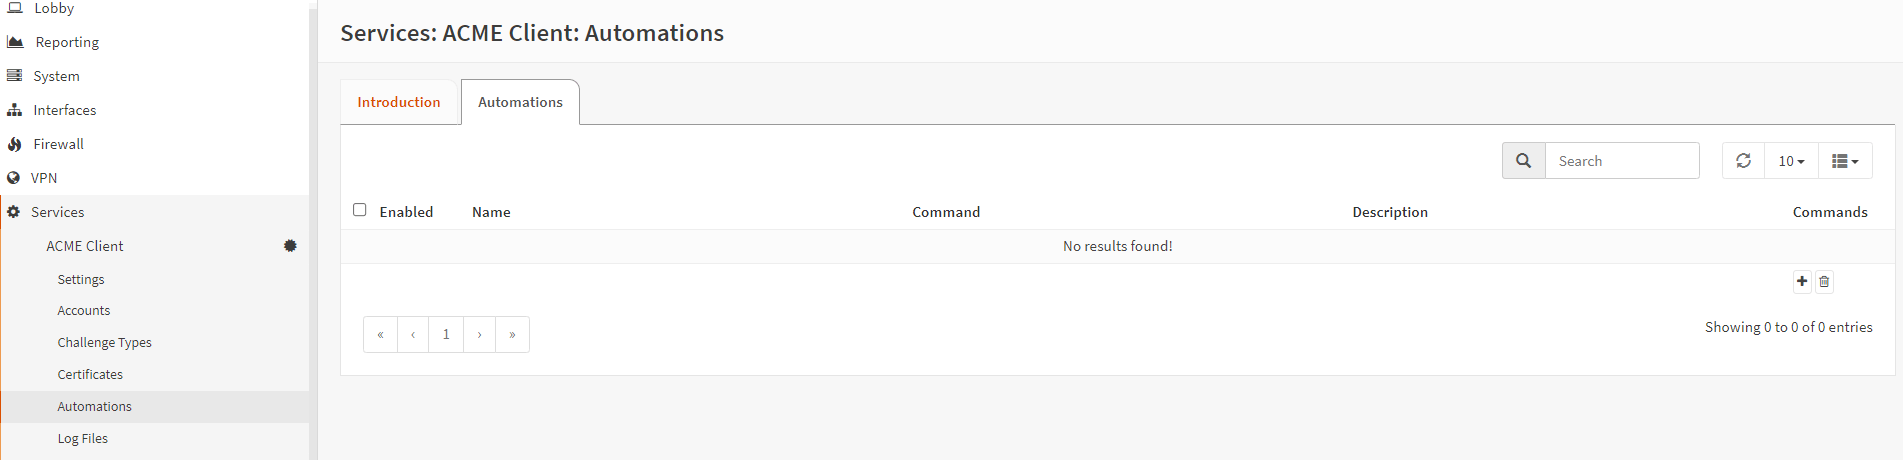
Figure 17. Setup Automation
-
Ensure that Enabled checkbox is checked.
-
Specify the Name to identify the account.
-
Type a descriptive name in to the Description field.
-
Select one of the options from Run Command drop-down menu, such as
Restart OPNsense Web UI.
Figure 18. Edit Automations
-
Click Save.
7. Add Certificate
ACME client plugin has the capability to handle an infinite amount of certificates. However, certificate authority may limit the number of certificates issued each week or impose other pricing restrictions. Repeatedly attempting a failed validation may lead to more failures as a result of rate-limiting.
When handling certificates with this plugin, the following rules must be followed:
- Certificates need to undergo validation by the Certificate Authority (CA) before they are usable. This procedure operates in the background and might need several minutes to finish. Monitoring progress is possible by using the log files.
- Certificates are kept in the OPNsense certificate storage. Once a Certificate Authority finishes validating a certificate request, the certificate is immediately imported into the OPNsense certificate store. When renewing certificates, the OPNsense certificate store will automatically update the existing entries.
- When a certificate is withdrawn from the plugin, it is not deleted from the OPNsense certificate store to ensure it may still be used by a core application or another plugin. Outdated certificates must be deleted manually from the OPNsense certificate store. Creating a new certificate with the same name will result in a new certificate being imported into the OPNsense certificate store, rather than updating the current record.
You may add a certificate for ACME clients by following the next steps:
-
Navigate to Services → ACME Client→ Certificates on OPNsense web UI.
-
Click Certificates tab.
-
Click on the Add button with
+icon at right of the page.
Figure 19. Certificates
-
Ensure that Enabled checkbox is checked.
-
Specify the Common name which is the hostname and domain name of your OPNsense router, such as
router.myhome.net. The name must correspond to the hostname or domain name of the OPNsense system. -
Type a descriptive name in to the Description field.
-
You may configure additional names that should be part of the certificate, i.e.
www.example.comormail.example.comvia Alt Names field.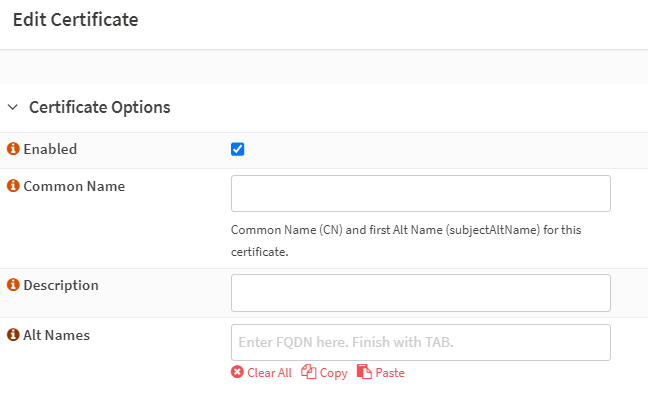
Figure 20. Certificate Options
-
Select ACME Account.
-
Select Challenge Type.
-
Enable Auto Renewal option to prevent expiration. When disabled, the cron job will ignore this certificate.
-
Set Renewal Interval to specify the days to renew the cert.
-
Select the Key Length value which is 4096 bit by default.
-
You may select the
Restart OPNsense Web UIautomation that was created in the previous step for the Automations option. Every program necessitates a swift restart to reload the latest certificate. Failure to set up an automation might lead to the expiration of the in-memory certificate, resulting in security alerts and other complications.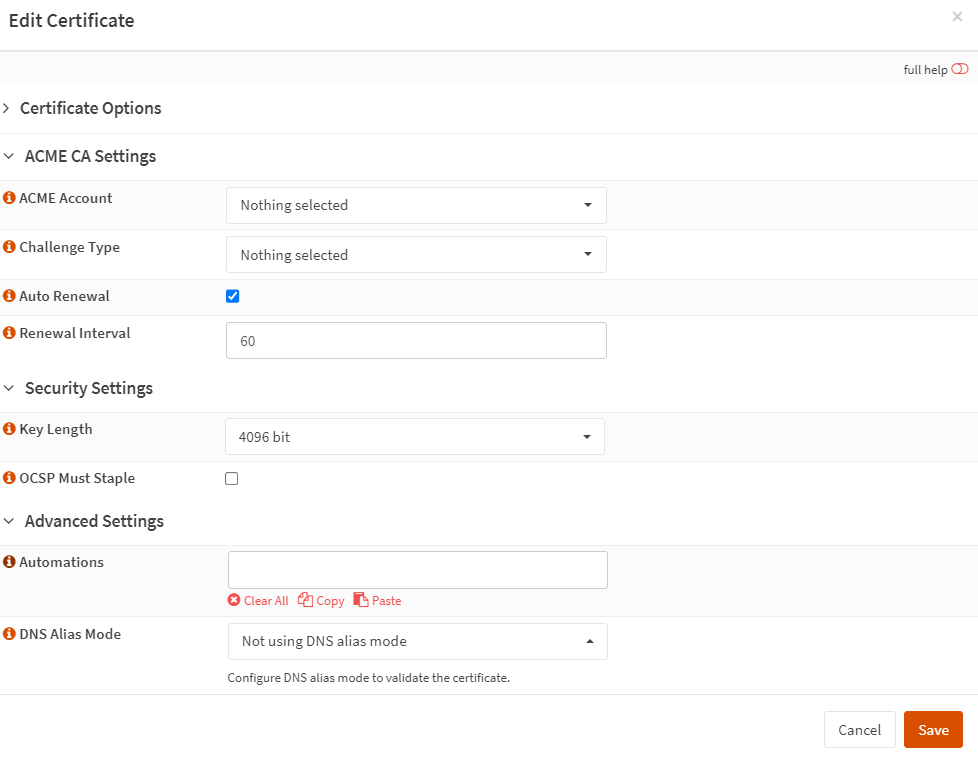
Figure 21. ACME CA security settings
-
Click Save. At this time, the certificate is displayed. You may attempt to manually issue the initial certificate as a test to ensure that it can be generated accurately.
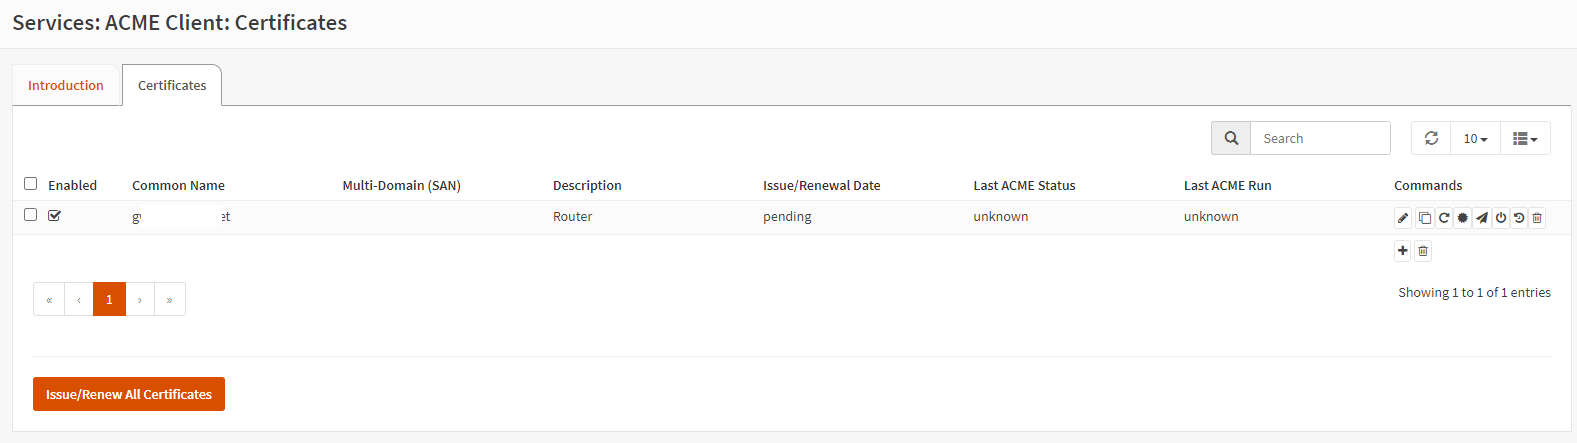
Figure 22. Newly Added ACME Certificate
-
Click Issue/Renew All Certificates button In order to generate the certificate. Alternatively, if you wish to issue/renew a specific certificate exclusively, click the third icon to the right of the certificate. You will see the Issue/Renewal date and Last ACME Status listed as
OKif everything is properly set up..If not, review the log files located under Services → ACME Client → Log Files to troubleshoot.

Figure 23. Validated Certificate List
8. Enable ACME Client Plugin
After installing the ACME client, it must be configured to generate and automatically renew certificates. You may easily enable the ACME client plugin and configure its general settings by following the next steps:
-
Navigate to Services → ACME Client→ Settings on OPNsense web UI.
-
Click Settings tab.
-
You may click advanced mode toggle bar at the top left of the pane.
-
Click Enable Plugin checkbox.
-
Ensure that Auto Renewal option is enabled to prevent certificate expiration. By doing so, a cron job will be added to the system. Changing the cron job schedule to suit your requirements may be necessary, as re-issuing a certificate could result in a brief period of inactivity, contingent upon the challenge type and service that you choose.
-
You may enable HAProxy integration with the OPNsense. For this option, installation of the OPNsense HAProxy plugin is mandatory. This will add the necessary backend, server, action, and ACL for you automatically. Simply choose your HAProxy frontend during the certificate or challenge type configuration process. This option is only applicable to HTTP-01 validation and HAProxy frontends operating in HTTP mode; it does not support TCP frontends.
-
You may specify the Log Level for
acme.sh. The default value is "normal". All other log levels include diagnostic information. As the level increases, "debug 2" and "debug 3" log messages from theacme.shthat are successively more detailed, including messages from the DNS-01 DNSAPI scripts. -
You may disable Show introduction pages option if you want.
-
You may change Local HTTP Port that is default
43580. When HTTP-01 is used as the challenge type, the ACME CA receives challenge data from a local webserver. The local web server should NOT utilize port 80 or any other widely recognized port, as it is not directly accessible from the outside world. -
You may change Local TLS ALPN Port that is default
43581. This is the service port when using TLS-ALPN-01 as challenge type -
You may leave Automation Timeout as default,
600. This is the upper limit in seconds for the completion duration of an automation. The command is terminated automatically when the timeout expires. -
Click Test Config button to see if you have any configuration issues.
-
Click Apply to activate the settings.

Figure 24. ACME Client Settings
9. Change Test Certificate with Prod Certificate
After verifying that your test certificates working without any issues, you may replace them with your production certificate by following the next steps:
-
Navigate to Services → ACME Client → Accounts.
-
Select Accounts
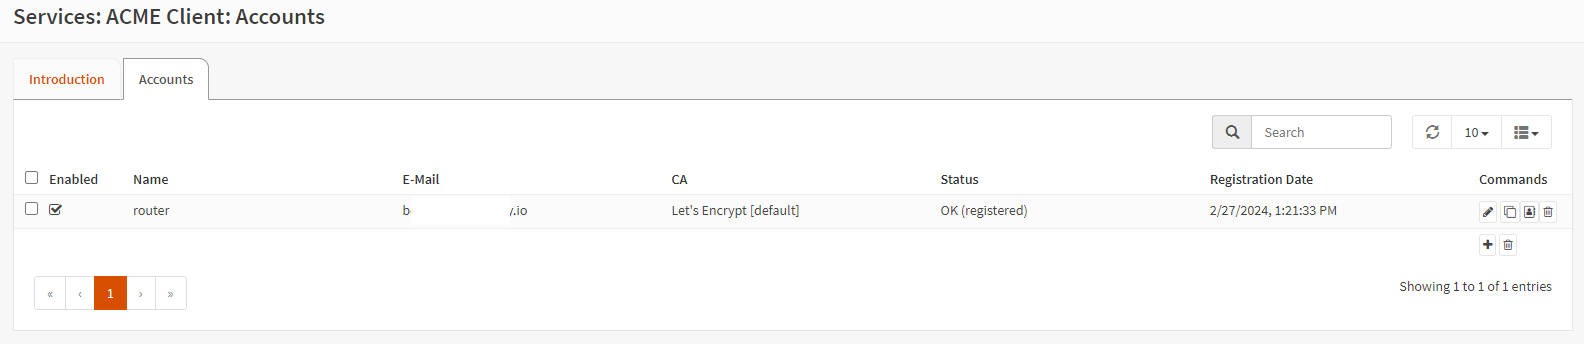
Figure 25. ACME Account list
-
Select the pencil icon under Commands to edit the Account.
-
Change the Let's Encrypt Test CA to Let's Encrypt in the ACME CA drop-down menu.

Figure 26. Changing Test Certificate
-
Select Save.
10. Updating Web GUI Certificate
To change the OPNsense web GUI certificate, you may follow the next steps:
-
Navigate to System → Settings → Administration on OPNsene web UI.
-
Select the new ACME (client) certificate from the SSL Certificate drop-down list.
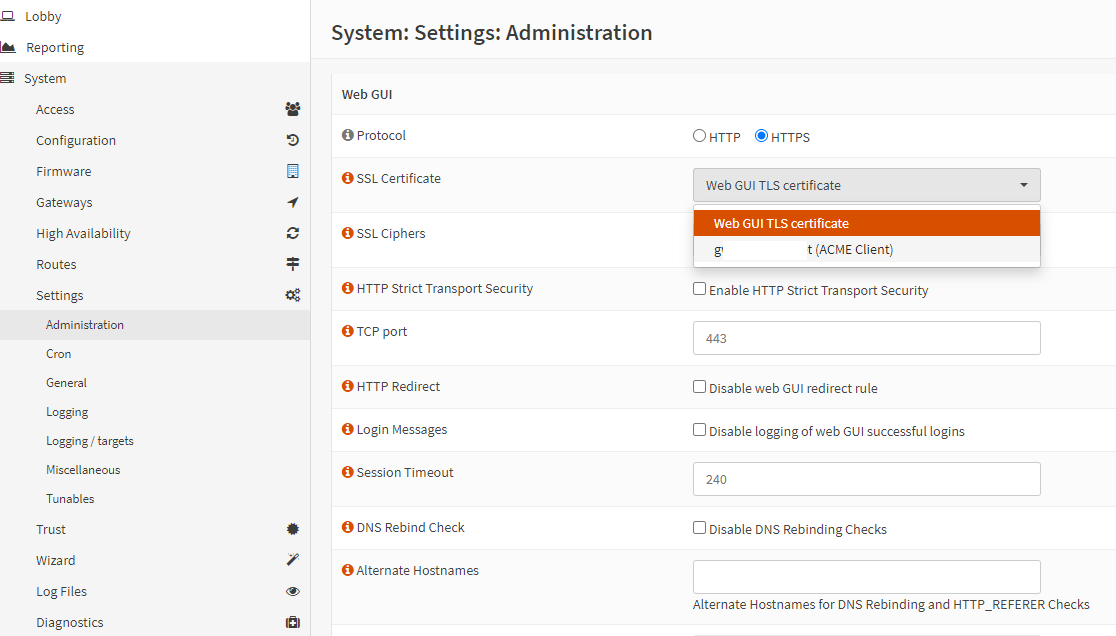
Figure 27. Change OPNsense GUI Certificate
-
Click Save at the bottom of the page.
-
Relaunch your OPNsense login page on a new browser. You should see the "not secured" icon is gone. You now have a Let's Encrypt wild card certificate.
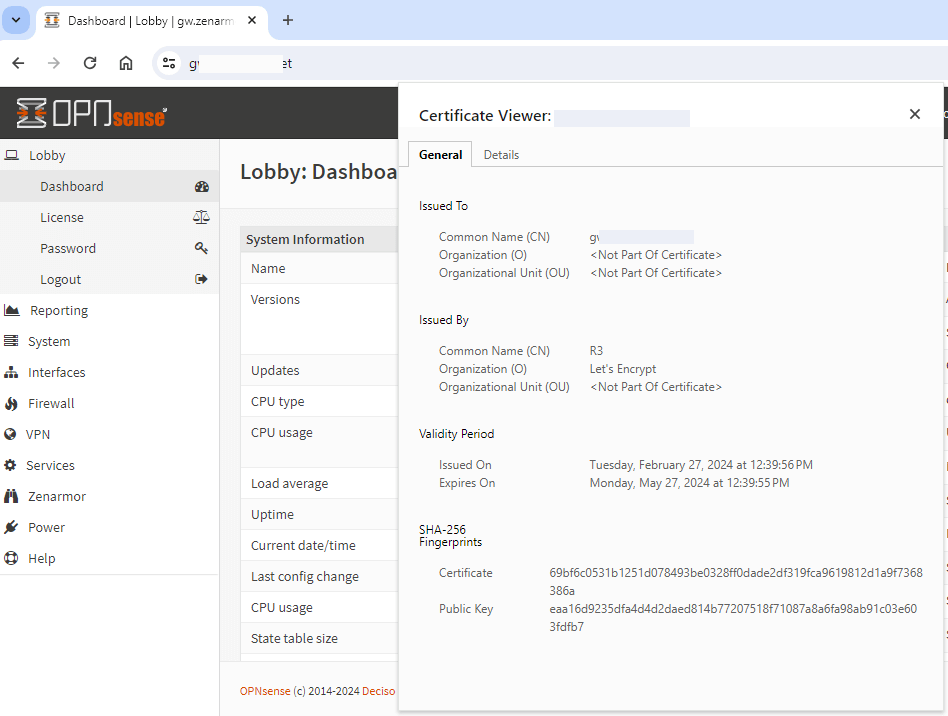
Figure 28. Signed Certificate
What is Let's Encrypt?
Let's Encrypt is a global Certificate Authority (CA) service provided by the Internet Security Research Group (ISRG). It enables organizations and individuals from all over the world to generate, renew, and administer SSL/TLS certificates. Websites may utilize Let's Encrypt certificates to establish secure HTTPS connections.
Let's Encrypt provides user-friendly and cost-free services, enabling any website to implement HTTPS. No fee is assessed by Let's Encrypt for its certificates. The mission of the non-profit organization Let's Encrypt is to guarantee a more secure and privacy-conscious Internet by advocating for the extensive implementation of HTTPS.
As Let's Encrypt certificates are Domain Validation standards, they are applicable to all servers that utilize domain names, including but not limited to web servers, mail servers, and FTP servers.
The validity of Let's Encrypt certificates is ninety (90) days.
What is ACME Client?
ACME (Automatic Certificate Management Environment) client is any application capable of communicating with an ACME-enabled Certificate Authority such as Let's Encrypt, and ZeroSSL. Certain applications are end-user tools that facilitate the ordering and management of certificates, while others are integrations into external services.
OPNsense firewall has an ACME Client plugin for complete implementation of the ACME protocol. It is likely "the simplest, smallest, and smartest shell script" available, according to the authors, to generate and renew free certificates from Let's Encrypt automatically.
ACME Client plugin facilitates the generation of SSL certificates via the following Certificate Authorities (CAs):
- Let's Encrypt: Let's Encrypt is an open, automated, and cost-free certificate authority that operates for the benefit of the public. The portal is an Internet Security Research Group (ISRG) utility.
- ZeroSSL: ZeroSSL is an Austria-based commercial European certificate authority. An exposition of the features offered by Let's Encrypt is available for consumers on their website.
- Google: Google is an authority on commercial certificates.
- Buypass: Buypass is a Norwegian-based commercial European certificate authority.
- SSL.com: SSL.com is a globally reputable, commercial certificate authority. A comprehensive manual is offered to assist users in utilizing their paid services in conjunction with the ACME protocol.
What is a Self-Signed Certificate?
A self-signed SSL/TLS certificate is a digital certificate that is not issued by a publicly trusted Certificate Authority (CA). Self-signed certificates differ from traditional CA-signed certificates in that they are generated, distributed, and affixed with a signature by the entity or developer accountable for the software or website linked to the certificate, as opposed to a trustworthy CA. Although this approach potentially yields cost savings on certificates for internal-facing websites, implementing it on public websites and applications is strictly discouraged.
Self-signed certificates, while employing the cryptographic private and public key pair architecture found in X.509 certificates, lack the verification process of a trusted third-party CA. Consequently, unlike certificates issued by trusted CAs, self-signed certificates are not chained to a root CA or intermediate certificate. This additional risk is introduced by the absence of independent validation during the issuance process. Generally employed solely in internal development and testing environments, self-signed certificates are deemed unsuitable for public-facing websites and applications.
What are the Advantages of a Self-Signed Certificate?
The major benefits of self-signed certificates are listed below:
- Cost: Issuing self-signed certificates is quick, cost-effective, and uncomplicated.
- Ideal for Testing and Internal Use: Self-signed certificates may be utilized on websites accessible via an internal network and in development/testing environments where encryption is prioritized over trust validation.
- Easy Management: Customizing or modifying self-signed certificates is straightforward; for instance, they can support larger key sizes or additional metadata.
- No Dependency: The absence of any dependencies on external systems results in time savings during the testing phase of certificate issuance.
- Unlimited Generation: Developers and application managers are not restricted in their ability to generate certificates and are not reliant on other teams to do so.
What are the Risks of a Self-Signed Certificate?
Self-signed certificates provide benefits in internal networks and software development stages but might pose hazards without adequate oversight and management. The main risks of self-signed certificates are as follows:
-
Absence of oversight and authority: Thousands of digital certificates, issued by both private and public CAs, are utilized by organizations, and it is difficult to manually trace each of these certificates. It is critical to understand the number of certificates in circulation, their owner, location, and the location where the private keys are kept in order to fortify cyber defense.
Frequently, organizations that utilize a multitude of self-signed certificates experience a lack of clarity regarding the certificate infrastructure. Regrettably, in the event of a breach occurring within your organization's network, the presence of a compromised self-signed certificate and private key would obscure the severity of the situation.
-
Susceptibility to vulnerabilities: Compromised private keys can pose a significant risk to the infrastructure of an organization. You may notify the issuing certificate authority of compromised certificates, and they will revoke them immediately. However, self-signed certificates will lack a reputable revocation mechanism.
Moreover, organizations frequently neglect to monitor their self-signed certificates, which can result in compromised or expired certificates going undetected. These certificates that have been compromised serve as entry points for malicious actors to infiltrate the network and initiate sophisticated and advanced attacks, including man-in-the-middle (MITM), phishing, malware, and botnets.
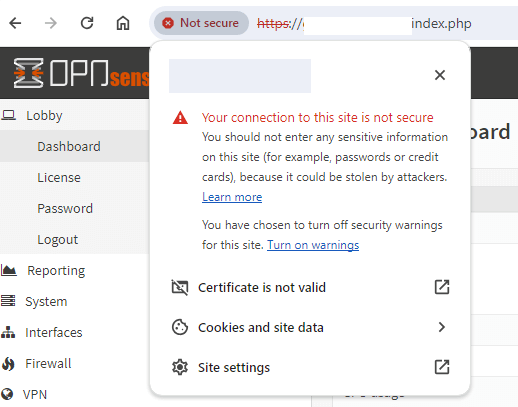
Figure 29. Certificate Warning
-
Absence of technical support and warranty: Public certificate authorities provide their certificates with assistance, knowledge, and management tools. However, no support, expertise, or management tool is offered for self-signed certificates, as these certificates are produced internally. Financial and human resources are required to maintain control over them.
-
Failure to satisfy security obligations: Digital certificates that are issued by reputable certificate authorities uphold rigorous standards, in contrast to self-signed certificates that are generated internally and seldom conform to the most recent security standards as a result of insufficient awareness and neglect of optimal methodologies.
The management and monitoring of every digital key and certificate that exists on a corporate network is of the utmost importance. Self-signed and CA-issued certificates that are accountable for the operation of both internal and external websites must be safeguarded, protected, and subject to continuous monitoring.
Self-signed certificates may be used for internal LAN-only services; however, a robust policy must be implemented to ensure that the issuing CA server is securely protected against cybercriminals, is located in an area inaccessible to all organization employees, and is accompanied by monitoring tools and a team responsible for managing the certificate estate.
Advantages Risks Cost Absence of oversight and authority Ideal for Testing and Internal Use Susceptibility to vulnerabilities Easy Management Absence of technical support and warranty No Dependency Failure to satisfy security obligations Unlimited generation Table 1. Advantages and Risks of Self-Signed Certificates
Hands on Video
Here is a video that will guide you through the steps of changing a self-signed certificate with a CA-signed certificate on OPNsense: