How To Install and Configure Tailscale on OPNsense?
Tailscale is a Virtual Private Network (VPN) service that allows you to safely and easily access your devices and apps from anywhere in the globe. It facilitates secure and direct communications by using the open-source WireGuard protocol, ensuring that only devices inside your private network can establish communication with one another.
The Tailscale client software may be installed on several operating systems, including Linux, Windows, macOS, Android, iOS, OPNsense, pfSense, and more. It serves the purpose of establishing connections between devices inside a secure Tailscale Mesh Network. Tailscale offers an advantage over typical WireGuard server configuration by eliminating the need for port forwarding.
OPNsense and Tailscale are robust networking tools and technologies that provide significant advantages to network users. By incorporating OPNsense into a Tailscale private network, you will get the ability to access not just the specific device, but also any other network devices that are accessible via the advertised routes.
This tutorial discusses the process of installing, configuring, and connecting OPNsense to a Tailscale. Ultimately, your OPNsense device, along with its routes if desired, will become integrated into the Tailscale private network. We will also add a Windows PC to your telnet and force the Windows client to access the Internet through your OPNsense tailscale exit node.
You may install and configure Tailscale on OPNsense by following the next steps:
- Enable SSH server on OPNsense
- Install Tailscale on OPNsense
- Enable and Start Tailscale Service
- Register Tailscale and Generate Tailscale Authentication Keys
- Add OPNsense to Tailnet
- Interface Assignment
- Define Firewall Rule
- Validate Advertised Routes
- Add Windows Client to Tailnet

1. Enable SSH server on OPNsense
Since there is no native Tailscale plugin that can be installed via web UI on OPNsense, you must enable the SSH server to install the Tailscale package by following the next steps:
-
Navigate to the System → Settings → Administration on OPNsense web UI.
-
Scroll down to the Secure Shell pane.
-
Select Permit Root User Login option.
-
Select Permit Password Login option.

Figure 1. Enabling SSH on OPNsense
-
Click the Save button at the bottom of the page to activate settings.
2. Install Tailscale on OPNsense
You may easily install Tailscale on your OPNsense by following the next steps:
- Connect your OPNsense firewall as
rootvia SSH. - Enter
8to access the shell. - Run the OPNsense code utility to download and update the ports tree by typing the next command:
You should see an output similar to the one below:
opnsense-code portsUpdating OPNsense repository catalogue...
OPNsense repository is up to date.
Updating SunnyValley repository catalogue...
SunnyValley repository is up to date.
All repositories are up to date.
The following 2 package(s) will be affected (of 0 checked):
New packages to be INSTALLED:
git: 2.44.0 [OPNsense]
p5-Error: 0.17029 [OPNsense]
Number of packages to be installed: 2
The process will require 24 MiB more space.
4 MiB to be downloaded.
[1/2] Fetching p5-Error-0.17029.pkg: 100% 27 KiB 27.5kB/s 00:01
[2/2] Fetching git-2.44.0.pkg: 100% 4 MiB 2.2MB/s 00:02
Checking integrity... done (0 conflicting)
[1/2] Installing p5-Error-0.17029...
[1/2] Extracting p5-Error-0.17029: 100%
[2/2] Installing git-2.44.0...
===> Creating groups.
Creating group 'git_daemon' with gid '964'.
===> Creating users
Creating user 'git_daemon' with uid '964'.
[2/2] Extracting git-2.44.0: 100%
=====
Message from git-2.44.0:
--
If you installed the GITWEB option please follow these instructions:
In the directory /usr/local/share/examples/git/gitweb you can find all files to make gitweb work as a public repository on the web.
All you have to do to make gitweb work is:
1) Please be sure you're able to execute CGI scripts in
/usr/local/share/examples/git/gitweb.
2) Set the GITWEB_CONFIG variable in your webserver's config to
/usr/local/etc/git/gitweb.conf. This variable is passed to gitweb.cgi.
3) Restart server.
If you installed the CONTRIB option please note that the scripts are
installed in /usr/local/share/git-core/contrib. Some of them require
other ports to be installed (perl, python, etc), which you may need to
install manually.
Cloning into '/usr/tools'...
remote: Enumerating objects: 12943, done.
remote: Counting objects: 100% (1332/1332), done.
remote: Compressing objects: 100% (442/442), done.
remote: Total 12943 (delta 812), reused 1085 (delta 762), pack-reused 11611
Receiving objects: 100% (12943/12943), 10.85 MiB | 1.66 MiB/s, done.
Resolving deltas: 100% (8062/8062), done.
Already on 'master'
Your branch is up to date with 'origin/master'.
Cloning into '/usr/ports'...
remote: Enumerating objects: 2047712, done.
remote: Counting objects: 100% (40869/40869), done.
remote: Compressing objects: 100% (30934/30934), done.
remote: Total 2047712 (delta 9701), reused 38417 (delta 9483), pack-reused 2006843
Receiving objects: 100% (2047712/2047712), 544.18 MiB | 2.43 MiB/s, done.
Resolving deltas: 100% (993993/993993), done.
Updating files: 100% (158731/158731), done.
Already on 'master'
Your branch is up to date with 'origin/master'. - Change your working directory by running the next command:
cd /usr/ports/security/tailscale - Run the next command to build and install Tailscale:
A successful installation will provide an output that resembles the one seen below.
make install...............................
tailscale.com/ipn/localapi
tailscale.com/ipn/ipnserver
tailscale.com/net/proxymux
tailscale.com/net/socks5
github.com/creack/pty
github.com/kr/fs
github.com/pkg/sftp/internal/encoding/ssh/filexfer
golang.org/x/crypto/ssh/internal/bcrypt_pbkdf
golang.org/x/crypto/ssh
github.com/pkg/sftp
github.com/u-root/u-root/pkg/termios
log/syslog
github.com/anmitsu/go-shlex
tailscale.com/tempfork/gliderlabs/ssh
tailscale.com/ssh/tailssh
github.com/djherbis/times
container/heap
github.com/tailscale/xnet/webdav/internal/xml
github.com/tailscale/xnet/webdav
tailscale.com/tailfs/tailfsimpl/shared
tailscale.com/tailfs/tailfsimpl/compositefs
golang.org/x/sync/singleflight
github.com/jellydator/ttlcache/v3
github.com/tailscale/gowebdav
tailscale.com/tailfs/tailfsimpl/webdavfs
tailscale.com/tailfs/tailfsimpl
tailscale.com/tsweb/varz
tailscale.com/types/flagtype
gvisor.dev/gvisor/pkg/sleep
gvisor.dev/gvisor/pkg/tcpip/header/parse
gvisor.dev/gvisor/pkg/tcpip/transport
gvisor.dev/gvisor/pkg/tcpip/transport/internal/network
gvisor.dev/gvisor/pkg/tcpip/transport/internal/noop
gvisor.dev/gvisor/pkg/tcpip/transport/packet
gvisor.dev/gvisor/pkg/tcpip/transport/raw
gvisor.dev/gvisor/pkg/tcpip/transport/tcp
gvisor.dev/gvisor/pkg/tcpip/transport/udp
gvisor.dev/gvisor/pkg/tcpip/adapters/gonet
gvisor.dev/gvisor/pkg/tcpip/link/channel
gvisor.dev/gvisor/pkg/tcpip/network/hash
gvisor.dev/gvisor/pkg/tcpip/network/internal/fragmentation
gvisor.dev/gvisor/pkg/tcpip/network/internal/ip
gvisor.dev/gvisor/pkg/tcpip/network/internal/multicast
gvisor.dev/gvisor/pkg/tcpip/network/ipv4
gvisor.dev/gvisor/pkg/tcpip/network/ipv6
gvisor.dev/gvisor/pkg/tcpip/transport/icmp
tailscale.com/wgengine/netstack
tailscale.com/cmd/tailscaled
===> Staging for tailscale-1.60.1_1
===> tailscale-1.60.1_1 depends on package: ca_root_nss>0 - found
===> Generating temporary packing list
for t in ./cmd/tailscale ./cmd/tailscaled; do dst=$(echo ${t} | /usr/bin/sed -Ee 's/^[^:]*:([^:]+).*$/\1/' -e 's/^\.$/tailscale/'); src=$(/usr/bin/basename ${dst}); case ${dst} in /*) dst=/usr/obj/usr/ports/security/tailscale/work/stage${dst}; /bin/mkdir -p $(/usr/bin/dirname ${dst}) ;; *) dst=/usr/obj/usr/ports/security/tailscale/work/stage/usr/local/bin/${src} ;; esac; echo "===> Installing ${src} as ${dst}"; install -s -m 555 /usr/obj/usr/ports/security/tailscale/work/bin/${src} ${dst}; done
===> Installing tailscale as /usr/obj/usr/ports/security/tailscale/work/stage/usr/local/bin/tailscale
===> Installing tailscaled as /usr/obj/usr/ports/security/tailscale/work/stage/usr/local/bin/tailscaled
====> Compressing man pages (compress-man)
===> Staging rc.d startup script(s)
===> Installing for tailscale-1.60.1_1
===> Checking if tailscale is already installed
===> Registering installation for tailscale-1.60.1_1
Installing tailscale-1.60.1_1...
3. Enable and Start Tailscale Service
After the installation, you may enable tailscale client service to start automatically by running the next command:
service tailscaled enable
You should see the following output:
tailscaled enabled in /etc/rc.conf
To start the tailscale client service, run the next command:
service tailscaled start
You may check tailscale service status by running the following command:
service tailscaled status
You may view the running tailscale version by running the following command:
tailscale version
You should see the output similar to the given below:
1.60.1
go version: go1.22.1
4. Register Tailscale and Generate Tailscale Authentication Keys
You should now register for a Tailscale account and generate an authentication key to connect your OPNsense node to the Tailscale network. In order to start using Tailscale, you must have an account with an SSO provider such as Apple, Google, Microsoft, GitHub, Okta, OneLogin, or another approved SSO identity provider.
When a new tailnet is created using a public domain, it is automatically configured to use the Personal plan which is a tailscale plan for individuals who want to securely connect personal devices, for free.
You may generate Tailscale authentication keys by following the next steps:
-
Login Tailscale dashboard at https://login.tailscale.com/login.
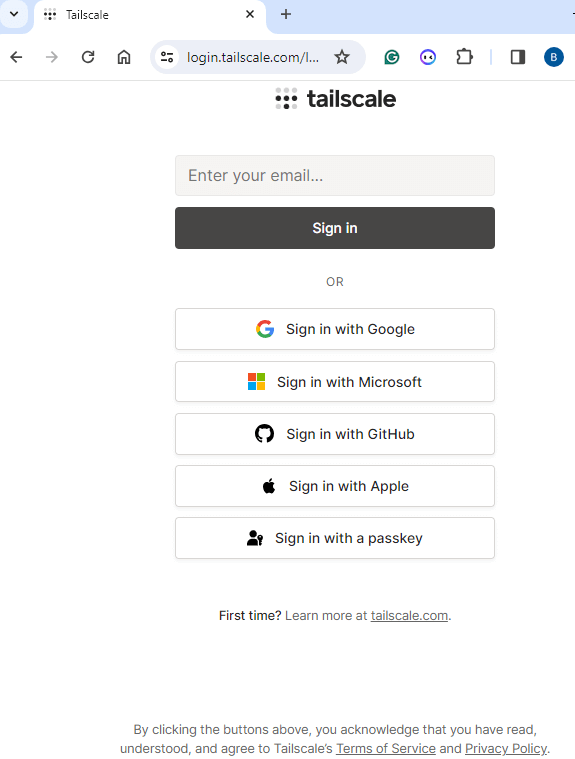
Figure 2. Tailscale login page
-
You may click the Skip this introduction link to skip Welcome wizard. This will redirect you to the Tailscale dashboard.
-
Navigate to the Settings → Personal Settings → Keys.
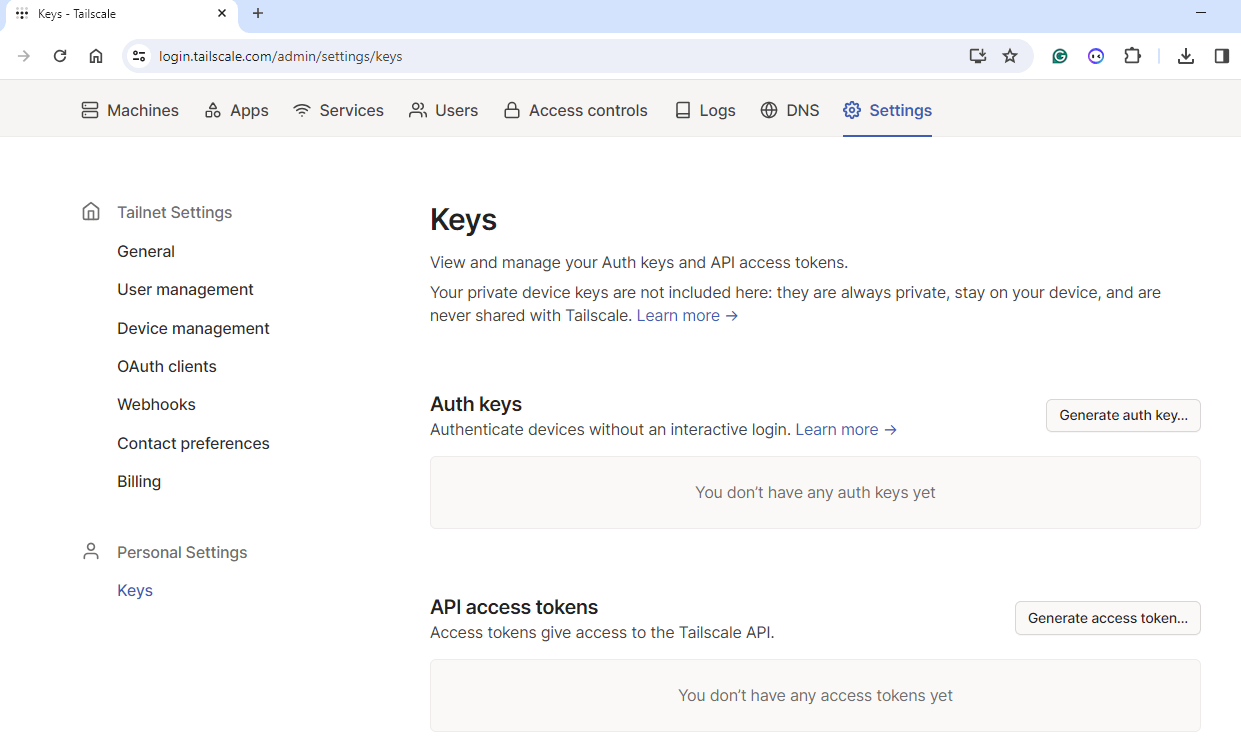
Figure 3. Tailscale keys settings page
-
Click the Generate auth keys button at the right top of the Auth keys pane.
-
Type a descriptive name into the Description field.
-
You may enable the Reusable option to be able to use this key to authenticate more than one device by clicking on the toggle bar.
-
You may set the number of days until this auth key expires. This will have no impact on the Expiration of the node key for any computer that has been authenticated using this authorization key.
-
You may leave other options as default.
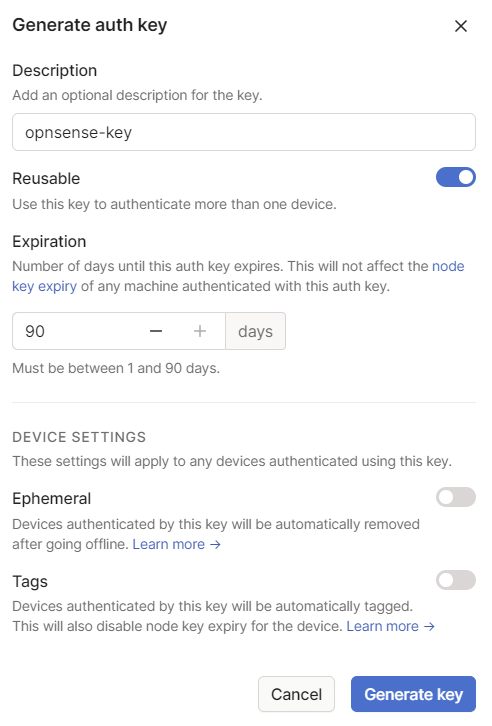
Figure 4. Generating Auth key
-
Click the Generate key button. This will automatically create a new auth key.
-
Click the Copy button to copy the newly generated key into a safe place.
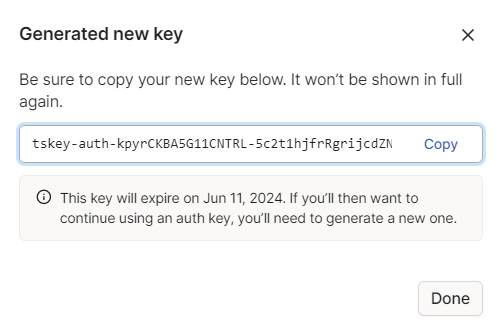
Figure 5. Copying key
-
Click Done. Now, you can view your key on Keys page.

Figure 6. Viewing keys on Tailscale console
5. Add OPNsense to Tailnet
You may easily add your OPNsense node to your Tailscale network, tailnet, by following the next steps:
-
Connect your OPNsense via SSH as a root.
-
Run the following command to add your OPNsense node to the tailnet:
tailscale up --login-server https://controlplane.tailscale.com \
--authkey <your_auth_key> \
--accept-routes \
--advertise-routes=<your_OPNsense_LAN> \
--force-reauthtipTo route the traffic from the devices in your mesh network via the OPNsense firewall, just add the
--advertise-exit-nodeparameter. -
Check the Tailscale connection status by running the following command:
tailscale statusYou should see the output similar to the given below:
100.68.172.76 opnsense myaccount@ freebsd -Also, you should see your OPNsense node on the Machines page of your Tailscale account and confirm that the device is connected.
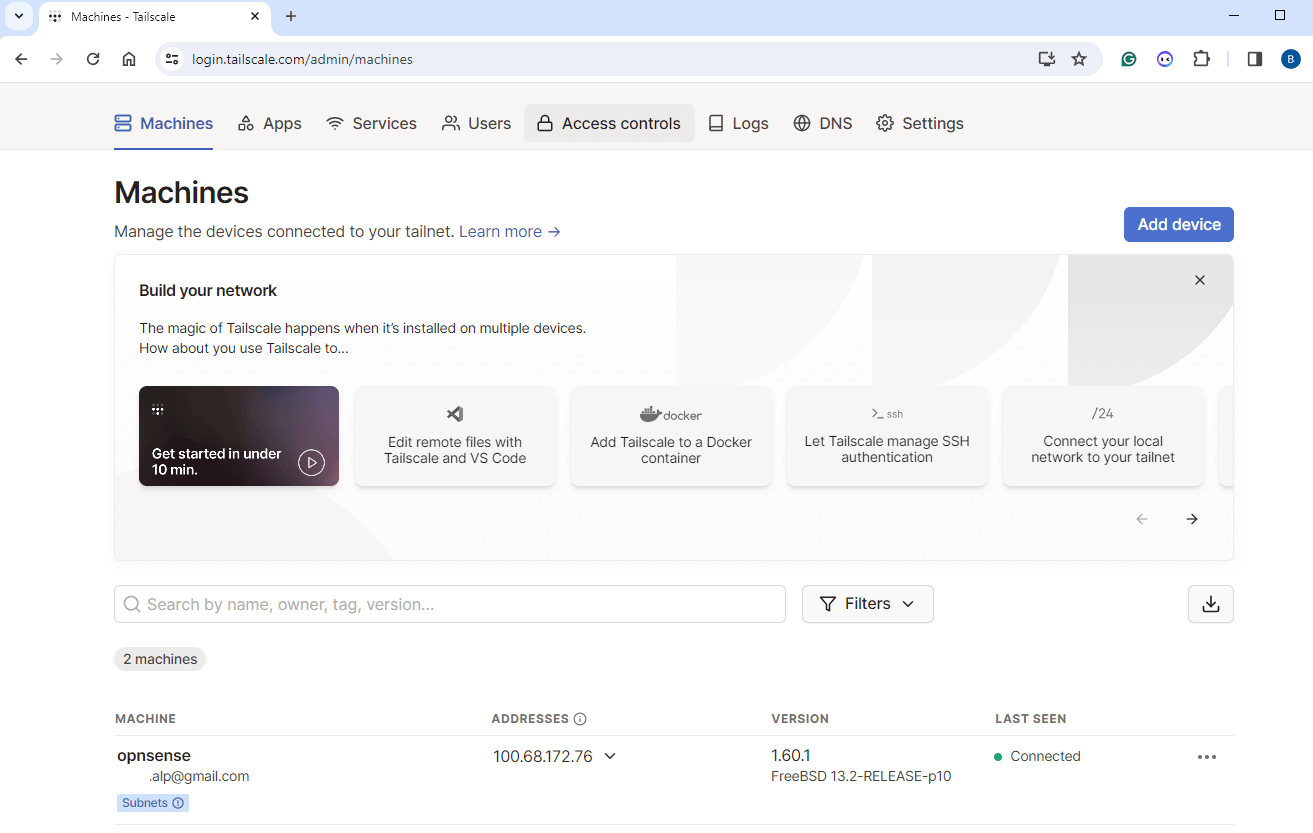
Figure 7. Viewing machines on Tailscale console
Tailscale employs the automated allocation of distinct 100.x.y.z IP addresses to every device inside your network. This enables establishing reliable connections between computers regardless of their geographical location, network transitions, and even while operating behind a firewall. Tailscale IP address is automatically allocated depending on the device and authorization credentials and cannot be manually changed.
tailscale up command has the following options:
--auth-key: Node authorization key; if it begins with "file:", then it's a path to a file containing the authkey--accept-dns, --accept-dns=false: Accept DNS configuration from the admin panel (default true)--accept-routes, --accept-routes=false: Accept routes advertised by other Tailscale nodes (default false)--advertise-connector, --advertise-connector=false: Advertise this node as an app connector (default false)--advertise-exit-node, --advertise-exit-node=false: Offer to be an exit node for internet traffic for the tailnet (default false)--advertise-routes string: List of routes to advertise to other nodes (comma-separated, e.g.10.0.0.0/8, 192.168.0.0/24) or empty string to not advertise routes--exit-node string: Tailscale exit node (IP or base name) for internet traffic, or empty string to not use an exit node--exit-node-allow-lan-access, --exit-node-allow-lan-access=false: Allow direct access to the local network when routing traffic via an exit node (default false)--force-reauth, --force-reauth=false: Force reauthentication (default false)--hostname stringThe hostname to use instead of the one provided by the OS--login-server string: The base URL of control server (defaulthttps://controlplane.tailscale.com)--operator string: Unix username to allow to operate on tailscaled without sudo--qr, --qr=false: Show QR code for login URLs (default false)--reset, --reset=false: Reset unspecified settings to their default values (default false)--shields-up, --shields-up=false: Don't allow incoming connections (default false)--ssh, --ssh=false: Run an SSH server, permitting access per tailnet admin�s declared policy (default false)--timeout duration: Maximum amount of time to wait for tailscaled to enter a Running state; default (0s) blocks forever (default 0s)
6. Interface Assignment
Tailscale should appear in the list of interfaces in the OPNsense UI. You may define firewall rules to secure your tailnet by assigning the tailscale interface. You may follow the next step to complete the interface assignment for the new Tailscale interface on OPNsense:
-
Navigate to the Interfaces → Assignments on OPNsense web UI. You should see the newly created tailscale interface at the bottom of the page.
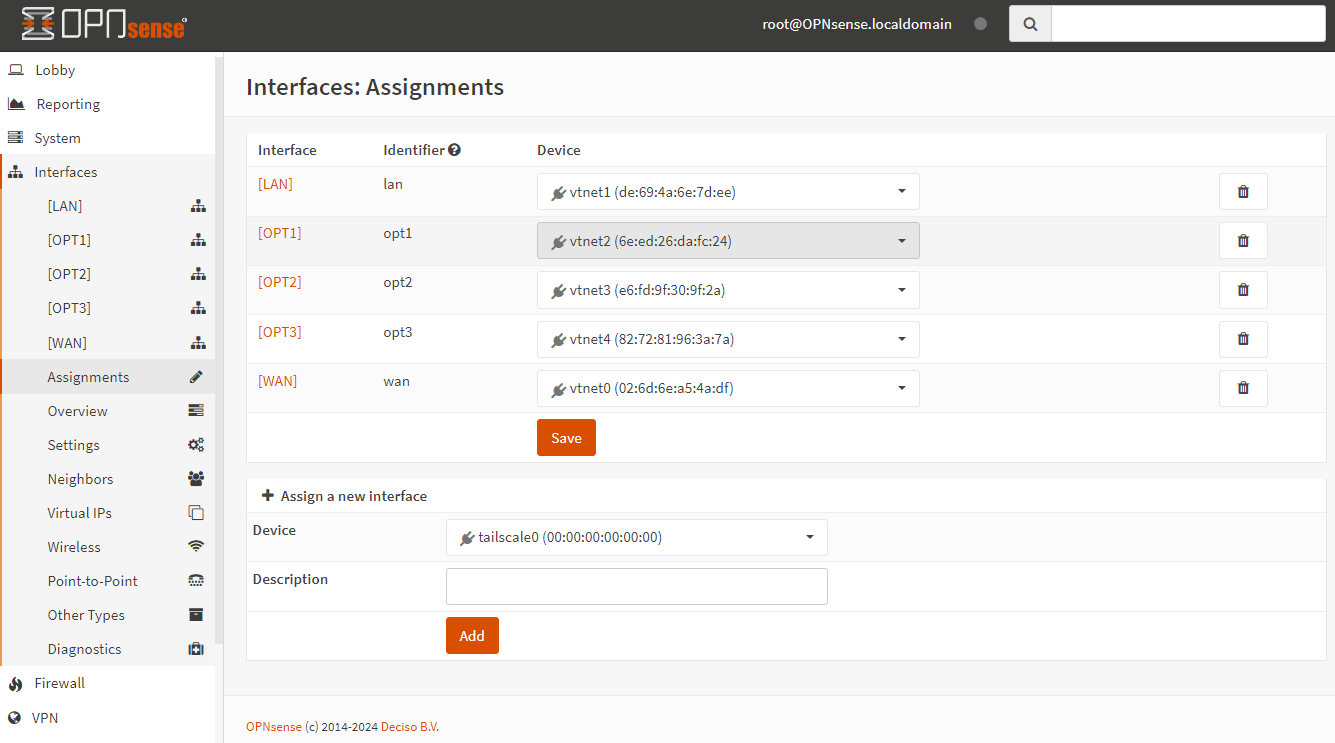
Figure 8. Tailscale Interface Assignment on OPNsense
-
Ensure that
tailscale0is selected from the Device drop-down menu on +Assign a new interface pane. -
Type a descriptive name, such as
tailscale, into the Description field. -
Click Add.
-
Click on the newly created interface for editing.
-
Click Enable Interface option to enable the Tailscale interface.
-
You may enable the Prevent interface removal option.
-
You may leave other options as default.
-
Click the Save button at the bottom of the page.
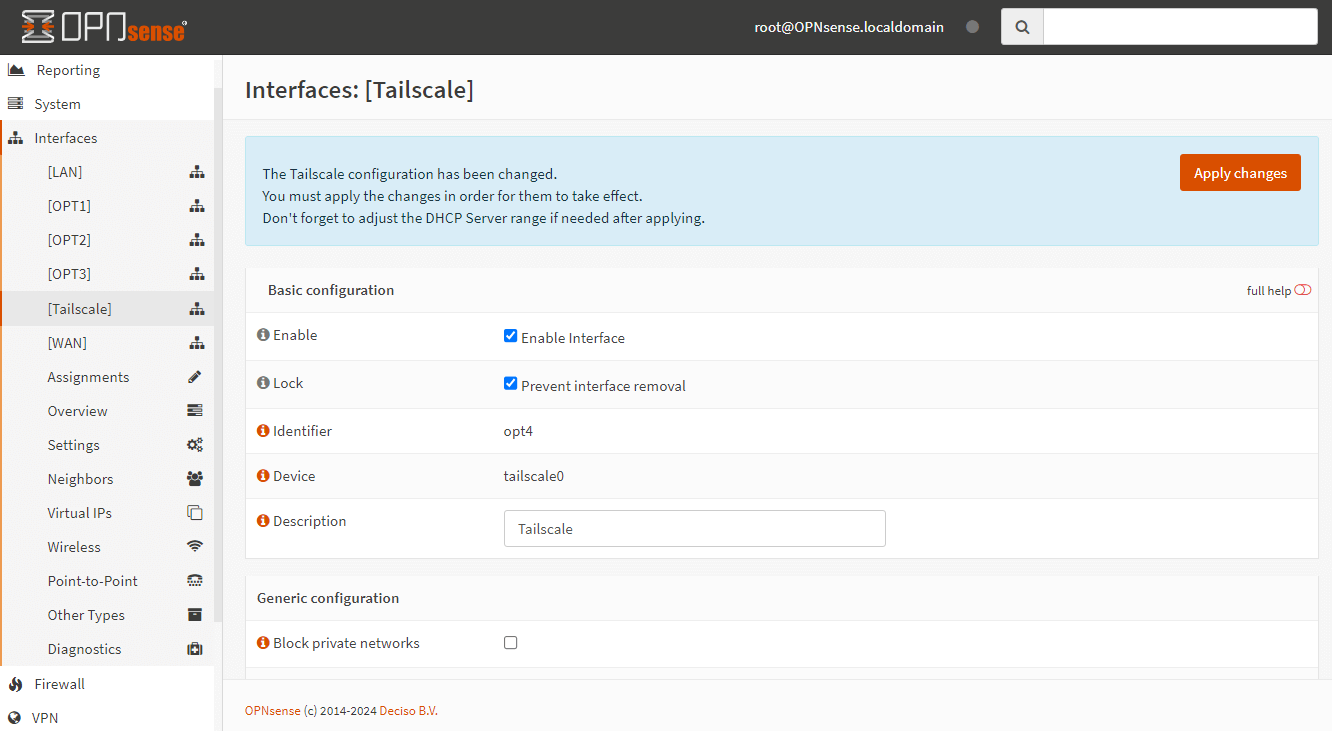
Figure 9. Enable Tailscale Interface on OPNsense
-
Click Apply Changes button to activate the settings.
-
You may check the IP address for Tailscale interface by navigating to the Interfaces → Overview on OPNsense web UI or by running the next command on OPNsense CLI:
ifconfig tailscale0You should see an output similar to the one given below:
tailscale0: flags=8043<UP,BROADCAST,RUNNING,MULTICAST> metric 0 mtu 1280
description: Tailscale (opt4)
options=80000<LINKSTATE>
inet 100.68.172.76 netmask 0xffffffff broadcast 100.68.172.76
inet6 fd7a:115c:a1e0::b544:ac4c prefixlen 48
groups: tun
nd6 options=1<PERFORMNUD>
Opened by PID 84861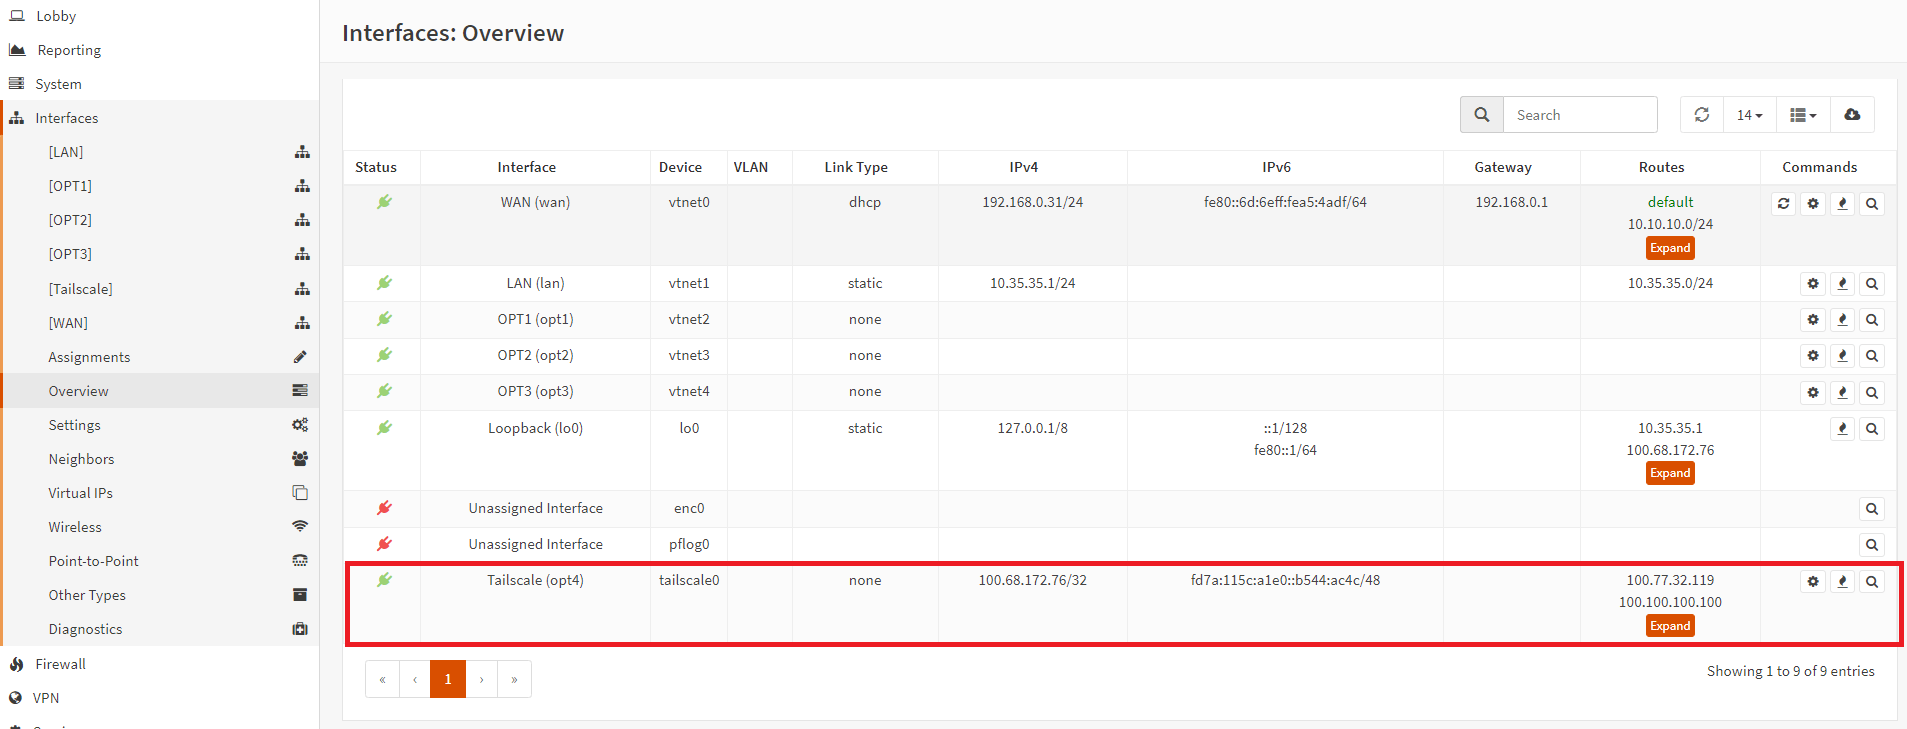
Figure 10. Interfaces overview on OPNsense
7. Define Firewall Rule
You may add a firewall rule to allow traffic on the newly added Tailscale interface by following the next steps so that other clients on your tailnet network can connect to OPNsense node or OPNsense LAN:
-
Navigate to the Firewall → Rules on OPNsense web GUI.
-
Select the Tailscale interface that you want to define a rule. This will list the existing firewall rules on the selected interface. By default, no firewall rules are defined and all incoming connections on this interface will be blocked until you add a pass rule.

Figure 11. Firewall rule on Tailscale Interface
-
Click the orange square with
+icon at the top right corner of the rule list. This will redirect you to the rule configuration page. -
Select
Passto allow a connection for the Action option.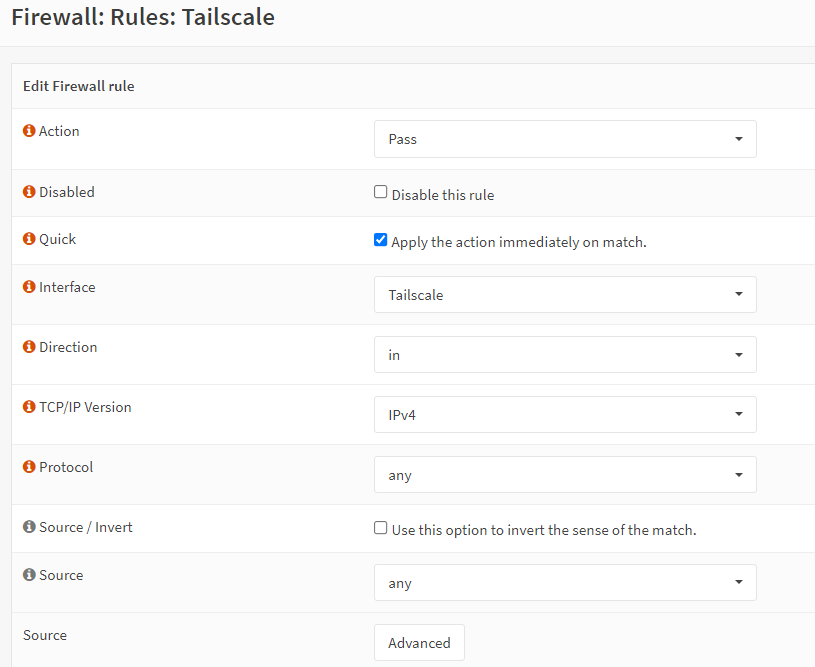
Figure 12. Tailscale Firewall rule configuration-1
-
You may enable logging.
-
You may enter a category to group firewall rules.
-
You may enter a description, such as
Allow all incoming tailnet trafficfor the rule which may be useful for rule maintenance. -
You may leave other fields as default or set them properly as you wish.
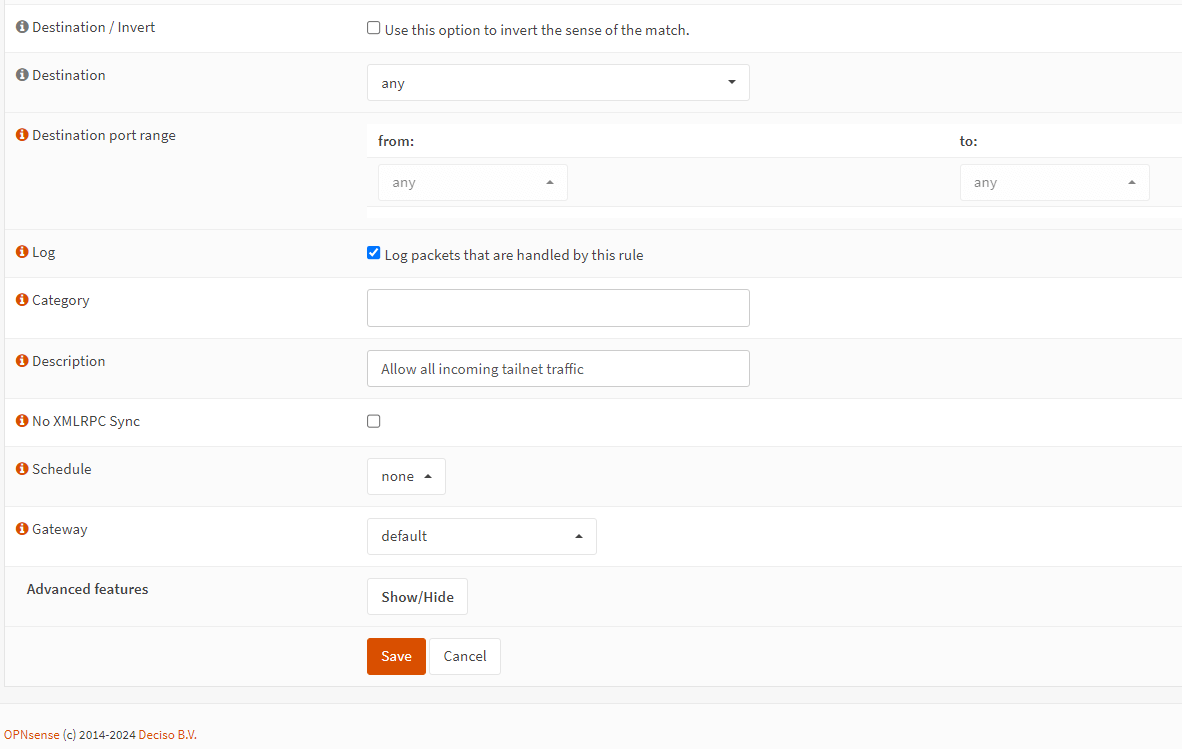
Figure 13. Tailscale Firewall rule configuration-2
-
Click the Save button to save the rule. This will take you to the interface rule list.
-
Click Apply Changes to activate the firewall rule.
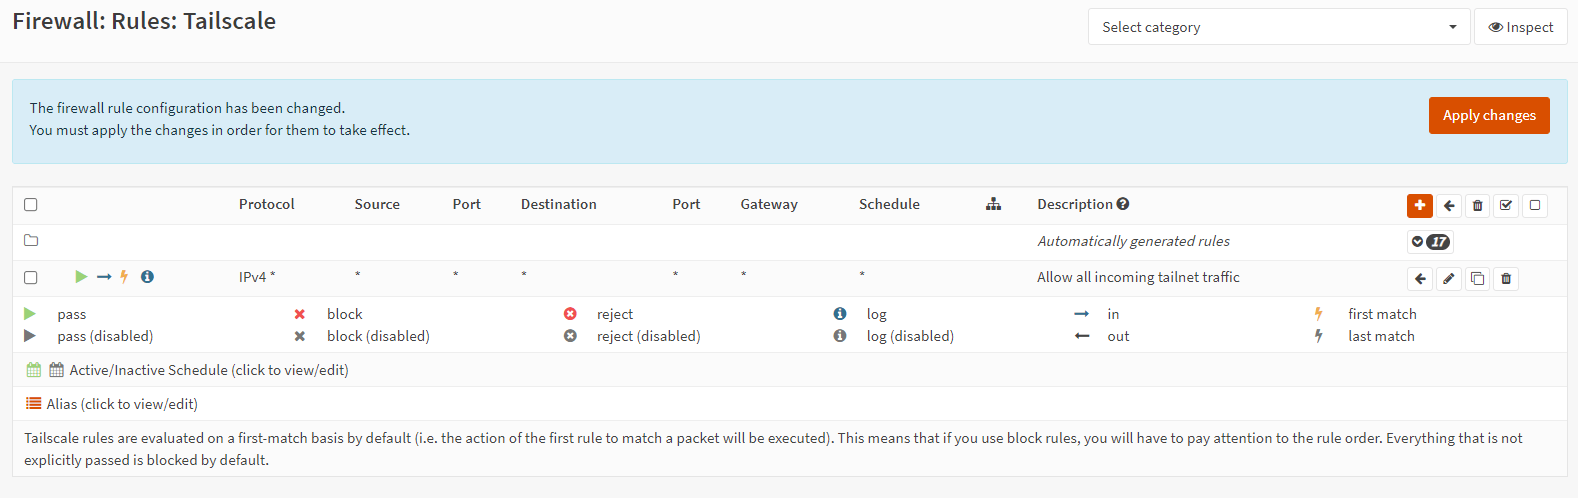
Figure 14. Applying Firewall rule
We recommend you define hosts aliases for all your Tailscale clients and only allow them to access OPNsense instead of allowing all incoming connections.
8. Validate Advertised Routes
If you have used the --advertise-routes flag to transmit the routes, such as OPNsense LAN network, to be advertised to other nodes, it will be necessary for you to authorize the routes for them to take effect. To approve the advertised routes on the Tailscale dashboard, you may follow the next steps:
-
Login to your Tailscale account.
-
Navigate to the Machines page.
-
Click the menu with 3-dots icon,
..., at the end of the newly added OPNsense machine row.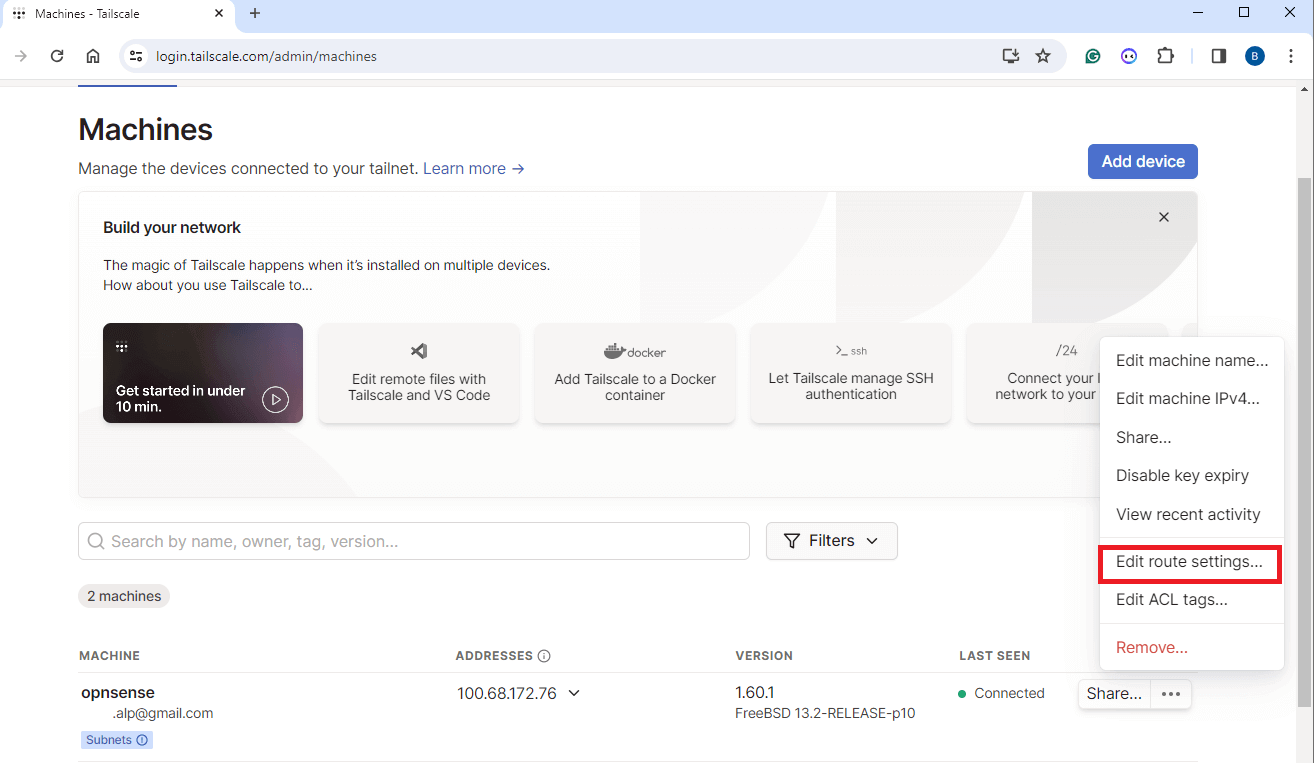
Figure 15. Edit route settings
-
Click Edit route settings... menu.
-
Select the advertised routes under Subnet routes pane to approve. If you have multiple routes waiting to be approved, you may use Approve all to tick all the routes.
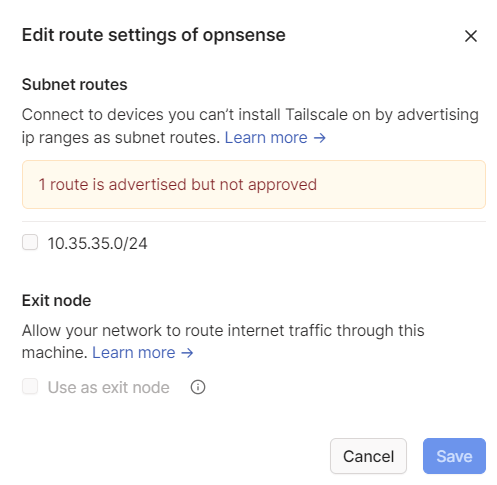
Figure 16. Selecting routes
-
Click Save button.
If the --advertise-exit-node option was enabled while executing the tailscale up command, the Use as exit node feature will be enabled.
9. Add Windows Client to Tailnet
You may quickly add your Windows PC to your Tailscale network by following the next steps:
-
Connect the Tailscale Download page at https://tailscale.com/download/windows on your Windows PC.
-
Click Download Tailscale for Windows button to download the Windows Installer.

Figure 17. Download windows tailscale installer
-
Click Save button to save the installer file, such as
tailscale-setup-1.60.1, on your local disk. -
After the installer file is downloaded, run the installer by double-clicking on it. A warning message will appear since Tailscale isn't a Microsoft-verified application. Click Install anyway button to start the installation.
-
Click
I agree to the license terms and conditionscheck box and click *Install button.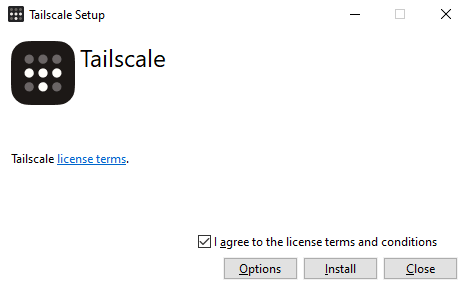
Figure 18. Accepting Tailscale license terms
-
After installation is completed, click on Log in from the Tailscale icon now in your system tray and authenticate in your browser
-
Sign in with your email address. This will redirect you Tailscale configuration page to connect your Windows client machine.
-
You may click Device details menu to view your newly installed Tailscale client.
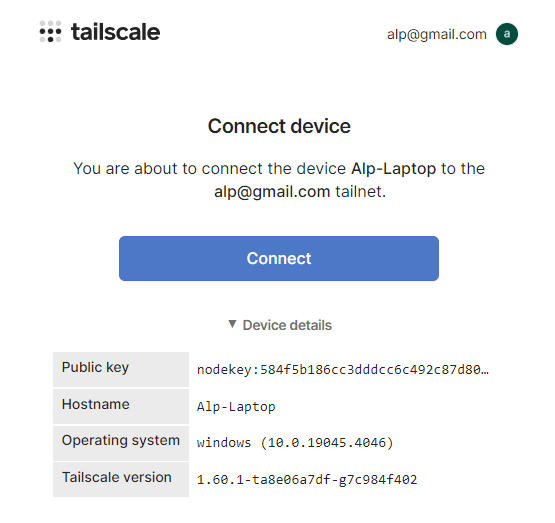
Figure 19. Connecting device to Tailscale
-
Click Connect button.
-
After your Windows client is added to your tailnet, you may see it on your Tailscale dashboard.
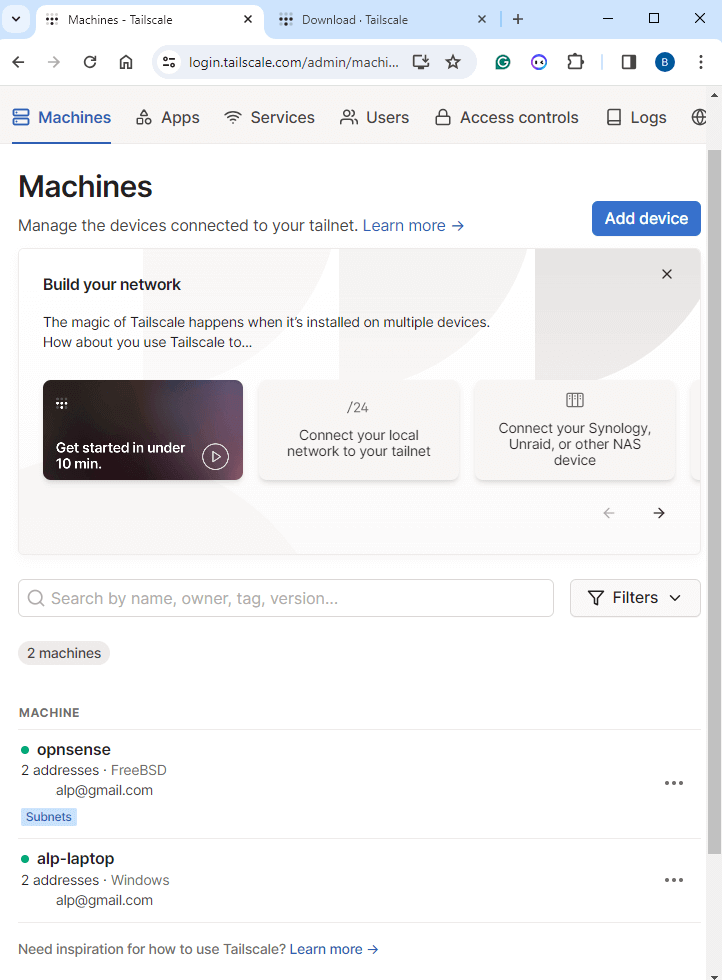
Figure 20. Viewing Tailnet Machines
Now, you can access your OPNsense firewall via SSH or web UI using the OPNsense LAN IP address, in our example 10.35.35.1, on your Windows PC
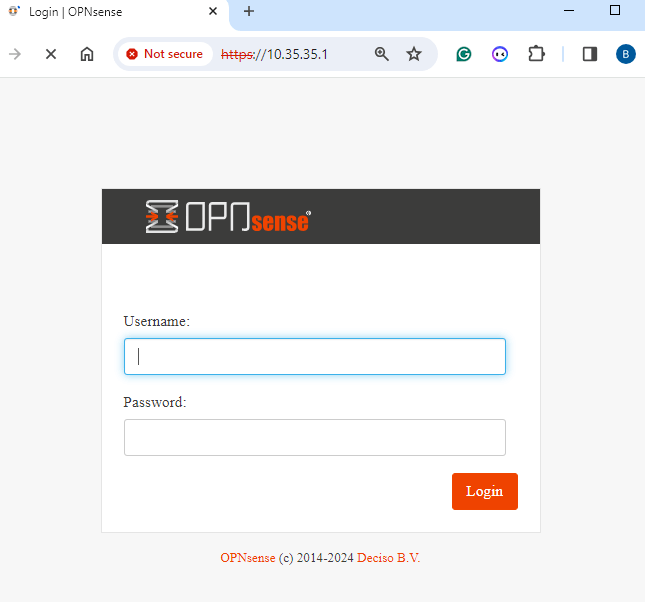
Figure 21. Accessing OPNsense web from tailnet
How to Configure OPNsense as an Exit Node on Tailscale?
You can route all non-Tailscale internet traffic through a designated device on your Tailscale network using the exit node function. The device which is responsible for directing your network traffic is known as an "exit node".
By default, Tailscale functions as an overlay network. It merely directs traffic between devices that are also running Tailscale. It does not intercept traffic from the public internet. This is optimal for the majority of users, who require secure communication between sensitive devices (home computers, company servers) but do not require additional encryption layers or latency on their public internet connection.
There may be circumstances in which you do want Tailscale to route your public internet traffic, such as when you are traveling internationally and require access to an online service (such as banking) that is only available in your home country or when you are in a cafe with untrusted Wi-Fi.
Tailscale allows you to configure a device on your network as an exit node to route all of your public internet traffic when necessary.
Configuring OPNsense as an Exit node and routing Internet traffic of other tailnet clients through the OPNsense firewall is a straightforward process. You may follow the steps given in the previous sections with the following exceptions:
-
Run Tailscale client service on OPNsense with
--advertise-exit-nodeparameter to advertise your OPNsense node as an exit node by running the next command on OPNsense CLI:tailscale up --login-server https://controlplane.tailscale.com \
--authkey <your_auth_key> \
--accept-routes \
--advertise-routes=<your_OPNsense_LAN> \
--force-reauth \
--advertise-exit-nodeNow you should see Exit Node badge under the OPNsense machine that is requesting to be used as an exit node, on the Machines page of the Tailscale admin console as given below figure.

Figure 22. Exit node on Tailscale Machines page
-
Allow the OPNsense firewall to be an exit node on the Tailscale admin console by clicking on the Edit route settings... panel of your OPNsense machine on the Tailscale admin console at https://login.tailscale.com/admin/machines and by enabling Use as exit node option.

Figure 23. Enabling use exit node option
-
Enable the exit node for each of your tailnet clients separately. To enable and select the exit node on your Windows client, you may follow the next steps:
- Selecting the Tailscale icon in your system tray menu.
- Click Exit node menu. This will open exit node configuration menu.
- Select the desired exit node device by its machine name from this menu, such as
opnsense. At any moment, routing through the exit node can be deactivated by selecting None from the corresponding menu. - Select Allow local network access if you wish to permit direct access to your local network when traffic is routed via an exit node.
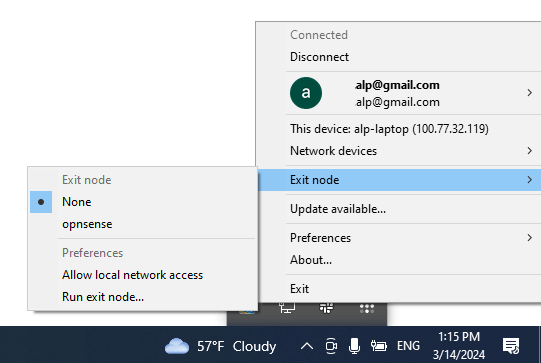
Figure 24. Selecting exit node on Windows client
You can validate the routing of your tailnet clients' traffic by the exit node device, such as the OPNsense firewall, by utilizing online tools to examine their public IP address. The public IP of the exit node should be displayed instead of the public IP address of your tailnet clients.
What are the Advantages of Tailscale?
Tailscale differs from standard VPNs by establishing a peer-to-peer mesh network, known as a tailnet, instead of routing all network traffic via a single gateway server. The major benefits of Tailscale VPN are listed below:
- Increased throughput
- Reduced Latency
- Enhanced Reliability
- Simplicity
What are the Use Cases for Tailscale?
Enterprise leaders may mitigate their security risk by significantly simplifying the complexity of internal networks. Through the use of Access Control Lists and your current identity provider, every user is granted precise and tailored access privileges. This ensures that your accountants may exclusively access the payroll system, your support staff can alone access the bug tracker, and your engineers can specifically access servers and databases.
Small company owners may quickly and affordably give their remote staff with a secure method of accessing critical information, without the need for expensive conventional VPN solutions.
Tailscale enables developers to effortlessly deploy experimental services to their team without the need for laborious firewall rules and network configuration setup.