OPNsense Wireguard: Setup and Configuration
WireGuard is a simple and fast VPN protocol that employs modern cryptography. It aims to be faster and less complicated than IPsec, as well as a significantly more performant alternative to OpenVPN. It has a smaller codebase, which makes auditing and maintaining it easier. It was originally designed for the Linux kernel, but it is now cross-platform and widely deployed. We believe that the best VPN fo OPNsense is WireGuard.
In this guide, we walk you through the complete setup of WireGuard on OPNsense, a powerful open-source firewall and routing platform. Whether you're a network administrator or a home user, this tutorial will help you verify WireGuard availability, configure the VPN server, add peer devices like Windows or Android clients, and test your connection to ensure secure remote access. From initial setup to verifying tunnel handshakes, all critical steps are covered in a clear, step-by-step format.
")
Figure 1. WireGuard P2P VPN Topology (OPNsense WireGuard Server and Android/Windows Clients)
You can use this WireGuard setup to securely access your company or home network from all over the world.
You can quickly install Zenarmor NGFW Plug-in on your OPNsense VPN server to protect remote employees from cyber threats.
Zenarmor NGFW Plug-in for OPNsense is one of the most popular OPNsense plug-ins and allows you to easily upgrade your firewall to a Next Generation Firewall in seconds. NG Firewalls empower you to combat modern-day cyber attacks that are becoming more sophisticated every day.
Some of the capabilities are layer-7 application/user aware blocking, granular filtering policies, commercial-grade web filtering utilizing cloud-delivered AI-based Threat Intelligence, parental controls, and the industry's best network analytics and reporting.
Zenarmor Free Edition is available at no cost for all OPNsense users.

What Makes WireGuard a Secure and Fast VPN Option for OPNsense?
WireGuard has rapidly gained recognition as one of the most secure, lightweight, and high-performance VPN solutions available today. Its seamless integration with OPNsense, a widely used open-source firewall and routing platform, makes it a powerful choice for both home and enterprise networks. The following characteristics explain why WireGuard is particularly well-suited for OPNsense users.
-
Modern and Robust Encryption Protocols: WireGuard utilizes modern cryptographic primitives such as ChaCha20 for encryption, Curve25519 for key exchange, Poly1305 for data authentication, and BLAKE2s for hashing. These algorithms are considered among the most secure and efficient in current use. Unlike older VPN protocols like OpenVPN or IPsec, WireGuard avoids supporting legacy cryptographic options, reducing the attack surface significantly. The use of ChaCha20 is especially beneficial for performance on low-powered devices, making it an excellent choice for embedded or resource-constrained environments running OPNsense.
-
Lightweight and Auditable Codebase: WireGuard’s codebase is remarkably small, consisting of only about 4,000 lines of code. This minimalist design stands in stark contrast to older VPN protocols, which often contain hundreds of thousands of lines of code. A smaller codebase not only enhances performance but also facilitates comprehensive security audits, reducing the likelihood of vulnerabilities. OPNsense, being a security-focused platform, benefits greatly from WireGuard’s lean and clean implementation.
-
Superior Performance and Faster Connections: WireGuard is designed to be connectionless and operates over UDP, enabling it to establish tunnels almost instantly. It employs a stateless handshake mechanism and supports roaming, meaning that clients can change IP addresses without interrupting the VPN connection. This leads to noticeably lower latency and faster reconnection times compared to traditional VPN protocols. OPNsense users experience quicker VPN sessions and smoother remote access when using WireGuard.
-
Simplicity in Configuration: One of WireGuard’s key advantages is its configuration simplicity. It relies on static key pairs for authentication and uses clearly defined
[Interface]and[Peer]configuration blocks. This straightforward structure eliminates the complexities found in OpenVPN setups, such as certificate authorities, TLS configurations, and Diffie-Hellman key exchanges. On OPNsense, administrators can easily configure WireGuard using the intuitive web interface, minimizing errors and accelerating deployment. -
Kernel-Level Integration for Enhanced Efficiency: WireGuard is implemented directly within the kernel on supported systems such as Linux and FreeBSD. This allows it to avoid the overhead associated with context switches between user space and kernel space, resulting in significantly better performance. Since OPNsense is based on FreeBSD, WireGuard’s kernel-level support ensures optimal throughput and lower CPU utilization, especially under high network loads.
-
Seamless Integration with OPNsense GUI: OPNsense provides native support for WireGuard through a user-friendly graphical interface. Administrators can manage peers, generate QR codes for mobile devices, and monitor handshake status directly from the OPNsense dashboard. This integration streamlines the deployment process and allows for easier management and troubleshooting, reducing the operational burden on network administrators.
-
Efficient Use of System Resources: Due to its optimized architecture and efficient cryptographic design, WireGuard consumes fewer CPU cycles, less memory, and overall lower system resources than traditional VPN solutions. This makes it particularly effective for use on embedded firewall appliances and small form-factor hardware, where OPNsense is commonly deployed. It ensures that other essential services, such as IDS/IPS, routing, and traffic shapin,g can run concurrently without degradation in VPN performance.
In summary, WireGuard’s combination of strong security practices, minimal code complexity, high performance, and ease of use makes it an ideal VPN solution for OPNsense environments. Whether deployed in home networks or enterprise settings, WireGuard provides a modern and reliable approach to secure communications with minimal overhead.
How to use WireGuard Server?
To successfully set up and use a WireGuard server on OPNsense, follow the step-by-step instructions below. These steps cover enabling the service, configuring the instance, and setting up client peers.
1. Enable the WireGuard Service:
Before you can start configuring the server, you need to activate the WireGuard service in the OPNsense interface with the following steps.
-
Navigate to
VPN → WireGuard → General. -
Check the box for Enable WireGuard.
-
Click Save to apply the changes.
2. Create a Instance (Server Configuration):
Once the service is enabled, you need to create a WireGuard instance that will act as the server with the following steps.
-
Go to
VPN → WireGuard → Instances. -
Click on
+ Addto create a new instance. -
Fill in the required fields:
-
Name: Give your instance a recognizable name (e.g., MyWireGuardServer).
-
Listen Port: Enter a UDP port number, such as 51820.
-
Private Key: Click the button to auto-generate a private key.
-
Public Key: This is automatically derived and shown after saving.
-
-
Click Save.
3. Add Peer (Client) Configuration:
After setting up the server instance, the next step is to add peers clients that will connect to your WireGuard server.
-
Go to
VPN → WireGuard → Peers. -
Click on
+ Addto create a new peer configuration. -
Fill in the following details:
-
Name: Choose a name like MyAndroidClient or MyWindowsClient.
-
Public Key: Paste the public key generated on the client device.
-
Allowed IPs: Enter the client’s virtual IP address in CIDR format (e.g., 10.0.0.2/32).
-
Endpoint Address and Port (optional): Use this if you're adding a static client (e.g., remote Windows PC).
-
-
Leave other settings as default unless specified.
-
Click Save.
4. Assign Interface to WireGuard:
To ensure the WireGuard traffic can be properly routed and managed, you need to assign it to an interface in OPNsense with the following steps.
-
Go to
Interfaces → Assignments. -
From the drop-down menu, select your WireGuard instance (e.g., wg0).
-
Click Add, then click on the newly created interface (e.g., OPT1).
-
Enable the interface, rename it to something like WireGuardVPN, and click Save.
5. Configure Firewall Rules:
Firewall rules must be configured to allow incoming and outgoing traffic through the WireGuard interface with the following steps.
-
Go to
Firewall → Rules → WireGuardVPN(or the interface name you assigned). -
Click
+ Addto create a new rule. -
Set Action to Pass, Protocol to any, Source and Destination to any.
-
Click Save and then Apply Changes.
6. Test the VPN Connection:
After all configurations are complete, it's time to test if the VPN tunnel works correctly with the following steps.
-
On your client device, activate the WireGuard connection.
-
On the OPNsense dashboard, go to
VPN → WireGuard → Statusto check if a handshake is established. -
You may also view logs under
System → Log Files → GeneralorFirewall Logsto verify successful traffic.
How to Configure the WireGuard VPN Server in OPNsense?
WireGuard is a modern, high-performance VPN protocol that offers superior speed, security, and simplicity compared to traditional VPN solutions like OpenVPN and IPsec. OPNsense includes built-in support for WireGuard, allowing users to set up a secure VPN server with minimal effort. In this section, we will walk through the complete process of configuring the WireGuard VPN server in OPNsense from verifying its availability to adding peers and applying firewall rules. Whether you are connecting from a Windows PC, mobile device, or remote office, this guide will help you build a reliable VPN infrastructure using WireGuard on OPNsense.
Step 1. Verify WireGuard Availability in OPNsense
As of OPNsense version 24.1 and later, WireGuard is included as a core componentof the system. This means you no longer need to manually install the os-wireguard plugin. To check if WireGuard is available follow these steps below.
-
Log in to your OPNsense web interface.
-
Navigate to
VPN → WireGuardfrom the main menu. -
If the WireGuard configuration page opens successfully, it is already installed and ready to use.

Figure 1. WireGuard Service on OPNsense
tipIf you don’t see the WireGuard menu, make sure your OPNsense system is up to date by going to
System → Firmware → Status, and clicking Check for Updates.
If you're using OPNsense 21.x or 22.x, you will need to install the WireGuard plugin manually with the following steps.
-
Go to
System → Firmware → Plugins. -
Search for
os-wireguard. -
Click the
+icon to install the plugin. -
After installation, refresh the page and access WireGuard from
VPN → WireGuard.
Consider upgrading to the latest OPNsense version to benefit from built-in WireGuard support and better security.
Step 2: WireGuard VPN Server Configuration on OPNsense
After confirming that WireGuard is available on your OPNsense system (version 24.1 or later), you can now configure the WireGuard server. This includes setting the server’s IP address, listening port, and generating cryptographic keys for secure communication.
Follow the steps below to create your WireGuard server instance.
2.1. Enable WireGuard Service:
Before creating your VPN server instance, you must enable the WireGuard service. To do this, log in to the OPNsense web interface and follow these steps.
-
Go to
VPN → WireGuard → Instances. -
At the bottom of the page, check the Enable WireGuard option.
-
Click Apply to activate the backend service.
This step starts the WireGuard backend service that is required for creating and managing VPN tunnels.
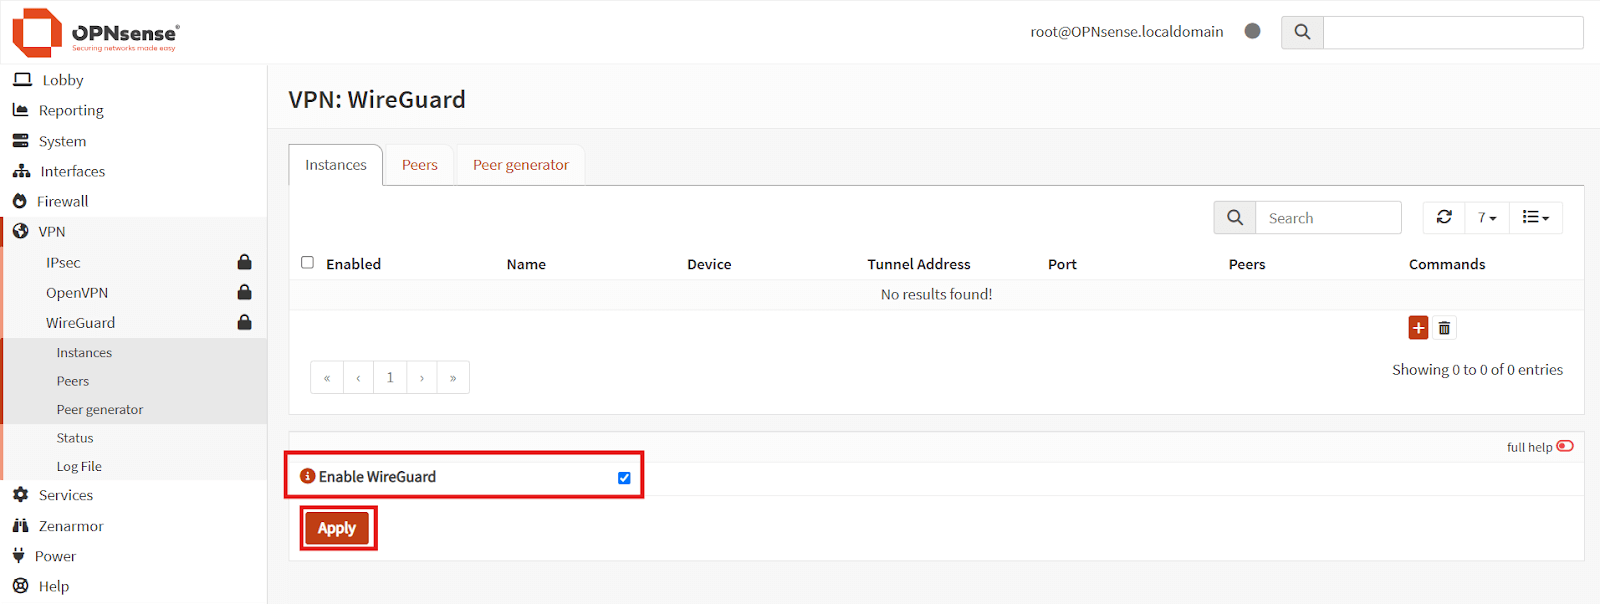
Figure 2. Enabling WireGuard Service on OPNsense
2.2. Create and Configure WireGuard VPN Server Instance on OPNsense:
Once WireGuard is enabled on your OPNsense firewall, the next step is to create and configure your WireGuard server instance. This instance will define how the VPN server listens for connections, what IP addresses it uses, and which cryptographic keys are assigned to it.
Follow the steps below to complete the server setup.
-
Click the + icon in the Instances tab to open the configuration form.
This instance will define the server’s listening port, tunnel address, and cryptographic identity.
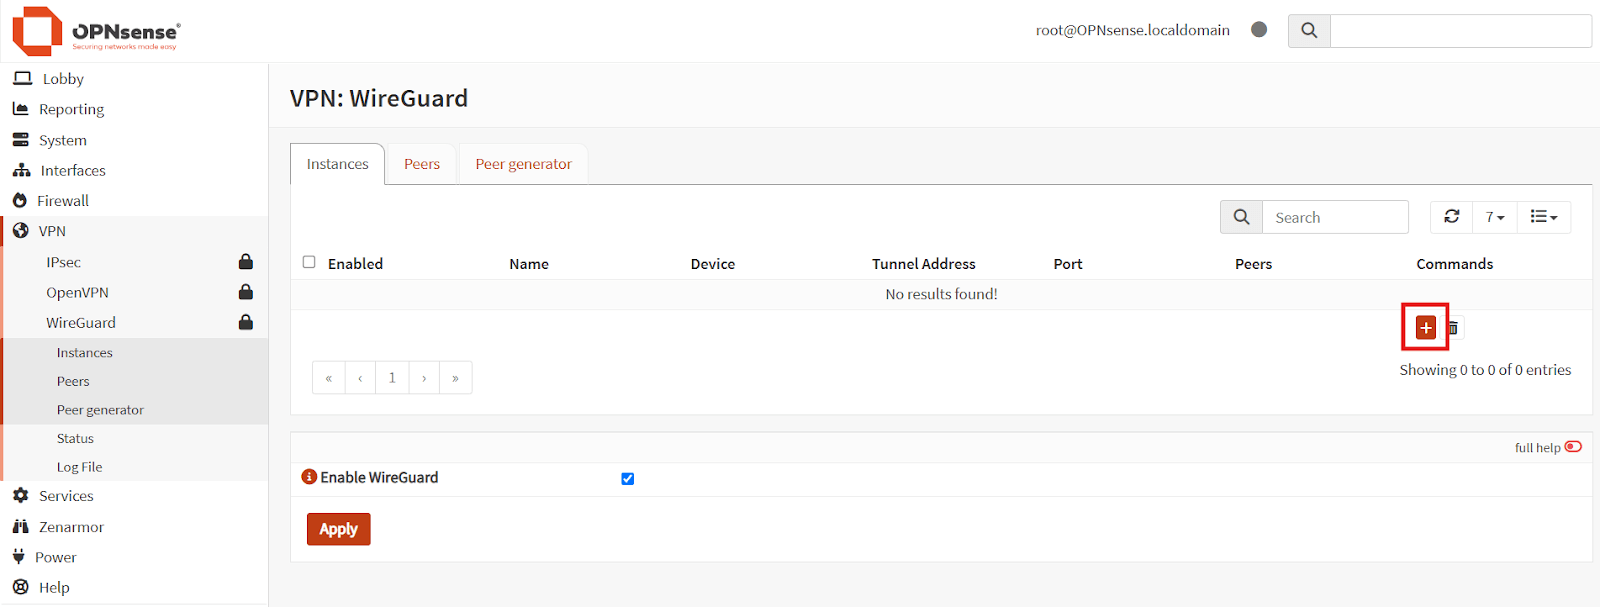
Figure 3. Adding a New WireGuard Instance
-
After clicking the "+" button, a configuration window titled Edit instance will appear. Here, you will define the basic parameters for your WireGuard server. Fill in the following fields.
Field Description Enabled Leave checked to activate this instance Name Any descriptive label (e.g., MyWireGuard) Public Key / Private Key Click the gear icon to auto-generate keys Listen Port Default is 51820, or set a custom unused UDP port Tunnel Address Example: 10.0.0.1/24 (used for VPN IP assignments) Peers Leave empty for now – will be configured later Disable Routes Leave unchecked unless needed for advanced routing infoThe tunnel address should be unique and reserved only for VPN communication. For example, 10.0.0.1/24 is common for small-scale setups.
tipIf you plan to connect multiple clients, ensure that the subnet (/24) has enough room to assign IP addresses to all peers.
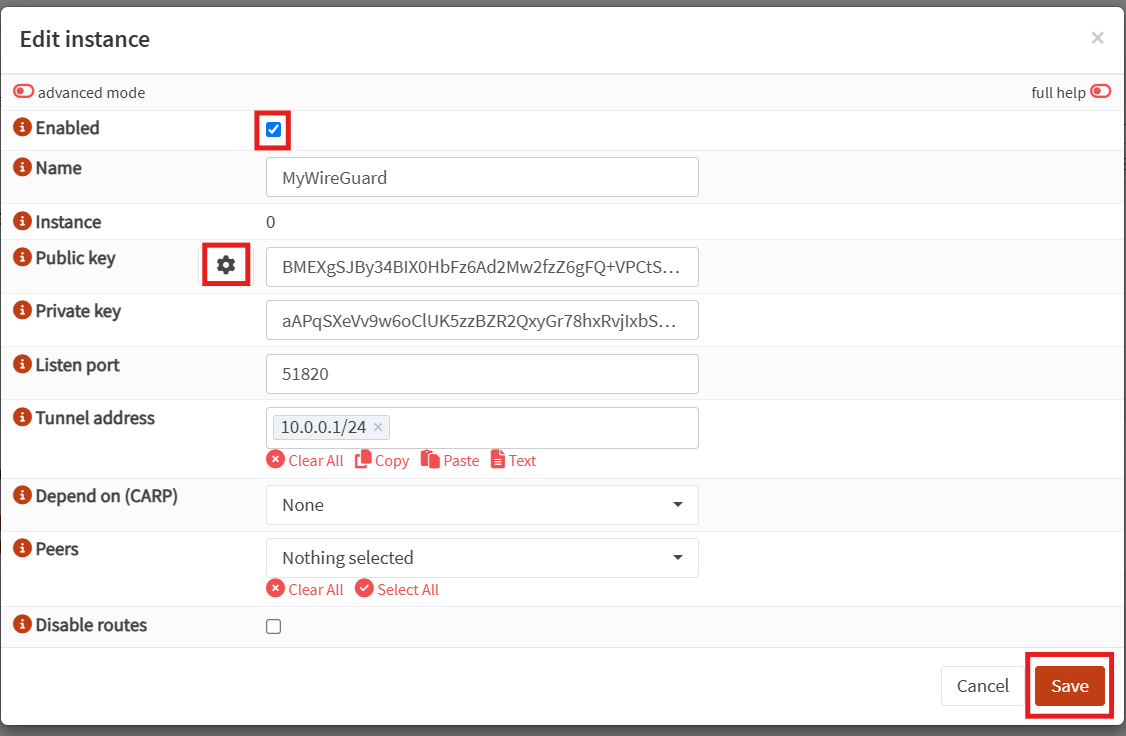
Figure 4. Filling out the Edit Instance form in WireGuard
-
After filling out all the necessary fields, click Save to create the instance. The server is now configured and ready to accept incoming WireGuard connections (once peers are added).
2.3. View and Copy the Server’s Public Key:
To complete the server-side setup, you need to copy the server’s public key, which will later be required when setting up clients. Follow these steps:
-
Go to
VPN → WireGuard → Instances. -
Click the Edit icon next to the instance you just created.
-
Find the Public Key field and copy the value.
Never share the private key. Only the public key should be exchanged with client peers.
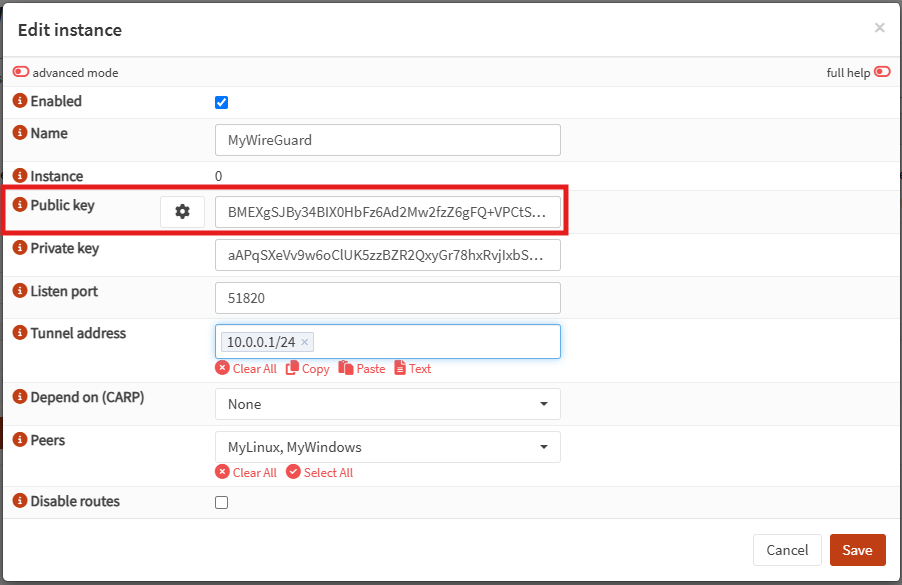
Figure 5. Viewing and copying the server’s public key
2.4. Close the Edit Window:
Once you’ve noted the public key, click Cancel or close the window. Your WireGuard server is now fully configured and listening on the defined port (e.g., 51820/UDP). You’re ready to proceed with peer (client) configuration in the next step.
This completes the initial server-side setup.
Step 3. WireGuard VPN Client Setup on Windows
In this section, we’ll walk through how to install and configure the WireGuard client on a Windows system. This setup will allow your Windows PC to securely connect to your OPNsense WireGuard VPN server using encrypted tunnels.
You may follow the steps below to install and configure WireGuard as a VPN client on a Windows platform.
3.1. Download and Install Windows WireGuard Client
Download and install the Windows installer from the WireGuard website. This option chooses the most recent version for your hardware, downloads it, and installs it.
-
Go to the official WireGuard website: https://www.wireguard.com/install
-
Under Windows, click Download Windows Installer
-
Run the installer and follow the on-screen instructions
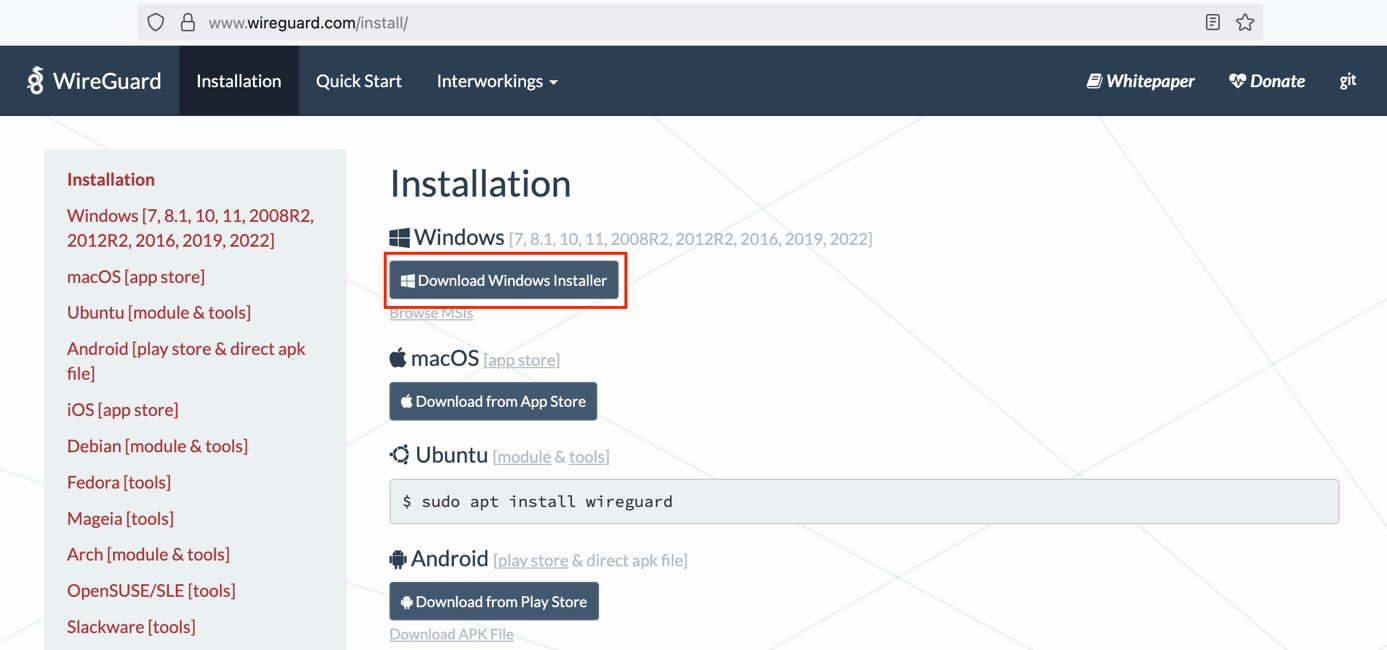
Figure 6. Downloading WireGuard Windows Installer
After the installation, you should see the WireGuard icon in the notification area on the taskbar.
Figure 7. WireGuard icon on taskbar
3.2. Configuring WireGuard Windows Client
-
Launch the WireGuard application. In the Tunnels tab, click the down arrow next to the Add Tunnel button.
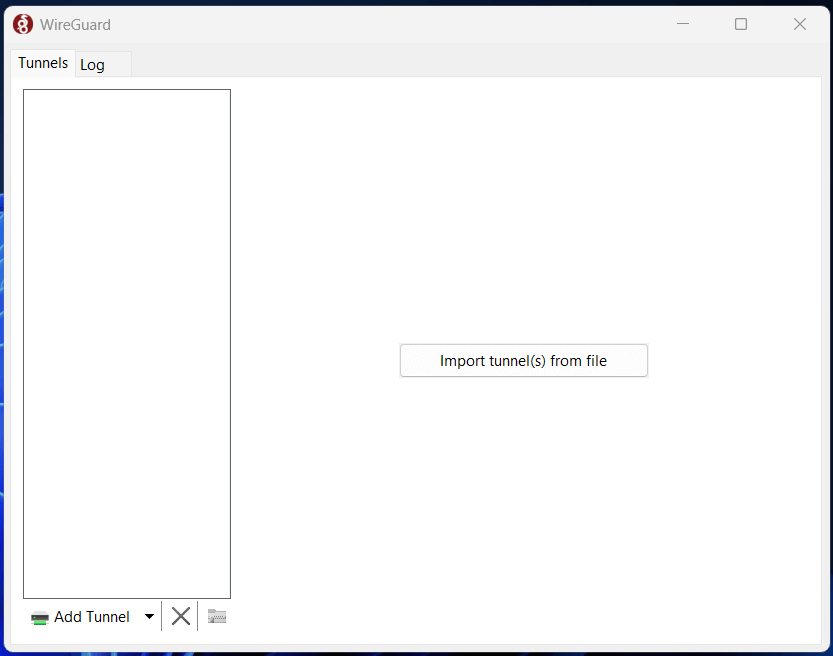
Figure 8. Configuring WireGuard on Windows Client
-
Choose Add empty tunnel.
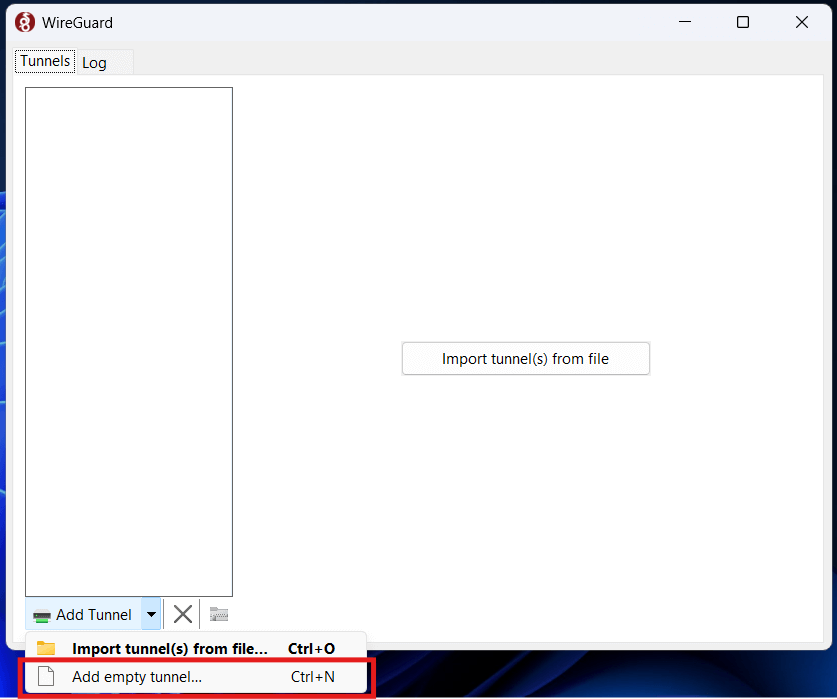
Figure 9. Adding empty tunnel
-
This automatically generates a public and private key pair for the client and displays them on the screen.
tipNote down the Public Key. You will need it later to add the Windows client as a peer on your OPNsense server.
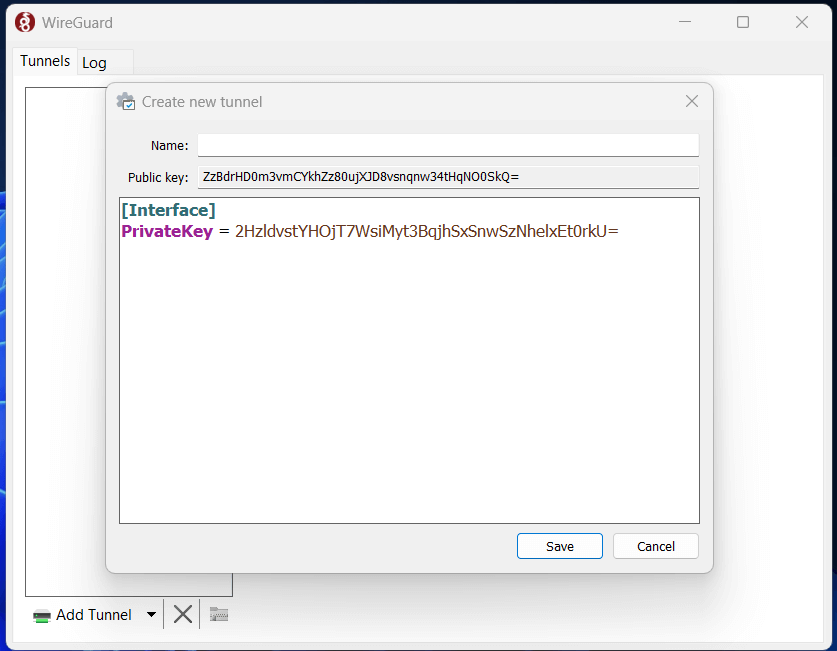
Figure 10. Generated key pair for the new tunnel
-
Enter a name with alphanumeric characters only (no spaces or punctuation) for the tunnel, such as MyWireGuard, and edit the configuration as follows.
[Interface]
PrivateKey = CLIENT_PRIVATE_KEY
Address = 10.0.0.11/24
DNS = 10.0.0.1
[Peer]
PublicKey = SERVER_PUBLIC_KEY
Endpoint = SERVER_IP_ADDRESS:51820
AllowedIPs = 0.0.0.0/0
Explanations of the fields in the interface section are given below.
[Interface]
-
PrivateKey: The private key of the Windows client (auto-generated)
-
Address: VPN IP address for this client. It must be unique (e.g., 10.0.0.11/24)
-
DNS: The DNS server used inside the tunnel, typically the WireGuard server (e.g., 10.0.0.1)
Explanations of the fields in the peer section are given below.
[Peer]
-
PublicKey: The public key of the WireGuard server on OPNsense (e.g., fyKJ4c6sXTVRTJla6zQ9wi4okRPRd/GsMbTMszjhAgA=)
-
Endpoint: Server’s public IP address and WireGuard port (e.g., 203.0.113.1:51820)
-
AllowedIPs – 0.0.0.0/0 means route all traffic through the VPN tunnel
-
3.3. Block untunneled traffic (kill switch) option
In the Edit Tunnel window of the WireGuard client, you can enable the Block untunneled traffic (kill-switch) option. This setting adds Windows Firewall rules to block all traffic that is not routed through the VPN tunnel.
You should enable this option only if:
- There is exactly one [Peer] section in your configuration.
- The AllowedIPs field is set to a catch-all address such as 0.0.0.0/0.
When enabled, this option ensures that no network traffic bypasses the VPN tunnel, preventing accidental IP leaks and protecting your privacy.
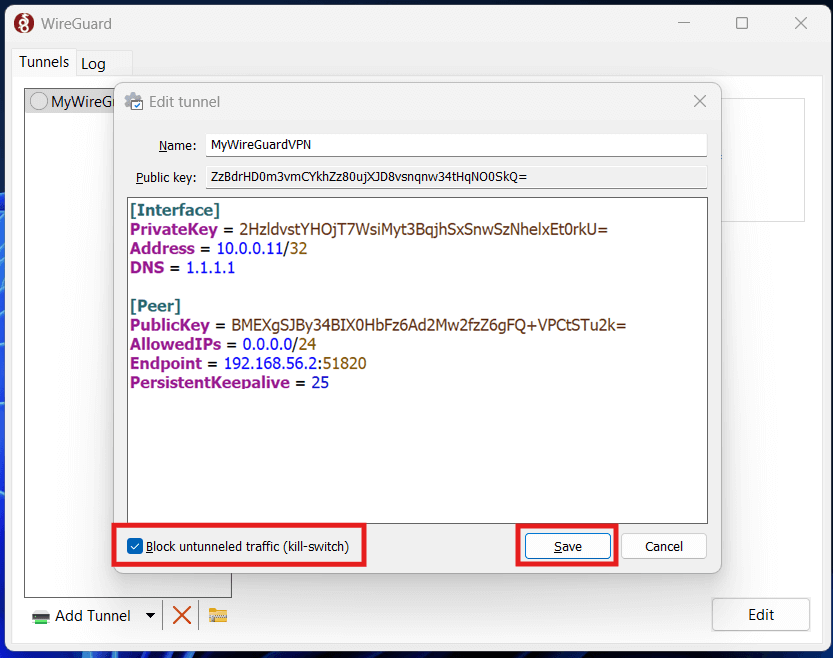
Figure 11. WireGuard Tunnel configuration on Windows client
Once completed, click the Save button to apply the settings.
Step 4. Adding WireGuard Endpoint (Client Peer) Configuration to the Server
To add the client’s public key and allowed IP to the WireGuard server on OPNsense, follow these steps below.
-
Navigate to
VPN → WireGuard → Peerson the OPNsense Web UI.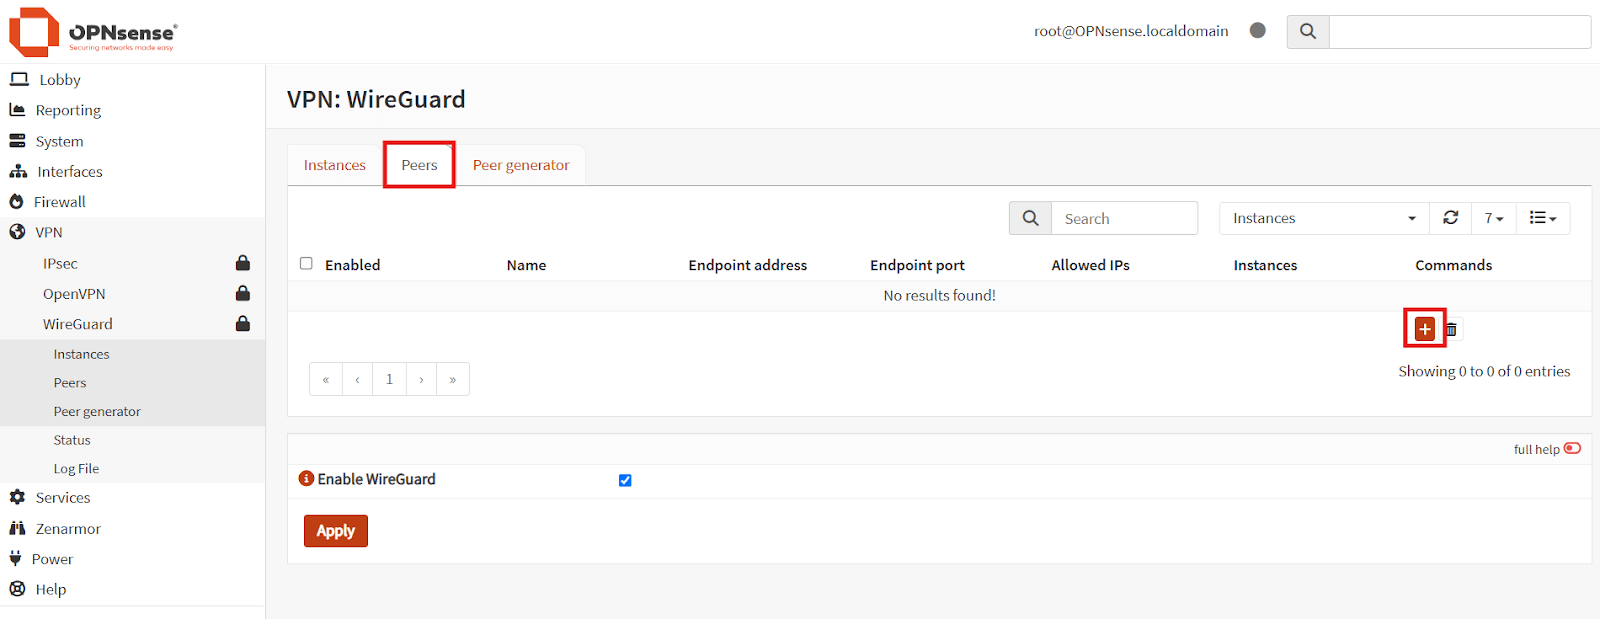
Figure 12. Adding WireGuard endpoint configuration on OPNsense
-
Click on the "+" button to add a new peer.
-
In the Edit peer dialog that appears, enter the following details.
-
Enabled: Ensure this box is checked.
-
Name: Choose a descriptive name for the peer, such as MyWindows.
-
Public Key: Enter the public key generated during the WireGuard client setup on Windows.
(Example: ZzBdrHD0m3vmCYkhZz80ujXJD8vsnqnw34tHqNO0SkQ=)
-
Pre-shared Key: Leave this field empty unless you’ve configured a pre-shared key on both sides.
-
Allowed IPs: Enter the client IP address you assigned in the WireGuard client configuration (use CIDR notation).
(Example: 10.0.0.11/32)
-
Endpoint Address: Optional. You may leave this empty for dynamic clients.
-
Endpoint Port: Optional. Default is usually 51820, or match what’s configured on the client.
-
Instances: Select the WireGuard instance you want to associate this peer with.
-
Keepalive Interval: Optional. Recommended to set this to 25 seconds if the client is behind NAT.
-
-
Click Save to apply the peer configuration.
Figure 13. Setting WireGuard Endpoint(Windows) configuration on OPNsense
Step 5. Configuring WireGuard Android Client
You can easily configure the WireGuard application on your Android device by following the steps below.
5.1. Download and install WireGuard Application on Android device
You can download and install the official WireGuard app from the Google Play Store.
Figure 14. Installing the WireGuard Android application from the Play Store
5.2. Configuring WireGuard Client on Android
Once the WireGuard application is installed, follow these steps to create a VPN tunnel:
-
Tap the blue + icon in the bottom-right corner.
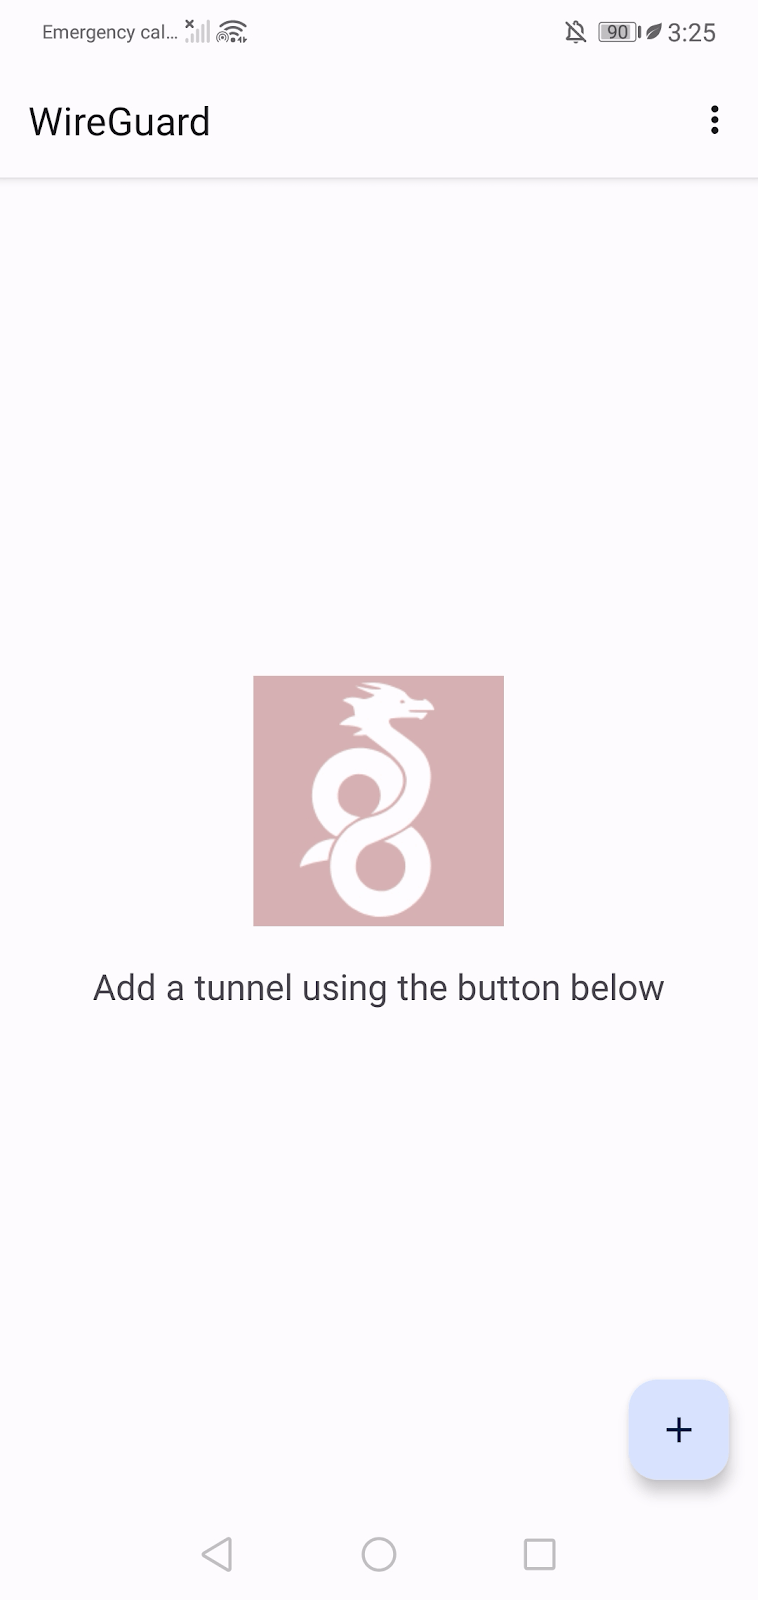
Figure 15. Adding a new WireGuard tunnel
-
Select Create from Scratch to manually configure a new tunnel.
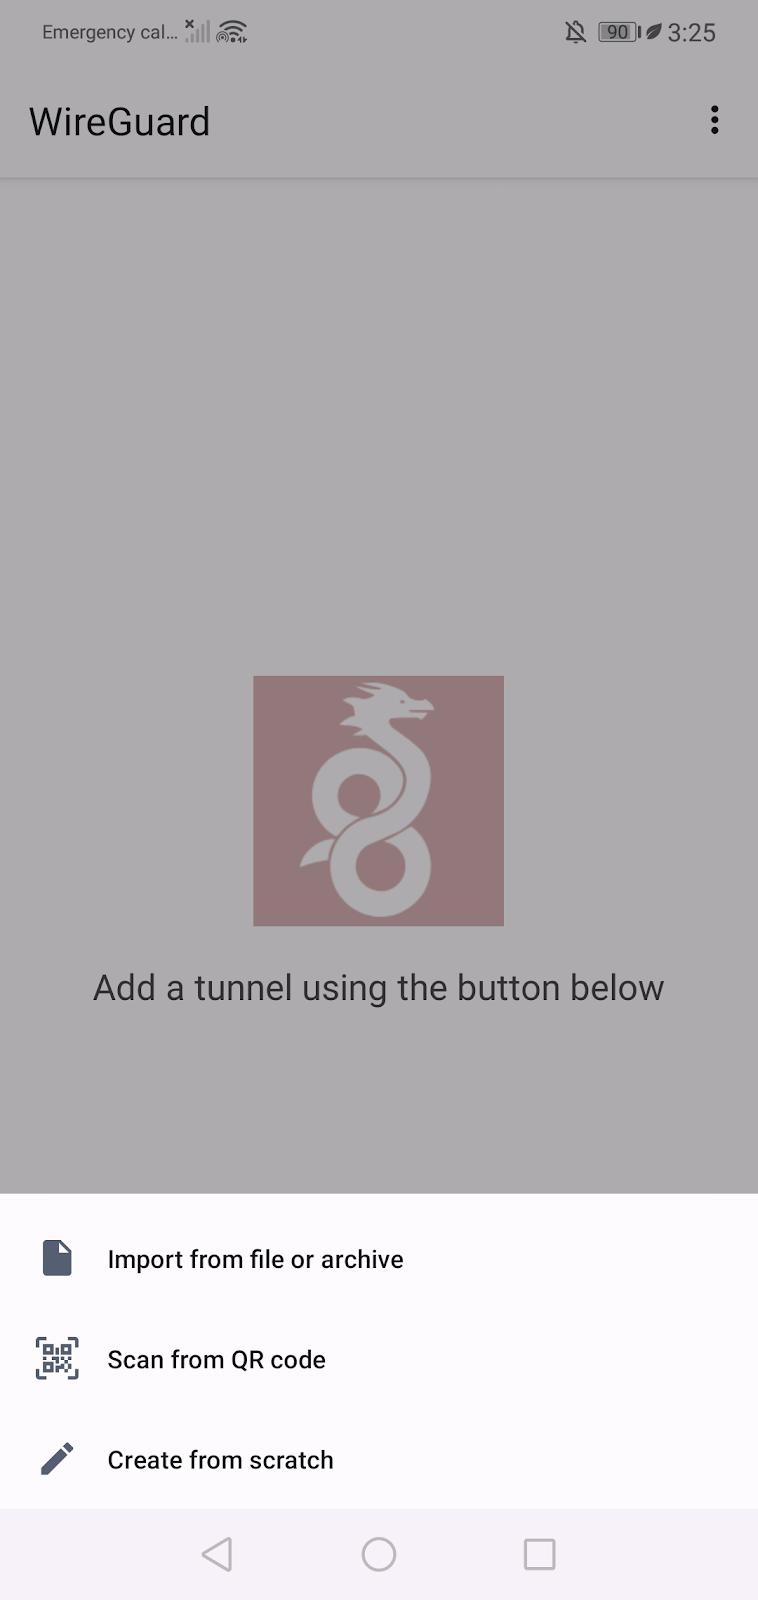
Figure 16. Creating a tunnel configuration from scratch
-
Set a Name for your tunnel, e.g., MyWireGuard.
-
Tap the recycle icon next to the "Private Key" field to auto-generate a key pair.
-
Set the Address, for example: 10.0.0.12.
-
Set the DNS, for example: 10.0.0.1.
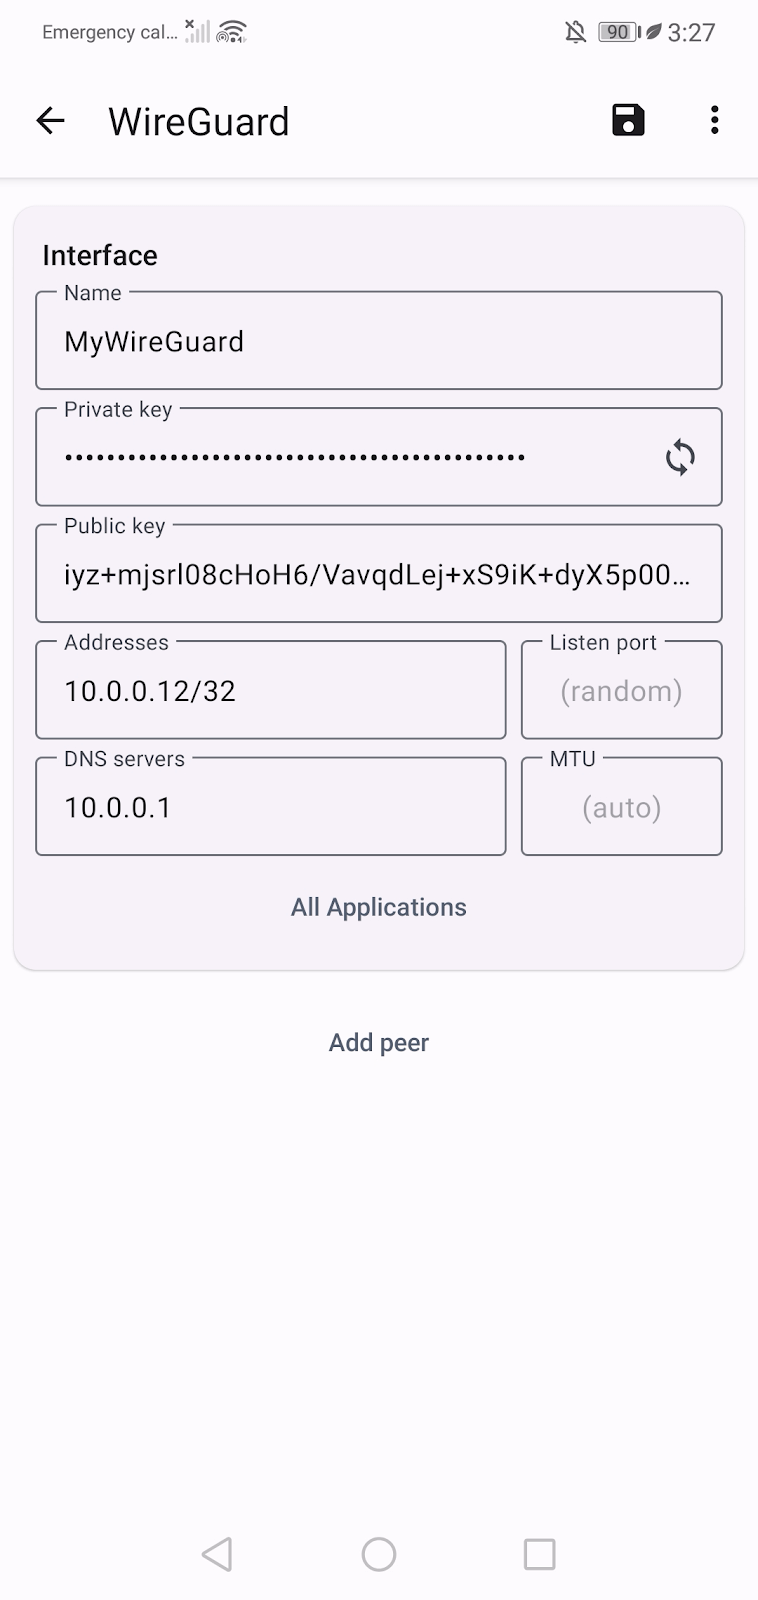
Figure 17. Android WireGuard client interface configuration
-
Tap Add Peer at the bottom to configure the peer settings.
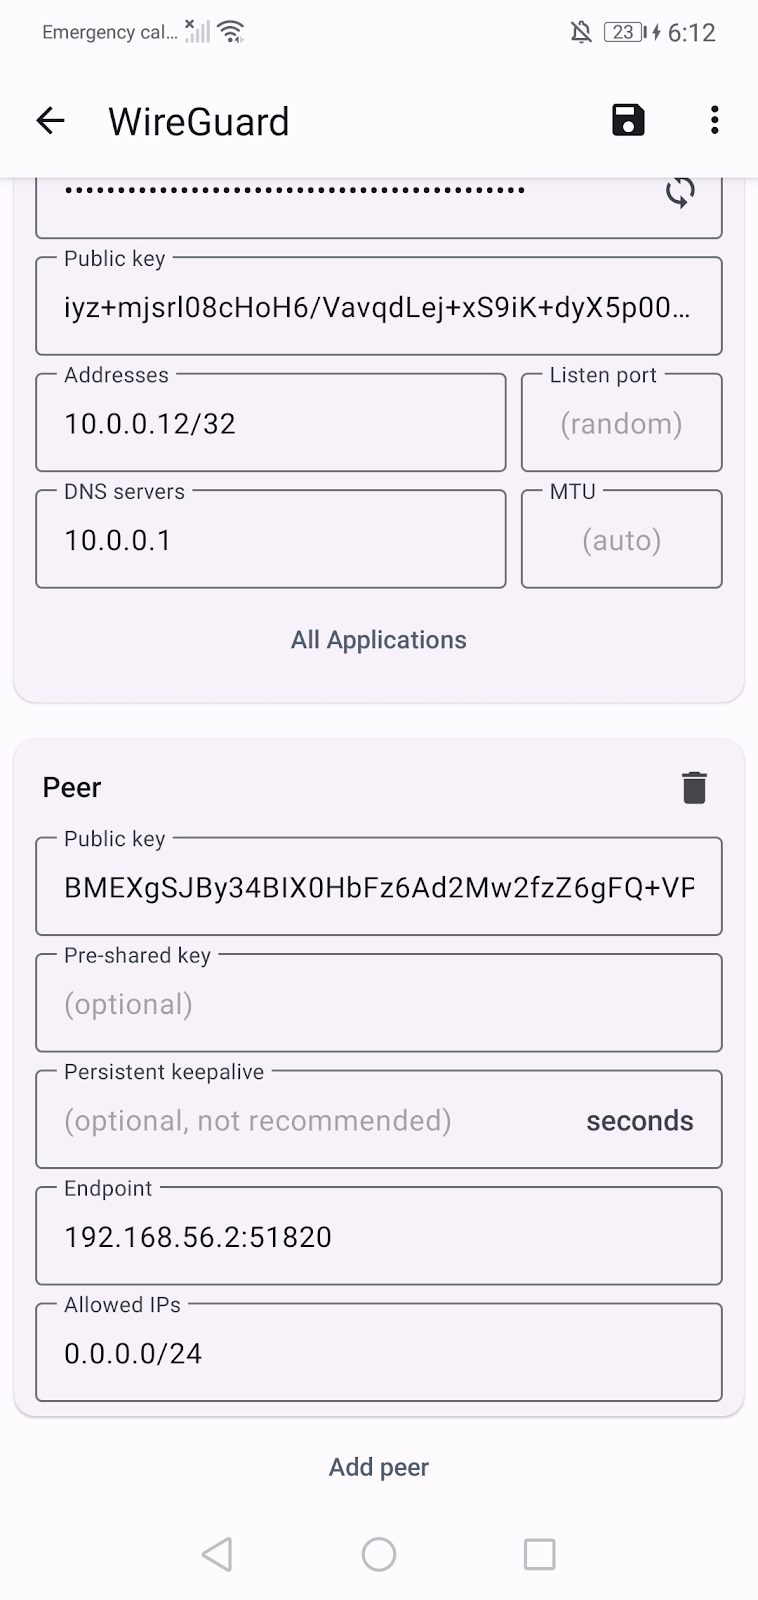
Figure 18. Adding peer information to the Android client
-
Copy the OPNsense WireGuard Server's Public Key from the configuration on OPNsense and paste it into the Public Key field in the peer section.
-
Set the Endpoint to the public IP address of the OPNsense server, followed by a colon : and the WireGuard port number. Example: 198.51.100.1:51820
-
Set Allowed IPs to 0.0.0.0/0. This means all traffic will be routed through the VPN tunnel.
-
Tap the floppy disk icon (top-right corner) to save the tunnel configuration.
Explanations of the fields in the interface section are given below:
-
PrivateKey: The private key for this Android client.
-
PublicKey: Automatically generated. This must be copied into the Peer configuration on the OPNsense server.
-
Address: The unique IP address for this client. It should match the AllowedIPs configured in OPNsense.
-
DNS: The IP address of a DNS server (typically the WireGuard server itself, e.g., 10.0.0.1).
Explanations of the fields in the peer section are given below:
-
PublicKey: The public key of the OPNsense WireGuard server.
-
Endpoint: The public IP address of the OPNsense server, followed by a colon : and the WireGuard listen port (e.g., 51820).
-
Allowed Ips: Use 0.0.0.0/0 to route all traffic through the VPN tunnel.
If you are using a Ubuntu desktop that needs a VPN connection, refer to the WireGuard Installation Guide for configuration steps specific to Linux clients.
Step 6. Adding WireGuard Endpoint (Android Client Peer) Configuration to the Server
To allow the Android client to connect to the VPN, its public key and IP address must be added as a new endpoint on the OPNsense WireGuard server. Follow these steps:
-
Go to
VPN → WireGuard → Peerson the OPNsense web interface. -
Click the + button to add a new endpoint.
-
Enter a descriptive Name, such as MyAndroid.
-
In the Public Key field, paste the public key generated on the Android WireGuard client.
Example:
rQdjEcn7UMbIverQ4D0FKfz+fkGLxClArwDsXCNf+DE= -
Set Allowed IPs to the IP address assigned to the Android client in CIDR format.
Example:
10.0.0.12/32 -
Click Save to apply the settings.
Once saved, you can view all configured WireGuard VPN endpoints (e.g., MyWindows, MyAndroid) under the VPN → WireGuard → MyAndroid tab on OPNsense.
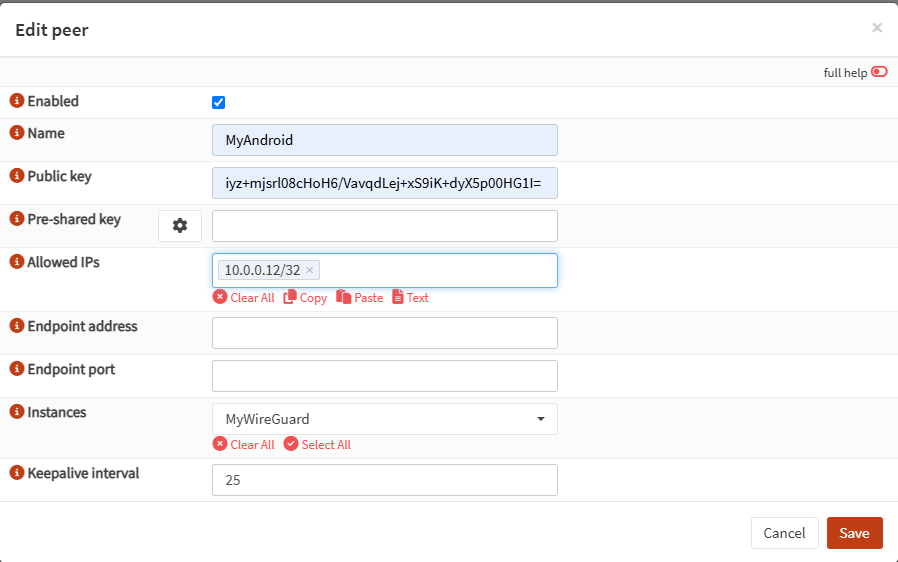
Figure 19. Setting WireGuard Endpoint(Android) configuration on OPNsense
Step 7. Adding Peers(VPN Clients) to Server Configuration on OPNsense
Once you have defined the VPN clients as Endpoints in OPNsense (e.g., MyWindows and MyAndroid), the next step is to add them as Peers to the WireGuard server configuration.
This step is essential because defining an Endpoint alone only registers the client's public key and IP address, it does not yet associate the client with the server instance.
By adding the clients as Peers to the configuration, you explicitly tell the WireGuard server which endpoints are allowed to connect and exchange traffic. This enables mutual communication between the server and each configured VPN client.
Follow the steps below to add the peers to the server's configuration.
-
Navigate to VPN → WireGuard → Instances in the OPNsense web interface.
-
Locate your WireGuard server instance (e.g., MyWireGuard) and click the Edit (pencil) icon.
-
In the **Peers dropdown menu, select the endpoints you have previously created, in this example, select MyWindows and MyAndroid.
-
Click Save to update the configuration.
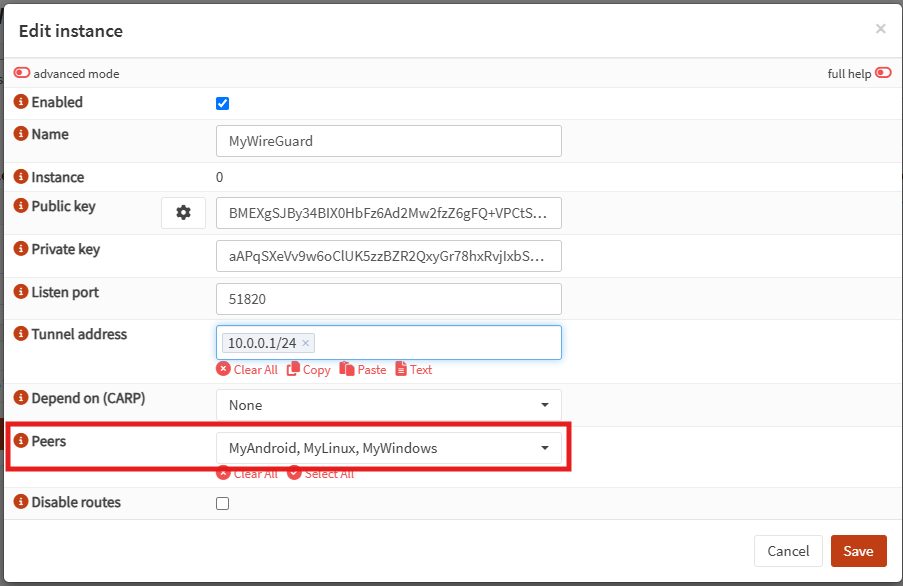
Figure 20. Adding VPN client endpoints to the WireGuard server configuration
Step 8. Enabling WireGuard Server on OPNsense
Once you have added the necessary peers (VPN clients) to the WireGuard configuration, the next step is to enable the WireGuard service so that the server can start listening for client connections.
Follow the steps below to enable the WireGuard server.
-
Navigate to the VPN → WireGuard → Interfaces tab on the OPNsense Web UI.
-
Check the Enable WireGuard checkbox to activate the service.
-
Click Apply to save and apply the changes.
This step starts the WireGuard service on your OPNsense firewall and prepares it to establish secure VPN tunnels with authorized clients.
If you’ve made changes to the instance or peer configurations, it’s a good idea to disable and re-enable the WireGuard service from this screen to ensure the changes take effect.
Step 9. Creating WireGuard Interface on OPNsense
Although not strictly required, it is recommended to create a dedicated WireGuard interface on OPNsense for better control and flexibility. This step allows you to apply specific firewall rules, simplifies alias management, and ensures proper NAT behavior for tunnel traffic.
If you only need to access the local network (LAN) via WireGuard and not public IP addresses (e.g., internet access), you may skip this step.
Although creating a WireGuard interface is not strictly required for a road warrior setup, it is strongly recommended due to several practical advantages:
- It automatically creates an alias for the tunnel subnet(s), simplifying the application of firewall rules. Otherwise, you'd have to define them manually.
- It adds an automatic outbound NAT rule for IPv4, enabling access to public IP addresses outside the local network without manual configuration.
- It allows each WireGuard instance (e.g., wg0, wg1, etc.) to have its own firewall rule set, ensuring clean separation and easier management.
To create and configure a WireGuard interface, follow the steps below.
-
Navigate to Interfaces → Assignments on the OPNsense Web UI.
-
Under Assign a new interface, find your WireGuard device in the dropdown, for example: wg0 (WireGuard - MyWireGuard).
-
Click the Add button.
-
The interface will be added to the list above with a default name like opt1.
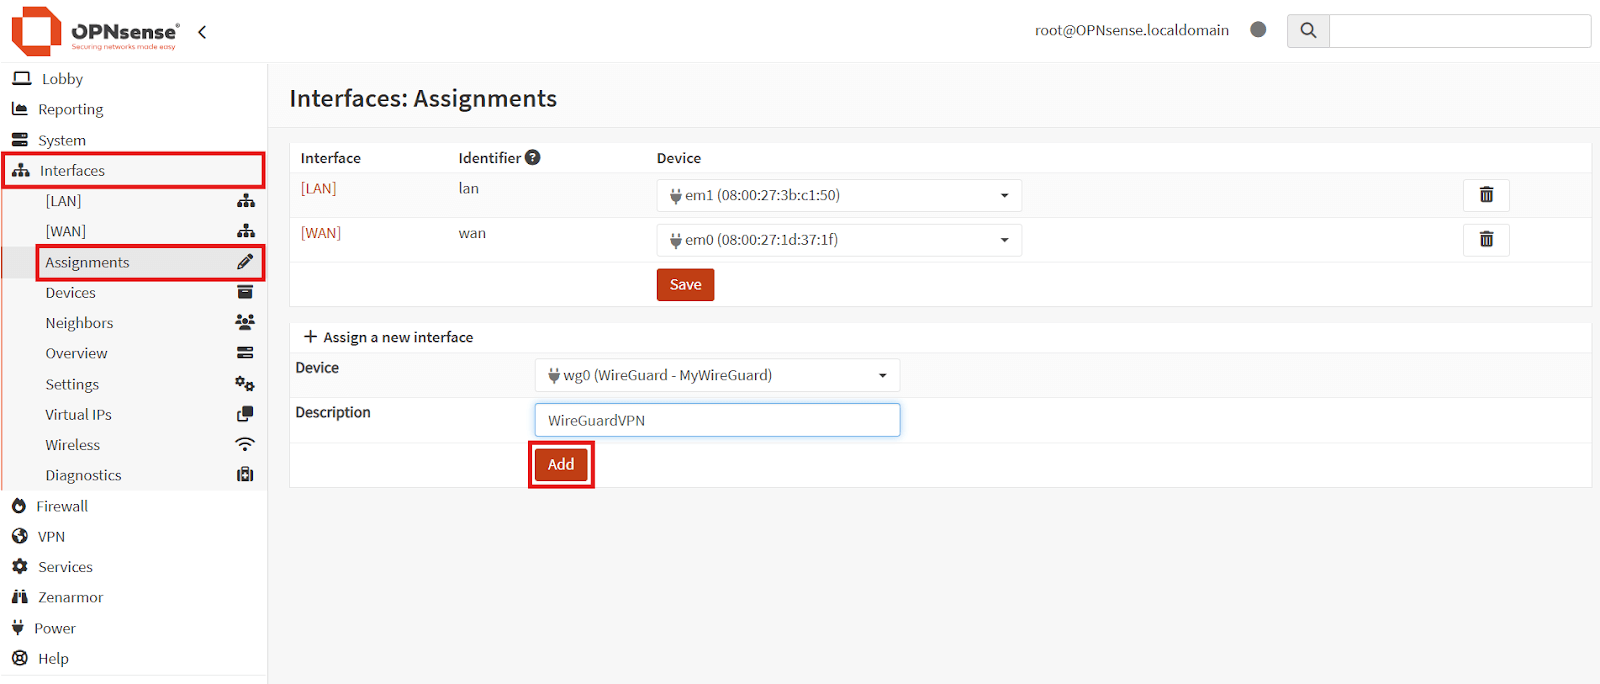
Figure 21. Creating WireGuard Interface on OPNsense
-
Click on the newly added interface name (e.g., [WireGuardVPN]) to open its configuration page.
-
Check the Enable interface box.
-
Provide a Description, such as MyWireGuardVPN.
-
In the Lock section, enable the checkbox Prevent interface removal.
-
Leave other settings as default.
-
Click Save.
-
Click Apply changes.
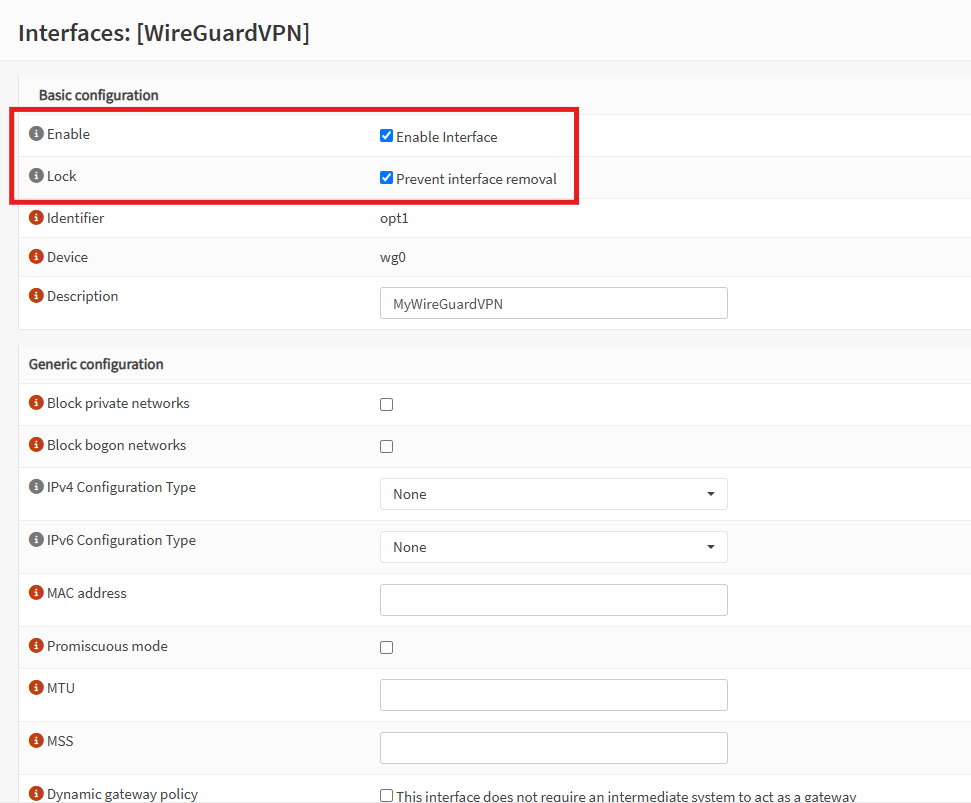
Figure 22. Enabling WireGuard Interface on OPNsense
You do not need to manually assign an IP address to the WireGuard interface. Once the WireGuard service is restarted, the IP address specified during the initial WireGuard configuration will be automatically applied to the interface. To ensure this, restart the WireGuard service with the following steps.
- Go to VPN → WireGuard → Instances.
- Uncheck the Enable WireGuard checkbox and click Apply.
- Then check the Enable WireGuard checkbox again and click Apply.
This ensures that the interface receives the correct tunnel address and is ready for use before configuring firewall rules or testing the VPN tunnel.
Step 10. Creating Firewall Rules
To ensure secure and functional communication between WireGuard VPN clients and the OPNsense network, you need to define two firewall rules that are shared below.
-
A rule on the WAN interface to allow incoming connections to the WireGuard VPN server from remote clients.
-
A rule on the WireGuard interface (e.g., MyWireGuard) to allow VPN clients to access internal network resources (e.g., LAN devices or the Internet), depending on your specific needs.
10.1. Allowing VPN clients to access the OPNsense WireGuard Server
You have installed and configured a WireGuard VPN server to provide secure remote access to your internal network.
To make your WireGuard server accessible from the Internet, you must define a firewall rule on the WAN interface that allows incoming connections to the WireGuard port (e.g., 51820/UDP).
Once this firewall rule is defined, your VPN clients will be able to connect to the WireGuard server and access internal or external resources through the OPNsense gateway.
For detailed guidance on how to define this rule, you can refer to the How to Configure OPNsense Firewall Rules article by Sunny Valley Networks.
10.2. Allowing VPN clients to access the internal networks
If you want your WireGuard VPN clients to access internal network resources (e.g., LAN devices, printers, file servers), you need to define a second firewall rule on the WireGuard interface you previously created (e.g., MyWireGuard).
This rule allows traffic from the connected VPN clients to reach the rest of the internal network or any destination, depending on how broadly you configure it.
To define the rule follow these steps below.
-
Navigate to Firewall → Rules, and select the WireGuard interface (e.g., MyWireGuard) from the tabs.
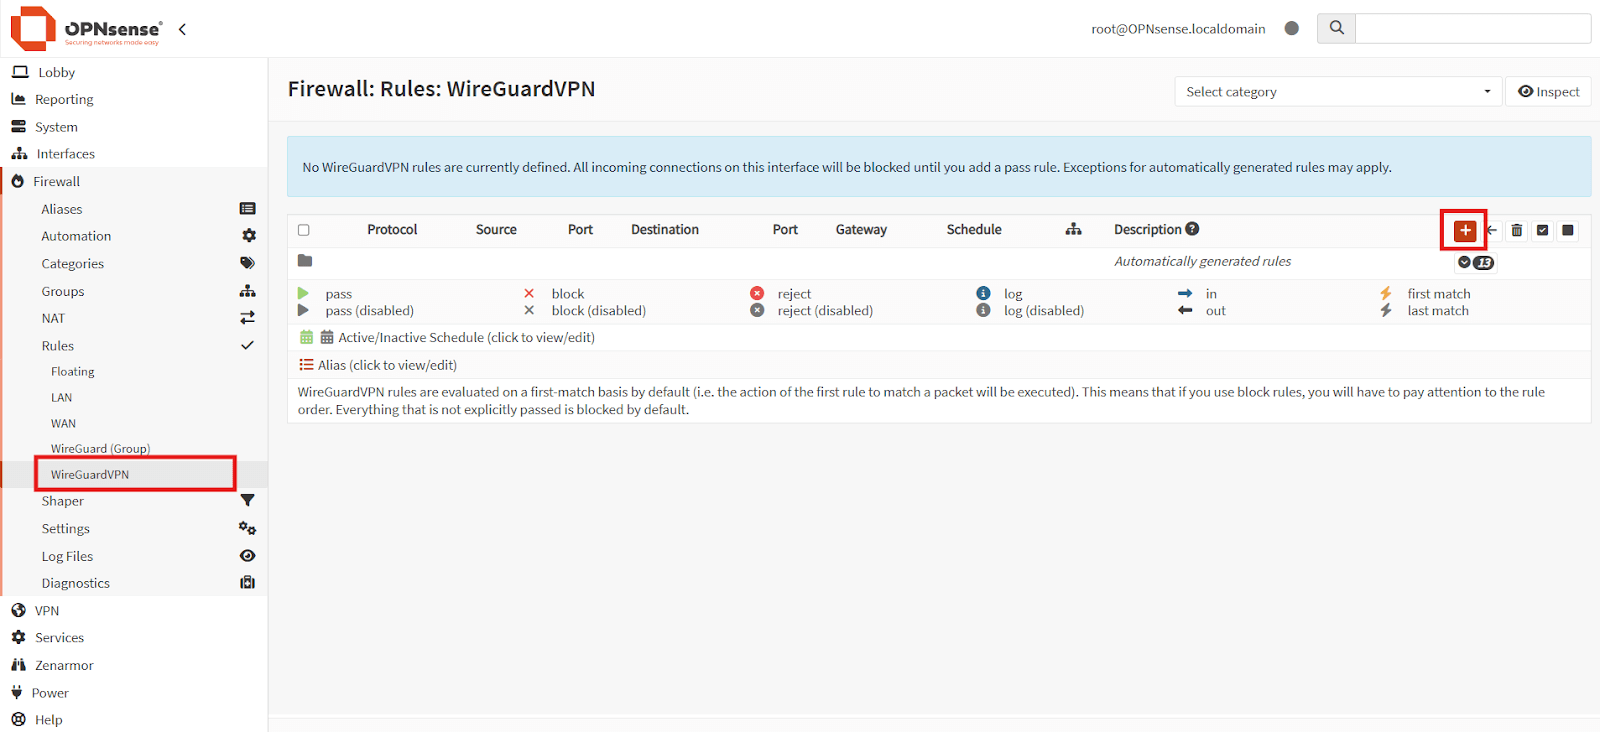
Figure 23. Creating Firewall Rule on the WireGuardVPN Interface
-
Click the ➕ (Add) button to create a new rule with the following settings.
Option Value Action Pass Interface WireGuardVPN Direction in TCP/IP Version IPv4 Protocol any Source WireGuardVPN net Source Port any Destination any Destination Port any Description Allow WireGuard clients access to all destinations -
Click Save at the bottom of the page.
-
Click Apply Changes to activate the rule.
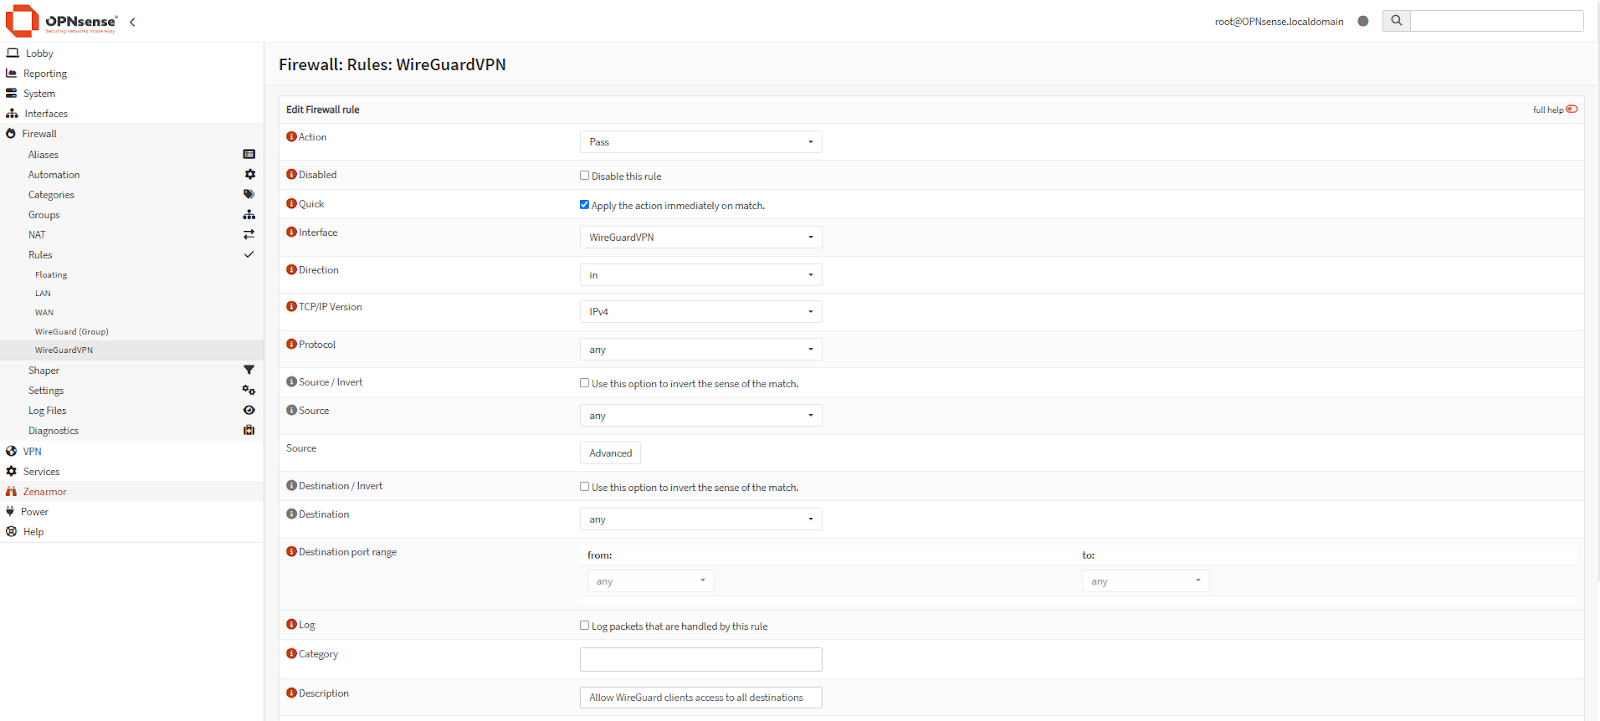
Figure 24. Firewall Rule Settings on OPNsense
Step 11. Verifying the WireGuard Setup on OPNsense
After completing both the WireGuard server and client configurations, you can verify the VPN setup using the following steps.
11.1. Activating WireGuard on Windows Client:
To establish a VPN connection from your Windows PC follow these steps.
-
Open the WireGuard application.
-
Click on the tunnel named MyWireGuard and press the Activate button.
-
Once connected, the tunnel Status will change to Active.
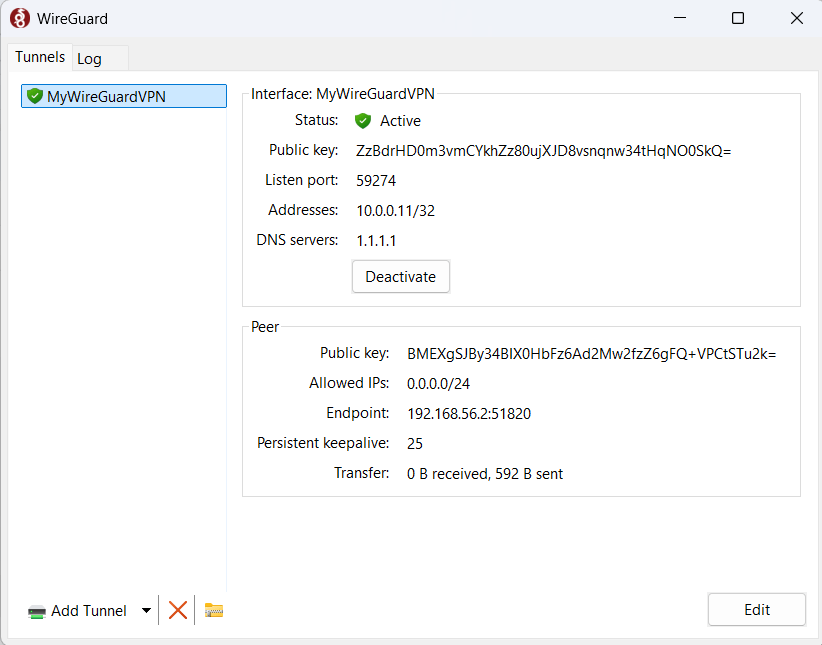
Figure 25. Activating the WireGuard tunnel on Windows client
11.2. Activating WireGuard on Android Client:
To connect your Android device to the VPN:
-
Open the WireGuard app.
-
Toggle the MyWireGuard tunnel to ON.
11.3. Monitoring VPN Clients on OPNsense:
To view active connections navigate to VPN → WireGuard → Status on OPNsense. You should see each connected client with the following details.
- Public key of the peer
- Time since last handshake
- Amount of data transferred
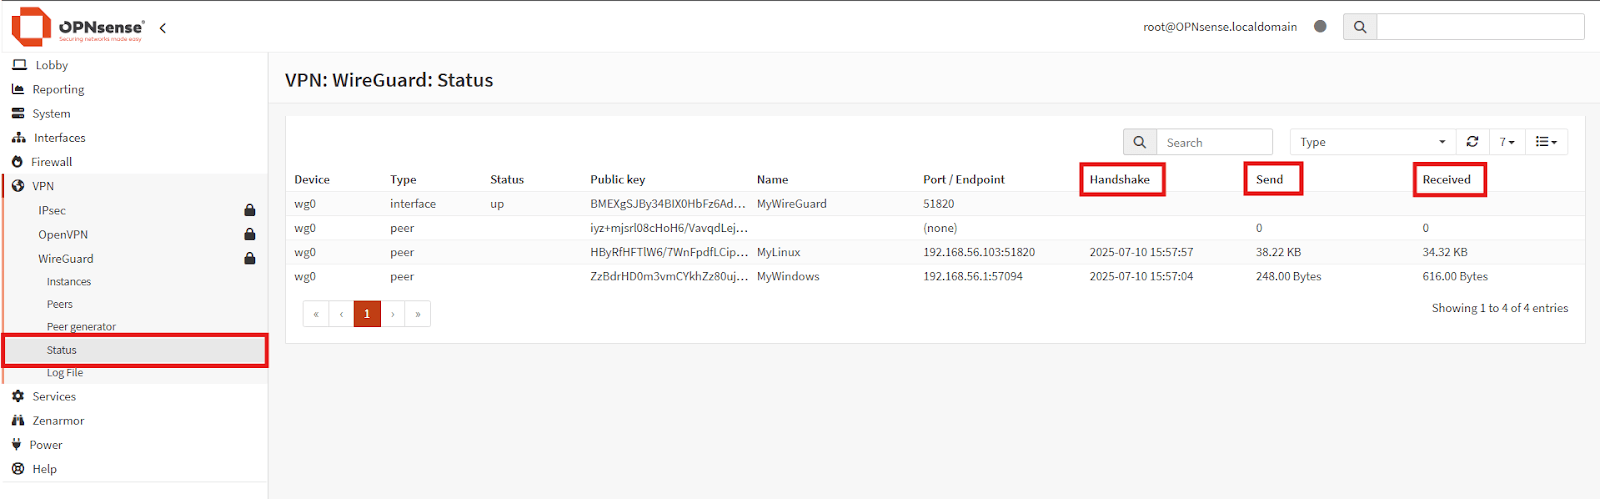
Figure 26. List of connected WireGuard clients in OPNsense
11.4. Performing a Ping Test:
From the client device (Windows or Android), test connectivity to the WireGuard server by running the following command.
ping 10.0.0.1
If successful, it confirms tunnel functionality and routing.
11.5. Verifying Public IP Address:
To confirm that your traffic is routed through the VPN, open https://www.whatismyip.com from the client.
If the tunnel is working, it should show the VPN server’s public IP, not your local ISP IP.
11.6. Running a Traceroute Test:
You can trace the route to an external IP to ensure traffic goes through the VPN.
tracert 8.8.8.8
Expected output example is shown below. The presence of 10.0.0.1 as the first hop indicates successful tunnel routing.
1- 10.0.0.1 ← WireGuard Server IP
2- 192.168.0.1 ← LAN Gateway
3- ...
11.7. Internal Network Access Test:
If the firewall rules permit, clients should have full access to internal LAN devices.
-
Try pinging an internal device (e.g.,
192.168.1.100) from the client. -
Then ping the client (e.g.,
10.0.0.12) from within the LAN.
If both directions work, LAN access via VPN is verified.
How to Resolve os-wireguard (missing) Issue?
With the release of OPNsense 24.1, the WireGuard plugin (os-wireguard) has been integrated into the core system. As a result, the separate plugin is no longer required or visible under installed plugins.
If you're seeing an error message such as os-wireguard (missing), there's no need to reinstall the plugin manually.
To resolve this issue, follow the steps below.
To resolve this issue and remove outdated plugin references, follow the steps below:
-
Navigate to System → Firmware → Status on the OPNsense Web UI.
-
Click Check for Updates, and wait for the list to refresh.
-
If any system updates are available, apply them.
-
(Optional) Reboot the system to ensure all integrated components are correctly loaded.
How to Resolve WireGuard Handshake Issue?
If you are encountering issues with the WireGuard handshake in OPNsense, the following checks and actions may help you diagnose and resolve the problem:
-
Check Firewall Rules: Ensure that your firewall is configured to allow UDP traffic on port 51820, which is the default port used by WireGuard. Missing or misconfigured rules may prevent handshake packets from reaching the server.
-
Verify VPN Keys: Double-check that the public and private key pairs are correctly configured on both the server and client sides. Each device should have the correct peer public key, and the keys must not be mismatched.
-
Check IP Address and DNS Configuration: If you're using a dynamic DNS (DDNS) service, make sure it is correctly set up and actively resolving to your current public IP address. An outdated or incorrect DNS record can prevent a successful handshake.
-
Restart Services and Network Devices: Sometimes, a simple restart can fix the issue. Try restarting the WireGuard service on both the server and the client. Additionally, rebooting your router, modem, or firewall may help refresh network routes and fix handshake failures.
Use the Status page in OPNsense’s WireGuard interface to verify if packets are being received. If the "Handshake" field is empty or doesn't update, it’s an indication that something is blocking the connection.
How do I Verify the Installation of WireGuard on OPNsense?
After updating OPNsense or setting up WireGuard, it’s essential to verify that the plugin is correctly installed and operational. The steps below outline how to perform this verification via the web interface and, optionally, using the CLI.
-
Log in to the OPNsense Web UI: Open a browser and navigate to the IP address of your OPNsense firewall. For example: https://192.168.56.2. Log in using your administrative credentials (e.g., root user).
-
Check WireGuard Menu Availability: On the left-hand menu, go to VPN → WireGuard. Verify that the following tabs are visible.
- Instances
- Peers
- Peer Generator
- Status
- Log File
The presence of these menu items confirms that the WireGuard component is integrated into the system.
-
Confirm WireGuard Status on Web UI: Navigate to VPN → WireGuard → Status page. You should see information about running WireGuard instances and active peers.
- If a tunnel is properly configured and active, the instance status will appear as UP.
tipThe Status tab also shows connection statistics such as handshake time and data transfer details.
-
Peer Generator Verification: Navigate to VPN → WireGuard → Peer Generator. Confirm that the configuration fields, public/private key details, and generated QR code are displayed correctly. This feature allows quick peer configuration for mobile or desktop clients.
If all the above components are visible and operational, your WireGuard installation on OPNsense is correctly set up. If you cannot see the menu options or the system behaves unexpectedly, consider rebooting the firewall or reviewing system logs via System → Log Files.
What are Best Practices for Managing WireGuard Keys and Configurations?
Managing WireGuard VPN keys and configurations effectively is essential for ensuring the security, stability, and scalability of your VPN setup. Below are industry-recognized best practices you should follow for WireGuard VPN key management.
-
Generate Unique Key Pairs for Each Peer: Each peer (device) should have its own unique public and private key pair to maintain proper identification and avoid potential security risks. Sharing or duplicating key pairs between peers weakens traceability and increases vulnerability.
tipUse
wg genkeyandwg pubkeyon each client device to generate independent credentials. -
Securely Store Private Keys: Private keys are extremely sensitive and must be stored in secure locations with restricted access. They should never be shared or transmitted through unsecured channels. Store them in secure file systems with limited access rights (
chmod 600) or within secure vault solutions (e.g., HashiCorp Vault, Bitwarden).noteNever paste private keys into unsecured platforms (email, chat apps, etc.)
-
Rotate Keys Regularly: Regular key rotation is essential to minimize risks due to key exposure, outdated configurations, or compromised devices. Rotating keys ensures your WireGuard network remains secure and up-to-date.
Rotate keys every 90 days and re-share updated configuration files or QR codes with clients.
tipAfter rotation, be sure to update configuration files or QR codes on both the server and client sides to reflect the new key pairs.
-
Use Pre-Shared Keys (PSKs) for Extra Security: In addition to using public and private key pairs, it is highly recommended to configure a Pre-Shared Key (PSK) to add an extra layer of encryption and protect against potential brute-force or replay attacks.
In OPNsense, the PSK can be generated and configured directly within the
VPN → WireGuard → Peerssection. Simply create or edit a peer, and use the Generate button next to the Pre-shared key field. Once generated, this PSK must be applied on both the server and the client to ensure mutual authentication. -
Backup Configuration Files Securely: To prevent data loss and ensure fast recovery in case of system failure or misconfiguration, it's crucial to maintain encrypted backups of both server and peer configuration files.
Sensitive configuration files should be backed up using encrypted ZIP archives or GPG encryption, and these backups must be stored in secure locations such as zero-knowledge cloud storage (e.g., Tresorit, Sync.com), local NAS systems with restricted access, or offline USB drives.
-
Restrict Allowed IPs for Each Peer: Limiting each peer’s access using the Allowed IPs field is essential for minimizing network exposure and enforcing strict access controls within your VPN infrastructure.
For instance, specifying Allowed IPs:
192.168.100.0/24grants the client access only to the local LAN segment.Avoid using
0.0.0.0/0unless full tunneling (redirecting all traffic through the VPN) is explicitly required, as it may lead to unintended access or traffic leakage. -
Label and Document Each Peer Configuration Clearly: Using meaningful and descriptive labels for each peer configuration significantly simplifies management, especially in larger environments.
Clearly labeled peers make debugging and monitoring easier, improve team communication, and help track device ownership and intended purpose over time.
Examples of good labeling practices are visible below.
-
MarketingLaptop_Anna: A laptop used by the marketing team member Anna
-
DevServer_EU: A development server located in the EU region
-
HomeTablet_Merve: A personal device used for remote access
-
-
Regularly Audit Active and Inactive Peers: To maintain a clean and secure VPN configuration, it's important to routinely audit peer activity. You can do this by checking the “Last Handshake” time for each peer under
VPN → WireGuard → Statusin the OPNsense dashboard.If a peer has shown no activity for 30 days or more, and this aligns with your internal policy, consider removing or disabling that peer to reduce unnecessary exposure and keep the configuration lean.
-
Use DNS Servers Explicitly to Avoid Leaks: Without proper DNS configuration, client devices may bypass the VPN tunnel when resolving DNS queries, which can lead to privacy breaches and data leaks.
To prevent this, make sure to explicitly define DNS resolvers within the WireGuard configuration files. Use trusted and privacy-respecting DNS servers such as
10.0.0.1, 1.1.1.1, or9.9.9.9.In OPNsense, you can do this by navigating to
VPN → WireGuard → Peers, and entering the preferred DNS servers in the DNS Servers field. -
Protect and Limit Access to WireGuard Admin Interface: The WireGuard management interface, especially within platforms like OPNsense Web UI, is a critical control point for your VPN infrastructure. It is essential to restrict access only to trusted administrators and implement multi-factor authentication (MFA) to prevent unauthorized changes or breaches. Recommended Security Measures are visible below.
-
Limit access to the admin interface by specific IP addresses or internal networks to avoid exposure over the internet.
-
Assign admin roles with only the minimum necessary privileges, following the principle of least privilege.
-
Enable Two-Factor Authentication (2FA) using TOTP (Time-based One-Time Password) for added security during login.
noteNever expose the admin panel to the public internet without strict firewall rules and access restrictions in place.
How can I Customize MTU and Optimize WireGuard Performance?
Optimizing WireGuard performance ensures a fast, stable, and secure VPN experience, especially in environments with varying network conditions. Below are key practices and adjustments you can implement to maximize WireGuard efficiency and reliability.
-
Adjust the MTU (Maximum Transmission Unit) for Your Network: The MTU defines the largest size of a packet that can be transmitted without fragmentation. Using an inappropriate MTU may result in packet loss, latency issues, or connectivity problems.
Manually test your ideal MTU value by sending pings with different payload sizes. On a Linux machine, you can use the following command.
ping -M do -s 1472 your_vpn_server_ipGradually decrease the -s value (starting from 1472) until you find the highest size that doesn’t return a
fragmentation needederror. Once identified, set the MTU in your WireGuard configuration file.tipLower MTUs (like 1280–1400) work better on LTE, mobile, or PPPoE networks where smaller packets reduce the risk of fragmentation.
-
Optimize UDP Buffer Sizes to Improve Throughput: WireGuard uses the UDP protocol, which can be sensitive to system buffer limitations under heavy load. Increase your system’s send and receive buffer sizes to avoid packet drops with the following commands.
sysctl -w net.core.rmem_max=2500000
sysctl -w net.core.wmem_max=2500000
To make this change persistent across reboots, add the values to your /etc/sysctl.conf file.
net.core.rmem_max = 2500000
net.core.wmem_max = 2500000
This is especially important for high-throughput environments, such as data centers or file transfers over VPN, where small default buffers can become bottlenecks.
-
Allocate System Resources to WireGuard Efficiently: When WireGuard runs on resource-constrained systems like routers or virtual machines, performance may degrade due to CPU or memory bottlenecks. Give WireGuard processes higher priority using nice with the following command.
nice -n -5 wg-quick up wg0In OPNsense, regularly monitor system resource usage (CPU, memory, and I/O) via the dashboard to ensure WireGuard isn’t competing with other processes.
Consider disabling unused services or increasing hardware resources if you're running WireGuard on virtual machines or low-end devices.
-
Adapt Configuration for Unstable or High-Latency Connections: Connections over LTE, satellite (e.g., Starlink), or public Wi-Fi networks often suffer from high latency and interruptions.
Enable the
PersistentKeepaliveoption to maintain a stable connection across NAT devices or aggressive firewalls.[Peer]
PersistentKeepalive = 25Consider reducing MTU further (e.g., 1280) to accommodate the unpredictable nature of such connections.
-
Monitor and Benchmark Performance Continuously:
Measuring performance regularly helps detect bottlenecks, packet loss, or routing misconfigurations early.
Use the network tools provided below.
iperf3to measure throughput
pingandtraceroutefor latency and path analysis
wg showto inspect peer stats and handshake statusIn OPNsense, navigate to
VPN → WireGuard → Statusto view real-time data transfer rates, handshake times, and peer activity. Use these logs to assess if optimizations are effective.
How do I Set Up a WireGuard Failover Cluster or Redundant VPN Setup?
Setting up a** redundant or failover WireGuard VPN** ensures your devices stay connected even if the main VPN server goes down. While WireGuard does not support automatic multi-server switching out of the box, you can create a reliable failover system using smart routing, monitoring tools, and some configuration tricks.
1. Configure Multiple Endpoints for Failover (Manually or Dynamically): In WireGuard, you can only define one Endpoint per [Peer] block. This means you can't add two servers directly into a single config. However, you have options.
-
Option 1: Use Dynamic DNS to point to whichever server is active: Instead of hardcoding a server IP, use a Dynamic DNS (DDNS) hostname as shown below.
[Peer]
PublicKey = SERVER_PUBLIC_KEY
Endpoint = vpn.example.com:51820
When your primary server goes offline, update the DNS record to point to the backup server. Your client will connect to the new server without changing its config.
-
Option 2: Use Separate Config Files and Switch with Scripts: You can create two separate
.conffiles.Primary Configuration:
wg0.conf[Interface]
PrivateKey = your_private_key
Address = 10.0.0.2/32
[Peer]
PublicKey = PRIMARY_PUBLIC_KEY
Endpoint = server1.example.com:51820
AllowedIPs = 0.0.0.0/0Backup Configuration:
wg1.conf[Interface]
PrivateKey = your_private_key
Address = 10.0.0.2/32
[Peer]
PublicKey = BACKUP_PUBLIC_KEY
Endpoint = server2.example.com:51820
AllowedIPs = 0.0.0.0/0tipBoth configurations use the same client private key and IP address, but connect to different servers.
You can switch from the primary to the backup server manually or automate the process using scripts or monitoring tools. The command below deactivates the current VPN and activates the backup.
wg-quick down wg0 && wg-quick up wg1
You can integrate this command into a health-check script or use a tool like Monit or systemd to automate the failover.
2. Set Up Redundant Routing in OPNsense (or Linux): To ensure uninterrupted VPN access, you can configure redundant routing so that if your primary WireGuard server becomes unreachable, traffic is automatically routed through a backup server.
OPNsense provides built-in support for routing failover using Gateway Groups. Follow these steps.
-
Navigate to
System → Gateways → Group. -
Click **+**Add to create a new gateway group.
-
Add both of your WireGuard VPN gateways.
-
Set Tier 1 for the primary gateway.
-
Set Tier 2 for the backup gateway (used only if Tier 1 fails).
-
-
For the
Trigger Level, choose when failover should occur:- Options include Packet Loss, High Latency, or Down.
-
Save the group and assign it to the appropriate firewall rule (e.g., for LAN or WireGuard interface).
Redundant routing ensures that VPN connectivity stays active, even during outages or server failures, without requiring manual intervention. This is especially valuable for remote workers, branch offices, or systems that require constant secure access.
3. Implement Health Monitoring to Trigger Failover: Even with redundant servers and routing, you still need a way to detect when the primary VPN server is down, and then automatically switch to the backup server. That’s where health monitoring comes in.
It constantly checks if your VPN connection is working. If it detects a failure (for example, no response from the main server), it can run a command or trigger a script to switch to the backup.
OPNsense includes a Gateway Monitoring system that checks the connection status of each VPN server.
-
Go to
System → Gateways. -
Edit your WireGuard gateway.
-
Enable Monitor IP set it to something like 1.1.1.1 or 8.8.8.8 (these are stable DNS IPs to test reachability).
-
Set conditions for failover. Choose when to trigger failover: Packet Loss (% of failed checks), Latency or Down.
-
Enable email or system notifications if desired.
-
Save and apply the settings.
When the primary gateway becomes unreachable, OPNsense will automatically switch to the Tier 2 (backup) gateway if you configured Gateway Groups earlier.
How can I Monitor WireGuard VPN Connections Using OPNsense's Diagnostic Tools?
Monitoring WireGuard VPN connections in OPNsense is crucial for ensuring stability, detecting issues, and maintaining continuous secure access. OPNsense provides several built-in diagnostic tools that allow you to view logs, observe real-time connection status, and analyze network traffic through packet capture. These tools help identify handshake failures, connectivity drops, or routing problems.
1. View WireGuard Logs Within OPNsense: To begin monitoring, you can view WireGuard logs directly within the OPNsense web interface. Follow these steps.
-
Navigate to
System → Log Files → General. -
In the log viewer, look for entries related to wireguard, wg-quick, or interface status updates.
-
Depending on the WireGuard plugin version, there may also be a dedicated WireGuard log section under
VPN → WireGuard → Log File.
These logs include valuable information such as successful handshakes, interface status, peer connectivity, and error messages. Reviewing these logs helps you understand when connections were established or if failures occurred.
These log types that are listed below are especially useful for troubleshooting.
-
Handshake logs show if the connection between the client and server was successfully established.
-
Interface up/down logs indicate whether the VPN interface was brought online or offline.
-
Peer activity logs help confirm if data is being exchanged and if peers are staying connected.
By analyzing these logs, you can detect problems such as incorrect keys, failed tunnels, or issues caused by MTU mismatch.
2. Real-Time Monitoring of WireGuard Status*: For live monitoring, OPNsense provides a status page for WireGuard, follow these steps
-
Go to
VPN → WireGuard → Status. -
You can see each peer, their latest handshake timestamp, and data transfer statistics.
If the "Last Handshake" is recent and data transfer is active, your VPN connection is working as expected. However, if no handshake is detected for a prolonged time, it may indicate that the server is unreachable or that the peer is misconfigured.
3. Using Packet Capture for Deep Troubleshooting: When log files and status pages are not enough, OPNsense's built-in Packet Capture tool allows you to analyze the actual network traffic on the WireGuard interface.
To use the packet capture tool, follow these steps.
-
Go to
Interfaces → Diagnostics → Packet Capture. -
Select the WireGuard interface (e.g., wg0) from the dropdown menu.
-
Set a custom capture filter such as udp port 51820, which is the default port used by WireGuard.
-
Start the capture and download the resulting .pcap file for further analysis using Wireshark or a similar tool.
Packet capture helps you identify the followings.
-
Whether WireGuard packets are being sent from your device.
-
Whether the remote server is responding.
-
Any signs of packet loss, corruption, or duplication.
-
Potential issues with NAT or firewall rules blocking return traffic.
This tool is essential when you need to troubleshoot advanced issues like asymmetric routing or intermittent connectivity.
To effectively monitor WireGuard VPN connections in OPNsense, you can combine system log analysis, real-time status monitoring, and packet-level inspection. These diagnostic tools provide deep insight into the health of your VPN tunnels and enable you to take action quickly when something goes wrong. This is especially important in critical environments where secure and continuous VPN connectivity is required
How do I Test the Performance and Speed of My WireGuard VPN Setup?
Testing the performance of your WireGuard VPN setup is crucial to ensure that the connection is stable, fast, and suitable for your needs. While WireGuard is known for its high-speed performance, various factors like server load, routing, bandwidth limits, and encryption overhead can impact real-world speeds. To get accurate measurements, it’s best to use dedicated tools and follow a structured approach.
One of the most effective tools to measure the speed between two endpoints is iperf3. It can test both upload and download throughput between your WireGuard server and client. You can use the tools shown below for WireGuard performance test.
-
speedtest-cli: For testing internet speed from the client over the VPN tunnel. -
ping: To measure latency and packet loss. -
iperf3: For controlled bandwidth testing between two hosts (ideal for VPN testing).
Among these, iperf3 is the most reliable for VPN testing since it eliminates external internet factors and focuses solely on the VPN tunnel.
Here’s how you can use iperf3 to test performance between your WireGuard server and client.
1. Install iperf3 on Both Systems: On Debian/Ubuntu-based systems, run the following command.
sudo apt install iperf3
On FreeBSD/OPNsense, use the following command.
pkg install iperf3
2. Start the iperf3 Server on One End: On your WireGuard server, run the following command.
iperf3 -s
This puts the server in listening mode, ready to receive traffic.
3. Run the iperf3 Client on the Other End: On the client, run the following command.
iperf3 -c <WireGuard_Server_IP>
This command starts the test and sends traffic through the VPN tunnel to the server. Also, optional parameters are listed below.
-t 30: Run the test for 30 seconds.
-R: Reverse mode to test upload from server to client.
Example command can be seen below. This will help you measure download speeds (from server to client).
iperf3 -c 10.0.0.1 -t 30 -R
4. Interpreting the Results: Once the test completes, you'll see the following details.
-
Bandwidth (in Mbits/sec): This tells you the actual data throughput.
-
Retransmissions (TCP only): In TCP mode, the output includes a “Retr” column, which shows how many packets had to be resent due to network issues.
-
Jitter and Latency (if tested with UDP): Useful for VoIP or gaming.
-
Packet loss: Any lost packets indicate instability or congestion.
Compare the results with your internet speed to determine if WireGuard introduces any significant bottlenecks.
Testing your WireGuard VPN’s performance is best done with iperf3, which allows controlled speed tests directly through the tunnel. By installing the tool on both ends and running client-server tests, you can accurately assess upload/download performance and identify any limitations in your setup. Regular performance testing ensures that your VPN delivers the speed and reliability needed for secure, high-throughput tasks.
Conclusion
Setting up WireGuard on OPNsense provides a robust, secure, and efficient VPN solution for modern network environments. With proper key exchange, firewall configuration, and peer management, you can ensure seamless connectivity between devices across different networks. Regular performance checks, careful peer configuration, and understanding the key principles of WireGuard will help you maintain a reliable VPN infrastructure. Whether you're an advanced user or just starting with OPNsense, this setup empowers you with the flexibility and speed of WireGuard.