How to Configure High Availability on OPNsense?
High availability (HA) refers to the capacity of an IT system, component, or application to function consistently and without interruption at a superior level for a certain duration. High availability (HA) aims to guarantee that a system satisfies a pre-established level of operational performance. The high-availability architecture is designed to provide optimal performance and effectively manage various workloads and faults while minimizing or eliminating any interruptions in service. Five-nine availability, a highly sought-after criterion in the field of information technology (IT), refers to a system or product that is accessible 99.999% of the time.
An impressive capability of OPNsense is the ability to establish a redundant firewall with an automated fail-over option. OPNsense employs the Common Address Redundancy Protocol (CARP) to enable hardware failover. A failover group is created by configuring two or more firewalls. The secondary becomes active if one interface fails on the master firewall or the primary firewall entirely goes down.
Using this potent OPNsense capability, one may establish a completely redundant firewall system with automated and flawless fail-over. During the transition to the backup network, connections will remain operational with little disruption for the users.
Zenarmor NGFW Plug-in for OPNsense is one of the most popular OPNsense plug-ins and allows you to easily upgrade your firewall to a Next Generation Firewall in seconds. NG Firewalls empower you to combat modern-day cyber attacks that are becoming more sophisticated every day.
Some of the capabilities are layer-7 application/user aware blocking, granular filtering policies, commercial-grade web filtering utilizing cloud-delivered AI-based Threat Intelligence, parental controls, and the industry's best network analytics and reporting.
Zenarmor Free Edition is available at no cost for all OPNsense users. You may run Zenarmor Business Edition that has high availability support on your OPNsense HA cluster firewall.
In this tutorial, we will show you how to configure high availability on OPNsense firewall systems. You may effortlessly configure the High Availability (HA), CARP, and pfSync features on your OPNsense nodes and establish a redundant OPNsense firewall cluster by following the next main steps:
- Configure Interfaces
- Configure Firewall Rules
- Add Firewall Rules on Master Node
- Add Firewall Rules on Backup Node
- Configure Virtual IP Addresses
- Configure Outbound NAT
- Configure DHCP Server (Optional)
- Configure pfSync and HA Synchronization (xmlrpc)
- Add Multiple CARP IPs (Optional)
- Test

Figure 1. OPNsense High Availability Topology

What are the Requirements for OPNsense HA Cluster?
A redundant OPNsense firewall has the following requirements:
- Two OPNsense firewall devices: In this tutorial, we assume that you have already installed and configured two OPNsense firewalls that each have a minimum of three network interfaces.
- 3 IP addresses for the Wide Area Network (WAN): Uplink with a minimum of three accessible IP addresses (one fixed IP address per master firewall and backup firewall, in addition to one virtual IP address designated for the master firewall).
- 3 IP addresses for Local Area Network (LAN): three available IP addresses (one fixed IP address for the master firewall and backup firewall, in addition to a virtual IP address designated for the master firewall).
In order for the two OPNsense cluster nodes to operate within virtual machines, MAC address changes must be permitted for the virtual machines. The utilization of the Common Address Redundancy Protocol (CARP) necessitates this.
1. Configure Interfaces
In this tutorial, Master and Backup firewalls have 3 interfaces using the following IP addresses:
| Interface | IP address |
|---|---|
| LAN | 10.10.10.201/24 |
| WAN | 192.168.0.201/24 |
| pfSync | 11.11.0.1 |
Table 1. IP Addresses of Master Firewall Interfaces
| Interface | IP address |
|---|---|
| LAN | 10.10.10.202/24 |
| WAN | 192.168.0.202/24 |
| pfSync | 11.11.0.2 |
Table 2. IP Addresses of Backup Firewall Interfaces
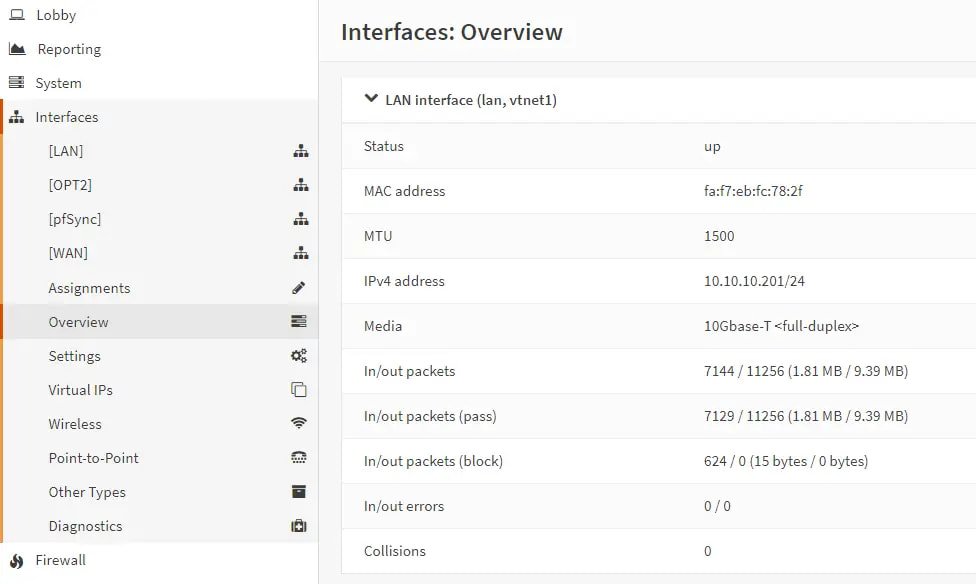
Figure 2. LAN interface overview on master node
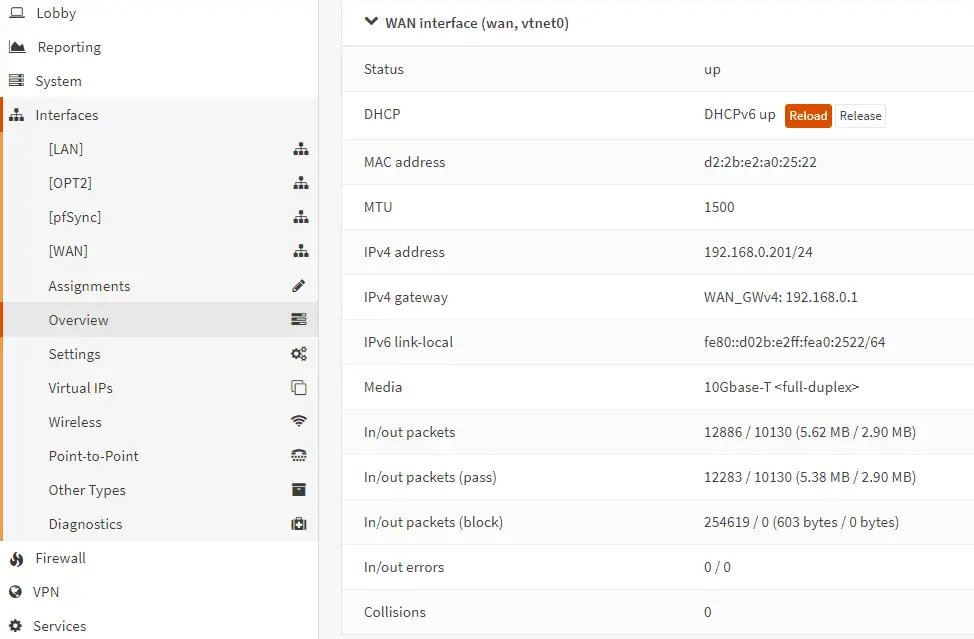
Figure 3. WAN interface overview on master node
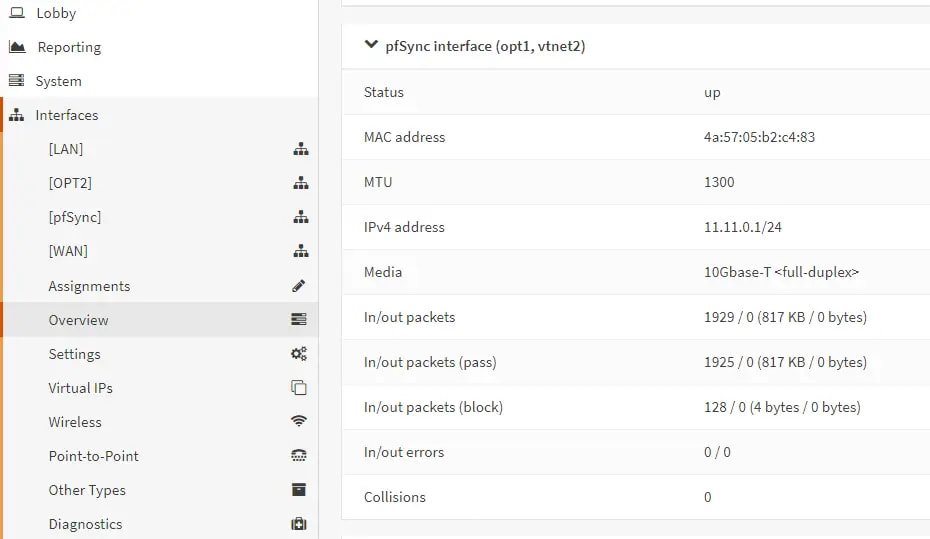
Figure 4. pfSync interface overview on master node

Figure 5. LAN interface overview on backup node

Figure 6. WAN interface overview on backup node
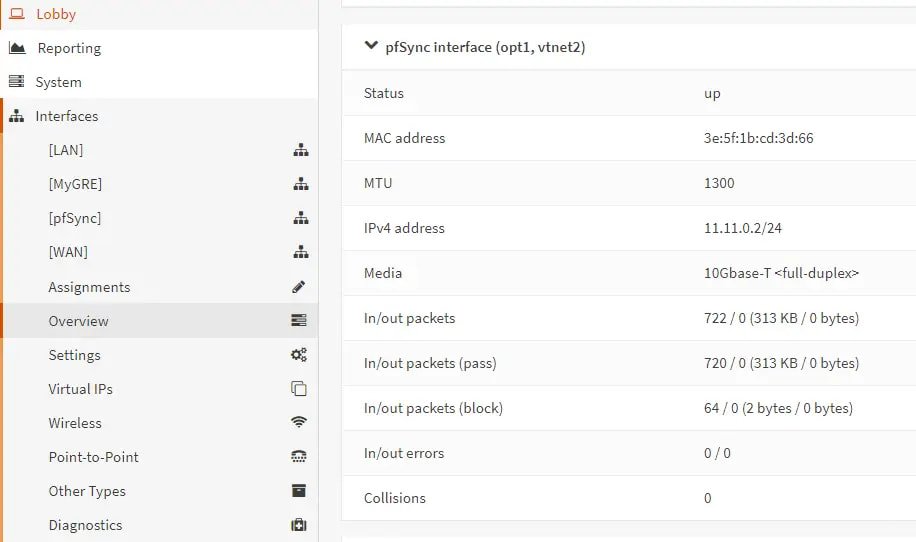
Figure 7. pfSync interface overview on backup node
Ensure that the interface assignments are identical on both systems, By accessing the Interfaces > Overview menu on the OPNsense web UI, one can determine whether a setting such as LAN is set to opt1 on both machines. When the assignments diverge, the Master and Backup IP addresses on both devices will be mixed.
2. Configure Firewall Rules
You must create firewall rules on both master and backup firewalls.
2.1. Add Firewall rule on Master Node
You may easily add firewall rules to your master node by following the next steps:
-
Connect to the master firewall via web UI.
-
Ensure that the proper protocols can be utilized on the various interfaces by navigating to Firewall → Rules.
-
Ensure that both the LAN and WAN accept CARP packets.
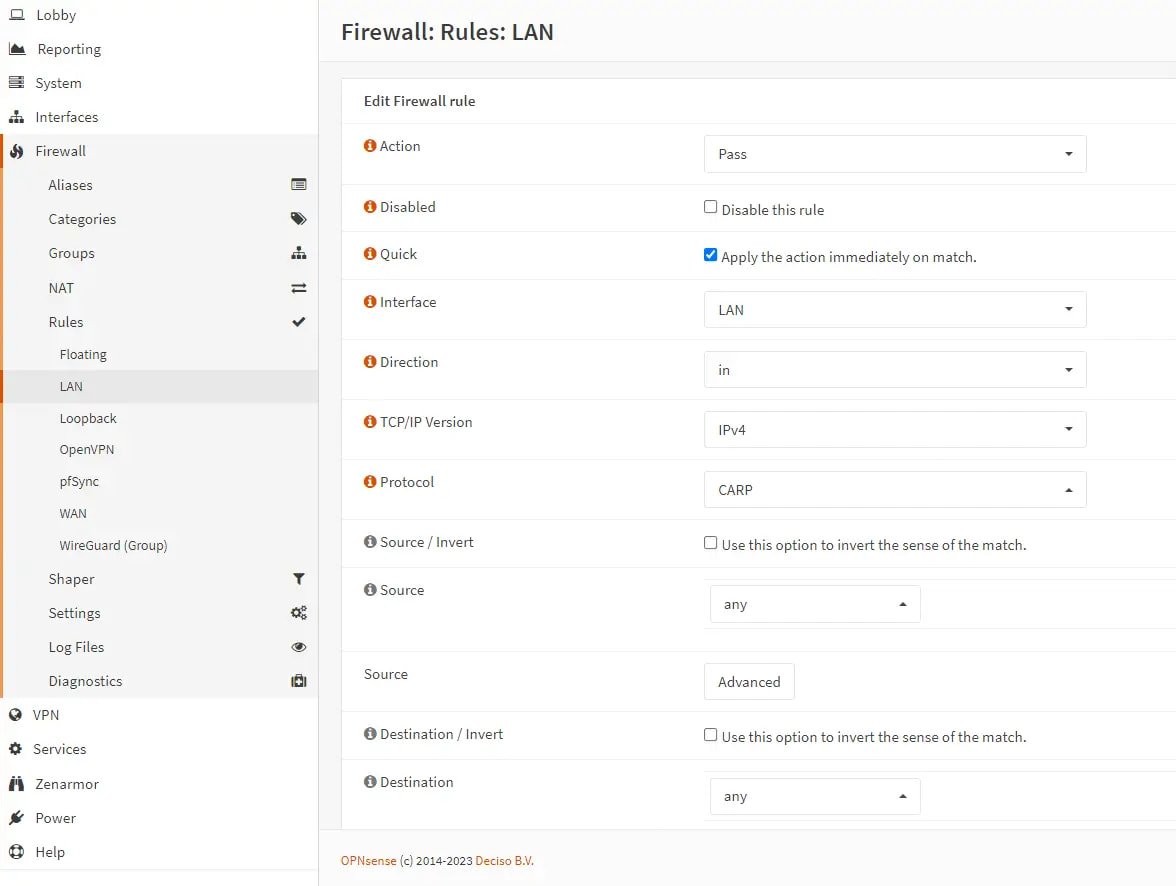
Figure 8. Firewall rule to allow CARP on LAN interface of master
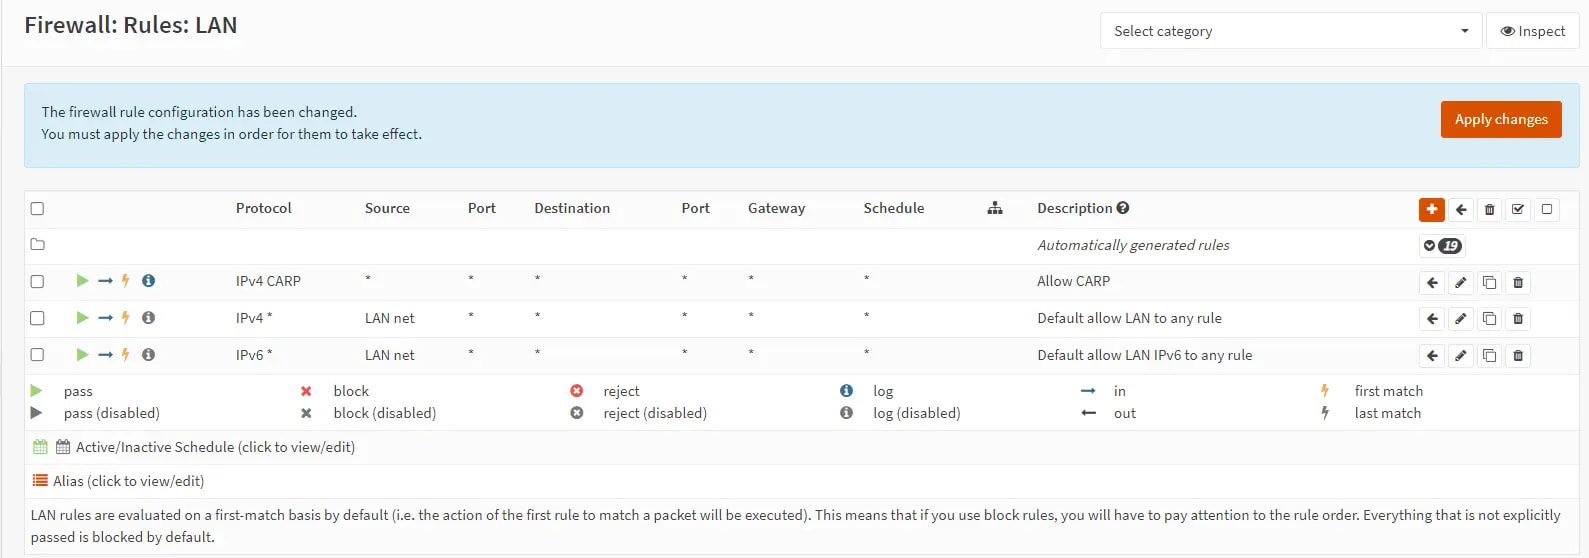
Figure 9. Firewall rules on LAN interface of master
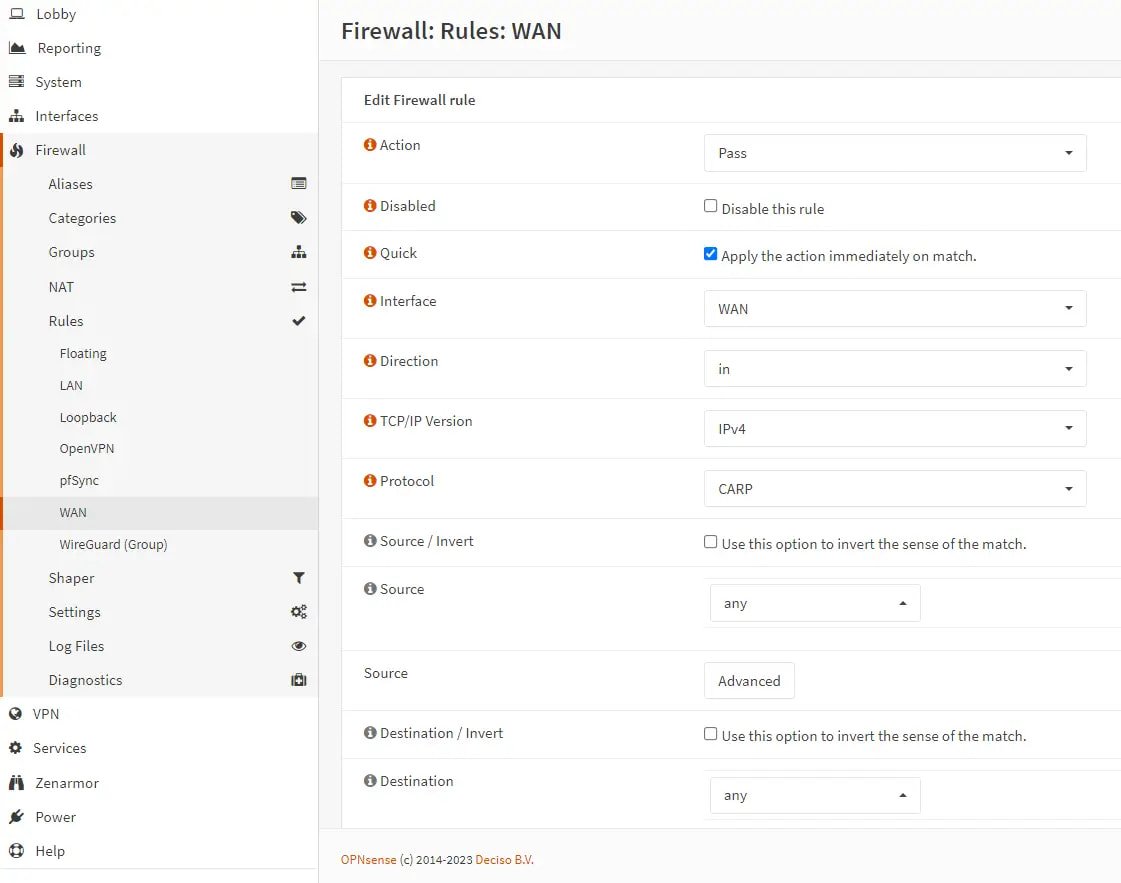
Figure 10. Firewall rule to allow CARP on WAN interface of master
-
Select pfSync interface under Firewall → Rules menu.
-
Add a rule to permit all traffic across all protocols for the designated interface due to the direct cable connection between the two firewalls. It is also possible to restrict traffic acceptance to the pfSync protocol and the GUI port.

Figure 11. Firewall rule to allow all packets on pfSync interface of master
2.2. Add Firewall rule on Backup Node
Due to the fact that we will be synchronizing firewall settings between both hosts, the initial configuration merely requires that the pfSync interface can receive data from the master. Apply the same rule to this interface as was done to the master by following the next steps:
-
Connect to the master firewall via web UI.
-
Navigate to Firewall → Rules.
-
Select pfSync interface.
-
Add a rule to permit all traffic across all protocols for the designated interface due to the direct cable connection between the two firewalls. It is also possible to restrict traffic acceptance to the pfSync protocol and the GUI port.
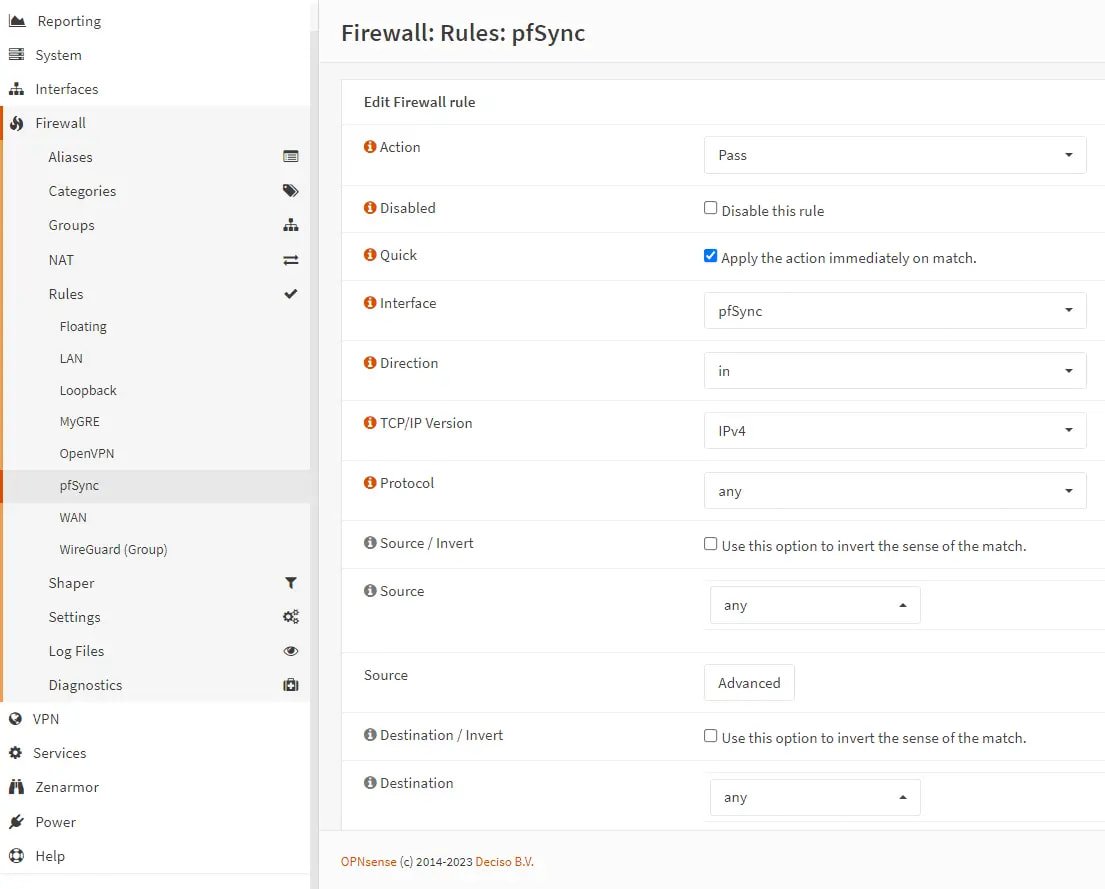
Figure 12. Firewall rule to allow all packets on pfSync interface of backup node
3. Configure Virtual IP Address
We will configure our virtual IP addresses on the master node. These addresses will be mirrored, with a greater imbalance on the secondary node following synchronization. Virtual IP addresses have the following settings:
| Option | Description |
|---|---|
| Mode | The address type, such as IP Alias, CARP, Proxy ARP, and Other. |
| Interface | The interface associated with this address. |
| Type | The impact of either a network or single address is limited to the creation of NAT rules, in which the combination of Proxy ARP and Other with Expansion produces unique addresses for every element in the netmask. |
| Expansion | When applicable, separate addresses within the netmask. |
| Address | Generally, when designating multiple addresses within the same network, the address and netmask to be assigned should correspond. |
| Gateway | This field is applicable solely to IP Alias varieties. While it is generally recommended to leave it blank, certain tunnel devices (ppp/pppoe/tun) require the gateway address to be specified. |
| Virtual IP Password | For preferred master and fallback nodes to encrypt CARP transmissions over the network, the password must be identical. |
| VHID Group | ID of the virtual host. This is a distinct numerical value employed to differentiate the redundancy group from other nodes within the group and to differentiate between groups operating on the same network. The range of acceptable values is between 1 and 255. This requirement applies to every individual in the group. |
| Advertising Frequency | The parameter specifies the frequency (in seconds) at which this interface is advertised as belonging to a group, as well as the bias to be applied when transmitting advertisements. A greater skew indicates less preference. |
| Description | Description that is user-friendly for this VIP |
Table 3. VIP Settings on OPNsense
In our example, WAN and LAN interfaces have the following VIP settings:
| Option | Value |
|---|---|
| Type | Carp |
| Interface | WAN |
| IP addresses | 192.168.0.200 / 24 |
| Virtual password | opnsense |
| VHID Group | 1 |
| Advertising Frequency | Base 1 / Skew 0 |
| Description | VIP WAN |
Table 4. WAN interface virtual IP settings
| Option | Value |
|---|---|
| Type | Carp |
| Interface | LAN |
| IP addresses | 10.10.10.200 / 24 |
| Virtual password | opnsense |
| VHID Group | 3 |
| Advertising Frequency | Base 1 / Skew 0 |
| Description | VIP LAN |
Table 5. LAN interface virtual IP settings
To create a new virtual IP address for the WAN interface on master firewall, you may follow the next steps:
-
Connect to the master firewall via web UI.
-
Navigate to the Interfaces → Virtual IPs → Settings page.
-
Click Add button with
+icon at the right bottom of the page. -
Enable the advanced mode by clicking on the toggle button at the top left corner of the window.
-
Select CARP in the Mode dropdown menu.
-
Select WAN in the Interface dropdown menu.
-
Type Network / Address, such as
192.168.0.200/24. -
Set Password, such as
opnsense. It is better to use a random password of 30 characters. You can create this password on a Linux machine using the following command on the command line:tr -dc A-Za-z0-9_ < /dev/urandom | head -c 30 | xargs -
Type the VHID group that the machines will share, such as
1. -
You may leave the advbase option that Specifies the base of the advertisement interval in seconds as default,
1. The acceptable values are 1 to 255. -
You may leave the advskew option as default,
0. -
Type a Description, such as
WAN VIP.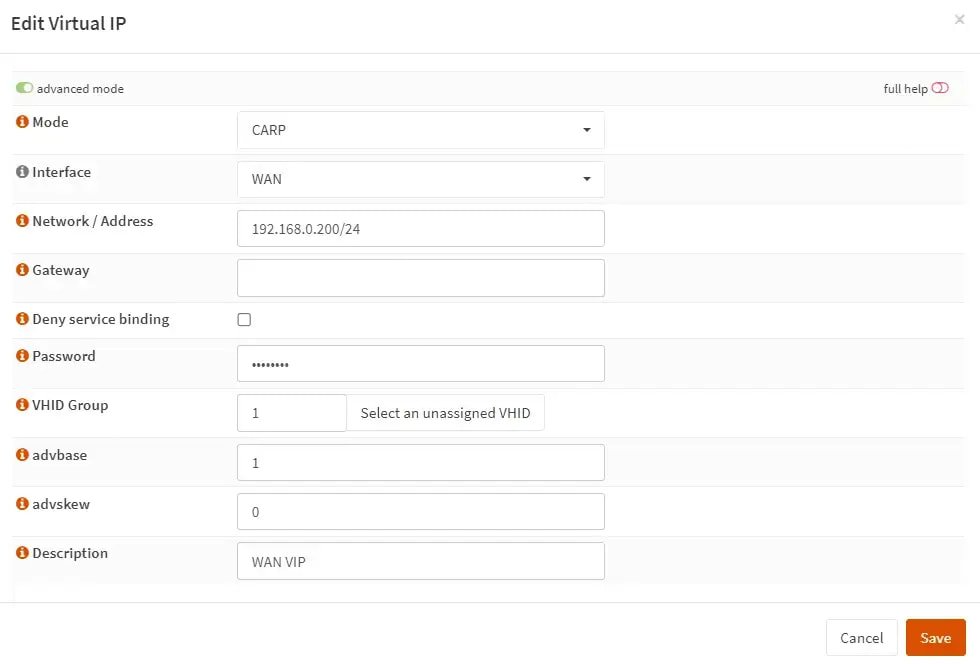
Figure 13. Adding VIP address on WAN interface of master node
-
Click Save.
-
Click Apply to activate the settings.
To create a new virtual IP address for the LAN interface on master firewall, you may follow the next steps:
-
Connect to the master firewall via web UI.
-
Navigate to the Interfaces → Virtual IPs → Settings page.
-
Click Add button with
+icon at the right bottom of the page. -
Enable the advanced mode by clicking on the toggle button at the top left corner of the window.
-
Select CARP in the Mode dropdown menu.
-
Select LAN in the Interface dropdown menu.
-
Type Network / Address, such as
10.10.10.200/24. -
Set Password, such as
opnsense. -
Type the VHID group that the machines will share, such as
3. This number serves as the final octet of the virtual IP address's MAC address. In our case, the MAC address is00:00:5e:00:01:03. -
You may leave the advbase option that Specifies the base of the advertisement interval in seconds as default.
1.The acceptable values are 1 to 255. -
You may leave the advskew option as default,
0. -
Type a Description, such as
LAN VIP.
Figure 14. Adding VIP address on LAN interface of master node
-
Click Save.
-
Click Apply to activate the settings.
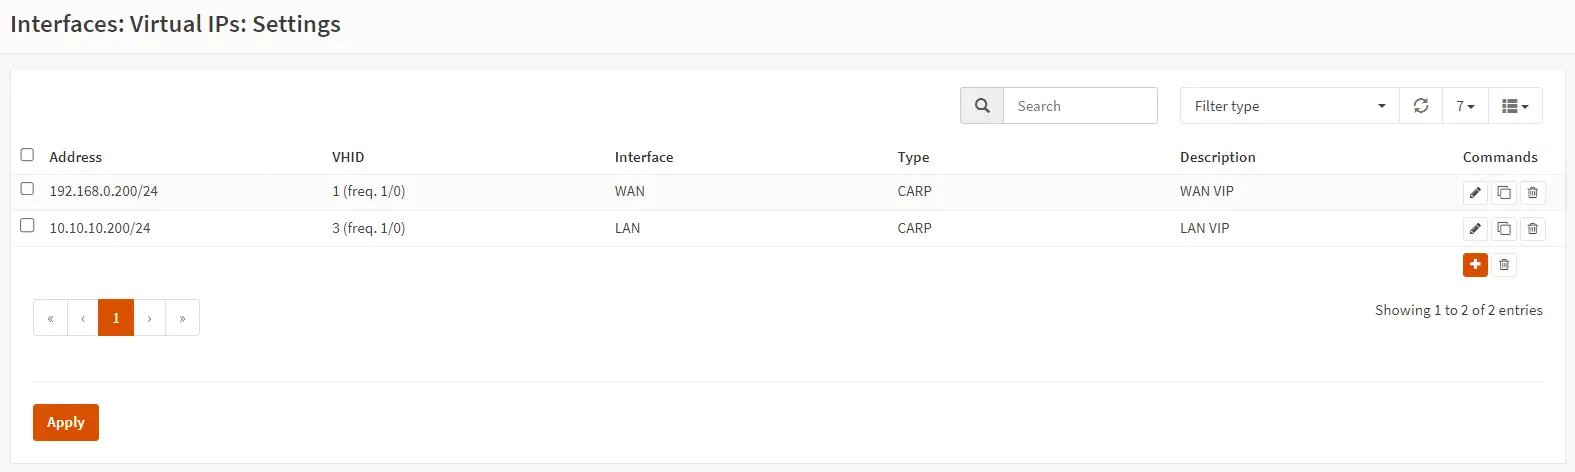
Figure 15. Applying VIP address configuration on master node
Constantly apply the same subnet mask to Carp VIPs as to their primary interface. Carp VIP should have the same value of /24 as the parent interface.
Ensure that advskew options on backup node have higher value, such as 100.
4. Configure Outbound NAT
In order to facilitate smooth transitions, traffic departing from the firewall should also utilize the virtual IP address associated with the wide area network (WAN) interface. By default, Automatic outbound NAT rule generation utilizing the WAN interface's IP address for outgoing connections is configured for OPNsense. This prevents smooth transitions and must be modified to the WAN VIP status. Your outbound NAT rule should contain the following settings for the packets originating from the 10.10.10.0/24 network to use the CARP virtual interface (192.168.0.200):
| Option | Value |
|---|---|
| Interface | WAN |
| Source address | LAN net (10.10.10.0/24) |
| Translation / target | (192.168.0.200)(CARP virtual IP) |
Table 6. Outbound nat rule
You may configure Outbound NAT rule on master firewall, by following next steps:
-
Navigate to Firewall → NAT → Outbound.
-
Choose Manual outbound nat rule generation.

Figure 16. Selecting Outbound NAT Mode on master node
-
Click Add button with
+icon to create a rule. -
Select WAN for the Interface option.
-
Set LAN net as the Source address option.
-
Set 192.168.0.200 for the Translation / target option.
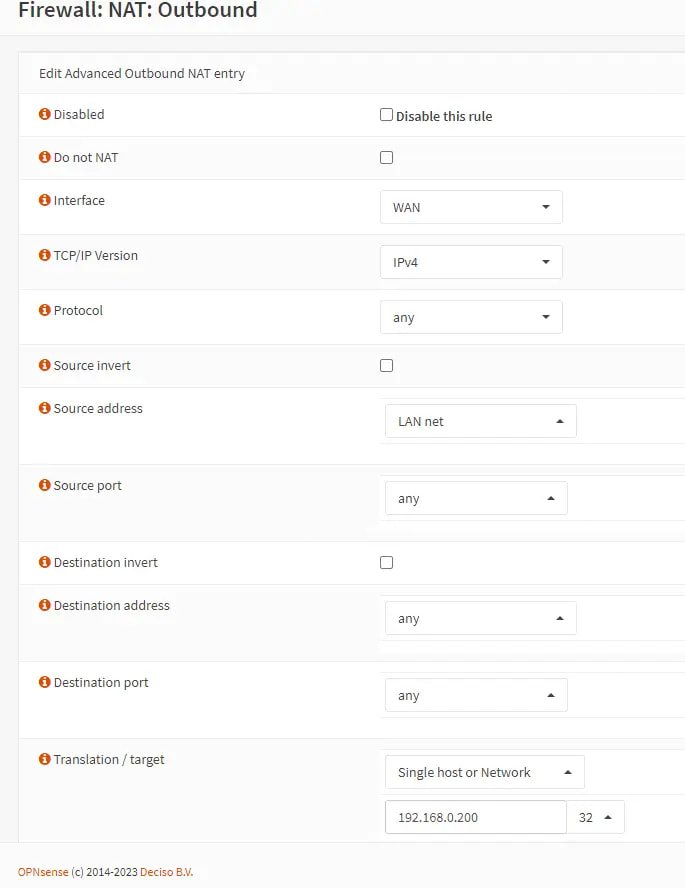
Figure 17. Adding Outbound NAT rule on master node
-
Click Save.
-
Click Apply Changes to activate the settings.
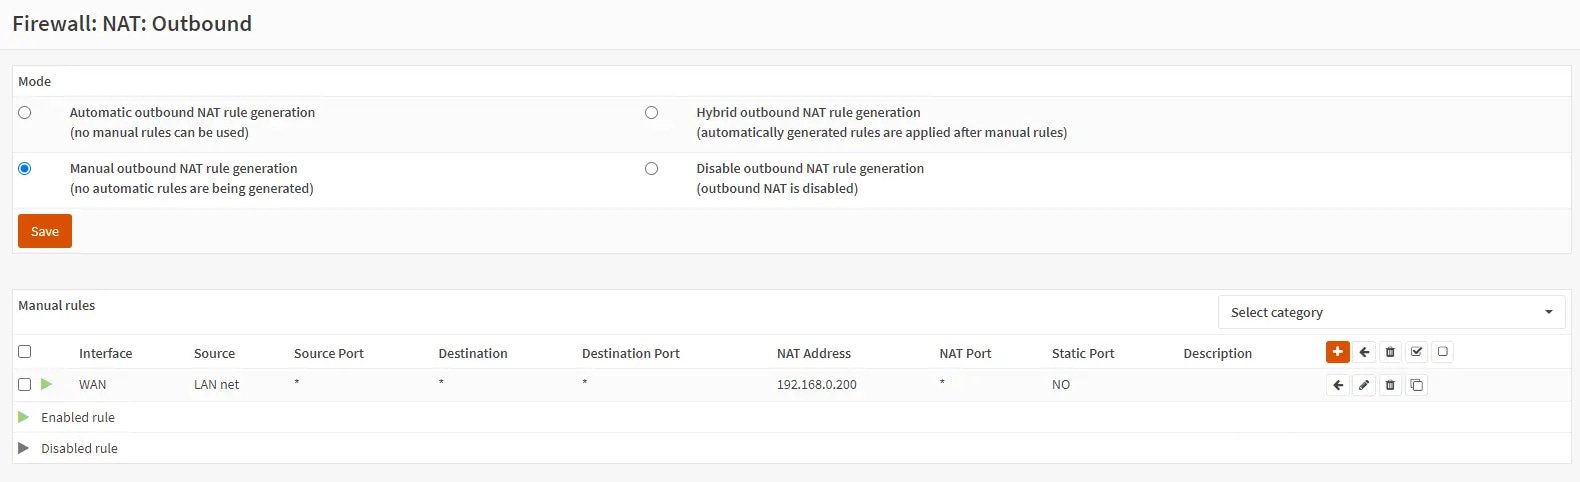
Figure 18. Viewing Outbound NAT rule on master node
5. Configure DHCP Server (Optional)
When implementing DHCP for the local area network, several factors must be taken into account. The virtual address should be utilized by all consumers in lieu of the physical address that is typically being transmitted. Additionally, it is important to note that two servers will be operational concurrently, and they should be aware of one another's pools. When OPNsense forwards DNS requests, verify that the DHCP server provides the correct IP address. On both firewalls under Services → DHCPv4 → LAN, select the following parameters.
The configurations on the master node utilized in our example are as follows:
| Option | Value |
|---|---|
| DNS servers | 10.10.10.200 |
| Gateway | 10.10.10.200 |
| Failover peer IP | 10.10.10.202 |
Table 7. DHCP server options on master node
The configurations on the backup node utilized in our example are as follows:
| Option | Value |
|---|---|
| DNS servers | 10.10.10.200 |
| Gateway | 10.10.10.200 |
| Failover peer IP | 10.10.10.201 |
Table 8. DHCP server options on backup node
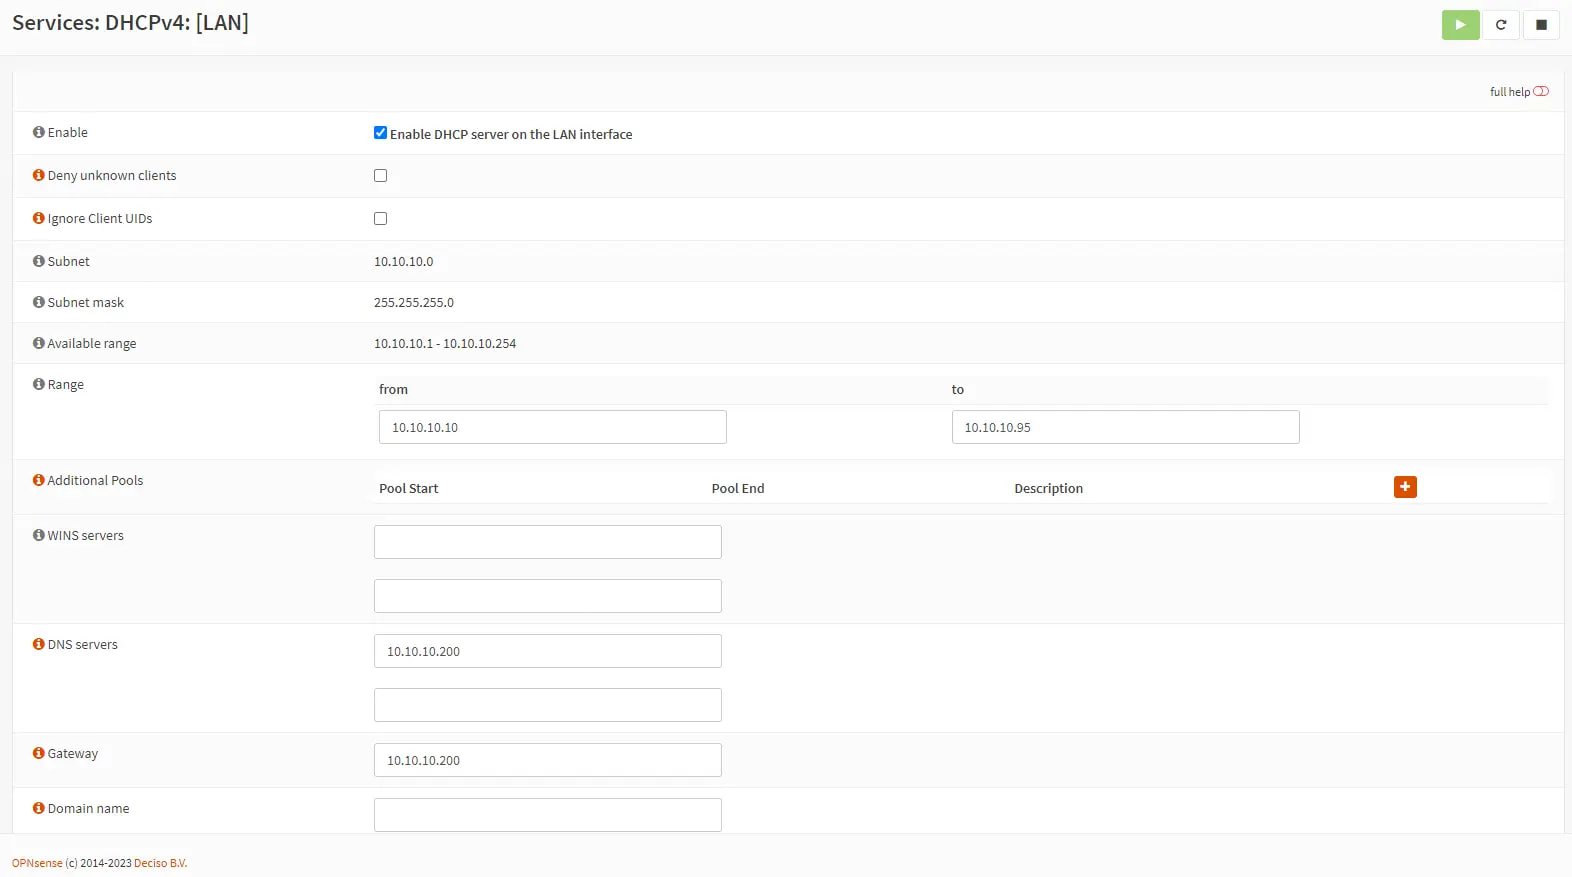
Figure 19. DHCP server settings on master node
6. Configure pfSync and HA sync (xmlrpc)
In order to initiate the synchronization process, it is imperative to configure pfSync and HA sync (xmlrpc) on the master firewall, respectively. In order to enable pfSync on master node, you may follow the next steps
-
Connect to the master firewall via web UI.
-
Navigate to System → High Availability → Settings
-
Check Synchronize States option.
-
Select PFSYNC for the Synchronize Interface option.
-
Set Synchronize Peer IP to 11.11.0.2. (here use the IP address of the PFSYNC interface of backup firewall).
-
Set Synchronize Config to 11.11.0.2.
-
Set Remote System Username , such as
root. -
Set Remote System Password , such as
opnsense. -
Select services to be synchronized, such as Dashboard, Aliases, NAT, DHCPD, Virtual IPs, and Firewall rules.
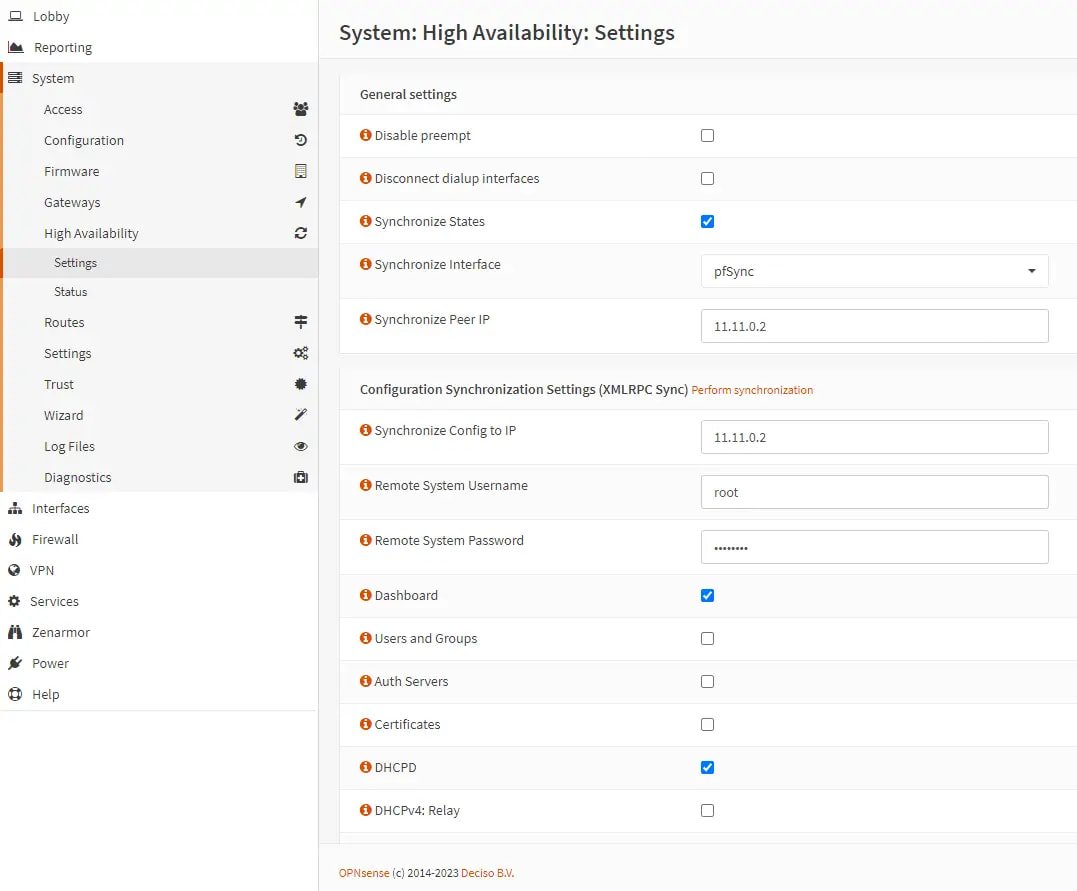
Figure 20. HA settings on master node
We established the XMLRPC sync in order to synchronize the configuration settings of the master and backup firewalls. To maintain this traffic on the direct connection between the two firewalls, we re-enter the peer IP (11.11.0.2 of the PFSYNC interface in the Synchronize Config to IP field. At this stage, it is necessary to input the remote user name and password, as well as configure the desired settings to be replicated to the backup server. In our configuration, we shall enable the subsequent:
- Synchronize Dashboard
- Synchronize Firewall rules
- Synchronize Aliases
- Synchronize NAT
- Synchronize DHCPD
- Synchronize Virtual IPs
pfSync is subsequently configured on the secondary firewall. To enable pfSync on backup node, you may follow the next steps:
- Connect to the backup firewall via web UI.
- Navigate to System → High Availability → Settings.
- Check Synchronize States option.
- Select PFSYNC for the Synchronize Interface option.
- Leave Disable preempt option as disabled so that preempt remains active. This ensures that if a single network connection (e.g. WAN connection from master firewall) fails, all IP addresses (WAN and LAN in this example) are moved to the second firewall.
- Enter the master IP (such as
11.11.0.1) in the Synchronize Peer IP field. - Avoid configuring XMLRPC synchronization on the secondary firewall.
7. Add Multiple CARP IPs (Optional)
You will need to include them in your HA configuration if your provider provides you with a subnet of public IP addresses and you wish to expose them for NAT or other services operating on your Firewall. In lieu of adding a VHID for each IP, which would significantly amplify the caRP traffic, it is possible to add an additional IP alias and designate it with the VHID associated with the initial CARP IP.
IP Alias is not synchronized with the backup firewall; therefore, it must be added to the second machine as well.
8. Test
You may test your OPNsense high availability configuration by following the next steps:
-
On master firewall dashboard, add the CARP widget by clicking on + Widget, selecting CARP and then clicking on Save Settings.
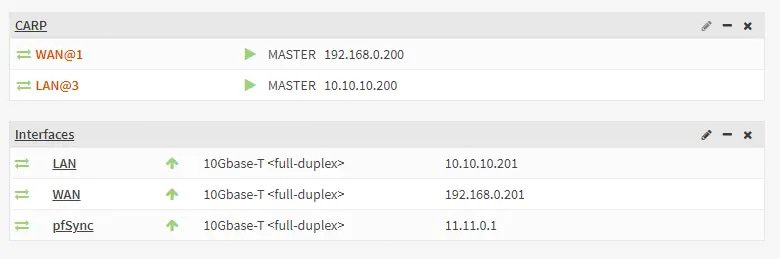
Figure 21. CARP and Interfaces widgets on master node dashboard
-
Reboot both firewalls before testing.
-
Navigate to System → High availability → Status in the OPNsense web UI to verify the successful initialization of both devices.
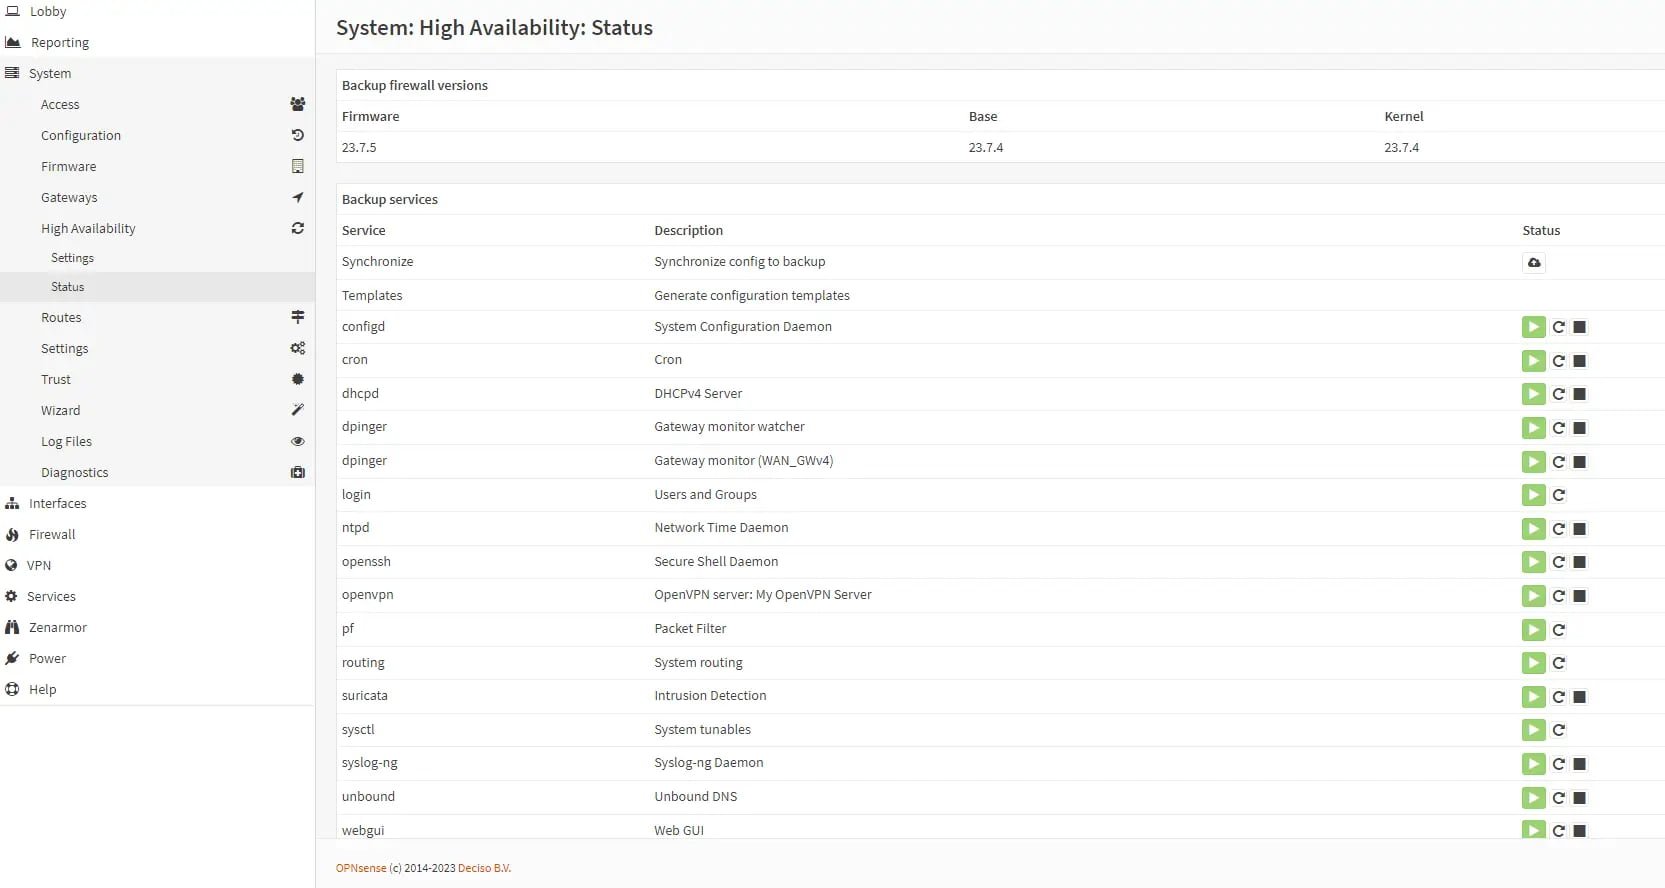
Figure 22. Viewing HA status on master node
-
Connect a client to the local area network and establish an SSH connection to a host located behind both firewalls in order to validate our configuration. At this juncture, both OPNsense firewalls should exhibit the same connection in the states dump section of the firewall configuration menu (Firewall → Diagnostics).
-
Pull the network plug from the primary firewall. This should transfer the connection to the backup without causing the SSH connection to be lost or frozen.
Updating HA Cluster Firewall System
Operating a redundant Active/Passive cluster results in the anticipation of a complete absence of outages. To minimize interruptions during update execution, simply adhere to the following procedures:
-
Restart your secondary unit after applying the update.
-
Navigate to Interfaces → Virtual IPs → Status on your primary device and select Enter Persistent CARP Maintenance Mode. Now that your secondary unit is MASTER, verify that all services, including DHCP, VPN, and NAT, are operational.
-
After verifying that the update was successful, proceed to update your primary unit and disable Persistent CARP Maintenance Mode.
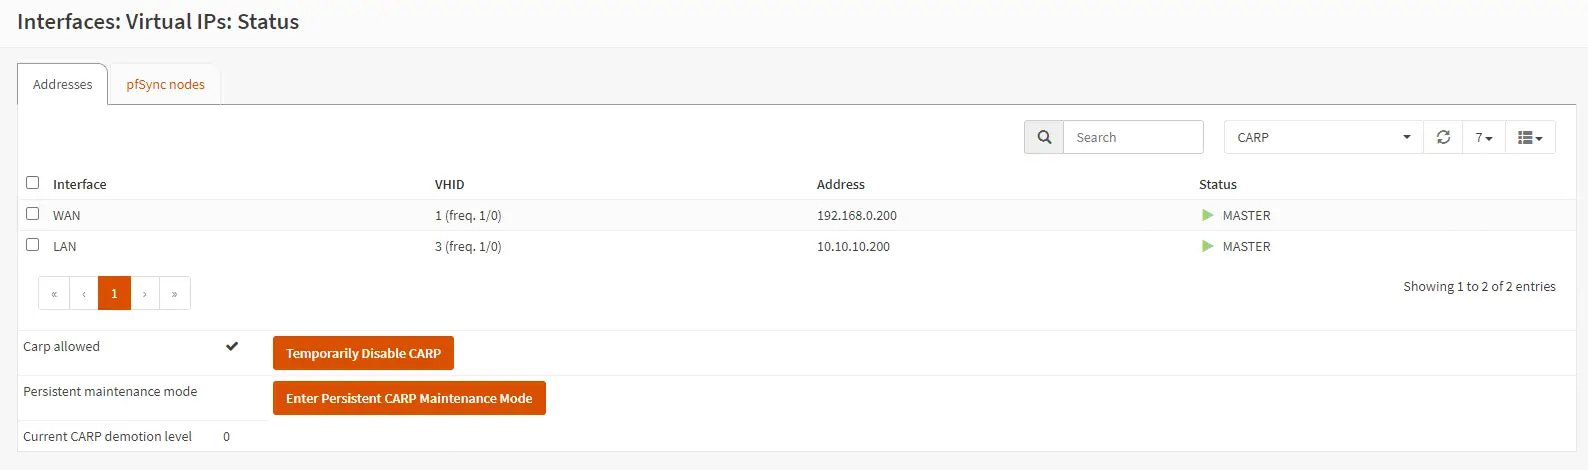
Figure 23. Viewing VIP status on master node
You will not lose an excessive number of packets, and your current connection will be transferred. Moreover, observe that persistent mode entry remains active even after a reboot.
How do I automate the replication of HA OPNsense Nodes?
While it is recommended to maintain the integrity of the backup firewall while performing maintenance, there are individuals who would rather synchronize the backup at periodic intervals. In light of this, OPNsense has a cron action on the primary firewall node that can be manually scheduled via System → Settings → Cron.
To enable automatic replication functionality, you may create a new cron job that includes the HA update and reconfigure backup command and schedule appropriately; outside of business hours, once per day is generally a safe bet.
In order to restrict the update of the active master by a non-operational primary machine, the HA update and reconfigure backup will solely be executed when all carp interfaces are set to MASTER mode.
How to View the Status of a HA Node?
You may view the status of the previously configured backup firewall by navigating to System → High Availability → Status. The status page displays all services operational on the backup firewall. You can update the backup machine and resume services from this page, if necessary.
You may restart all services simultaneously and update the backup firewall by utilizing the refresh button.
You may view the status of your HA cluster by navigating to Interfaces → Virtual IPs → Status.
The status page lists the active status of every configured carp VHID group. Additionally, the status page includes options for forcing a node into maintenance mode and disabling carp. Each VIP status is described in detail below.
- INIT: This typically signifies a problem with the interface; frequently, it is the result of interfaces that are not disconnected or other technical issues.
- BACKUP: When in the fallback state, this interface is monitoring for advertisements as part of a cluster. In the event that it is temporarily deprived of advertisements, it will undergo a transition to the master mode.
- MASTER: Identifies the active node while monitoring the network for advertisements. In the event that a node with a superior advertisement is detected, it may transition to backup status (subject to the preempt setting, which can be accessed via the System → High Availability → Settings page).
- Disabled: Disabled when the Temporarily Disable CARP option on this page is selected.
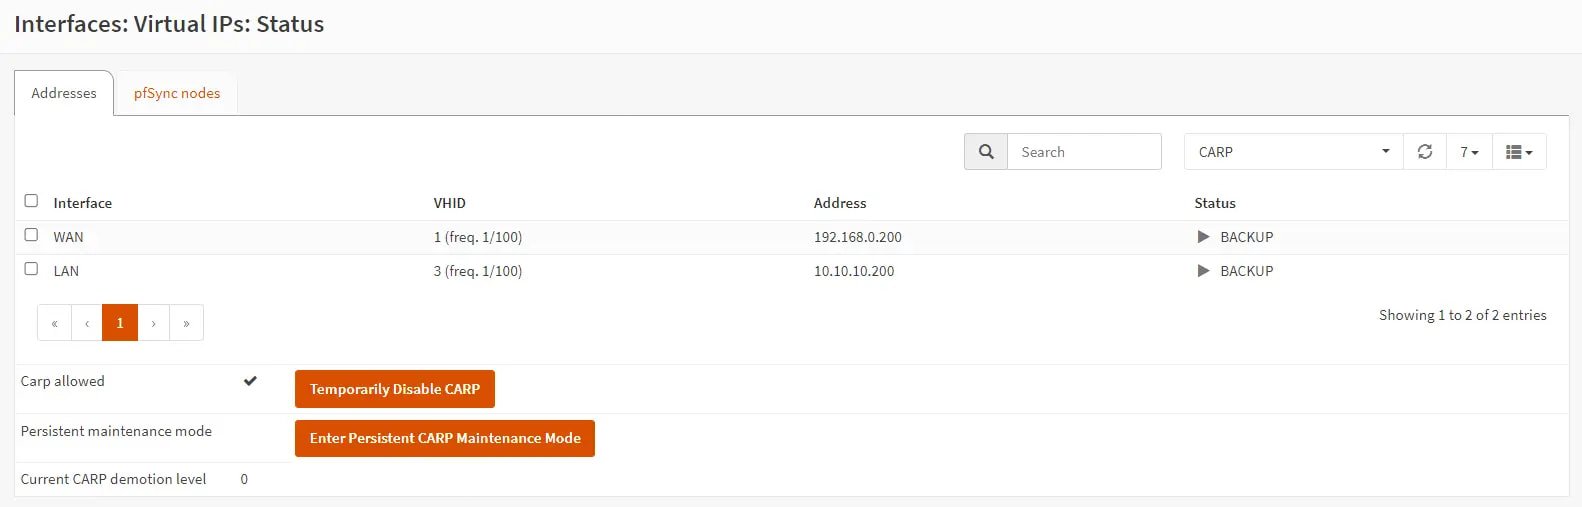
Figure 24. Viewing VIP status on backup node
What are CARP and pfSync?
Prior to delving into the HA setup on OPNsense, we will provide comprehensive information on the terminology associated with establishing a cluster system.
What is CARP?
The Common Address Redundancy Protocol (CARP) enables the sharing of a single IP address and Virtual Host ID (VHID) across several hosts, ensuring high availability for one or more services. This implies that in the event of one or more hosts failing, the remaining hosts will seamlessly assume control, ensuring that users do not experience any disruption in service.
Each host is assigned a unique IP address for administration and configuration, in addition to the shared IP address. All computers that share an IP address possess identical VHID. Each virtual IP address in the network interface's broadcast domain must have a unique Virtual Host Identifier (VHID).
The Common Address Redundancy Protocol (CARP) utilizes IP protocol 112, is based on OpenBSD, and employs multicast packets to communicate its status to neighboring devices. Ensure that every interface is capable of receiving CARP packets. Each virtual interface is required to possess a distinct Virtual Host ID (vhid), which is shared across the physical computers. The stated skew is used to ascertain the physical machine with a superior priority. A decrease in skewness corresponds to an increase in the score. (In this tutorial our master firewall utilizes 0).
A CARP interface's virtual MAC address is 00:00:5e:00:01:XX, with its vhid populating the final two digits.
CARP employs IP protocol 112 (0x70) to determine priority when transmitting advertisements; it does so via 224.0.0.18 or FF02::12.
What is pfSync?
pfsync is a computer protocol used for the synchronization of firewall states across computers that are running Packet Filter (PF) in order to achieve high availability. It is used in conjunction with CARP to ensure that a backup firewall maintains identical information to the primary firewall. In the event of the primary system in the firewall cluster failing, the secondary machine is capable of seamlessly handling ongoing connections without any loss.
It is strongly recommended to use a dedicated interface for transmitting pfSync packets between the hosts, both to enhance security (preventing state injection) and to improve speed.
For the state information to be accurately applied across both firewalls, it is imperative that they employ identical interface names to access the same networks. To illustrate, if Firewall 1's internal network (LAN) is linked through the igb0 interface, Firewall 2 must also allocate igb0 to the LAN. For a remedy, LAGG can be configured in the case of two distinct firewalls featuring unique interface identities and network devices.
What is XMLRPC sync?
A feature of OPNsense, XMLRPC sync, ensures that the configuration of the backup server remains consistent with that of the master server. After each configuration change, settings from supported areas are copied from the primary node to the secondary node and activated when XMLRPC synchronization is enabled. XMLRPC synchronization is not required, but it significantly increases the effort required to maintain a cluster.
You can access XMLRPC sync options by navigation to the System → High Availability → Settings on OPNsense UI.
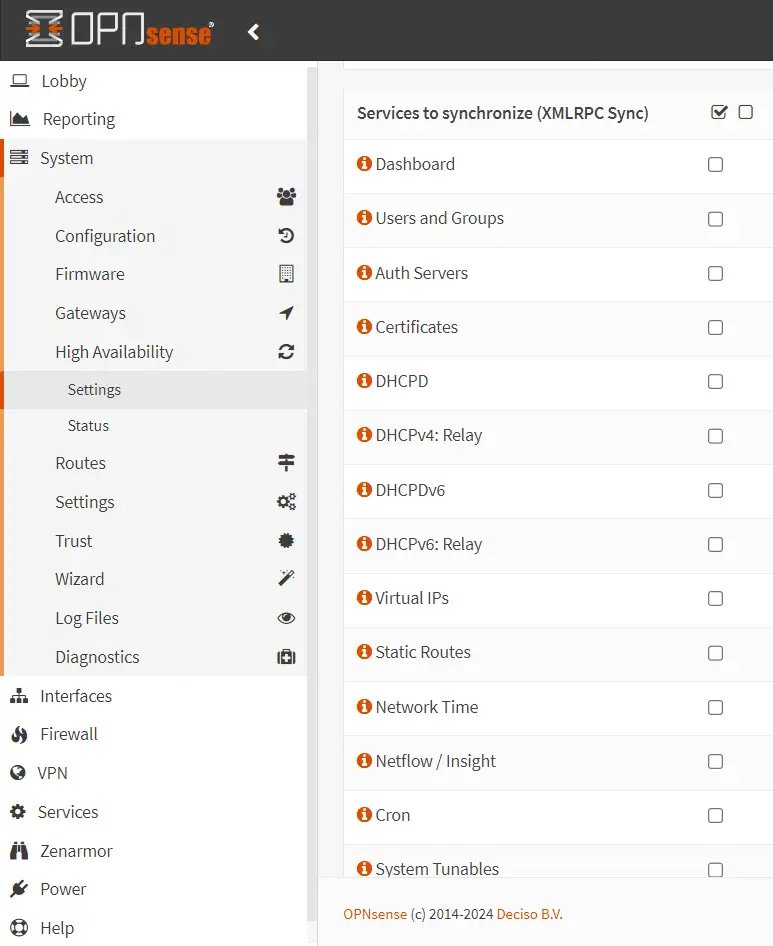
Figure 25. XMLRPC sync options on OPNsense HA