A Comprehensive Guide to Interfaces on OPNsense
OPNsense, a powerful open-source firewall and routing platform, offers users a robust set of tools for managing network interfaces to control the flow of traffic within their systems. Understanding and effectively configuring interfaces on OPNsense is essential for optimizing network performance, enhancing security measures, and ensuring seamless connectivity.
By exploring the functionalities of interfaces on OPNsense, users can assign physical ports, create virtual interfaces for specific purposes, and fine-tune settings to tailor network traffic management to their unique requirements. From setting up IPv4 and IPv6 configurations to utilizing diagnostic tools for troubleshooting network issues, this guide equips users with the knowledge and skills needed to navigate the complexities of interface configuration on OPNsense effectively.
This comprehensive guide delves into the intricacies of interfaces on OPNsense, covering the following topics:
- What are the Interfaces on OPNsense?
- Why are interfaces crucial for OPNsense network management?
- How does the OPNsense interface work?
- What are the types of Interfaces on OPNsense? And how can I set them up?
- What are the recommended methods for optimizing an OPNsense network's interfaces?
What are Interfaces on OPNsense?
In the domain of network management, interfaces serve as the crucial link between devices, facilitating the exchange of data packets and enabling communication within a network. Specifically in the context of OPNsense, interfaces play a pivotal role in directing network traffic, connecting various devices, and implementing network security measures.

Figure 1. OPNsense Interface List
On OPNsense, interfaces serve as gateways through network traffic flows, allowing users to control and manage the communication between different networks and devices within the system. These interfaces can be physical ports on the hardware where network cables are connected, or virtual interfaces created for specific purposes such as VLANs, captive portals, or high availability setups.
Why are Interfaces Essential for Network Management on OPNsense?
Interfaces play a vital role in network management within OPNsense by serving as the linchpin for connecting different segments of a network. Whether it's linking devices within a local area network (LAN) or establishing connections to external networks like the wide area network (WAN), interfaces act as the gateways through which data travels. By assigning specific roles to each interface, users can effectively organize and control traffic flow between various network segments, ensuring seamless communication and efficient data exchange.
Assigning IP addresses and network configurations to interfaces is another key aspect of network management on OPNsense. By defining IP addresses, subnet masks, and gateway settings for each interface, users can establish clear communication paths within the network. This enables devices to identify and communicate with each other effectively, facilitating tasks such as data transfer, resource sharing, and network access.
One of the primary functions of interfaces on OPNsense is to control traffic flow and enforce security measures based on the type of interface. By configuring firewall rules, traffic shaping policies, and access control lists at the interface level, users can regulate the movement of data packets, filter incoming and outgoing traffic, and protect the network from unauthorized access or malicious activities.
Interfaces provide a granular level of control over network traffic, allowing users to implement security measures tailored to specific interface types. For example, users can set up stricter security policies for external-facing interfaces like WAN to safeguard against external threats, while implementing more permissive rules for internal interfaces like LAN to facilitate seamless communication within the network.
The benefits of interfaces on OPNsense extend beyond connectivity and security to offer users flexibility, enhanced control, and improved network performance. By leveraging interfaces effectively, users can segment their networks for better organization, optimize traffic routing for improved efficiency, and fortify network defenses to mitigate potential security risks. Overall, interfaces on OPNsense empower users to manage their networks with precision, ensuring reliable connectivity, robust security, and streamlined operations.
How do OPNsense Interfaces Function?
All traffic on OPNsense travels via interfaces, with WAN and LAN being the default assignments. Each physical or virtual interface acts as a pathway for data packets to move between devices and networks. When a data packet enters the network, it is routed through the appropriate interface based on its destination IP address and routing rules. Interfaces process packets sequentially, applying configurations such as firewall rules, Quality of Service (QoS) policies, and routing decisions.
Interfaces on OPNsense interact closely with various features like the firewall, DHCP, NAT, and routing protocols. The firewall uses interface-specific rules to filter traffic, ensuring network security. DHCP dynamically assigns IP addresses to devices connected to interfaces, simplifying network configuration. NAT translates private IP addresses to public ones for internet access. Routing protocols like OSPF and BGP utilize interface information to determine optimal data paths between networks.
Configuring interface settings on OPNsense empowers users to customize network behavior to meet specific requirements. By defining IP addressing schemes, setting up routing rules, and implementing security policies, users can optimize network performance, enhance security, and streamline operations. Understanding how interfaces function and interact with other OPNsense features is essential for effective network management and ensuring a secure and efficient network infrastructure.
What Types of Interfaces are Available on OPNsense?
OPNsense offers a variety of interface types to cater to different network requirements and configurations. Each interface type serves a specific purpose and plays a crucial role in managing network connectivity, security, and traffic routing within the OPNsense firewall.
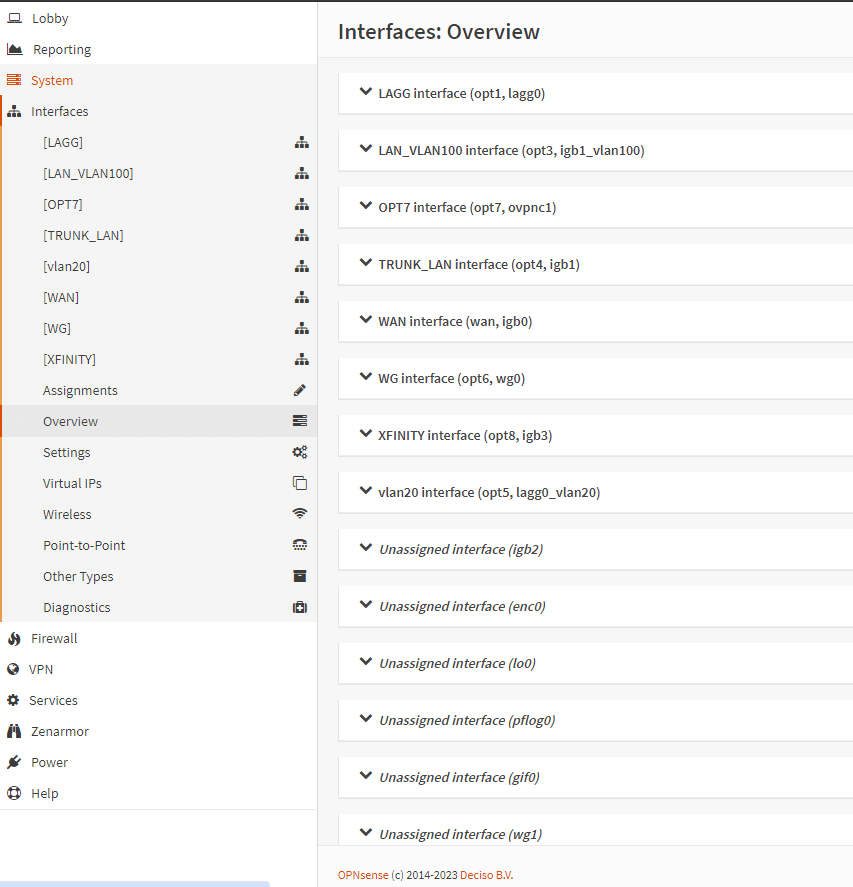
Figure 2. OPNsense Interfaces Overview
The following interface types are available on OPNsense
- LAN interfaces
- WAN interface
- Wireless interface
- Other Types
- Bridge interface
- GIF interface
- GRE interface
- LAGG interface
- Loopback interface
- VLAN interface
- VxLAN interface
We can begin to investigate the various OPNsense interface types now.
LAN (Local Area Network) Interface
The LAN interface is typically used for internal devices within a local network. It facilitates communication between devices such as computers, printers, and servers within the same network segment. The LAN interface is essential for local data transfer, file sharing, and internal network operations.

Figure 3. OPNsense LAN Interface
Simply following the steps provided below will allow you to configure the LAN interface.
- Navigate to Interfaces > Assignments on OPNsense firewall.
- Select LAN from the list of interfaces.:
- Set Type to
Static IPv4for IPv4 Configuration. - Enter the desired IPv4 address in the Address field (e.g., 192.168.1.1).
- Enter the subnet mask in the Netmask field (e.g., 255.255.255.0).
- If you have a local gateway or router, enter its IP address in the Upstream Gateway field. Otherwise, leave it blank.
- Optionally you may modify MTU, MSS, or other advanced settings if needed.
- Click "Save" to apply the changes.
WAN (Wide Area Network) Interface
The WAN interface is designed for connecting to the internet or external networks. It serves as the gateway for outgoing traffic from the local network to the internet and vice versa. The WAN interface handles external communication, internet access, and data exchange with remote servers and services.
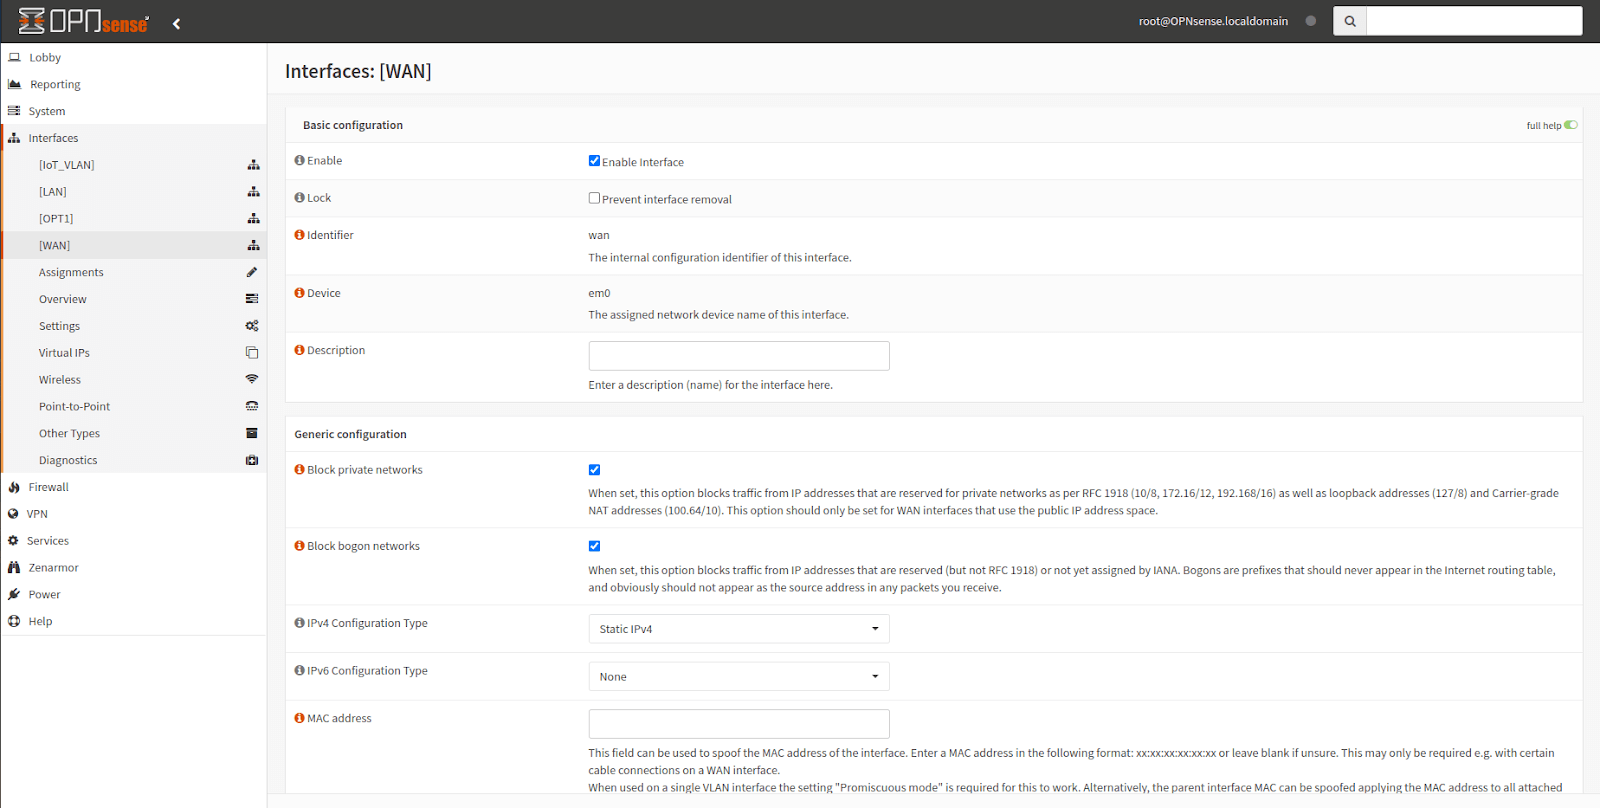
Figure 4. OPNsense WAN Interface Configuration
The steps below will show you how to configure a WAN interface. Assuming you have a static IP WAN connection, here's a step-by-step guide on defining the WAN interface on OPNsense:
- Go to Interfaces > Assignments on OPNsense web UI.
- Find the "WAN" interface in the list and click on it.
- Make sure Enable Interface and "Lock" are checked.
- Leave "Identifier" as "wan".
- Leave "Device" as default (unless you have a specific reason to change it).
- Give the interface a descriptive "Description" (e.g., "Main Internet Connection").
- Leave Block private networks and Block bogon networks checked unless you have a specific reason to disable them.
- Set IPv4 Configuration Type to
Static IPv4if you have a static public IP address and your firewall is directly connected to the Internet. If not, you may leave this option asDHCP. - You may leave IPv6 Configuration Type as "None" (unless you use IPv6).
- Leave MAC address blank unless your ISP explicitly requires it.
- Leave Promiscuous mode unchecked.
- Leave "MTU" and "MSS" blank unless your ISP specifies specific values.
- Set "Speed and duplex" to "Default (no preference, typically autoselect)".
- Leave "Dynamic gateway policy" unchecked.
- Leave "Overwrite global settings" unchecked in Hardware settings pane.
- Enter your IPv4 address provided by your ISP (e.g., 172.172.172.172) if you have a static public IP address.
- Enter your "Netmask" (usually 255.255.255.0 for a /24 network).
- Enter your "IPv4 Upstream Gateway" (the IP address of your ISP's gateway) in the "WAN_GW" field.
Wireless Interface (if applicable)
In cases where OPNsense supports wireless connectivity, a wireless interface is available for managing wireless networks and devices. The wireless interface enables the configuration of wireless access points, security settings, and network policies for wireless communication within the network environment.
-
Navigate to the interface settings.
-
Create a wireless clone interface.
-
Assign the interface.
-
Install and enable the FreeRADIUS plugin.
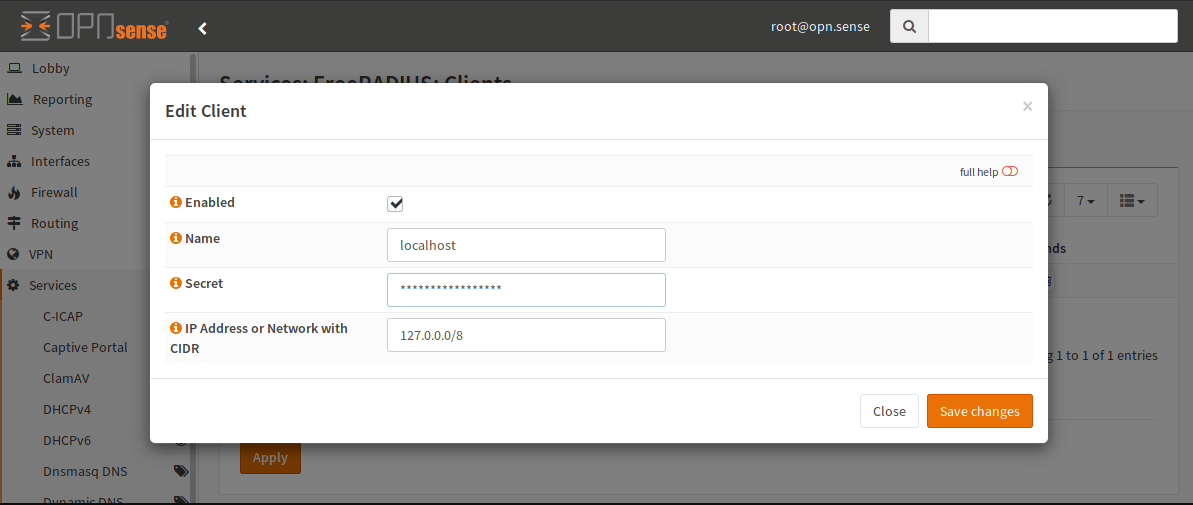
Figure 5. Editin AP Client on OPNsense
-
Create a new client (Access Point) with a secret key.
-
Create a new user with a username and password for authentication.
-
Enable WLAN and configure IPv4 settings.

Figure 6. OPNsense WLAN Interface Enable
-
Set SSID (Name of the wireless network).
-
Choose security settings as WPA2 with PSK (WLAN password) or WPA/WPA2 Enterprise if using RADIUS.
-
Set encryption method to AES.
-
If you are using RADIUS authentication enable IEEE802.1X Authentication.
-
Set 802.1X Server IP Address to 127.0.0.1.
-
Set 802.1X Server Port to 1812.
-
Set 802.1X Server Shared Secret to the password configured above.
-
On your device (e.g., laptop or handheld), set the security setting to "WPA/WPA2 Enterprise" if using RADIUS authentication or "WPA2" if using PSK.
-
Set the authentication setting to "Protected EAP (PEAP)".
-
Set the inner authentication to "MSCHAPv2".
-
Use the username and password configured in the RADIUS plugin for authentication. That's it! You should now have configured your wireless interface in access point mode.
Other Types of Interfaces
In addition to wired, wireless, and VPN interfaces, there are some other virtual interfaces, as well as some other interface-related items. These choices can be accessed in Interfaces ? Other type. This page provides a brief explanation of these possibilities.
Bridge Interface
A bridge interface on OPNsense allows for the combination of multiple physical ports into a single logical interface. This setup enables seamless communication between devices connected to different physical ports, treating them as part of the same network segment. Bridge interfaces are commonly used for network expansion, load balancing, and redundancy purposes.
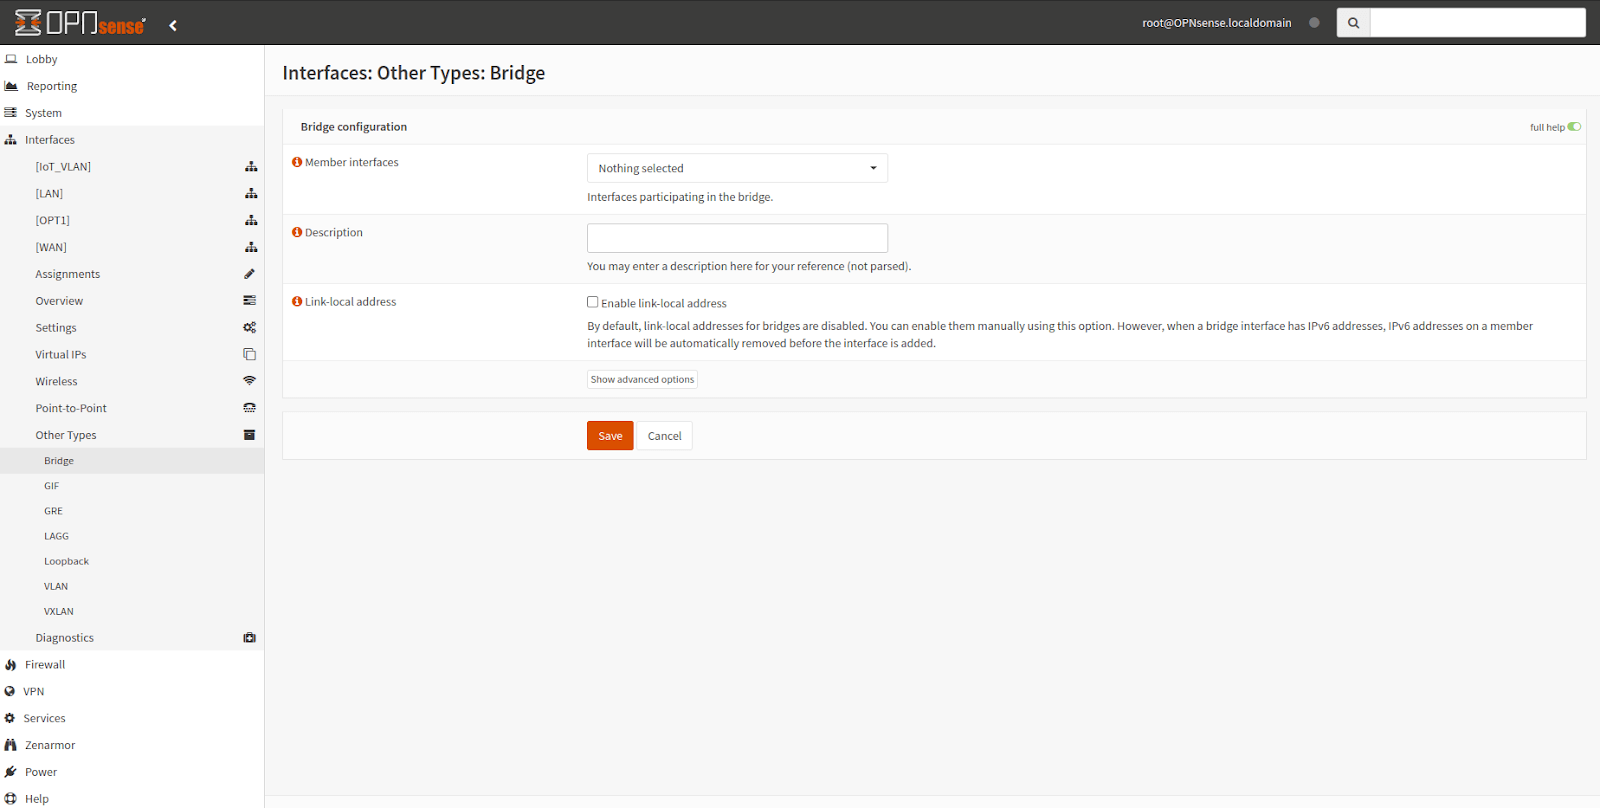
Figure 7. Bridge Interface Configuration in OPNsense
You can easily configure a bridge interface on OPNsense to combine multiple physical interfaces into a single logical interface for enhanced network management and connectivity.
GIF
The GIF interface is used to tunnel IPv6 traffic over IPv4 connections. It provides a mechanism for encapsulating IPv6 packets within IPv4 packets, facilitating communication between IPv6-enabled devices over IPv4 networks. GIF interfaces are commonly utilized for establishing IPv6 tunnels and enabling connectivity between IPv6 networks across IPv4 infrastructure.
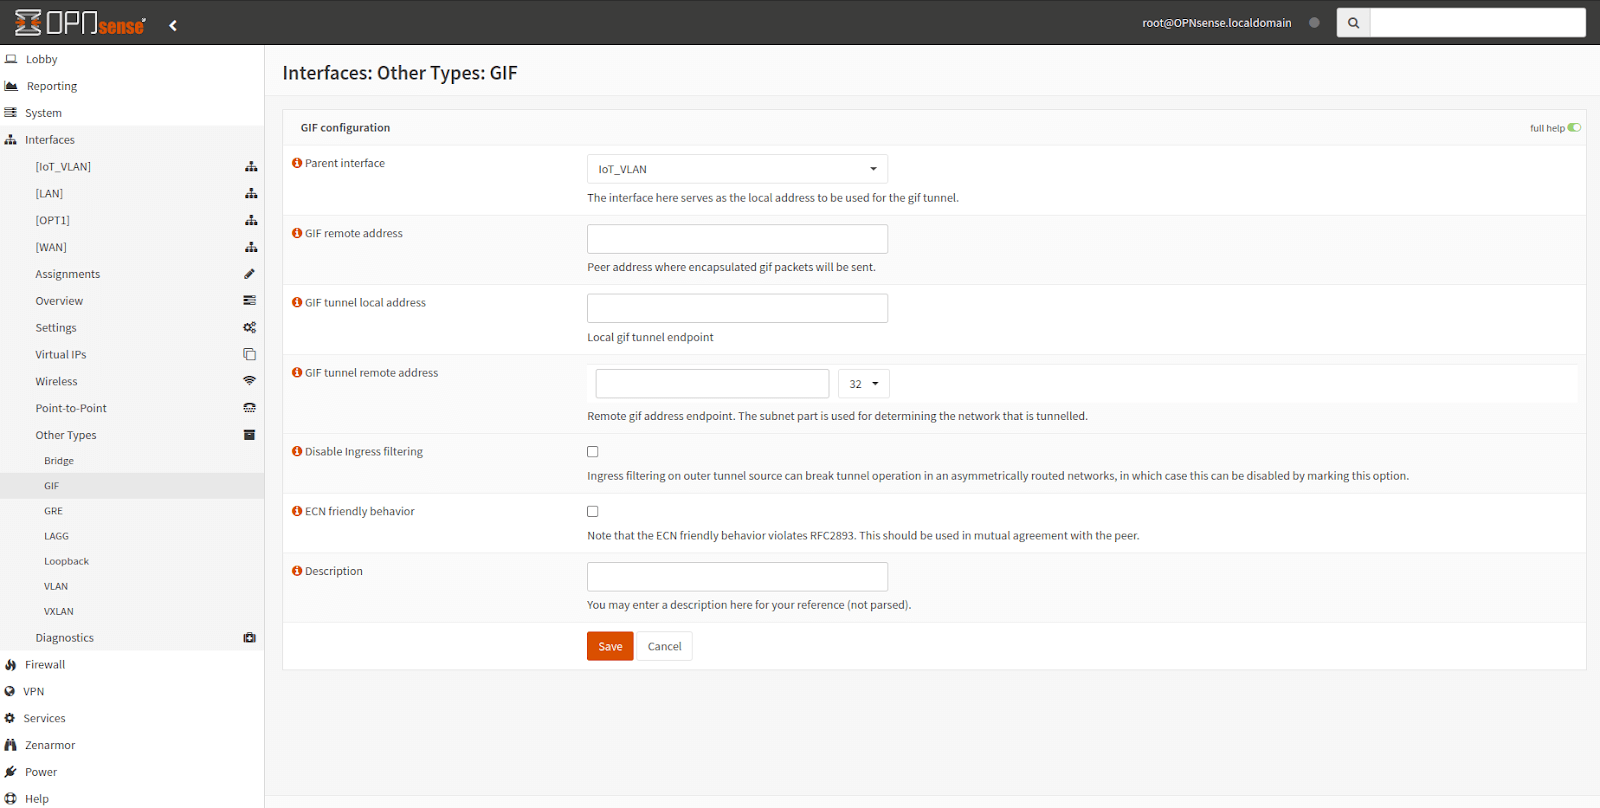
Figure 8. GIF Interface configuration in OPNsense
GRE
The GRE interface is a tunneling protocol that encapsulates a wide variety of network layer protocols inside virtual point-to-point links. GRE tunnels are used to establish secure communication channels between remote networks over an untrusted network, such as the Internet. GRE interfaces enable the creation of virtual private networks (VPNs) and secure data transmission between geographically dispersed networks. You can quickly create a GRE interface on your OPNsense firewall.
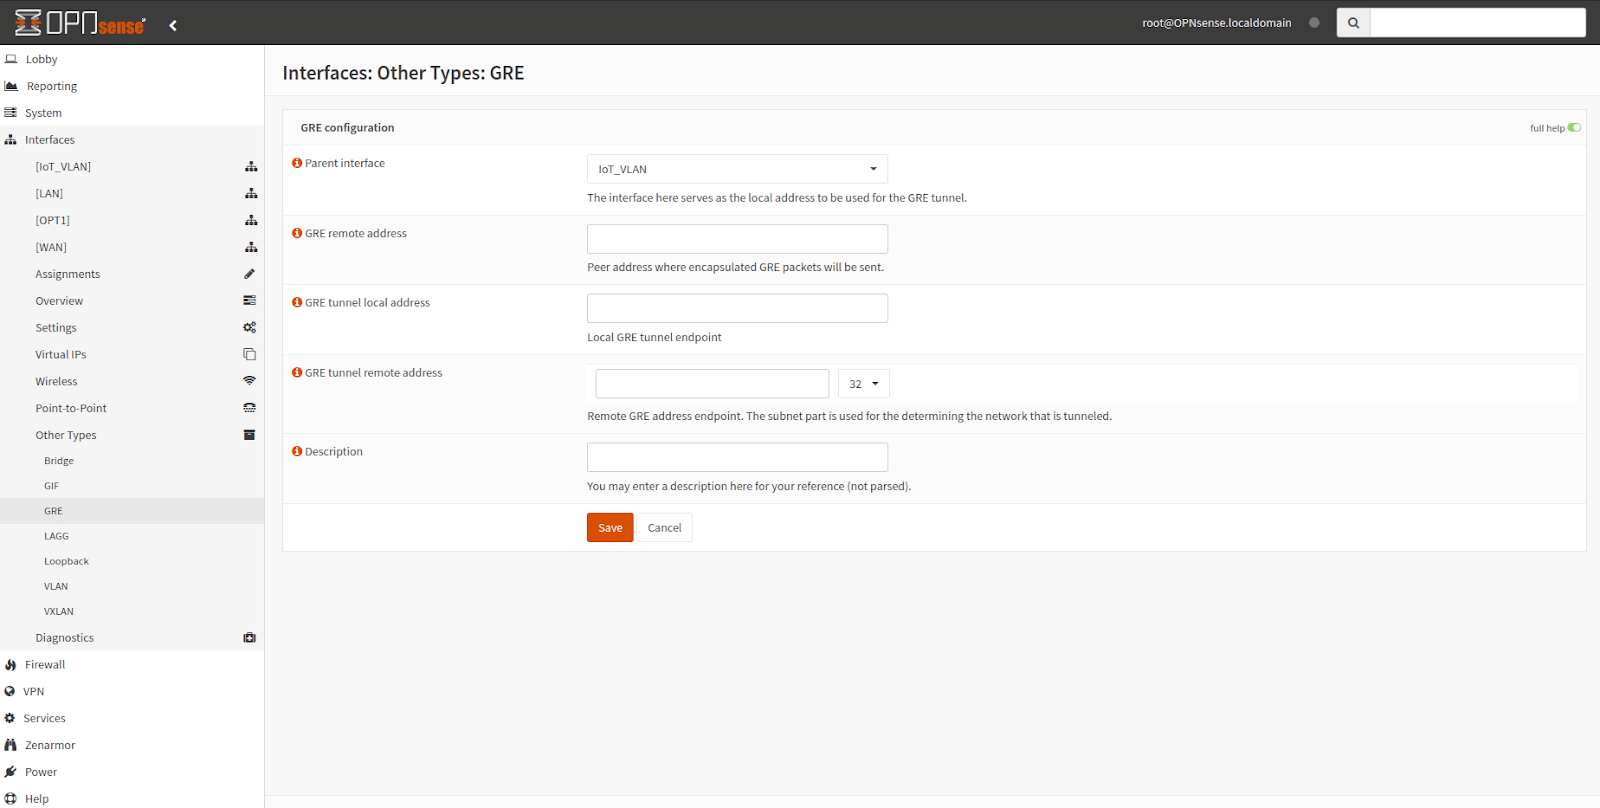
Figure 9. GRE Interface configuration in OPNsense
LAGG
The LAGG interface, also known as link aggregation or bonding, combines multiple physical network interfaces into a single logical interface. LAGG interfaces enhance network performance, reliability, and bandwidth by distributing traffic across aggregated links. This setup provides load balancing, fault tolerance, and improved network throughput by utilizing multiple network connections simultaneously.
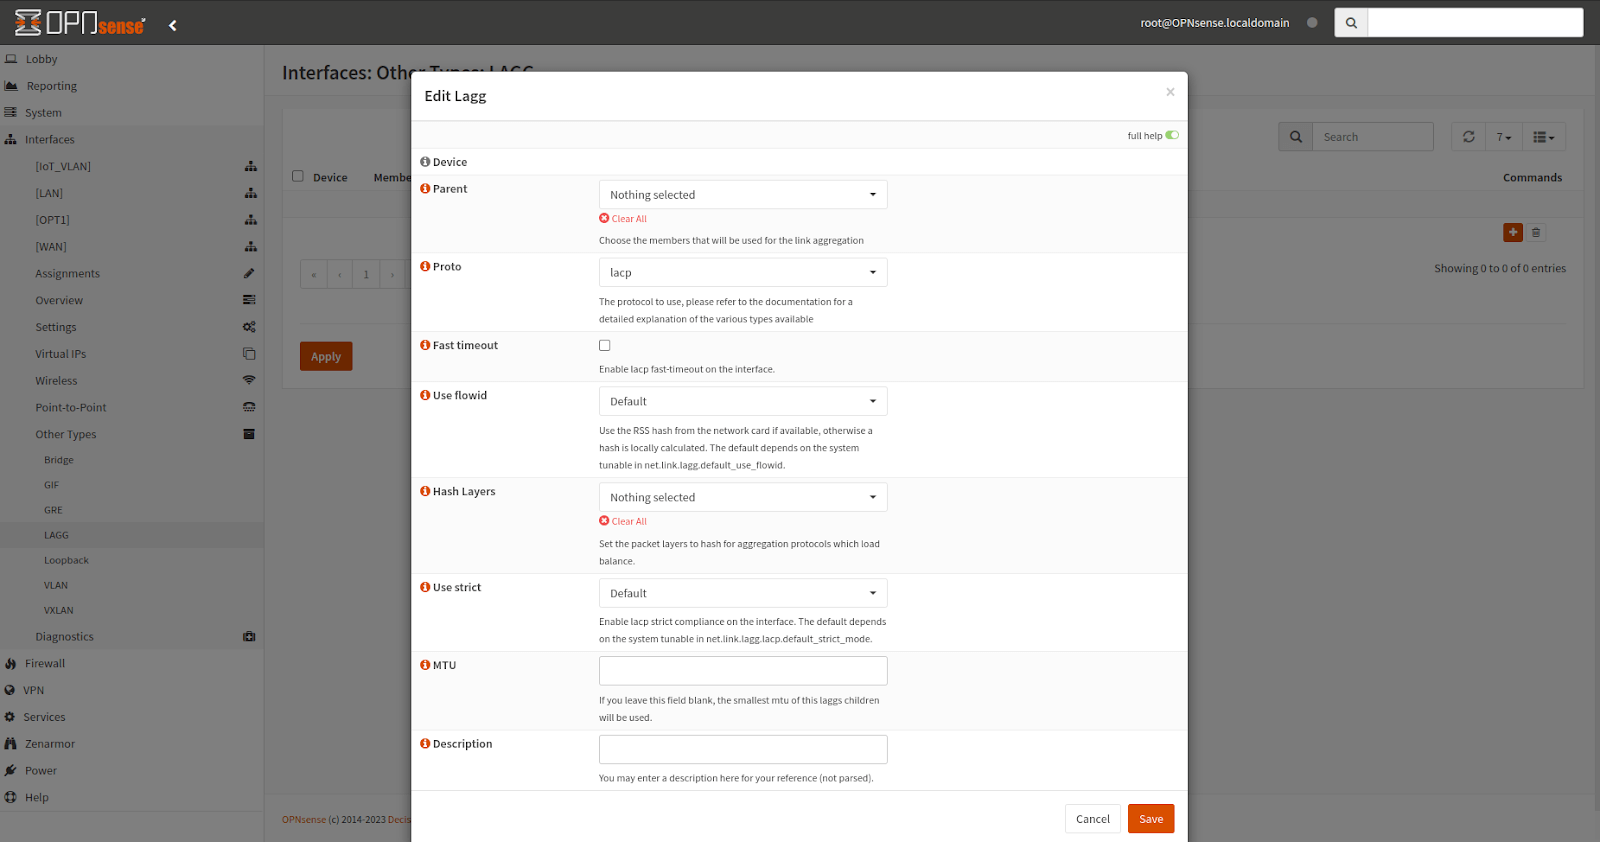
Figure 10. LAGG Interface Configuration in OPNsense
Loopback
The loopback interface is a virtual interface that allows a device to communicate with itself. Loopback interfaces are commonly used for administrative purposes, testing network configurations, and running local services that require network connectivity. On OPNsense, loopback interfaces are utilized for tasks such as router ID assignment for routing protocols and accessing services bound to loopback addresses.
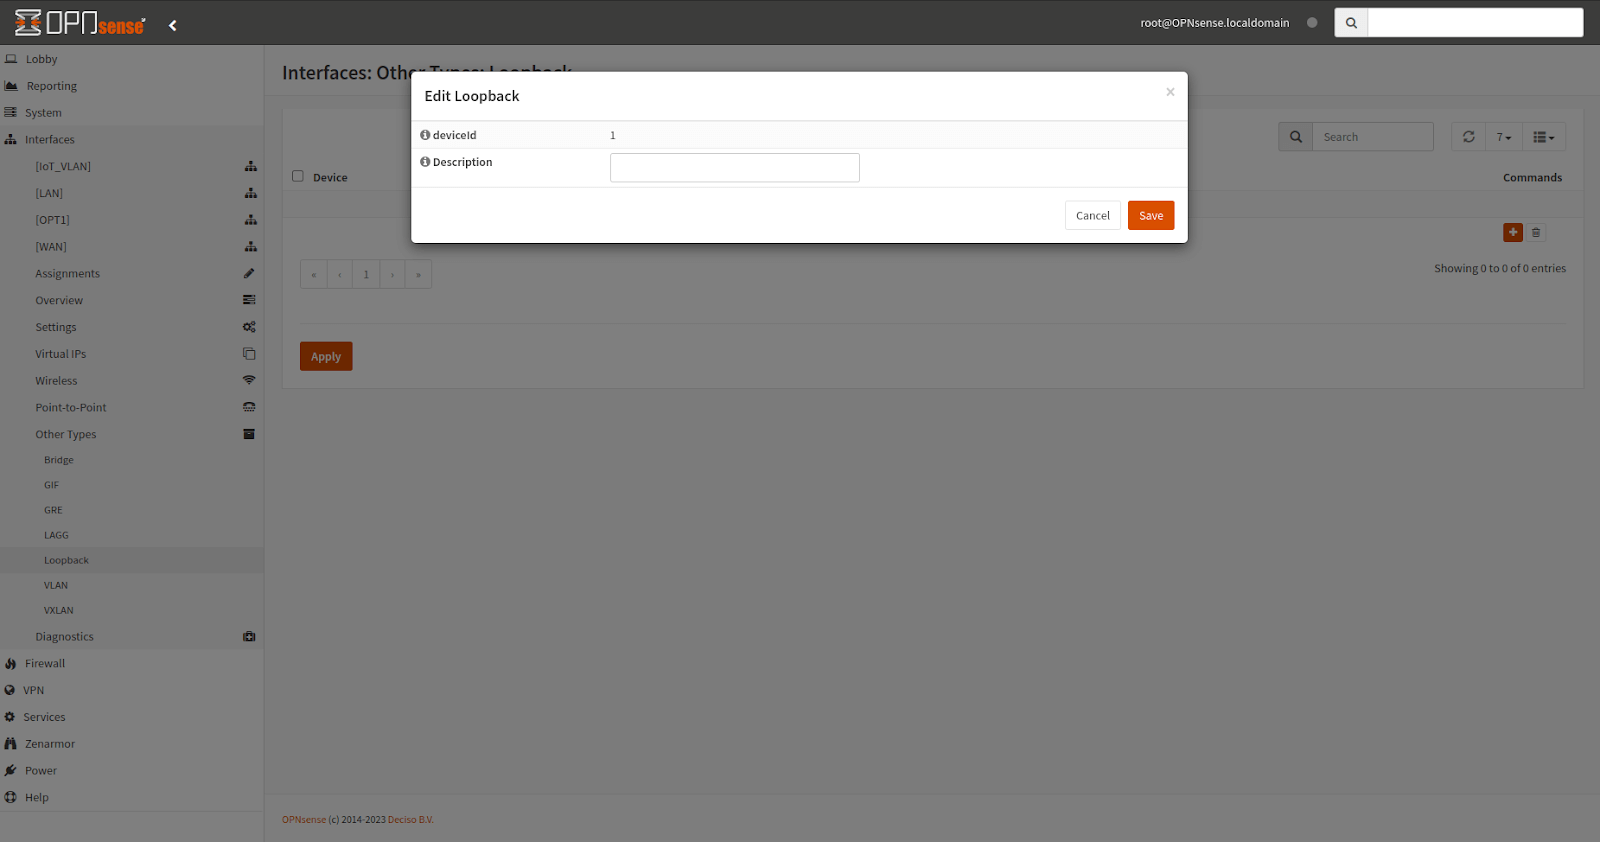
Figure 11. Loopback Interface Configuration in OPNsense
VLANs (Virtual Local Area Networks) Interface
VLAN interfaces enable network segmentation by dividing a single physical network into multiple virtual networks. Each VLAN operates as a separate entity with its own set of security policies, IP addressing, and routing rules. VLANs enhance network security, optimize traffic flow, and facilitate the isolation of specific network segments for different purposes. You may create and configure the VLAN interface on your OPNsense node easily by following the 5 main steps:
- Preparing the Network Environment
- Creating VLANs in OPNsense
- Configuring VLAN Interfaces
- Configuring Firewall Rules for VLANs
- Testing the VLAN Configuration
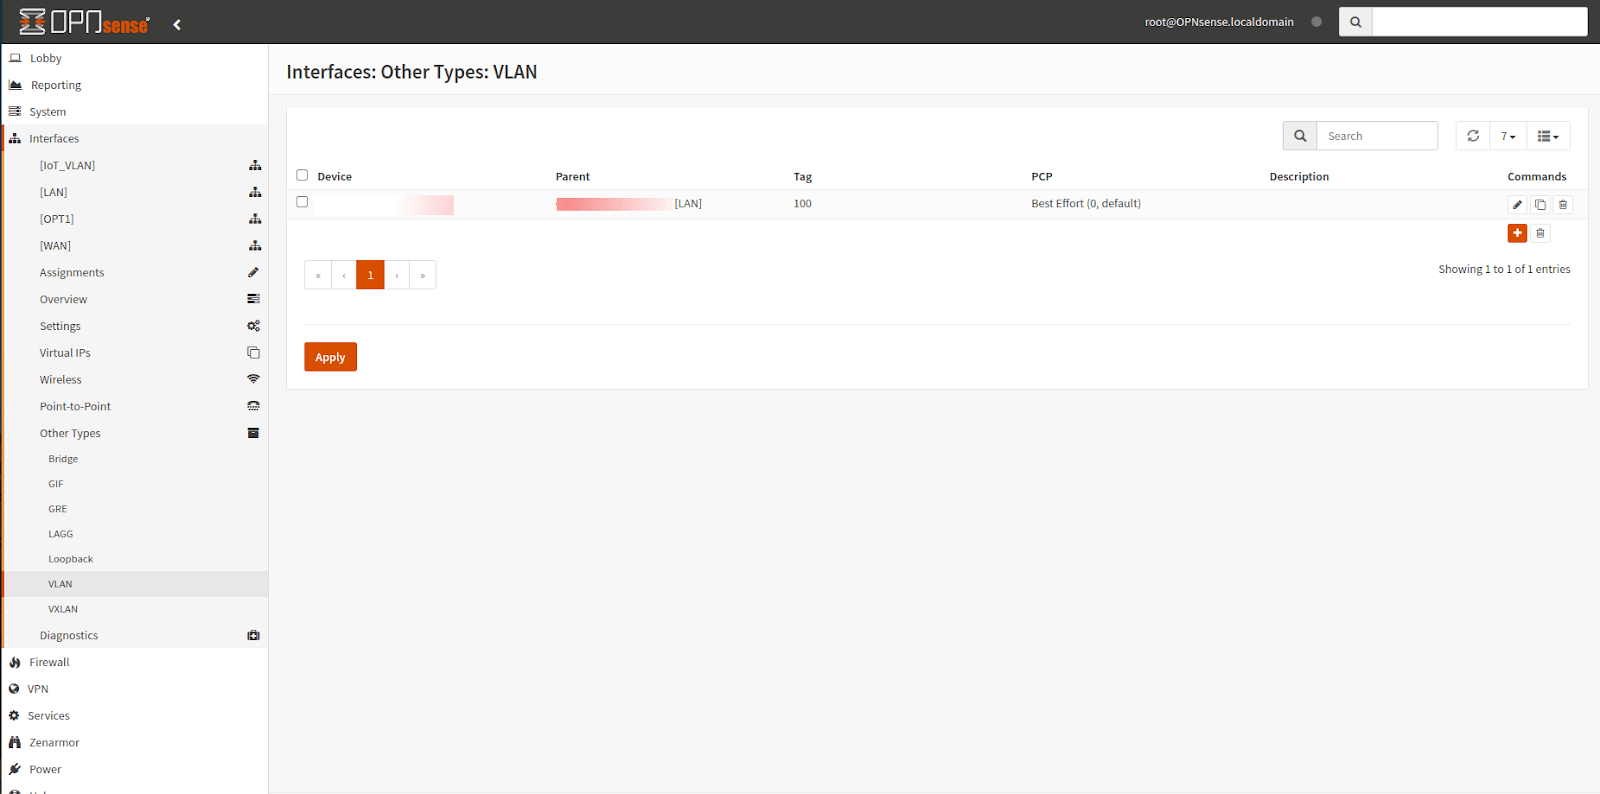
Figure 12. VLAN Interface Configuration in OPNsense
VXLAN
VXLANs are utilized to overlay virtual layer 2 networks over layer 3 networks. Tunnels can be established either in point-to-point mode via Remote address parameters or in multicast mode using Multicast group and Device parameters. The Source address needs to be an existing statically assigned address on the firewall, serving as the source in the encapsulating IPv4/IPv6 header. It's important to note that due to the encapsulation of Ethernet frames with additional headers, the resulting frame might exceed the MTU of the physical network. To address this, it's recommended to configure the physical network MTU to use jumbo frames or adjust the MTU size on the VXLAN interface accordingly.
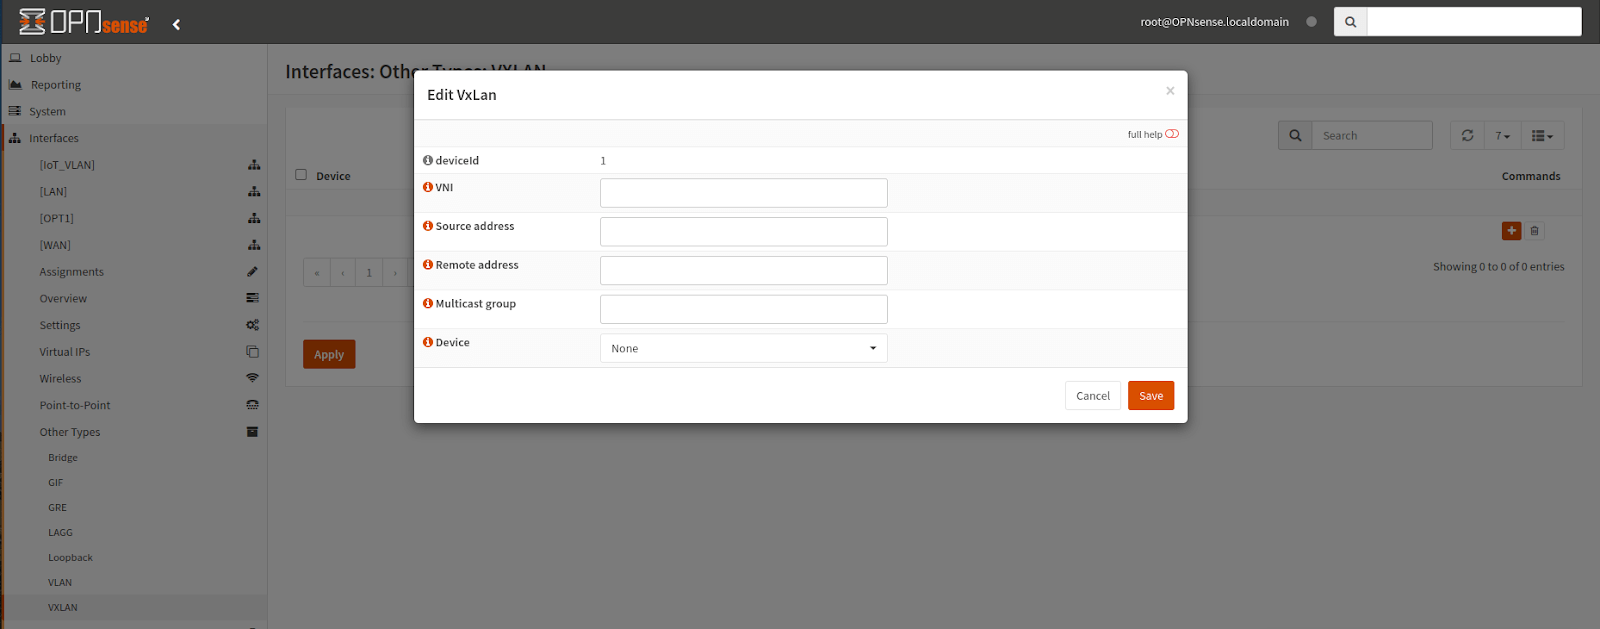
Figure 13. VXLAN Interface Configuration in OPNsense
What Are the Best Practices for Optimizing Network Management with Interfaces in OPNsense?
On OPNsense network management, proper interface naming, organization, and security are crucial for efficiency and reliability. Descriptive names, logical grouping, and consistent conventions simplify management and troubleshooting. Robust security, performance optimization, and proactive monitoring mitigate risks and ensure network stability. This comprehensive approach fosters a secure and efficient network environment aligned with organizational needs.
This section outlines some recommended procedures for configuring the OPNsense interface.
- Implement proper naming and organization of interfaces. Assign descriptive names to interfaces based on their function or location within the network (e.g., LAN, WAN, VLAN10). Organize interfaces logically by grouping related interfaces for easier management and troubleshooting. Use consistent naming conventions to maintain clarity and consistency across interfaces.
- Implement network segmentation using VLANs to isolate different network segments and enhance security.
- Configure firewall rules to control traffic flow between interfaces and enforce security policies.
- Regularly review and update firewall rules to adapt to changing network requirements and security threats.
- Enable intrusion detection and prevention systems (IDS/IPS) to monitor and protect network traffic against malicious activities.
- Utilize VPNs for secure remote access and encrypted communication between network endpoints.
- Implement traffic shaping to prioritize and control bandwidth usage for different types of traffic.
- Configure Quality of Service (QoS) policies to ensure critical applications receive sufficient network resources and prioritize traffic based on predefined rules.
- Monitor network traffic patterns and adjust traffic shaping and QoS settings as needed to optimize network performance.
- Utilize caching and content filtering mechanisms to reduce bandwidth usage and improve network efficiency.
- Regularly monitor interface status, traffic utilization, and performance metrics to identify potential issues.
- Set up alerts and notifications for critical events, such as interface failures or abnormal traffic patterns.
- Use diagnostic tools provided by OPNsense to troubleshoot interface connectivity, configuration, and performance problems.
- Keep network documentation up to date with detailed information about interface configurations, IP addresses, VLAN assignments, and firewall rules for easier troubleshooting.
By following these best practices for network management in OPNsense, administrators can ensure efficient, secure, and optimized network operations. Properly configured interfaces, robust security measures, performance optimization techniques, and proactive monitoring strategies contribute to a stable and reliable network environment that meets the organization's requirements and safeguards against potential threats.
Conclusion: Maximizing Network Efficiency with OPNsense Interfaces
In conclusion, mastering interface configurations on OPNsense is essential for building robust and secure networks. By leveraging features like bridge interfaces, GIF, GRE, and WLAN setups, users can expand network capabilities, enhance communication between devices, and establish secure connections over various protocols.
Furthermore, following best practices such as proper naming conventions, security considerations, and performance optimization techniques ensures a stable and reliable network environment. Regular monitoring, troubleshooting, and proactive network management are crucial for identifying and addressing potential issues promptly.
By implementing the recommendations outlined in this document, administrators can create efficient, secure, and optimized network operations that meet organizational requirements and safeguard against potential threats. With a solid understanding of OPNsense interfaces and their configurations, users can elevate their network management skills and ensure a seamless networking experience.