How to Install and Configure CrowdSec on OPNsense?
CrowdSec is a lightweight, open-source program that identifies individuals exhibiting violent tendencies and prevents them from accessing your systems. The design of the system is user-friendly and provides easy access while still offering strong security measures. By utilizing the CrowdSec plugin on your OPNsense firewall, you are able to perform the following tasks:
- Implement LAPI on the OPNsense server for additional agents and bouncers.
- Scan the logs of an agent deployed on OPNsense for attacks
- Obstruct intruders from reaching the entire network with a single firewall bouncer
- Enumerate the hub modules (parsers, scenarios, etc.) and decisions in the OPNsense web UI.
CrowdSec plugin facilitates the installation of a CrowdSec agent/LAPI node and a Firewall Bouncer. By activating them on the "Settings" page, the OPNsense server is protected right away. This is done by receiving a large number of IP addresses belonging to active attackers, which are promptly blocked at the firewall level. Furthermore, the logs of the SSH service and OPNsense administrator interface undergo scrutiny to detect potential instances of brute-force assaults. If such a situation arises, it results in an immediate ban and is sent to the CrowdSec Central API, including the date, scenario, and attacker IP address.
Additional attack patterns may be identified on the OPNsense server and its plugins, as well as any other agent linked to the same LAPI node. Alternative methods of remediation may be used, such as implementing a captcha test to detect and prevent scraping attempts.
In its most fundamental configuration, the CrowdSec module functions exclusively on a single server, safeguarding only the services hosted on the OPNsense system. Furthermore, it restricts the barring of malicious IP addresses, which are curated by the CrowdSec community. Nevertheless, CrowdSec can be configured with multiple servers so that multiple agents report to a single local API server. The local API server may be executed on the OPNsense machine; however, if hardware resources are limited and the network parses a significant volume of logs, it might be possible to alleviate the strain on the OPNsense firewall by transferring the local API server to an alternative machine.
In this tutorial, we will do basic CrowdSec installation on a single OPNsense system by following the next steps:
- Installing CrowdSec plugin
- Configuring CrowdSec
- Adding Firewall Rules
- Creating CrowdSec Console Account (Optional)
- Adding Private Addresses to Whitelist
- Adding Additional Blocklists
- Testing CrowdSec

Installing CrowdSec plugin
On the OPNsense 22.1 firewall, you may easily install the CrowdSec plugin by running the next command on the console:
pkg install os-crowdsec-devel
As of OPNsense 22.7, you may easily install the CrowdSec plugin web UI by following the next steps:
-
Navigate to the System → Firmware → Plugins menu.
-
Type
os-crowdsecin the search field.
Figure 1. Installing crowdsec plugin
-
Click on the
+icon next toos-crowdsecto install the plugin. Then you will be redirected to the Update menu tab. It will deploy three packages:- os-crowdsec, the plugin itself
- crowdsec
- crowdsec-firewall-bouncer
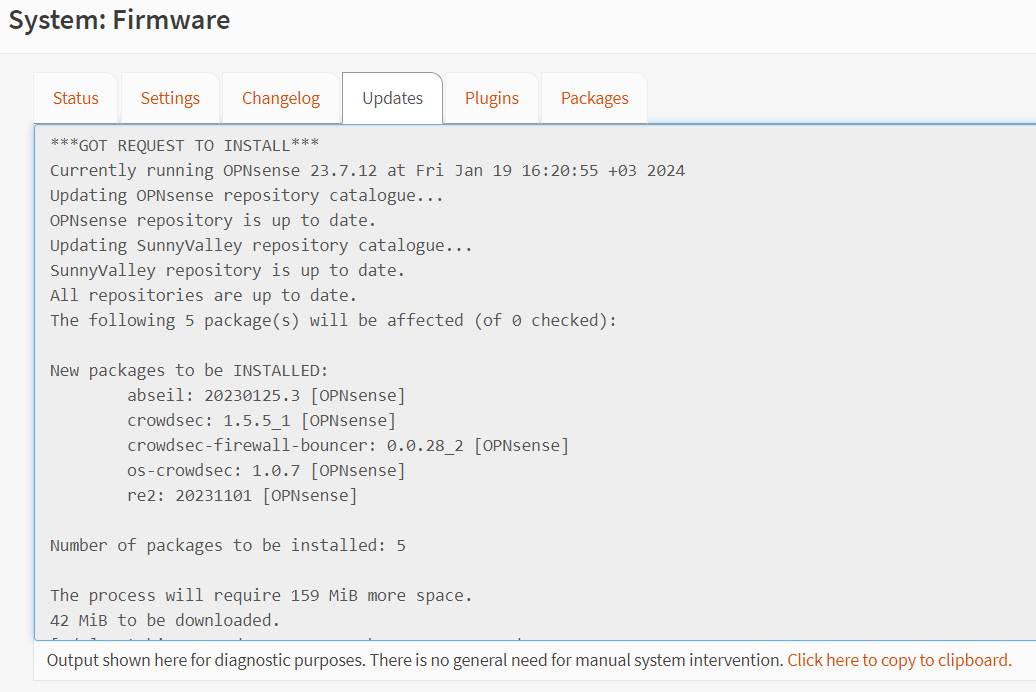
Figure 2. Installed CrowdSec packages
Parsers, scenarios, and all other CrowdSec Hub objects are routinely updated. By default, the crowdsecurity/freebsd and crowdsecurity/opnsense collections are installed.
Configuring CrowdSec
After installing the os-crowdsec plugin, you can configure CrowdSec by following next steps:
-
Navigate to the Services → CrowdSec → Settings on OPNsense UI.
-
Click the Settings tab.
-
Select Enable CrowdSec (IDS) checkbox. Keep this CrowdSec agent enabled to detect attacks and receive alerts from the CrowSec central service.
-
Select Enable LAPI checkbox. Keep this CrowdSec Local API enabled unless you connect to a LAPI on another machine.
-
Select Enable Firewall Bouncer (IPS) checkbox. Keep this firewall bouncer enabled to block packets from the attacking IP addresses.
-
You may select Enable log for rules option to enable log collection for CrowdSec's block rules.
-
You may leave other settings as default.
-
Click Apply.
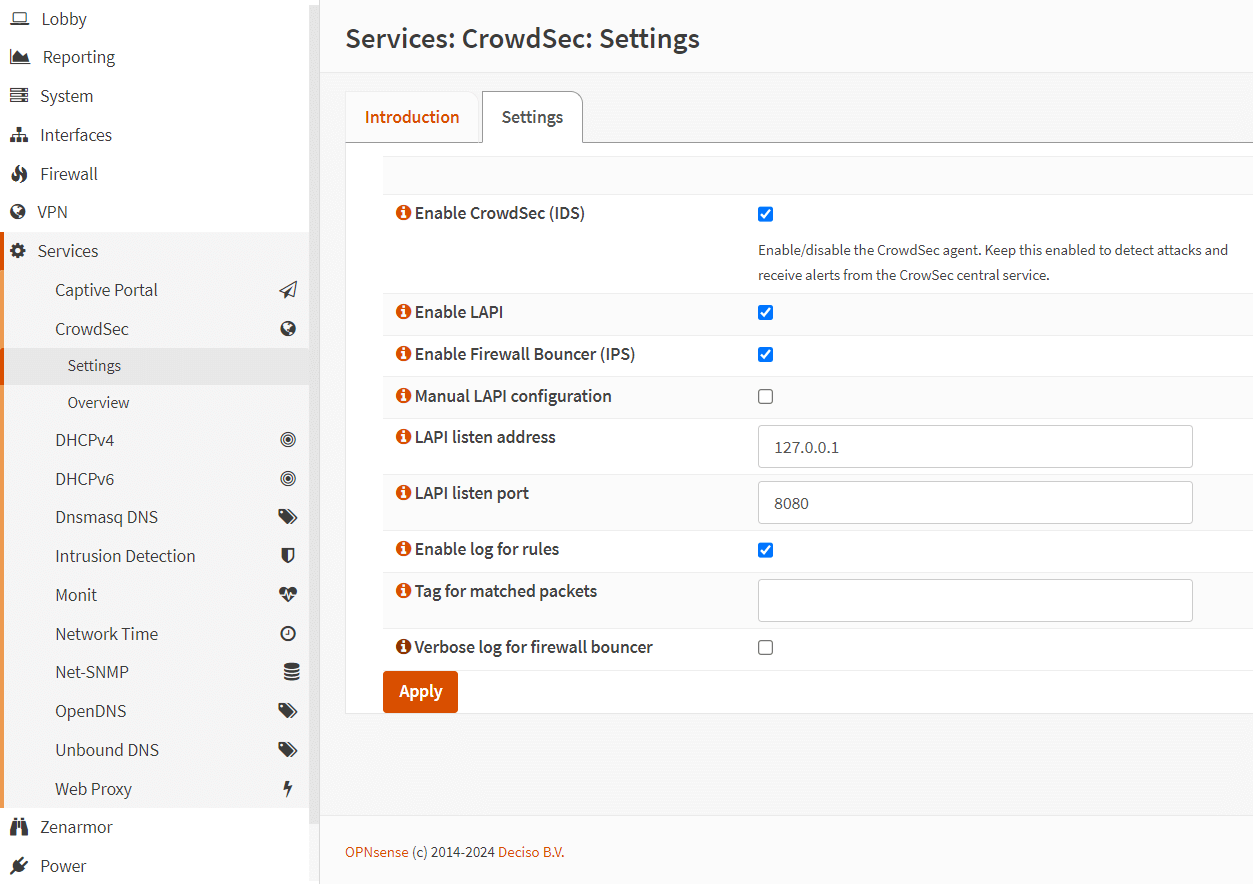
Figure 3. CrowdSec Settings
CrowdSec generates floating rules automatically to stop all incoming IPv4/IPv6 malicious IP addresses. Additionally, it generates block list aliases for IPv4 and IPv6 automatically, which you may utilize in your own custom firewall rules if necessary.
You should see CrowdSec firewall rules similar to those given below by navigating to the Firewall → Rules → Floating on OPNsense UI.
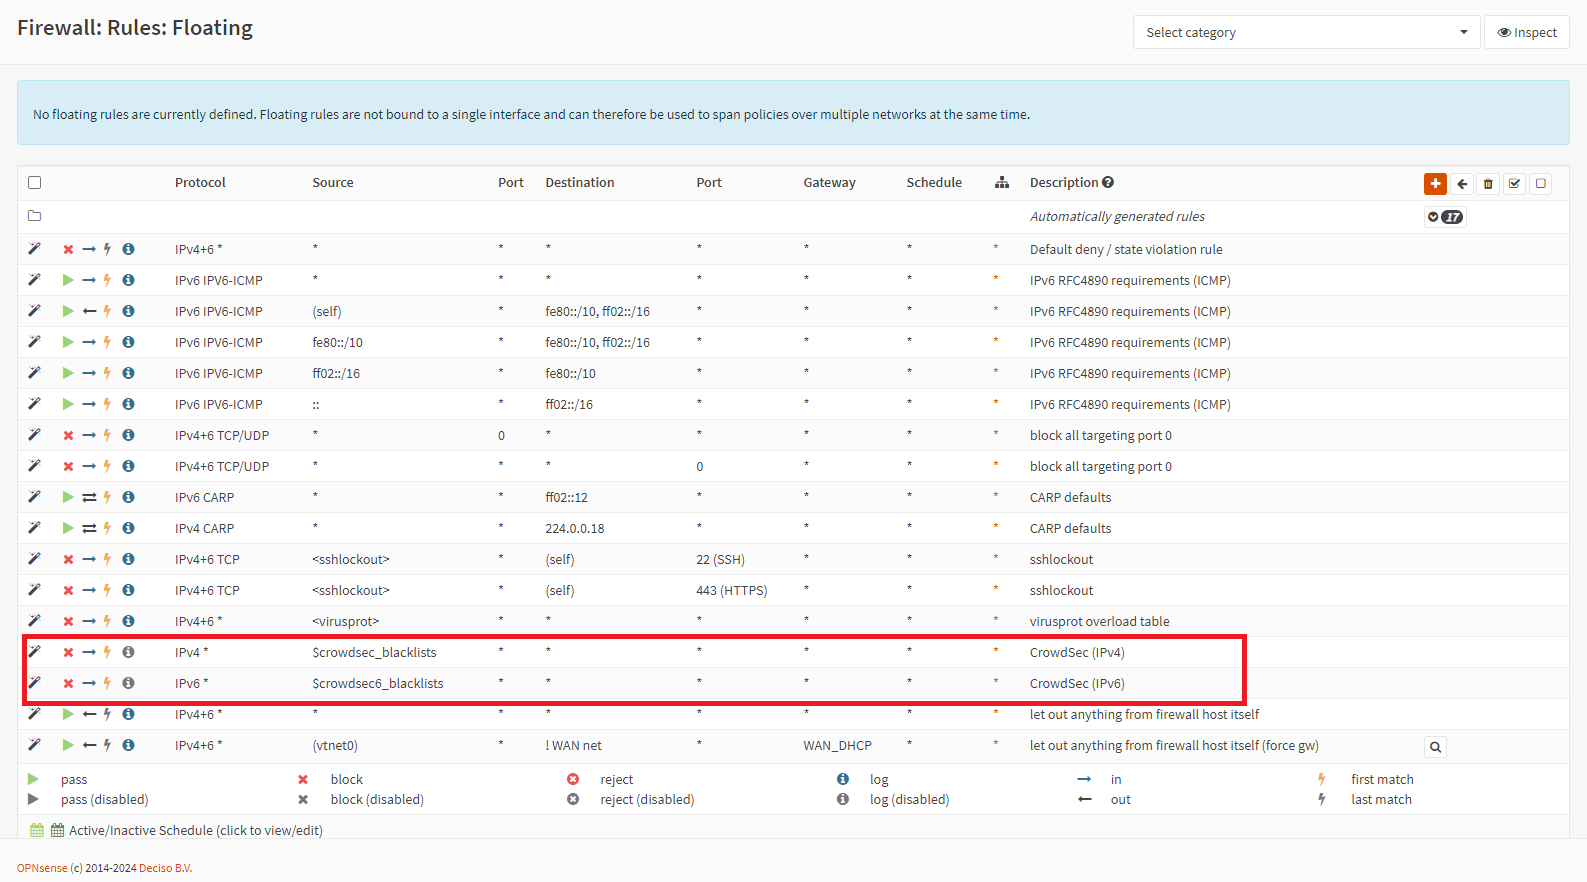
Figure 4. Floating firewall rules for CrowdSec
You should see CrowdSec aliases, crowdsec_blacklists and , crowdsec6_blacklists by navigating to the Firewall → Aliases on OPNsense UI.
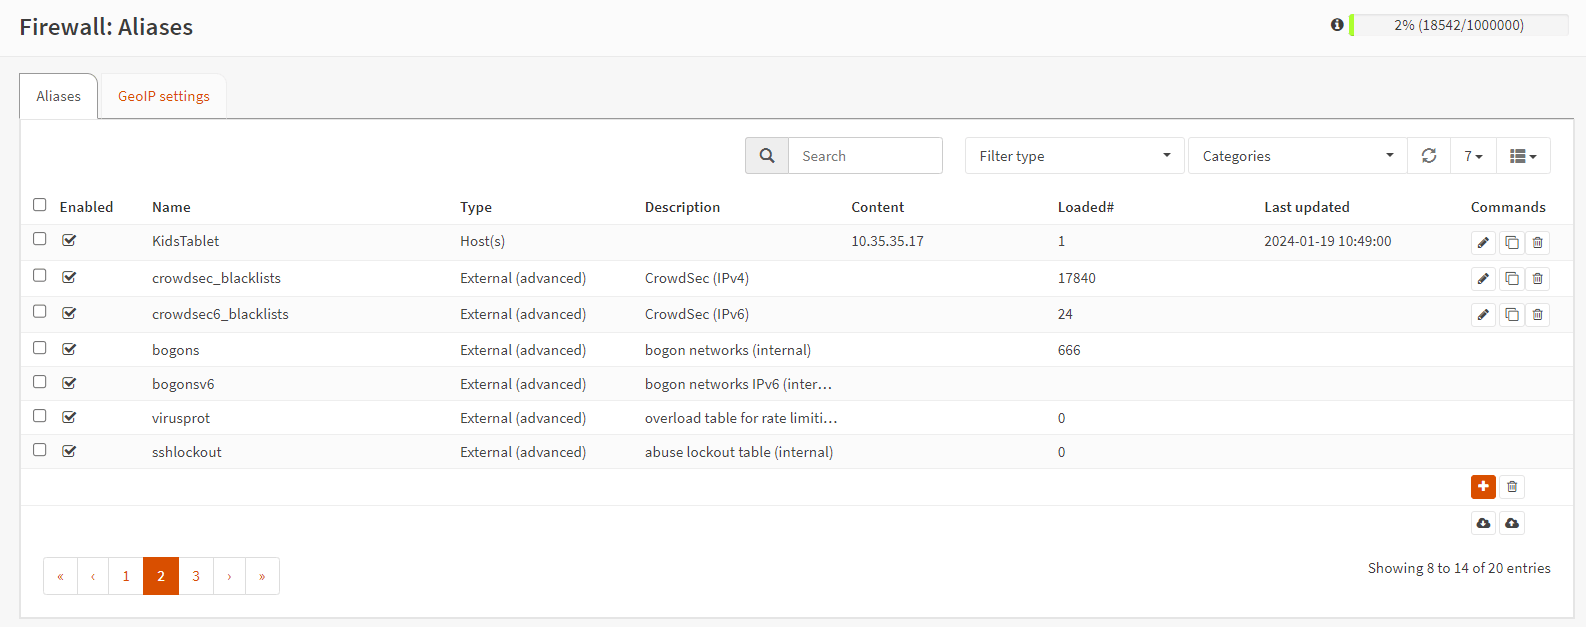
Figure 5. Firewall aliases
Adding Firewall Rules
Establishing firewall rules to block outgoing connections to the malevolent IP addresses is advisable. By default, external malicious connections are blocked. However, in the event that a user or machine on your network attempts to initiate a request to a malicious IP address, the connection will be permitted unless you specifically prohibit the connection. To create floating rules for the LAN/VLAN interface(s) you want to protect, you may follow the next steps:
-
Navigate to the Firewall → Rules → Floating on OPNsense UI.
-
Click Add button with
+icon at the top right of the page. -
Set Action option to Block.
-
Select the Interface that you want to protect, such as
LAN. -
Set Direction to
in. -
Select
crowdsec_blacklistsalias for the Destination option.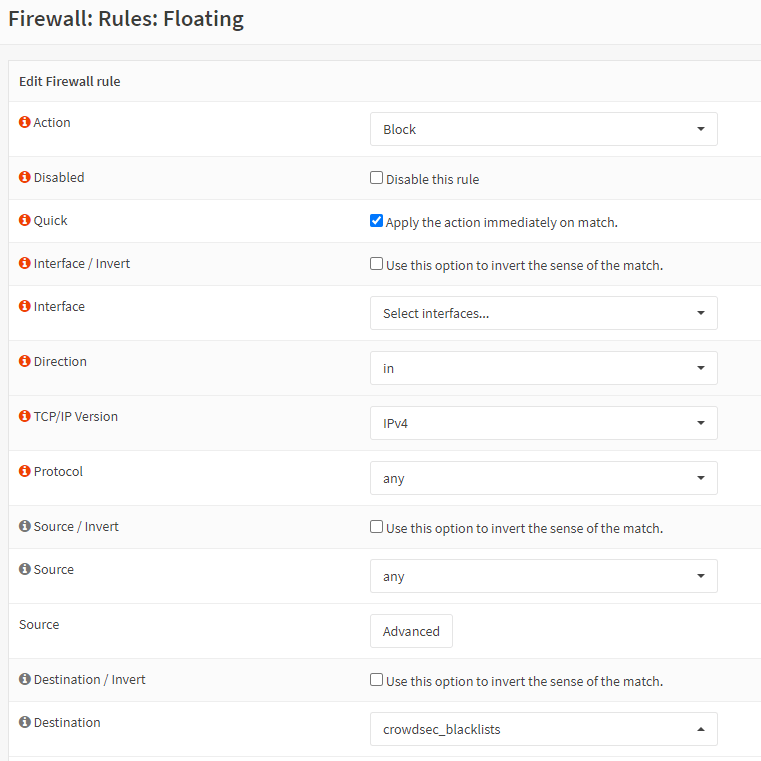
Figure 6. Adding firewall rule-1
-
Select Log packets that are handled by this rule option.
-
Type Description, such as
Block Accessing CrowdSec Blacklist.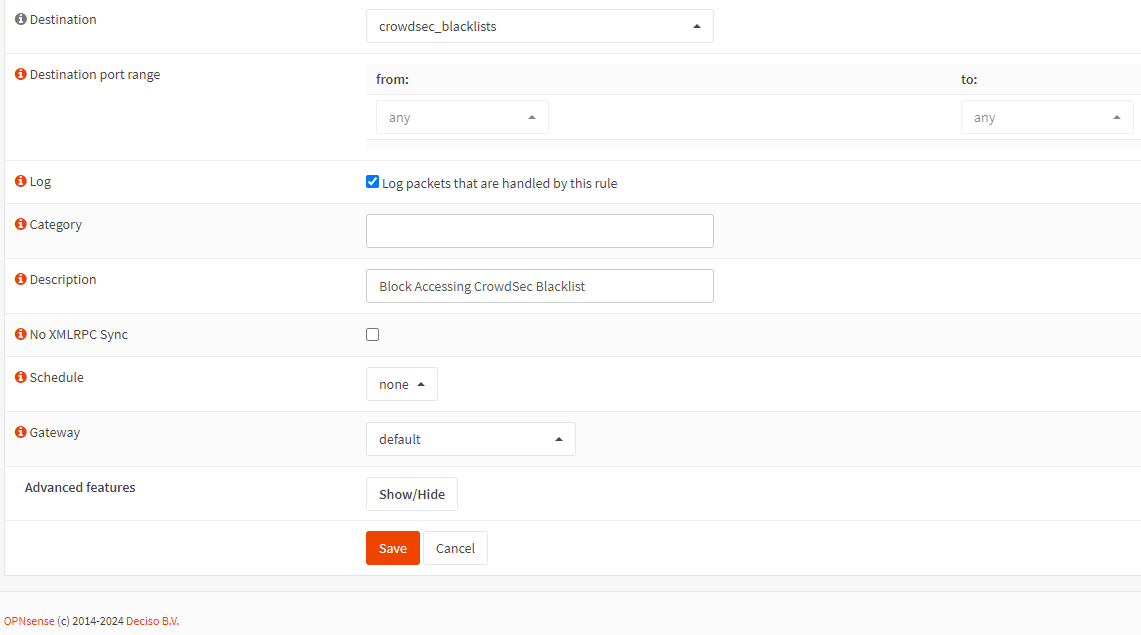
Figure 7. Adding firewall rule-2
-
Click Save. You need to create a separate rule for IPv4 and IPv6 if you have both.
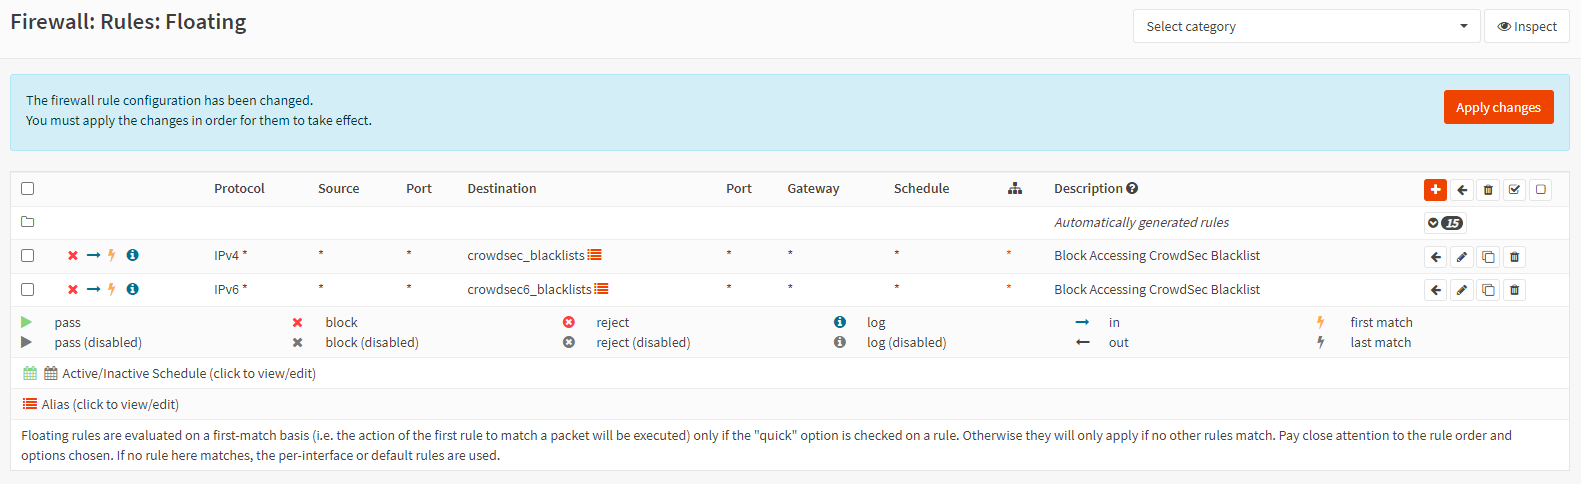
Figure 8. Applying firewall rules
-
Click Apply Changes to activate the added rules.
Creating CrowdSec Console Account (Optional)
To begin your CrowdSec adventure, it is recommended to create a console account. This will provide you with access to additional capabilities that can be easily integrated with your Security Engine.
The CrowdSec console functions as a web-based interface that allows you to efficiently oversee all your CrowdSec instances from a single hub. To create CrowdSec Console Account, you may follow next steps:
-
Register at
https://app.crowdsec.net/signupand verify your email address.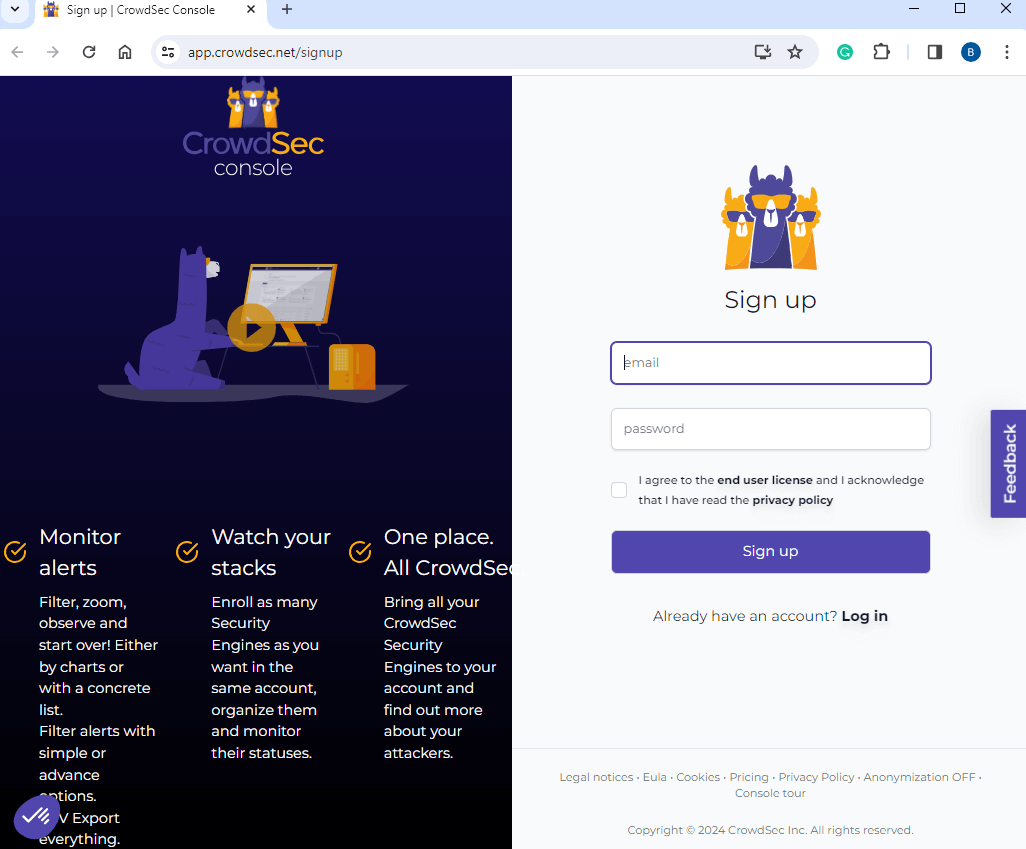
Figure 9. CrowdSec signup page
-
Add your OPNsense node to the Console after creating an account by executing the command displayed on the "Engines" page, the default page that loads upon logging in:
cscli console enroll <your-unique-code>
Figure 10. Taking unique code for enrolling security engine
-
When you refresh the webpage after executing the preceding command (via SSH terminal on your OPNsense system), you will be prompted for an enrollment request on
https://app.crowdsec.net. Click Accept enroll button.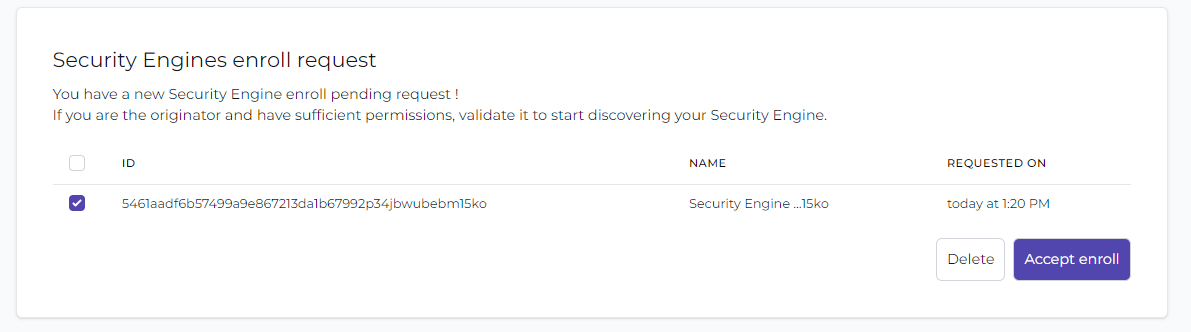
Figure 11. Enrolling security engine
-
Restart crowdsec after accepting the enrollment by navigating to System → Diagnostics → Services page or by running next command:
service crowdsec reload
Figure 12. Restarting CrowdSec service
Once enrollment is complete, your OPNsense node will be visible in the CrowdSec Console.
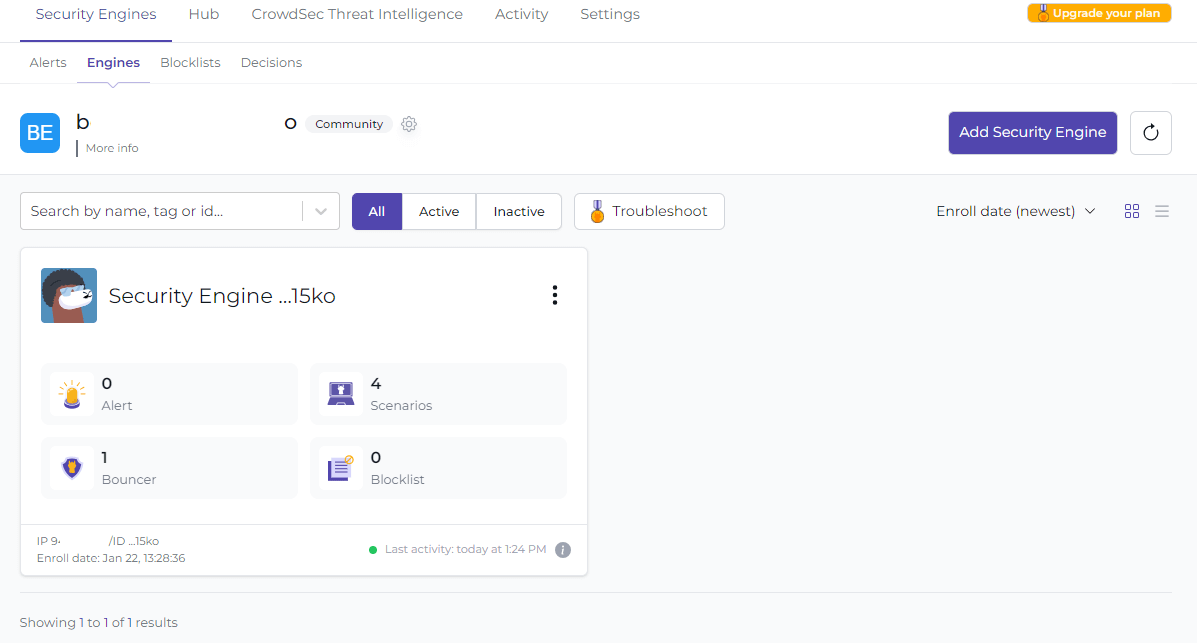
Figure 13. View OPNsense on CrowdSec portal
Adding Private Addresses to Whitelist
CrowdSec may choose to block the internal IP address of your client in specific circumstances if it observes activity that resembles a brute force attack. As a precautionary measure, it is recommended to incorporate an additional whitelist in order to prevent such incidents. The whitelist functions as a protective measure, thwarting unintended blockages and guaranteeing seamless operations throughout the network.
You may add private IP addresses to the whitelist and reload the Crowdsec plugin by running the following command on your OPNsense CLI:
cscli parsers install crowdsecurity/whitelists
Then, restart crowdsec service by running the following command for the new configuration to be effective:
service crowdsec reload
YAML configuration file of private IP addresses whitelist is as follows:
name: crowdsecurity/whitelists

description: "Whitelist events from private ipv4 addresses"

whitelist:

reason: "private ipv4/ipv6 ip/ranges"

ip:

- "127.0.0.1"

- "::1"

cidr:

- "192.168.0.0/16"

- "10.0.0.0/8"

- "172.16.0.0/12"

# expression:

# - "'foo.com' in evt.Meta.source_ip.reverse"
You may view the whitelist parser by navigating to the Services → CrowdSec → Overview → Parsers on OPNsense UI.
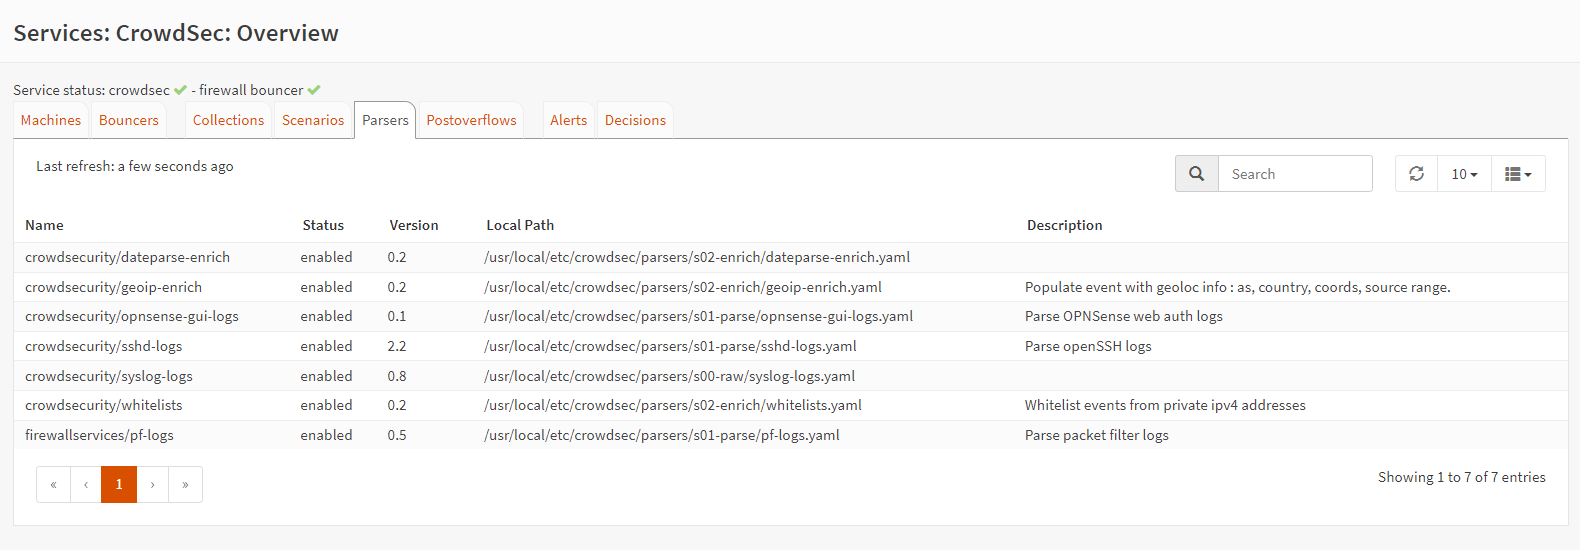
Figure 14. Viewing whitelist parser
Adding Additional Blocklists
Pre-installed within the CrowdSec package is a hub collection that is specifically engineered for OPNsense. This collection provides a safeguard against potential attacks that may target the system.
By using the various blocklists that CrowdSec Security Engines offer, you can reduce the risk of attacks coming from malicious IP addresses other than those that OPNsense lists. Pre-existing blocklists function as efficacious barriers, fortifying your network against established malevolent threats. 3 free blocklist subscriptions allowed in Free plan
Additional blocklists are accessible via the Crowdsec website by following the next steps:
-
Go to Account → Security Engines → Blocklists on CrowdSec console.
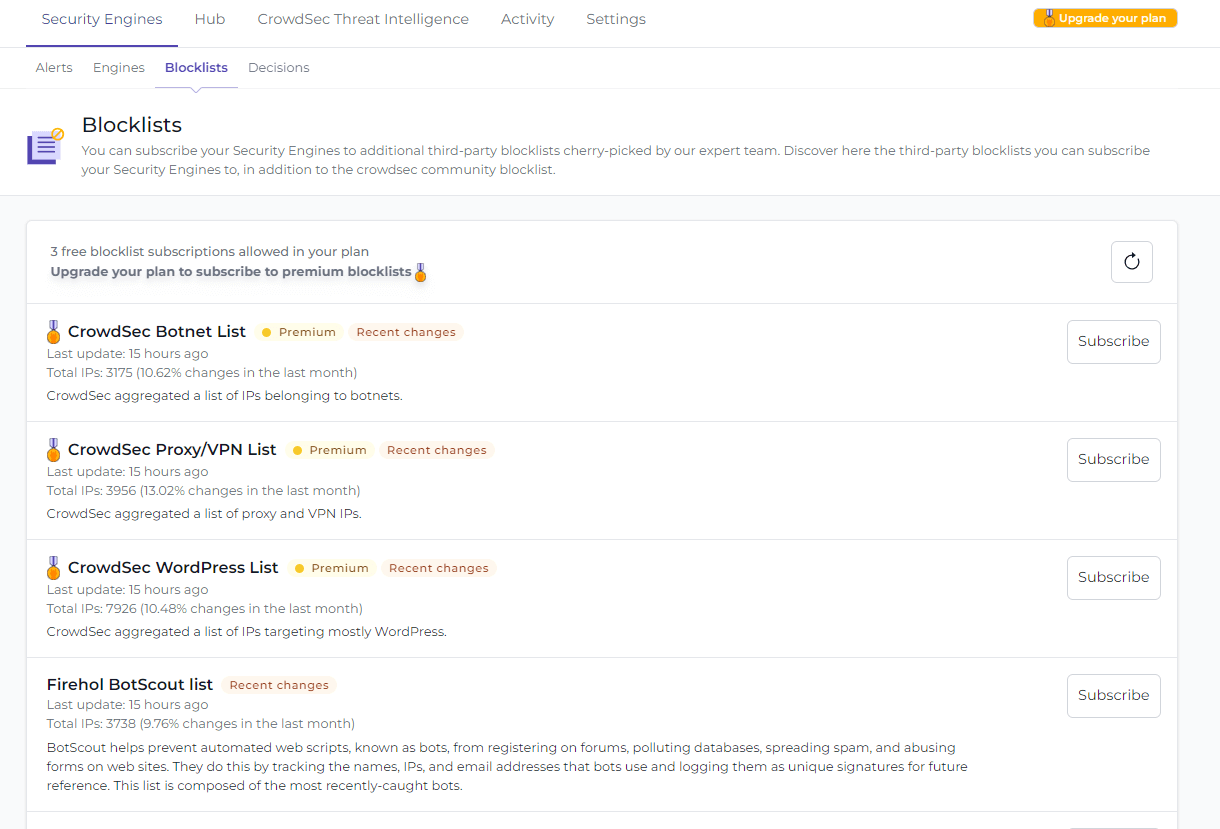
Figure 15. Viewing blocklists on CrowdSec portal
-
Choose the blocklists that correspond to your needs, such as
Firehol BotScout list. This will redirect you to the blocklist details page.
Figure 16. Adding Security Engine
-
Click + Add Security Engine(s) button at the bottom of the page.
-
Select your
Security Engineand select Ban. This will ban all the IPs referenced in the blocklist. This remediation will apply to all the Security Engines selected. It will be effective in up to 2h after your next community blocklist pull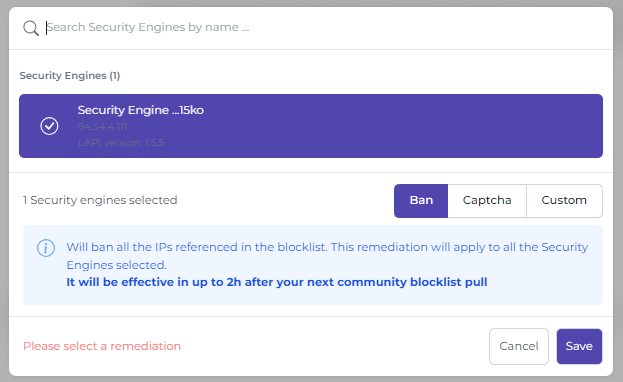
Figure 17. Saving blocklists for Security Engine
-
Click Save.
-
Restart crowdsec after accepting the enrollment by navigating to System → Diagnostics → Services page
-
You may view the subscribed blocklists on your CrowdSec account. Moreover, you should see these lists on your OPNsense aliases.
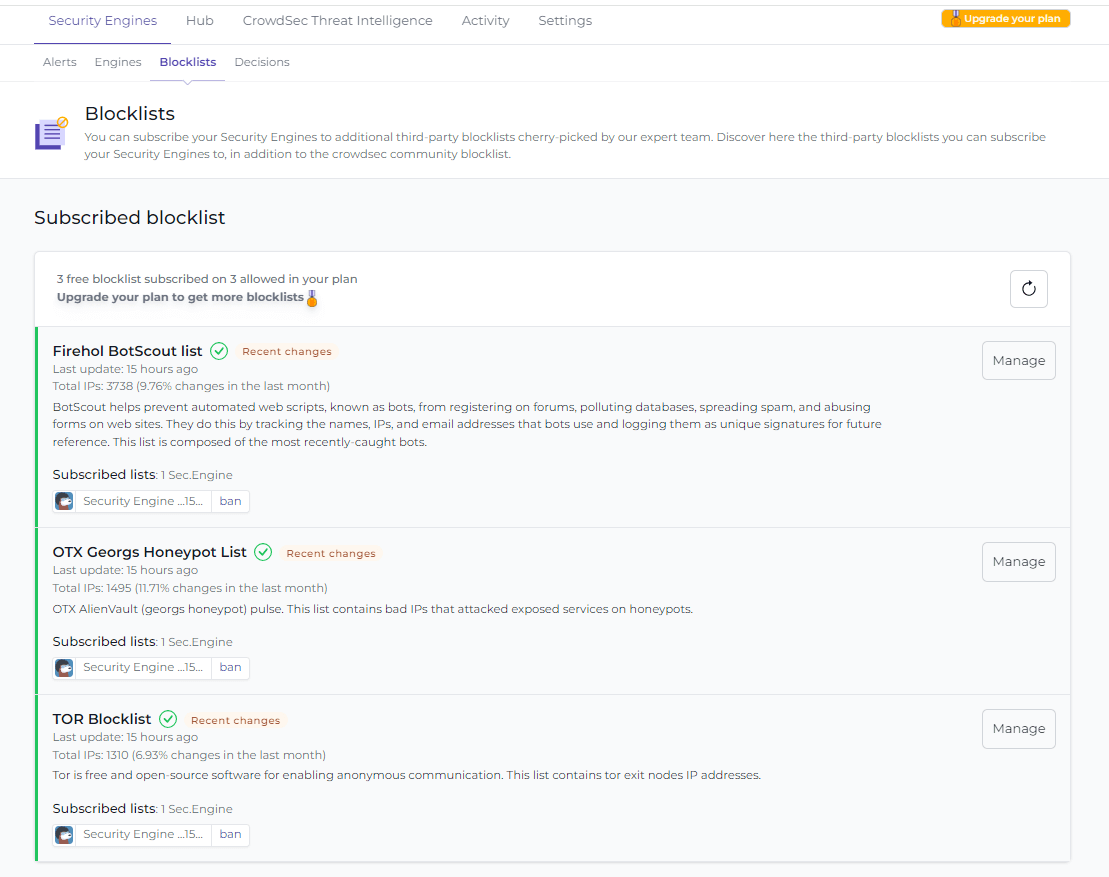
Figure 18. Subscribed blocklists for Security Engine
Testing CrowdSec
To verify the proper functioning of all CrowdSec components, just run the given command by replacing it with your connecting IP address.
cscli decisions add -t ban -d 2m -i your_ip_address
Your SSH session will become unresponsive and you will be forcibly disconnected by the firewall. You will be temporarily unable to establish a connection to it (using the same IP address) for two minutes. It is advisable to have an additional IP address available for connection in case of any unforeseen issues.
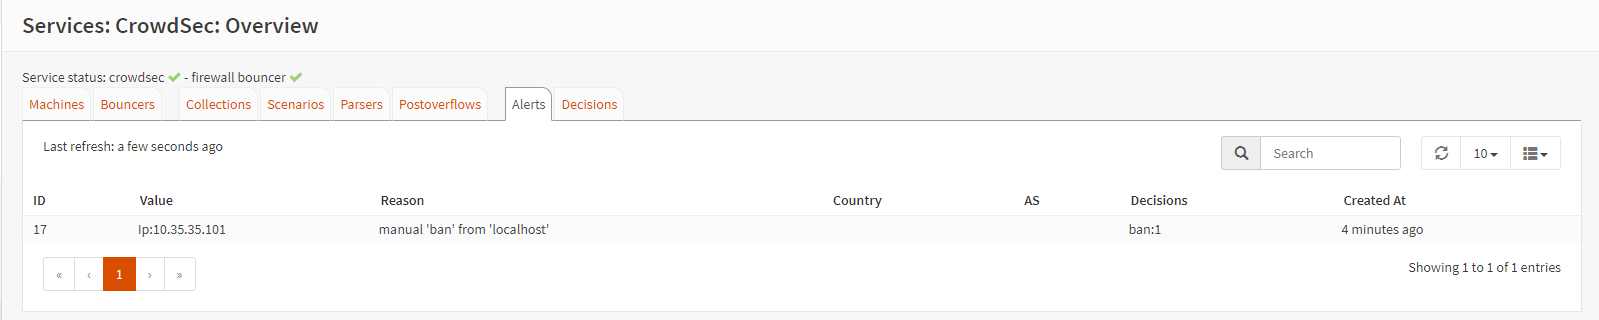
Figure 19. Viewing CrowdSec alerts on OPNsense
You should see alerts similar to those given above by navigating to the Services → CrowdSec → Overview → Alerts on OPNsense UI.
Using this method is more secure than trying to brute-force on your own. The default ban duration is set to 4 hours, and crowdsec analyzes the logs from the start. Therefore, it has the capability to ban you, even if you had 10 unsuccessful SSH login attempts within 30 seconds, two hours before its installation.
To get a comprehensive inventory of all accessible flags, use the next command:
cscli decisions add --help.
What are the Key Features of CrowdSec?
A distinctive feature of CrowdSec is its reliance on threat intelligence gathered from the community and shared by other CrowdSec users. This enables CrowdSec to swiftly react to emerging threats. CrowdSec has the capability to observe, notify, and obstruct malevolent activity on any network system where it is deployed. Alternative intrusion prevention system (IPS) platforms rely on signatures or rules to block known malicious traffic, but CrowdSec uses threat intelligence that the community has collectively compiled to compute a reputation score for IP addresses. Untrusted IP addresses may encounter restrictions on their ability to access protected resources. As a result, CrowdSec offers rapidity, effectiveness, and efficiency in safeguarding a wide range of network resources.
CrowdSec has the following main features:
- Simple Installation: Seamless and uncomplicated installation on all compatible systems.
- Streamlined Daily Operations: Utilize cscli and the hub for seamless maintenance and ensuring the currency of your detection methods.
- Reproducibility: The Security Engine has the capability to examine both real-time logs and archived logs, facilitating the identification of possible false triggers, performing forensic analysis, and generating reports.
- Perceptibility: Offering significant observations on the operation of the system:
- Users have the ability to access and control notifications using the (Console).
- Administrators may use a user-friendly command-line interface program called cscli.
- Operations personnel in have the ability to see intricate Prometheus analytics.
- API-Centric: All components interact over an HTTP API, enabling the establishment of multi-machine configurations.
What are the CrowdSec Components?
CrowdSec consists of two primary components:
- Security Engine (Agent): In addition to monitoring log files for malicious activity, the agents provide the CrowdSec community with specific information.
- Bouncer: The purpose of the bouncer is to prevent access to protected resources from IP addresses. Bouncers can protect specific services operating on your network, such as web servers, rather than the entire network, from malicious IP addresses. If the bouncer is integrated into a firewall such as OPNsense, it will safeguard the entire network.
CrowdSec agents and bouncers exchange crowd-sourced intelligence information via the local API (LAPI), which subsequently exchanges data with the central API (CAPI). The LAPI may be situated on a network server or the firewall, among other potential locations. It is feasible to operate multiple CrowdSec agents and bouncers on a network that communicate with a solitary local server housing the CrowdSec LAPI in an advanced CrowdSec installation.
How Does CrowdSec Work?
The CrowdSec Security Engine runtime is predicated on the following straightforward ideas:
- It reads logs (defined by the configuration of the data source).
- These records are ultimately enriched after being parsed by parsers.
- A comparison is made between the normalized records and the scenarios that the user has implemented.
- A scenario is "triggered" by CrowdSec, which subsequently produces an alert and one or more decisions that are linked to it.
- Primarily for the purpose of traceability, the alert will remain even after the decision has expired.
- The decision, conversely, is transitory and specifies the course of action that ought to be implemented in response to the IP/range/user that committed the offense.
- The data (the signal and the corresponding decisions) is subsequently transmitted to the Local API and entered into the database.
The CrowdSec Security Engine executes the detection process and retains the resulting determinations. Remediation components can subsequently "consume" those decisions and implement the remediation via the identical local API.