How to Configure LDAP Authentication with Google Cloud Identity on OPNsense?
Users can be authenticated using the Google Cloud Identity LDAP (Lightweight Directory Access Protocol) service on OPNsense installations. The Google Secure LDAP service facilitates a straightforward and protected method of connecting LDAP-based services and applications to Google Workspace or Cloud Identity. Cloud Directory can function as a cloud-based LDAP server for the purposes of authentication, authorization, and directory lookups when Secure LDAP is utilized. Companies that have already offloaded e-mail and drive storage to Google can now use the service for LDAP-based authentication. So that there is no need to maintain separate authentication services locally and on Google Workspace.
OPNsense firewalls are capable of employing client certificates that are stored directly on LDAP authentication sources.
An LDAP server is implemented in a variety of ways and used or provided by several directory service offerings like OpenLDAP, Google Cloud Identity, and Microsoft Active Directory (AD). OPNsense utilizes an LDAP server for authorization and authentication purposes regarding components of the graphical user interface (the web configurator). In order to define privileges for the GUI using LDAP, the local user manager must perform an import of the users from the LDAP source.
A multi-site organization that utilizes G Suite Enterprise for storage and email but does not wish to operate a local LDAP server but still wishes to implement centralized authentication for firewalls across all sites. Companies may also use LDAP authentication on OPNsense for their captive portal, virtual private network (VPN), or squid caching proxy users.
In order to establish a secure LDAP connection, firewalls operating on OPNsense must incorporate the stunnel program.
There are several procedures involved in configuring an OPNsense firewall to utilize G Suite LDAP authentication; each of these procedures is detailed in this document.
Additionally, LDAP can be integrated with two-factor authentication.
- Configure the LDAP Application on the G Suite admin portal
- Download the certificate, key, username and password
- Import the certificate and key
- Install the stunnel package on OPNsense
- Configure the stunnel package
- Configure LDAP authentication on OPNsense
- Test G Suite LDAP Authentication
- Use G Suite LDAP for Administrative Logins
- Importing G Suite LDAP Users

1. Configure the LDAP Application on the G Suite admin portal
Supported editions of G Suite for secure LDAP service are Frontline Standard; Business Plus; Enterprise Standard and Enterprise Plus; Education Fundamentals, Education Standard, Teaching and Learning Upgrade, and Education Plus; Enterprise Essentials Plus. Follow the instructions from official Google documentation or you may follow the next steps for configuring and enabling the G Suite LDAP
- Sign in to the Google Admin console.
- Click on Apps and LDAP, or select Apps from the hamburger menu and choose LDAP.
- From the LDAP app, click on Add Client.
- Name your client, enter a description (optional).
- Click CONTINUE.
- Configure permissions for access by selecting "Entire domain" for the "Verify user credentials" field, unless you are employing organizational units to achieve greater specificity, such as marketing, sales, and so forth.
- "Entire domain" should be selected for the "Read user information" option.
- Activate "Read group information" if you intend to map to groups via the MEMBER_OF attribute in your LDAP query; otherwise, do not include this attribute.
- Click ADD LDAP CLIENT.
- Go to Client Details page by clicking on Edit details.
- Choose the radio button for ON for everyone on Service status pane
- Click SAVE.
Having set the service status of the client to "on," you can now configure access for your users via the Admin Web UI.
2. Download the certificate, key, username and password
Download the certificate, key, username and password from G Suite to a local directory on a workstation. You may utilize the link provided on the confirmation page or access the generated certificate through the client's details page. A ZIP file containing both the certificate and the key will be downloaded to you.
3. Import the certificate and key
You may import certificate and key into your OPNsense firewall by following the next steps:
-
Navigate to System → Trust → Certificates tab.

Figure 1. Trust Certificates on OPNsense
-
Click
+Add button to display the certificate import interface. -
Select
Import an existing certificatefrom the Method dropdown menu. -
Type a Descriptive name, such as
G Suite LDAP. -
Copy and paste the contents of the downloaded certificate into the Certificate data field.
-
Copy and paste the contents of the downloaded key into the Private Key data field.

Figure 2. Importing G-Suite LDAP Certificate on OPNsense
-
Click Save.
The firewall is currently able to utilize the G-Suite LDAP certificate.
4. Install the stunnel plugin on OPNsense
Stunnel is a proxy that provides the ability to encrypt existing clients and servers with TLS without requiring any modifications to the source code of the applications.
OPNsense's Stunnel feature enables the secure forwarding of TCP connections via TLS mutual authentication. While the application allows for pre-shared key authentication, our plugin exclusively supports certificate-based authentication. While this method ensures greater security, it incurs a greater connection burden.
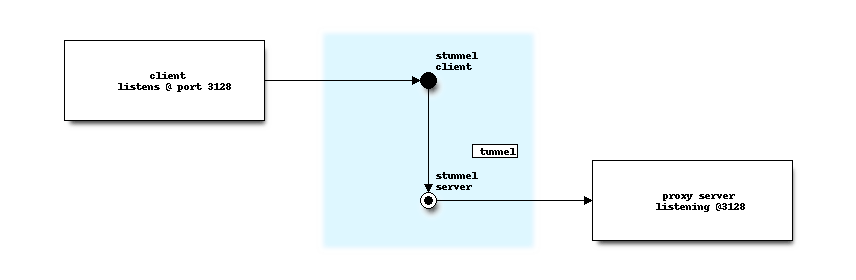
Figure 3. Stunnel functionality on OPNsense
The client component (which is not included in this plugin's delivery) establishes a connection with the server via a predefined port and initiates the forwarding of locally received packets to the opposite end of the tunnel, as depicted in the diagram above.
Tunneling HTTP proxy traffic is one of the more prevalent applications of the stunnel.
You may install the stunnel plugin on your OPNsense firewall by following the next steps:
-
Navigate to System → Firmware → Plugins on your OPNsense web UI.
-
Type
stunnelin the search field.
Figure 4. Installing stunnel package on OPNsense
-
Click the
+icon next toos-stunnelto install the plugin.
5. Configure the stunnel plugin
You may configure the stunnel plugin on OPNsense by following the next steps:
-
Navigate to VPN → STunnel → Configuration on your OPNsense web UI.
-
Click
+Add button to add a new profile.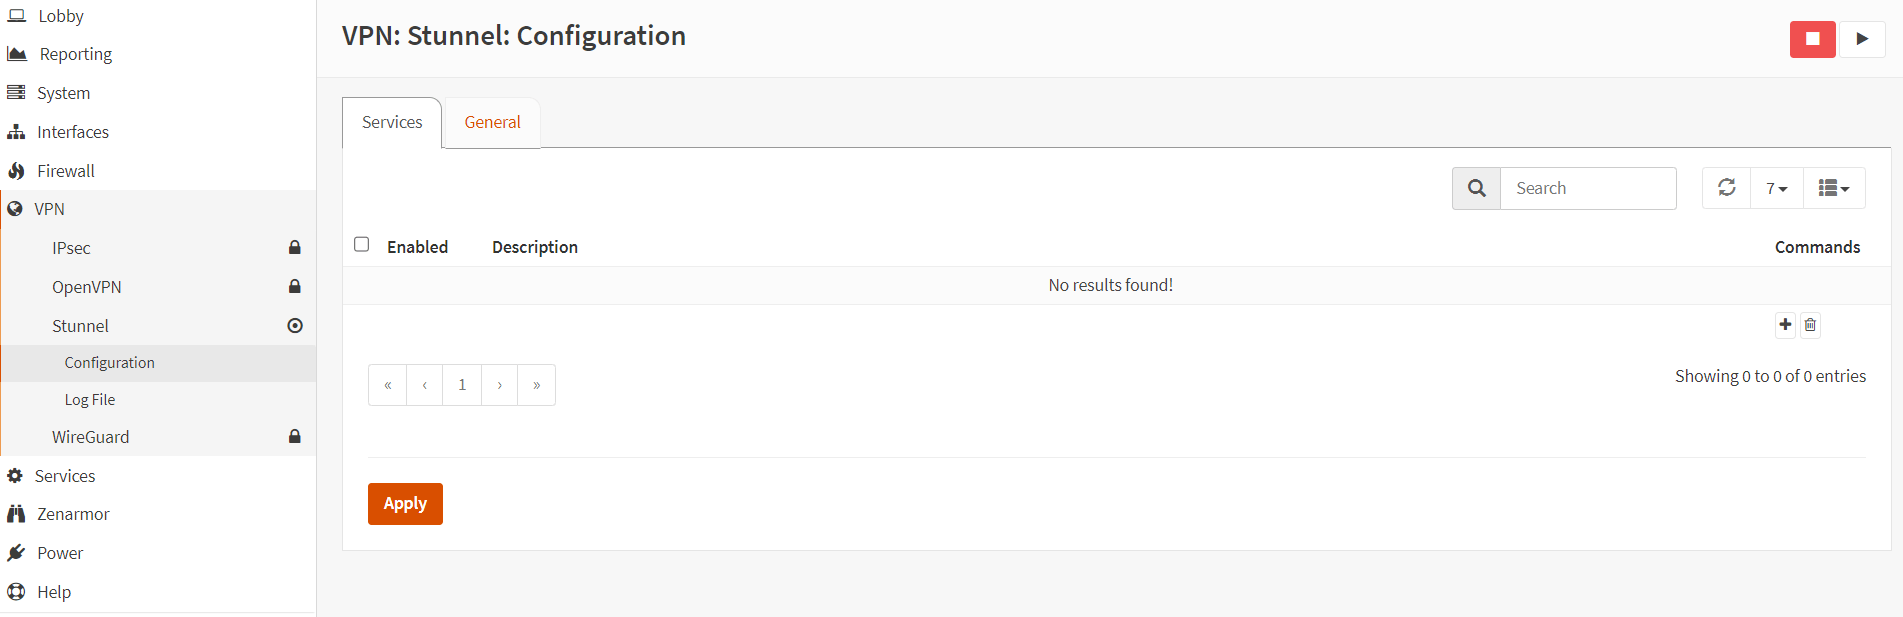
Figure 5. stunnel configuration on OPNsense
-
Type the Listen address. It is generally recommended to employ a loopback interface and direct traffic to the specified address via port forwarding. Maintain the current value (127.0.0.1) for the sake of illustration.
warningWhen selecting an interface that does not support loopback, ensure that it is static.
-
Type the Listen port number to which the stunnel client establishes a connection. Here, the number
1636is selected for the example. -
Type the Target hostname. The hostname or IP address of the service to which the connection is being established; in this case,
ldap.google.com. -
Type the Target port that the service utilizes as its target port is
636. -
Choose the Certificate that was imported previously, in this case,
G Suite LDAP. -
You may select enable CRL option to enable certificate revocation lists; when selected, a CRL in the (
/var/run/stunnel/certs) directory with the formatXXXXXXXX.r0is required. If certificates are managed from this device, an automatic generation of all attached CRLs will occur.
In the absence of a valid CRL and configuration, all connections will be denied. Stunnel restarts may be required for additions (if the certificate has already been used).
-
To identify this conduit, enter a descriptive phrase that is easy for users to comprehend, such as
G Suite LDAP -
Enable Client Mode by clicking on the checkbox.
-
You may leave other settings as default.
-
Click Save to save the settings.
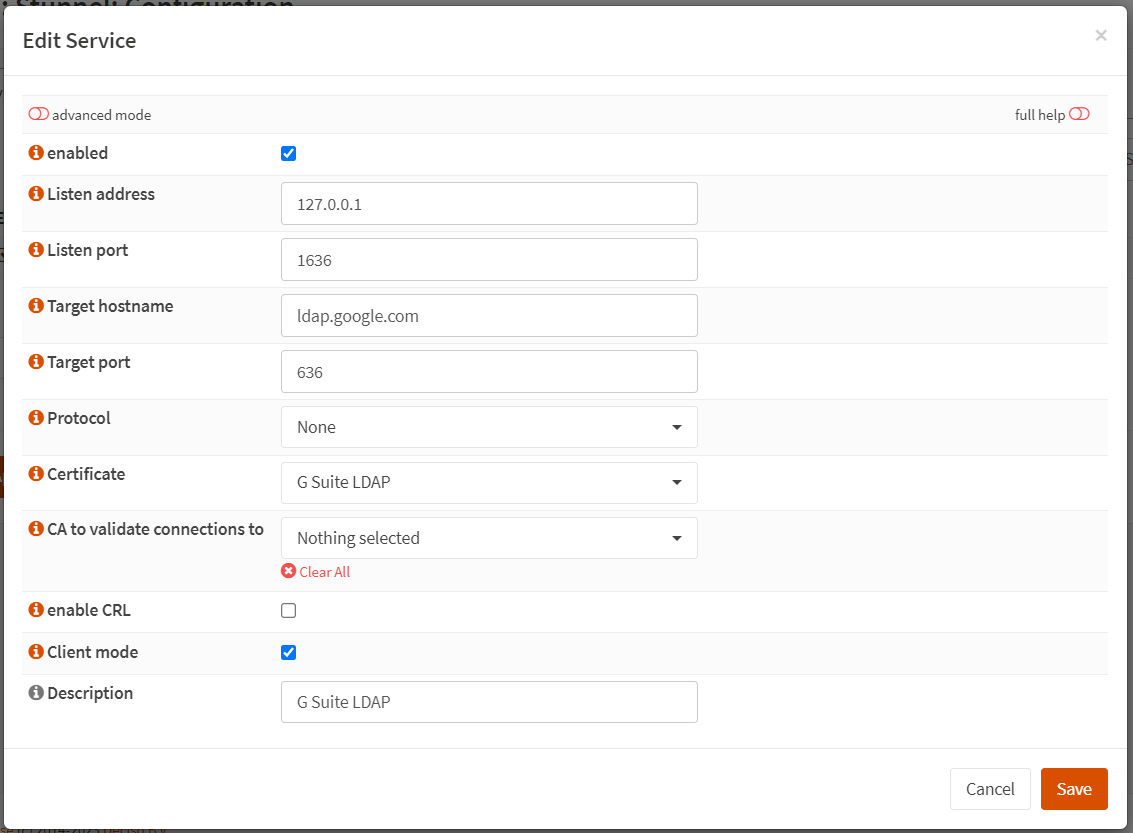
Figure 6. Configuring stunnel on OPNsense
-
Click Apply to activate the settings.
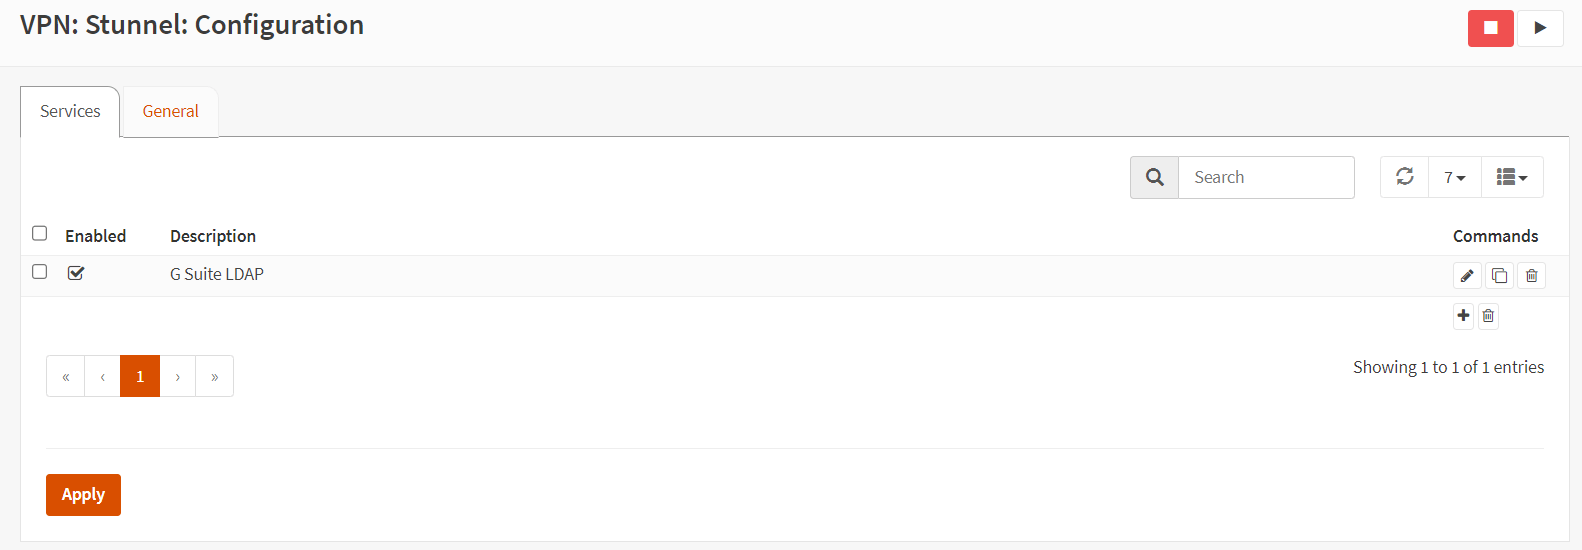
Figure 7. Applying stunnel configuration on OPNsense
To enhance security measures, one may activate chroot mode in the VPN tunnel. In general, however, there is a disadvantage to utilizing this feature. Stunnel will lose connectivity to the system logging facility (syslog) in the event that it is resumed, resulting in subsequent loss of visibility.
6. Configure LDAP authentication on OPNsense
To add a new LDAP server as an authentication source you may follow the next steps:
-
Navigate to System ? Access ? Servers on OPNsense web UI.
-
Click on
+Add button in the top right corner.
Figure 8. Access servers on OPNsense
-
Enter a Descriptive name for this LDAP server, such as
G Suite. -
Set Hostname or IP address to
127.0.0.1. -
Set Port value to
1636. -
Type the G Suite LDAP username and password that were created with the certificate and key into Bind credentials field.
-
Type the domain name in DN format into Base DN field, for example
dc=mycompany,dc=com. -
Fill in the 8Authentication containers*. Base DN prepended by the Users organizational unit, for example:
ou=Users,dc=mycompany,dc=com. -
You may leave other settings as default.
-
Click Save to store the settings.
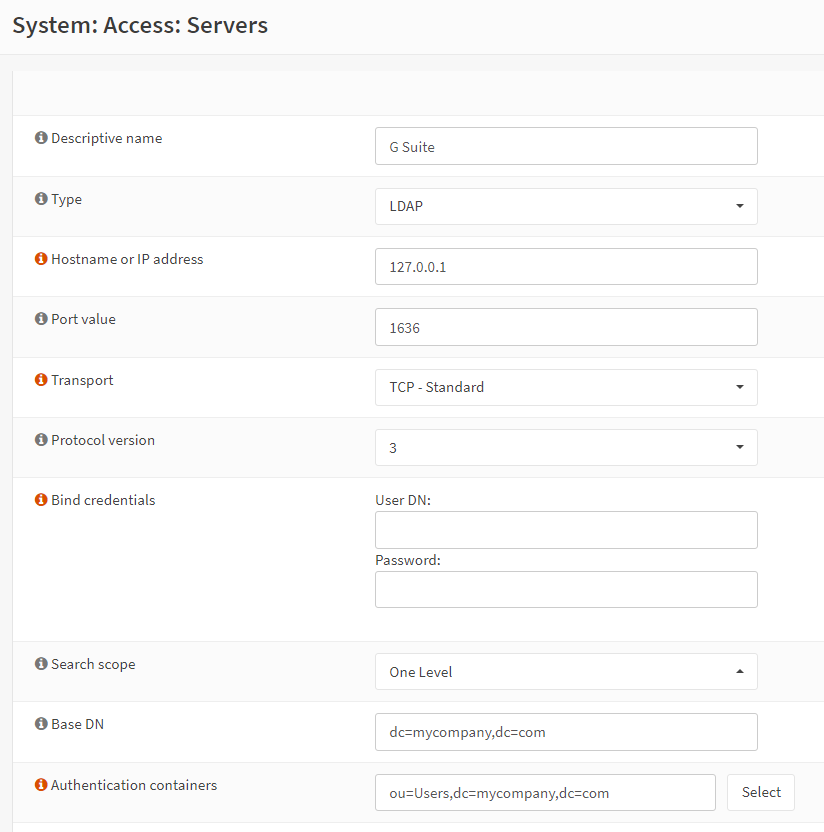
Figure 9. Access servers settings on OPNsense
7. Test G Suite LDAP Authentication
After implementing the comprehensive configuration outlined earlier, authentication against Google G Suite LDAP is now feasible. You may test the authentication initially to ensure that it is functioning correctly by following the next steps:
-
Navigate to the System → Tester menu.
-
Assign the name of the LDAP Server entry to the Authentication Server, such as G Suite.
-
Type the Username and Password that are well-known on the domain that G Suite manages. into the related fields.
-
Click Test.

Figure 10. LDAP test on OPNsense
Only the username component of the logon is validated against the configured LDAP base DN by default. When an identity is provided with a domain component, such as [email protected], the domain portion is disregarded.
The user should be identified as having successfully authenticated. Upon passing the test, the service will be deemed operational. It can be used as an authentication source for the graphical user interface, captive portal, squid proxy, VPNs, or anywhere the user manager authentication servers operate by OPNsense firewall.
Verify the main system log for LDAP error messages if the test fails. Commence the analysis by comparing every setting in this document, G Suite, and OPNsense, starting from the beginning. The majority of issues stem from incorrect parameter input, including the selection of the incorrect certificate, the use of an incorrect LDAP attribute name, or the failure to use the correct bind credentials.
8. Enable G Suite LDAP Server for Administrative Logins
Assuming all is well and the user has successfully authenticated, you may start to use G Suite for administrative logins on OPNsense by following the next steps:
-
Navigate to System → Settings → Administration on OPNsense web UI.
-
Scroll down to the Authentication pane.
-
Select
G Suiteas the Server. You may also selectLocal Databaseas an alternative authentication server. -
Click Save.
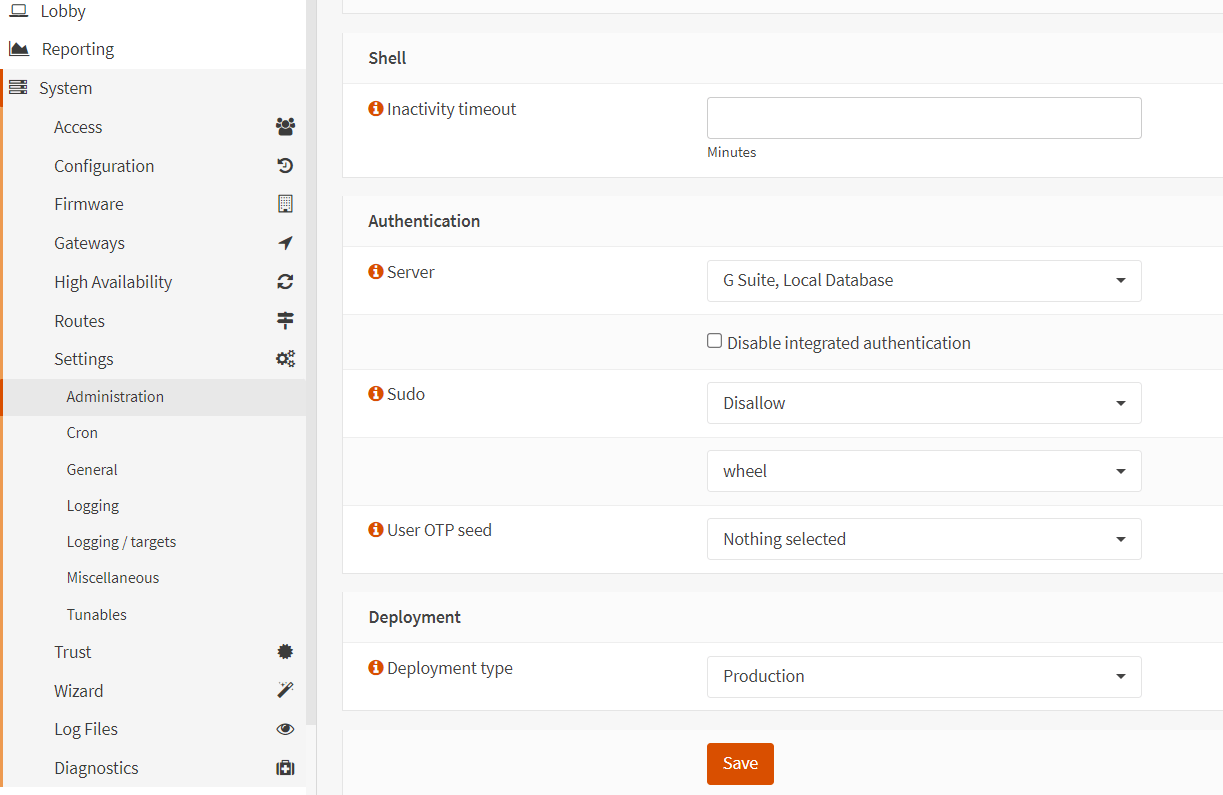
Figure 11. Setting Authentication server on OPNsense
Firewall web UI users will undergo authentication using Google Cloud Identity subsequent to uploading.
9. Importing G Suite LDAP Users
To grant G Suite LDAP users access to the graphical user interface, the users must be imported into the local user manager by following next steps:
-
Navigate to System → Access → Users, where a cloud import icon will appear in the form's upper right corner.
-
Initiate the user import process by clicking the cloud import icon.
-
A new form containing the users' information will appear; select those you wish to import.
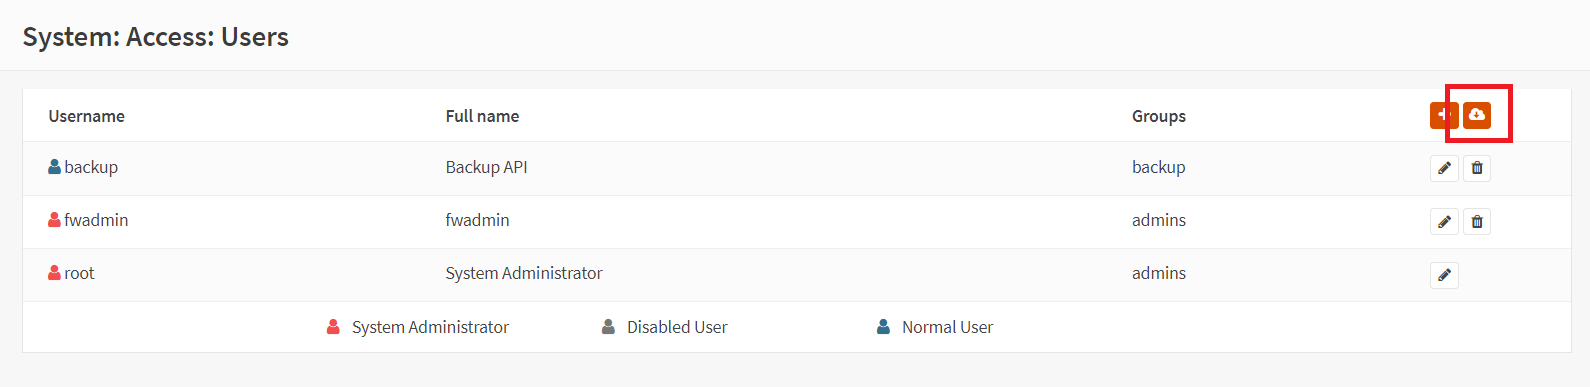
Figure 12. Importing LDAP users on OPNsense