How to Setup OpenVPN with MFA on OPNsense?
Road Warriors are mobile users who require secure access to an organization's infrastructure. OPNsense uses OpenVPN for its SSL VPN Road Warrior configuration and integrates OTP (One Time Password) with standard tokens and Google Authenticator.
OpenVPN is an open-source VPN protocol that creates secure point-to-point or site-to-site connections using virtual private network (VPN) techniques. It was created by James Yonan in 2001 and is now one of the most popular VPN protocols among VPN users. It is distributed under the GNU General Public License (GPL). The project is being worked on by OpenVPN Inc. and a large number of open-source developers.
It supports all major operating systems, including macOS, FreeBSD, Windows, Linux, iOS, and Android.
The OpenVPN protocol has a high level of security. It comes with 256-bit encryption via OpenSSL. OpenVPN can use two different protocols for data transmission: TCP and UDP. The more widely used and recommended protocol is UDP. Pre-shared keys, certificate-based authentication, username/password authentication, and MFA are all supported by OpenVPN.
The factors username/password and a token are required for two-factor authentication. Another layer, namely a user certificate, is supported by OPNsense. This means that the user certificate will uniquely identify each user.
In this tutorial, we will explain to you how to install and configure the OpenVPN server on your OPNsense firewall that will allow your remote clients to safely access the Internet through your VPN tunnel. We'll also configure MFA for VPN user authentication by using the following multi factors:
-
User certificate
-
Username/Password
-
Token (TOTP)
It is strongly advised that you install Zenarmor on your OpenVPN server to increase the security of your network. You can block security threats coming from your OpenVPN tunnel interface by configuring the Zenarmor, using web filtering, and applying application control.
The OpenVPN configuration is very simple. You can setup the OpenVPN tunnel with MFA in the OPNsense firewall by simply following the seven steps outlined below.
-
Create a Certificate Authority
-
Configure OpenVPN in OPNsense
-
Create a VPN User
-
Add TOTP Access Server
-
Create SSL VPN Service
-
Add Firewall Rules
-
Export OpenVPN Client
To be able to follow this OpenVPN installation in the OPNsense firewall tutorial, you must have the following devices and root privileges.
-
OPNsense 21.7.6 Firewall, configured as an OpenVPN VPN server.
-
As an OpenVPN VPN client, a Windows PC or an Android device will be set up.
-
Installed Google Authenticator Application.
1. Creating a Certificate Authority
OpenVPN requires certificates to protect the VPN service through encryption and authentication. The first step in configuring OPNsense is to create a Certificate Authority. To proceed, each option on this page must be selected, and all forms must be correctly completed. If you already have one, you can skip this step.
You may create a new Certificate Authority by following the steps below:
-
Navigate to System → Trust → Authorities.

Figure 1. Managing Certificate Authorities in OPNsense
-
Click on the add button with the
+icon at the top right corner of the form to create a new one. -
Fill in the Descriptive Name field for the Certificate Authority, such as
OPNsenseOpenVPNCA. -
Select Create an internal Certificate Authority for the Method option.
-
Select
RSAfor Key Type. -
Set Key length (bits) to
4096. A longer bit length increases the security of the key, but it also increases processing time. It is not recommended that the key length be less than 2048 bits. -
Digest Algorithm to
SHA512. -
Set Lifetime (days) to 365 which means that any certificates that are signed by this CA will become invalid after one year. For a home network firewall, you may set a longer lifetime.
-
Set Country Code, such as
US. -
Set State, such as
California. -
Set City, such as
Sunnyvale. -
Set Organization, such as
MyCompany. -
Set the Email Address.
-
Set Common Name to
internal-openvpn-ca. -
Click Save.

Figure 2. Created Certificate Authorities on OPNsense

2. Creating a Server Certificate
You may create a new Server Certificate that clients will use to verify the identity of the server when connecting to it by following the steps below:
-
Navigate to System → Trust → Certificates.

Figure 3. Created Server Certificates in OPNsense
infoThere are already some certificates in the list, as you may have noticed. That certificate is currently being used by the web admin page you are viewing. Because HTTPS is enabled by default, it was created during the OPNsense installation.
-
Click on the add button with the
+icon at the top right corner of the form to create a new one. -
Select
Create an internal Certificatefor the Method option. -
Fill in the Description field for the Server Certificate, such as
OpenVPN Server Certificate. -
Set Certificate Authority to
OPNsenseOpenVPNCA. -
Set Type to
Server Certificate. -
Set Key length (bits) to
4096. -
Digest Algorithm to
SHA512. -
Set Lifetime (days) to 365.
-
Set Private key location to
Save on this firewall,
Figure 4. Setting Server Certificate options in OPNsense-1
-
Set Country Code, such as
US. -
Set State, such as
California. -
Set City, such as
Sunnyvale. -
Set Organization, such as
MyCompany. -
Set the Email Address.
-
Set Common Name to
OpenVPN Server Certificate. -
Leave other settings as default.

Figure 5. Setting Server Certificate options in OPNsense-2
-
Click Save.
You may manage your server certificates on the Certificates page of your OPNsense firewall. It allows you to view, delete, export user certificates and user keys by using the action buttons at the end of the certificate row.
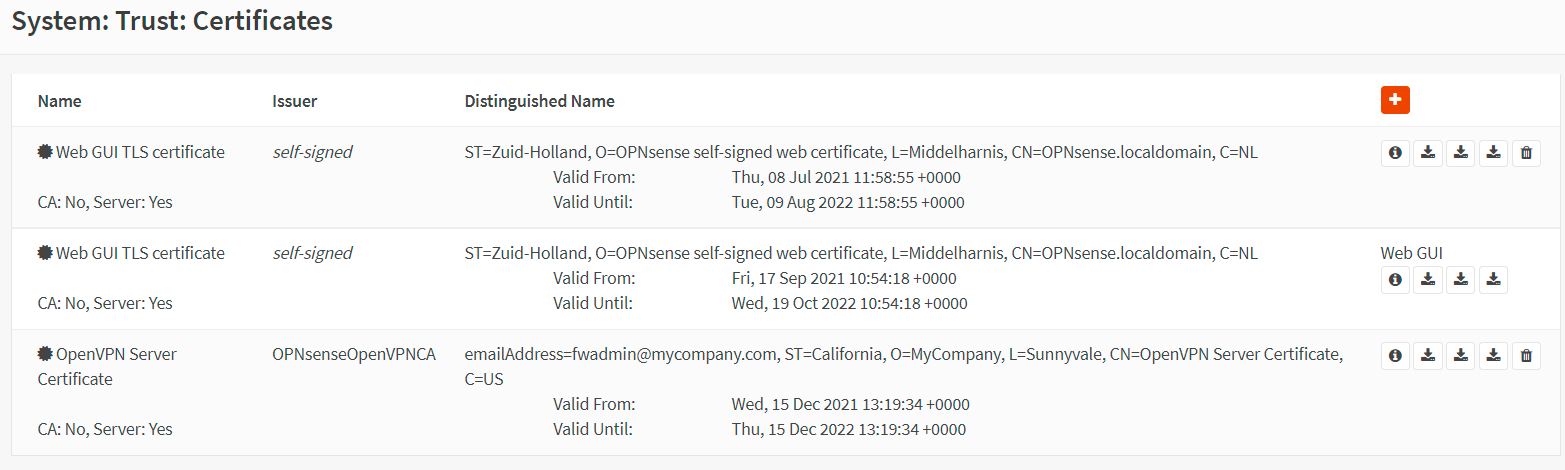
Figure 6. Managing Server Certificates in OPNsense
3. Creating a VPN User
OPNsense provides the following options for user authentication:
-
Local User Access: You may manage VPN users using the OPNsense local user manager.
-
RADIUS: You may manage users on an external RADIUS authentication server.
-
LDAP: You may manage user access by implementing Windows Active Directory Services or G Suite LDAP integration with OPNsense.
For authentication in this tutorial, we will use Local User Access. When using Local User Access, per-user certificates can be easily used and managed in the OPNsense GUI. This is far more secure, but depending on the number of people who will access the service, it may be less convenient than using a central authentication system.
To manage VPN users, passwords, and certificates in the OPNsense firewall, you may follow the next two main steps given below:
-
Adding OPNsense Local User
-
Creating Certificate for the VPN User
1. Adding OPNsense Local User
We will only create one user account in this tutorial, but the procedure applies to as many users as we want. You may follow the steps listed below to add a local user to your OPNsense firewall:
-
Navigate to the System → Access → Users in your OPNsense firewall.
-
Enter a unique Username for the VPN account, such as
vpnuser1. -
Enter a strong Password for the VPN user.
-
Fill in the Full Name field.
-
You may enter an E-Mail.

Figure 7. Creating VPN user account in OPNsense-1
-
You may leave the Login shell as
/sbin/nologinif the VPN account is only going to be used for VPN access. This option prevents the user from logging into the OPNsense web UI. -
You may enter an Expiration date or leave blank if the account shouldn't expire.
-
Check Click to create a user certificate for the Certificate option. So that a user certificate can be created at the same time creating the user account automatically.
-
Check
Generate new secretfor the OTP seed option to enable MFA for your VPN users. -
You may leave other settings as default.
-
Click the Save button to apply the settings. This will redirect you to the certificate page to create the VPN user certificate. Certificate creation for the VPN user account is explained in the next section.

Figure 8. Creating VPN user account in OPNsense-2
2. Creating Certificate for the VPN User
We will only create a certificate for the user we have created in the previous section. You may apply the same procedure for all users you want. Follow the next steps listed below to add a certificate for the VPN user you've previously created in your OPNsense firewall:
-
Select
Create an internal Certificatefor the Method option. -
You may leave the Descriptive Name field as it is, in our example
vpnuser1. -
Set Certificate authority to
OPNsenseOpenVPNCA. -
Set Type to
Client Certificate. -
Set Key length (bits) to
4096. -
Set Digest Algorithm to
SHA512. -
Set Lifetime (days) to 365.
-
Set Private key location to
Save on this firewall,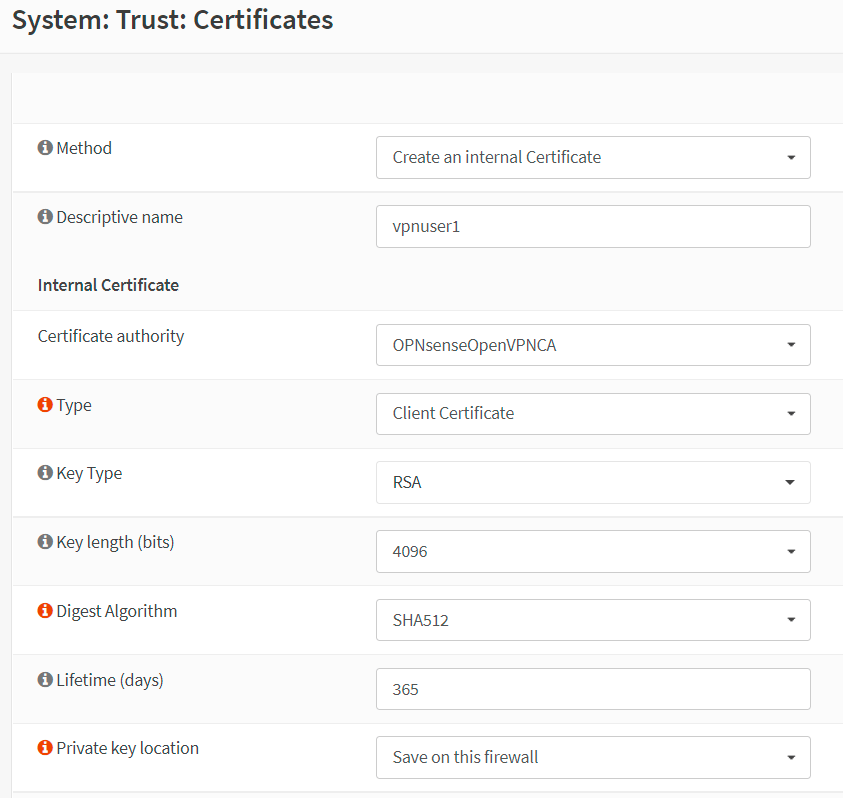
Figure 9. Setting Client Certificate options in OPNsense-1
-
Leave other settings as default.

Figure 10. Setting Client Certificate options in OPNsense-2
-
Click the Save button. This will redirect you to the User page.
-
Scroll down to the OTP QR code option.
-
Click on the Click to unhide button to activate your newly created seed with your Google Authenticator compatible app. You will be given a QR code that you can scan with your mobile phone.
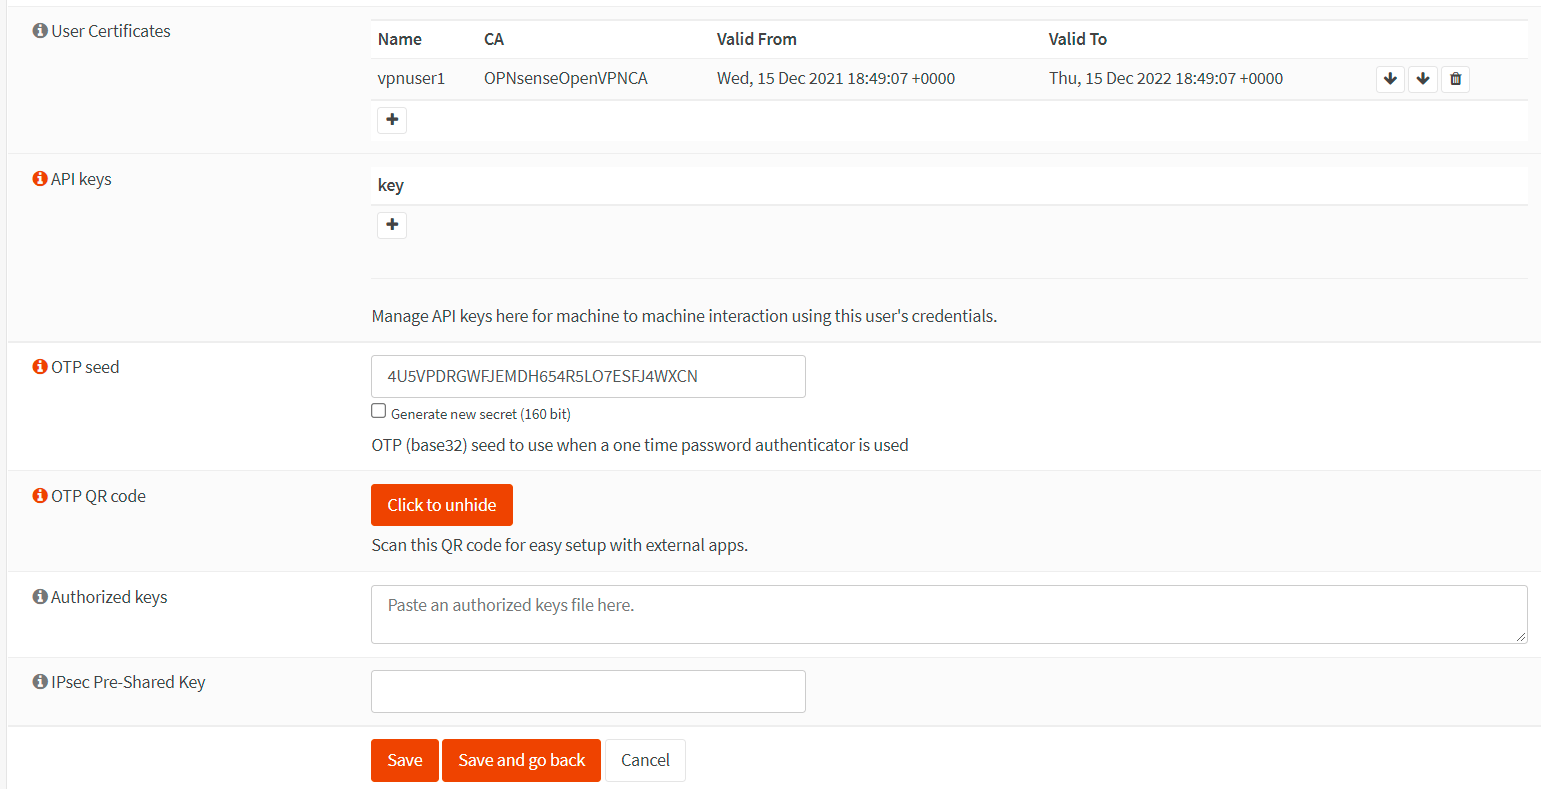
Figure 11. Activating OTP seed in OPNsense
-
Send the QR code to the user in a secure way.

Figure 12. Obtaining OTP QR code in OPNsense
-
Click the Save button to activate the settings.
-
You may view the certificate created for the VPN user by navigating to the System → Trust → Certificates in your OPNsense firewall.

Figure 13. Viewing the VPN client certificate in OPNsense
warningDon't forget to send the newly generated OTP QR code to the VPN user, here
vpnuser1, in a secure way.
4. Add TOTP Access Server
Since we'll configure an OpenVPN service with MFA in this tutorial, we must create a TOTP(Time-based One Time Password) server in the OPNsense firewall.
If you are installing the OpenVPN server to access your home network and you may not need an additional layer of security by implementing MFA for your VPN connection, you may skip this step.
To add a TOTP server in your OPNsense system, you may follow the instructions below:
-
Navigate to System → Access → Servers in your OPNsense web UI.

Figure 14. Access Servers in OPNsense
-
Click on the add button with the
+icon at the top right corner of the form to create a new one. -
Fill in the Descriptive name field for the Server, such as
TOTP VPN Access Server. -
Set the Type to
Local + Timebased One time Password. -
Leave other options as default if you use Google Authenticator as in our tutorial. For other tokens, you may need to change the Token Length option.
-
Click Save to add the TOTP server.

Figure 15. Adding TOTP Access Server in OPNsense
5. Add OpenVPN Server
After you've created the VPN users and certificates, you may start to set up the OpenVPN server in your OPNsense firewall. Adding a new OpenVPN server is a straightforward process. In this tutorial, we'll add one that makes use of multi-factor authentication. This configuration provides adequate protection and is simple to implement on clients, as each can use the same configuration.
There are five sections in the OpenVPN server configuration in OPNsense:
-
General Information
-
Cryptographic Settings
-
Tunnel Settings
-
Client Settings
-
Advanced configuration
To set up an OpenVPN server in your OPNsense firewall, you may follow the next steps given below:
-
Navigate to VPN → OpenVPN → Servers in your OPNsense web UI.

Figure 16. OpenVPN servers in OPNsense
-
Click on the add button with the
+icon at the top right corner of the form to create a new one.tipThere is a wizard icon next to the
+icon on the OpenVPN Servers page. By clicking on the wizard icon you may use the setup wizard to configure an OpenVPN server. It may be more convenient for some users. -
Fill in the Descriptive name field for the Server, such as
My OpenVPN Server. -
Select
Remote Access (SSL/TLS + User Auth)for the Server Mode since we'll use MFA. -
Select
TOTP VPN Access Serverfor Backend for authentication.tipIf you are installing the OpenVPN server to access your home network and you don't need an additional security layer by implementing MFA for your VPN connection, you may select Local Database for the Backend for Authentication. Then, your VPN clients are authenticated with 2FA by using local usernames, passwords, and certificates which are secure enough for a home network.
-
Set Protocol to
UDP. -
Select
tunfor the Device Mode. -
Set Interface to
WAN. If you have multiple WAN interfaces, you may selectany. -
You may leave the Local Port as default,
1194. Or, you may change it as you wish for security reasons.
Figure 17. Setting the General Information options for an OpenVPN server with MFA in OPNsense
-
Set TLS Authentication to
Enabled-Authentication & encryption. -
Check
Automatically generate a shared TLS authentication keyfor the TLS Shared Key option. -
Set Peer Certificate Authority to
OPNsenseOpenVPNCA. -
Set Server Certificate to
Open VPN Server Certificate -
Set DH Parameters Length to
4096 bit. -
You may set the Encryption algorithm to
AES-256-GCM (256-bit key, 128-bit block) -
Set the Auth Digest Algorithm to
SHA512. -
Set Certificate Depth to
One (Client+Server). -
You may check the
Strict User/CN Matchingoption to enforce a match between the Common Name of the client certificate and the username given at login for more security.
Figure 18. Cryptographic Settings for an OpenVPN server with MFA in OPNsense
-
Enter the IP address range in the CIDR format for the IPv4 Tunnel Network. This is the IP address range that will be used by your VPN clients. As your Tunnel Network, select an IP range that is not currently in use on your network. In this tutorial, we'll choose
192.168.10.0/24as the tunnel network. -
Select the Redirect Gateway option to force clients to access the Internet through your firewall. If you don't want to enable this option, you may enter your LAN address for the IPv4 Local Network. So that, your VPN clients are accessible from your local network, such as
10.10.10.0/24. -
You may set IPv4 Remote Network by entering the remote LAN/s to set up a
site-to-site VPN. You may leave this blank if you don't need to set up a site-to-site VPN. -
You may set a value for the Concurrent Connections option. This option specifies the maximum number of clients that can connect to this OpenVPN server instance at the same time. This is a global restriction that applies to all connected clients, not a per-user limit. The OpenVPN server will allow an unlimited number of connections to your server by default. Setting this to a reasonable value is advised, even if only for sanity purposes.
-
Select
legacy LZO algorithm with adaptive compressionfor Compression. If OpenVPN detects that the data in the packets are not being compressed efficiently, this mode will dynamically disable compression for a period of time. -
You may check the Inter-client communication option to allow communication between VPN clients connected to your OpenVPN server. Most of the time, you don't need to enable this option.
-
You may check the Duplicate Connections option to allow multiple concurrent connections from VPN clients using the same Common Name. Although this option is not recommended, you may need to enable it in some cases.

Figure 19. Tunnel Settings for an OpenVPN server with MFA in OPNsense
-
You may enable the Dynamic IP option which allows a client that is already connected to change its IP address without reconnecting.
-
Check the Address Pool option to provide a virtual adapter IP address to VPN clients.
-
Enable the Topology option so that VPN clients only receive a single IP and not an isolated IP subnet. For compatibility with older Windows OpenVPN clients, it is disabled by default.
-
If you specify a DNS Default Domain, this value will be used as the DNS suffix for your VPN clients. If your clients want to look up your internal hostnames without using an FQDN, this can be useful.
-
You may check DNS Servers and then enter DNS servers' IP addresses if you wish. If you have an internal DNS server, then you should enter its IP address here.
-
You may check the Force DNS cache update option to kick Windows clients into recognizing pushed DNS servers if you wish.
-
You may check the Prevent DNS leaks option to block DNS servers on other network adapters if you wish.
-
You may check NTP Servers and then enter NTP servers' IP addresses if you wish.
-
You may check NetBIOS Options to enable NetBIOS over TCP/IP if you wish.

Figure 20. Client Settings for an OpenVPN server with MFA in OPNsense
-
Select
3for the Verbosity level to show TLS negotiations & route info. -
Set Renegotiate time to
0to disable the renegotiate data channel key since we'll use OTP in our tutorial. -
Leave other options as default.
tipThe
Strict User/CN Matchingoption is used to force the use of the same username as the certificate CN, preventing people from logging in with credentials other than the certificate name supplied. (For example,vpnuser1cannot log in as root.)
Figure 21. Advanced configuration for an OpenVPN server with MFA in OPNsense
-
Click Save at the bottom of the page to activate the settings.
You may view and manage your new VPN server on the OpenVPN servers page of the OPNsense firewall.

Figure 22. OpenVPN servers in OPNsense
6. Add Firewall Rules
By default, all traffic connecting to an OpenVPN server or flowing through VPN tunnels is forbidden. Therefore, you must define the following firewall rules in your OPNsense:
-
Allow traffic from clients to VPN server
-
Allow VPN clients access to the Internet through VPN.
1. Allow traffic from clients to VPN server
Allowing access to the OpenVPN server port, default UDP/1194, on the WAN interface is required to allow SSL VPN client connections. You should define a firewall rule that allows VPN clients to access to your OpenVPN server.

Figure 23. OpenVPN servers access rule in OPNsense
2. Allow VPN clients access to Internet through VPN
To allow VPN clients to the internet through the VPN tunnel, you may follow the next steps given below:
-
Navigate to the Firewall → Rules → OpenVPN in your OPNsense web UI.

Figure 24. OpenVPN interface firewall rules in OPNsense
-
Click on the add button with the
+icon at the top right of the page. -
Set Action to
Pass. -
Set Interface to
OpenVPN. -
Set Direction to
in. -
Select
Single Host or Networkfor the Source and set VPN IP address range such as192.168.10.0/24.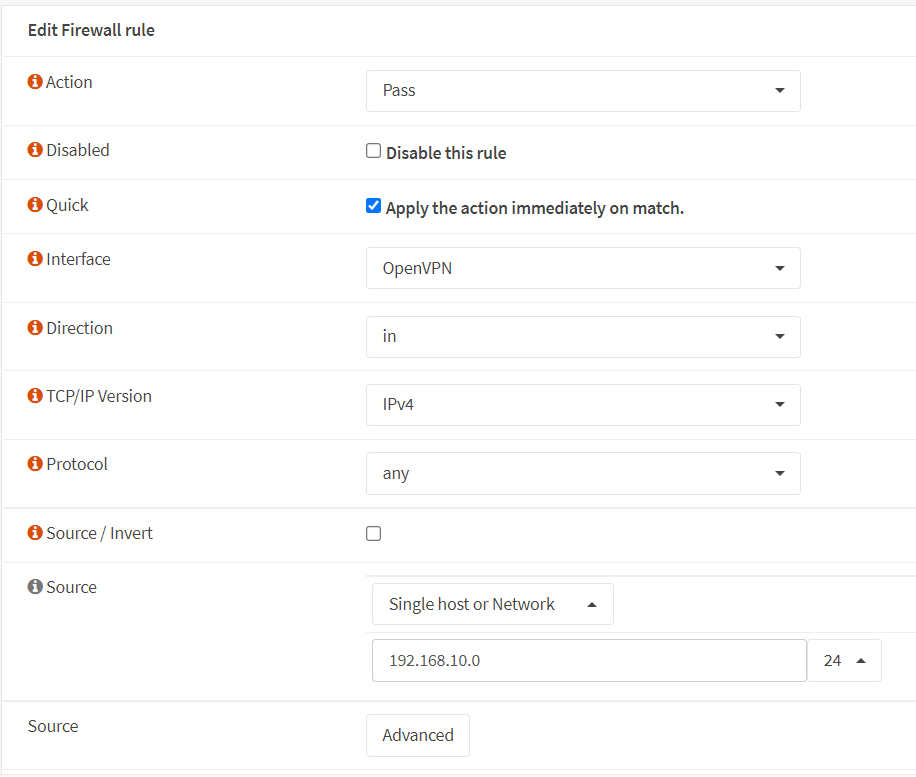
Figure 25. Defining OpenVPN firewall rules in OPNsense-1
-
Select
anyfor the Destination. -
You may type
VPN Rulesin the Category field. -
Fill in the Description field, like
Allow VPN clients access. -
You may leave other settings as default.
Defining OpenVPN firewall rules in OPNsense-2
Figure 26.* Defining OpenVPN firewall rules in OPNsense-2
-
Click the Save button at the bottom of the page to save the rule.
-
Click Apply Changes to activate the new firewall rule.
Activating OpenVPN firewall rules in OPNsense
Figure 27.* Activating OpenVPN firewall rules in OPNsense
The firewall configuration for the OpenVPN tunnel connection is complete. You must now export the configuration files so that they can be fed into the OpenVPN client that the user will install on his or her device.
7. Export OpenVPN Client
You can easily export the OpenVPN client configuration file as you need. To download the OpenVPN Client Configuration, you may follow the next steps:
-
Navigate to the VPN → OpenVPN → Client Export in your OPNsense web UI.
-
Select the newly created VPN server from the list, such as
My OpenVPN Server UDP:1194, for the Remote Access Server. -
Select the
File onlyfor the Export Type. Since you can easily import this text-based configuration file into OpenVPN client applications on different platforms, such as Windows, macOS, Android, and iOS.tipYou may select
Archiefor the Export Type, if your VPN client runs in Windows or macOS. In this case,Archiefile, such asMy_OpenVPN_Server_vpnuser1.zipincludes a directory that contains the configuration file (.ovpn), user certificate(.p12), and tls key(.key). -
Leave other settings as default. For most cases,
Hostnamemust be the public IP address of your OPNsense firewall andPortmust be the port number you have set for the VPN service, default 1194.
Figure 28. Exporting OpenVPN client in OPNsense
-
Scroll down to the bottom of the page. The list of users you have configured is in the
Accounts / certificatespane, and the download button with a small cloud icon is on the right side of the corresponding row. -
Click on the download button next to the VPN client user,
vpnuser1.
Figure 29. Downloading OpenVPN client in OPNsense
After exporting the OpenVPN client configuration file, such as My_OpenVPN_Server_vpnuser1.ovpn, you should send it to the user. So that, the user can import it into the OpenVPN client app in his/her device to connect to the LAN through the OpenVPN tunnel.
How do I connect to OPNsense OpenVPN?
In this section, we will explain how to connect the OPNsense OpenVPN server with MFA using a Windows PC or an Android device. We assume that you've already downloaded and sent the OpenVPN client configuration file to the VPN user.
Connecting from a Windows PC client
You can easily connect your OPNsense OpenVPN server with MFA from a remote Windows client by following the instructions given below:
-
Download the latest OpenVPN GUI installer file from the
openvpn.netofficial website. -
Install the OpenVPN installer, leaving everything at the default settings and agreeing to everything with
Yes. Installing a TAP network driver may be required; do so if prompted. -
After finishing OpenVPN installation on a Windows client machine, A small monitor icon with a locker on it appears in your taskbar. Right-click on it and select
Import fileto import the client configuration file.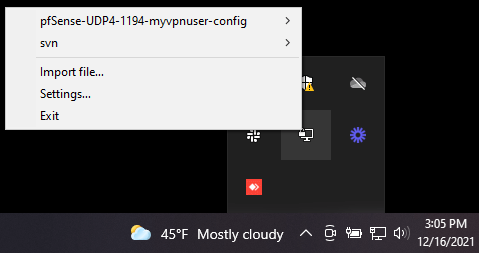
Figure 30. Importing OpenVPN client configuration on Windows 10
warningIf you've downloaded an
Archiefile, such asMy_OpenVPN_Server_vpnuser1.zipin the previous section, you must extract it into the OpenVPN config directory, such asC:\Users\Administrator\OpenVPN\config, for import. -
After importing the OpenVPN client configuration successfully, right-click on the OpenVPN icon on the taskbar and select the newly imported configuration file.

Figure 31. Connecting to the OPNsense OpenVPN server from Windows 10 client
-
Click Connect to start the VPN connection.
-
Enter your VPN Username.
-
Launch the Google Authenticator application on your mobile device.
-
Grab the token for your VPN account, such as
vpnuser1.
Figure 32. Token generated by Google Authenticator for OpenVPN client user
-
Return back to the OpenVPN GUI in your Windows PC.
-
Fill in the Password field using both the token and OPNsense local user password you defined.
infoRemember, you need to enter the token before or after your password (depending on your configuration). For example, if the Google Authenticator token is
387914and your local password isMyPassword, then you should enter387914MyPasswordin the Password field of the OpenVPN GUI application.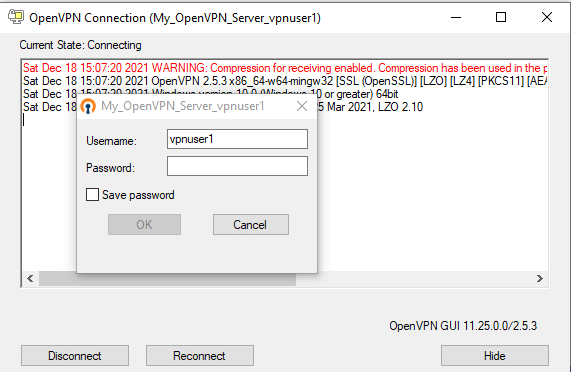
Figure 33. OpenVPN client authentication with MFA on Windows 10
-
Click on OK to connect.
You will be notified on the bottom right of the screen and the OpenVPN icon on the taskbar will change to green when the connection is successful.

Figure 34. OpenVPN Windows 10 client connected with MFA
Connecting from an Android Device
You can easily connect your OPNsense OpenVPN server from an Android client by following the instructions given below:
-
Install the official OpenVPN application from the Google Play Store on your Android device.

Figure 35. Installing OpenVPN Connect client on an Android
-
Launch the application and import the configuration file by selecting the file under the
FILEtabImport Profilemenu.
Figure 36. Importing OpenVPN client configuration on an Android
-
Enter the VPN user name.
-
Selecting the Connect after import option.
-
Tap on the ADD button.

Figure 37. Importing OpenVPN client configuration on an Android-2
-
Launch the Google Authenticator application on your mobile device.
-
Grab the token for your VPN account, such as
vpnuser1. -
Return back to the OpenVPN client app on your mobile device.
-
Enter the VPN password using both the token and OPNsense local user password you defined to connect to the VPN server. Then, tap on OK.
infoRemember, you need to enter the token before or after your password (depending on your configuration). For example, if the Google Authenticator token is
085256and your local password isMyPassword, then you should enter085256MyPasswordin the Password field of the OpenVPN GUI application.
Figure 38. Entering VPN password for OpenVPN connection in Android device
-
Now, you should be connected to a VPN server from your Android device.

Figure 39. Connected OpenVPN Client on Android
-
To disconnect from the VPN, you may tap on the green toggle button at the top.
Verifying the VPN connection
OpenVPN server configuration and client configurations are completed. To test the configurations, you may follow the steps given below.
-
Viewing VPN connections on OPNsense:
Navigate to the VPN → OpenVPN → Connection Status in your OPNsense web UI. You should be able to see information about the connected VPN clients. The following details are displayed:
-
Vpn username,
-
the real IP address of the connected client,
-
the VPN IP address of the connected client,
-
the time since the last connection,
-
the amount of data transferred and received.
-
Status of the OpenVPN server
Also, you may perform the following task:
-
Restart or stop the OpenVPN service by using the Action buttons at the upper right corner of the page.
-
Kill the VPN client connection by using the
Xbutton at the end of the VPN client connection.

Figure 40. OpenVPN status in OPNsense
-
-
Ping Test: You should be able to successfully ping your OpenVPN server from the client and vice versa:
ping 192.168.10.1 -
IP Control
On your client machine go to this website
https://www.whatismyip.comto check your public IP address. If your OpenVPN tunnel works well, you should see your VPN server's public IP address instead of your client computer's public IP address in the browser. -
Traceroute Test
You should see the OpenVPN Server VPN IP address in the traceroute command output.
-
Viewing Firewall Logs
You should see that your VPN clients with 192.168.10.X IP addresses are accessing the internet via VPN tunnel interface, such as
ovpnsin firewall live view by navigating to Firewall → Log Files → Live View and filtering src by VPN client IP, such as192.168.10.6.
Figure 41. Viewing firewall logs for OpenVPN client internet traffic in OPNsense
What are the Benefits of SSL VPN for Road Warriors?
The main advantages of using SSL VPN for Road Warriors instead of IPsec are as follows:
-
Multiple servers or Client Specific Overrides can be used for granular access control.
-
Using OPNsense's Client Configuration Export, configuration on nearly all mobile clients is simple.
-
No problems caused by NAT without NAT-T