How to Configure an IPSec Site-to-Site VPN Tunnel on Ubuntu
Secure communication between networks is a critical requirement in today’s IT infrastructure. Whether you are linking branch offices, integrating on-premises systems with the cloud, or building a local lab for training and testing, an IPSec site-to-site VPN offers a robust, encrypted solution for trusted data exchange over public networks.
In this guide, we will walk through the configuration of a site-to-site VPN tunnel using strongSwan on Ubuntu Server 22.04, running inside Oracle VirtualBox. This lab simulates two isolated networks connected securely over a VPN tunnel, ideal for network administrators, security engineers, and certification candidates.
Each virtual machine (VM) is assigned a unique static IP address within its own subnet and configured with dual network interfaces, one for internet access (NAT) and one for internal VPN traffic.
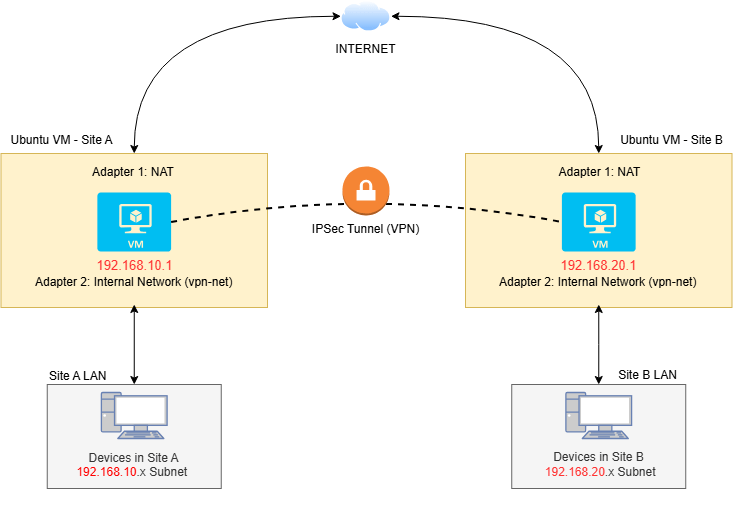
Figure 1 IPSec Site-to-Site VPN network diagram
You should have a lab environment similar to the given below.
- Two Ubuntu 22.04 VM on VirtualBox
- Dual network interfaces per VM:
- Adapter 1: NAT – for internet connectivity
- Adapter 2: Internal Network (vpn-net) – for VPN communication
- Simulated LANs with separate subnets:
- Site A: 192.168.10.0/24
- Site B: 192.168.20.0/24
Why Use IPSec for Site-to-Site VPN?
A site-to-site VPN creates a secure, encrypted tunnel between two separate networks over the internet, typically connecting corporate offices, branch locations, or data centers. Unlike remote-access VPNs, which connect individual users to a network, site-to-site VPNs link entire local area networks (LANs), ensuring seamless and protected communication between them. IPSec (Internet Protocol Security) is one of the most trusted protocols for establishing site-to-site VPNs. Here’s why IPSec is commonly used.
- Securely Connect Remote Networks: IPSec encrypts all data traveling between sites, ensuring that sensitive information is protected from interception or tampering.
- Bridge On-Premises and Cloud Networks: Easily connect your cloud infrastructure (like AWS, Azure, or Google Cloud) to your on-premises network, enabling hybrid cloud deployments without compromising security.
- Maintain Privacy Without Public Exposure: IPSec tunnels create a private, encrypted channel across the public internet without exposing internal endpoints to outside threats.
Using IPSec for site-to-site VPNs is a proven, scalable solution for businesses looking to maintain secure, high-performance connectivity across multiple locations.
Step-by-Step Guide: IPSec Site-to-Site VPN Configuration
The following configuration was tested successfully on the Ubuntu Server 24.04.2 LTS version.
Step 1: Create Virtual Machines & Configure Network Adapters
Before we begin configuring IPSec, you’ll need two Ubuntu 22.04 Server virtual machines installed and running in Oracle VirtualBox. Each VM will represent a separate network site (Site A and Site B) and must have two distinct network interfaces to simulate both internet connectivity and internal VPN communication.
| Adapter | Type | Purpose | Configuration |
|---|---|---|---|
| Adapter 1 | NAT | Provides internet access for software updates | Enabled, set to NAT |
| Adapter 2 | Internal Network | Dedicated interface for VPN tunnel traffic | Enabled, set to “Internal Network” named vpn-net |
Table 1. Network Adapter Configuration
This dual-adapter setup allows each VM to access the internet independently while establishing a private, secure tunnel over the internal network.
Open the Settings for each VM (Open VirtualBox Settings → Network Tab) and configure the network adapters as follows:
- Adapter 1: Set to NAT (to allow internet access for updates and package installations).
- Adapter 2: Enable and set to Internal Network named vpn-net
Step 2: Set Static IPs on Internal Network and strongSwan
After successfully installing Ubuntu Server on both virtual machines, we can begin configuring each site by following the next steps. Each VM will receive a static IP address on its internal network interface (enp0s8) to simulate separate LANs. We’ll also install strongSwan, the IPSec VPN software.
Site A (VM-1): 192.168.10.1/24 Site B (VM-2): 192.168.20.1/24
-
Update Both VMs: Before any VPN configuration, ensure both systems are fully up to date by running the next commands.
sudo apt update && sudo apt upgrade -yKeeping systems updated helps avoid compatibility or security issues with kernel modules used by strongSwan.
-
Enabling Kernel Packet Forwarding:This step is required for VPN tunneling between interfaces.
- Edit the configuration file.
sudo nano /etc/sysctl.conf - Uncomment or add the following line.
net.ipv4.ip_forward=1 - Apply the change.
sudo sysctl -p
- Edit the configuration file.
-
Install StrongSwan: Install StrongSwan, a modular and open-source IPSec-based VPN solution, by following the next steps.
-
Install strongswan package by running the next commands:
sudo apt install strongswan -yThe installer script will initiate the strongswan service and configure it to commence automatically upon system bootup upon completion of the installation.
-
Verify that the service is running.
sudo systemctl status strongswan.serviceor
sudo systemctl status ipsec.service -
Check if it's enabled to start on boot.
sudo systemctl is-enabled strongswan.serviceor
sudo systemctl is-enabled ipsec.service
-
-
Assign Static IPs to the Internal Network Interface: Configure static IPs on each VM for the VPN tunnel using Netplan by following the next steps.
-
Login VM-1 (Site A).
-
Find your network interface names and IP addresses using
ip addr show. -
Edit the Netplan configuration file
sudo nano /etc/netplan/01-netcfg.yaml -
Update the config as follows:
network:
version: 2
ethernets:
enp0s8:
dhcp4: no
addresses: [192.168.10.1/24] -
Save and exit the file.
-
Apply the configuration by running the next command.:
sudo netplan apply -
Login VM-2 (Site B).
-
Find your network interface names and IP addresses using
ip addr show. -
Edit the Netplan configuration file on VM-2 (Site B).
sudo nano /etc/netplan/01-netcfg.yaml -
Update the config as follows:
network:
version: 2
ethernets:
enp0s8:
dhcp4: no
addresses: [192.168.20.1/24] -
Apply the configuration.
sudo netplan apply -
Verify networking on both VMs by running the next command.
ip aYou should see a similar output.
1: lo: <LOOPBACK,UP,LOWER_UP> mtu 65536 qdisc noqueue state UNKNOWN group default
link/loopback 00:00:00:00:00:00 brd 00:00:00:00:00:00
inet 127.0.0.1/8 scope host lo
valid_lft forever preferred_lft forever
inet6 ::1/128 scope host
valid_lft forever preferred_lft forever

2: enp0s3: <BROADCAST,MULTICAST,UP,LOWER_UP> mtu 1500 qdisc fq_codel state UP group default qlen 1000
link/ether 08:00:27:8c:7f:65 brd ff:ff:ff:ff:ff:ff
inet 10.0.2.15/24 brd 10.0.2.255 scope global dynamic enp0s3
valid_lft 86390sec preferred_lft 86390sec
inet6 fe80::a00:27ff:fe8c:7f65/64 scope link
valid_lft forever preferred_lft forever
3: enp0s8: <BROADCAST,MULTICAST,UP,LOWER_UP> mtu 1500 qdisc fq_codel state UP group default qlen 1000
link/ether 08:00:27:92:4f:ab brd ff:ff:ff:ff:ff:ff
inet 192.168.10.1/24 brd 192.168.10.255 scope global enp0s8
valid_lft forever preferred_lft forever
inet6 fe80::a00:27ff:fe92:4fab/64 scope link
valid_lft forever preferred_lft forever -
Test connectivity by pinging from each VM to the other On VM-1 (Site A), run the next command.
ping 192.168.20.1On VM-2 (Site B), run the next command.
ping 192.168.10.1If the pings succeed, you’re ready to move on to the IPSec configuration step. Make sure you can ping between VMs before proceeding with VPN setup.
-
STEP 3: Configure the IPSec Tunnel
We’ll now configure strongSwan on both VMs to establish an IPSec Site-to-Site VPN tunnel.
Each VM will be assigned either the left or right role in the IPSec config file. For clarity:
- On ubuntu-vm1 (Left side), edit the configuration file.
sudo nano /etc/ipsec.conf - Add the following lines.
config setup
charondebug="ike 2, knl 2, cfg 2"
conn site-to-site
auto=start
left=192.168.10.1
leftsubnet=192.168.10.0/24
right=192.168.20.1
rightsubnet=192.168.20.0/24
ike=aes256-sha1-modp1024
esp=aes256-sha1
keyexchange=ikev2
authby=psk - On ubuntu-vm2 (Left side), edit the configuration file.
sudo nano /etc/ipsec.conf - Add the following lines.
config setup
charondebug="ike 2, knl 2, cfg 2"
conn site-to-site
auto=start
left=192.168.20.1
leftsubnet=192.168.20.0/24
right=192.168.10.1
rightsubnet=192.168.10.0/24
ike=aes256-sha1-modp1024
esp=aes256-sha1
keyexchange=ikev2
authby=psk
Explanation of IPSec configuration parameters are given below.
| Parameter | Meaning |
|---|---|
| left / right | Local and remote IP addresses of the tunnel endpoints |
| leftsubnet / rightsubnet | LANs behind each endpoint that should be routed |
| ike | Algorithms used in Phase 1 (key exchange) |
| esp | Algorithms used in Phase 2 (data encryption) |
| keyexchange | Protocol used (IKEv2 is modern and recommended) |
| authby=psk | Authentication method (using pre-shared key) |
| auto=start | Automatically initiate the connection on boot |
Table 2. IPSec configuration parameters
STEP 4: Configure Pre Shared Key
Now, let’s define the remote site and authentication method. strongSwan supports different types of authentication methods. However, we will use the Pre-Shared Key to authenticate the peer.
Both ends must use the same pre-shared key to authenticate.
-
On both VMs edit the configuration file.
sudo nano /etc/ipsec.secrets -
Add the following line.
192.168.10.1 192.168.20.1 : PSK "MySuperSecretKey"
STEP 5: Start the VPN Tunnel
Start the StrongSwan service by running the next command.
sudo systemctl restart strongswan-starter
You may check tunnel status using the next command.
sudo ipsec statusall
Output for successful connection should be similar to the below.
Status of IKE charon daemon (strongSwan 5.9.1):
uptime: 5 minutes, since Apr 13 15:22:41 2025
worker threads: 16 of 16 idle, job queue: 0/0/0/0, scheduled: 3
loaded plugins: charon aes sha1 sha2 md5 random nonce hmac stroke kernel-netlink x509
Listening IP addresses:
192.168.10.1

Connections:
site-to-site: 192.168.10.1...192.168.20.1 IKEv2, dpddelay=30s
site-to-site: local: [192.168.10.1] uses pre-shared key authentication
site-to-site: remote: [192.168.20.1] uses pre-shared key authentication
site-to-site: child: 192.168.10.0/24 === 192.168.20.0/24 TUNNEL, dpdaction=restart

Security Associations (1 up, 0 connecting):
site-to-site[1]: ESTABLISHED 84 seconds ago, 192.168.10.1[192.168.10.1]...192.168.20.1[192.168.20.1]
site-to-site{1}: INSTALLED, TUNNEL, reqid 1, ESP SPIs: c8a9bf1e_i ca6f7a9c_o
site-to-site{1}: 192.168.10.0/24 === 192.168.20.0/24
Test the tunnel using ping. If both pings are successful, your IPSec Site-to-Site VPN is working properly.
Use sudo journalctl -u strongswan for logs if the tunnel fails.
Troubleshooting Tips
If the tunnel does not come up, try the following:
| Action | Command |
|---|---|
| View logs | sudo journalctl -u strongswan |
| Confirm strongSwan status | sudo systemctl status strongswan-starter |
| Check IP forwarding | cat /proc/sys/net/ipv4/ip_forward |
| Disable UFW or open ports | sudo ufw allow 500,4500/udp or sudo ufw disable |
| Re-verify PSK match | Ensure /etc/ipsec.secrets is identical on both ends |
Table 3. IPSec Tunnel Troubleshooting methods
To diagnose encrypted vs. plain traffic in a lab, try: sudo tcpdump -i enp0s8
You’ll observe ESP packets between the two VPN interfaces once the tunnel is active.
Real-World Use Case Scenarios
Some real world use cases for IPSec site-to-site VPN tunnel are given below.
Use Case 1: Simulating Remote Branch Office Connectivity
A small company has two office locations—one in Berlin and another in Amsterdam. Each office runs its own local server and internal applications (file sharing, internal web tools, etc.). They want to allow employees to access services in both offices securely, without exposing everything to the public internet.
By deploying Ubuntu servers in each office and setting up an IPSec Site-to-Site VPN, both networks are securely connected. Local traffic is routed between sites over the tunnel, encrypted with IPSec.
The benefits of using IPSec tunnel in this case are as follows.
- Applications can communicate as if on the same LAN.
- Employees in either location can securely access internal services.
- Sensitive data (like HR files or shared drives) never travel unencrypted.
Use Case 2: Cybersecurity Training Lab for VPN Penetration Testing
You're studying for a cybersecurity certification and need a safe environment to test VPN vulnerabilities and packet inspection tools like Wireshark, tcpdump, or nmap.
By setting up two VMs connected by IPSec, you can simulate VPN traffic and practice:
- Packet inspection of encrypted vs. unencrypted traffic
- IDS/IPS testing (like Snort or Suricata inside the tunnel)
- VPN misconfiguration scenarios and log analysis
The benefits of using IPSec tunnel in this case are as follows.
- All lab work happens locally safe, isolated, no risk.
- Ideal for ethical hacking and secure configuration practice.
- Real-world tunnel logs and error analysis experience
Best Practices for IPSec VPN in Virtual Environments
To ensure a secure, reliable, and maintainable IPSec VPN deployment, consider implementing the following best practices.
-
Use a strong pre-shared key to protect against brute-force attacks and unauthorized tunnel access, such as
7&JeN#41wF$k^2!zP0Lo8q3B. -
Assign different subnets to each VPN site to avoid IP conflicts and simplify routing.
Site A → 192.168.10.0/24 Site B → 192.168.20.0/24 -
Restrict access with firewall rules to limit which services and ports are reachable over the tunnel.
Example;sudo ufw allow from 192.168.100.2 to any port 22 proto tcp
sudo ufw enable -
Monitor tunnel activity using diagnostic tools such as
tcpdumpandip xfrmto analyze traffic and troubleshoot connectivity issues. -
Isolate VPN and internet-bound traffic by assigning separate network interfaces to each, enhancing security and performance.
-
Regularly backup configuration files (
/etc/ipsec.confand/etc/ipsec.secrets) to enable quick recovery in case of errors or system changes. -
Maintain comprehensive documentation of all IP addresses, cryptographic keys, and firewall rules to ensure consistency and facilitate future updates.
Conclusion
With a few lines of configuration and some basic network setup, we’ve now successfully built an IPSec Site-to-Site VPN using Ubuntu and VirtualBox. This hands-on experience lays the groundwork for deploying secure VPN tunnels in production or testing environments. If you are ready to take it further, try adding firewalls (UFW or iptables), routing rules, or simulating internet breakouts!