How to Install OpenVPN on pfSense® software?
OpenVPN is a free and open-source VPN protocol that uses virtual private network (VPN) techniques to create secure site-to-site or point-to-point connections. It was first released by James Yonan in 2001 and is currently one of the most widely used VPN protocols among VPN users. It is distributed under the terms of the GNU General Public License (GPL). The OpenVPN Inc. and a large number of open-source developers are working on the project.
It is compatible with all major operating systems, such as Windows, Linux, macOS, FreeBSD, Android, and iOS.
The OpenVPN protocol is extremely secure. It includes 256-bit encryption via OpenSSL. For data transmission, OpenVPN can use two different protocols: TCP and UDP. UDP is the more commonly used and recommended protocol. OpenVPN supports pre-shared keys, certificate-based authentication, and username/password authentication.
OpenVPN has been integrated into several router platforms, such as OPNsense and pfSense software, allowing users to use their routers to run OpenVPN as a VPN client or VPN server.
The pfSense® software is an open-source customized installation of FreeBSD that can be used as a router and firewall and is completely administered via a web interface. It's been proven to succeed in a wide range of environments, from single machine protection in tiny home networks to thousands of network devices in large enterprises, academic institutions, and other businesses.
In this tutorial, we will explain to you how to install and configure the OpenVPN server on your pfSense® software firewall that will allow your remote clients to safely access your home/office network, as well as pass all of their network traffic through it so they can securely access the internet.
It is strongly recommended that installing the Zenarmor on your OpenVPN server will make your network more secure. By configuring the Zenarmor, applying web filtering, and application control, you can block security threats coming from your OpenVPN tunnel interface.
The OpenVPN configuration is very straightforward. You can use the OpenVPN tunnel by just following the 5 main steps given below:
- Installing the Client Export Package
- Creating a Certificate Authority
- Configure OpenVPN on pfSense using the OpenVPN Wizard
- Creating a VPN User
- pfSense OpenVPN Client Export
To be able to follow this OpenVPN installation on pfSense® software tutorial, you will need to have the listed devices below and root privileged access.
-
pfSense® software 2.5.2 Firewall which will be configured as an OpenVPN VPN server.
-
Windows PC or an Android device will be configured as an OpenVPN VPN client.
1. Installing the Client Export Package
To be able to export the client configuration which should be provided to the clients for their VPN connections, you may install the OpenVPN Client Export package. The OpenVPN Client Export Package allows you to export configurations in a variety of formats. It also allows you to export a pre-packaged Windows installer executable with all of the necessary configurations.
To install the Client Export Package, you may follow the next steps given below:
- Navigate to
System→Package Manager→Available Packageson pfSense web UI.
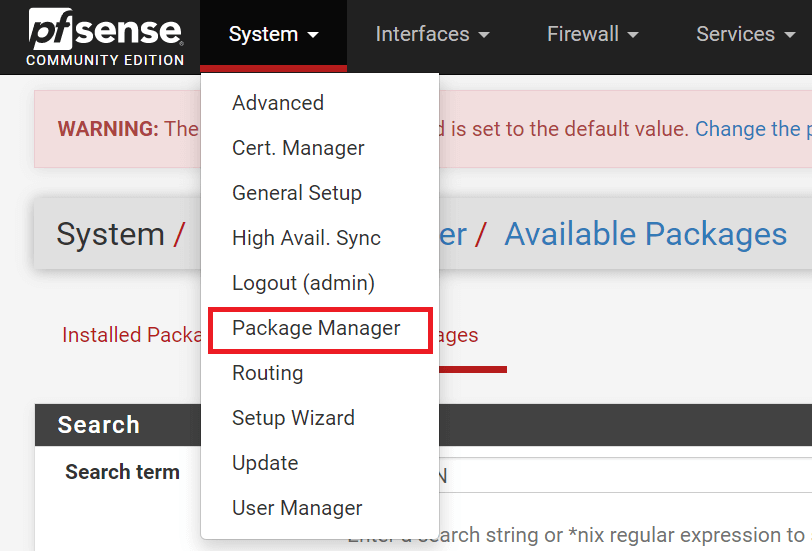
Figure 1. Navigating to Package Manager under System menu on pfSense.
- Search for
OpenVPN.
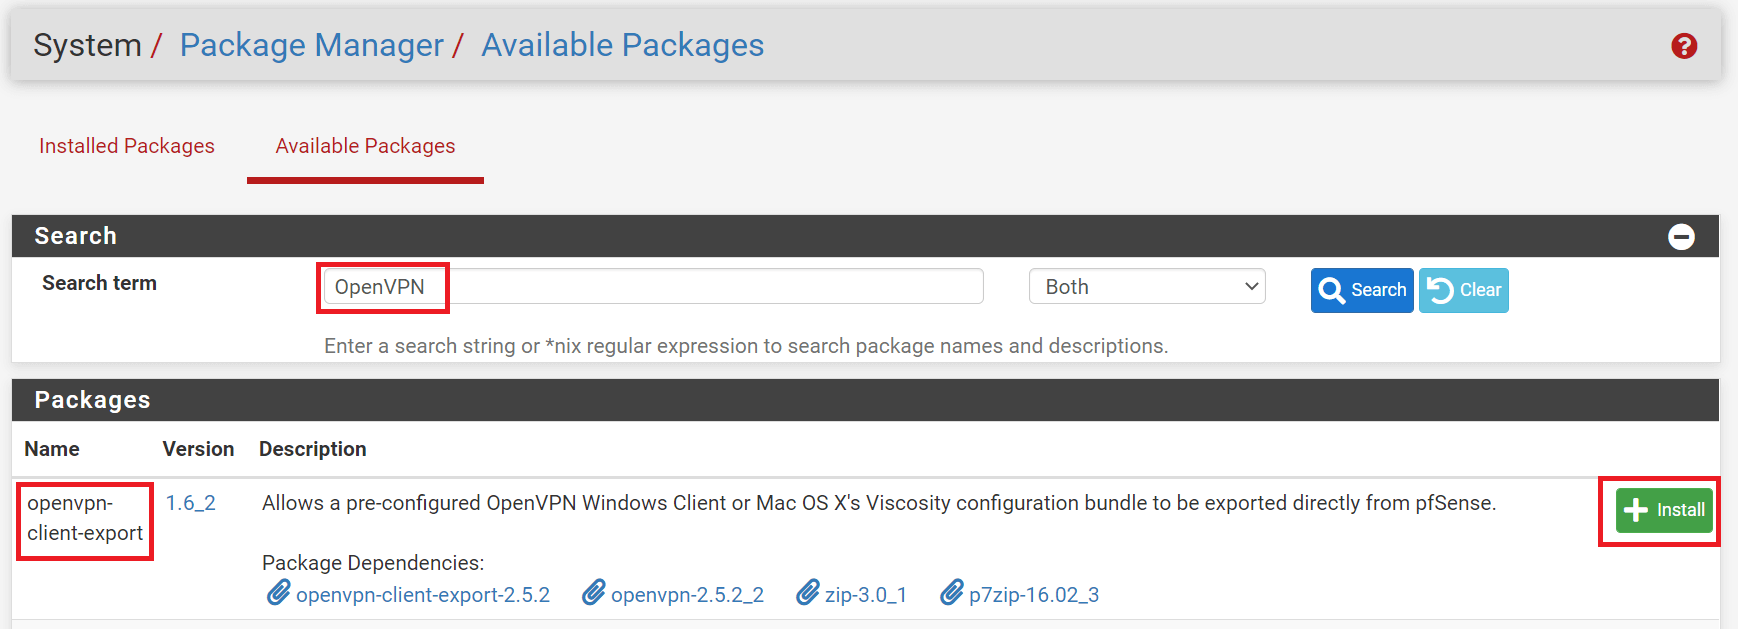
Figure 2. Installing openvpn-client-export package on pfSense
- Click on the
+ Installbutton next to theopenvpn-client-exportpackage.
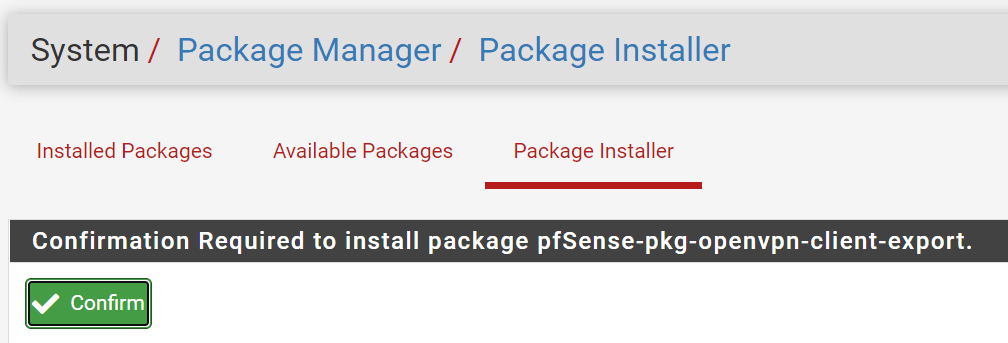
Figure 3. Confirmation of the openvpn-client-export package installation on pfSense
- Click the
Confirmbutton for confirmation of the package installation.
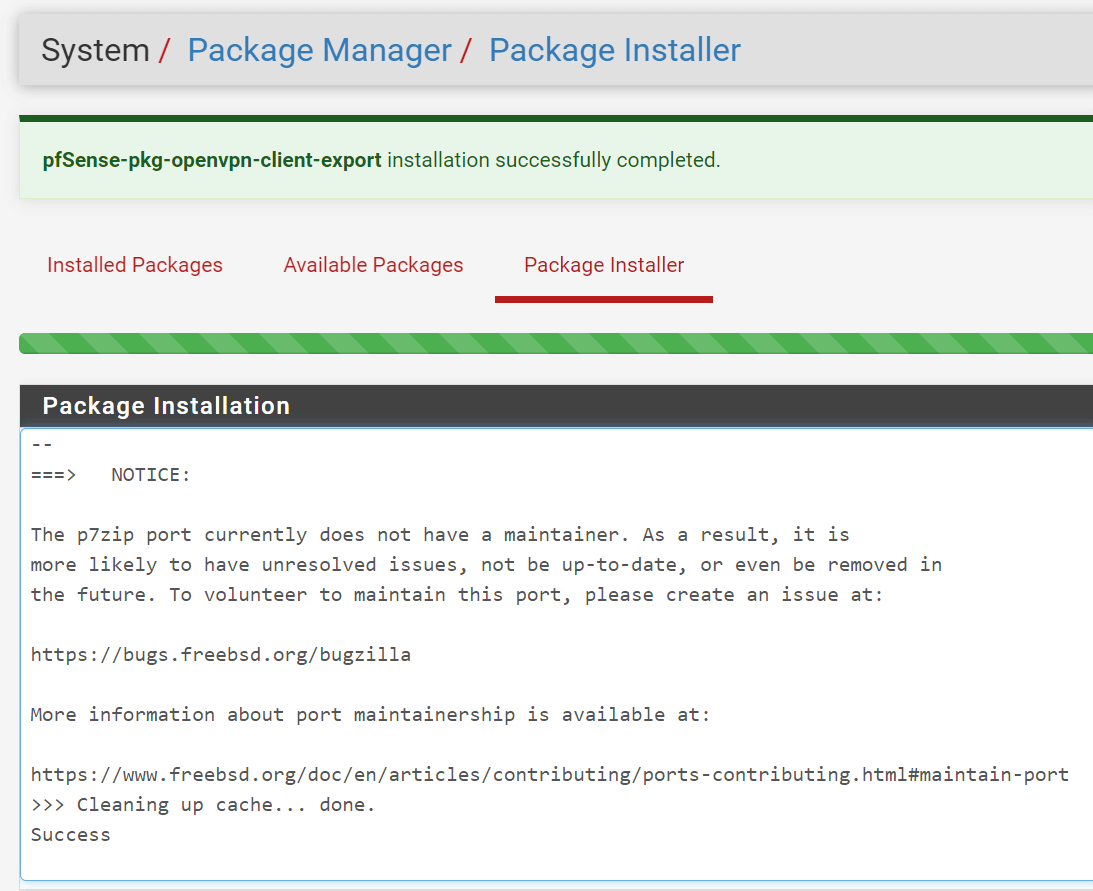
Figure 4. openvpn-client-export package installation on pfSense finished successfully
- The package will be installed and you should get notified if it was installed successfully.
2. Creating a Certificate Authority
OpenVPN needs certificates to protect the VPN service for encryption and authentication. On pfSense, the first thing you need to do is set up a Certificate Authority. Every option on this page must be selected, and all forms must be completed correctly in order to continue. You can skip this step if you already have one.
You may create a new Certificate Authority by following the steps below:
- Navigate to
System→Certificate Manager→CAs.

Figure 5. Managing Certificate Authorities on pfSense
-
Click on
+Addto create a new one. -
Fill in the
Descriptive Namefield for the Certificate Authority, such aspfSenseOpenVPNCA.
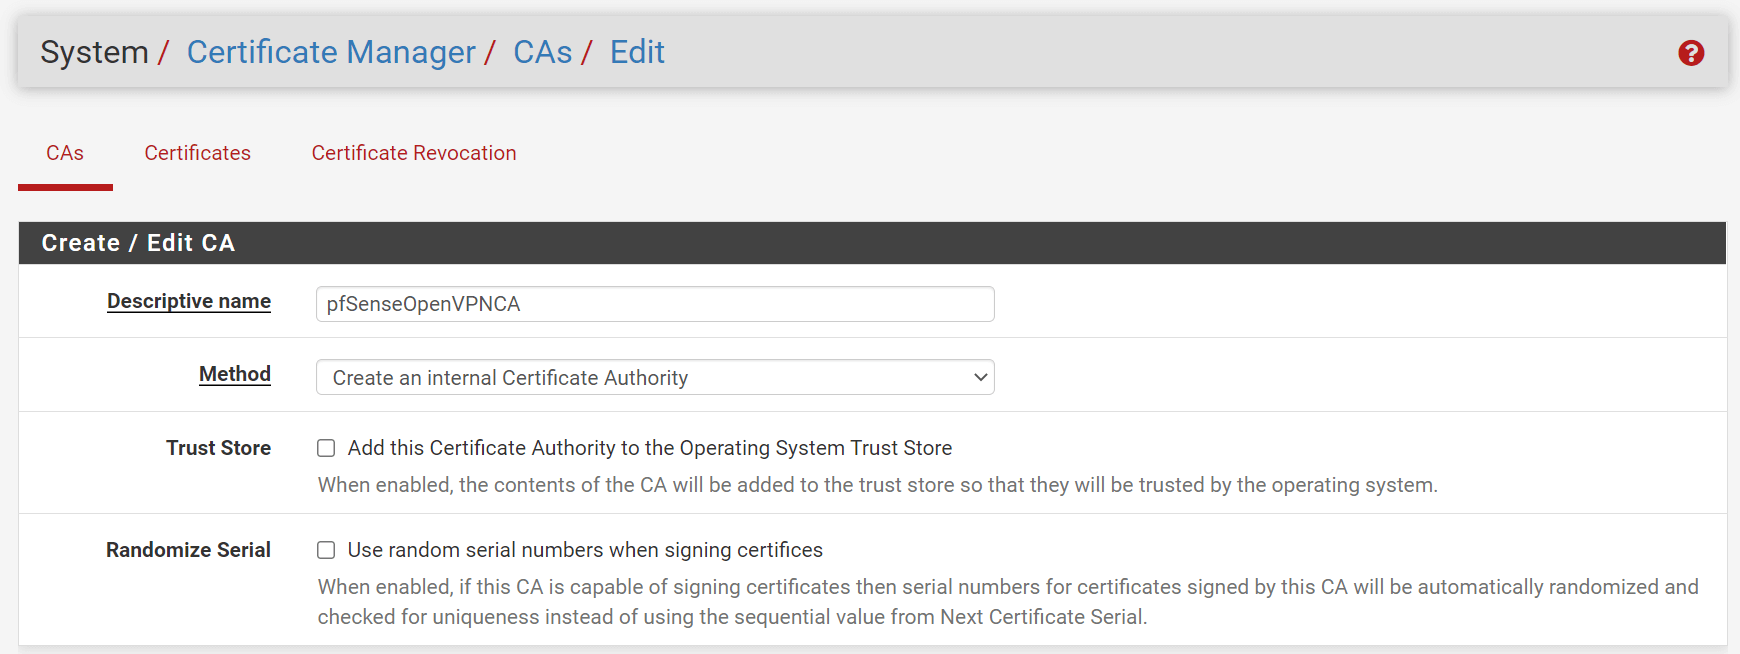
Figure 6. Creating a Certificate Authority for OpenVPN on pfSense
-
Set
Country Code, such asUS. -
Set
State, such asCalifornia. -
Set
City. -
Set
Organization, such asMyCompany -
You may leave other settings as default.
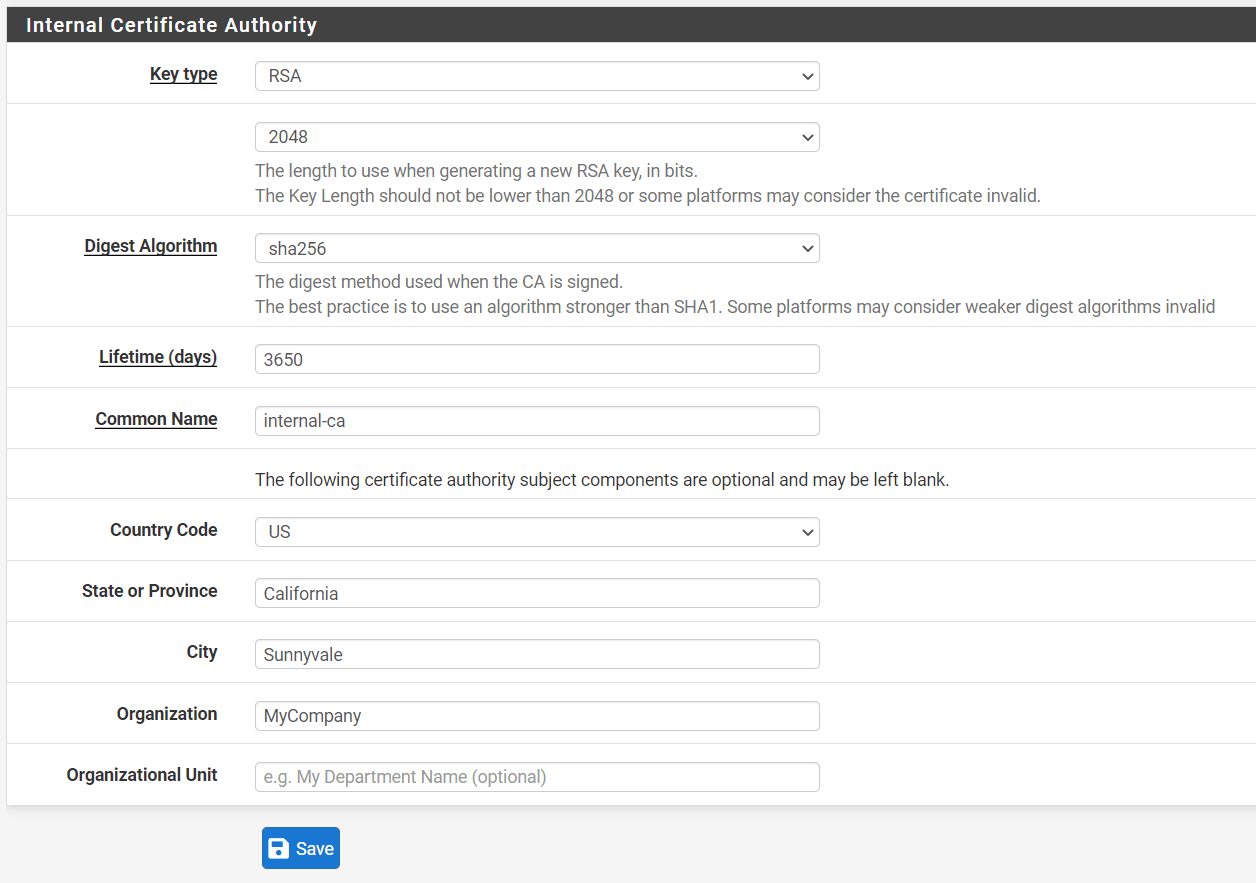
Figure 7. Setting Internal Certificate Authority options on pfSense
- Click
Save.
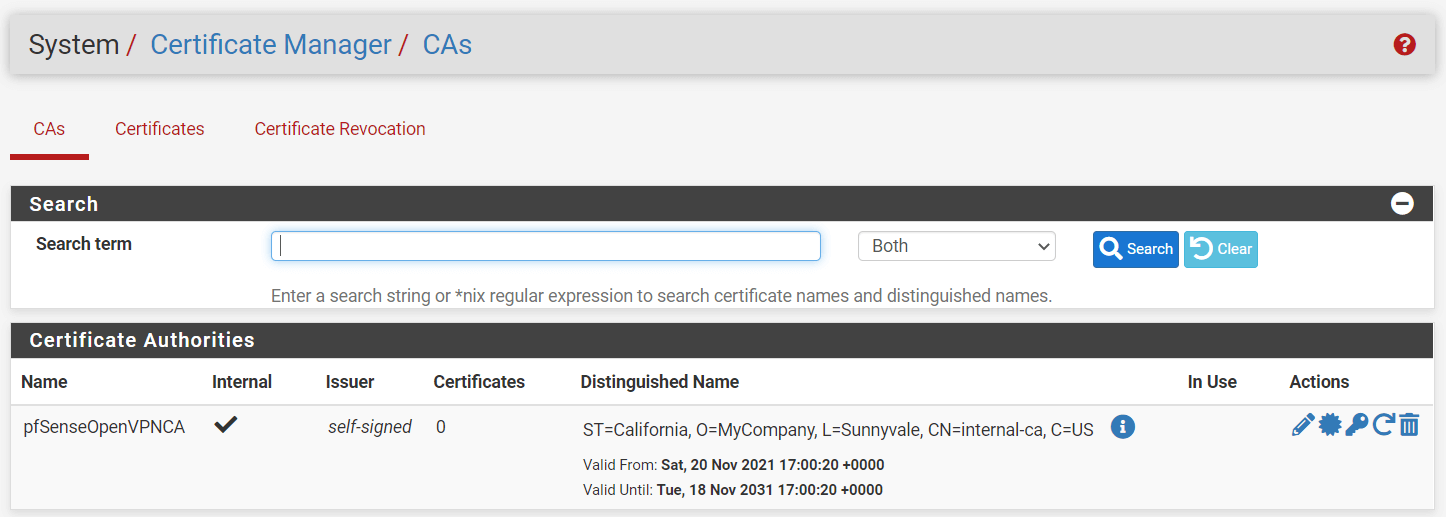
Figure 8. Created Certificate Authorities on pfSense
3. Configure OpenVPN on pfSense using the OpenVPN Wizard
You can easily configure OpenVPN using the wizard. It sets up all of the prerequisites for an OpenVPN Server. To start the OpenVPN Wizard, follow the steps below:
-
Click
VPNon pfSense web UI. -
Select
OpenVPN. -
Click
Wizards.

Figure 9. Starting OpenVPN Wizard
By the end of the wizard, you'll have a fully functional server that's ready for clients.
To complete the wizard, you may follow the steps outlined below.
1. Selecting Authentication Type
You can choose a user authentication method on the first screen of the OpenVPN Remote Access server wizard. The following are the options for Authentication Backend Type:
-
Local User Access: You may manage VPN users using the pfSense local user manager.
-
LDAP: You may manage user access using Windows Active Directory Services.
-
RADIUS: You may manage users on an external RADIUS authentication server.
In this tutorial, we will use Local User Access for authentication. Since per-user certificates may be simply used and managed in the pfSense GUI when using Local User Access. This is far more secure, but it may be less convenient than utilizing a central authentication system, depending on the number of people who will access the service.
Per-user certificates cannot be utilized with LDAP or RADIUS without manually generating them.
The Local User Access option is the equivalent of Remote Access (SSL/TLS + User Auth), while LDAP and RADIUS are equivalent to Remote Access (User Auth).
To manage users, passwords, and certificates on the pfSense® firewall,
-
Click
Local User Access -
Click the
Nextbutton to proceed with the wizard.
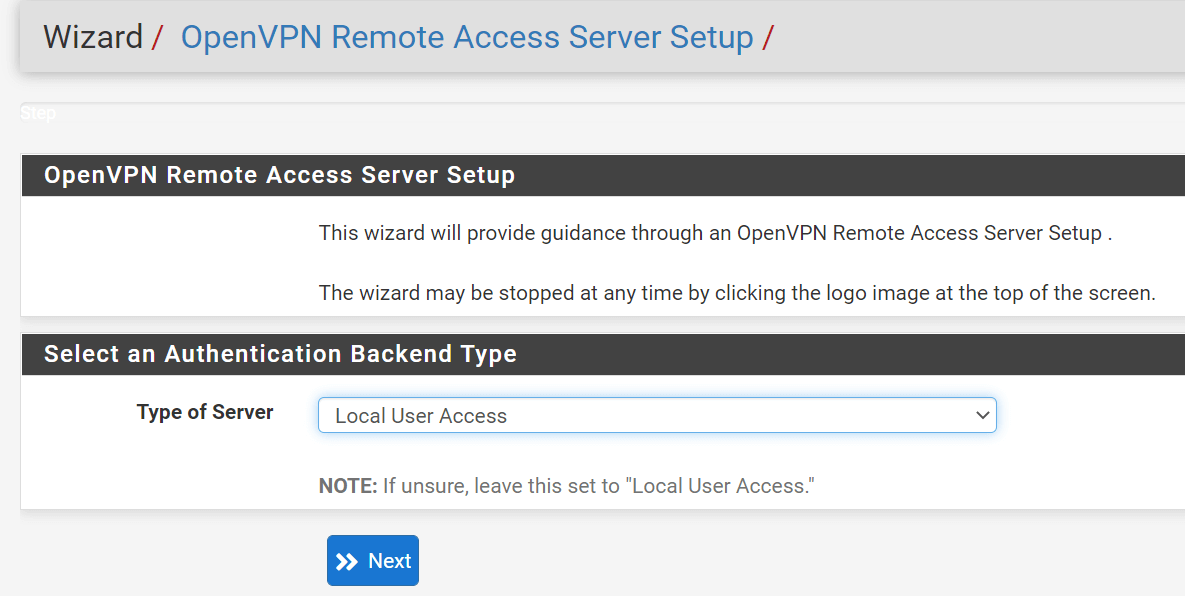
Figure 10. Selecting Local User Access for Authentication Backend Type
2. Selecting Certificate Authority
Select the Certificate Authority you have previously created, in our example pfSenseOpenVPNCA, and then click the Next button.
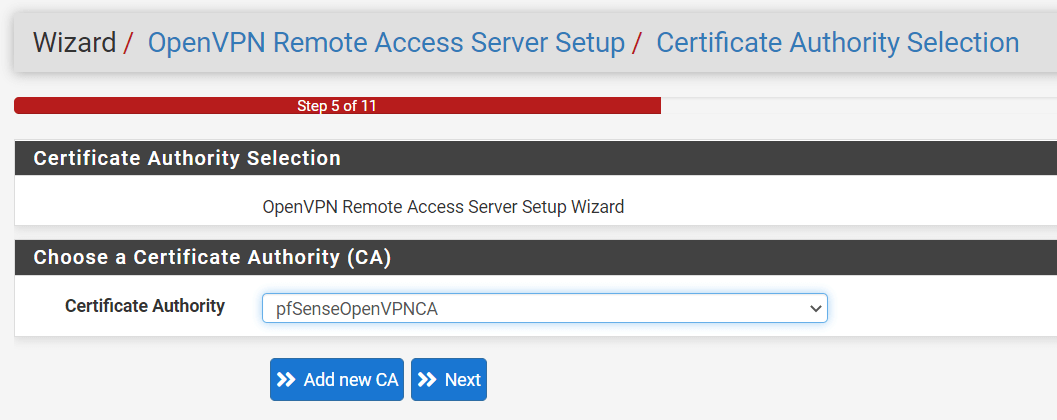
Figure 11. Selecting Certificate Authority on pfSense
3. Creating a Server Certificate
You may create a new Server Certificate that clients will use to verify the identity of the server when connecting to it by following the steps below:
-
You may fill in the
Descriptive Namefield for the server certificate, such asmypfSense.mycompany.com. Using the hostname of the node is a common choice for a server certificate. -
Leave other settings as default.
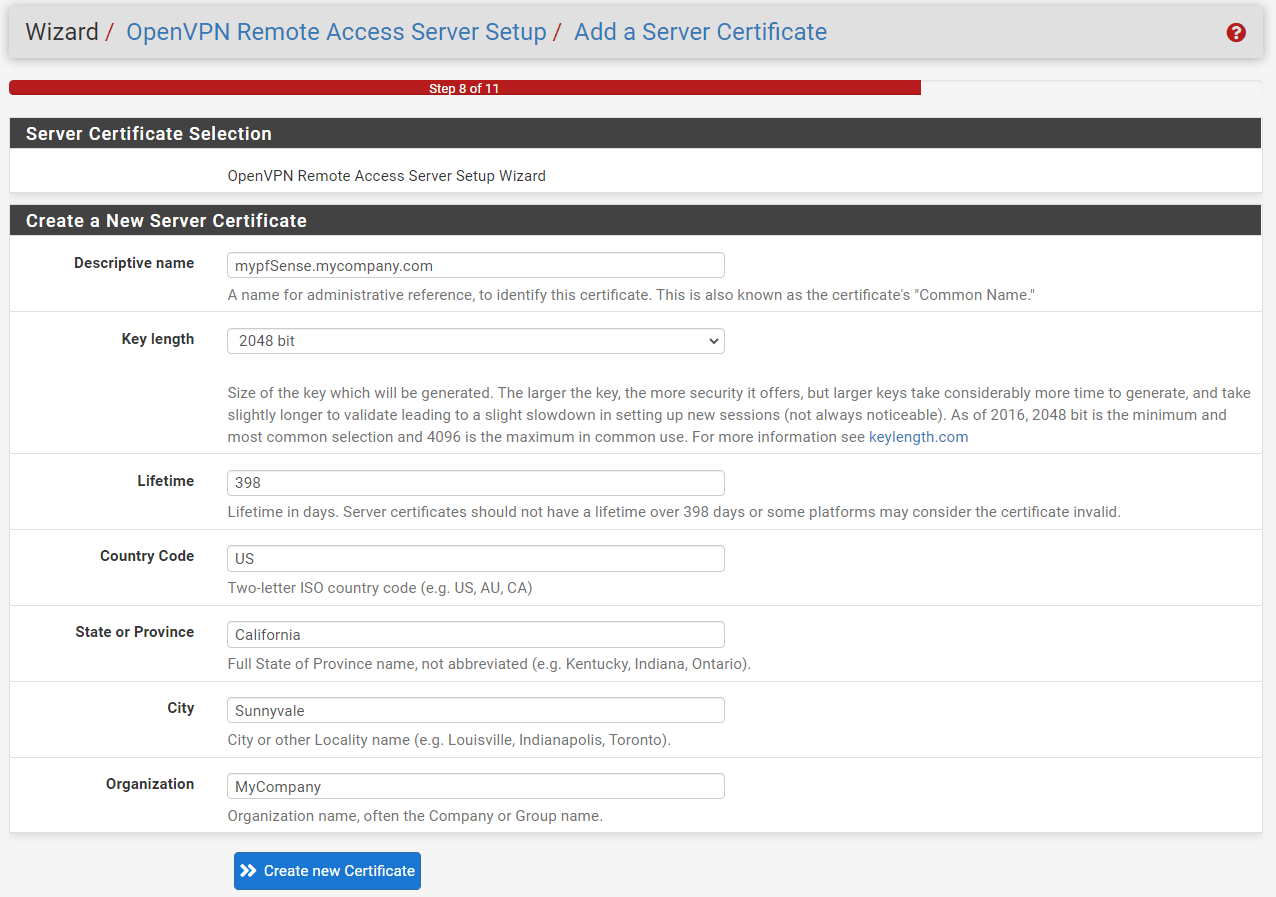
Figure 12. Creating Server Certificate on pfSense
- Click
Create new Certificate.
4. Server Setup
The settings on this phase of the wizard configure both the OpenVPN server's behavior and the parameters that are sent on to clients. You may complete the OpenVPN server setup by following the instructions given below:
1. General OpenVPN Server Information
You may set the options in the General OpenVPN Server Information as given below:
-
Interface: Set the Interface as
WANbecause the inbound connections will come from the WAN. -
Protocol: You may set the Protocol as
UDP on IPv4 only. Although UDP is quicker than TCP, it is less dependable due to the fact that packet delivery is not guaranteed. TCP has a higher level of reliability, although it can be slower due to the protocol overhead. -
Local Port: You leave it as default, 1194.
-
Description: You may type a descriptive name, such as
mypfSense OpenVPN Clients

Figure 13. General OpenVPN Server Information settings on pfSense
2. Cryptographic Settings
You may leave all cryptographic settings as default.
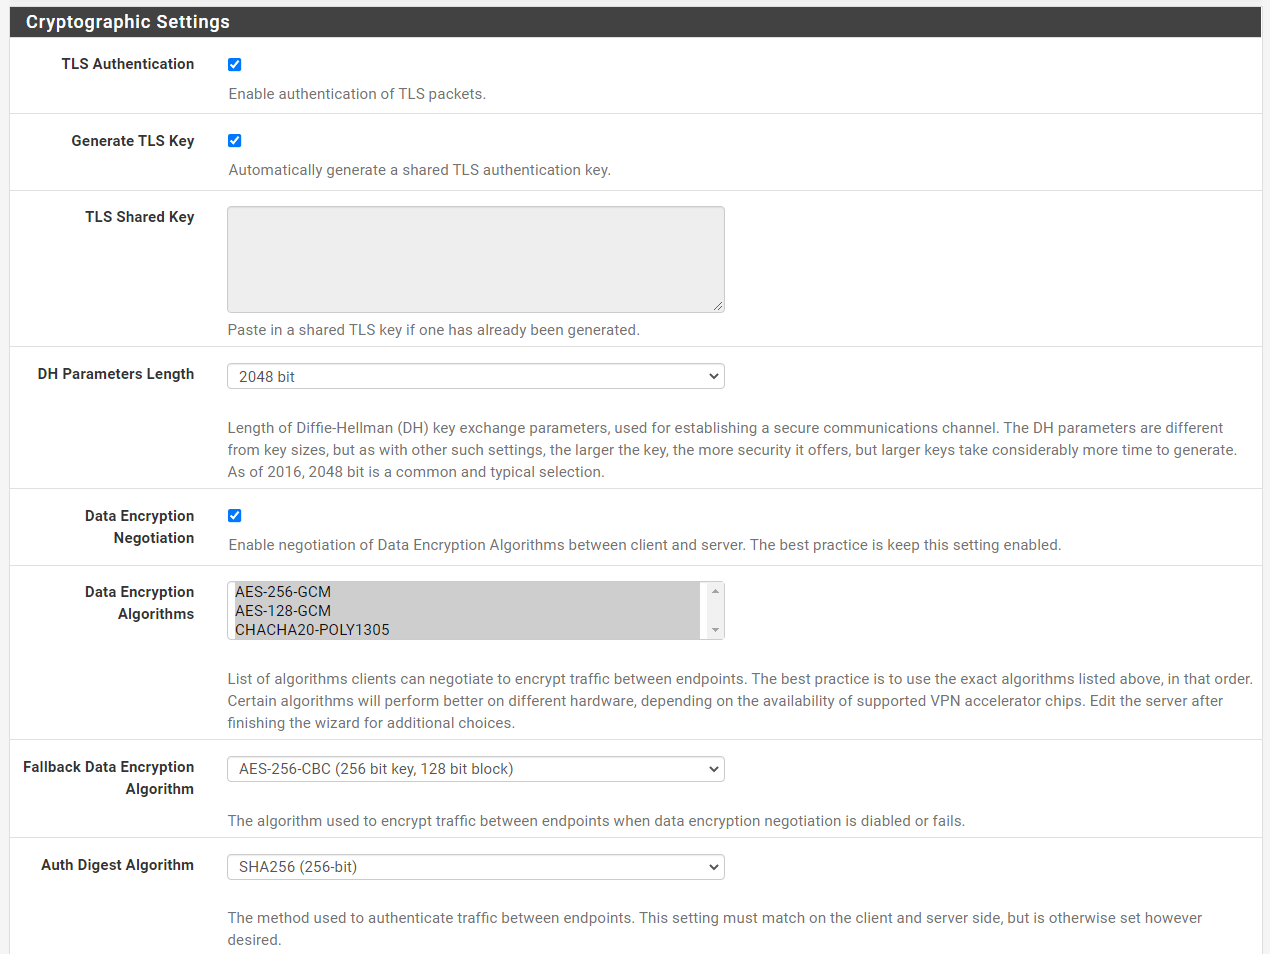
Figure 14. Cryptographic settings
3. Tunnel Settings
You may set the options in the Tunnel Setings as given below:
-
Tunnel Network: As your Tunnel Network, select an IP range that is not currently in use on your network. If you use a subnet that is already in use, PfSense will complain. So, if your network address range is 192.168.0.0/24, choose 192.168.10.0/24 as your tunnel network. This is the IP address range that will be used by your VPN clients. For example, your first VPN client will have an IP address of 192.168.10.2.
-
Redirect Gateway: You may select this option if you want to force clients to access the Internet through your firewall.
-
Local Network: The Local Network address is the address of your internal network(LAN). If you do not want to be able to connect to your VPN from your local network, leave this field blank. In our case, we will enter 10.1.1.0/24.
-
Concurrent Connections: Specifies the maximum number of clients that can connect to this OpenVPN server instance at the same time. This is a global restriction that applies to all connected clients, not a per-user limit.
-
Leave other options as default.
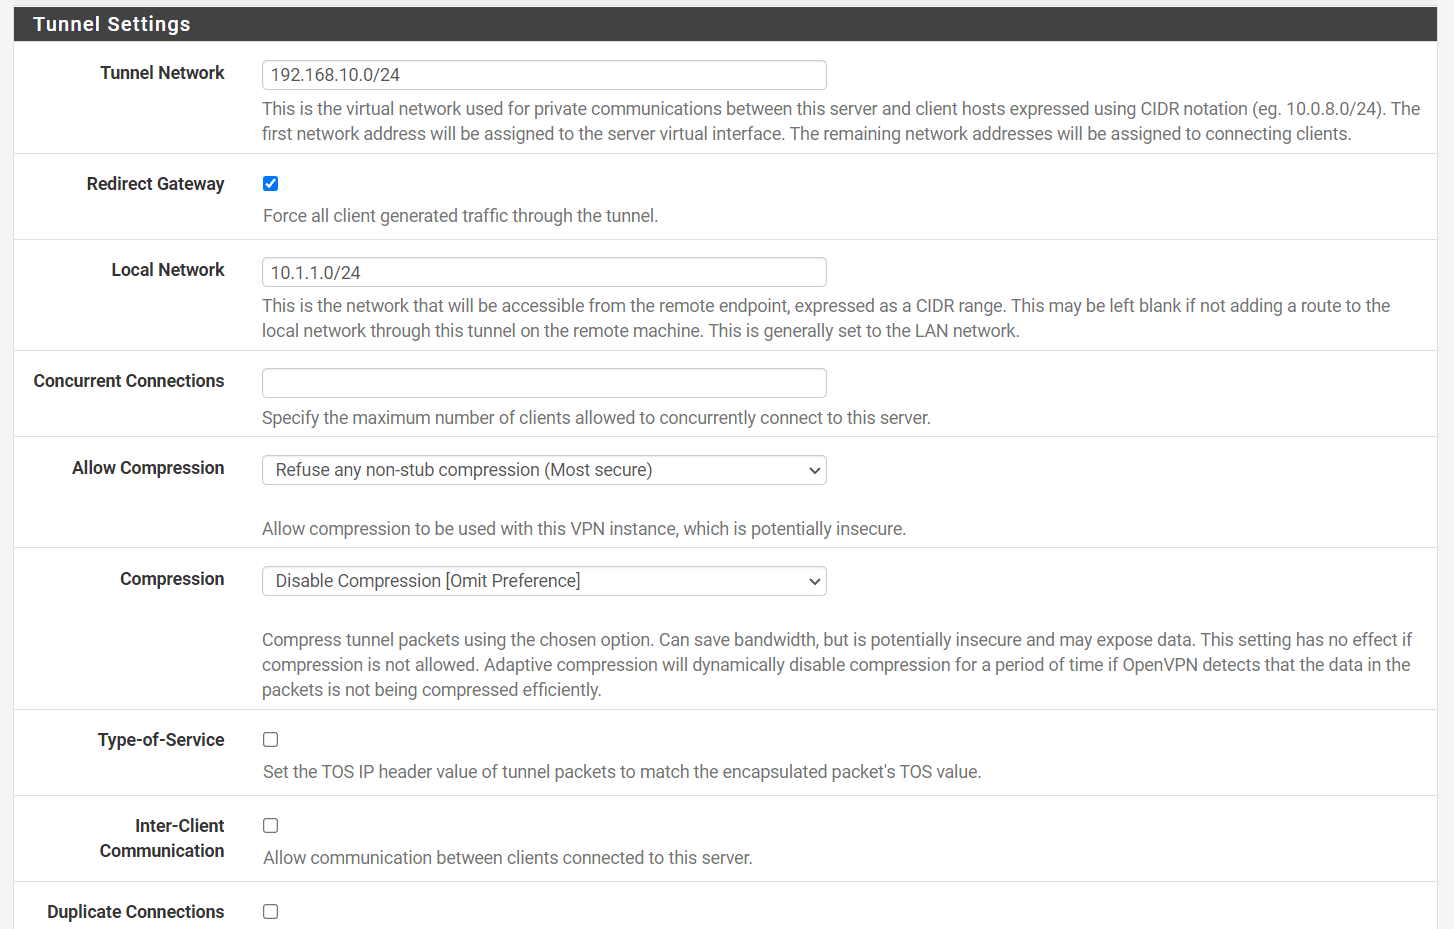
Figure 15. OpenVPN Tunnel Settings on pfSense
4. Client Settings
You may set the options in the `Client Settings as given below:
-
DNS Default Domain: You may enter your domain here, for example,
mycompany.com -
DNS Servers: You may set the 'DNS Server 1' option to make your local pfSense firewall a DNS server for your connected clients. So that they can resolve internal network names. In our example, we set it to
10.1.1.1. -
NTP Servers: You may use your local pfSense firewall, here 10.1.1.1, as an NTP server to synchronize VPN client clocks.
-
NetBIOS Options: You may check
Enable NetBIOS over TCP/IP, if your clients need access to Windows shares behind the VPN. -
Leave other options as default.
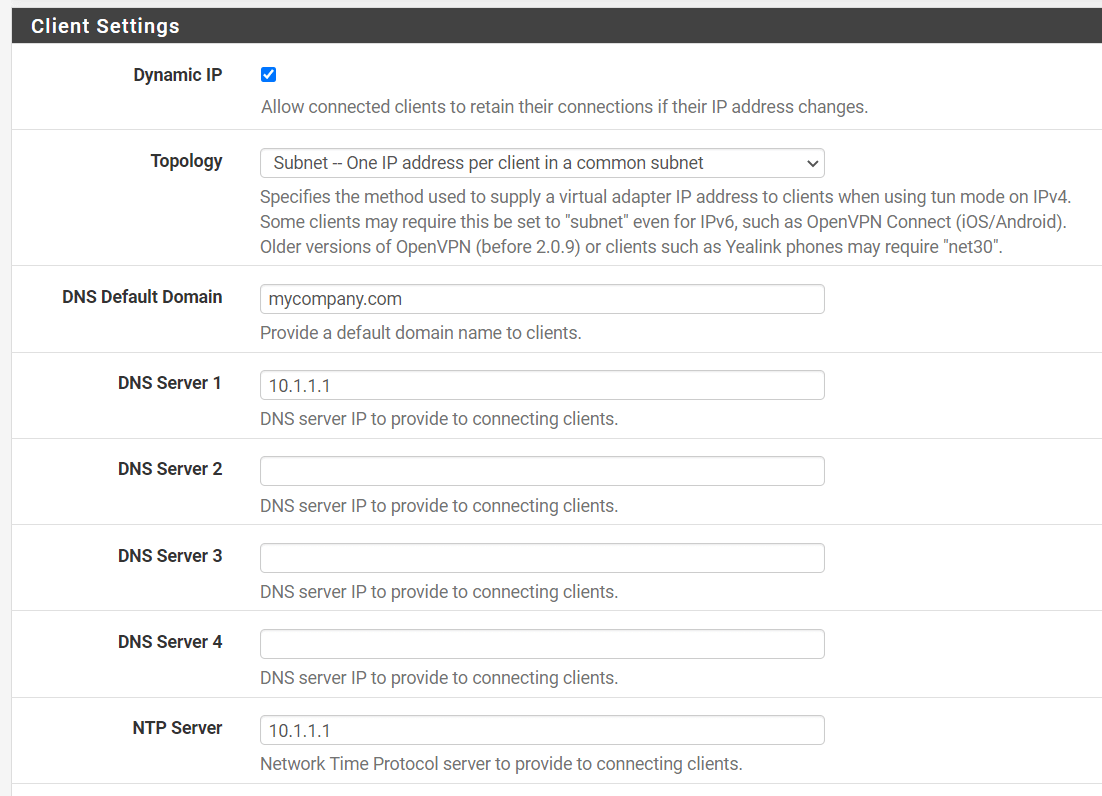
Figure 16. OpenVPN Client Settings on pfSense
- Click the
Nextbutton at the bottom of the page.
5. Firewall Rules
By default, all traffic connecting to VPNs or flowing through VPN tunnels is banned. This phase of the wizard automatically adds firewall rules to allow traffic to connect to the VPN and also to allow connected clients to pass traffic across the VPN.
On the Firewall Rule Configuration page check both checkmarks under the Traffic from clients to server and Traffic from clients through VPN panes to create the appropriate firewall rules.
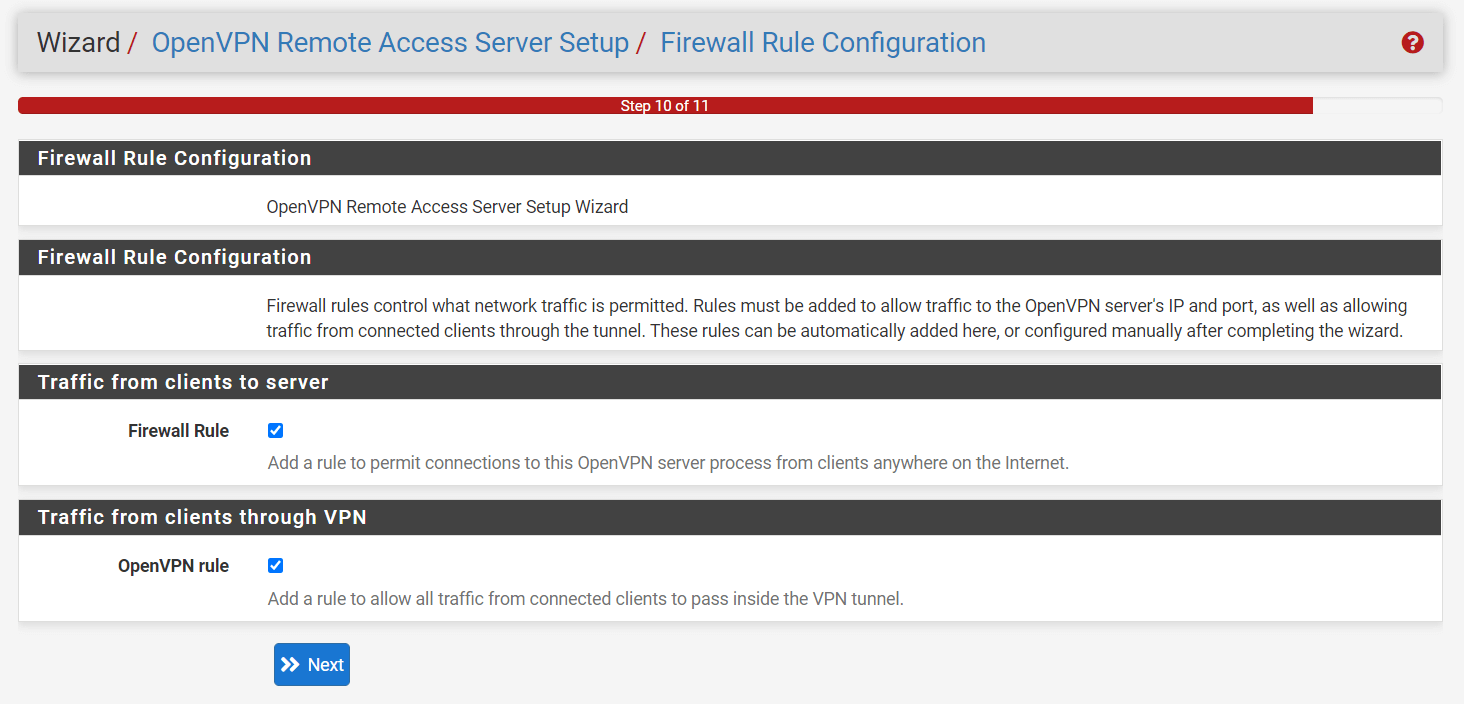
Figure 17. Firewall Rule Configuration for OpenVPN on pfSense
Then, click the Next button at the bottom of the page.
6. Finishing the Setup

Figure 18. Completing the OpenVPN Configuration Wizard
Finally, click Finish to complete the installation of the pfSense OpenVPN Server.
You should now have a configured OpenVPN server, a newly created WAN Firewall Rule, and an OpenVPN tab under Firewall rules with the OpenVPN rule configured. Examples below.

Figure 19. OpenVPN Servers on pfSense
Your firewall rules for WAN and OpenVPN interfaces should be similar to the rules given in figure 20 and 21.
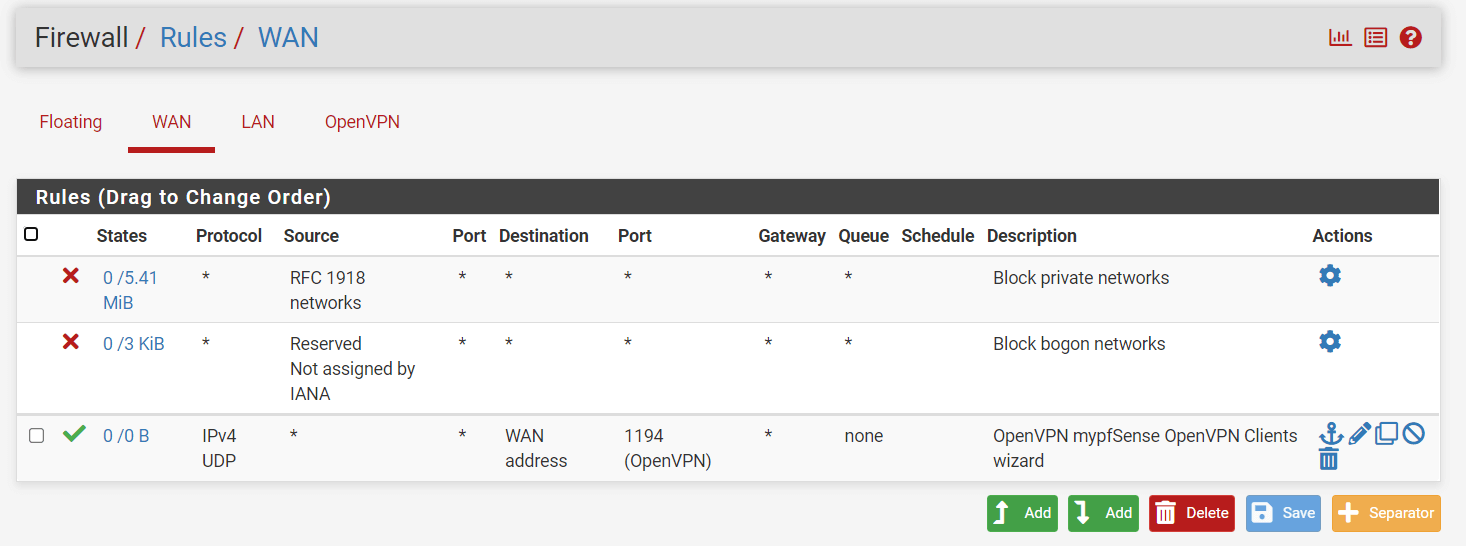
Figure 20. OpenVPN WAN Interface Firewall Rules on pfSense

Figure 21. OpenVPN Interface Firewall Rules on pfSense
4. Creating a VPN User
This is the final step in configuring OpenVPN on pfSense from the pfSense server side. VPN user settings should match the config you created under Client Settings during the OpenVPN client configuration.
To add a new user, you may follow the steps given below:
- Navigate to
System→User Manager.

Figure 22. Managing Local Users on pfSense
-
Click on
+Addbutton. -
Give your user a
UsernameandPassword
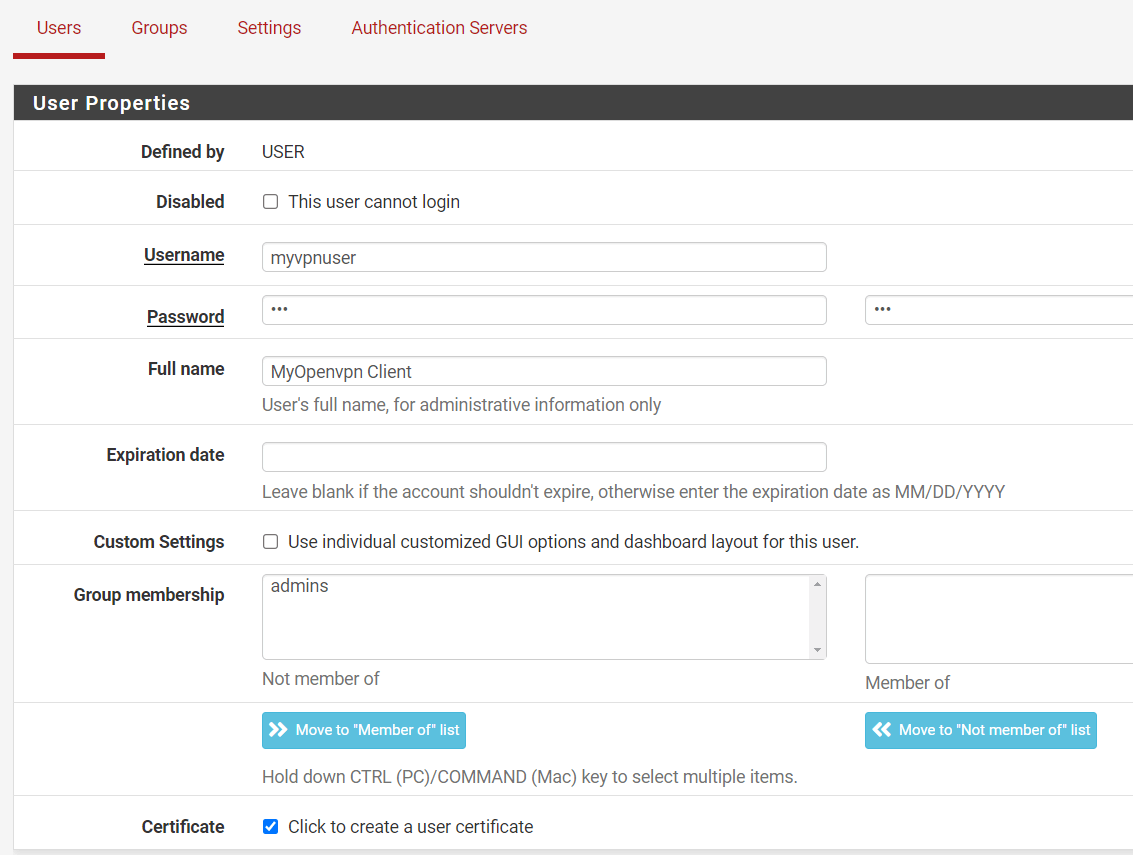
Figure 23. Setting local user properties on pfSense
-
Make sure to check
Click to create a user certificate. -
You may fill in the
Descriptive Namefield for the user certificate. -
Select the correct
Certificate Authority, such aspfSenseOpenVPNCAthat you had created earlier. -
Leave other settings as default.
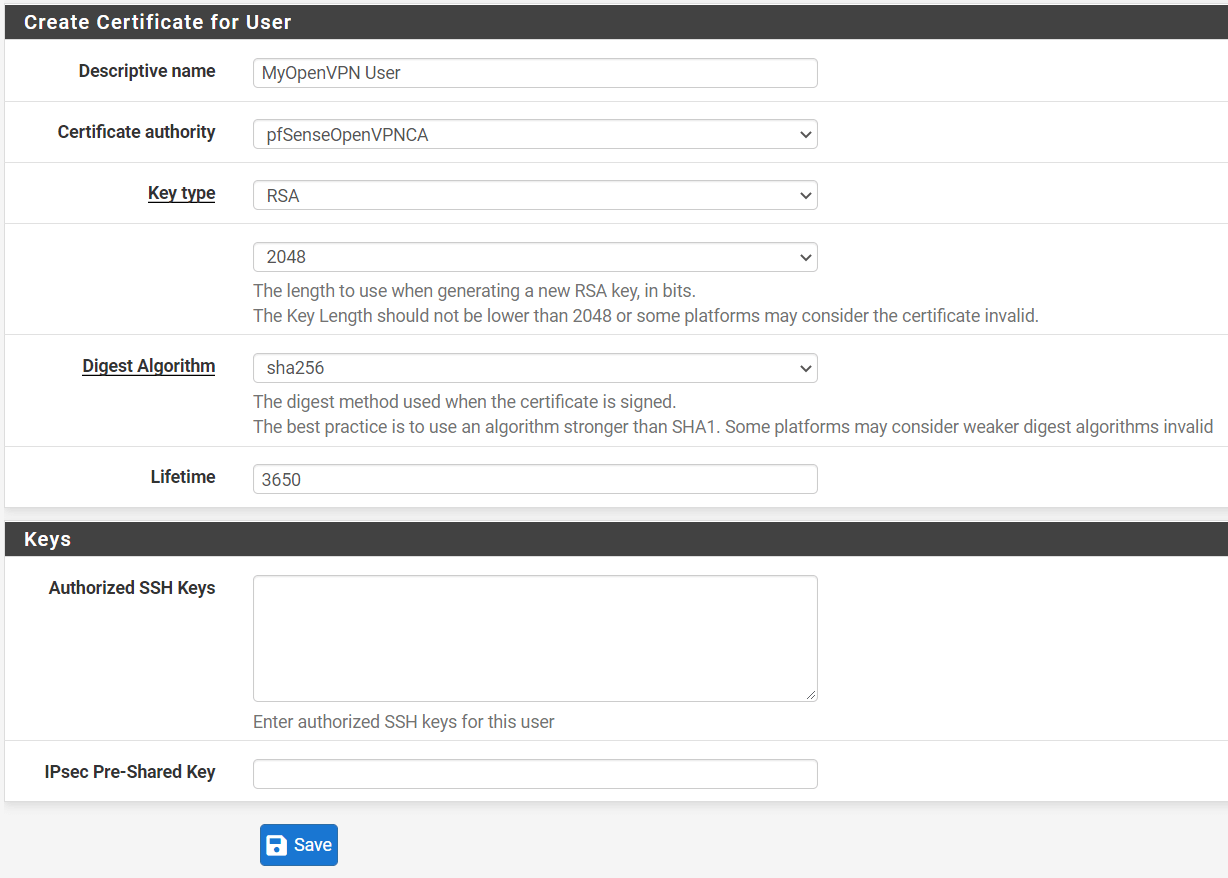
Figure 24. Creating certificate for OpenVPN User on pfSense
- Click on
Savebutton.

Figure 25. Local users on pfSense
5. pfSense OpenVPN Client Export
To download the OpenVPN Client Configuration,
- You may navigate to
VPN->OpenVPN->Client Exportmenu item.

Figure 26. OpenVPN Client Export on pfSense
-
Scroll down to the
OpenVPN Clientspane. If everything is set up successfully, you should be given several download options. -
Click on the Windows installer button to download the OpenVPN client configuration file for Windows client PC. Windows, Mac, Android, and iOS are among the operating systems and clients supported by the
Client Exporttool. You may download the proper client configuration file as you need depending on the client type.

Figure 27. OpenVPN Client configuration files to download from pfSense
How do I connect to pfSense OpenVPN?
In this section, we will explain how to connect the pfSense OpenVPN server using Windows PC or an Android device.
Connecting from a Windows PC client
You can easily connect your pfSense OpenVPN server from a remote Windows client by following the instructions given below:
-
Send the OpenVPN installer file you have downloaded from your pfSense software UI in the previous step.
-
Install the OpenVPN installer, leaving everything at the default settings and agreeing to everything with
Yes. Installing a TAP network driver may be required; do so if prompted. -
After finishing OpenVPN installation on Windows client machine, A small monitor icon with a locker on it appears in your taskbar. Right-click on it and select
Connect.
Figure 28. OpenVPN client icon on Windows 10 taskbar
-
Enter your
VPN UsernameandPassword. Click onOKto connect. -
You will be notified on the bottom right of the screen and the OpenVPN icon on the taskbar will change to
greenwhen the connection was successful.
Connecting from an Android Device
You can easily connect your pfSense OpenVPN server from an Android client by following the instructions given below:
-
Download the
Inline Android Client Configurationfile fromVPN->OpenVPN->Client Exporton pfSense GUI. -
Send the client configuration file to your Android device.
-
Install the official OpenVPN application from the Google Play Store on your Android device.
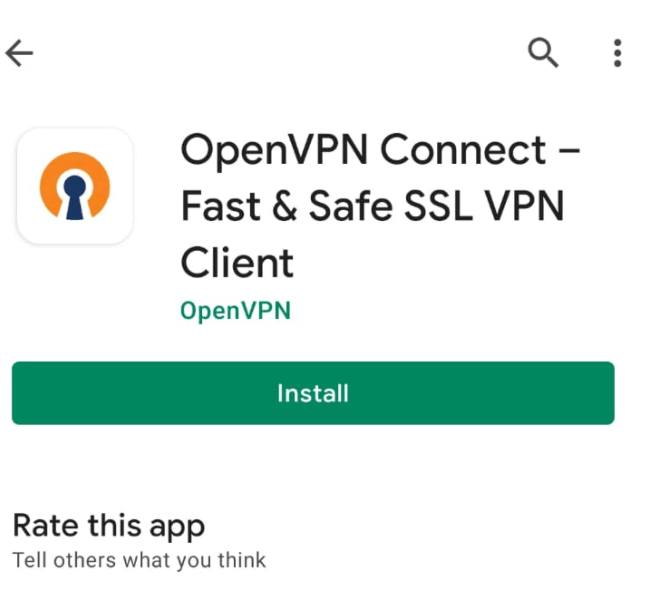
Figure 29. Installing OpenVPN Connect client on an Android
- Launch the application and import the configuration file by selecting the file under the
FILEtabImport Profilemenu.
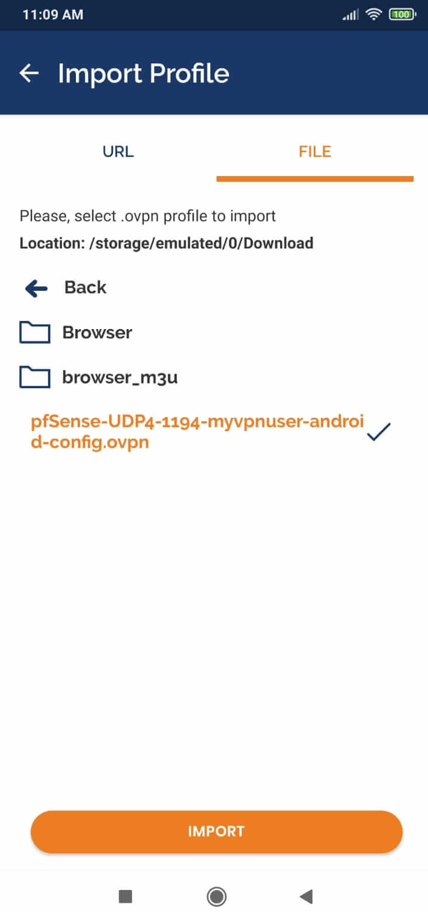
Figure 30. Importing OpenVPN client configuration on an Android 5. Enter the VPN user name.
-
Selecting the
Connect after importoption. -
Tap on
ADDbutton.
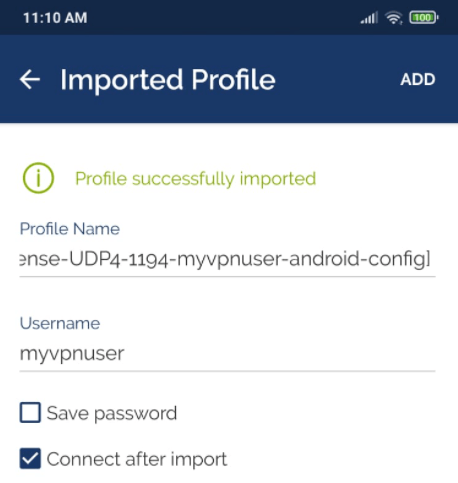
Figure 31. Importing OpenVPN client configuration on an Android-2
- Enter the VPN password to connect to the VPN server. Then, tap on
OK.
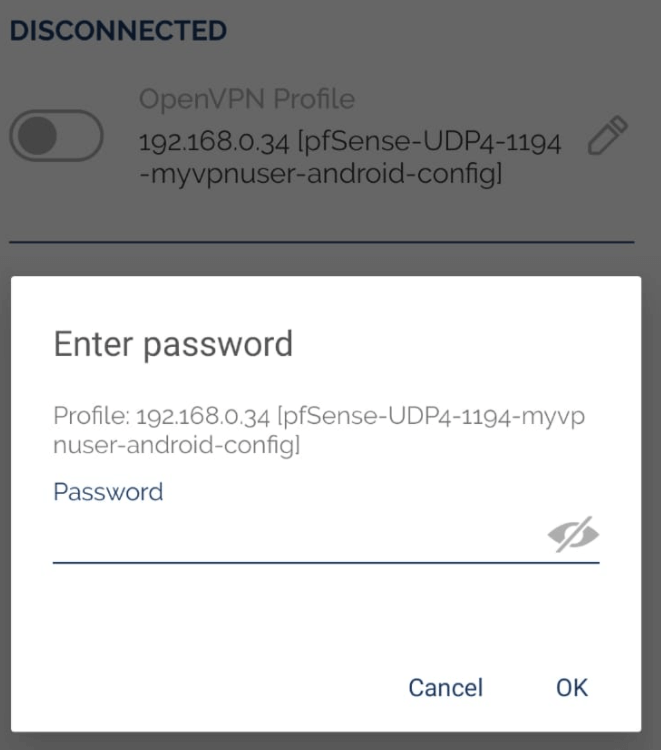
Figure 32. Entering VPN password
- Now, you should be connected to a VPN server from your Android device.
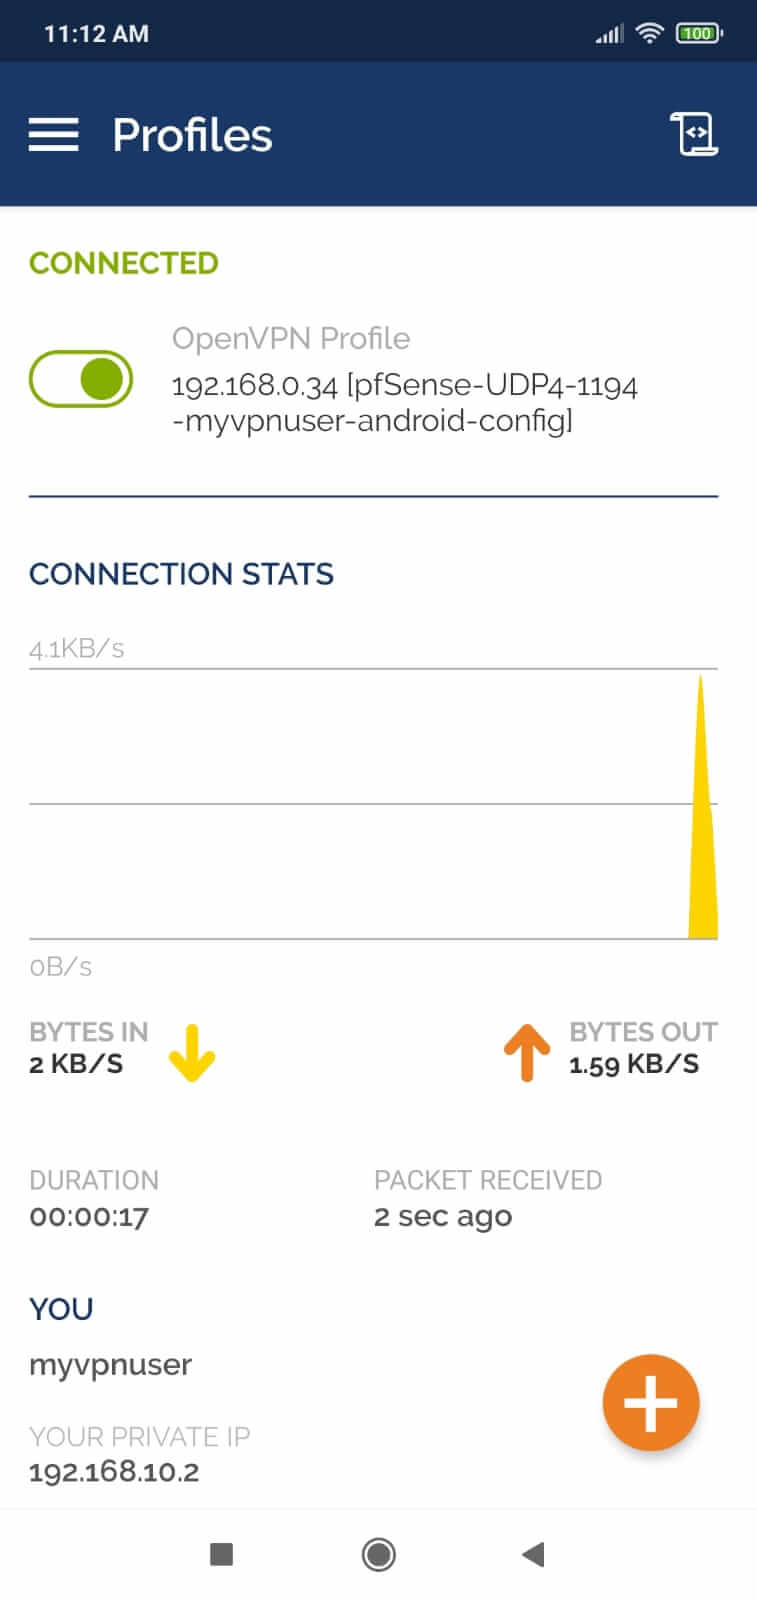
Figure 33. Connected OpenVPN Client on Android
- To disconnect from the VPN, you may tap on the green toggle button at the top.
Verifying the VPN connection
OpenVPN server configuration and client configurations are completed. To test the configurations, you may follow the steps given below.
- Viewing VPN connections on pfSense: Navigate to the
Status->OpenVPNon your pfSense web UI. You should be able to see information about the connected VPN clients. The following details are displayed:- Status of the OpenVPN server
- Vpn username
- the VPN IP address of the connected client
- the real IP address of the connected client
- the time since the last connection
- the amount of data transferred and received
- Cipher Also, you may perform the following task:
- Kill the VPN client connection by using the
Xbutton at the end of the VPN client connection. - Restart or stop the OpenVPN service by using the Action buttons at the bottom of the pane.

Figure 34. OpenVPN status on pfSense
- Ping Test: You should be able to successfully ping your OpenVPN server from the client and vice versa:
ping 192.168.10.1
- Internal Networks Access Test: Since we allow VPN clients access to the internal networks behind the firewall without any restrictions, they should be able to access anywhere in your LAN. For example, you should be able to successfully ping a device on your LAN from the client and vice versa.
Is OpenVPN free?
Yes. The OpenVPN Community Edition is an open-source project and free to use if you keep to the software license agreement. However, OpenVPN Inc. also has a commercial product that is called Access Server and it is not free. There are significant differences between these VPN solutions. While Access Server is based on the open-source OpenVPN application, it provides much more features. The primary differences between open-source OpenVPN Community Edition and commercial OpenVPN Access Server are given in the table below.
| Features | OpenVPN CE open source | OpenVPN Access Server |
|---|---|---|
| TLS encrypted VPN tunnels | Available | Available |
| Configurable encryption ciphers | Available | Available |
| LDAP support included | N/A | Available |
| RADIUS support included | N/A | Available |
| Multi-daemon mode | N/A | Available |
| Graphical web interface | N/A | Available |
| Automated certificate creation | N/A | Available |
| Pre-configured client software | N/A | Available |
| Easy deployment | N/A | Available |
| Pre-built virtual appliances | N/A | Available |
| Simple user management | N/A | Available |
| High-availability failover solution | N/A | Available |
| Multi-node cluster solution | N/A | Available |
| Easy scalability | N/A | Available |
