Managing Policies
You can easily configure your Zenarmor policies on the Zenconsole (Centralized Cloud Management Portal) by completing the tasks explained in this guide.
Policy Actions
Based on your organization's information security standards, a Zenarmor policy defines how your organization's firewalls should process inbound and outbound network traffic for certain IP addresses, address ranges, users, user groups, protocols, applications, content categories, and more.
You may view or manage your policies on your firewall on the Policies page.
To view the Policies page of a node:
-
Select a node on Zenconsole.
-
Click Policies on the left sidebar menu.

Figure 1. Policies page of a node
On the Policies page of a node, you can perform the following management tasks:
-
Import policies
-
View the list of the policies
-
View the status of the policies
-
Enable/Disable a policy
-
Edit a policy
-
Clone a policy
-
Delete a policy
-
Create a new policy
-
Create a new centralized policy
-
Reorder the policies
-
Synchronize a policy with a firewall
-
Create a restore point (backup node policies)
-
Restore a node to a point (restore node policies)
-
Delete a restore point (delete backup of node policies)
Importing Policies
When you view the policies of a node for the first time, all of your local policies defined on the node are imported into the Cloud Portal automatically.
If you have not created any new policies yet, only one policy called Default will be imported.

Figure 2. Importing policies automatically
Viewing Policies List & Status of the Policies
All of the defined policies on your firewall are listed on the Policies page as well as the status of the policies.
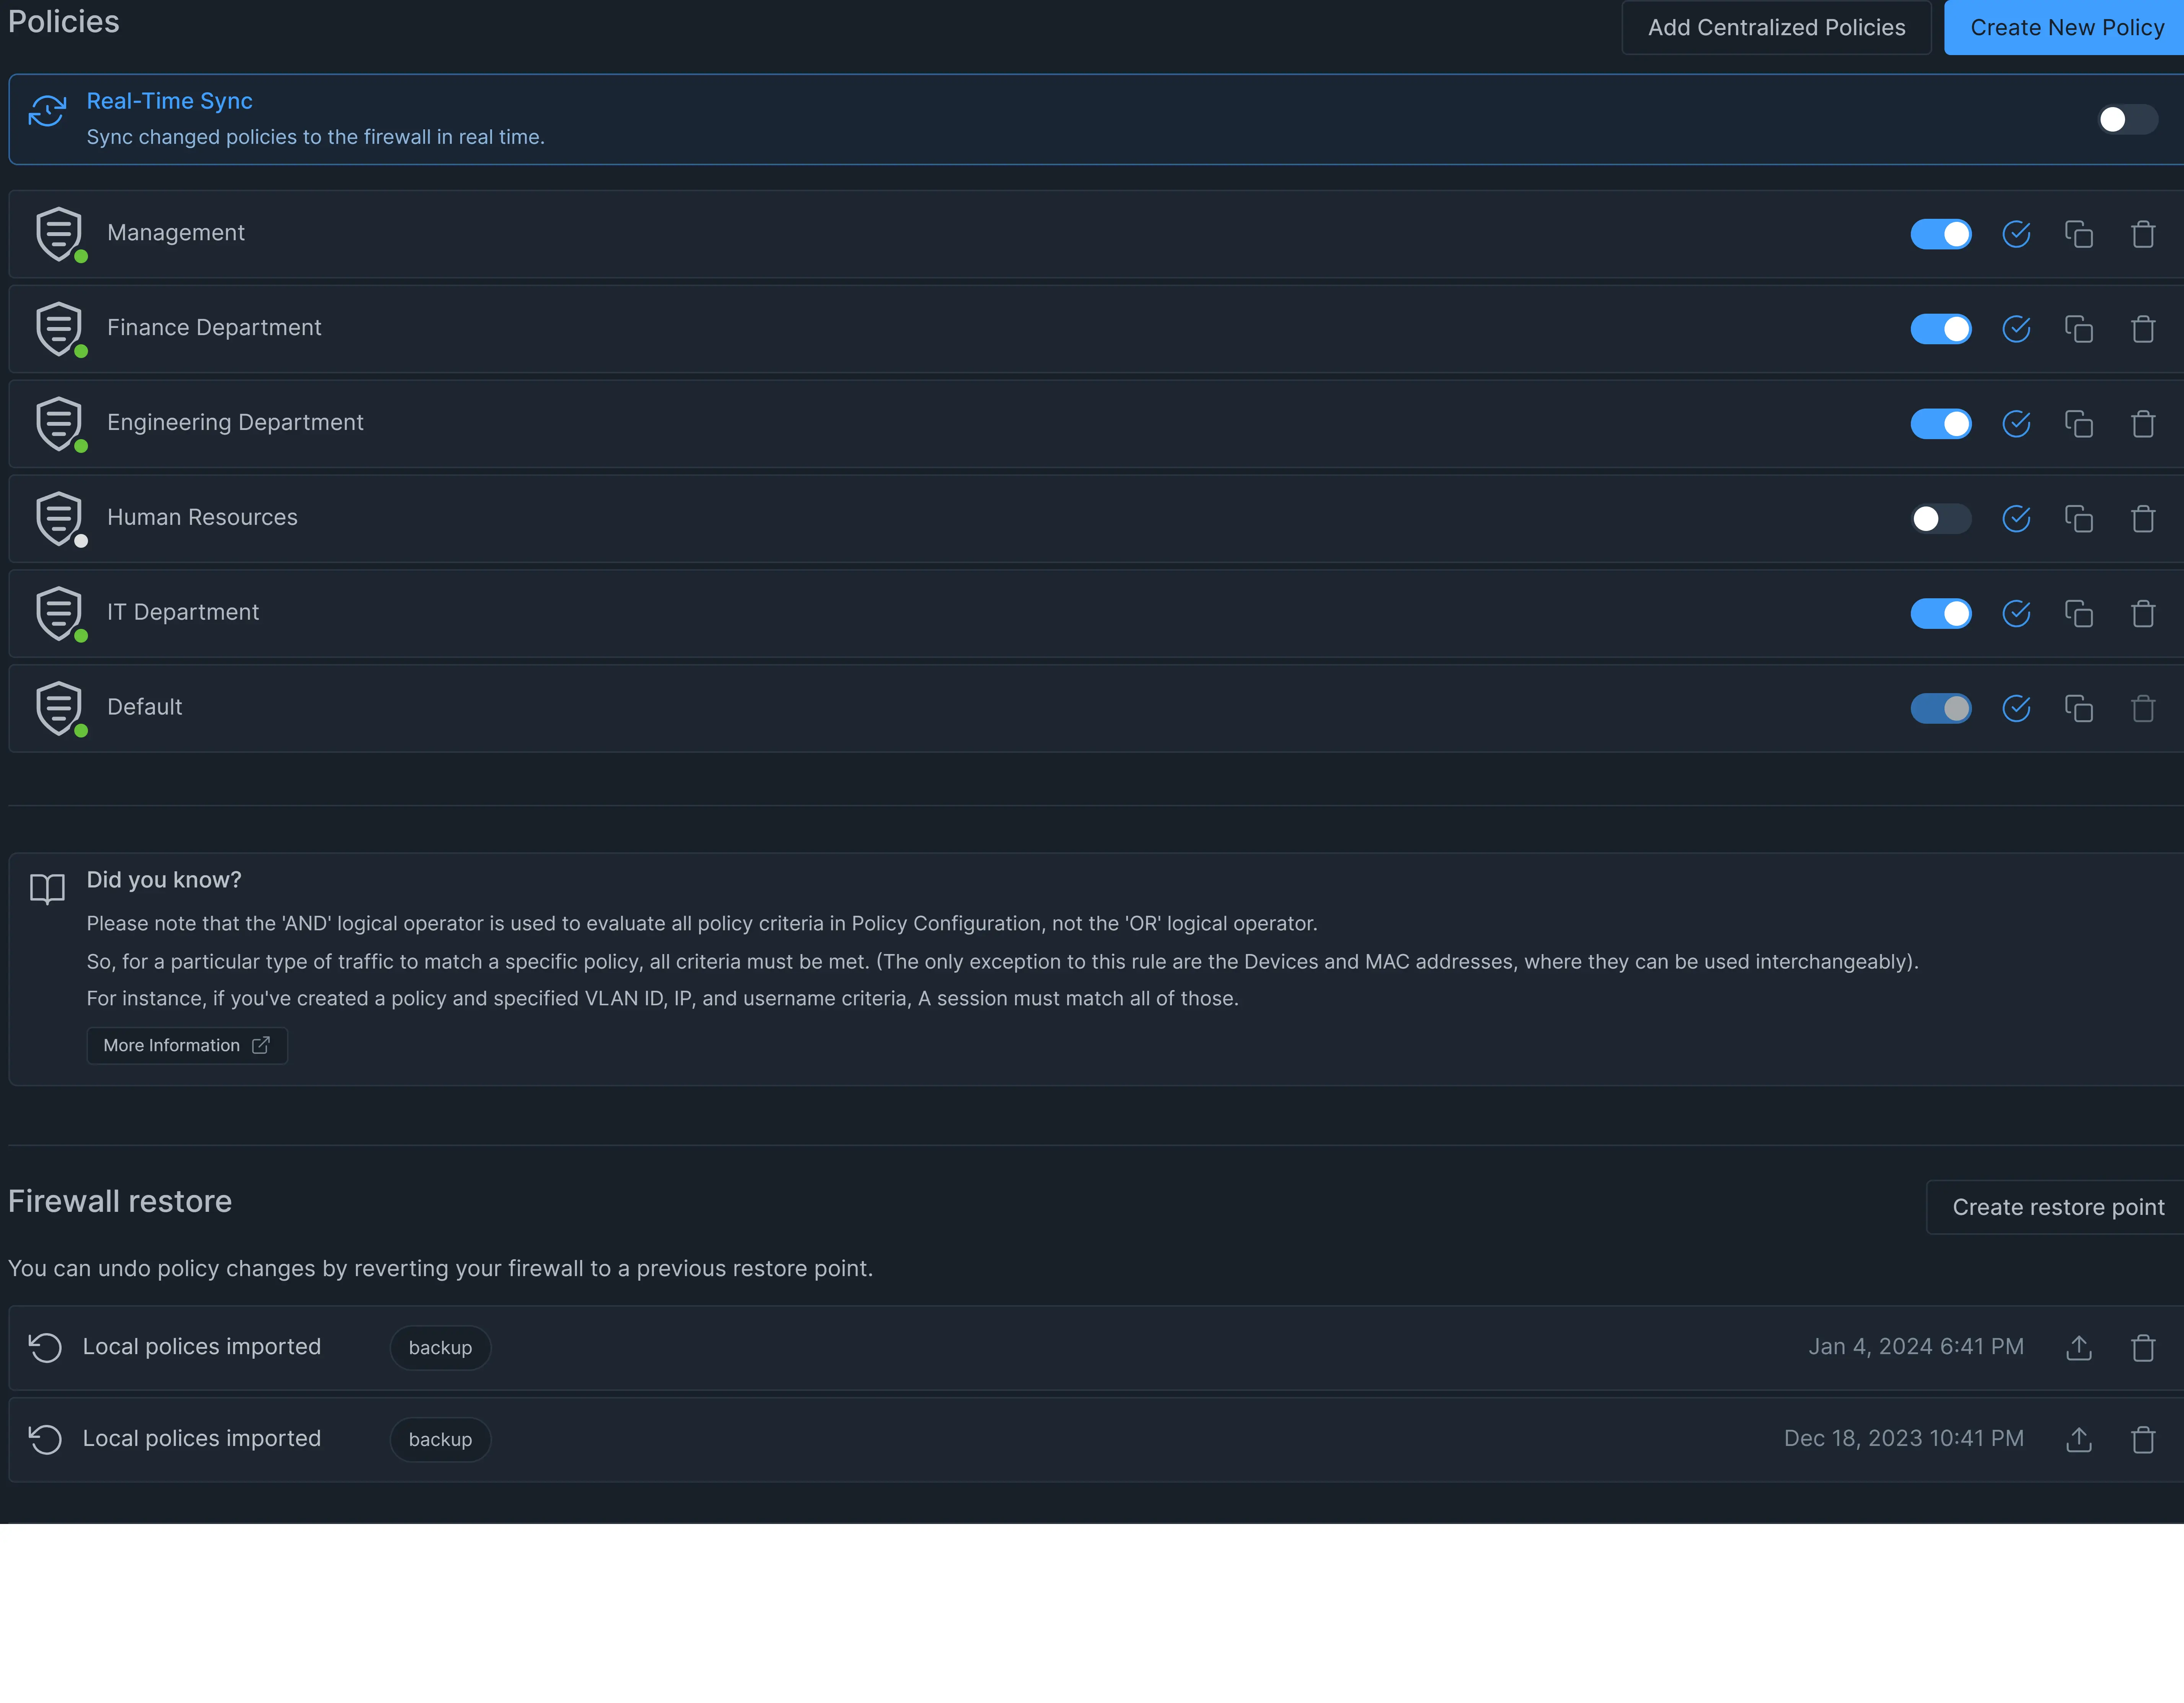
Figure 3. Policies list view
Status
![]() If the policy is enabled, a solid green circle is displayed in the bottom right corner of the policy's icon to the left of the policy name.
If the policy is enabled, a solid green circle is displayed in the bottom right corner of the policy's icon to the left of the policy name.
![]() If it is not enabled, you will see a solid white circle instead of green.
If it is not enabled, you will see a solid white circle instead of green.
Synchronization
The policy list includes icons to indicate the synchronization status of each policy.
![]() If the policy is synchronized with the firewall, a solid blue circle with a checkmark icon is displayed on the right side of the policy list.
If the policy is synchronized with the firewall, a solid blue circle with a checkmark icon is displayed on the right side of the policy list.
![]() If it is not synchronized, a solid grey synchronization icon is displayed.
If it is not synchronized, a solid grey synchronization icon is displayed.
Enabling/Disabling Policy
You can easily change the status of the Policy to Enabled or Disabled by clicking on the Status toggle button on the Policy Configuration page or by clicking on the toggle button next to the policy name on Policy list view.

Figure 4. Enabling/Disabling Policy
Editing a policy
You may edit a policy by simply clicking on the name of the policy in the policy list view. For more information about policy configuration, please refer to Configuring a policy.

Figure 5 Editing a policy
If you are not the owner of the firewall you cannot edit policy settings.
Cloning a policy
Zenconsole allows you to clone a policy to a different firewall. This will create a new policy with the same settings as the original policy.
You can also clone a policy as a Centralized policy. Centralized policies can be added to multiple firewalls at the same time. This will help you to manage the policy in a centralized manner.
To make a copy of a policy:
-
Click on the clone icon
 next to the policy name that you wish to copy. This will open a dialog box for renaming the clone of the policy.
 -
Enter a descriptive name for the new policy
-
Select the firewall from the drop-down Firewall list.
-
Or if you wish to clone the policy as a Centralized policy, you may switch on the toggle button next to the
Centralize policyoption. -
Click the
Clonebutton. The new policy will be sent to the node. You will see the clone of the policy in the policy list view.

Figure 6. Cloning a policy
Policy Clone feature is available only for Paid Edition. If you need more than one policy, you must have a Premium subscription. For more information, please refer to plans & pricing.
Deleting a Policy
To delete a policy:
-
Click on the trash icon
 . This will open a dialog box for confirming the deletion of the policy.
 -
Click the
Removebutton. The policy will be removed from the firewall.

Figure 7. Deleting a policy
If you have not created a restore point before deleting a policy, please be careful since the delete action cannot be undone.
Creating a New Policy
To create a new policy:
-
Click on the
Create new policybutton at the top right corner of thePoliciespage. A dialog box will open for renaming the new policy. -
Enter a name and click the
Createbutton. The new policy will be sent to the node. You will see the new policy in the policy list view. For more information about policy configuration, please refer to Configuring a policy.

Figure 8. Creating a new policy
Here is a video that will guide you through creating additional policies on Zenarmor Premium Editions:
Adding a Centralized Policy
The centralized policy feature is not available for the Free & Home Editions. To enable the centralized policy feature, you must have either the SOHO or Business subscriptions.
To add a centralized policy:
-
Click on the
Add centralized policiesbutton at the top right of thePoliciespane. A window will open that lists the existing centralized policies. -
Select one of the centralized policies or click
create centralized policyto create a new policy as shown in figure 8. For more information about centralized policies, please refer to Configuring policy. -
The centralized policy will be sent to the firewall. You will see the new policy in the policies list as shown in figure 9.

Figure 9. Adding a centralized policy

Figure 10. Policies list view with a centralized policy
Removing a Centralized Policy
To remove a centralized policy:
-
Click on the minus icon. A dialog box will open for confirming the removal of the policy.
-
Click the
Removebutton. The policy will be removed from the firewall.

Figure 11. Removing a centralized policy
Ordering Policies
The sequence of policies is crucial for rule application. The policy at the top of the list is examined and implemented first if a match is found. The default policy is the policy that is implemented if none of the other policies match. The settings of the default policy cannot be modified or removed. It cannot be raised or lowered. Security / App / Web Control rules for the Default Policy may still be modified.
A policy may be easily reordered by dragging and dropping it inside the policy list.
Synchronizing a Policy with a Firewall
Zenconsole provides Real-time policy synchronization feature. When you enable the Real-Time Sync option on the Policies page, the changed policies will be synchronized to the firewall in real time.
If you don't enable Real-Time Sync option, a policy may be manually synchronized with your firewall by clicking on the synchronization button on the policy list view. This will send the policy to the node. If the synchronization has completed successfully, a notification message is displayed on the policy view and the synchronization icon is replaced with a solid blue circle with a checkmark icon for the policy.

Figure 12. Real-Time Sync option
Restore Point Overview
A restore point is an image of the Zenarmor policy configuration and settings in the Cloud which helps to restore the system to an earlier date when the system was running properly.
Restore Point Actions
Creating Restore Point (backup node policies)
The Firewall restore feature is available only for Premium subscriptions. For more information, please refer to plans & pricing.
To create a backup of your policies on the node:
-
Click on the
Create restore pointat the top right corner of theFirewall restorepane. This will open a dialog box. -
Enter a description in the dialog box.
-
Click on the
Createbutton.

Figure 13. Creating restore point
After the restore point creation has completed, you will see the list of restore points in the Firewall restore pane. The following information is present in this list:
-
Description of the restore point
-
Tag of the restore point (manual: restore point of policies created on the cloud portal manually. backup: local policies imported from the node automatically)
-
Creation date of the restore point
-
Restorebutton to restore a policy -
Deletebutton to delete a policy

Figure 14. Firewall restore point list
Restoring Node to a Point (restore node policies)
To restore your firewall to a point:
-
Click on the upload icon
 . A dialog box will open for confirmation of the restore operation.
 -
Click the
Restorebutton. Your node will be restored to the state it was at that point.

Figure 15. Restoring node to a point
Deleting a Restore Point (delete the backup of the policies)
To delete a restore point:
-
Click on the trash icon
. A dialog box will open to confirm the deletion of the restore point. -
Click the
Removebutton. The restore point will be removed from the firewall restore point list.

Figure 16. Deleting a restore point