Central Policy Management in Organizations
Zenconsole enables the establishment of central policies that are applicable to all Zenarmor instances within an organization. The central policy management feature provides the following benefits:
- Easy Management: The primary advantage of central policy management in a single glass-of-pane is the effortless administration of policies across the entire organization. Thanks to the central policy management feature, you don’t need to define policies for all endpoints and gateways individually in your infrastructure, which may consist of hundreds of endpoints.
- Flexibility: Zenconsole provides exceptional flexibility by allowing you to establish security policies that correspond to Zenarmor instances in a diverse array of combinations. You may define endpoint-specific or gateway-specific policies easily.
- User-based Filtering: Another noteworthy capability is the ability to designate usernames and groups in the policy configuration, which enables user-based filtering. You can specify the security rules for each individual user or group.
Your organization comes pre-installed with a Default policy. Although you cannot change the Default policy, you can still change the Security rules, Application Control rules, Web Control rules, TLS Controls, Cloud Access rules and Exclusions on the default policy to suit your needs.
You can create new policies to protect yourorganization in a more customizable way. After creating a new policy, you must edit it to complete the configuration and identification of the policy rules.
Create New Policy
You may add a new policy to your organization by following the next steps.
-
Login to Zenconsole and then select the organization you want to manage.
-
Click Policies menu on the left sidebar. This will open the organization's policy management page and display the policy list view.
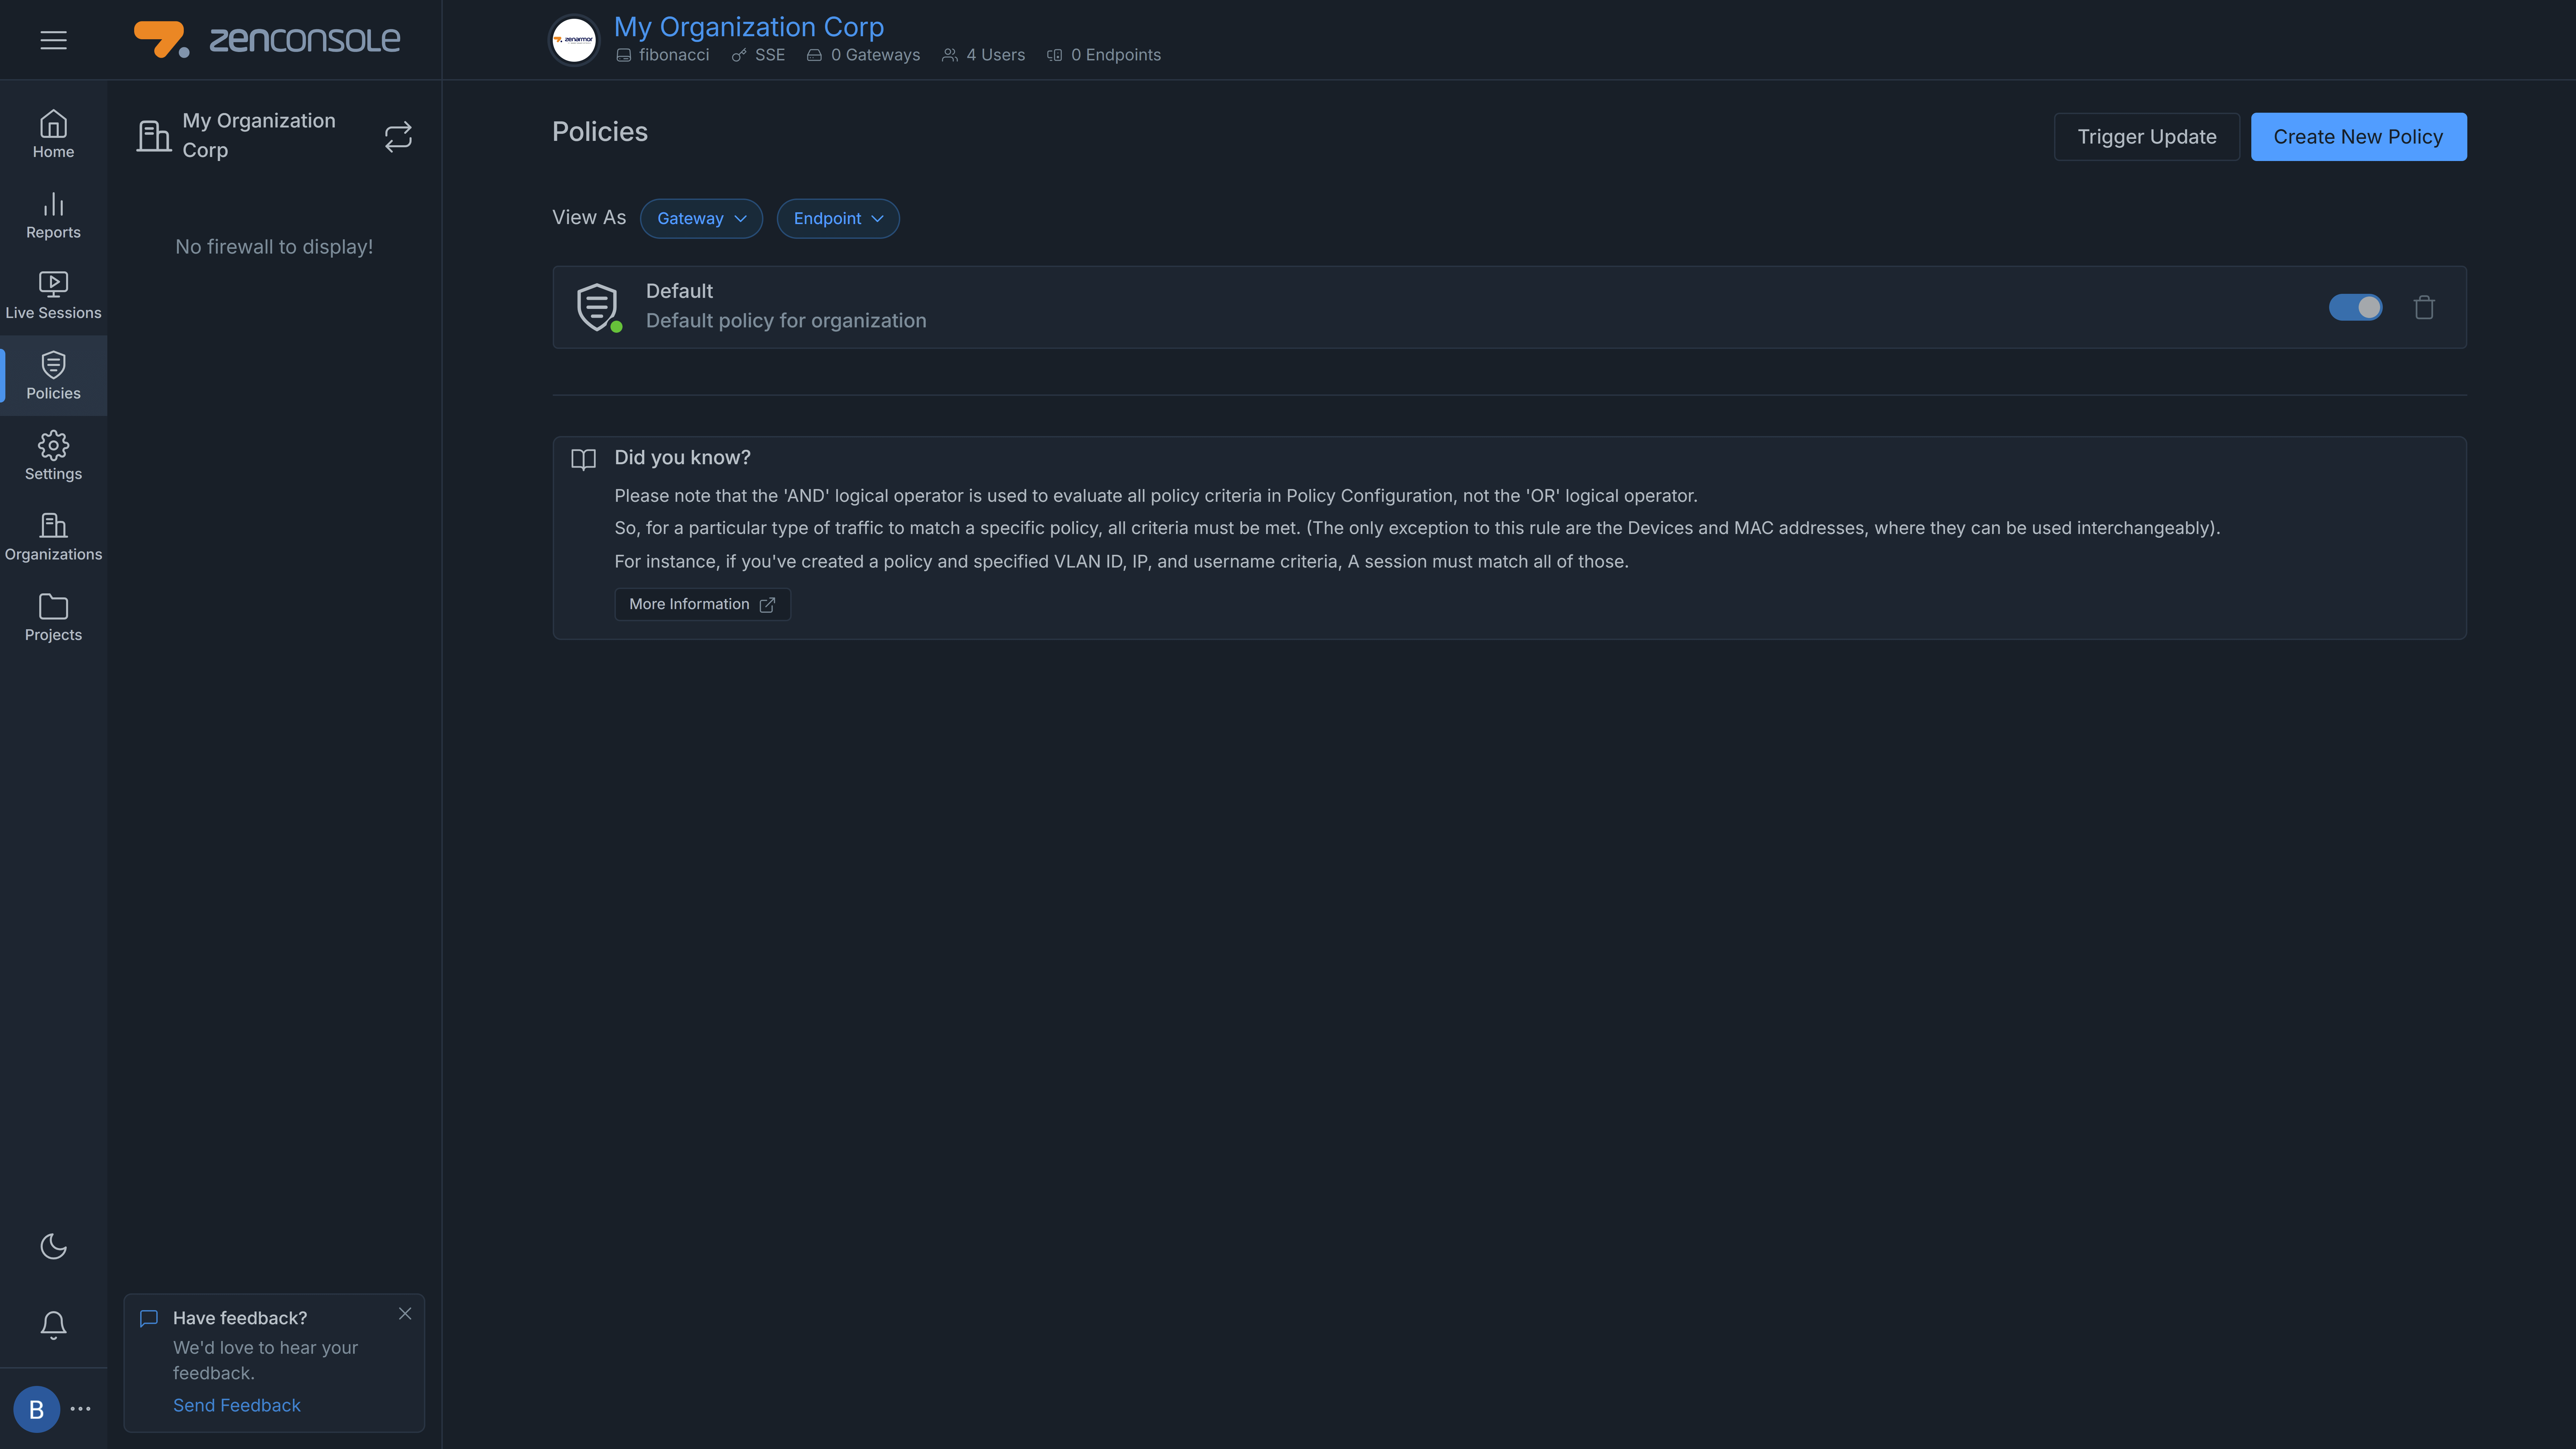
Figure 1. Organization Policies
-
Click Create New Policy button at the top-right of the page. A dialog box will appear.
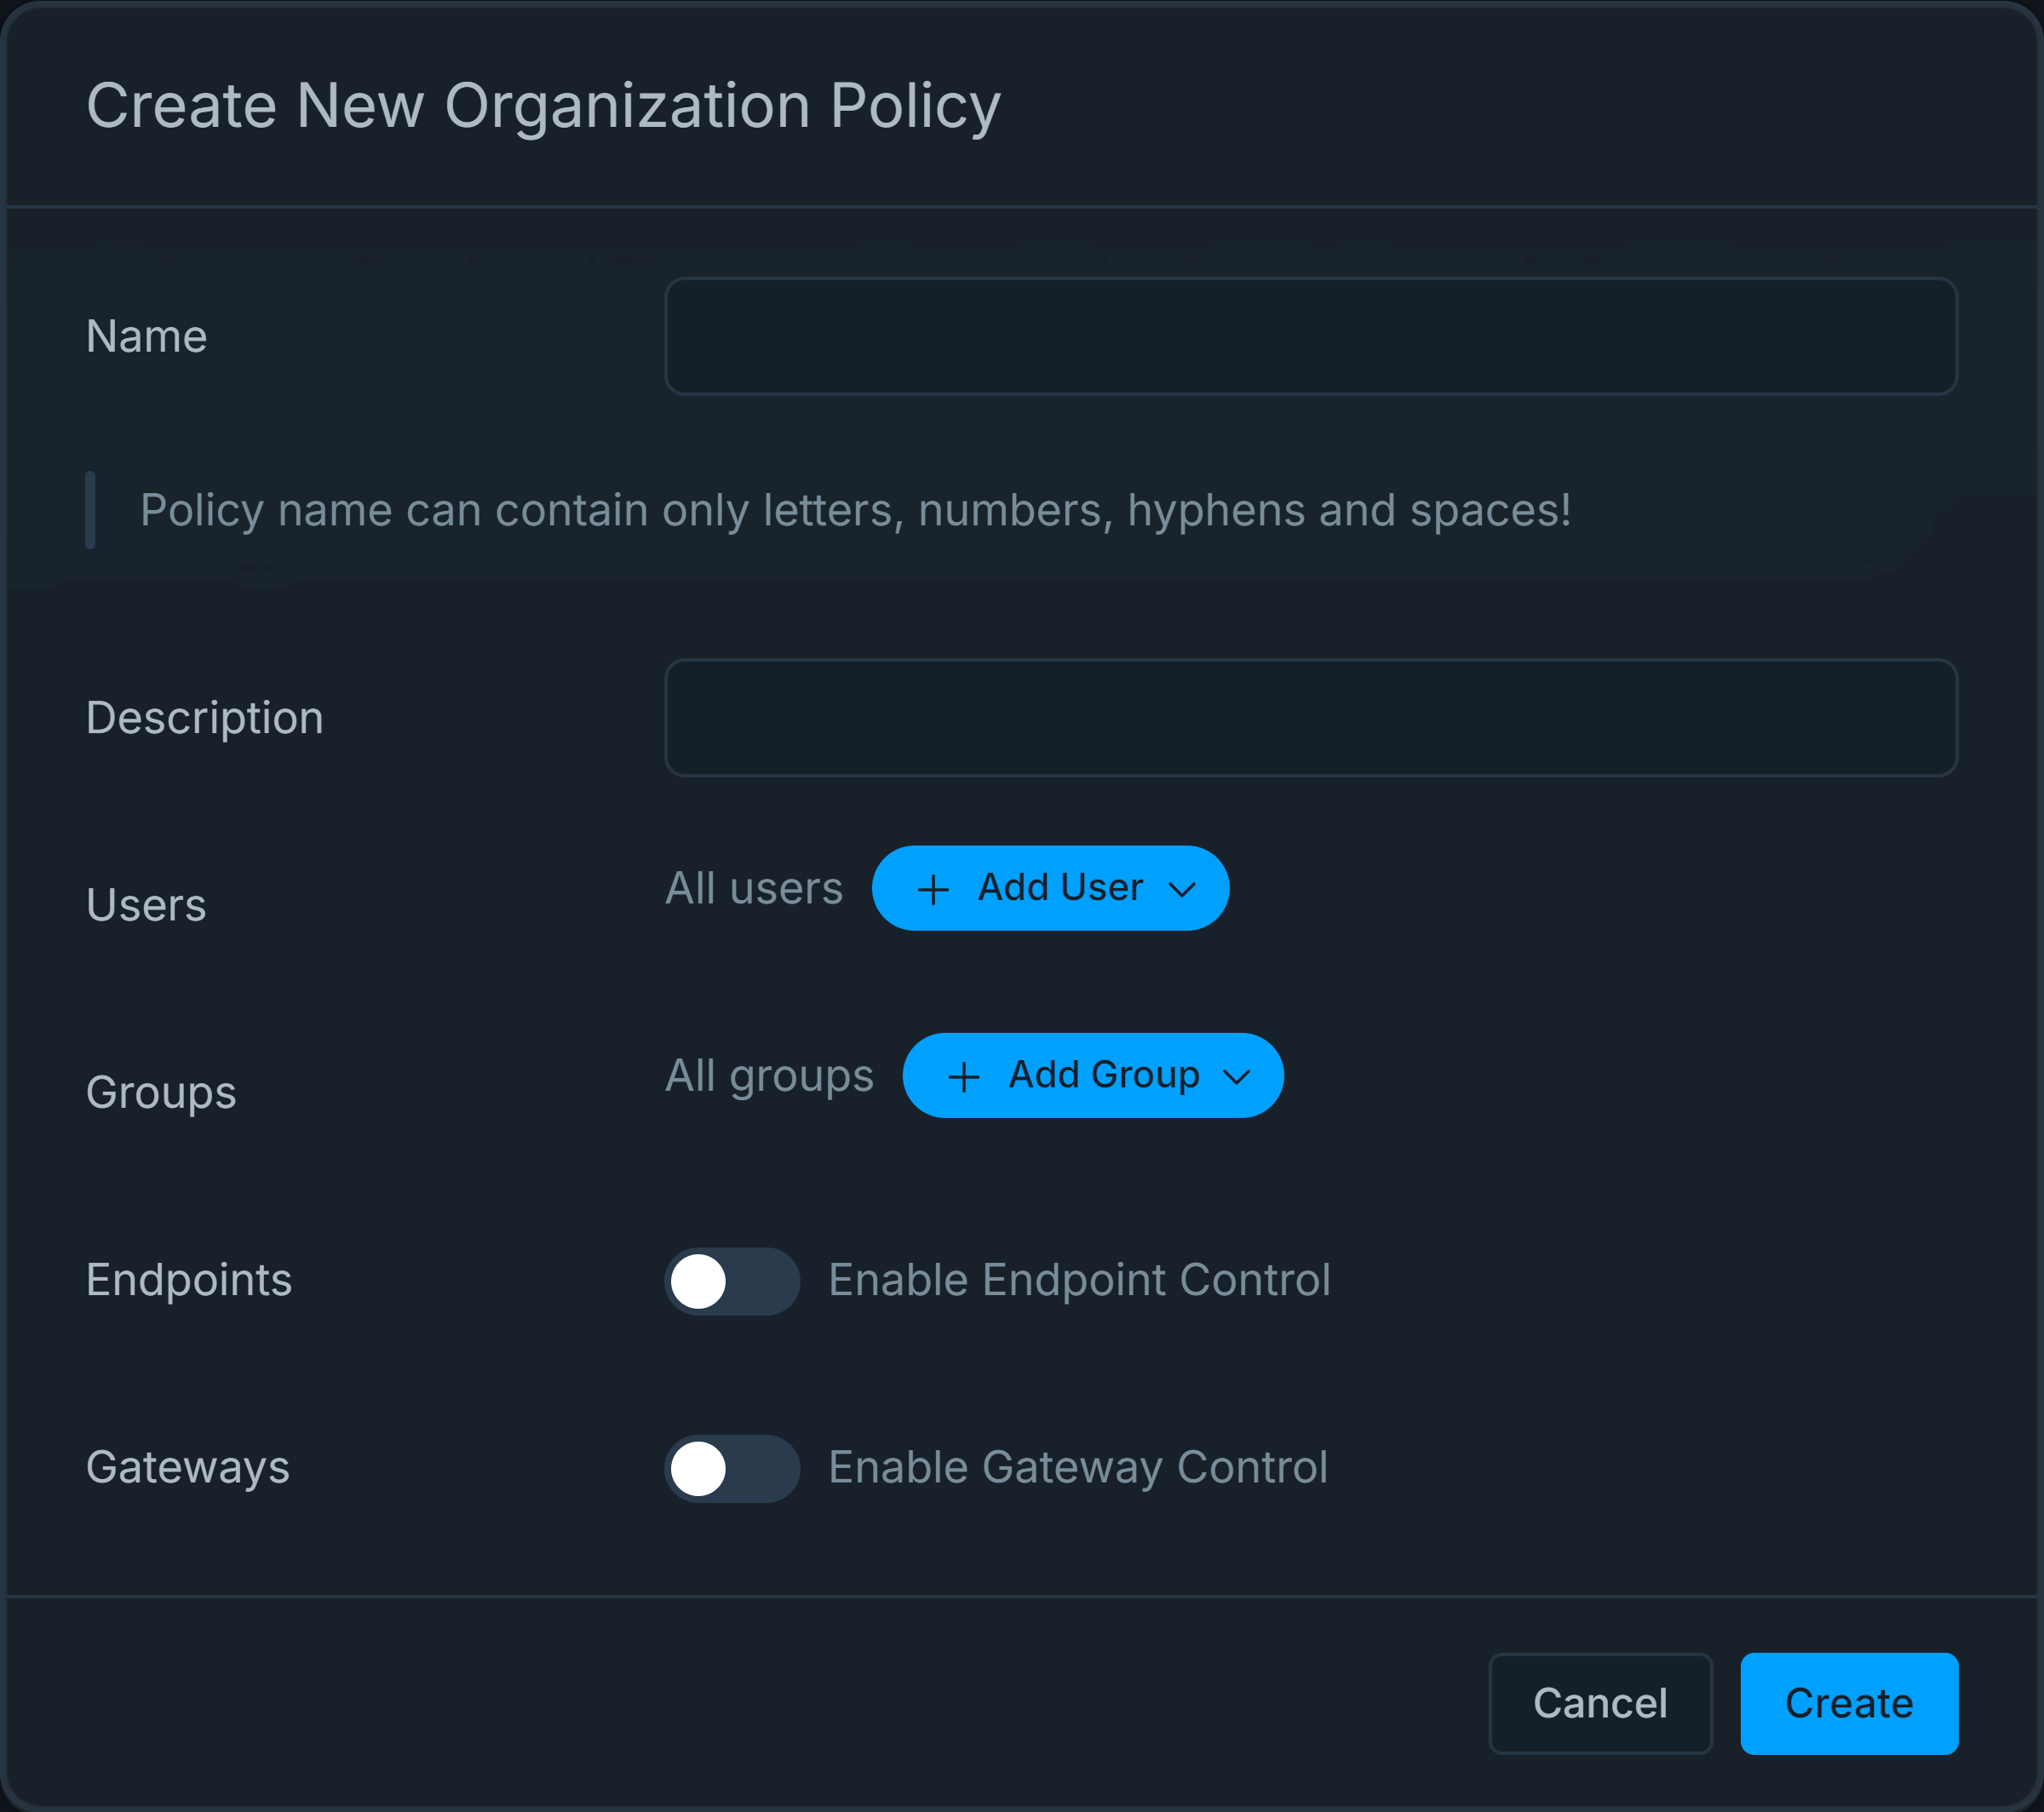
Figure 2. Adding New Policy
-
Type a descriptive name into the Name field.
-
Fill in the Description field.
-
You may click + Add User drop-down menu to select the organization user(s) that you want to be affected by the policy. By default, policies are applied to All users in your organization.
-
You may click + Add Group drop-down menu to select the organization group(s) that you want to be affected by the policy. By default, policies are applied to All users in your organization.
-
You may click Enable Endpoint Control toggle bar to apply the rule to Zenarmor endpoint instances in your organization. This will display +Add Endpoint drop-down menu to allow you to select available endpoints as you wish. By default, All Endpoints are selected.
tipYou may use the search toolbox to find a specific endpoint easily.
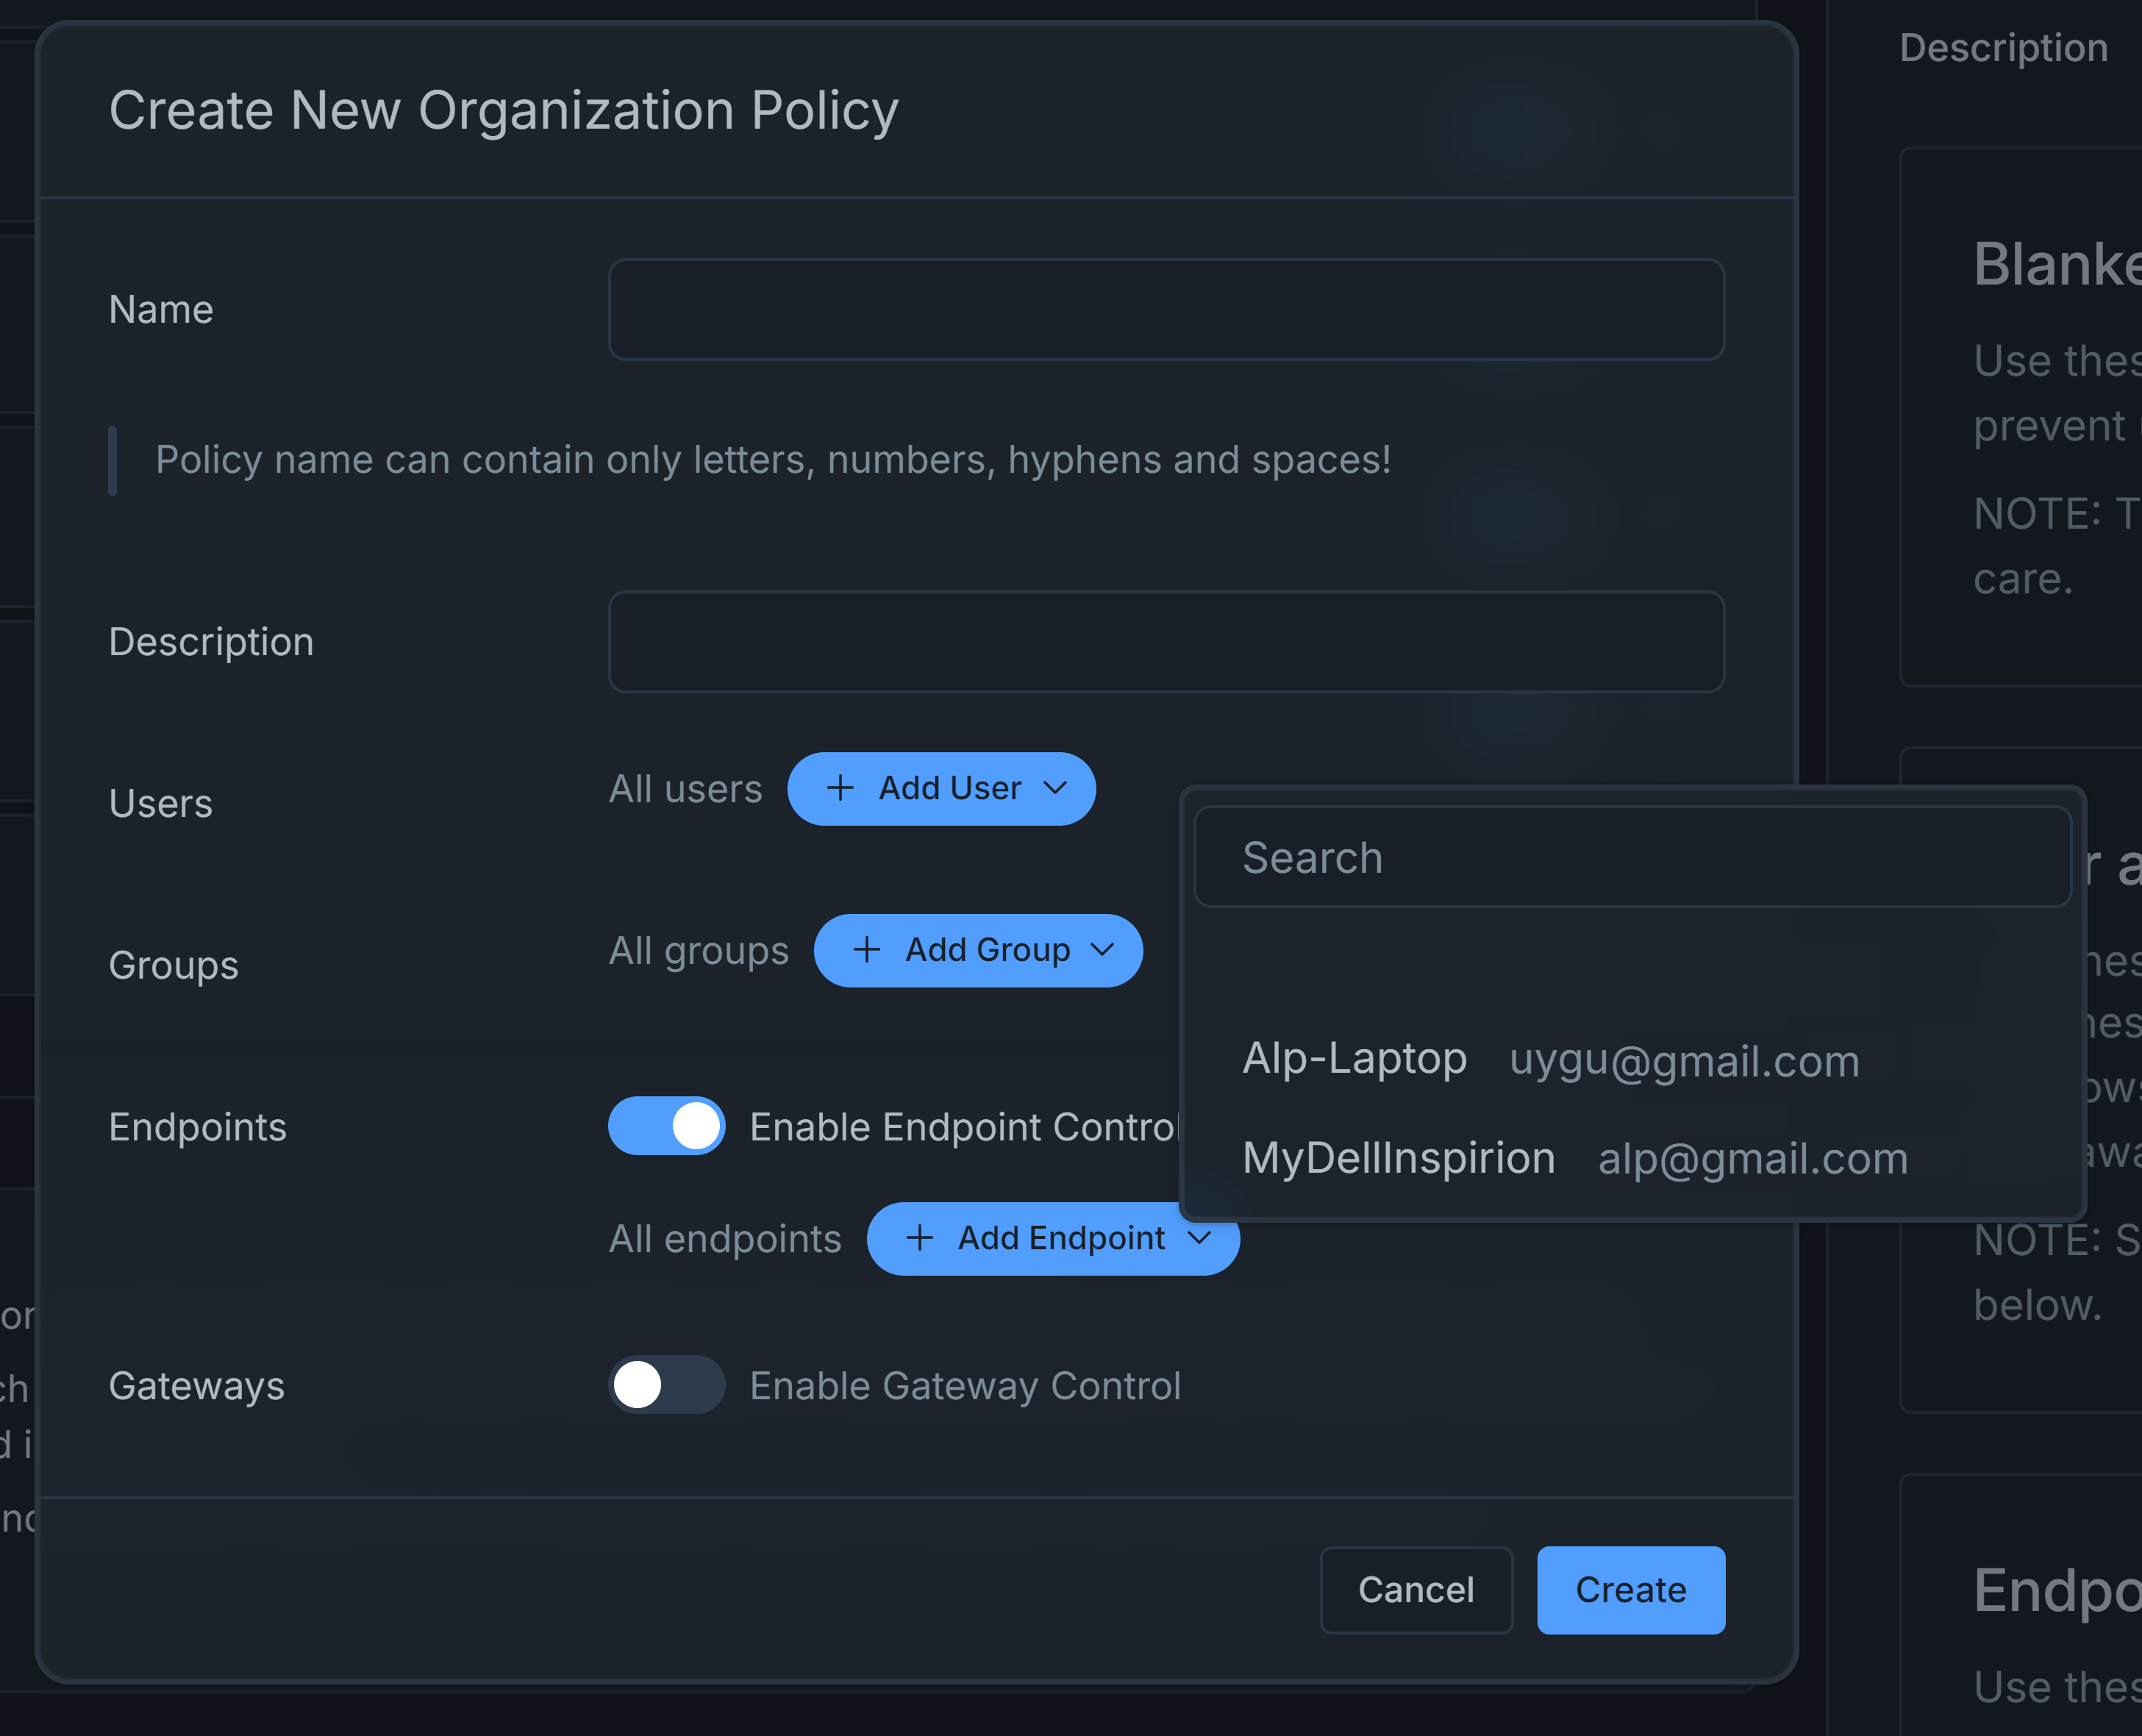
Figure 3. Selecting Endpoints
-
You may click Enable Gateway Control toggle bar to apply the rule to Zenarmor gateway instances in your organization. This will display +Add Gateway drop-down menu to allow you to select available endpoints as you wish. By default, All Gateways are selected.
tipYou may use the search toolbox to find a specific gateway easily.
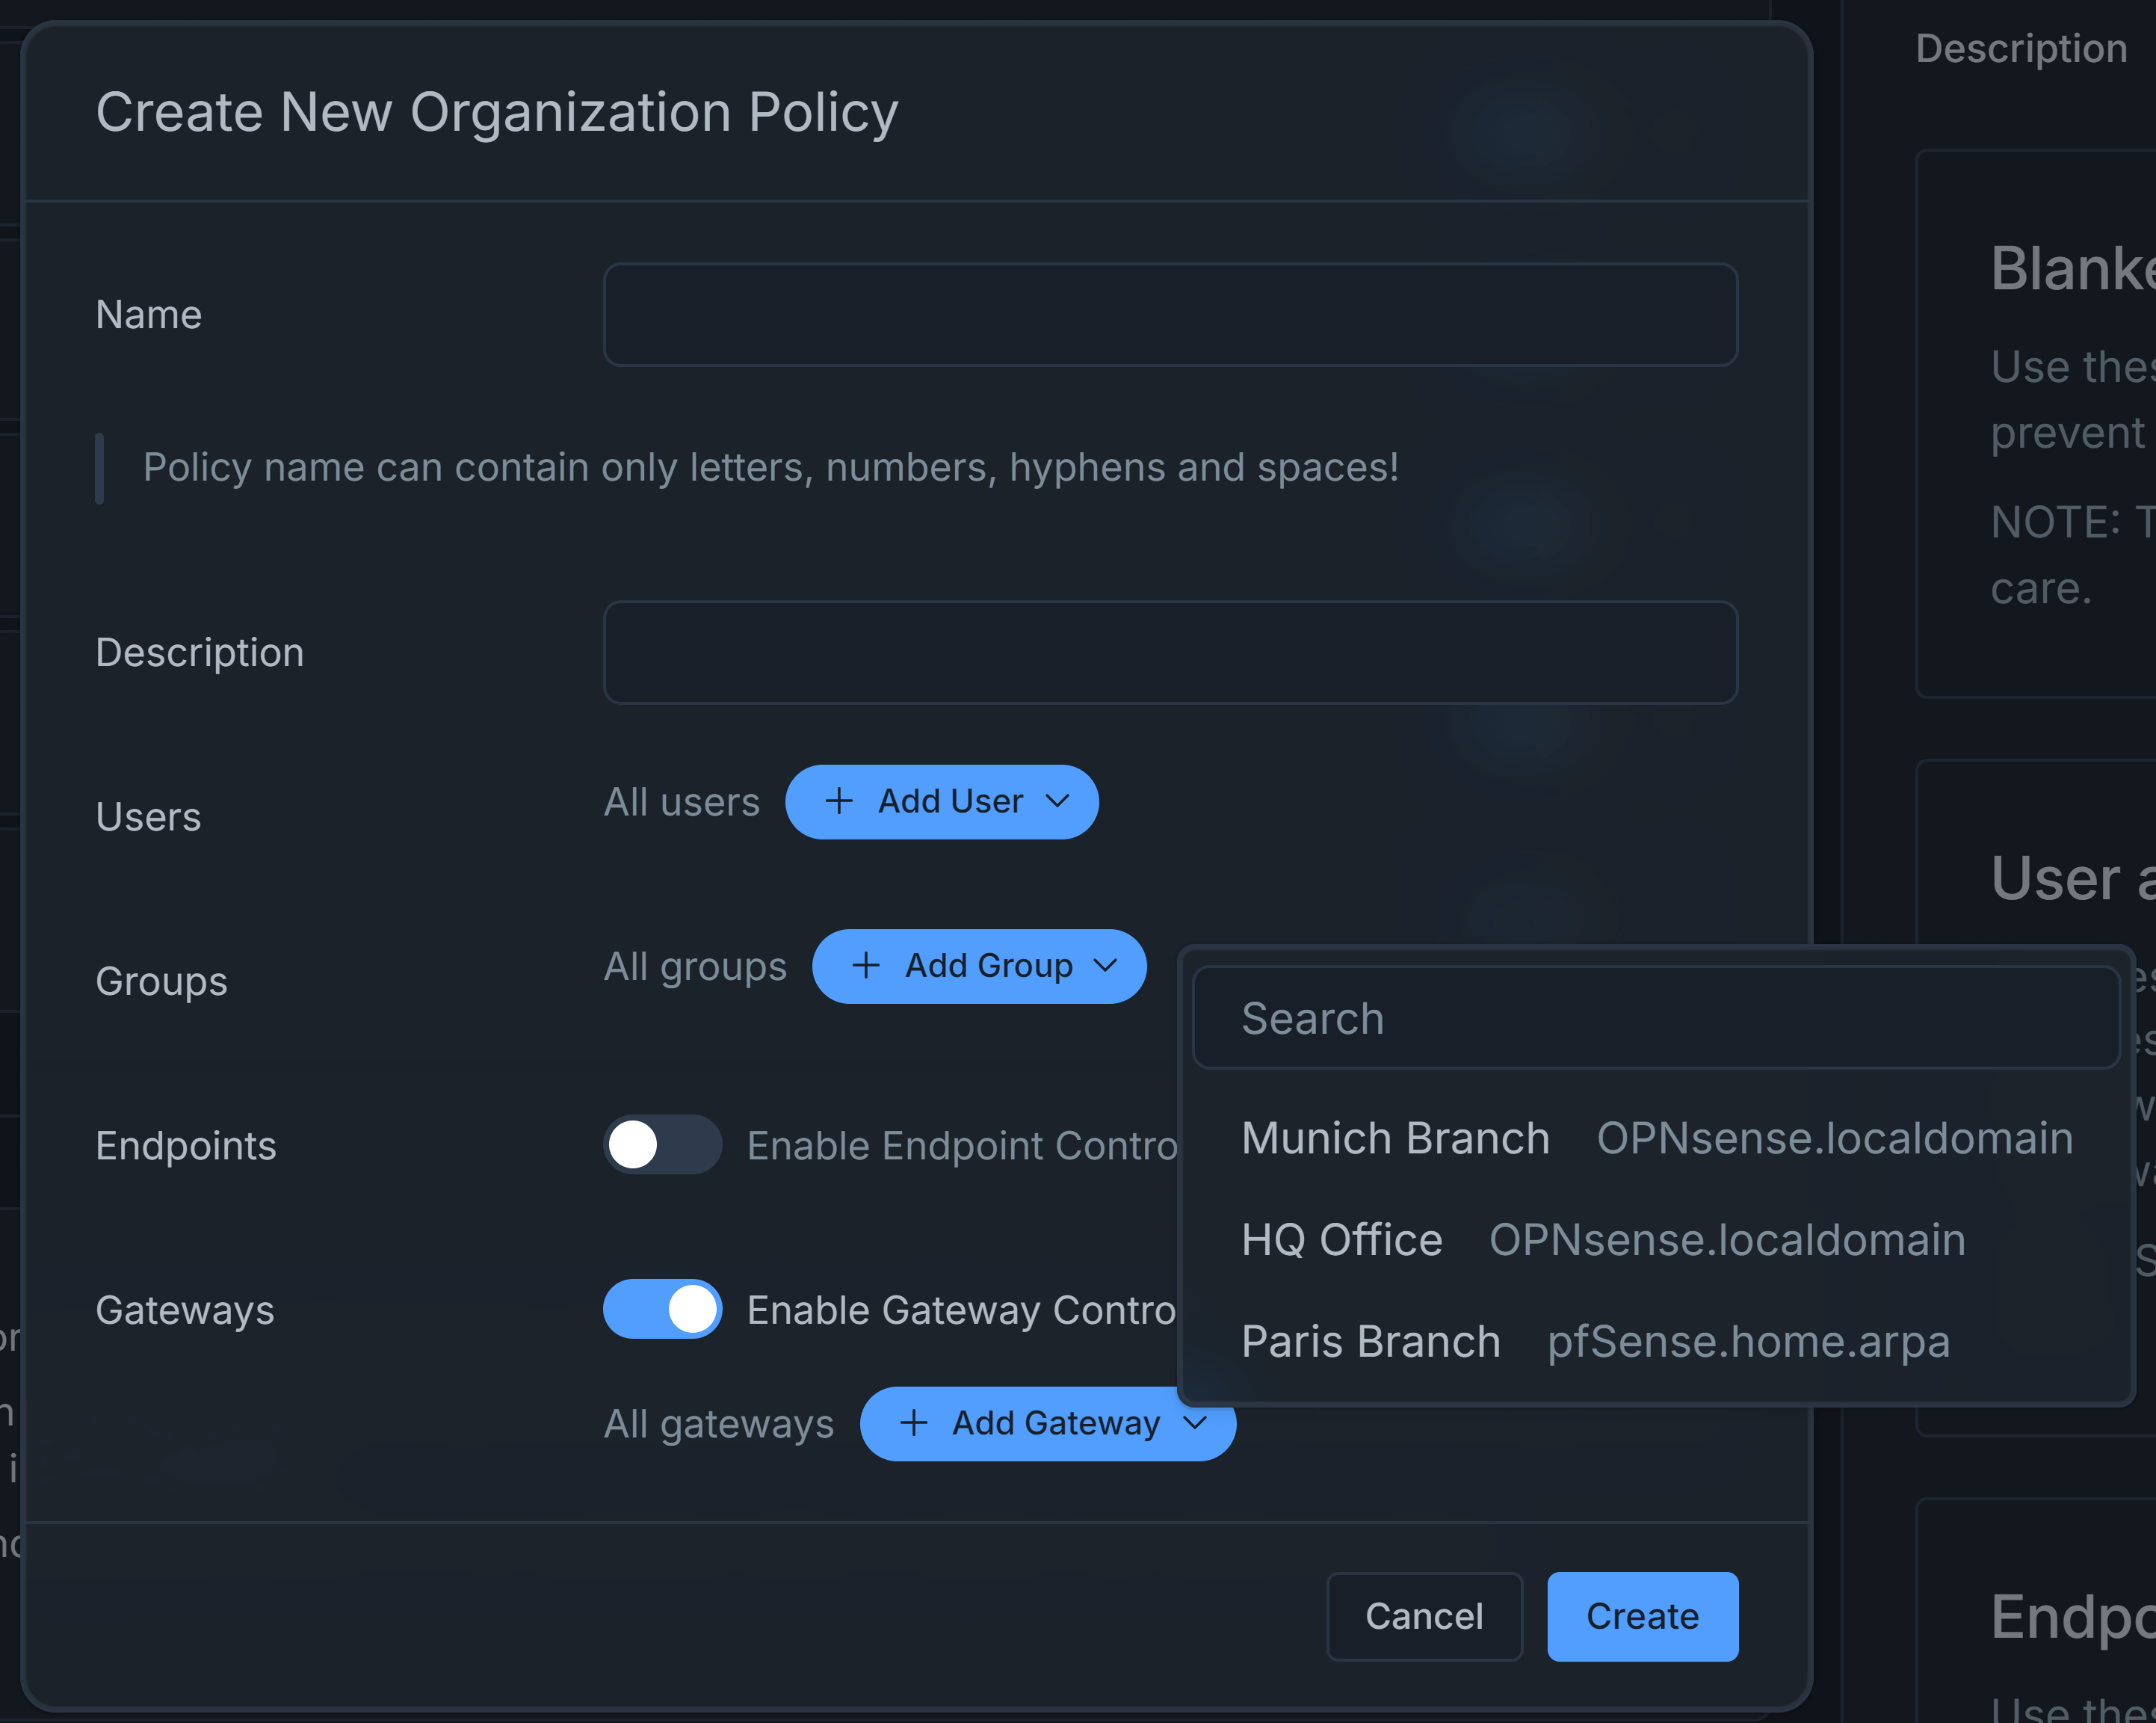
Figure 4. Selecting Gateways
warningYou must enable either a gateway control or an endpoint control in order to apply a policy on your organization's network. Otherwise, the policy does not match any traffic and filters nothing, even though it seems enabled and active.
-
Click Create to add a new policy.
Your newly created policy will appear on the organization's Policies page. The policy list view displays it with a disabled status at the top.
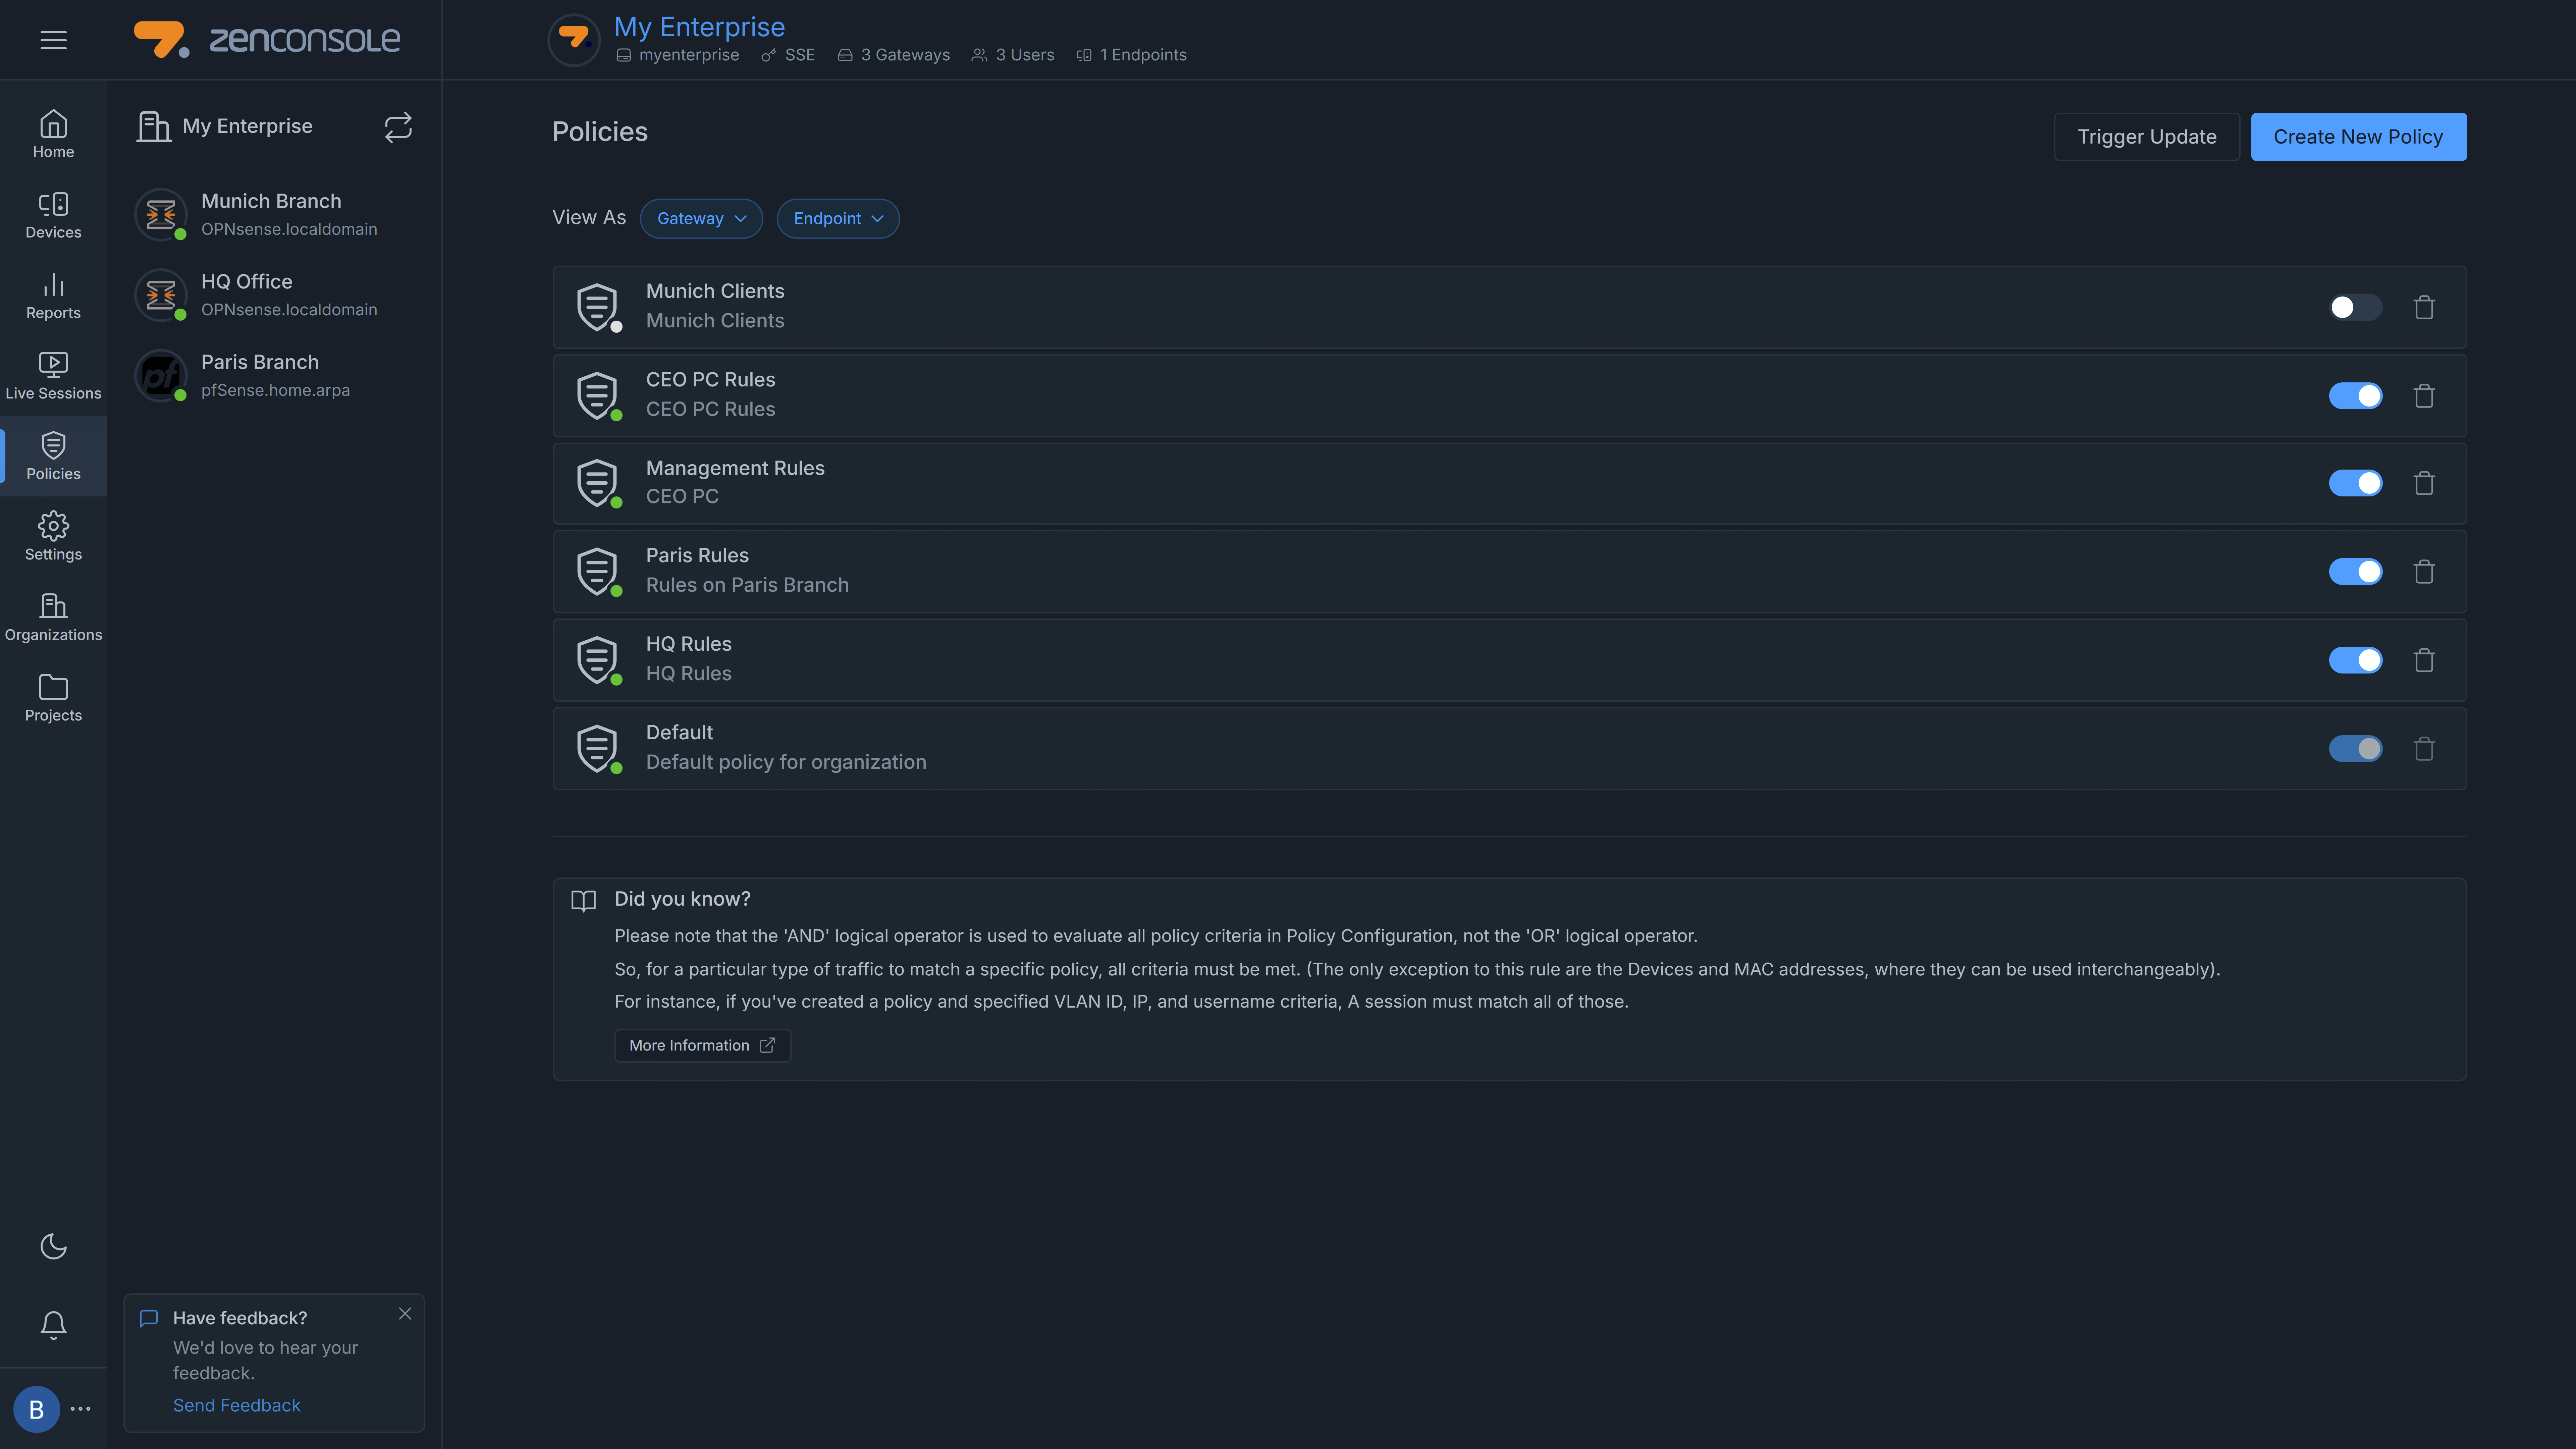
Figure 5. Organization Policy List View
Policy Configuration
After creating a new policy, you must complete the policy configuration steps. You can edit a policy's configuration by clicking on its name in the policy list view. This will display the policy configuration view as shown in the figure given below.
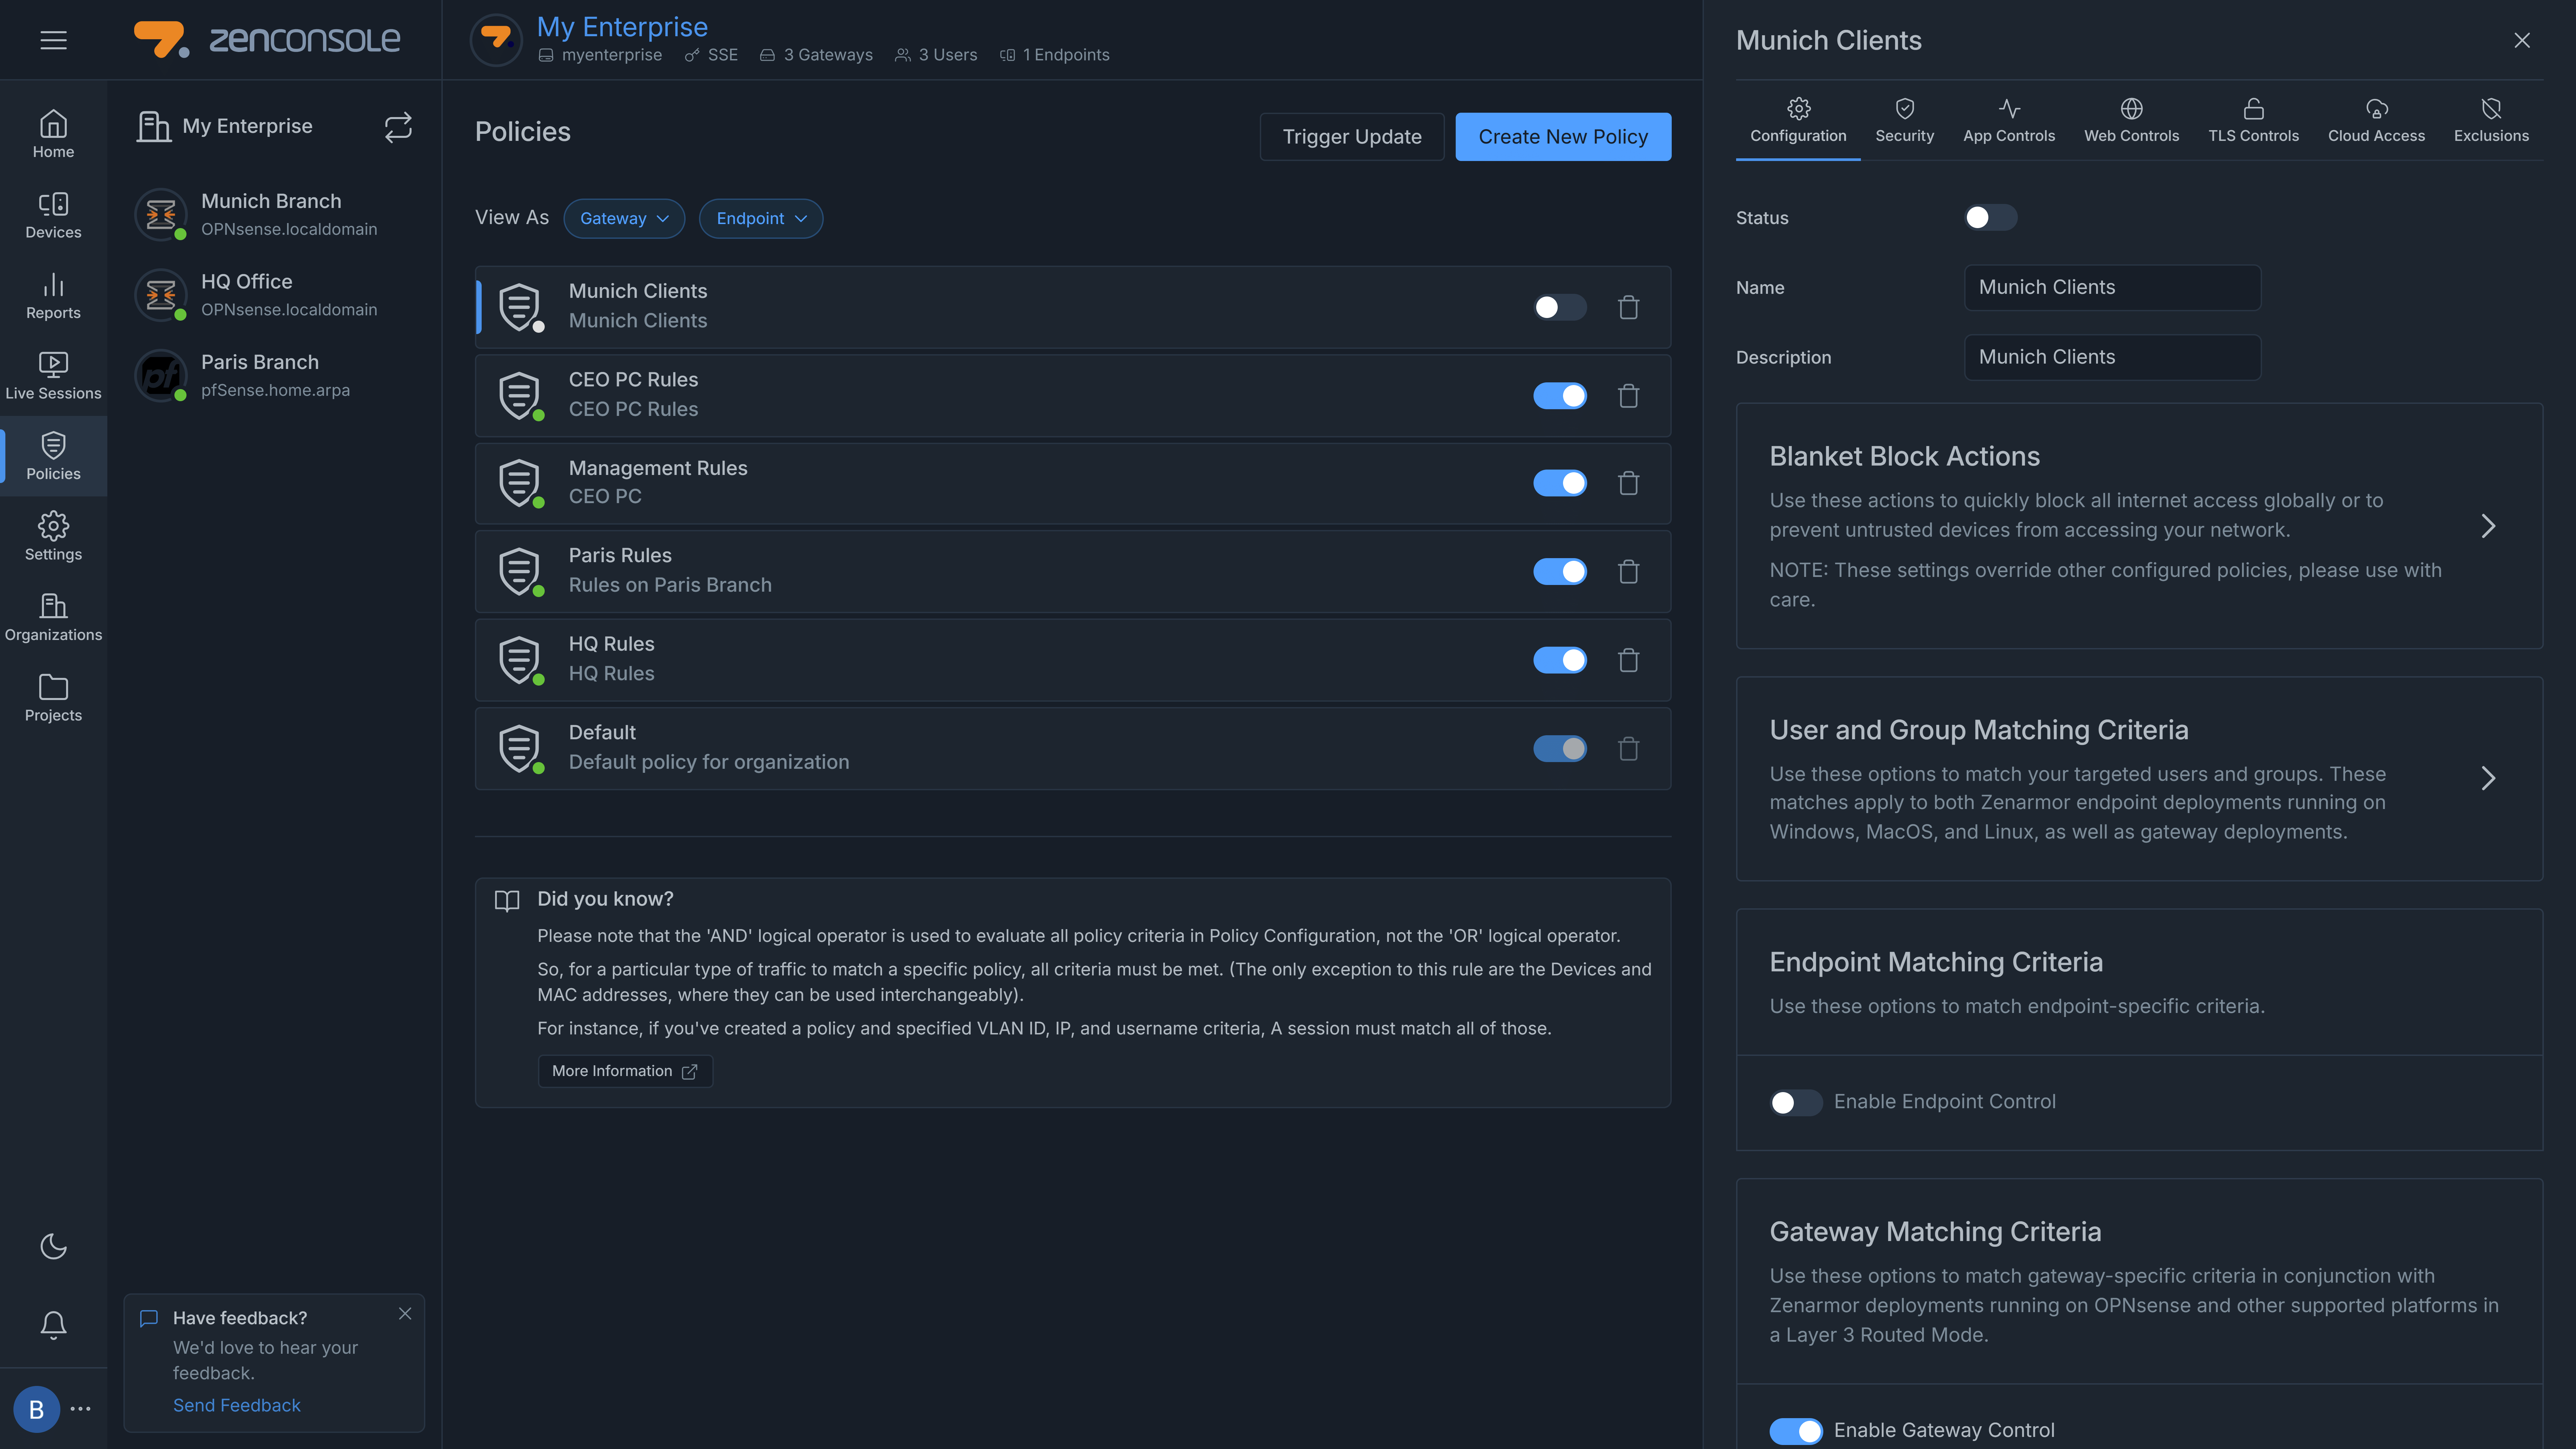
Figure 6. Editing Organization Policy
After the policy configuration has been finalized, you will be able to apply the policy within your organization by enabling it.
To complete the central policy configuration in your organization, you may follow the next steps:
-
On the Policies page, click the name of the newly created organization policy. This will display the Configuration page on the right side of the page.
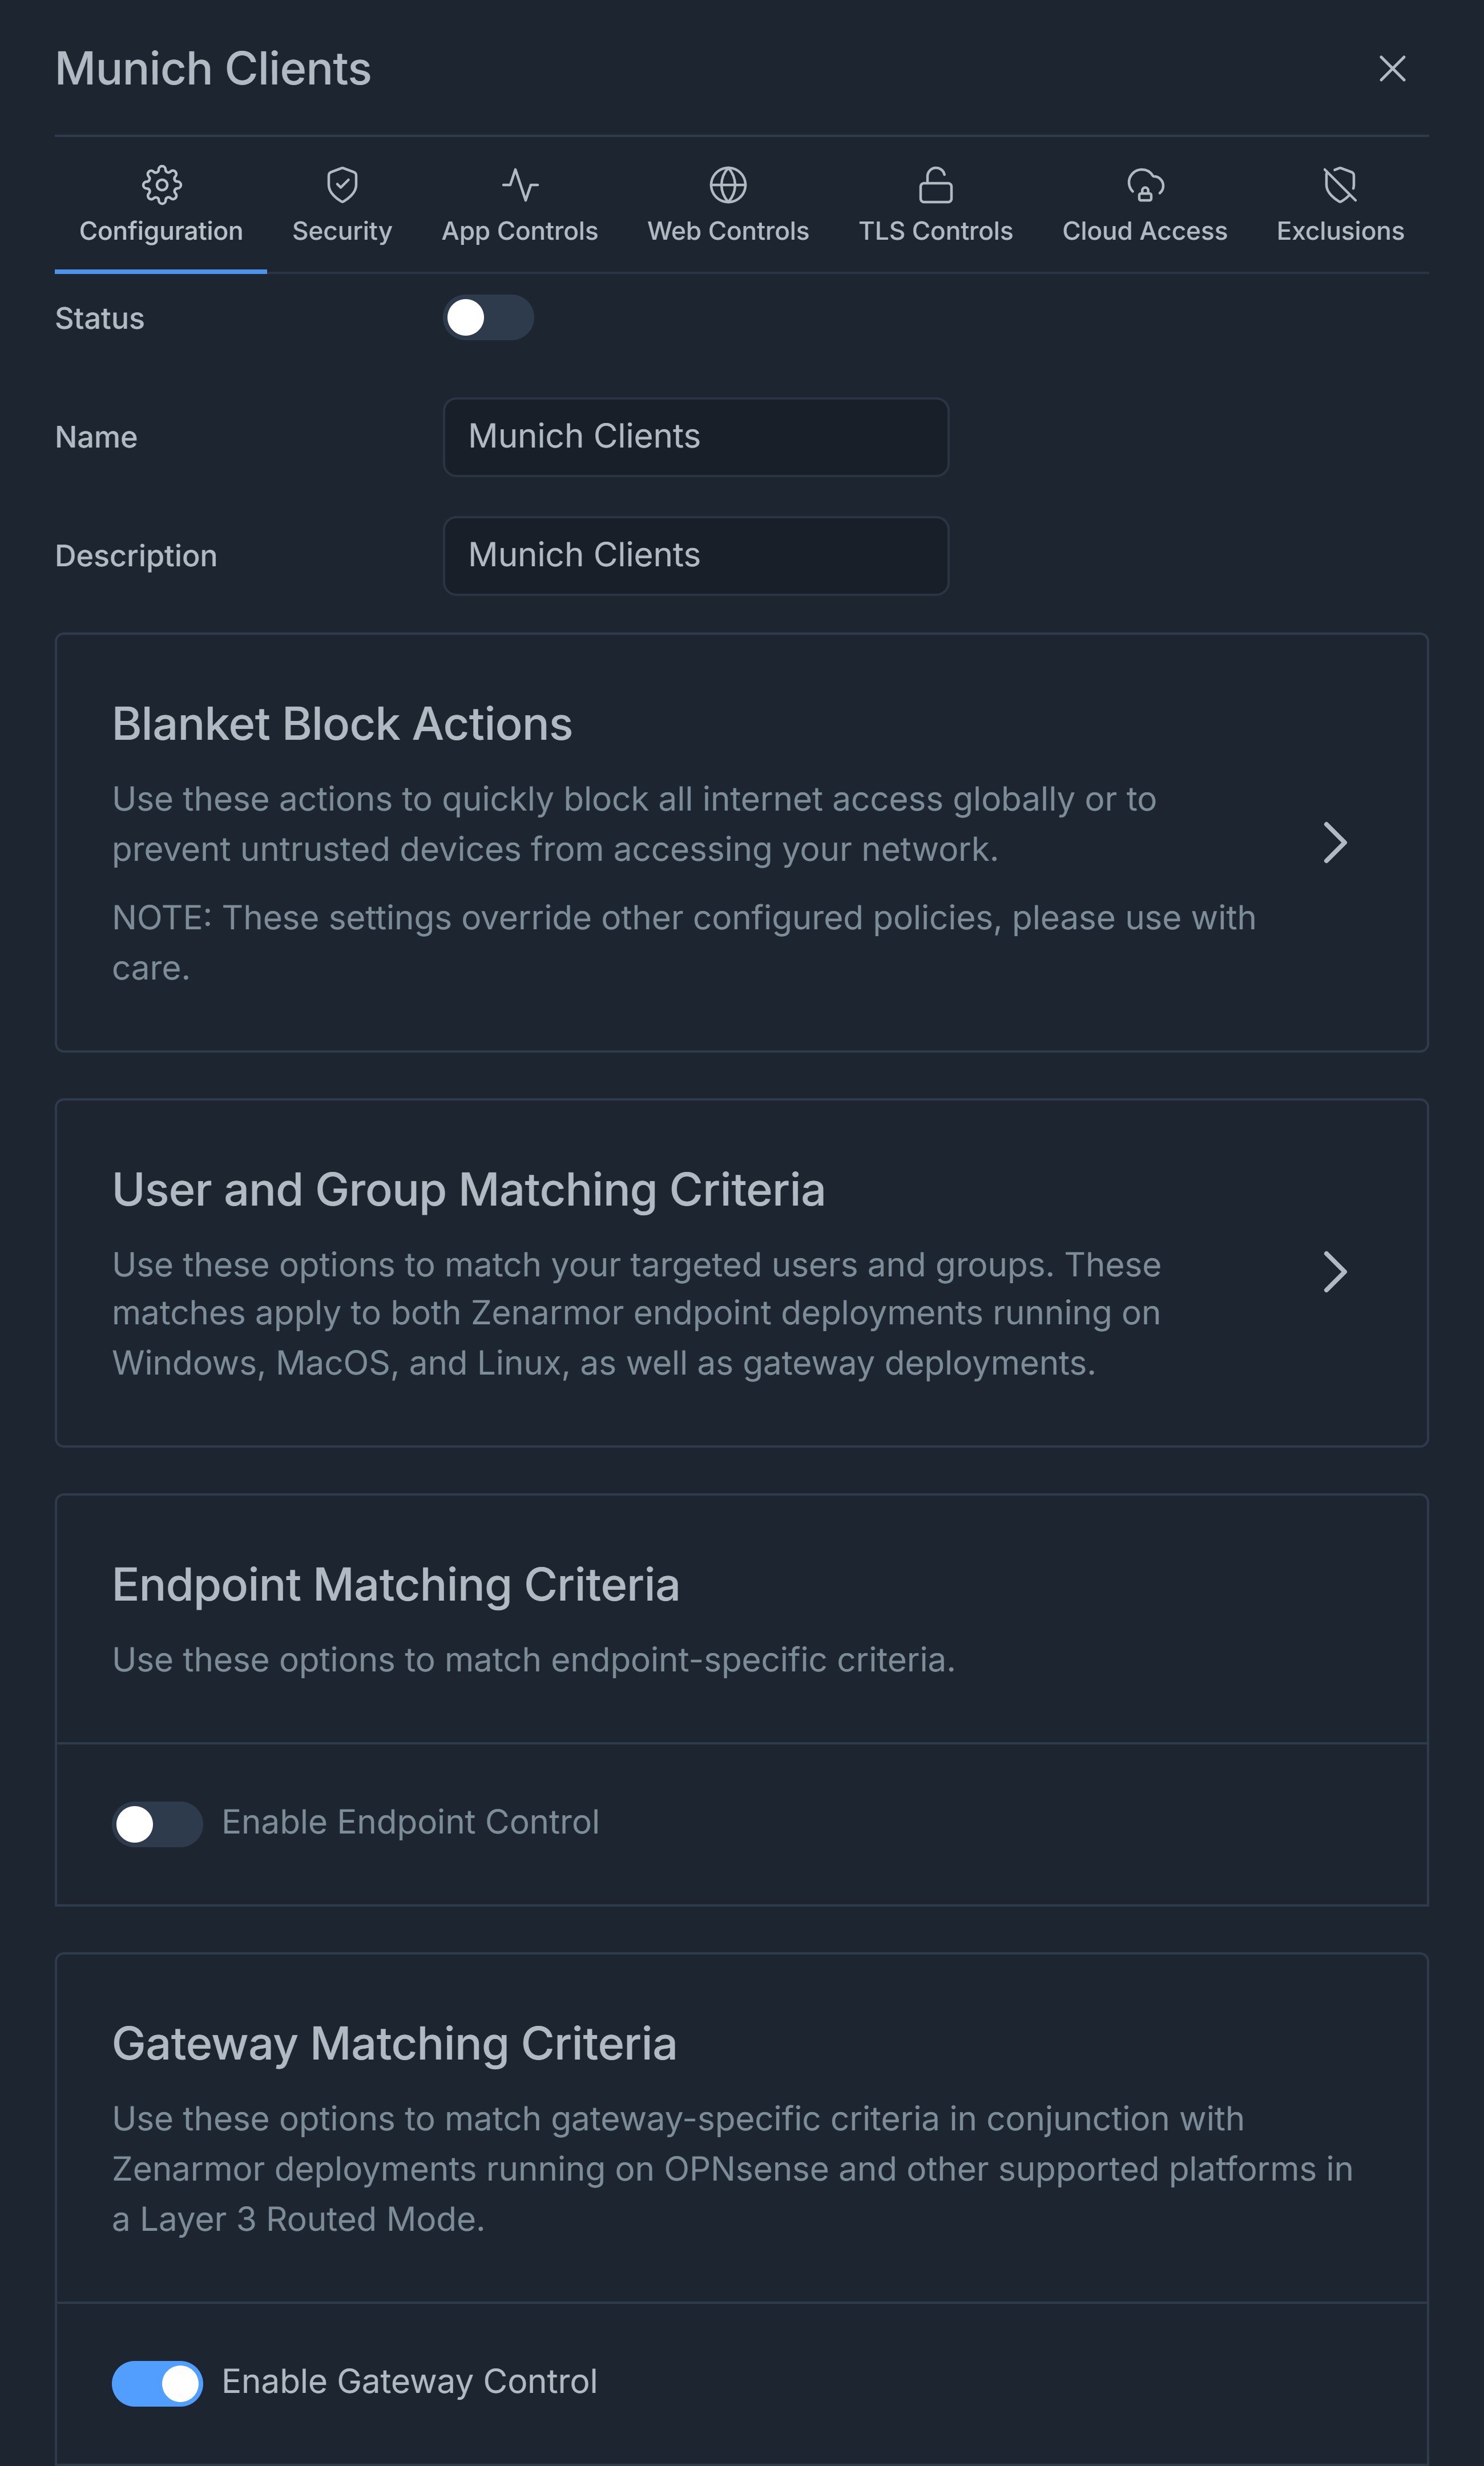
Figure 7. Organization Policy Configuration
-
You may update Name field for renaming the policy.
-
You may update Description field.
-
You may click on the Blanket Block Actions pane to restrict internet access for your clients.
-
You may click on the User and Group Matching Criteria pane to define user-based filtering in your organization.
-
To define an endpoint-specific policy, you can click on the Endpoint Matching Criteria pane and add endpoints that the policy will match by enabling Endpoint Control.
-
To define a policy that will be activated on a gateway, you can click on the Gateway Matching Criteria pane and add gateways by enabling Gateway Control.
-
You may click on the Time-Based Matching Criteria to define a schedule for the policy.
-
Navigate the Security tab to define security rules.
-
Navigate the App Controls tab to define application control rules.
-
Navigate the Web Controls tab to define web control rules.
-
Navigate the TLS Controls tab to enable full TLS inspection.
-
Navigate the Cloud Access tab to define Cloud Access Security Broker (CASB) rules.
-
Navigate the Exclusions tab to add blacklis and whitelist exclusions.
-
You may quickly enable new policy by click on the Status toggle bar next to the policy name in the policy list view.
IMPORTANT NOTEPlease note that all of the criteria listed below are matched with the AND logical operator. In order for a flow to match your configured policy, all of these criteria need to match the flow information. For instance, if you have a policy configuration specifying the 10.0.0.0/24 network, the em0 interface, and the 'Admins' group, all of these conditions should be met for a policy to be applied. If a packet is identified as belonging to the 'Admins' group but is on the ixl0 interface, the packet will not match this particular policy.
Enable/Disable Policy
By default, a newly created policy is set to disabled. You must complete the policy configuration and set policy rules based on your specific needs.
To enable or disable a policy, click on the Status toggle bar on the policy configuration page.
Changing Policy Name
You can easily change the name of a policy, except the Default policy, via Name field on the policy configuration page.
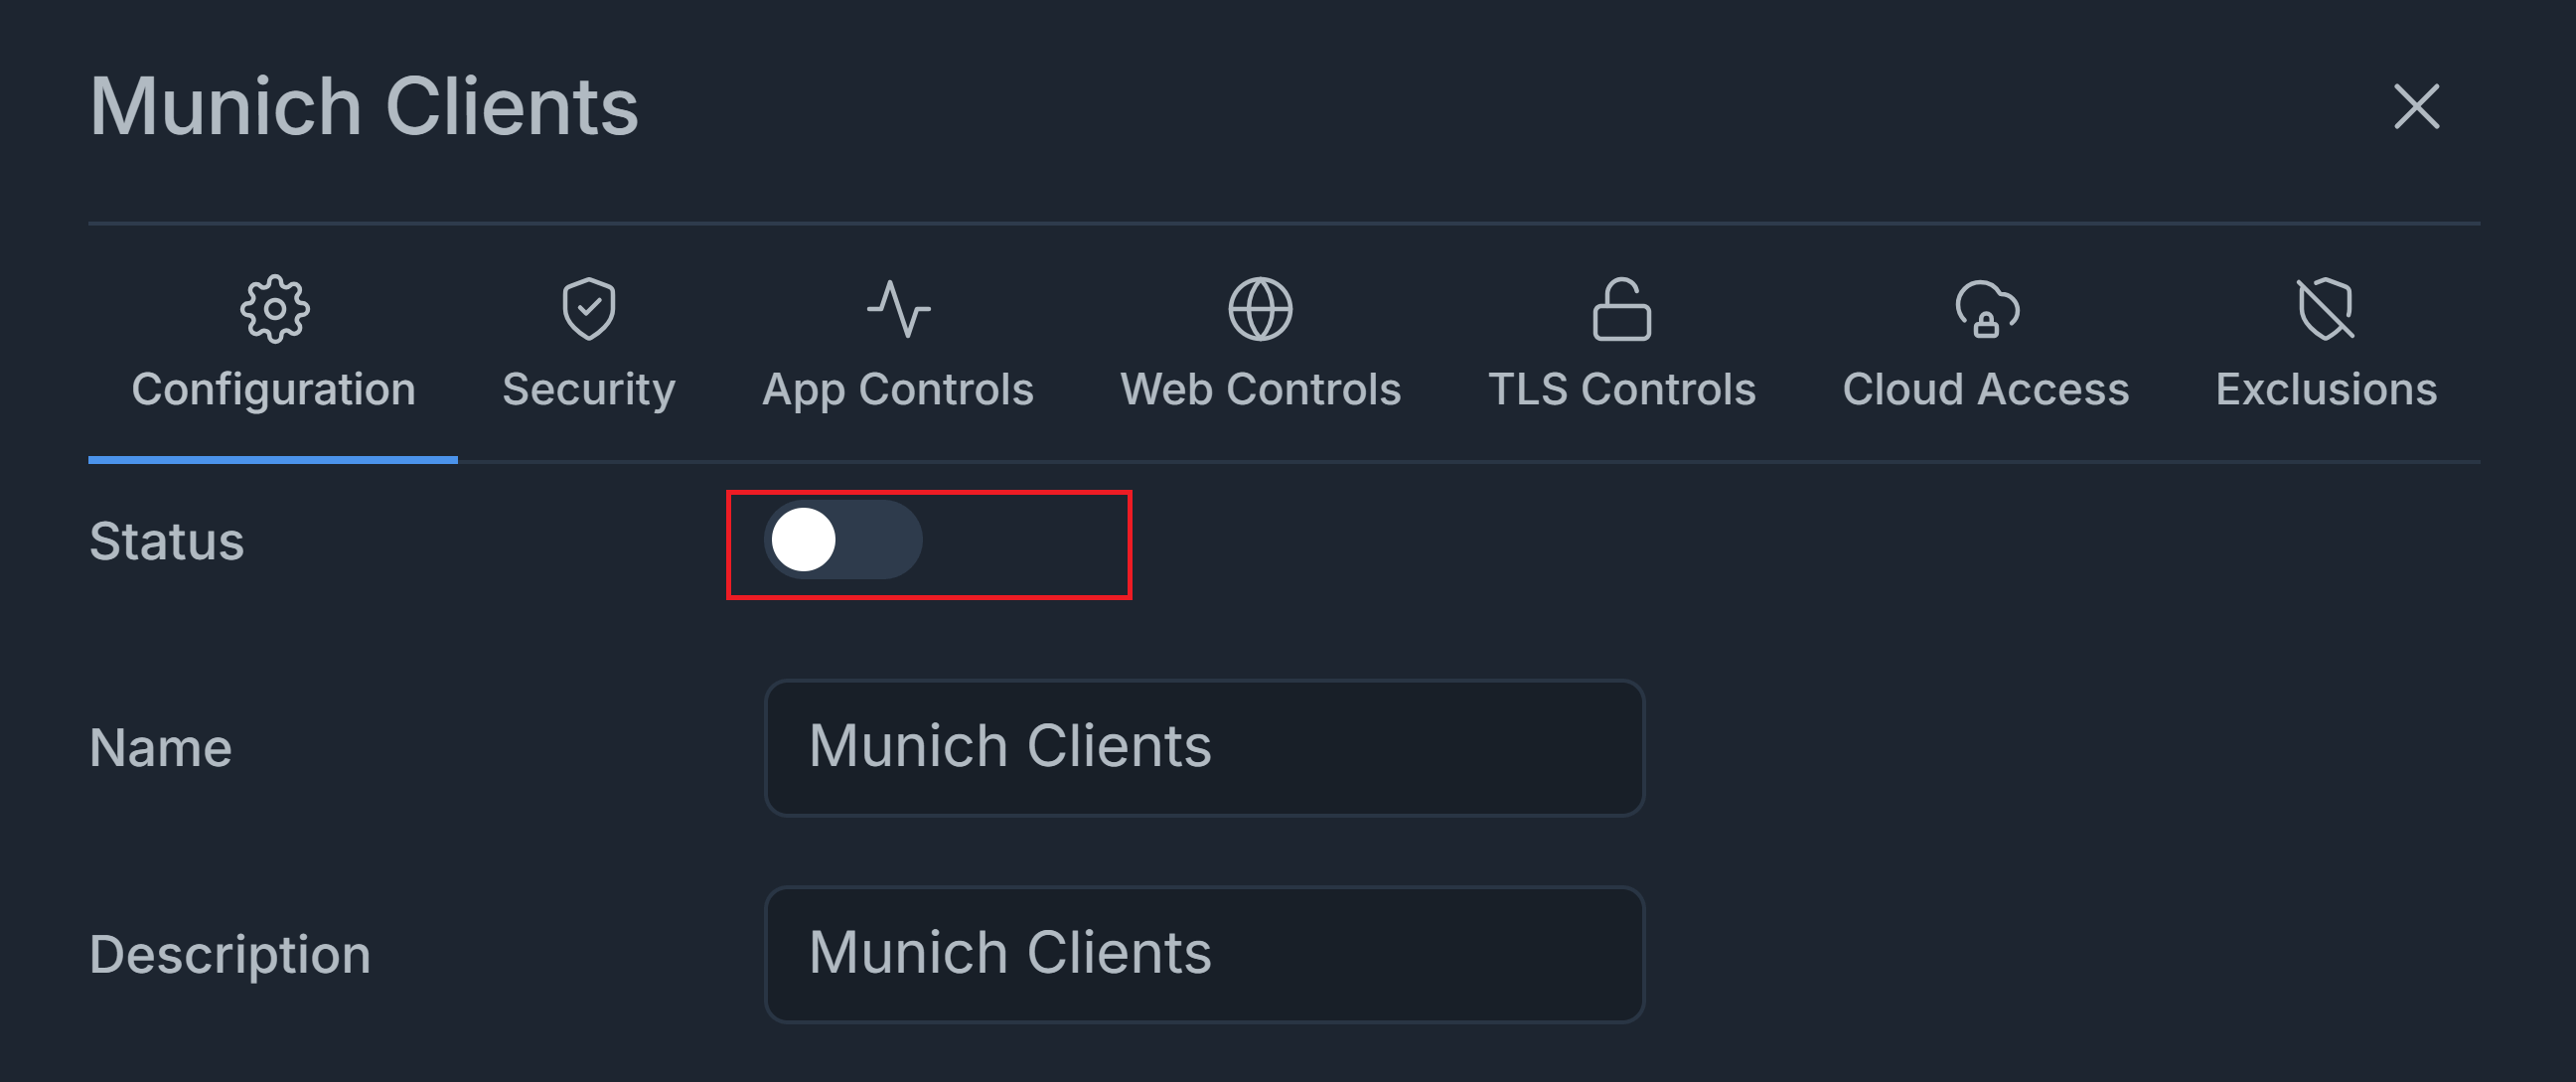
Figure 8. Changing Organization Policy Name
Restrict Internet Access
Zenarmor enables the complete restriction of Internet access for Untrusted devices concealed behind protected interfaces of organization gateways or for all endpoints and gateways specified in a policy.
You can accomplish this restriction via the Blanket Block Actions pane on the policy configuration page. There are two options under this setting. By default, these options are disabled.
-
Block all internet access: If you wish to restrict all internet access at specific time intervals, you can enable this option. When it is enabled, it overrides all rules and blocks all connections. In other words, this option blocks all connections for all clients that the policy matches regardless of the policy's app/web/security rules.
-
Block Untrusted Devices: You can enable this option to activate the Device Access Control feature on your organization network. When enabled, it prevents unauthorized devices from connecting to the internet. Since all newly detected devices are categorized as Untrusted by default, you must acknowledge and mark them as trusted to allow them to reach the Internet if this option is enabled.
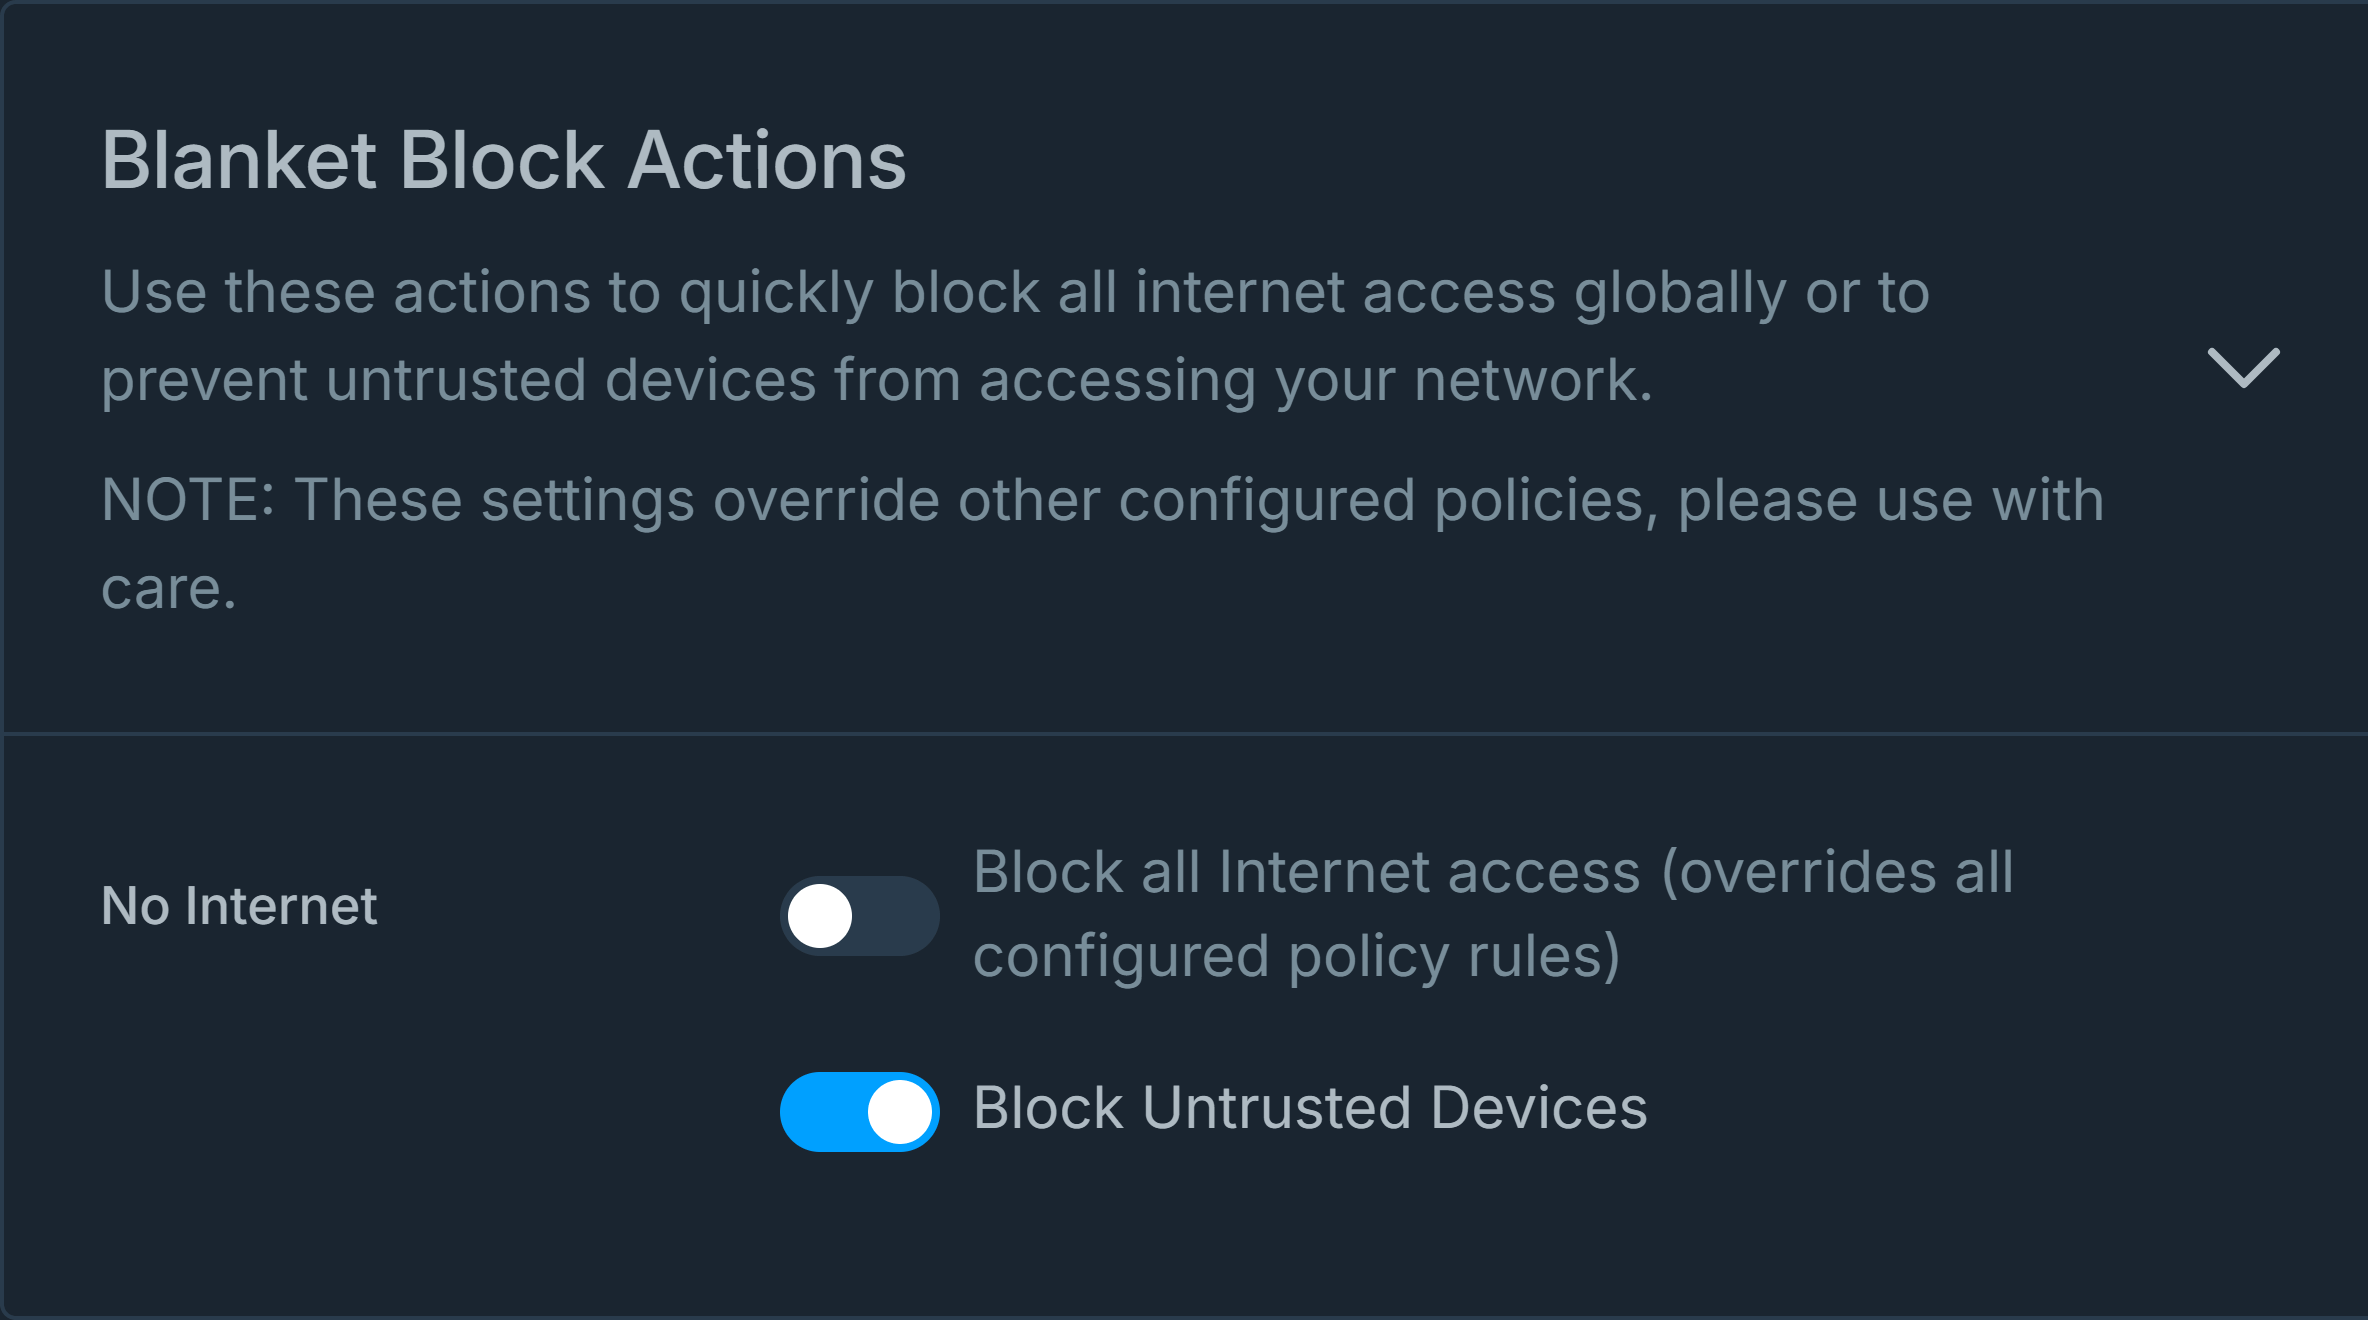
Figure 9. Blanket Block Actions
Blanket Block Actions settings override other app/web/security rules in the policy, so you should enable it with care.
Defining User- or Group-Based Policy
The Zenconsole Identity and access management feature provide user-based policy filtering. Zenconsole can integrate with your Google Workspace for username/group resolution. You may also add users and groups to your organization manually.
On the policy configuration page, you can define a user/group-based policy by simply adding a user or group to the policy.
By default, newly created policies are applied to all users and groups in an organization.
To define a user- or group-based policy for your organization, you may follow the next steps:
-
Navigate to the Configuration page of the organization policy.
-
Click on the User and Group Matching Criteria pane.
-
Click on the + Add User drop-down menu to select the user(s). This will display all available users in your organization.
-
Select the users that you want to add. You may add as many users as you want.
-
Click on the + Add Group drop-down menu to select the group(s). This will display all available groups in your organization.
-
Select the groups that you want to add. You may add as many groups as you want.
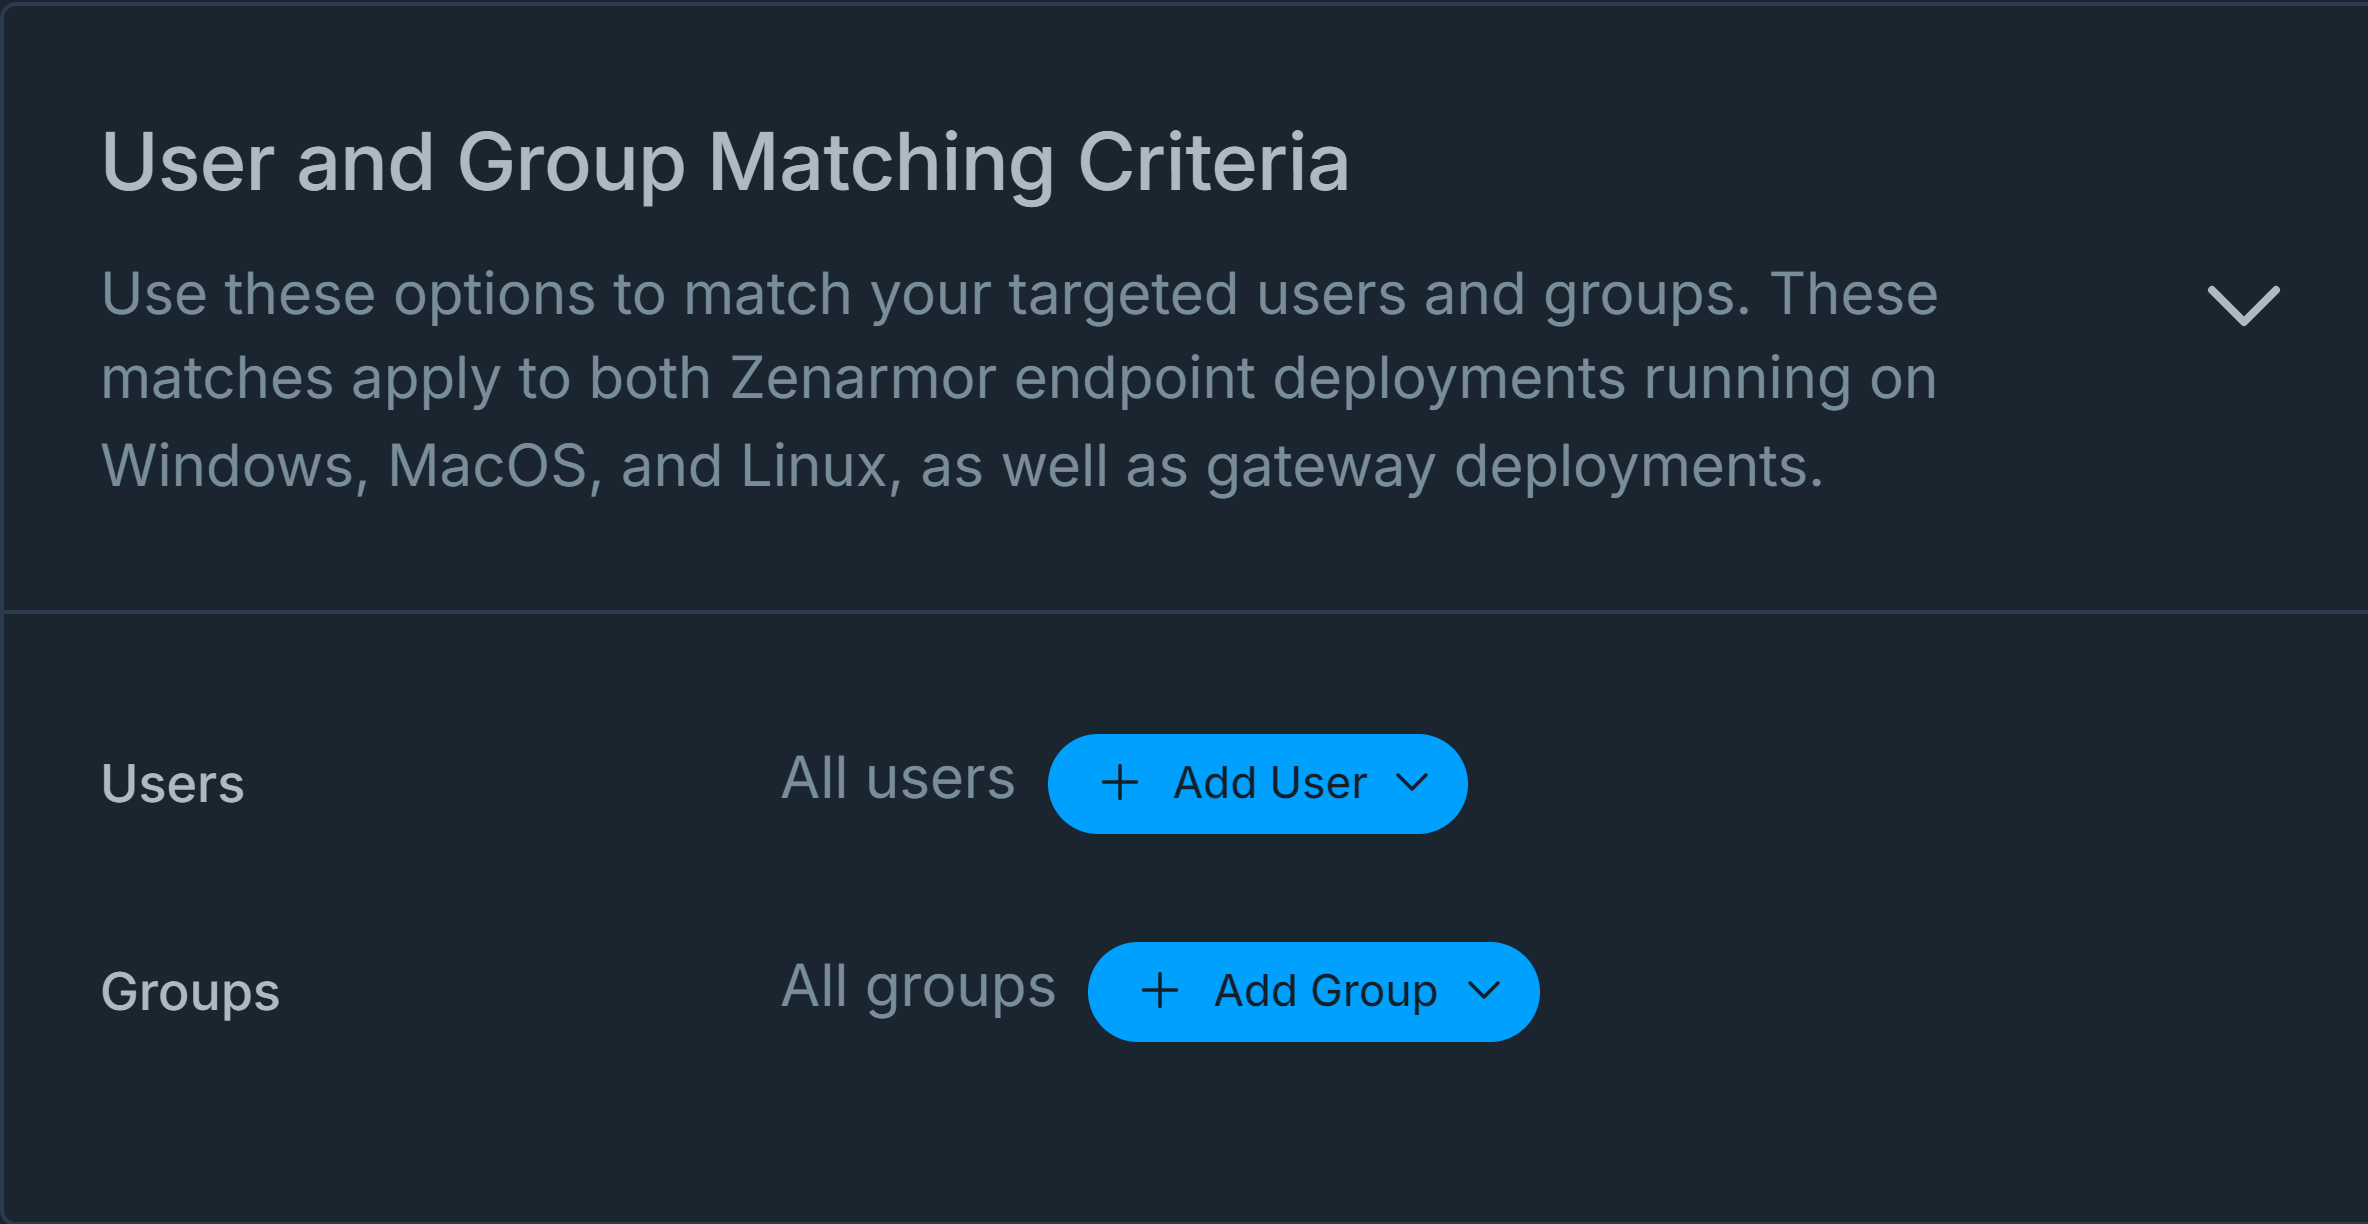
Figure 10. Adding Users/Groups on Policy Configuration
After enabling and synchronizing the policy with your firewall, your user/group-based filtering will be activated in your organization.
Defining Endpoint-Based Policy
Zenarmor allows you to define endpoint-specific policies easily in your organization. By default, endpoint control-enabled policies are applied to all endpoints.
To define endpoint-based policy, you may follow the next steps:
- Navigate to the Configuration page of the organization policy.
- Click on the Endpoint Matching Criteria pane.
- Click on the Enable Endpoint Control toggle bar to apply the rule to Zenarmor endpoint instances in your organization. This will display +Add Endpoint drop-down menu to allow you to select available endpoints as you wish. By default, All Endpoints are selected.
- Click on the + Add Endpoint drop-down menu to select the endpoint(s). This will display all available endpoints in your organization.
- Select the endpoints that you want to add. You may add as many users as you want.
You may use the search toolbox to find a specific endpoint easily.
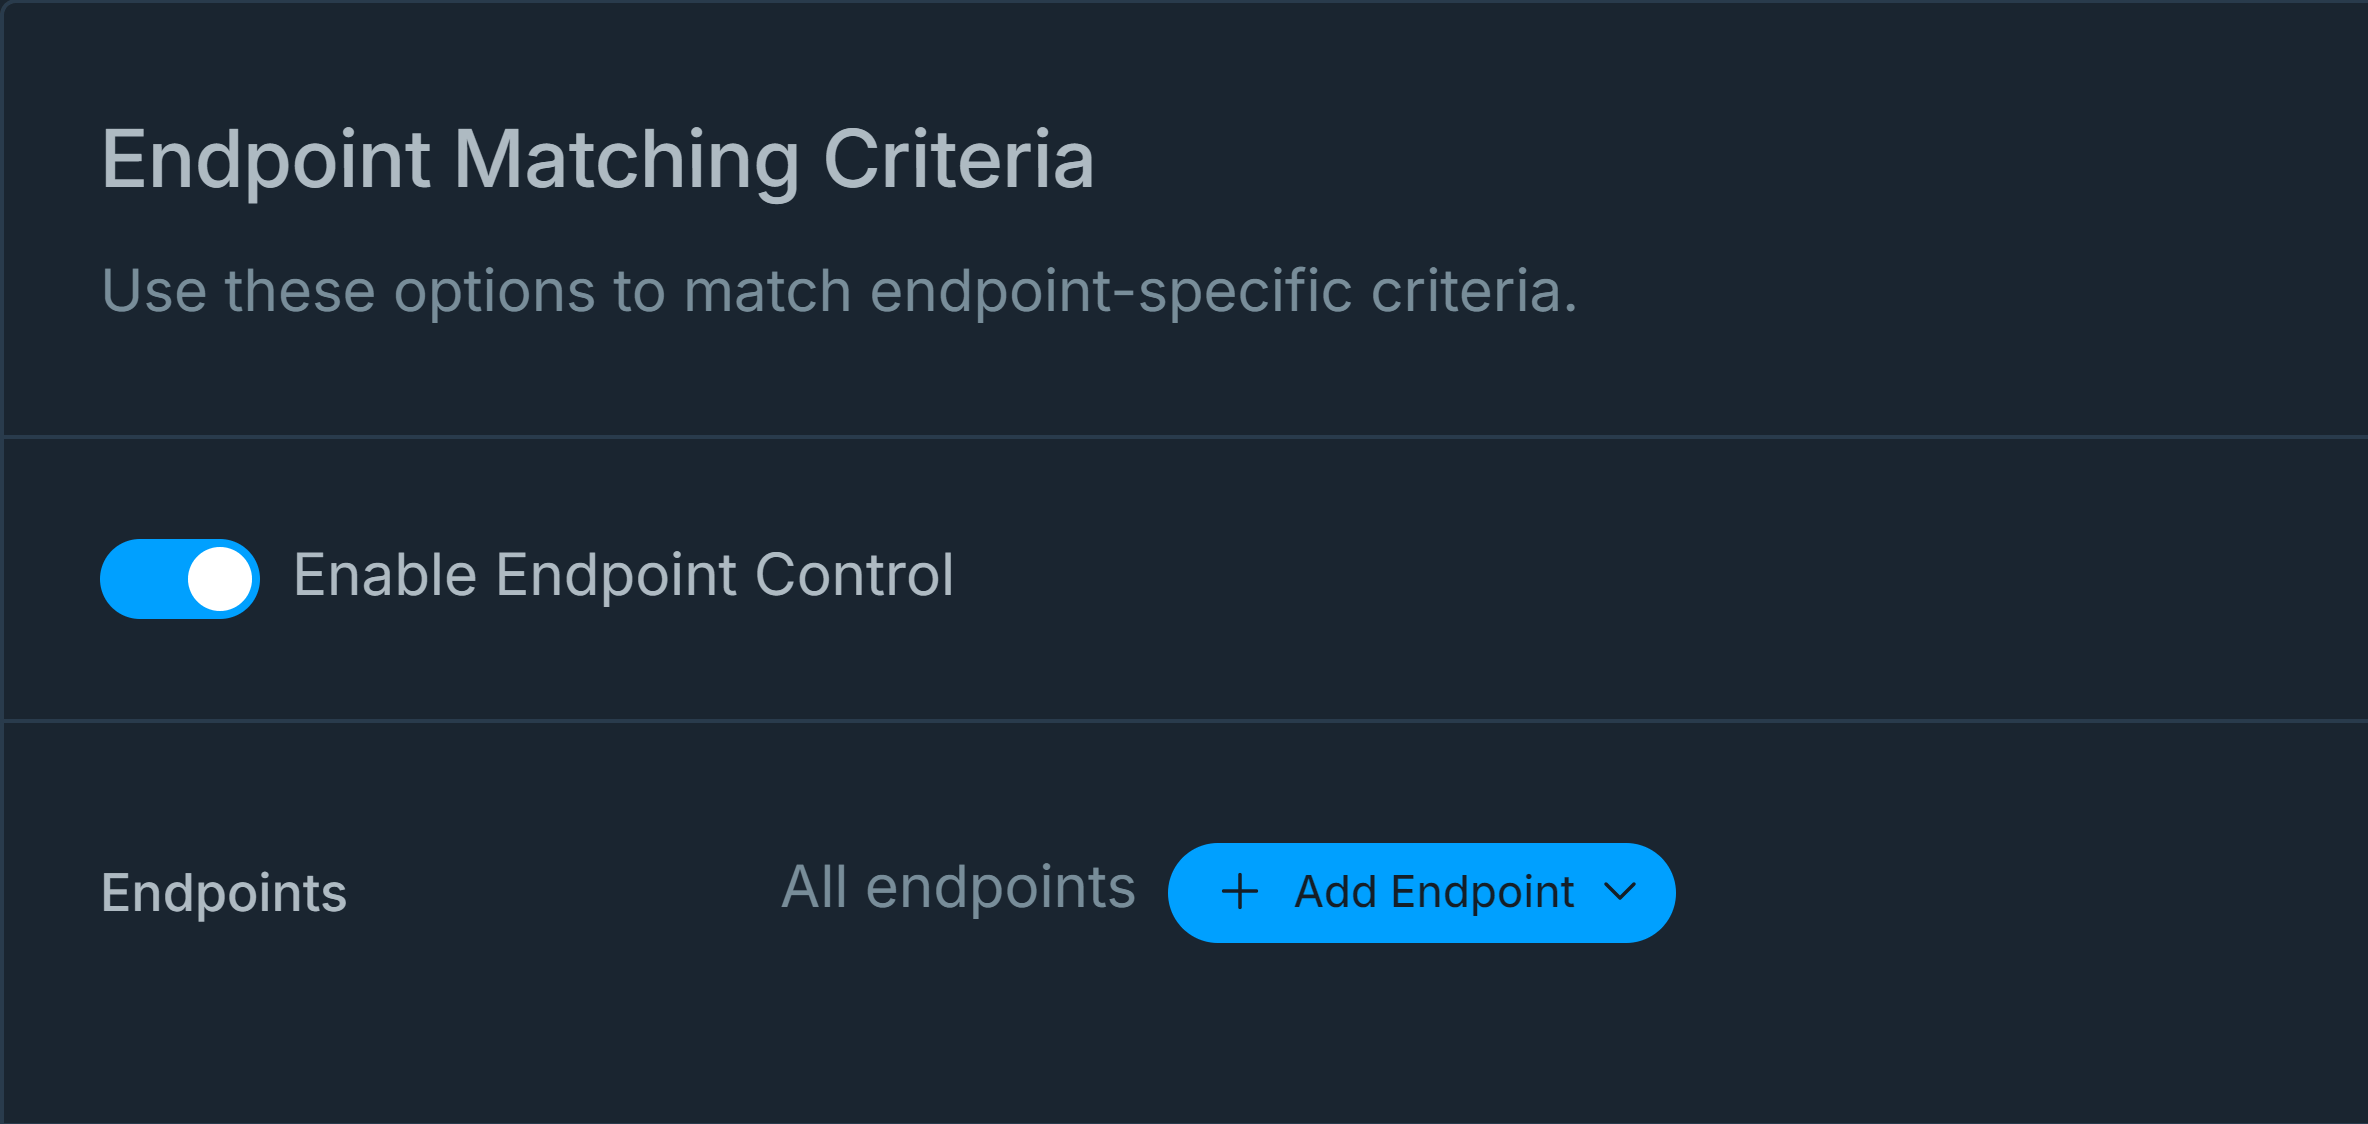
Figure 11. Defining Endpoint-Based Policy
Defining Gateway-Based Policy
Zenarmor allows you to easily define gateway-specific policies within your organization. By default, gateway control-enabled policies are applied to all gateways.
To define gateway-based policy, you may follow the next steps:
-
Navigate to the Configuration page of the organization policy.
-
Click on the Gateway Matching Criteria pane.
-
Click on the Enable Gateway Control toggle bar to apply the rule to Zenarmor gateway instances in your organization. This will display +Add Gateway drop-down menu to allow you to select available endpoints as you wish. By default, All Gateways are selected.
tipYou may use Enable Gateway Control options to match gateway-specific criteria in conjunction with Zenarmor deployments running on OPNsense and other supported platforms in a Layer 3 Routed Mode.
-
Click on the + Add Gateway drop-down menu to select the gateway(s). This will display all available gateways in your organization.
-
Select the gateways that you want to add. You may add as many gateways as you want.
tipYou may use the search toolbox to find a specific gateway easily.
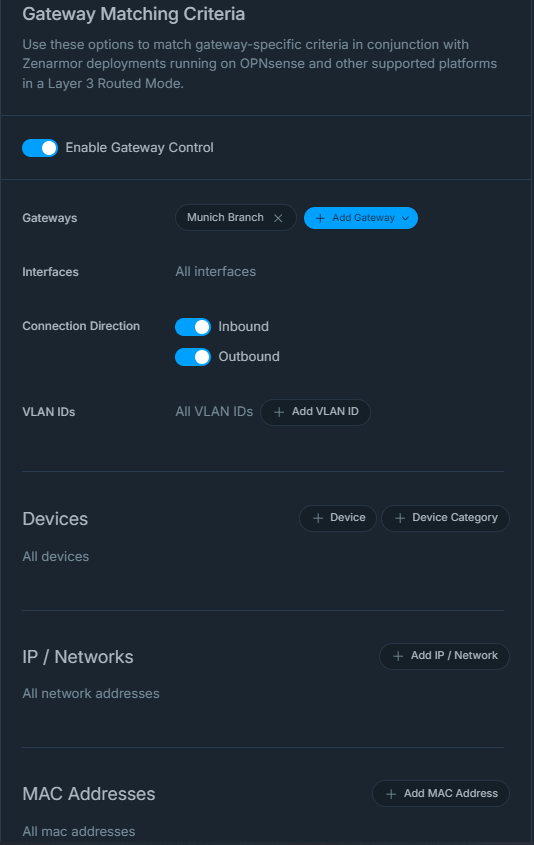
Figure 12. Defining Gateway-Based Policy
-
After selecting your gateway, proceed with setting other policy configuration parameters. By default, all protected interfaces are filtered in the policy. You may change protected interfaces on the firewall configuration page of the gateway.
-
Select the network packet direction in which to apply the rules that may be specified for the policy. By default, packets in both Inbound and Outbound directions are filtered. You can easily change packet direction settings by clicking on the toggle bars next to the Inbound and Outbound options on the Connection Direction pane.
-
You may apply the policy to specific VLANs on your network by adding VLAN IDs. To define a Vlan-based filtering, click on the + Add VLAN ID button in the VLAN IDs pane.
-
In the Devices pane, you can define device-based filtering by clicking on the + Add Device or + Add Device Category button.
-
For IP/Network address-based filtering, you can add an IP/Network address by clicking on the + Add IP / Network button in the IP/Networks pane.
-
For MAC address-based filtering, you can add a MAC address by clicking on the + Add MAC address button in the MAC Addresses pane.
tipFor more information about policy configuration on gateways please refer to Configuring a Policy on Zenarmor documentation.
Defining Time Schedule
A time schedule may be added to your organziation policy if you want your policy to be active only certain times of the day or days of the week. You may update or remove schedules that were previously created on the Policy Configuration page.
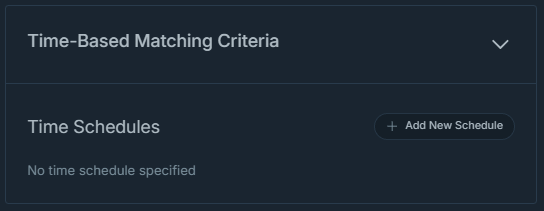
Figure 13. Time Schedules on Policy Configuration
To create a new schedule for a policy, you may follow the next steps:
-
Navigate to the Configuration page of the organization policy.
-
Click on the Time-Based Matching Criteria pane.
-
Click the
Add new schedulebutton. This will open a dialog box for naming the schedule.
Figure 14. Adding a new time schedule for a policy
-
Enter a name and click on the
Addbutton. This will add the new schedule to theTime scheduleslist. -
Select each day you wish to be applied to the schedule. Selected days will be displayed with a solid blue checkmark icon.
-
Specify the starting and stopping hours for which the policy will be effective.

Figure 15. Time schedule configuration for a policy
Modifying/Removing Time Schedule
You can modify the existing time schedule by updating the start/stop hours and selecting/deselecting the days at any time after creating the initial schedule.
To remove an existing time schedule, click on the Remove button with a trash icon. This will open a dialog box for confirming the removal of the schedule. Clicking on Remove button in the confirmation box will erase the schedule for the policy.

Figure 16. Removing a time schedule for a policy
Policy Synchronization
A policy is automatically synchronized with associated endpoints and gateways within a maximum of 15 minutes after it is defined on Zenconsole. In certain circumstances, it may be necessary to promptly implement new policy settings on associated Zenarmor instances. Zenconsole offers a Trigger Update mechanism to facilitate immediate policy synchronization on gateways and endpoints. This feature supersedes the periodic update schedule, guaranteeing that all instances are updated without delay.
You may manually force policy synchronization in your organization by following the next steps:
-
Login to Zenconsole and then select the organization you want to manage.
-
Click Policies menu on the left sidebar. This will open the organization's policy management page and display the policy list view.
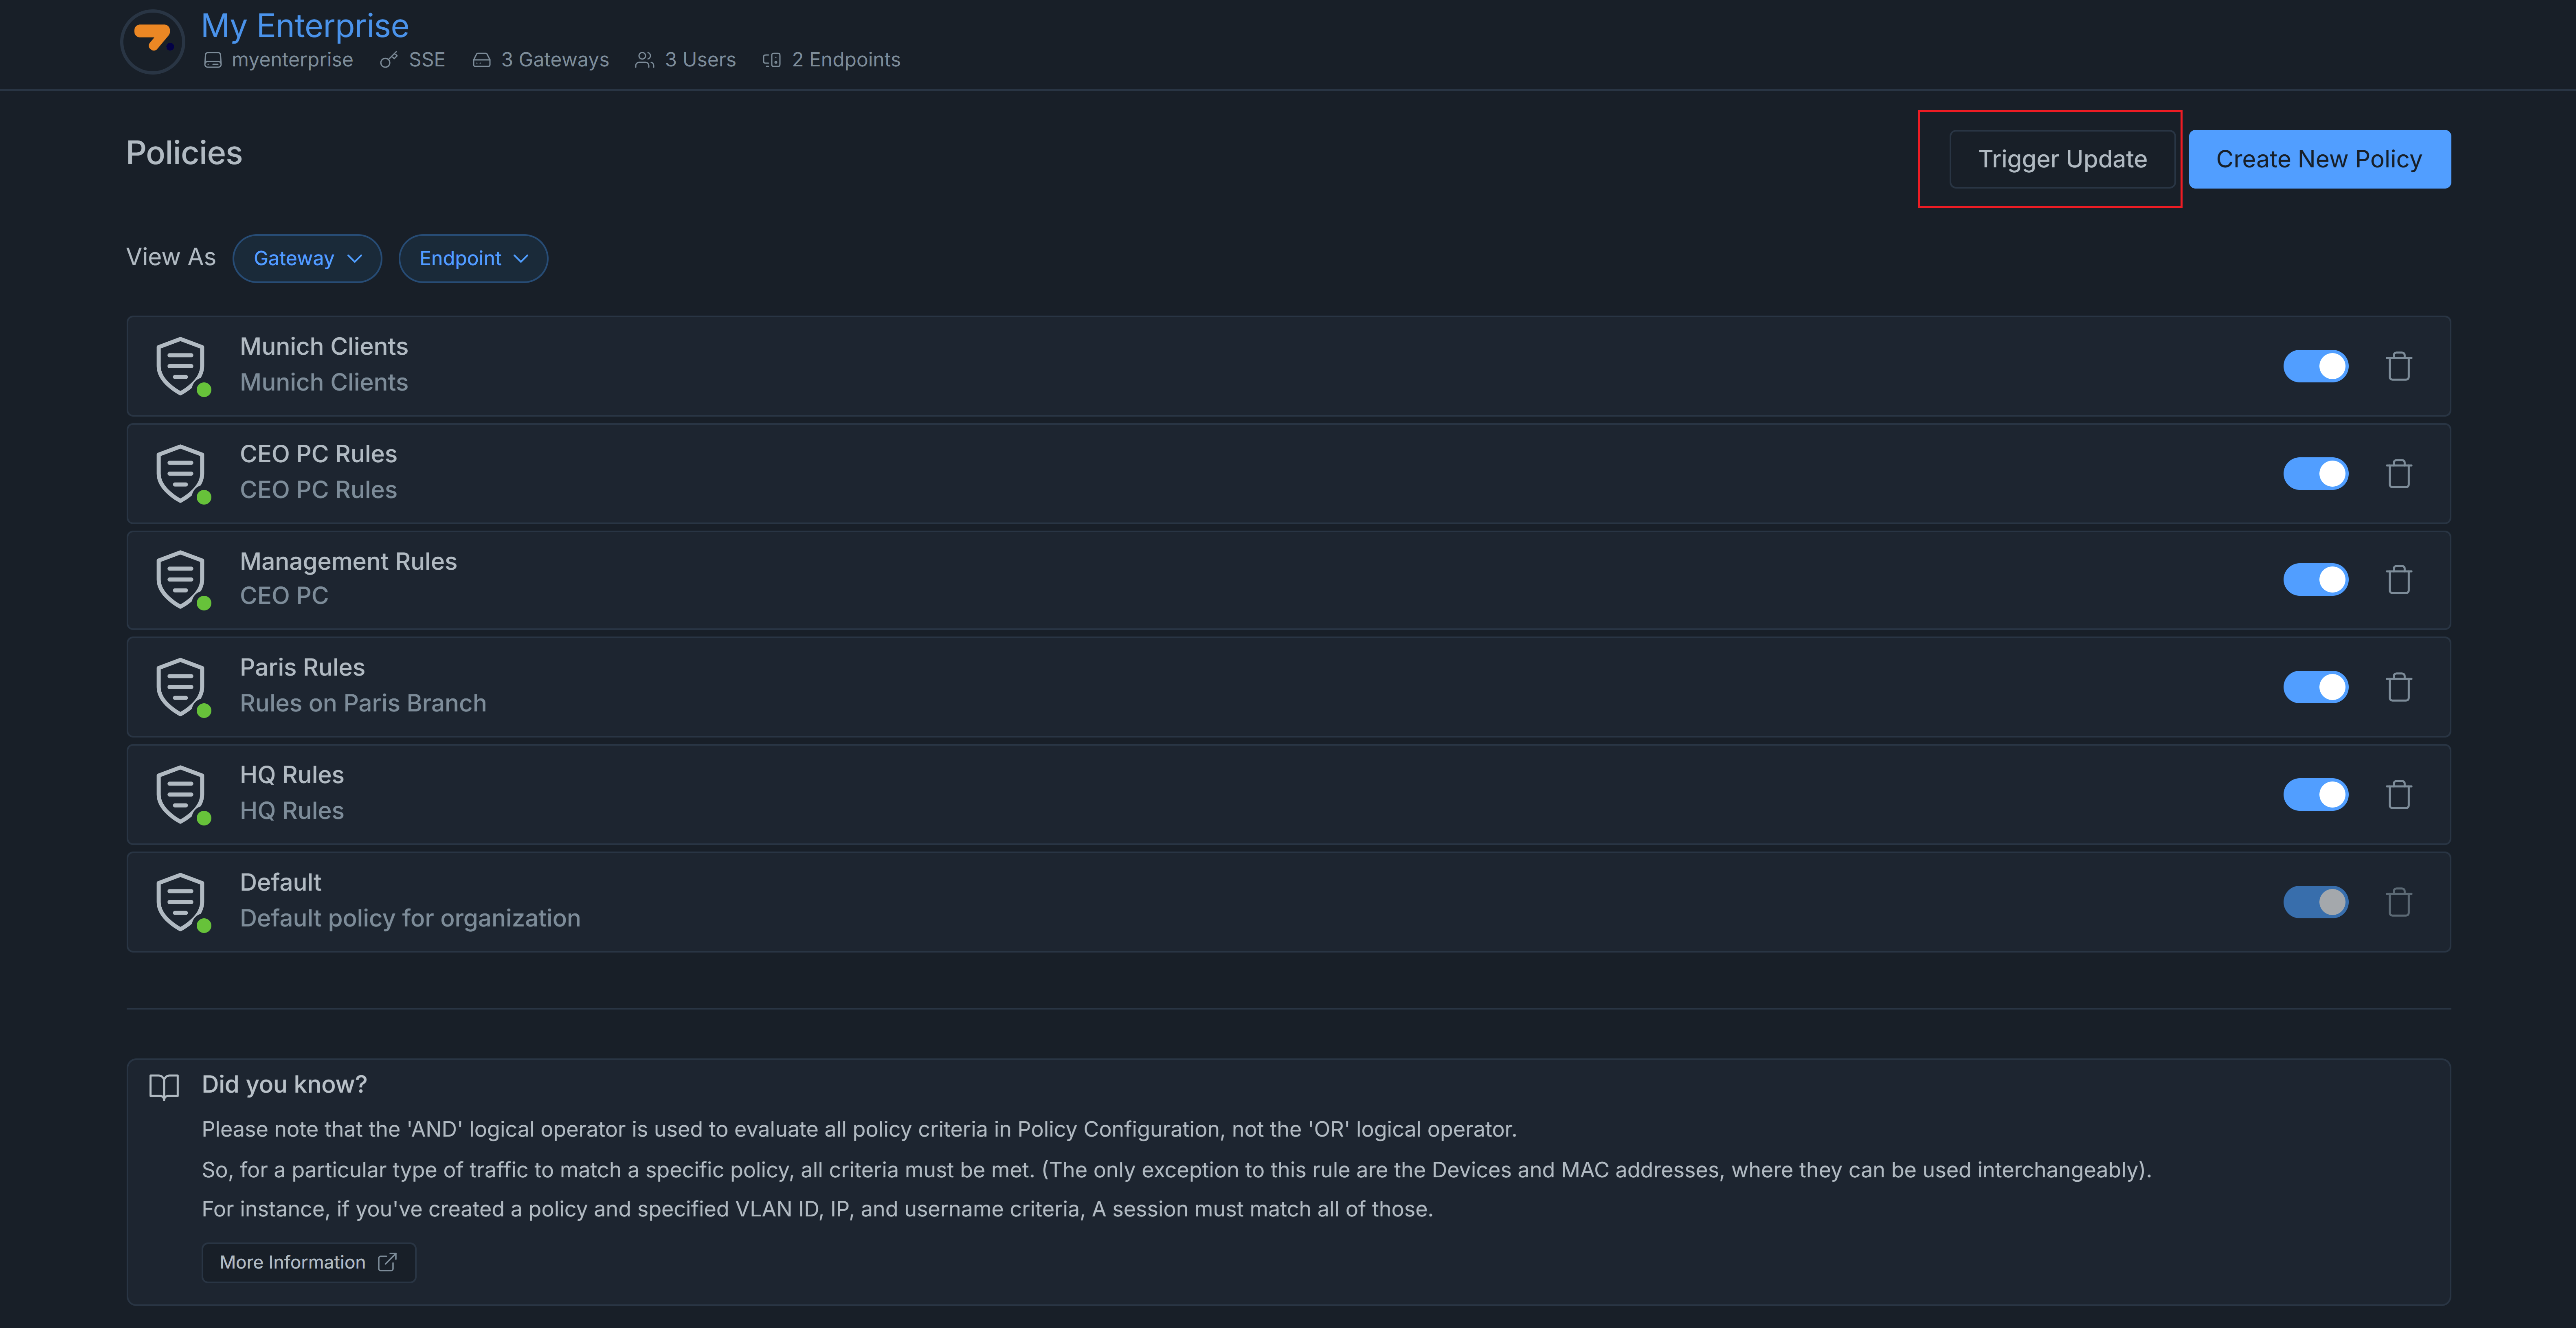
Figure 17. Trigger Update on Policy List View
-
Click Trigger Update button at the right top of the page. A dialog box appears to trigger an immediate policy update.
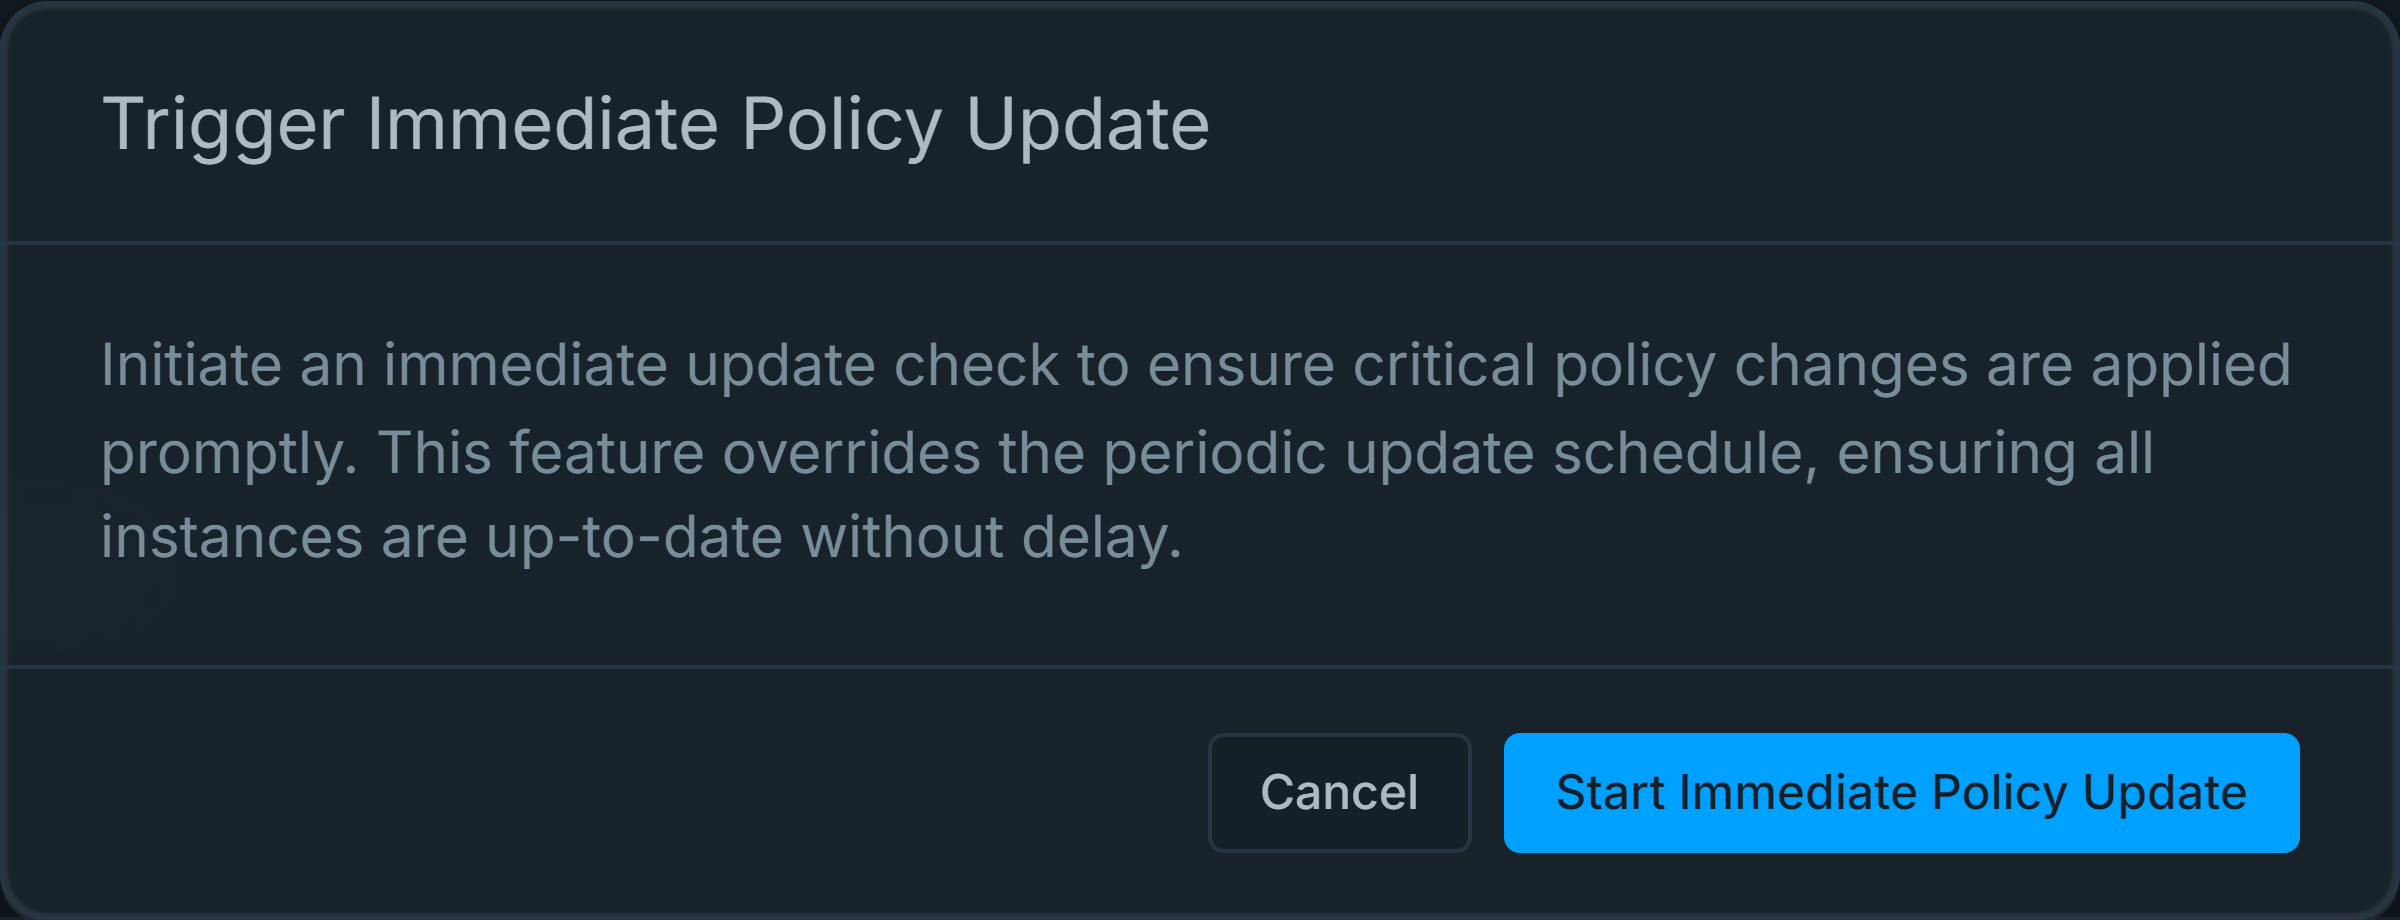
Figure 18. Starting immediate policy update
-
Click Start Immediate Policy Update button. A confirmation message is displayed.
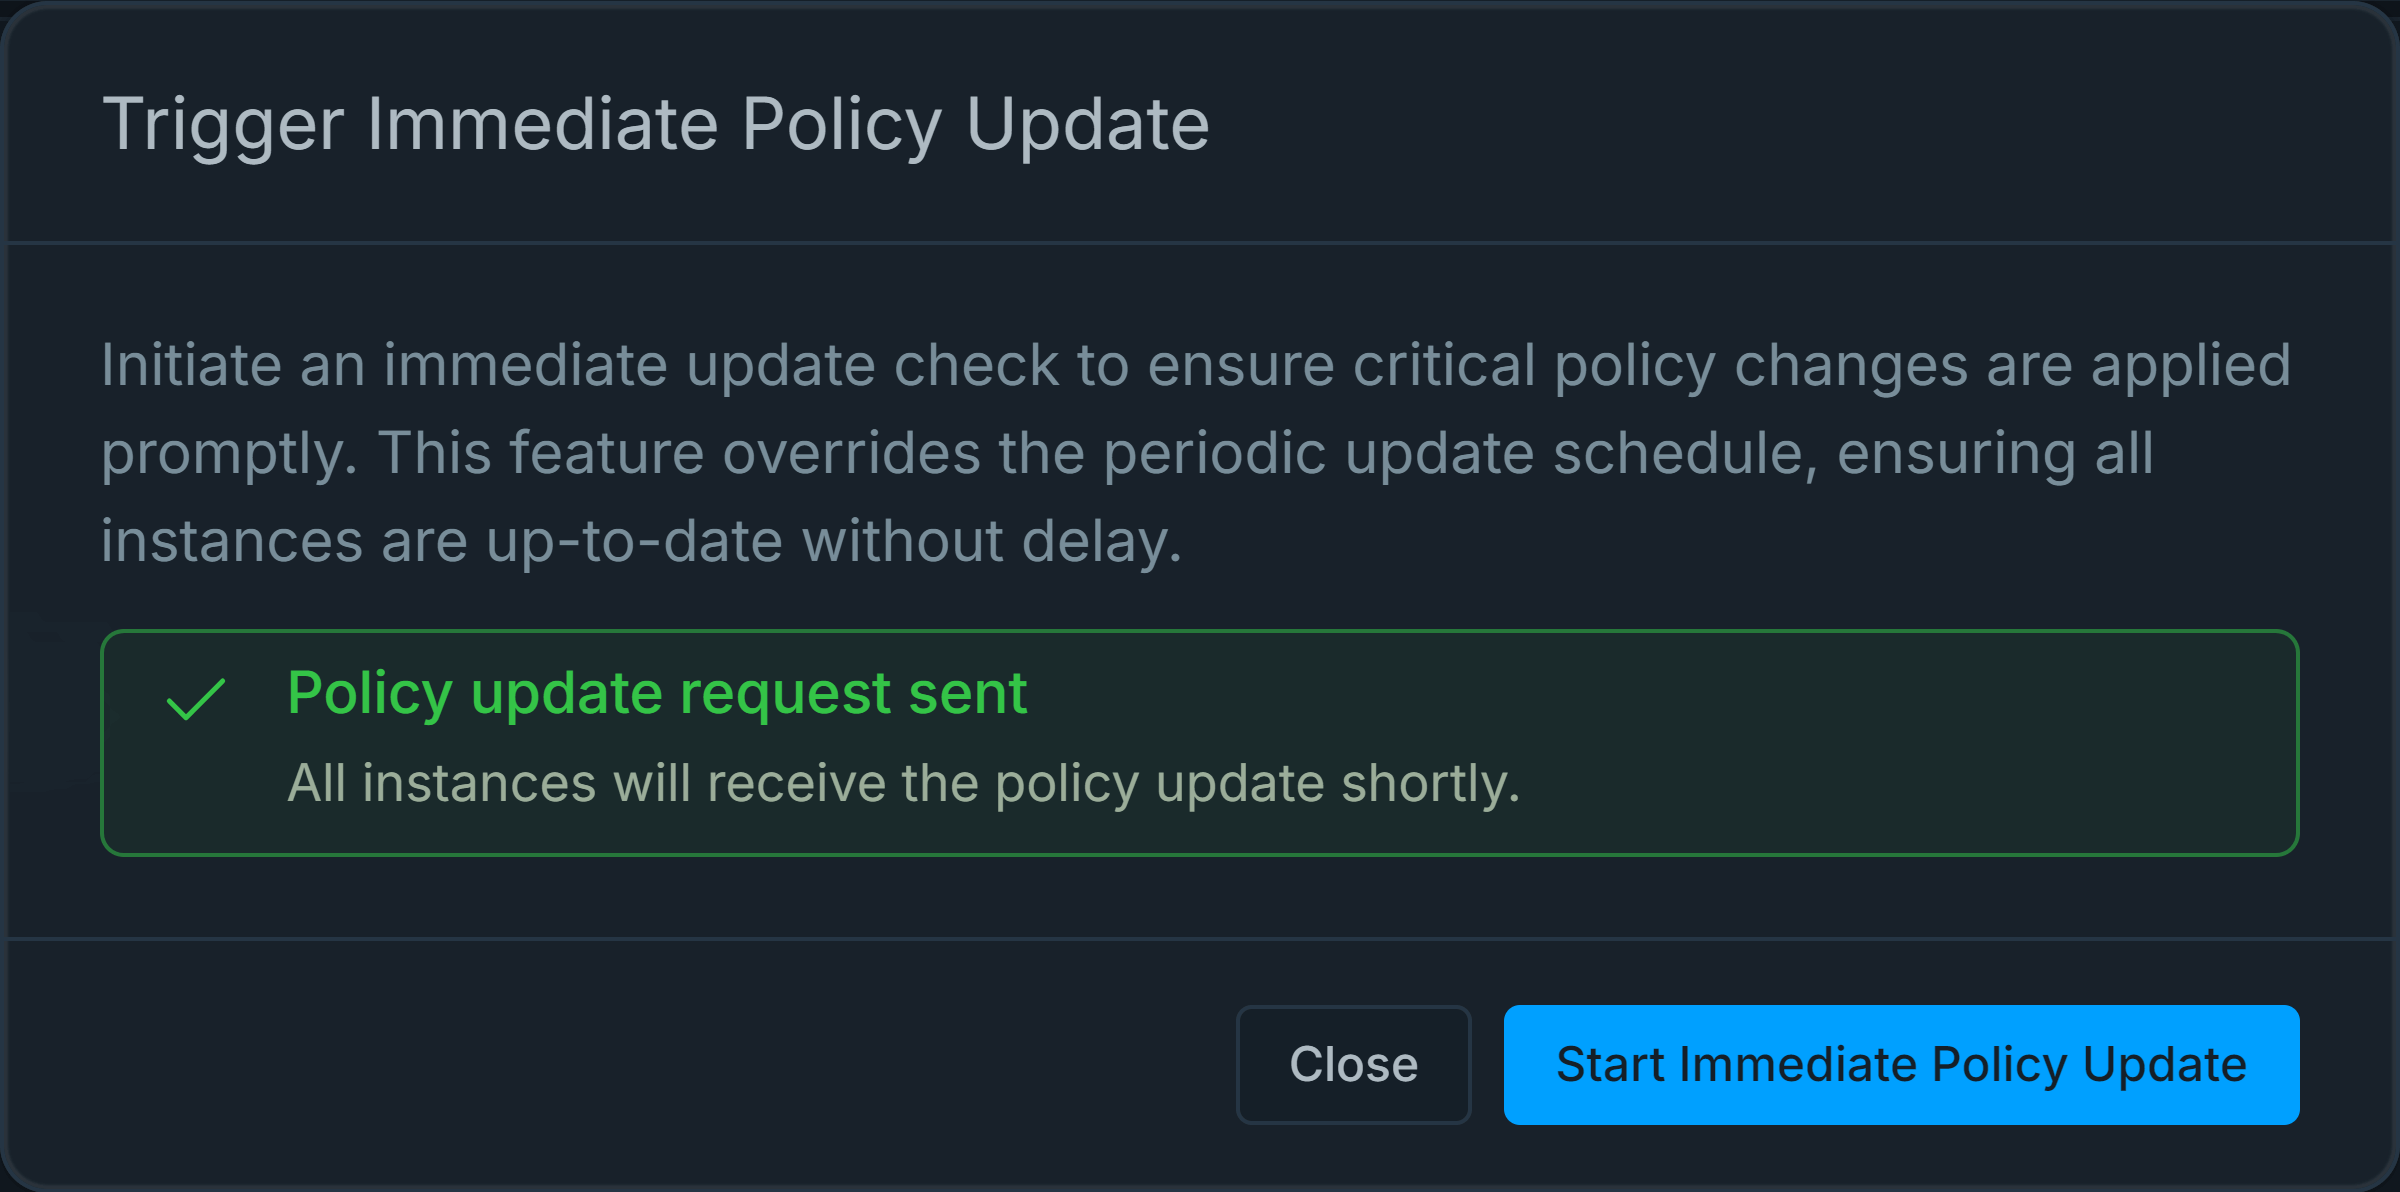
Figure 19. Policy Update Request Sent
-
Click Close.
If all goes well, all related Zenarmor instances should be up-to-date after the trigger update mechanism is executed.
Checking Policy Synchronization Status
By examining the synchronization status on the Policies page, you can easily confirm the successful deployment of your organization's policies on your Zenarmor instances.
To view the policy synchronization status, you may follow the next steps:
-
Login to Zenconsole and then select the organization you want to manage.
-
Click Policies menu on the left sidebar. This will open the organization's policy management page and display the policy list view.
-
Filter policies by either a Gateway or an Endpoint depending on your need by clicking on the View as drop-down menu at the top left of the page. This will list the applied policies on the selected Zenarmor instance.
-
Look at the Policy Status column on the right side of the policy list view. A check mark (
) icon is displayed in this column for successfully synchronized policies. If Zenconsole cannot confirm that the policy is successfully received by the Zenarmor instance, an exclamation mark icon appears in the Policy Status column. Also, a warning message indicating that some of the organization policies that match the gateway do not seem to be synced is displayed at the bottom of the policies list.
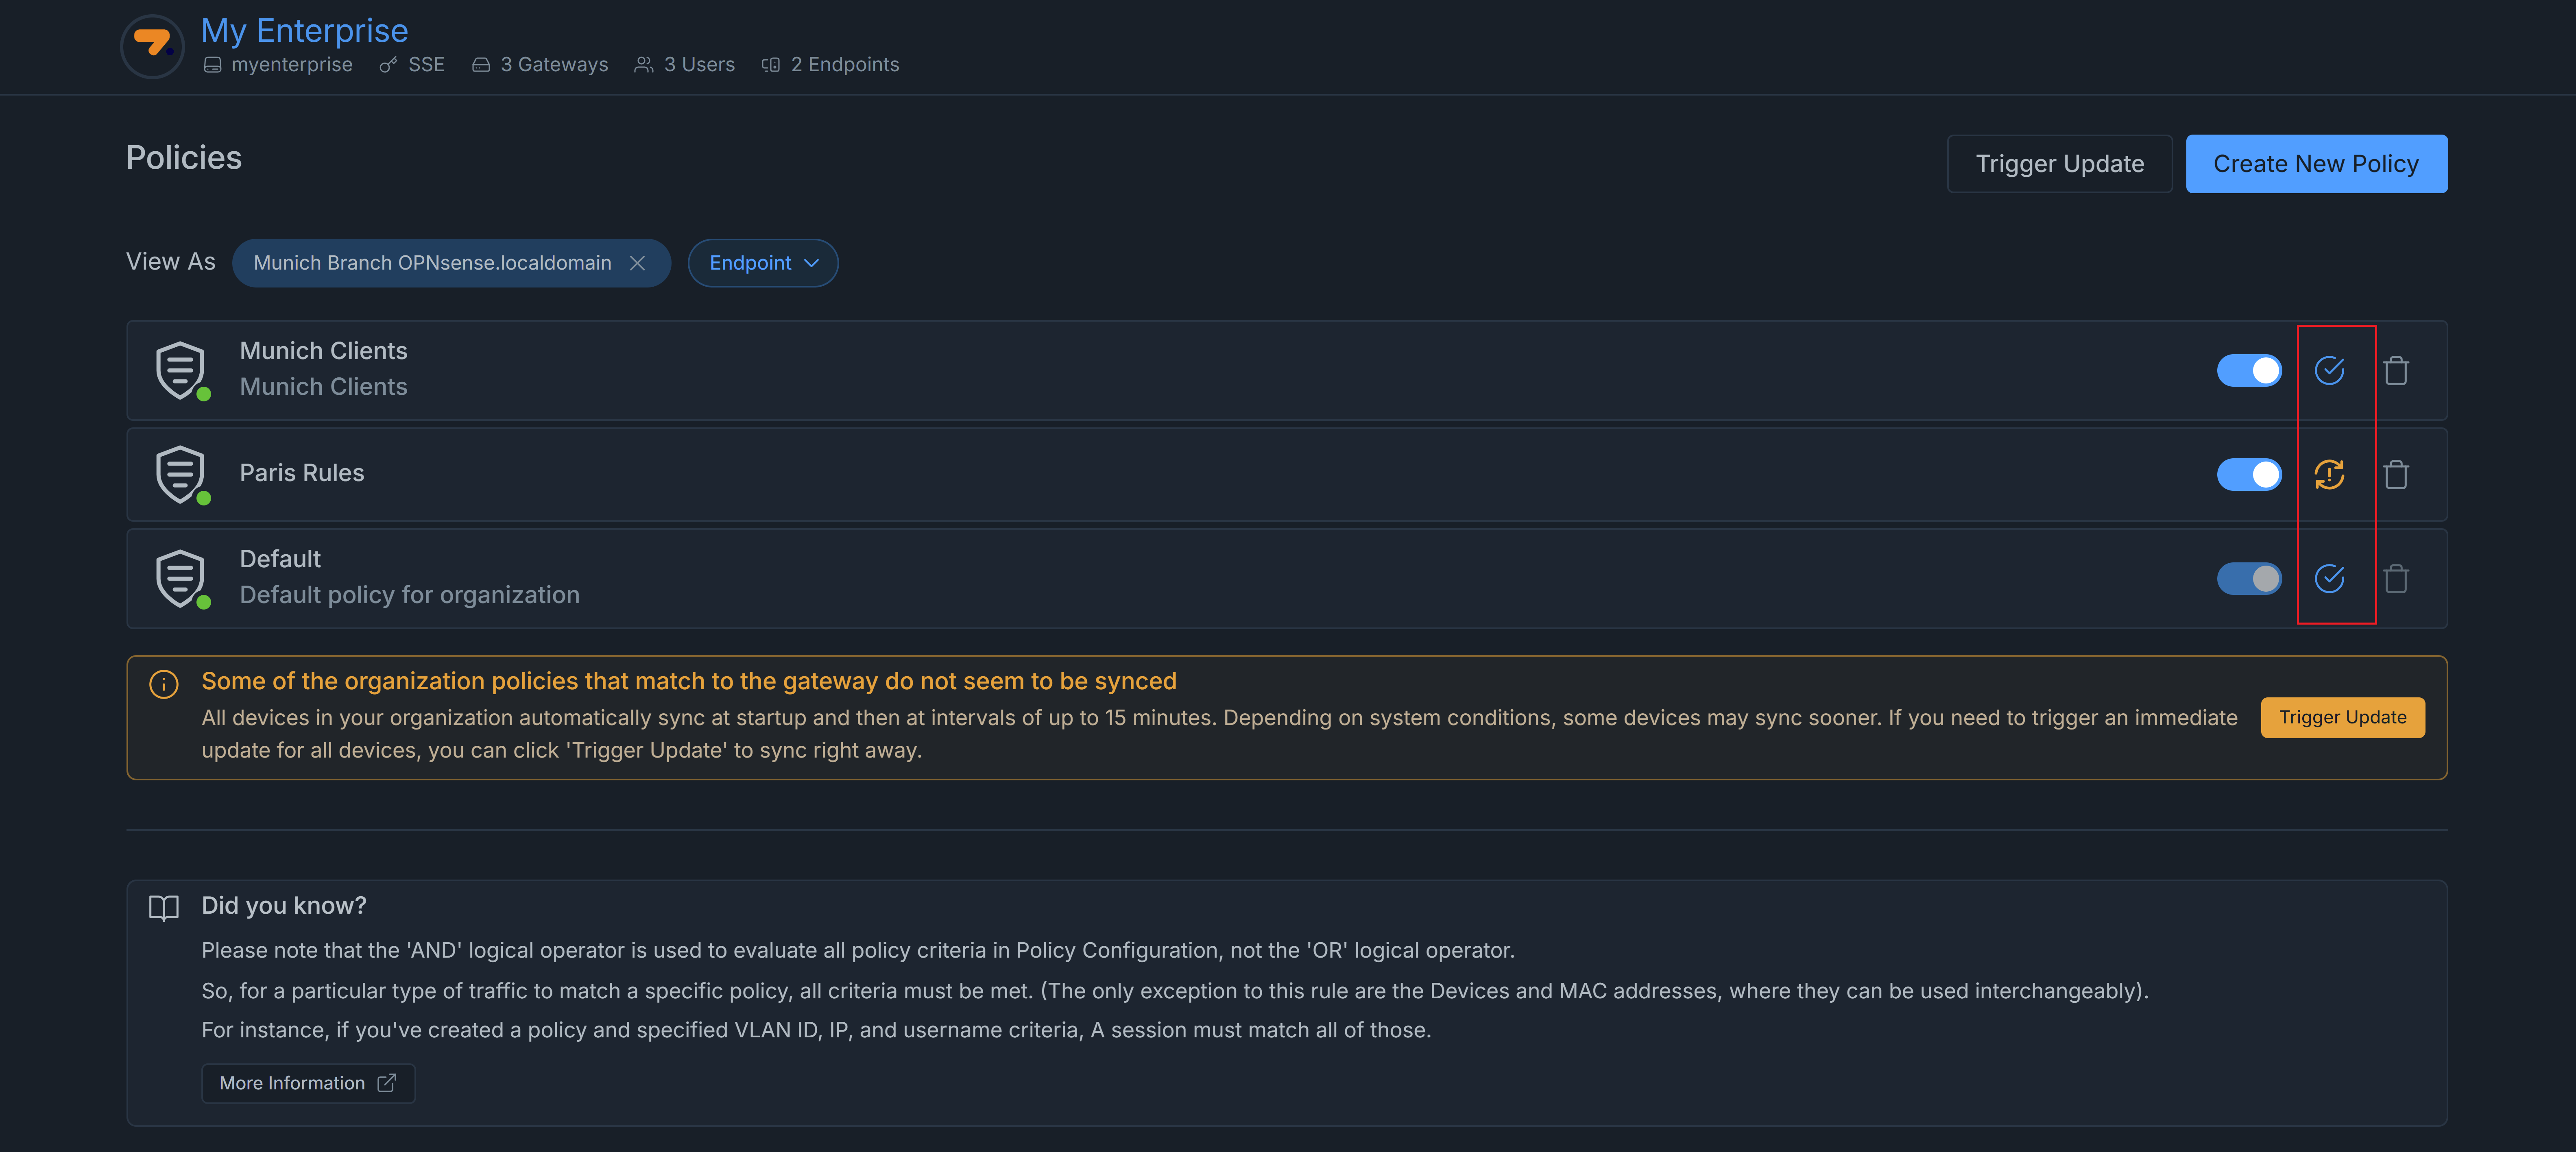
Figure 20. Viewing Policy Synchronization Status