Configuring Firewall on Zenconsole
On the Settings tab of Zenconsole (Centralized Cloud Management interface) you can manage and configure your firewall settings.
By using this Settings tab you can perform the following tasks:
-
configure general firewall settings like node name, location, tags and image,
-
configure your firewall by making database selection, interface selection, deployment mode selection, or deleting the firewall from the centralized cloud management portal.
-
configure cloud threat intelligence settings.
-
configure reporting data management.
-
configure DNS for reporting data of your firewall.
-
configure exempted VLANs and Networks.
-
configure the health check settings of your firewall.
-
configure the block notification page for your network traffic.
-
manage the privacy-related settings of your firewall.
-
share your firewall with others you want to manage it collaboratively.
-
enable/disable API and manage API keys for your firewall here.
General
General settings page allows you to perform the following tasks:
- Set Node
Name - Configure the
Locationof your node - Add
Tagsfor your node - Configure
Imagefor your node
To access the General settings page you can follow the steps listed below:
- Select your firewall on Zenconsole.
- Click
Settingsmenu on the left-hand sidebar. - Click
Generalmenu.

Figure 1. Zenconsole - General
Setting a Node Name
You can easily set a name for your node by typing in the Name field. As soon as pressing the enter key, the name you type will be applied.
A maximum of 30 characters are allowed. Special characters like (*-/?) will be removed automatically from the node name.
Changing Location
Zenarmor automatically detects the GeoIP location of your firewall and displays it on the node information bar and dashboard. To change the location of your node, you may follow the steps below:
- Select the country from the
Locationdrop-down menu. - Type location details like state, city, or GPS coordinates as you wish in the field.
Adding Tags
Zenconsole allows you to add a tag for your node. You can easily manage your firewalls by grouping them with a tag. To add or remove a tag to/from your firewall you may follow the steps explained in the All Firewall Dashboard documentation.
Changing Image
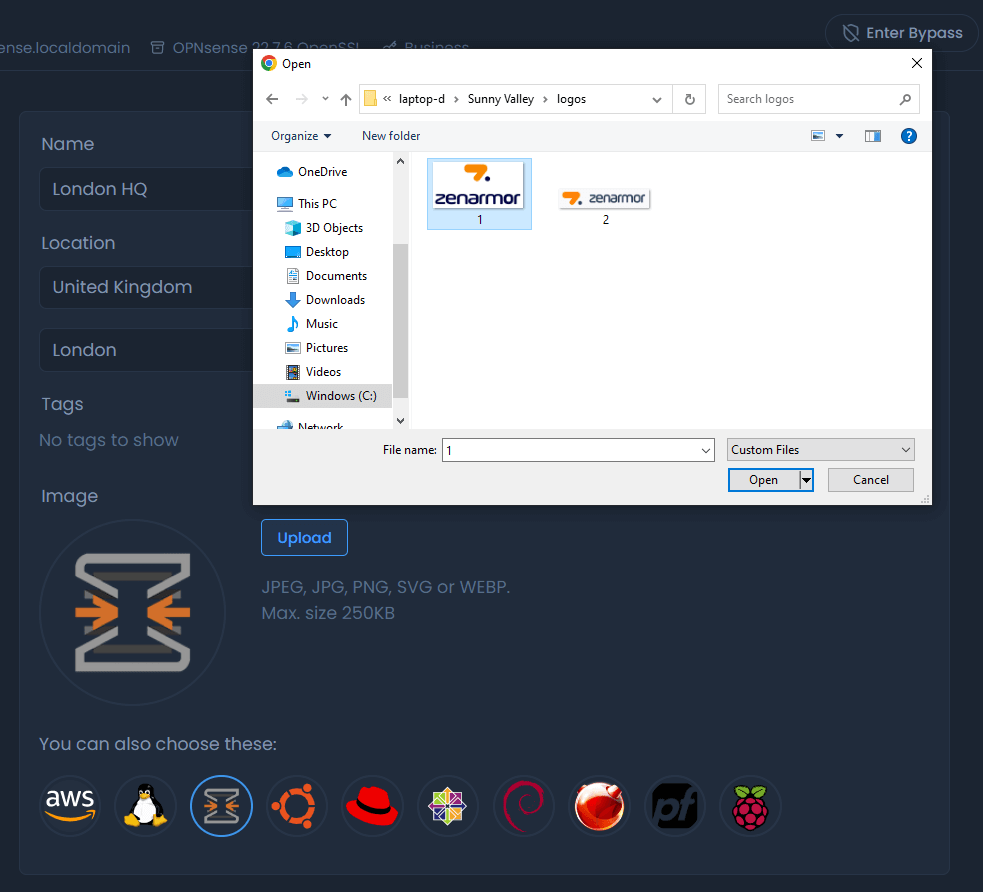
Zenarmor automatically detects the operating system (OS) of your firewalls such as OPNsense, pfSense Software, RHEL, or Ubuntu, and displays their logo on the node information bar and dashboard. You can change this logo by uploading a new image, such as your company logo, or selecting one of the existing images. You can easily upload a new image by following the steps below:
- Click on the
Uploadbutton. - Select the image file from your local disc and click open to upload the file.

Figure 2. Zenconsole - Uploading new image
You may use JPEG, JPG, SVG, or WEBP file formats. The maximum size of the image is limited to 250 KB.
- You may need to resize the image using your mouse.
- Click
Saveto start using the newly loaded image.

Figure 3. Zenconsole - Resizing and saving new image
You may choose one of the existing images by clicking on the logo. This will quickly replace the image on your firewall dashboard.
Configuration
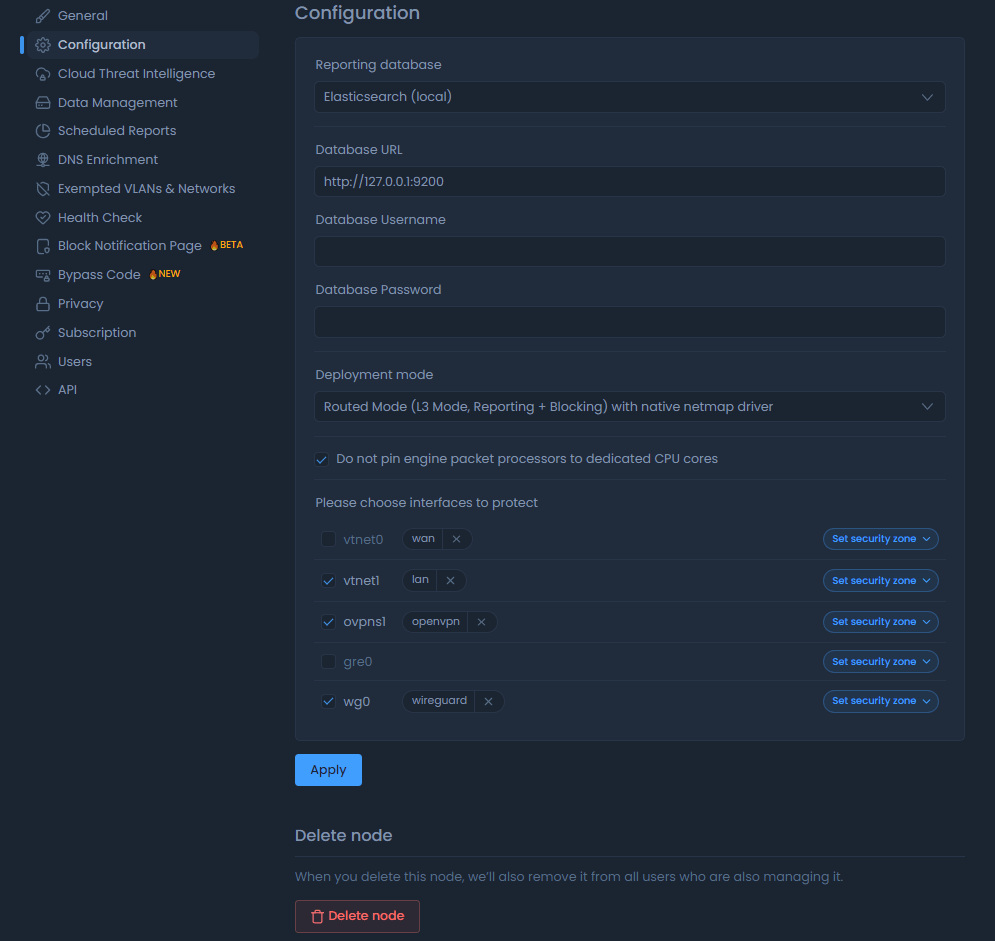
Configuration page allows you to perform the following tasks:
- Configure Reporting database
- Selecting Deployment Mode
- Interface Selection
- Deleting Node
To access the Configuration settings page you can follow the steps listed below:
- Select your firewall on Zenconsole.
- Click
Settingsmenu on the left-hand sidebar. - Click
Configurationmenu.
If you are the owner of the firewall you can configure the settings.
For more information about how to configure a node, please refer to Initial Configuration of A Firewall For the Cloud Central Management Portal

Figure 4. Zenconsole - Configuration
If you are not the owner of the firewall you will see the message below
Figure 5. Zenconsole - Configuration - Permission
Deleting Node
Deleting your node means unregistering your firewall from Zenconsole (Cloud Management Portal).
Figure 6. Zenconsole - Configuration - Delete
If you want to re-register your node to the Zenconsole (Centralized Cloud Management Portal), please refer to Registering to the Cloud Central Management Portal