Zenarmor - MS Active Directory Integration - Displaying Users in Reports
Zenarmor supports Active Directory (AD) for username resolution. You can quickly integrate your Active Directory with Zenarmor running on Linux/BSD-based firewalls to display usernames and groups in analytics if you have Active Directory. Using Zenarmor AD agent you can define custom policies for your specific AD groups and users and empower your network security with User/Group based filtering.
To start to get the benefit of user-based filtering, you can easily integrate your Active Directory with Zenarmor by following the 3 steps explained below:
-
Download Zenarmor AD Agent
-
Install Zenarmor AD Agent to Domain Controller (DC)
-
Configure Zenarmor AD Agent
To take advantage of user-based filtering, you must upgrade to one of the premium editions. You must also have a Zenarmor Business Edition subscription for AD integration.
You may need to install NoMAD tool on your MacOS clients from https://nomad.menu/ if you encounter name resolution problems for them.
Please also be aware that NoMAD is currently not supported on macOS platform version 26.x (macOS Tahoe). Support may become available as the release matures.
1. Download Zenarmor AD Agent
To download the latest Zenarmor Active Directory Agent installation file, you may follow the next steps:
-
Connect to the Zenarmor Active Directory Agent Download page via your favorite browser on your Domain Controller (DC).
OPNsense users may access this download page by navigating to the Zenarmor > Settings > Active Directoy Integration and clicking on the Go to Download Page link in the Download AD Agent pane.
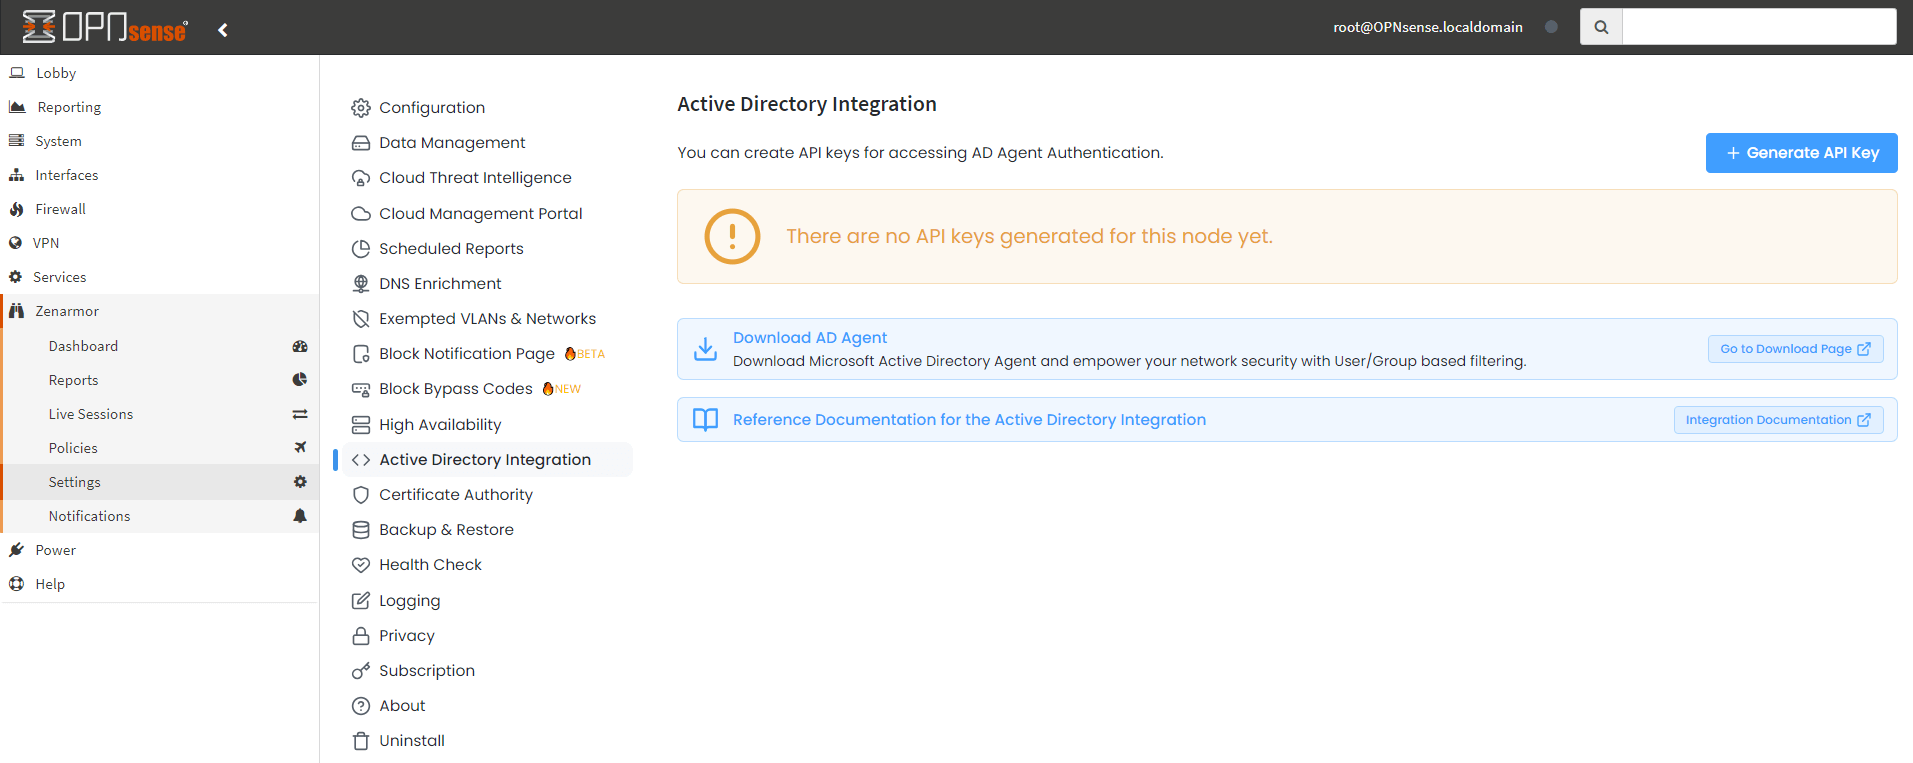
Figure 1. Downloading Zenarmor AD Agent via OPNsense Web UI
-
Click the Download Now button on the download page.

Figure 2. Zenarmor AD Agent Download Page
-
Click on the Save button in the dialog box to start downloading the compressed installation file, like
adagent-1.3.8.zip.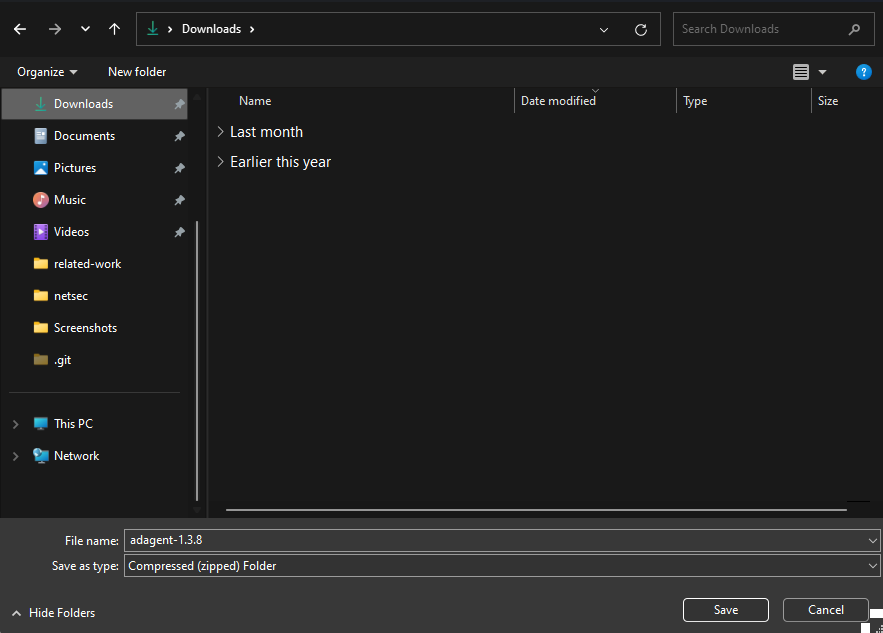
Figure 3. Downloading Zenarmor AD Agent (adagent-1.3.8.zip)
2. Install Zenarmor AD Agent
After downloading the Zenarmor AD Agent installation file on your Domain Controller (DC), you may follow the instructions given below to install the Zenarmor AD Agent:
-
Extract the compressed installation file,
adagent-1.3.8.zip, on your Domain Controller (DC). -
Navigate to the extracted directory, such as
adagent-1.3.8. -
Click on the
setupinstallation file with the right mouse button. This will open a dropdown menu. -
Click on the
Run as administrator. This will start Zenarmor AD Agent Setup Wizard.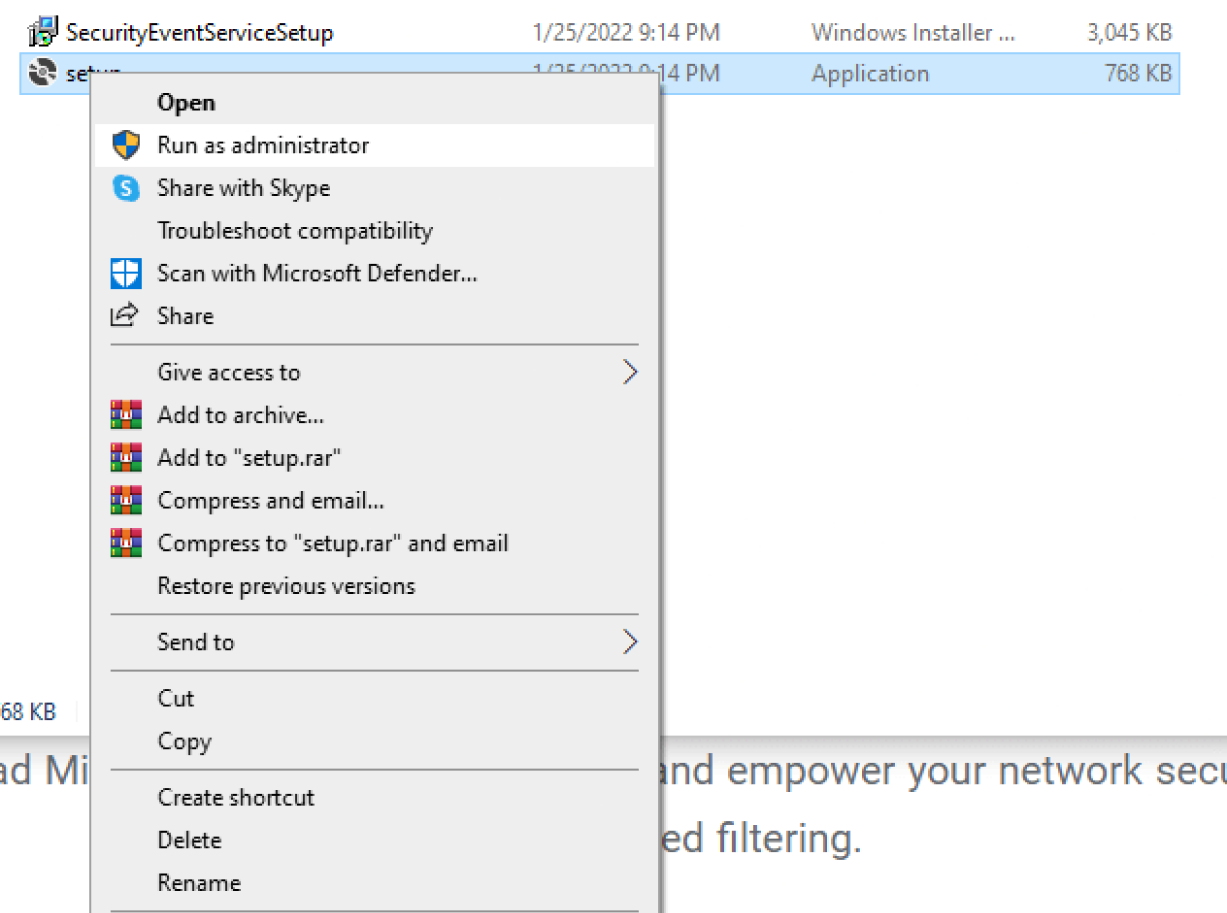
Figure 4. Running setup as administrator
-
Click on the Next button to proceed with the installation wizard.
Figure 5. Zenarmor AD Agent Setup Wizard
-
You can select the installation path and user permissions or you can proceed with the default preferences. You may click the Browse... button to change the installation folder. The default installation folder is
C:\Program Files (x86)\Zenarmor\Zenarmor Active Directory Agent\.Figure 6. Selecting Zenarmor AD Agent Installation Folder
-
You may check the available disk space on your server by clicking on the Disk Cost... button. This will list the available disk partitions on your Domain Controller (DC) along with available and required disk space.
Figure 7. Zenarmor AD Agent Wizard - Viewing Available Disk Space
-
You may leave other settings as default to install the Zenarmor AD agent for
Everyone. -
Click Next to proceed the wizard.
-
Click Next to confirm the installation.
Figure 8. Confirming Zenarmor AD Agent Setup
-
Click Close after the installation is complete. This will automatically launch the Zenarmor Active Directory Agent application for configuration.
Figure 9. Zenarmor AD Agent Setup Wizard- Installation Completed
3. Configuring Zenarmor AD Agent
You may easily configure the Zenarmor AD Agent by following the steps below:
-
You may leave the Platform option as default,OPNsense, for your OPNsense node or select Other Platforms (Linux, FreeBSD, pfSense) option depending on your Zenarmor platform. In this guide, we assume that you have a Linux-based or BSD-based firewall. So, we will select Other Platforms option.
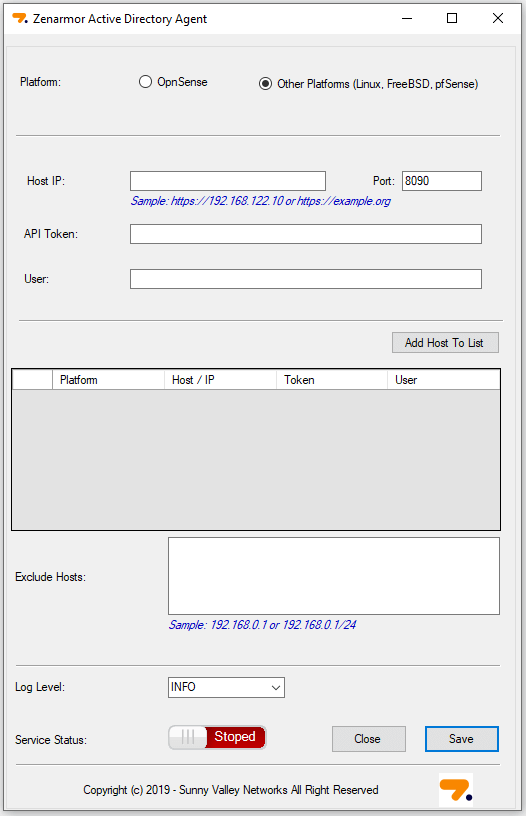
Figure 10. Zenarmor AD Agent Configuration
-
Set Host IP by typing the IP address of your Zenarmor platform, such as pfSense Software firewall, with
https://prefix. For example, you may typehttps://10.1.1.1if your Zenarmor firewall IP address is10.1.1.1. -
You may leave the Port option as default that is
8090. -
You must enable API and generate a Zenarmor AD Agent Authentication Token for your firewall on Zenconsole. Connect your Zenconsole account and select your firewall.
infoOPNsense users may generate a Zenarmor AD Agent Authentication Token on OPNsense web UI by
- Navigating to the Zenarmor > Settings > Active Directory Integration page on OPNsense Web UI and
- Clicking the + Generate API Key button at the top right of the page.

Figure 11. Creating Zenarmor AD Agent Authentication Token
-
Navigate to the Settings > API.
-
Enable API support for your firewall by clicking on the Disabled button.

Figure 12. Enable API on Zenconsole
-
Click on the +Generate API key button to generate an API key. This will open a dialog box.
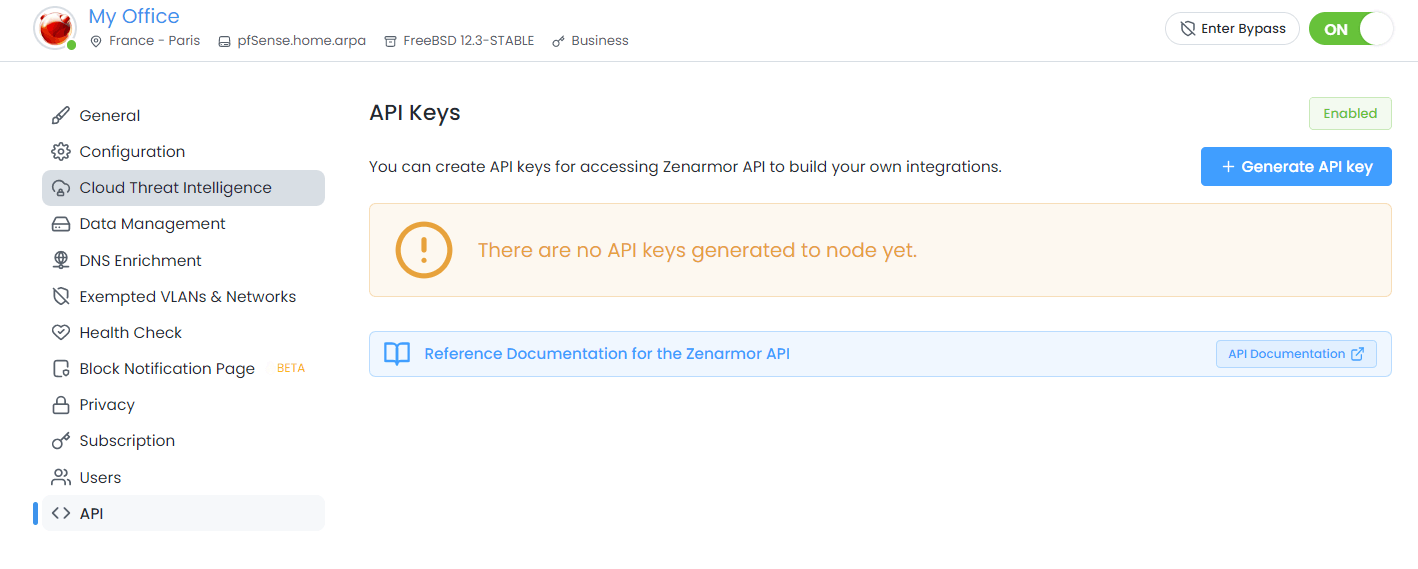
Figure 13. Generate API key on Zenconsole
-
Type API key User name, such as
activedirectoryand press Generate. This will automatically generate a new API key.Figure 14. Setting API key Username on Zenconsole
-
Copy the newly created API key on Zenconsole.
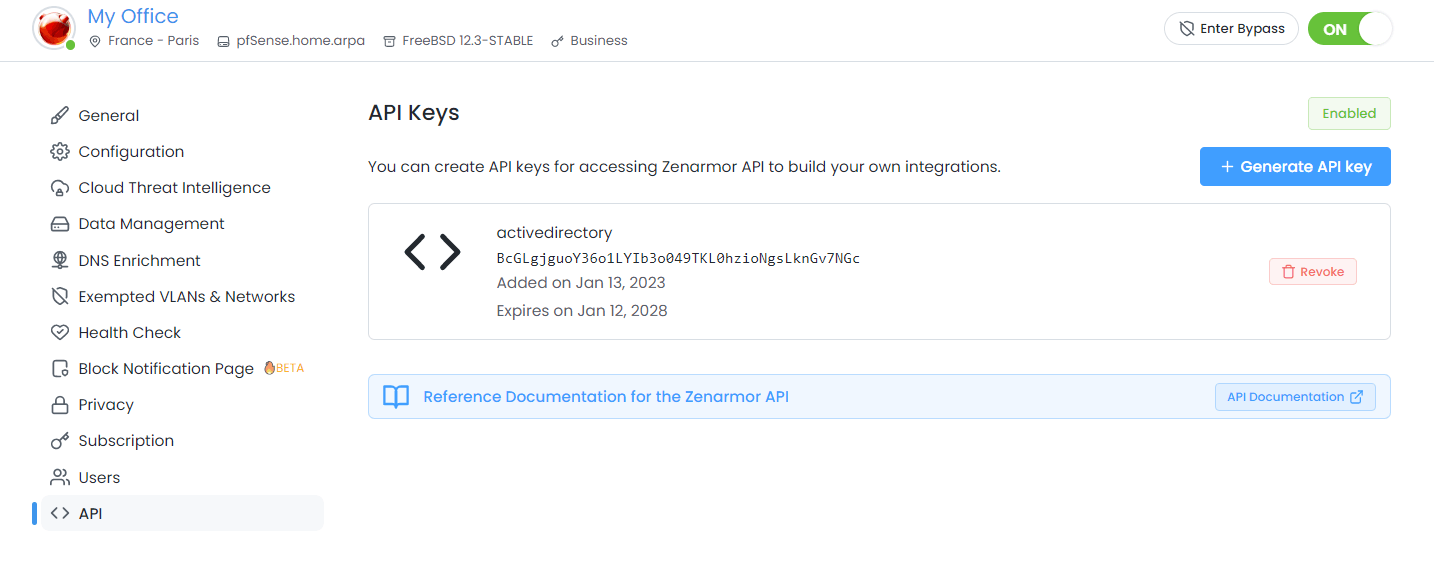
Figure 15. Viewing Zenarmor API Keys
-
Return back to the Zenarmor AD Agent Configuration application window and fill in the API Token field by entering the newly created Zenarmor API Key.
-
Enter the API key username, previously defined on Zenconsole, in User field.
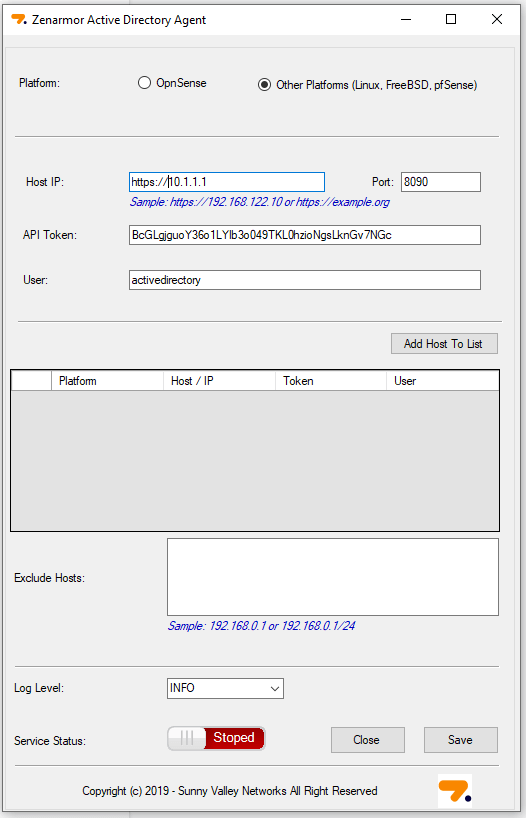
Figure 16. API Keys Settings on Zenarmor AD Agent
-
Click the Add Host to List button to add your Zenarmor host URL and token to the list. This will pop-up a notification window.
tipIf you need to remove or change the Zenarmor platform settings from your Active Directory Agent configuration, you may easily delete host settings by following next steps:
- Right click on the Host in the list. This will open a tool box.
- Click on the Remove Record button. This will open a dialog box.
- Click Yes in the dialog box to confirm the Host removal.
-
Click OK to close the notification window and proceed with the configuration.
-
You may enter one IP address per line in the Exclude Hosts pane. Zenarmor will not perform username resolution for the IP addresses in the Exclude Hosts list.
-
You may set Log Level or leave it as default,
INFO. AvailableLog Leveloptions are as follows:- ALL
- DEBUG
- INFO
- WARN
- ERROR
- FATAL
- OFF
-
Click on the Service Status button to enable the service.
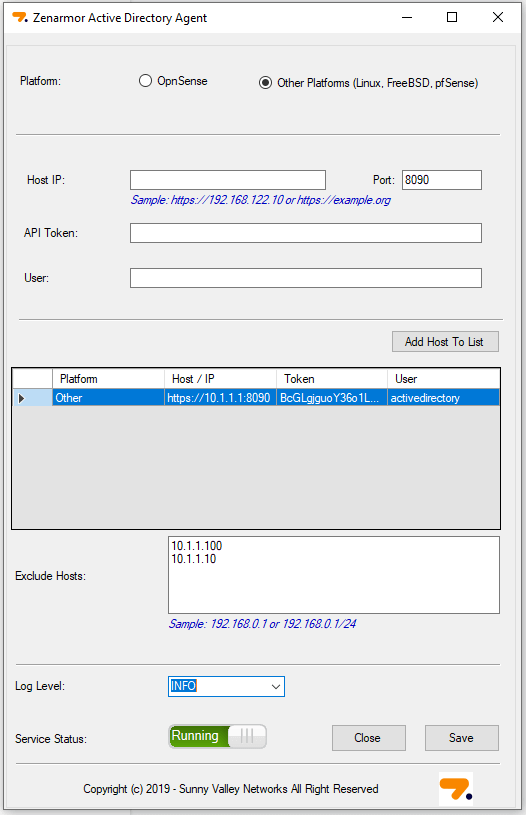
Figure 17. Enabling Zenarmor AD Agent Configuration
-
Click
Saveto activate the settings. This will also popup a notification window. -
Click OK to close the notification window.
Figure 18. Notification for Zenarmor AD Agent Configuration Save
Now, you can configure user-based fitering policies and you view usernames in Zenarmor reports.
Hands-on video for Downloading-Installing-Configuring Zenarmor AD Agent
You can access the hands-on installation and configuration steps from next video.
Video on Zenarmor User-based Filtering and Reporting Capabilities
Here is a video about the Zenarmor User-based Filtering and Reporting Capabilities.