Account Management on Zenconsole
You can easily manage your Zenconsole account by clicking the user icon located in the top-right corner of the Zenconsole interface. This Account Management menu allows users to manage their account information, access subscription and billing settings, get support, and view their projects and system activity logs.
The Account Management Menu includes the following sections:
-
My Profile: View and update personal account information
-
Subscriptions & Billing: Manage subscription plans and billing details
-
Support: Access help resources and contact technical support
-
Projects: View and switch between assigned projects
-
Event Logs: Review records of all system activities and events
-
Log Out: Securely sign out of the account

Figure 1. Account Management Menu
My Profile
When you click on My Profile from the User Menu, a panel opens. It provides access to various account settings and features that let you manage your personal details, security, and collaboration options.
Within this section, you will find the following sub-menus:
- Account settings
- Account sharing
- Notification settings
- Referrals
- Authentication & Security
- Sessions

Figure 2. My Profile Menu
Account Settings
The Account Settings page allows you to manage essential details of your Zenconsole account. Here, you can update personal information, change your email, and add corporate details when needed. Below are the main functions available:

Figure 3. Account Settings
Changing the User Name
At the top of the page, you can edit your first name and last name. Once updated, click Save Changes to apply the modifications or Cancel to discard them.

Figure 4. Changing the Username
Changing the Email Address
You can update the email address associated with your Zenconsole account. This feature ensures that your contact and login credentials remain current and secure.

Figure 5. Changing the Email Address
By clicking Change Email Address, a pop-up window appears, allowing you to enter your new email information.
To complete the update, follow the steps below:
i. Enter your new email address.
ii. Confirm with your current password.
iii. Click Request Verification Code to complete the process.
This process ensures that only authorized users can modify account credentials, maintaining the security and integrity of your Zenconsole profile.

Figure 6. Change Email Pop-up
Managing Corporate Account Information
When you enable the Corporate Account Information checkbox, additional fields appear:
-
Company name, country, city, address, postal code, phone number, VAT number
-
Contact persons for technical support and billing (name and email).
These details are particularly important for businesses requiring proper invoicing and dedicated communication channels.

Figure 7. Corporate Account Information
Account Sharing
The Account Sharing section allows you to share access to your Zenconsole account with other users in a secure and controlled way.
It enables collaborative management of the same environment without sharing your personal credentials, making it especially useful for teams and administrators.
To access the Account Sharing page on Zenconsole, follow the steps below:
-
Navigate to your Zenconsole.
-
Click on your profile icon in the top-right corner and select My Profile from the dropdown menu.
-
In the left-hand menu, click Account Sharing.

Figure 8. Account Sharing
Once you open the page, you’ll see a clean interface where you can add new users to share your account with or remove existing shared users when necessary. The following functions are available to help you manage account sharing effectively.
Sharing Your Account
To share your Zenconsole account with another user, follow these steps below.
-
Enter the email address of the person you want to share your account with in the input field labeled [email protected].
-
Press Enter. This creates a tag containing the entered email. Once an email is added, the Add User button becomes active.
-
Click Add User to complete the sharing process.

Figure 9. Adding a User
Removing Account Sharing
To stop sharing your account with a user, follow these steps below.
-
Locate the user’s email in the shared users list.
-
Click the Remove button next to their name.

Figure 10. Removing a User
-
A confirmation dialog will appear asking if you want to proceed with the removal. Click Remove to confirm or Cancel to cancel the action. Once confirmed, the selected user will immediately lose access to your Zenconsole account.

Figure 11. Warning Pop-up
tipYou can re-add the same user anytime by entering their email address again.
noteAccount Sharing grants other users access to your Zenconsole environment, including dashboards and configurations.
For security and privacy reasons, it is strongly recommended to share your account only with trusted team members, review your shared users list regularly, and remove access immediately when it is no longer required.
This feature is powerful yet sensitive, so it should always be used responsibly.
Notification Settings
The Notification Settings section allows you to customize how you receive alerts and updates from Zenconsole.
It helps you stay informed about system activities, warnings, and critical events through flexible notification channels such as Portal UI (In-App) and Email.
To access the Notification Settings page on Zenconsole, follow the steps below:
-
Navigate to your portal dashboard.
-
Click on your profile icon in the top-right corner and select My Profile from the dropdown menu.
-
From the left-hand menu, click Notification Settings.
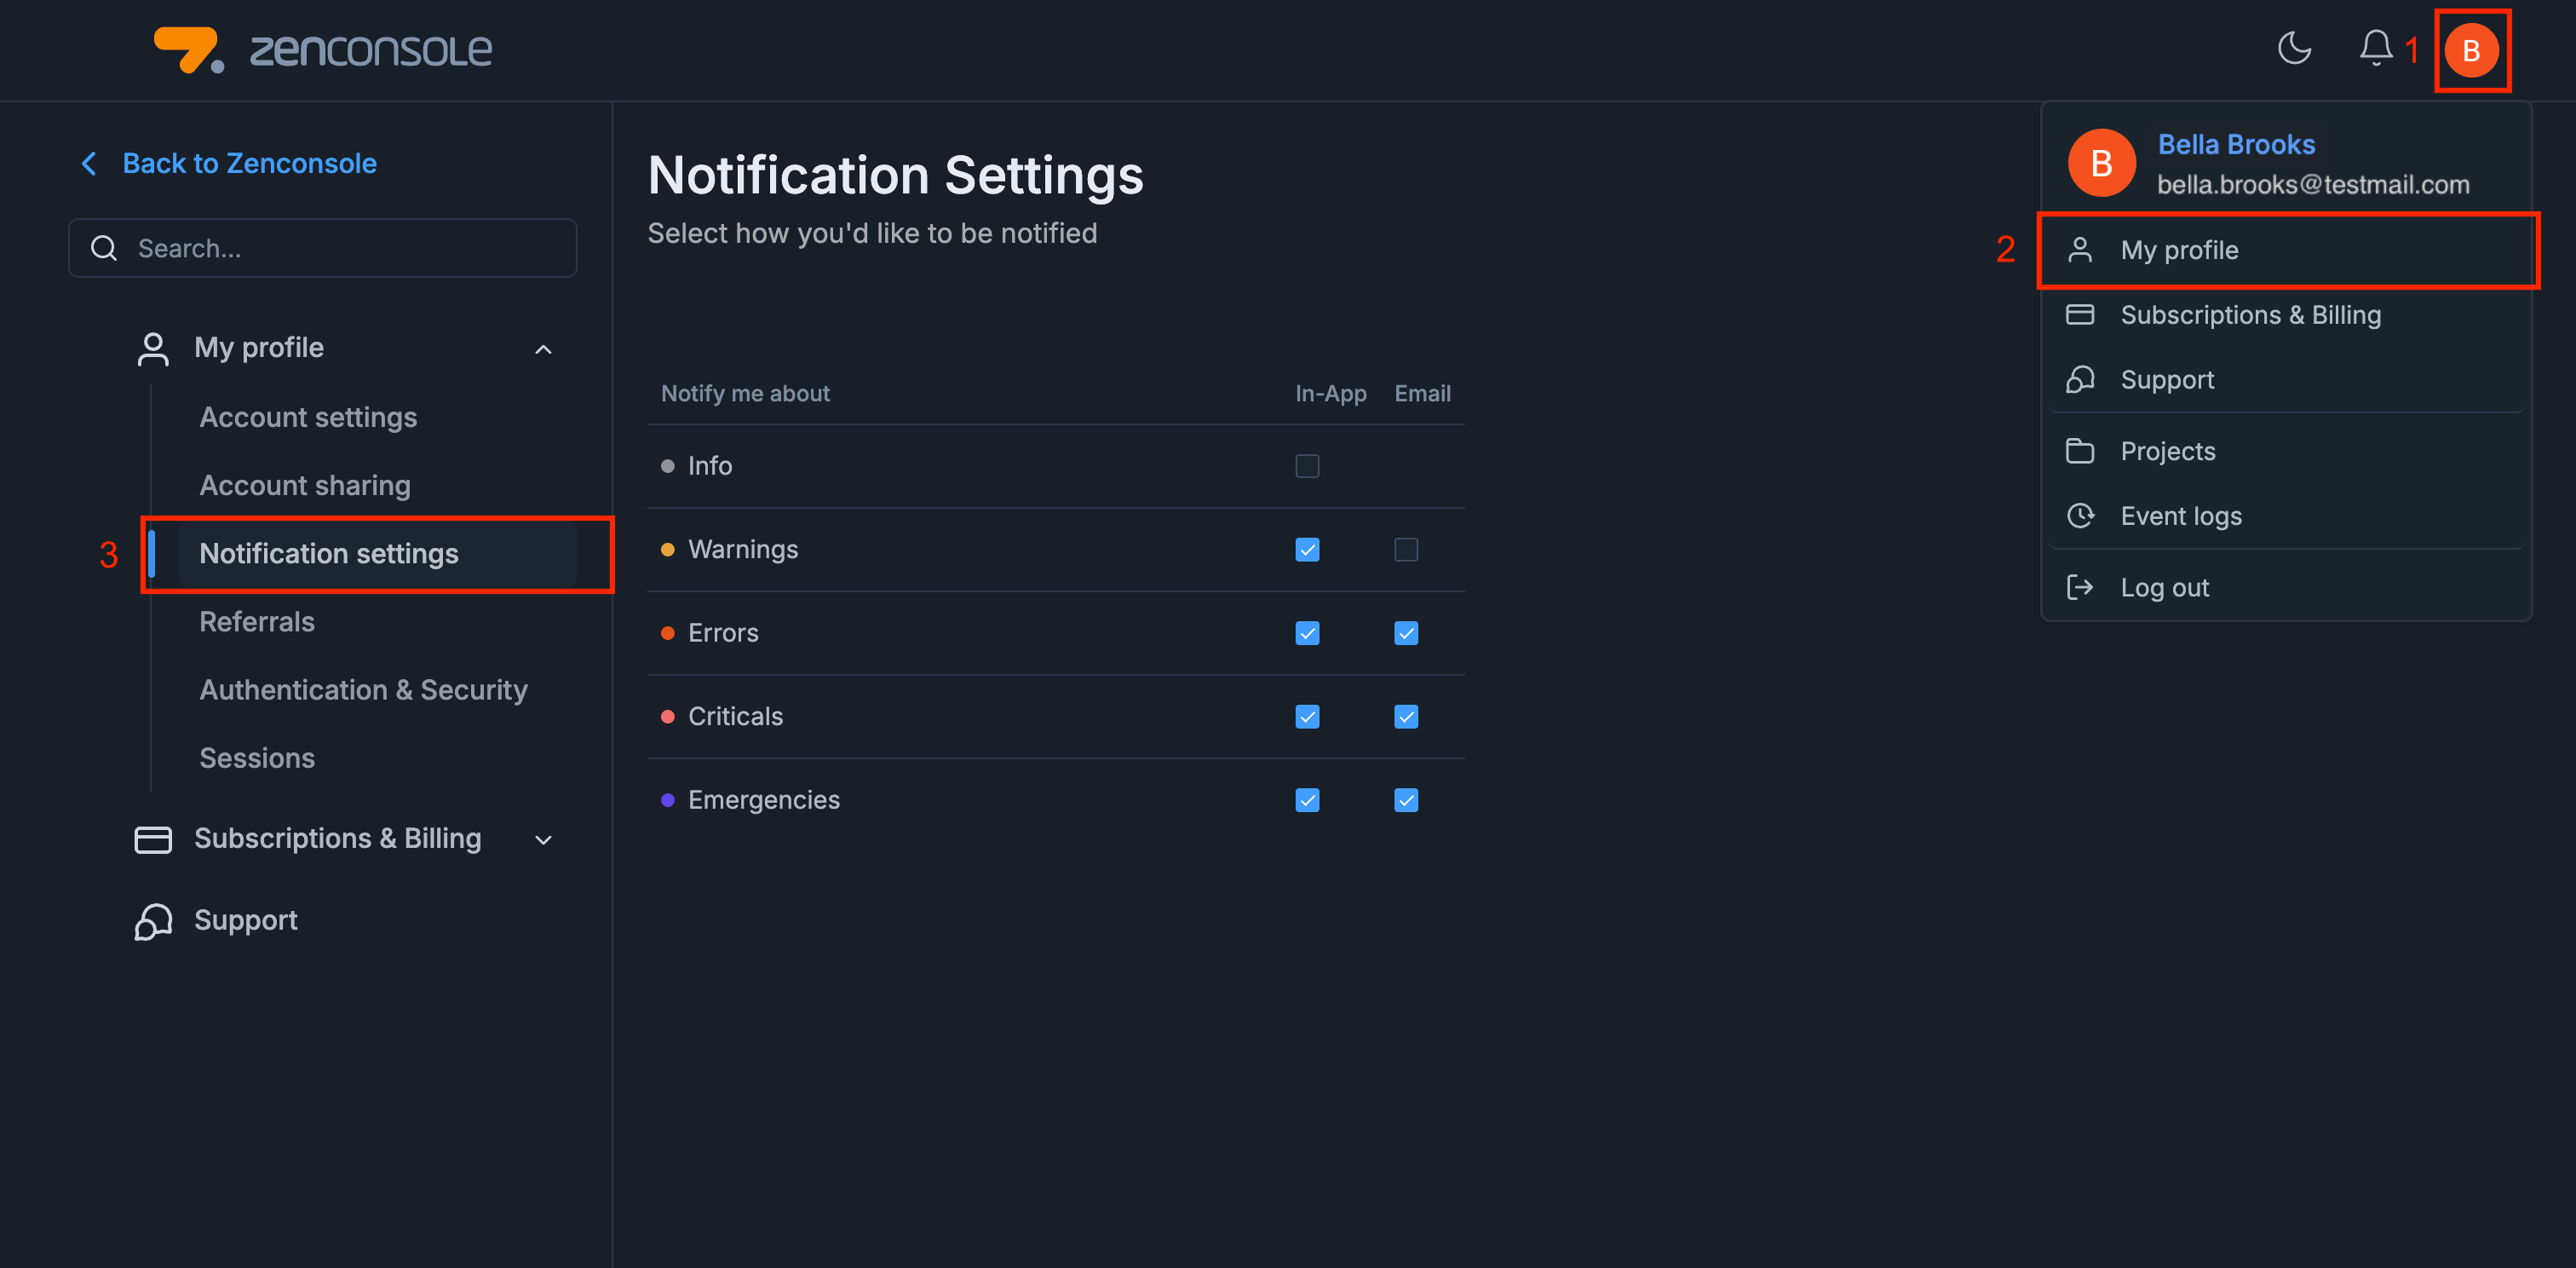
Figure 12. Notification Settings
Once opened, the page displays a table where you can select which types of notifications you want to receive and how you’d like to be notified, either via Portal UI (In-App), Email, or both.
You can easily enable or disable each option by clicking the corresponding checkboxes in the table.
Notification Priorities (Based on Event Logs)
Zenconsole (Centralized Cloud Management Portal) provides five event-log-based notification priority levels on your firewalls.
These levels correspond directly to the notification categories listed below and determine the urgency of alerts displayed in the Notification Settings page.
| Priority Level | Description | |
|---|---|---|
| Emergency | Extremely serious error events that cause the application to terminate. | |
| Critical | Serious error events that may cause the application to terminate. | |
| Error | Significant error events that prevent normal program execution but may allow the application to continue running. | |
| Warning | Potentially harmful situations that may indicate configuration or performance problems. | |
| Informational | User- and administrator-friendly informational messages that show the application’s progress. |
For detailed instructions on managing notifications and event logs, visit: Managing Notifications and Event Logs – Zenarmor Documentation
It is highly recommended to keep Critical and Emergency notifications enabled for both Portal UI (In-App) and Email to avoid missing important system alerts.
Changes to your notification preferences take effect immediately. If you disable both options for a category, you will not receive any alerts related to that event type. Use this configuration carefully.
Referrals
The Referrals section provides tools to invite new users, manage invitations, and track referral rewards. It helps you expand Zenconsole’s community while benefiting from referral incentives.
To see your Referrals page on Zenconsole, follow the steps below:
-
Navigate to your portal dashboard, click on your
My profilefrom the dropdown menu. -
In the left-hand menu, click
Referrals.
Figure 13. Referrals
The following functions are available in the Referrals section.
Sharing Your Referral Code or Link
Each user receives a unique referral code and a referral URL, which can be shared with others. You can copy these details directly or use one-click options to share on Facebook, LinkedIn, X (Twitter), and WhatsApp.
At the top of the Referrals page, you will see your personal Referral Code and Referral URL.
-
The Referral Code is a short code that your friends can enter during sign-up.
-
The Referral URL is a clickable link that already contains your code. When you share it, invitees are automatically directed to the registration page.
Both options ensure that new sign-ups are correctly linked to your account.
Right below these fields, you will find quick-share buttons for Facebook, LinkedIn, X (Twitter), and WhatsApp. With one click, you can instantly share your referral link on these platforms, making it easier to reach a wider audience.
Tracking Referral Statistics
At the bottom of the Referrals page, you will see your Referral Stats dashboard. It is divided into five boxes:
- Clicks: Number of times your referral link has been clicked.
- Referrals: People who signed up using your link.
- Pending: Rewards that are in progress but not yet credited.
- Earned: Rewards confirmed and added to your account balance.
- Used: Rewards already spent.
The people you invite must be new Zenconsole members, and they need to create a Zenconsole account for your referral to be valid.
Authentication & Security
The Authentication & Security section in Zenconsole allows you to manage critical security settings for your account. From this page, you can change your password, enable or disable Two-Factor Authentication (2FA), and ensure that your portal account remains protected against unauthorized access.
This page provides two main options:
-
Password Management: Update your account password at any time.
-
Two-Factor Authentication (2FA): Add an extra layer of security by enabling a time-based one-time password (TOTP) method.
Enabling these security features helps safeguard your personal data and ensures only trusted users can access your Zenconsole account.
You may see your Authentication & Security settings on Zenconsole with the steps below:
-
Navigate to your portal dashboard, click on your
rofile icon, and selectMy profilefrom the dropdown menu. -
In the left-hand menu, click
Authentication & Security.
Figure 14. Authentication & Security
For detailed instructions on how to change your password or enable Two-Factor Authentication, please refer to the documentation at the following link: Authentication & Password Management.
Sessions
The Sessions page enables you to view and manage all active devices and sessions associated with your Zenconsole account. This feature helps you monitor account activity and terminate any suspicious sessions to maintain security.
To see your Sessions on Zenconsole, follow the steps below:
-
Navigate to your portal dashboard, click on your
profile icon, and selectMy profilefrom the dropdown menu. -
In the left-hand menu, click
Sessions.
The Sessions page will display a list of active sessions with the following details:
-
Platform (e.g., OS X, Windows, Android)
-
Browser version (e.g., Firefox 143.0, Chrome 140)
-
IP Address used during the session
-
Location of the session
-
Last Activity timestamp

Figure 15. Sessions
Managing Your Sessions
Managing sessions in Zenconsole allows you to keep control over your account security by reviewing and managing all active logins. Each session represents a device or browser currently connected to your account. By monitoring these sessions, you can detect unusual activity, identify unauthorized access, and take immediate action to protect your data.
-
The session you are currently using is marked as the Current session.
-
Other sessions display an End session button, which allows you to terminate them.
-
If you identify an unfamiliar session, click End session to log out from that device immediately.
On the Sessions page, you will also notice a display limit selector on the top right corner (default value is 10). This option lets you choose how many sessions are listed per page, which is useful if you manage multiple active devices.
We recommend regularly reviewing your active sessions to ensure that no unauthorized devices have access to your account. If you notice any suspicious activity, terminate the session immediately and change your password.