Authentication & Password Management
Your account security is our top priority. At Zenconsole, we continually improve our infrastructure to provide you with a safer digital experience. Authentication is the very first layer of protection, and strong passwords play a key role in keeping your account secure from cyber threats.
Cybercriminals today use advanced tools to crack credentials or trick users into sharing them. That’s why relying only on passwords is never enough. To add an extra layer of defense, Zenconsole offers Two-Factor Authentication (2FA) as an optional feature. Enabling 2FA takes just a minute and significantly increases the protection of your account.
Start your journey with Zenconsole today, create a new account or simply Sign in with Google, and secure your access with 2FA for maximum safety.
Read on to discover how you can easily set up and secure your Zenconsole account.
Creating a new account
Sign up for a new account at the Zenconsole - Cloud Central Management Portal if you have not already done so.
To create your Zenconsole account, follow these steps:
-
Select your account type, choose the option that best fits your needs:
-
Business Use: Provides full feature access.
-
Personal Use: Designed for personal evaluation and home lab environments.

Figure 1. Signup Page for a new account from Zenarmor
-
-
When you select Business Use or Personal Use, you’ll be directed to the sign-up options. Choose your preferred sign-up method.
- Continue with Email
- Sign up with Google
- Sign up with Microsoft
tipFor Business Use, a corporate email address is required to continue with the trial.

Figure 2. Signup Methods
-
In this example, we selected Continue with email to proceed with registration.
-
Complete the registration form (if you selected Email):
-
Enter your First Name and Last Name
-
Provide your Email Address
-
Create and confirm your Password
-
(Optional) Enter a Referral Code
-
Select “Where did you hear about us?”
-
Review and accept the Terms of Use and Privacy Policy
-
-
Click Continue to continue your account creation.
tipAlready have an account? Simply select “Login” to log in.

Figure 3. The Registration Form
-
A 6-digit code will be sent to your email for email verification. Enter it to verify your account. If you didn’t receive the code, click Resend.
-
Click Continue.

Figure 4. Verifying Your Account Using a 6-digit Code
-
Since we selected Personal Use before, the next screen will ask how you’d like to use Zenarmor.
Choose one of the following:-
Home: Ideal for home users, home lab enthusiasts, or anyone wanting stronger protection for a personal network.
-
Free NGFW: Provides free, essential internet security and basic protection.
After selecting your preferred option, click Continue to proceed.

Figure 5. Choosing Between Home and Free NGFW Options
-
-
Provide a Home Network Name to register your network. Then, click Continue to complete setup

Figure 6. Enrolling Your Home Network
-
After you click Continue, your account is successfully created, and you’ll be redirected to the Zenconsole dashboard automatically.
Sign in with Google
Instead of creating a new account, you can also Sign in with Google to the portal. However, please be informed that you cannot use your Google credentials to register your firewalls on the cloud portal. If you prefer this authentication method, you must also set a portal password for the first time to complete the firewall registration process successfully.
Sign in with Microsoft
Alternatively, you can choose to sign in with Microsoft for portal access. Similar to Google authentication, your Microsoft credentials alone cannot be used to register firewalls on the cloud portal. To complete firewall registration, you are required to set a portal password during your initial login.
Changing Zenconsole Password
To change your Zenconsole portal password, follow the steps below:
-
Navigate to your portal dashboard, click on your
**profile icon**, and select**My profile**from the dropdown menu. -
In the left-hand menu, click
**Authentication & Security**. -
Under the Password panel, click the Change password button.

Figure 7. Changing Password
-
When you click the Change Password button, a pop-up will appear asking you to enter your current password, a new password, and confirm the new password. After filling them in, click Continue to enter the verification code.

Figure 8. Change Password pop-up Window
-
An OTP verification window will appear. A 6-digit verification code will be sent to your registered email address.
Copy the 6-digit code from the email and paste it into the OTP verification window.
-
Then click Verify and Change Password to proceed.

Figure 9. OTP Verification Window

Figure 10. Verification Email Containing the 6-digit Code
-
Once verification is successful, your password will be updated. A confirmation message will appear to indicate the change was successful.

Figure 11. Password Successfully Changed Confirmation Message
Resetting Zenconsole Password
If you don’t remember your password, you can reset it by following the steps below:
-
Go to the Zenconsole Login Page and click on Forgot your password? link.

Figure 12. Forgot Your Password?
-
You’ll be redirected to the Password Recovery Page. Enter your email address and click the Send Login Link button to receive a password reset email.
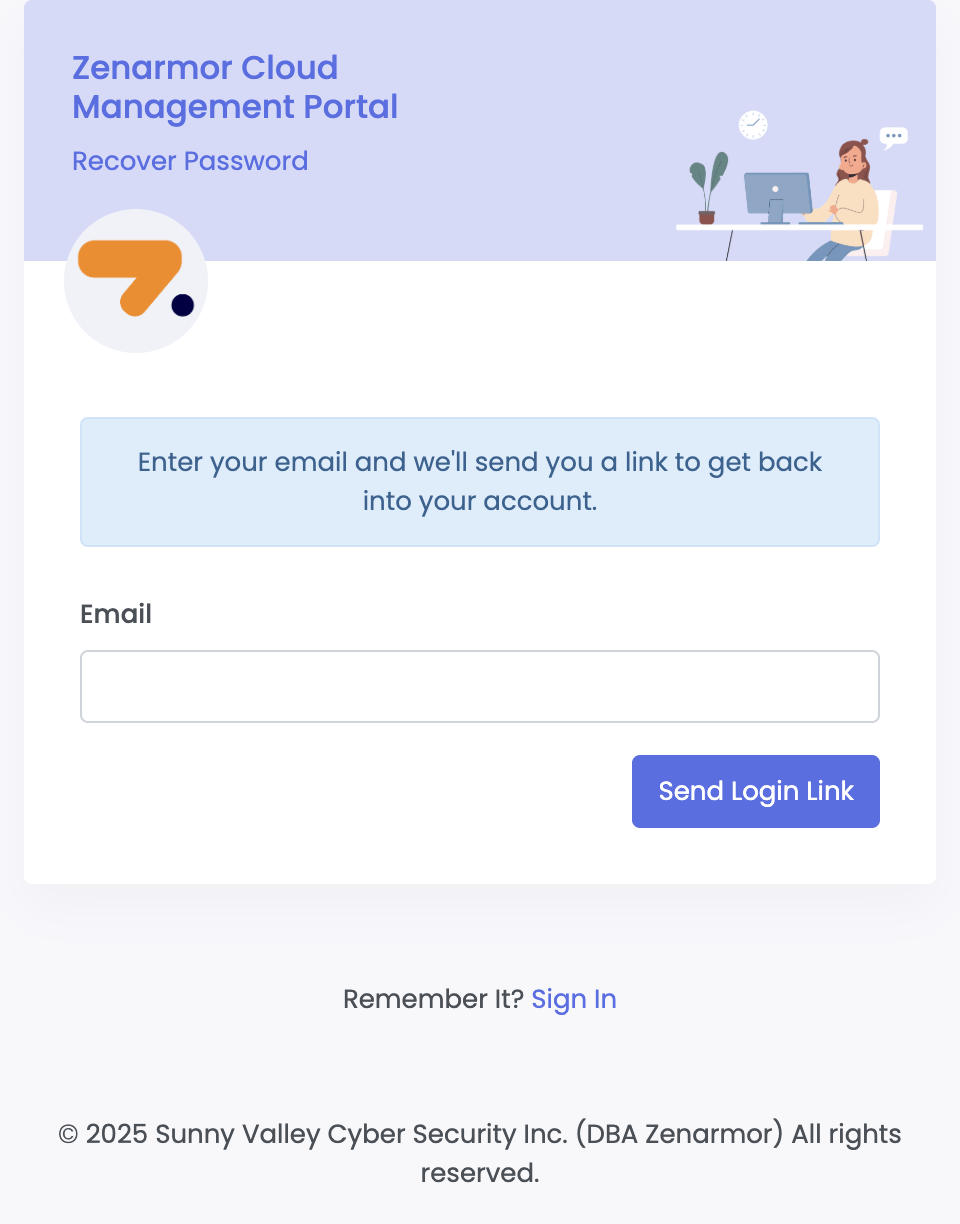
Figure 13. Password Recovery Page
-
Check your email inbox for a message from Zenarmor. Open the email and click the Reset Password button to proceed.

Figure 14. Password Reset Email
-
You’ll be directed to the Set New Password page. Enter your new password and confirm it in the New password confirmation field.
-
Click Reset Password to save your new password.

Figure 15. Set New Password Page
-
Once your password has been successfully updated, a confirmation page will appear.
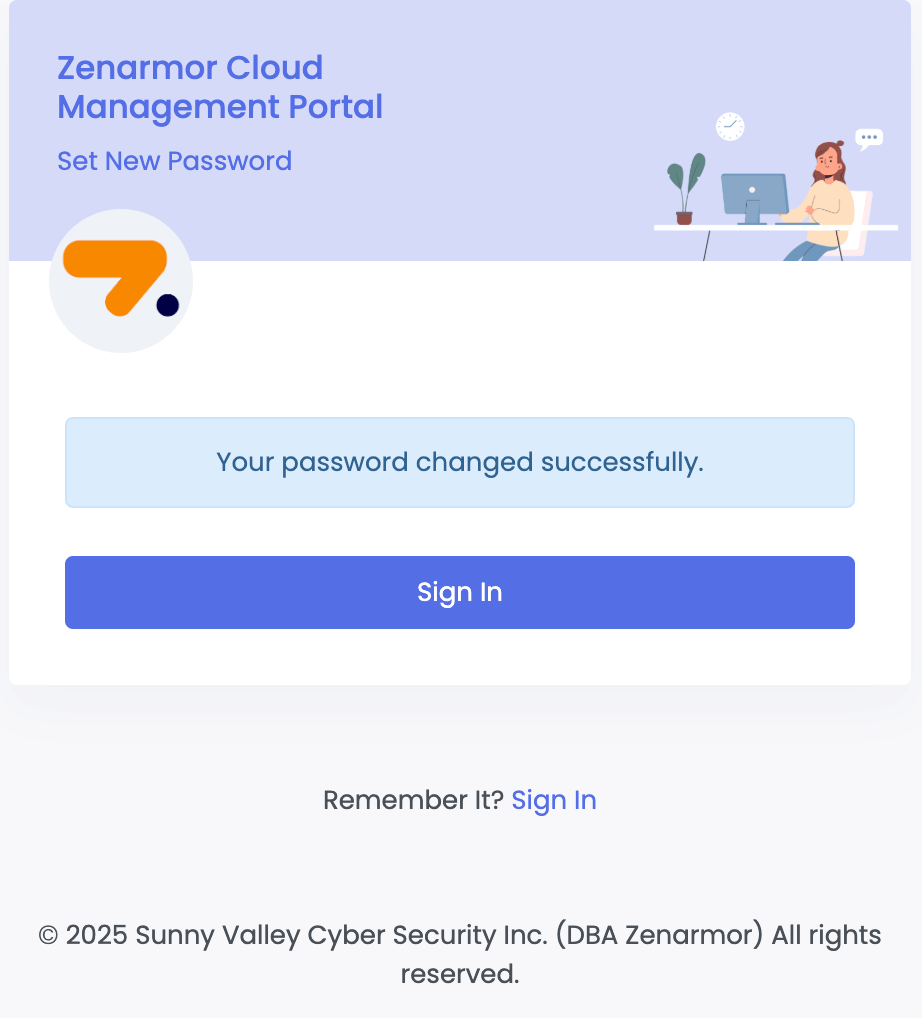
Figure 16. Password Successfully Changed
-
Click Sign In to return to the login page and access your account using your new password.
Using a Recovery Code to Login
If you cannot access your authenticator app, you can log in to Zenconsole using a recovery code. Follow the steps below to sign in with your recovery code.
-
On the Zenconsole Login Page, first enter your email address and password, then click Sign In.
-
When the authenticator code screen appears, click on Use a recovery code at the bottom of the page.

Figure 17. Use a Recovery Code
-
On the next screen, enter your Recovery Code into the field provided and click Login.

Figure 18. Zenarmor Recovery Code Screen
-
Once authenticated successfully, you will be redirected to your Zenconsole dashboard.
Enabling Two-Factor Authentication
Two-Factor Authentication (2FA) is an optional security feature that provides an additional layer of protection for your account beyond the standard username and password combination. By enabling 2FA with a TOTP (Time-based One-Time Password) method, you can significantly reduce the risk of unauthorized account access.
We strongly recommend enabling 2FA for your portal account. To use this feature, you must first enable 2FA on the Zenconsole and then link your account to a trusted device using an authenticator application.
After setup, a set of recovery codes will also be generated. These codes allow you to access your account in case you lose access to your authenticator device.
To set up Two Factor Authentication for your portal account, follow these steps below.
-
Navigate to your portal dashboard, click on your profile icon, and select My profile from the dropdown menu.
-
In the left-hand menu, click Authentication & Security.
-
Under the Two-Factor Authentication panel, click the Set up button.
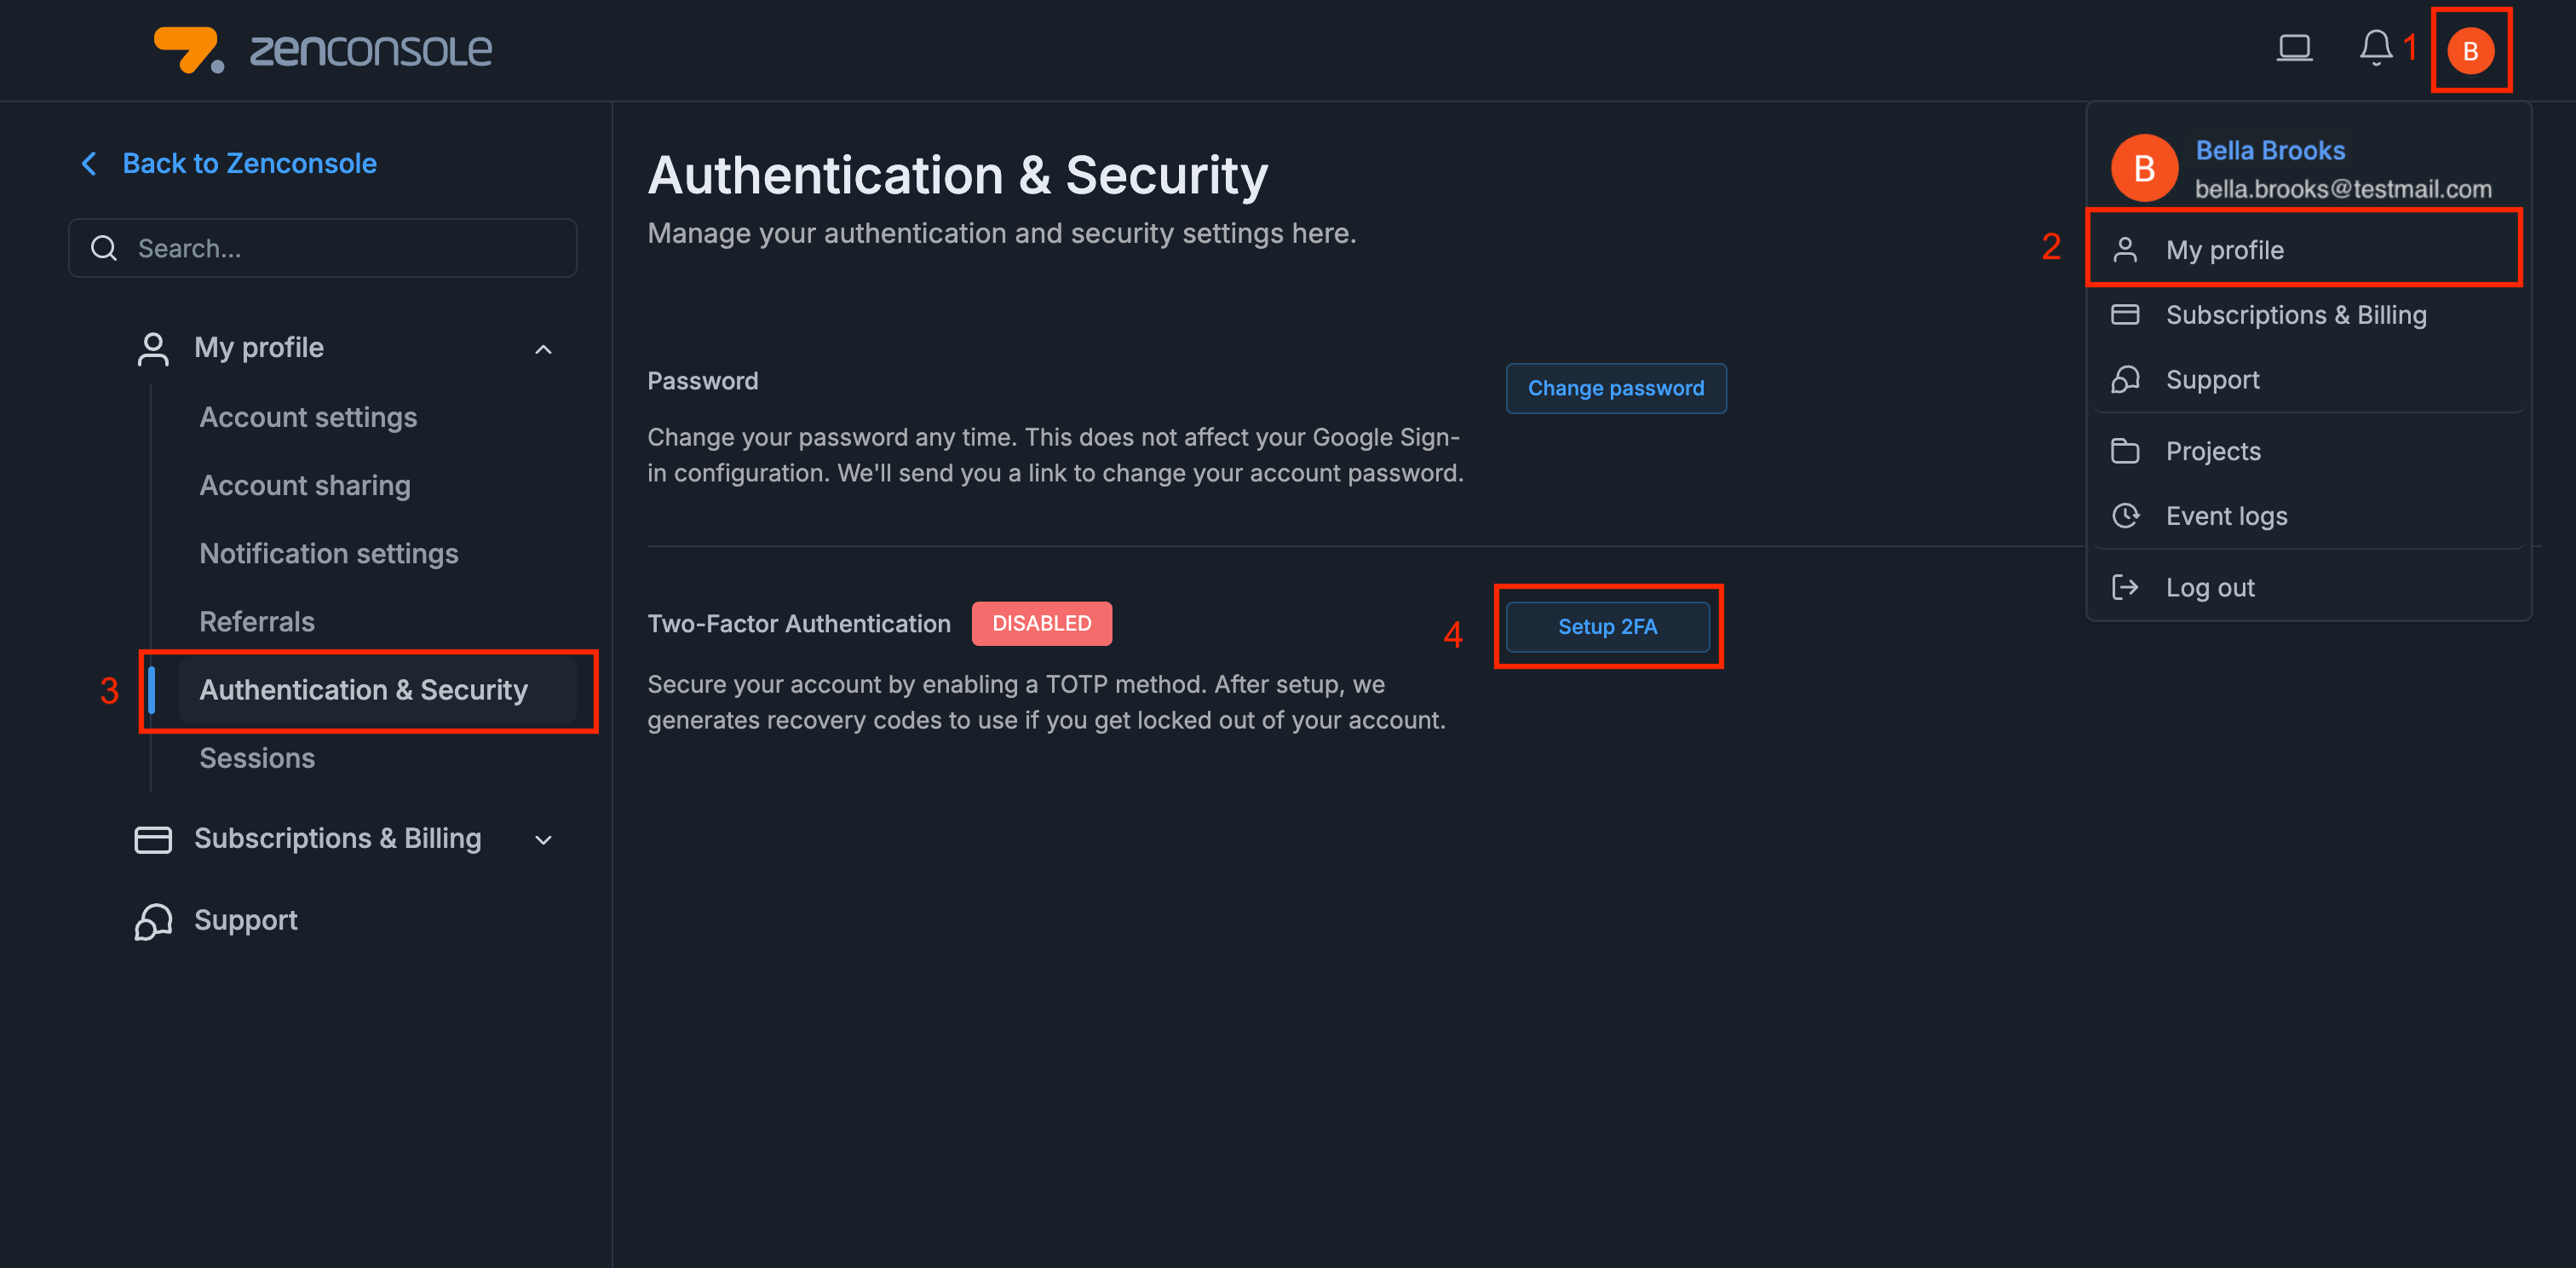
Figure 19. Two-Factor Authentication Setup
-
You will be redirected to the Verify your device screen.
-
To be able to use 2FA, an authenticator application must be installed on your mobile device. You can use Google Authenticator or any other TOTP apps from stores. Open your authenticator application (e.g., Google Authenticator, Microsoft Authenticator, Authy).
-
Use the app to scan the QR code displayed on the configuration page.
-
In the Password field, enter the same password you use to log in to your portal account.
-
The authenticator application will generate a 6-digit one-time verification code. Enter this code into the Enter verification code field.
-
Click the Verify and enable button to complete the setup.

Figure 20. Verify Your Device
-
If the verification is successful, 2FA will be activated for your account.
-
Once 2FA is successfully enabled, the system will generate a set of Recovery Codes automatically. Don’t forget to save these codes in a secure location.
warningThese codes serve as a backup method to access your account in case you lose access to your authenticator device. Each code can only be used once, so it is critical to store them securely.
-
Before proceeding, check the box I have stored my recovery codes safely to confirm you have saved them in a secure location.
-
Click Done to finish the Two-Factor Authentication setup process.
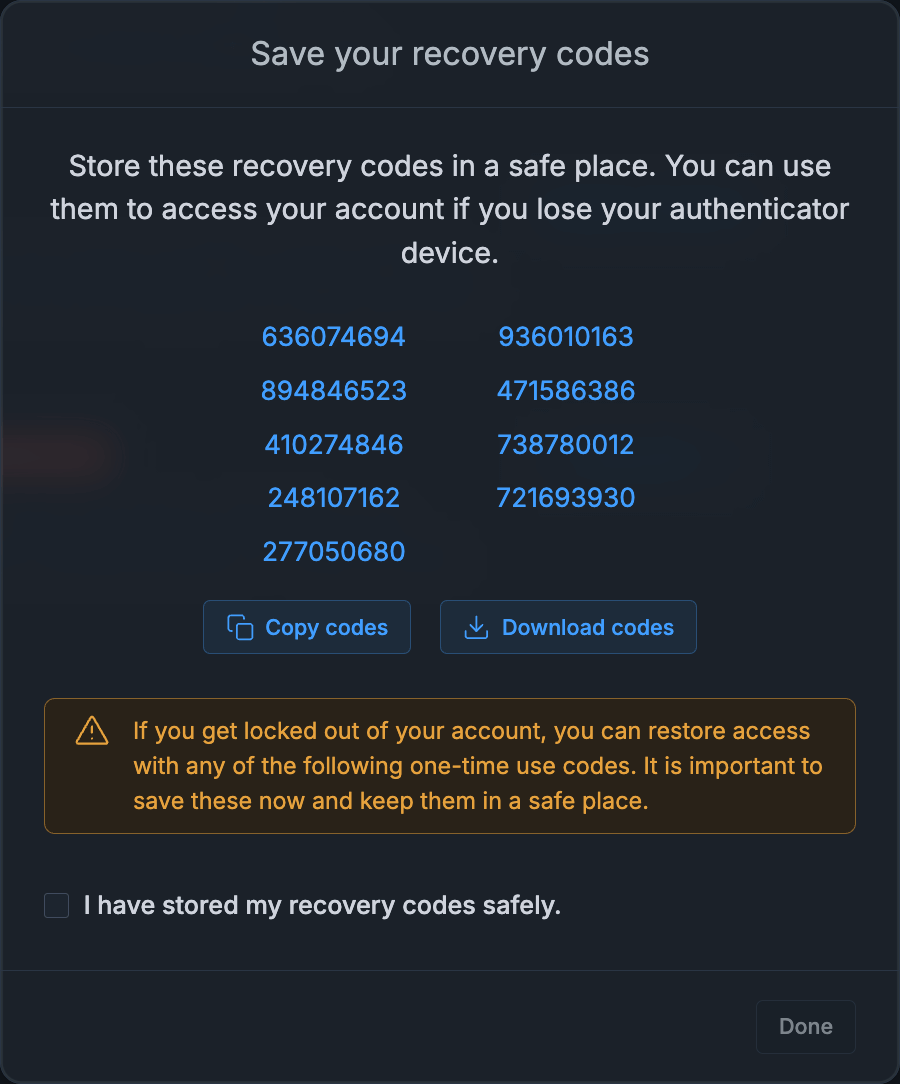
Figure 21. Automatically generated recovery codes
You can now access your account more securely by using two-factor authentication. After entering your email and password in the Zenconsole Login Page, you will be redirected to the Two-Factor Authentication page. To access your account dashboard, you must enter a one-time code generated by your authenticator application or one of your recovery codes.

Figure 22. Two-Factor Authentication Page
Disabling Two Factor Authentication
Disabling Two-Factor Authentication will make your account less secure. Without 2FA, anyone with your password could access your account. We strongly recommend keeping 2FA enabled to protect your personal data and prevent unauthorized access.
However, if you still wish to disable Two Factor Authentication for your portal account, follow these steps below.
-
Navigate to your portal dashboard, click on your profile icon, and select My profile from the dropdown menu.
-
In the left-hand menu, click Authentication & Security.
-
Under the Two-Factor Authentication panel, click the Disable button.

Figure 23. Disabling Two-Factor Authentication
-
When you attempt to disable Two-Factor Authentication (2FA), the system will ask for additional confirmation to protect your account. To proceed, you must enter both your Zenconsole portal password and the verification code generated by your authenticator app.

Figure 24. Confirmation of Disabling 2FA Method
-
Once both fields are correctly filled in, the Disable Two-Factor Authentication button becomes active. Click the button to complete the process.

Figure 25. Message indicating that 2FA is disabled