Quick Installation Guide
Welcome to Zenconsole.
Zenarmor is built on a Plug.SASE.Everywhere architecture, allowing security services to be deployed directly where protection is needed, on endpoints, gateways, edge environments, or cloud infrastructure, without requiring additional hardware appliances or complex cloud redirection.
Figure 1. Zenconsole - Organization Dashboard View
This approach helps organizations achieve fast deployment, centralized visibility, consistent policy enforcement, and secure connectivity across distributed environments.
This guide is designed to help you complete your first Zenarmor deployment and understand the initial onboarding experience inside Zenconsole.
After completing the registration or trial activation process, you are redirected to the Zenconsole onboarding page. This page serves as the starting point of your Zenarmor deployment journey and helps you complete your initial setup steps quickly.
Figure 2. Onboarding Page
From the onboarding page, you can choose the deployment option that best fits your environment and deployment needs.
Add your first endpoint
The Add your first endpoint option allows you to protect individual devices such as laptops, desktops, and remote user systems with Zenarmor endpoint protection.
Adding endpoints enables Zenarmor to apply security policies, provide visibility into device activity, enforce secure connectivity, and protect users regardless of their location or network environment.
To add your first endpoint, follow the steps below:
-
Open your browser and navigate to Zenconsole.
-
Sign in using your Zenconsole credentials.
-
Select the Add your first endpoint tab from the onboarding page. You can also add gateways later from the Global Deployments section using the Add Endpoint button.
Figure 3. Add your first endpoint
-
Choose your preferred endpoint platform, such as Windows, macOS, Linux, Android, or iOS.
Figure 4. Supported Platforms
-
Select the deployment method that best fits your environment. Depending on the platform, available methods may include MSI installers, script-based deployment, Microsoft Store, Apple App Store, or other supported installation options.
Figure 5. Deployment Methods
-
Install the endpoint using the selected deployment method.
-
Once the installation is completed, launch the Zenarmor Endpoint application on your device.
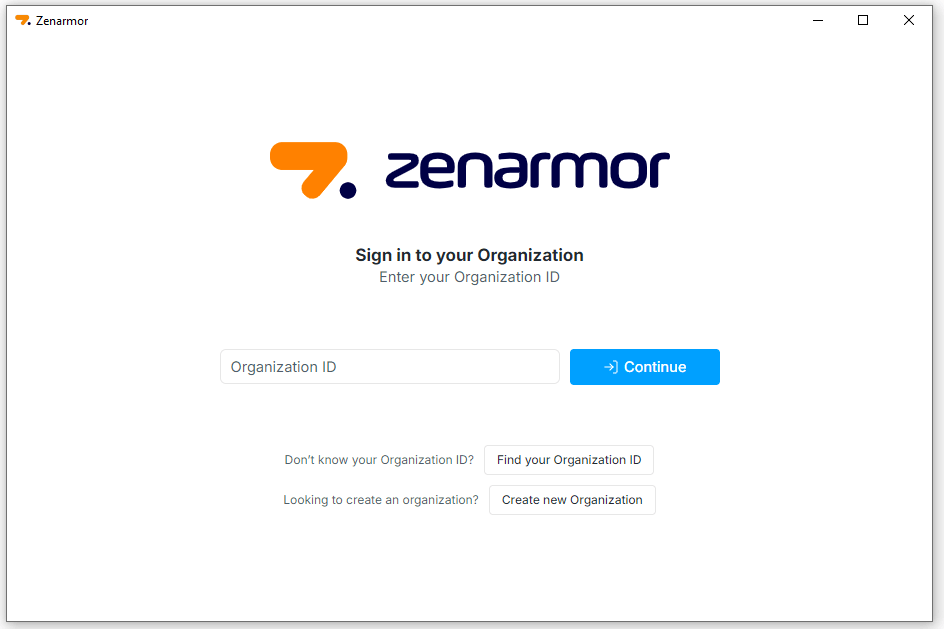
Figure 6. Signing-in Organization
-
Enter your Organization ID (for example:
sunnyvalley) to connect the endpoint to your Zenconsole organization.tipYou can find your Organization ID at the top of the Zenconsole dashboard, next to your organization name. This value is required when registering endpoints to your organization.
Figure 7. Organization ID
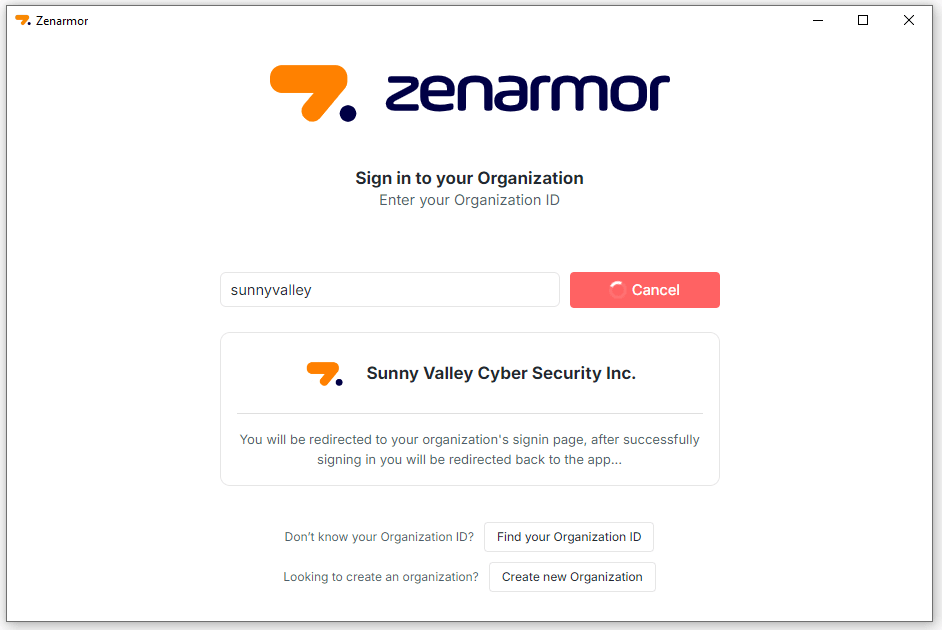
Figure 8. Redirecting Organization Sign-in Page on Zenconsole
-
Click Continue. You will be redirected to your organization's sign-in page.
-
After successfully signing in, you will be redirected back to the Zenarmor Endpoint application.
-
Click Open Zenarmor to complete the endpoint activation process.
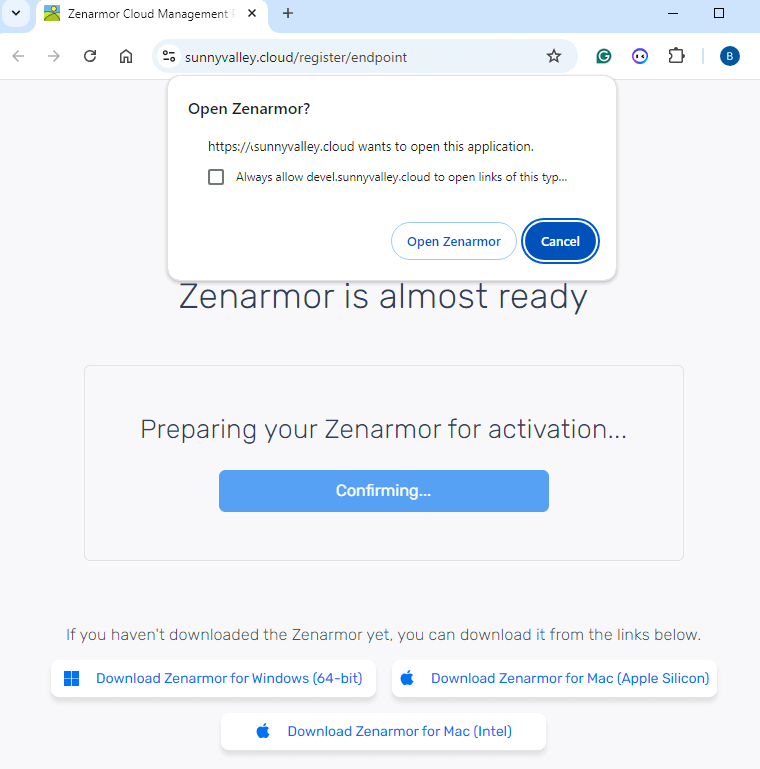
Figure 9. Zenarmor Endpoint Activation
-
After successful registration, open the Zenarmor endpoint application and verify that the Zenarmor Engine and Cloud Agent are running and connected.
Figure 10. Zenarmor Endpoint Application After Successful Registration
Detailed deployment and endpoint registration guides are available in the Zenarmor documentation:
Add your first gateway
The Add your first gateway option allows you to transform your existing firewall or network environment into a fully capable network security enforcement edge with Zenarmor protection.
Adding gateways enables Zenarmor to inspect and secure network traffic, enforce internet and security policies, provide centralized visibility, and protect users and connected environments across your organization.
To add your first gateway, follow the steps below:
-
Open your browser and navigate to Zenconsole.
-
Sign in using your Zenconsole credentials.
-
Select the Add your first gateway tab from the onboarding page. You can also add gateways later from the Global Deployments section using the Add Gateway button.
Figure 11. Add your first gateway
-
Choose the supported firewall or gateway platform you want to deploy Zenarmor on.
Figure 12. Supported Platforms
-
Select the deployment method that best fits your environment. Depending on the selected platform, available methods may include one-time installation scripts, reusable installation scripts, or other supported deployment methods.
Figure 13. Deployment Methods
-
Copy the provided installation or provisioning script from the onboarding page.
-
Run the installation script on the selected gateway environment with administrator or root privileges.
-
Complete the installation and provisioning process on the selected gateway environment.
-
After the installation and provisioning process is completed, locate your newly added gateway under the Pending Gateways section in the left-hand navigation panel.
Figure 14. Organization Dashboard - Pending Gateways
-
Select the gateway to launch the Gateway Integration Wizard.
-
In the Name step, configure the following settings:
a. Gateway Name → Enter a descriptive name for your gateway. This name will be displayed throughout Zenconsole dashboards and deployment views.
b. Gateway Slug → A unique identifier automatically generated from the gateway name. The slug must be unique within your organization and can be customized if needed.Figure 15. Gateway Integration Wizard
-
Continue completing the remaining Gateway Integration Wizard steps based on your deployment requirements.
Figure 16. Gateway Integration Wizard - 2
- Once the setup is completed, the gateway will appear in the Global Deployments section in Zenconsole, allowing you to centrally manage and monitor the deployment from anywhere.
Detailed gateway deployment and provisioning guides are available in the Zenarmor documentation:
Already using Zenarmor?
If Zenarmor is already installed and running in your environment, you can use the Already using Zenarmor? option to register your existing deployment with Zenconsole for centralized cloud management and visibility.
This option allows you to connect previously deployed Zenarmor gateways to your Zenconsole organization without performing a full reinstallation.
To connect an existing Zenarmor deployment, follow the steps below:
-
Open your browser and navigate to Zenconsole.
-
Sign in using your Zenconsole credentials.
-
Select the Already using Zenarmor? tab from the onboarding page.
Figure 17. Already Using Zenarmor
-
Choose the preferred registration method for your environment.
You can register your existing gateway using one of the following methods:
- Access the firewall web interface and navigate to:
Zenarmor → Settings → Cloud Management Portal → Register to Cloud Management Portal - Or connect to the firewall through SSH and run the provided one-time installation script.
- Complete the registration process by following the provided instructions.
- Once registration is completed, the gateway will automatically connect to your Zenconsole organization.
- Verify that the gateway appears in the Global Deployments section and that the deployment status is active and connected.
Detailed deployment and gateway provisioning guides are available in the Zenarmor documentation:
After completing your deployment, you can continue to configure and manage your environment through additional Zenconsole features, such as Global Deployments, Secure Networks, Reporting, and centralized management.
Exploring Zenconsole
Once your first endpoint or gateway is connected, Zenconsole begins displaying deployment activity, operational status, and management controls across the platform.
This section gives you a quick walkthrough of the main Zenconsole areas you will use after your initial deployment. The goal is to help you understand what to do next, where to manage your connected deployments, and how to continue with the recommended setup flow.
Organization Dashboard
From the Home section in the left navigation panel, the Organization Dashboard provides a centralized overview of your environment.
Here, you can review high-level information such as connected deployments, detected threats, traffic activity, application visibility, bandwidth usage, and overall system health.
This dashboard is useful as a quick status check after connecting your first endpoint or gateway.
Figure 18. Zenconsole - Organization Dashboard View
Gateway Dashboards
The Gateway Dashboards section provides more detailed visibility into individual gateway environments connected to your organization.
From here, you can select a specific gateway and review gateway-specific information such as traffic analytics, reporting status, resource utilization, service status, and operational metrics.
Figure 19. Zenconsole - Gateway Dashboards
Global Deployments
After adding your first endpoint or gateway, the Global Deployments section becomes one of the main places to manage your connected deployments.
From the Global Deployments section in the left navigation panel, you can view all endpoints and gateways connected to your organization. This section helps you monitor deployment status, connectivity, location, activity, and operational health from a centralized view.
If you need to add more gateways or endpoints later, you can also use the action buttons available in the Global Deployments section.
Figure 20. Zenconsole - Global Deployments
Adding Additional Gateways or Endpoints
As your environment grows, you can add additional gateways or endpoints directly from the Global Deployments section.
Figure 21. Adding Additional Gateways or Endpoints
Use the Add Gateway or Add Endpoint buttons located at the top of the page to start a new deployment.
Figure 22. Add New Gateway to Your Deployment
After selecting the preferred deployment type:
- Follow the same onboarding and installation steps described earlier in this guide.
- Choose the appropriate platform for your environment.
- Select the preferred deployment or installation method.
- Complete the installation and registration process.
Once completed, the new deployment will automatically appear in the Global Deployments section for centralized management and monitoring.
Zero Trust Networks
After your endpoints and gateways are connected, the next recommended step is configuring secure connectivity through the Zero Trust Networks section.
Zero Trust Networks allow you to securely connect users, devices, offices, cloud environments, and edge locations through encrypted private overlay networks managed directly within Zenconsole.
This step should be completed after adding at least one gateway or endpoint to your organization. Connected deployments can then participate in secure private connectivity and Zero Trust access environments.
To create your first Zero Trust Network, follow the steps below:
-
Open your browser and navigate to Zenconsole.
-
Sign in using your Zenconsole credentials.
-
Open the Zero Trust Networks section from the left navigation panel.
-
Click Create Zero-Trust Network to launch the Zero Trust Network setup wizard.
Figure 23. Create Zero-Trust Network
-
Configure the network in the Network Configuration step:
a. Enter a descriptive Network Name for the Zero Trust Network.
b. Configure the Network Slug if customization is required.
c. Enter the private Address Range (IPv4) in CIDR format that will be used within the Zero Trust network.warningPlease be aware that assigning a private IP address (such as RFC1918) may trigger DNS rebinding protection mechanisms in browsers and network security systems. This can lead to access being blocked or resolution failures occurring. Public DNS servers should not resolve to private IP ranges (for example, 10.0.0.0/8, 172.16.0.0/12, 192.168.0.0/16).
If you need to use non-public addresses, there are two recommended approaches:
-
Utilize CGNAT address space (100.64.0.0/10) instead of RFC1918 ranges. This can help avoid DNS rebinding protection issues while still allowing the use of non-public IPs.
-
Set up your own private DNS server for internal resolution.
If you plan to use RFC1918 addresses, ensure they are not used within your internal networks.
d. If required, enable the This is an Internet Gateway Network option.
Figure 24. Create Zero-Trust Network Wizard
noteInternet Gateway Networks are designed to securely route and inspect internet-bound traffic through designated Zenarmor gateways. This deployment model is especially useful for:
- Remote users
- Mobile devices
- iOS and Android endpoints
- Distributed or hybrid work environments
When enabled, connected endpoints securely route internet traffic through Zenarmor gateways where internet policies, filtering, DNS security, TLS inspection, and traffic inspection can be centrally enforced.
If the network is intended for secure private connectivity between gateways, users, and internal resources, this option can remain disabled.
-
-
After completing the network configuration, click Next to continue.
-
In the Add Gateways and Endpoints step:
a. Click the Add Gateway button and select the gateway instances that should participate in the Zero-Trust Network.
b. Click the Add Endpoint button and select the endpoints or mobile devices that should securely connect to the network.
c. Optionally, click the Add User or Add Group buttons to associate specific users or groups with the network.
d. If users or groups are not yet configured, they can be created and managed from the related menus under:
i. Settings → Users
ii. Settings → Groups
iii. Settings → IAM
e. If you do not want to assign gateways, endpoints, users, or groups during this step, click Skip Optional Steps and Create to create the network with the current configuration.Figure 25. Create Zero-Trust Network Wizard - 2
-
After completing the deployment selection process, click Next to continue.
-
Create ZTNA Access Rules. In the Create ZTNA Access Rules step:
a. Configure the access rules that define communication permissions between users, groups, endpoints, gateways, and applications within the Zero Trust Network.
b. Click Create Access Rule to define the required Zero Trust access policies. -
Review the configured rules and complete the deployment by clicking Complete & Sync Now.
Figure 26. Create Zero-Trust Network Wizard - 3
Once the setup is completed, connected gateways and endpoints will begin securely communicating through the configured Zero Trust Network environment.
Detailed Zero Trust Network deployment and configuration guides are available in the Zenarmor documentation:
Settings
Before configuring Zero-Trust Network and assigning users to secure environments, it is recommended to configure users, groups, and identity integrations through the Settings section.
Figure 27. Zenconsole - Settings
Endpoint authentication, Zero Trust access rules, and policy enforcement rely on properly configured users and identity providers. Without user or IAM configuration, endpoint users may not be able to authenticate or access protected resources.
To access these settings, navigate to Settings from the left-hand navigation panel in Zenconsole.
Add Users
The Users section allows you to add and manage organization users who will access Zenarmor endpoints and Zero-Trust environments.
To add a user, follow the steps below:
-
Open your browser and navigate to Zenconsole.
-
Sign in using your Zenconsole credentials.
-
Navigate to Settings → Users.
-
Click Add User.
-
Choose whether to add the user manually or import it from CSV/JSON.
-
Enter the required user information and save the configuration.
Figure 28. Settings - Add User
After users are added, they can later be assigned to groups, Zero-Trust Networks, and access policies.
Add Groups
The Groups section allows you to organize users into groups for simplified policy management and access control.
To create a group, follow the steps below:
- Open your browser and navigate to Zenconsole.
- Sign in using your Zenconsole credentials.
- Navigate to Settings → Groups.
- Click Add Group.
- Choose whether to add the group manually or import it from CSV/JSON.
- Save the configuration.
Groups can later be used in Internet Security Policies, Zero-Trust Networks, and Private Access Policies to simplify access management.
Figure 29. Settings - Add Group
Configure Authentication (IAM)
The IAM section allows you to configure how users authenticate into Zenconsole and Zenarmor endpoints.
To configure authentication, follow the steps below:
- Open your browser and navigate to Zenconsole.
- Sign in using your Zenconsole credentials.
- Navigate to Settings → IAM.
- Click Add Authentication Method.
- Select your preferred authentication provider.
- Complete the provider configuration steps.
- Save the configuration.
After the authentication method is configured, users can sign in to Zenarmor services using the selected identity provider.
Figure 30. Settings - IAM
Policies
The Policies section allows you to control how internet traffic and private resource access are managed across your Zenarmor environment.
Before creating policies, make sure you already have:
- Gateways or endpoints connected
- Users or groups configured
- Zero-Trust Networks created (for private access use cases)
To access policy management, navigate to Policies from the left-hand navigation panel.
Figure 31. Policies Page
Zenconsole provides two main policy types:
- Internet Security Policies → Used to control and secure internet traffic.
- Private Access Policies → Used to control access inside Zero-Trust Networks and private environments.
Create an Internet Security Policy
Internet Security Policies allow you to control and secure internet access across your gateways and endpoints.
These policies can be used to define web filtering, application control, TLS inspection, content inspection, cloud access restrictions, and other internet security controls for users, groups, endpoints, and gateways.
To create a new Internet Security Policy, follow the steps below:
-
Open your browser and navigate to Zenconsole.
-
Sign in using your Zenconsole credentials.
-
Navigate to Policies → Internet Security Policies.
-
Click Create New Policy in the upper-right corner.
Figure 32. Create New Policy Button
-
Enter a policy name and optional description.
-
Select the users, groups, endpoints, or gateways to which the policy applies.
-
Click Create.
Figure 33. Create New Organization Policy
-
After the policy is created, select the policy from the list to open the policy configuration panel.
Figure 34. Internet Security Policy Details
From the policy configuration screen, you can customize how internet traffic is inspected and controlled across your organization.
Common configurations include:
-
Security Controls → Enable threat protection and security enforcement features.
-
Content Inspection → Inspect and control downloaded or transmitted content.
-
Application Controls → Allow, block, or monitor specific applications and services.
-
Web Controls → Configure web filtering categories and website access rules.
-
TLS Controls → Enable HTTPS/TLS inspection for encrypted traffic visibility.
-
Cloud Access → Control access to cloud applications and SaaS services.
-
Exclusions → Exclude specific users, destinations, or traffic from policy enforcement when required.
-
Once the required configuration is completed, enable the policy using the Status toggle to activate enforcement across your selected deployments.
notePolicies can be applied to gateways, endpoints, or both depending on your deployment model and selected matching criteria.
Create a Private Access Policy
Private Access Policies are used to control secure communication inside your Zero-Trust Networks.
These policies define which users, groups, endpoints, gateways, applications, or services are allowed to communicate with each other inside the private overlay network.
Figure 35. Private Access Policies
For example, you can:
-
Allow remote users to access internal applications or file servers
-
Restrict communication between specific devices or user groups
-
Limit access to certain ports, protocols, or applications
-
Create segmented access policies between offices, users, and environments
To create a Private Access Policy, follow the steps below:
-
Open your browser and navigate to Zenconsole.
-
Sign in using your Zenconsole credentials.
-
Navigate to Policies → Private Access Policies from the left-hand navigation panel.
-
Select the related Zero-Trust Network from the list.
-
Click Create New Rule.
Figure 36. Private Access Policies - Create New Rule
-
Enter a descriptive Rule Name.
-
Under Source Peers Matching Criteria, define which users, groups, peers, IP addresses, or locations should initiate the connection.
-
Under Destination Peers Matching Criteria, define the allowed destination users, groups, peers, applications, or resources.
Figure 37. Create Zero-Trust Network Access Rule
-
Optionally configure additional controls such as:
- Ports and protocols
- Allowed applications
- Device posture checks
- Internet Security Policy assignments
- Time schedules and location-based restrictions
Figure 38. Create Zero-Trust Network Access Rule - 2
-
Click Create Rule to save the policy.
After the rule is created, navigate back to the selected Zero-Trust Network under the Private Access Policies section to view and manage your access rules.
From here, you can enable, disable, duplicate, or modify existing rules at any time.
All newly created Zero-Trust Networks enforce a default deny model. Communication is blocked unless an explicit Private Access Policy allows the connection.
Private Access Policies are commonly used to control secure communication between remote users, endpoints, gateways, branch offices, and internal resources inside a Zero-Trust environment.
Reports and Live Sessions
The Reports and Live Sessions sections provide visibility into network traffic, applications, DNS activity, TLS traffic, detected threats, and real-time network activity across your connected environments.
To access reporting and monitoring features, navigate to the Reports or Live Sessions sections from the left-hand navigation panel in Zenconsole.
These sections help administrators monitor traffic behavior, investigate security events, verify policy enforcement, and gain operational visibility across gateways and endpoints.
Figure 39. Reports Page
Figure 40. Live Sessions Page
For more detailed configuration guidance and feature-specific instructions, refer to the related Zenarmor documentation sections throughout the platform.
Video
If you would like to follow the onboarding process step-by-step, Zenarmor also provides a guided video walkthrough covering the recommended deployment flow, including endpoints, gateways, secure networks, policies, and platform management: