API Key Management
Zenarmor® provides the Zenarmor API feature, which allows you to create your own integrations between the firewall and other security solutions. It employs API keys to authenticate requests. For API management, Zenconsole (Centralized Cloud Management Portal) allows you to perform the following tasks:
-
Enable/Disable API
-
Generate API key
-
Revoke API key
After you've generated a new API key, you'll need to activate it via CLI on your Zenarmor firewall before you can use it.
Keep in mind that your API keys are extremely powerful, so keep them safe! Do not make your private API keys public on GitHub, in client-side code, or anywhere else.
Generate API Key
To build your own integrations, you can create API keys to access the Zenarmor API. After enabling API on your firewall, you can easily generate API key by following next instructions given below:
-
Select the firewall on your Zenconsole.
-
Navigate to Settings > API.
-
Click +Generate API Key button. This will pop up a dialog box.
Figure 1. Generating API Key on Zenconsole
-
Specify a user name, such as
developerand click Generate. This will automatically generates an API key and displays it in the API Keys pane.Figure 2. Specifying the User to Generate an API Key on Zenconsole
-
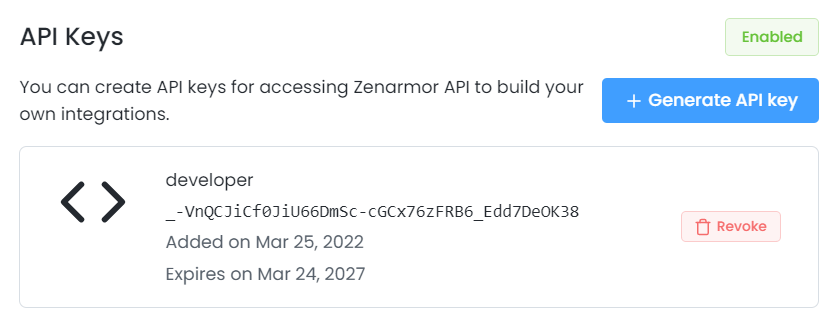
After generating the API key you can view the following details on the API Keys pane:
- User name
- API key value
- Key Creation Date
- Key Expiration Date

Figure 3. Viewing API Keys Details on Zenconsole
Revoke API Key
You can easily revoke an API key by following the next instructions given below:
-
Select the firewall on your Zenconsole.
-
Navigate to Settings > API.
-
Click the Revoke button with a trash box icon in the API key pane which you wish to delete. This will pop up a dialog box.
-
Click Revoke to confirm the removing API key access from your firewall.
Figure 4. Revoking API Keys on Zenconsole
Sample API
Zenarmor provides a sample Python script, zenapi.py, for API usage. To be able to run this script successfully, you must activate your API key on your Zenarmor firewall by following the steps below:
-
Connect your firewall using root privileged user via SSH.
-
Edit
zenapi.pyfile using your favorite editor to update the following lines at the beginning of the file using your API key details.# uri of firewall which run api
api_host = 'https://192.168.122.101:8090/'
# please set this username which take from sunnyvalley cloud.
api_user = 'testuser'
# please take api key from cloud
api_key = 'uBHElPyuMjWy74f1HeArB1rtMf5krICmlVbVSNGRbdI'infozenapi.pyPython script is found at the following location:/usr/local/zenarmor/zenarmor-agent/scripts/. -
Set the
api_hostparameter using your firewall IP address. -
Set the
api_userparameter using API key username which was specified during key generation. -
Set the
api_keyparameter using API key value which can be viewed on Zenconsole.
Here is the hands on video for Zenarmor API Management on Zenconsole: