Content Inspection Rules on Zenconsole
Zenarmor Content Inspection is a critical component of modern network security policies. It ensures that every file, DNS request, and web access attempt passing through your environment is thoroughly examined for potential threats. Instead of relying solely on perimeter defenses, the Zenarmor Content Inspection feature provides deep visibility and control over the actual content being transmitted, whether it is a downloaded file or a DNS query.
By enabling Zenarmor Content Inspection, organizations can have the following capabilities.
- Detect and block hidden malware before it executes.
- Identify covert data exfiltration attempts through DNS tunneling.
- Prevent phishing attacks by scanning suspicious websites in real time before users are exposed.
- Enforce consistent security standards across all devices and users.
The Content Inspection feature is accessible under each policy. Once inside, you will find two essential protective layers: Realtime File Scanning, Real-Time Anti-Phishing Protection, and DNS Deep Inspection. These tools enable IT administrators to proactively prevent advanced threats and ensure compliance with corporate security requirements.

Figure 1. Zenarmor Content Inspection
Realtime File Scanning
Zenarmor Realtime File Scanning is a vital security capability that analyzes downloaded files in-line, examining their origins, behaviors, and trust signals to prevent harmful payload execution. This feature helps organizations detect and prevent hidden threats.
When Realtime File Scanning is enabled, the system inspects several critical file categories, which are frequently exploited in attacks. You can find the file categories below.
- Windows EXE (executable)
- Linux ELF (executable)
- macOS Mach-O (executable)
- Android Dex (executable)
- ZIP archives
- Web Assembly
- Shell Script
Zenarmor Realtime File Scanning feature is only available for SSE and higher editions.
This extensive protection ensures security across different operating systems and commonly used file formats. By scanning documents, executables, and compressed files in real-time, Zenarmor Realtime File Scanning helps organizations proactively defend against advanced persistent threats (APTs) and cross-platform malware campaigns.
To tailor Realtime File Scanning to your organization’s needs, the dropdown menu provides three enforcement modes. These options allow administrators to decide whether files should be bypassed, only monitored, or fully blocked, ensuring the right balance between security and operational continuity:
-
Disabled: No file scanning will occur. Files are delivered without inspection. This mode should be reserved for trusted environments where inspection is unnecessary.
-
Log: Files are scanned and results are recorded in logs, but no blocking action is taken. This mode is particularly useful during testing or pilot phases, allowing administrators to observe potential threats without impacting end users. You may view these logs on your Reports or Live Sessions Explorer pages.
-
Block: Files are scanned in real time, and any malicious or suspicious file is immediately prevented from being delivered. This is the most secure option and is recommended for production environments where maximum protection is required.

Figure 2. Zenarmor Realtime File Scanning Settings
How to Enable Realtime File Scanning
You may follow these steps to locate and configure the Realtime File Scanning option in your policy settings:
-
Open your browser and navigate to Zenconsole.
-
Enter your username and password.
-
Click Policies on the left-hand sidebar. This will expand the menu to show the following sub-options, Internet Security Policies and Private Access Policies.
-
Click Internet Security Policies.

Figure 3. Policies-Internet Security Policies
-
From the list of available policies, choose the one you want to configure (e.g., security).
-
In the policy settings, go to the Content Inspection tab.
-
Locate the “Perform inline scan of downloaded files” option with a dropdown menu on Realtime File Scanning pane.
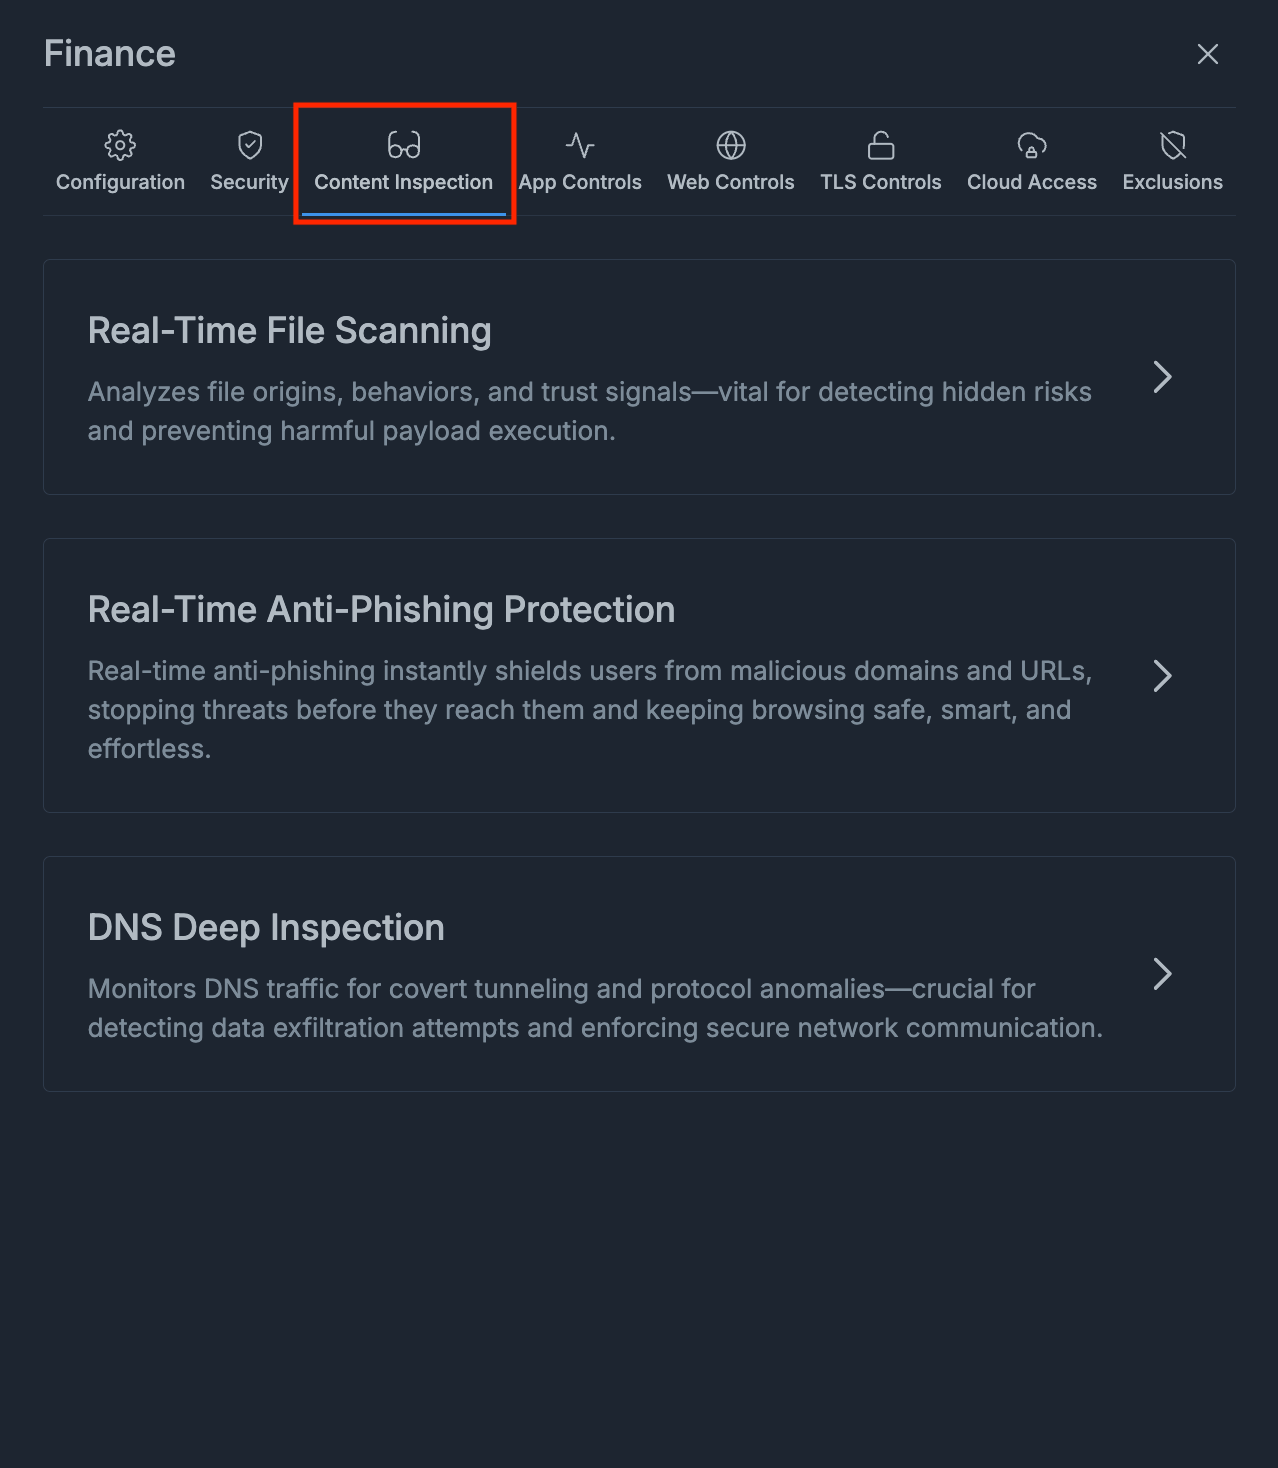
Figure 4. Content Inspection Tab
-
Select the desired enforcement mode from the dropdown menu.
- Disabled
- Log
- Block
Figure 5. Available Enforcement Modes for Realtime File Scanning
The setting is applied instantly; no manual saving is required. Once selected, your enabled policy will begin enforcing the chosen mode immediately.
Real-Time Anti-Phishing Protection
Real-Time Anti-Phishing Protection is a content-aware security mechanism that protects users against phishing attacks by performing live analysis of URLs and domains at the moment of access. It evaluates suspicious web destinations in real time and applies policy-defined actions before users can interact with malicious or deceptive content. This feature is particularly effective against credential harvesting pages, malicious redirects, and phishing campaigns hosted on newly created or compromised domains.
Real-Time Anti-Phishing Configuration Options
The following options allow administrators to customize how real-time anti-phishing protection is applied within a policy. Each setting controls a specific aspect of URL inspection, enforcement behavior, and performance optimization, as detailed below.
-
Enable real-time anti-phishing protection: Turns on live phishing detection for web traffic governed by the policy. When enabled, URLs and domains are evaluated in real time before users can access the destination.

Figure 6. Enable Real-Time Anti-Phishing Protection
-
Action for unsafe URLs: Defines the enforcement behavior for URLs that are explicitly identified as malicious or phishing-related. There are two available options: Block and Warn & Allow user
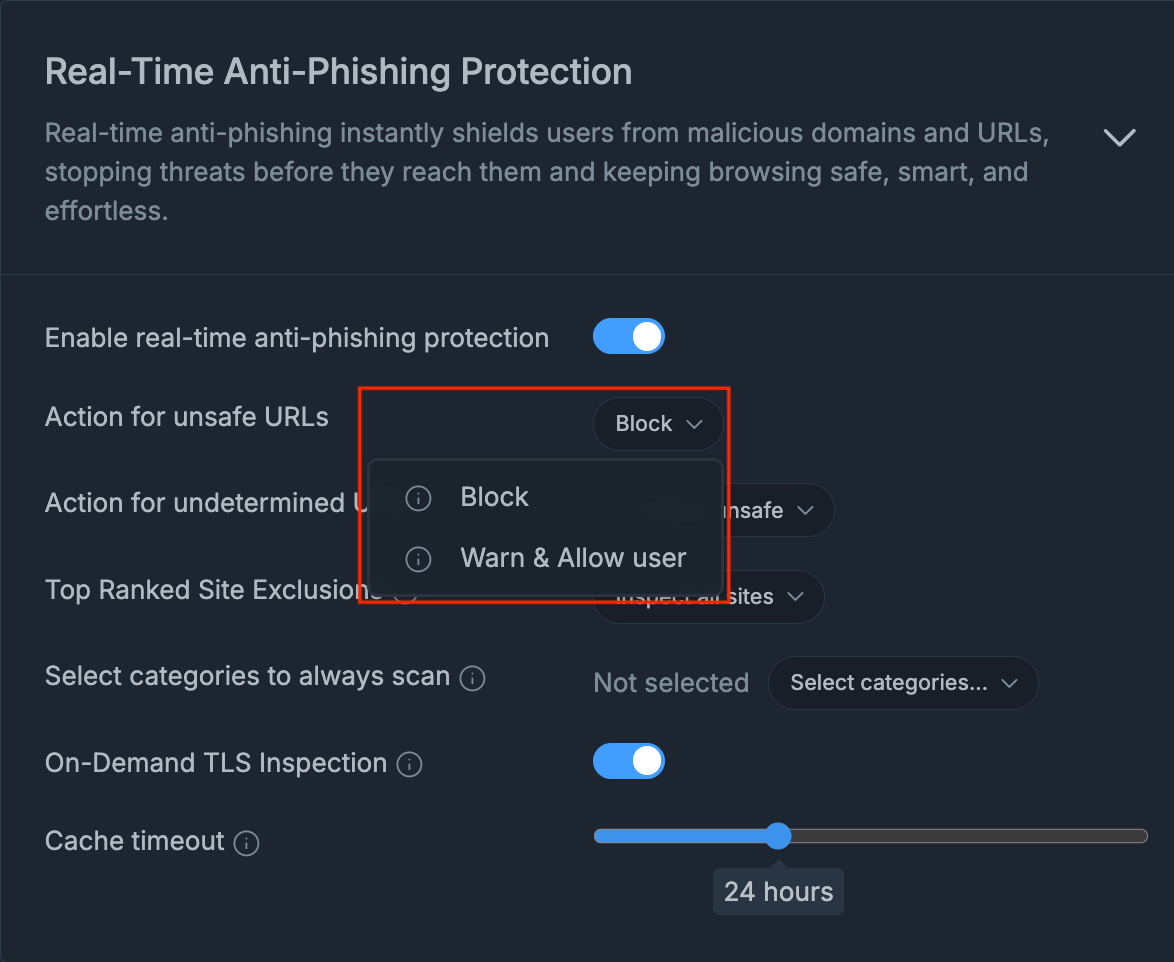
Figure 7. Action for Unsafe URLs
-
Action for undetermined URLs: Specifies how Zenarmor handles URLs that cannot be definitively classified at the time of access. There are two available options: Consider unsafe(default) and Consider safe after timeout.

Figure 8. Action for Undetermined URLs
noteSites are considered unsafe by default until they are explicitly reported as safe.
-
Top Ranked Site Exclusions: Controls whether highly ranked and commonly trusted websites should be excluded from inspection. This setting helps balance inspection performance and security coverage.

Figure 9. Top Ranked Site Exclusions
-
Select categories to always scan: This feature allows administrators to define specific website categories that should always be inspected, regardless of their reputation or ranking.
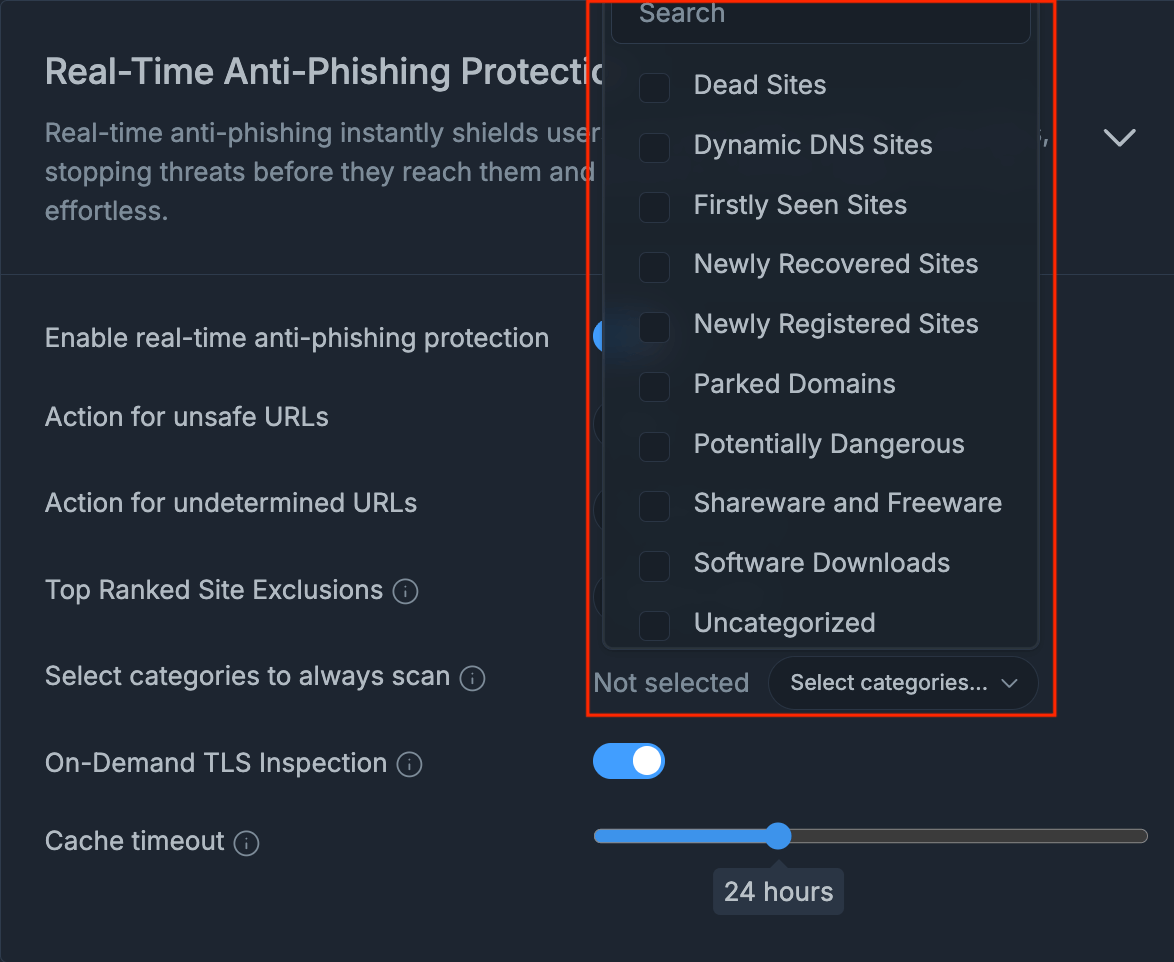
Figure 10. Select Categories to Always Scan
noteIf no category is selected, Zenarmor inspects the Uncategorized web category by default.
-
On-Demand TLS Inspection: Enables TLS inspection dynamically for suspicious or insufficiently classified URLs.

Figure 11. On-Demand TLS Inspection
-
Cache timeout: Defines how long inspection results for previously analyzed URLs are cached. Shorter timeouts improve responsiveness to newly emerging phishing threats. Longer timeouts reduce processing overhead. The default value is 24 hours.

Figure 12. Cache Timeout
How to Enable Real-Time Anti-Phishing Protection
You may follow these steps to locate and configure the Real-Time Anti-Phishing Protection feature in your policy settings:
-
Open your browser and navigate to Zenconsole.
-
Enter your username and password.
-
Click Policies on the left-hand sidebar. This will expand the menu to show the following sub-options, Internet Security Policies and Private Access Policies.
-
Click Internet Security Policies.
Figure 13. Policies-Internet Security Policies
-
From the list of available policies, choose the one you want to configure (e.g., Finance).
-
In the policy settings, go to the Content Inspection tab.
Figure 14. Content Inspection Tab
-
Under the Content Inspection section, click Real-Time Anti-Phishing Protection to expand the panel.
-
Enable Real-time anti-phishing protection and configure the related options according to your security requirements.
Figure 15. Enable Real-Time Anti-Phishing Protection
-
Once enabled, users attempting to access malicious or phishing-related websites may be presented with a Zenarmor block page, depending on the configured enforcement behavior.

Figure 16. Access blocked by Real-Time Anti-Phishing Protection
noteDepending on the endpoint environment, browsers or third-party security solutions may display their own warning pages before the Zenarmor block page appears.
In such cases, the browser or endpoint security software may intercept the request before it reaches the Zenarmor inspection flow.
DNS Deep Inspection
DNS Deep Inspection is an advanced security capability that analyzes DNS traffic at a packet level to detect hidden threats, protocol anomalies, and covert communication channels. Since DNS is a core service that rarely gets blocked in networks, attackers often exploit it for data exfiltration or to control infected devices.
By enabling DNS Deep Inspection in Zenarmor, organizations gain deeper visibility into DNS activities and can stop sophisticated attack techniques before they cause harm.
Zenarmor DNS Deep Inspection feature is only available for paid editions.
Below are the available DNS Deep Inspection options you can configure.
Inspect DNS traffic for malicious DNS tunnels
DNS Tunneling is an advanced technique often exploited by cybercriminals to bypass network security measures. By using DNS queries and responses as a covert channel, attackers can disguise malicious traffic as legitimate DNS activity. This allows them to exfiltrate sensitive data, deliver commands, or maintain communication with compromised systems without triggering traditional security alerts.
Zenarmor’s Block DNS Tunneling feature provides a robust defense against this threat. When enabled, Zenarmor performs a deep inspection of DNS traffic to detect and block tunneling attempts proactively. This prevents attackers from leveraging covert DNS channels for data exfiltration or evading detection mechanisms.
Since DNS Tunneling is particularly difficult to identify with conventional tools, having a proactive solution is critical. Zenarmor ensures that your network remains resilient against data exfiltration, covert channel communication, and advanced evasion techniques.
In summary, enabling the Block DNS Tunneling feature strengthens your security posture, safeguards sensitive information, and enhances overall network protection against emerging threats.

Figure 16. Inspect DNS Traffic for Malicious DNS Tunnels
Inspect DNS traffic for malformed/non-standard DNS transactions
Malformed or non-standard DNS queries can indicate attempts to exploit vulnerabilities in DNS servers or resolvers, as well as signs of misconfigured or compromised devices within the network. Attackers may craft abnormal DNS packets to crash a resolver, inject malicious data, or use protocol irregularities to bypass detection.
Zenarmor’s Malformed DNS protection automatically inspects DNS traffic for suspicious or corrupted queries. When this option is enabled, malformed requests are blocked before they can cause disruption or be leveraged in an attack. In addition, detecting such traffic can help administrators identify malfunctioning endpoints or devices that may still be infected with malware.
By enabling this feature, organizations strengthen their defenses against protocol abuse, reduce the risk of DNS-based exploitation, and ensure the integrity of their DNS infrastructure.
Figure 17. Inspect DNS Traffic for malformed/non-standard DNS Transactions
Inspect DNS traffic for botnet DGA domain queries
Botnets frequently rely on Domain Generation Algorithms (DGA) to create large numbers of random domain names, making it extremely difficult to predict or block their communication patterns using traditional domain-based detection methods. This allows infected devices to reach Command and Control (C&C) servers through constantly shifting domains, bypassing conventional security defenses.
Zenarmor’s Botnet DGA Domains protection provides a critical layer of defense against this evasive technique. When enabled, the system inspects DNS queries in real time to identify and block suspicious, algorithm-generated domains before they can be resolved. This prevents botnet agents from establishing communication with their C&C infrastructure and stops malicious activity at its root.
Because DGA-based domains are dynamic and unpredictable, they pose a significant challenge to cybersecurity teams. By proactively blocking these queries, Zenarmor ensures your network remains resilient against advanced botnet strategies, adding an essential layer of protection against evolving threats.

Figure 18. Inspect DNS Traffic for Botnet DGA Domain Queries
How to Enable DNS Deep Inspection
To configure DNS Deep Inspection in Zenconsole, follow the steps below:
-
Open your browser and log in to Zenconsole with your username and password.
-
Navigate to Policies on the left-hand sidebar.
-
Click Internet Security Policies.
Figure 19. Policies-Internet Security Policies
-
Select the policy you want to configure (for example: Security).
-
Go to the Content Inspection tab.
Figure 20. Content Inspection Tab
-
Scroll down to the DNS Deep Inspection section and click to expand the panel.
-
Under this section, you will see three available options:
- Inspect DNS traffic for malicious DNS tunnels
- Inspect DNS traffic for malformed/non-standard DNS transactions
- Inspect DNS traffic for botnet DGA domain queries

Figure 21. DNS Deep Inspection
-
Next to each option, you’ll find a dropdown menu. Select the enforcement mode:
- Log: DNS traffic is inspected and all findings are recorded in logs, but no blocking occurs. This mode is useful for monitoring or testing environments. You may view these logs on your Reports or Live Sessions Explorer pages.
- Block: DNS traffic is inspected, and any malicious or suspicious activity is immediately blocked. This is the recommended option for maximum security.

Figure 22. DNS Deep Inspection Controls
The setting is applied instantly; no manual saving is required. Once selected, your enabled policy will begin enforcing the chosen mode immediately.