Zenarmor Gateway Installation
Zenarmor® provides you with two powerful deployment options, tailored to meet your unique cybersecurity needs based on your subscription type.
-
Perimeter Protection with Zenarmor Gateway Deployment: Deploy Zenarmor as a gateway on a perimeter firewall or routing platform, such as OPNsense or pfSense CE. This option ensures that your network is fortified at its entry points, providing a robust shield against external threats. All Zenarmor editions, including Free Edition, can be deployed as a gateway on a routing platform to protect your networks.
With Zenarmor SASE, your users can securely access internal resources behind your Zenarmor gateway, no matter where they are located, through private networks. Moreover, the Zenarmor SASE edition enables seamless connection between different branches via a secure private network, providing unmatched flexibility without compromising security.
-
Comprehensive Endpoint Security with Zenarmor Endpoint Application: Install the Zenarmor endpoint application directly on devices like desktop PCs, laptops, or servers.
With Zenarmor, you gain proactive defense mechanisms, enhanced control, and peace of mind knowing your digital environment is secure.
In this documentation, we provide a comprehensive list of the supported platforms you can deploy Zenarmor gateway mode. Additionally, we outline the straightforward steps required to install the Zenarmor on each of these platforms.
To get benefit of Zenarmor endpoint application and to be able to protect your endpoints you must have Zenarmor SSE and higher editions.
Supported Platforms
You can install Zenarmor as a gateway on variety of platforms for trying it free. Zenarmor supports the following platforms for gateway deployment.
- OPNsense® (OPNsense 24.7, and 25.X, fully integrated into the OPNsense WebUI)
- FreeBSD® (FreeBSD 13.3, 14.1, 15)
- Ubuntu Linux (Ubuntu 22.04 LTS and later)
- OpenWRT (OpenWRT 24.10 and later)
- Debian Linux (Debian 11, 12)
- Amazon Linux (Amazon Linux 2)
- pfSense® software (pfSense® software CE 2.7.x, 2.8.x)
Before installing Zenarmor, you should ensure you meet the minimum system requirements in order to run Zenarmor or to have the best user experience. See Hardware Requirements for more information.
To use all of the filtering functionalities of the Zenarmor, you must have either the netmap framework or nfqueue framework installed on your system. Although FreeBSD systems has installed netmap by default, Linux systems such as Ubuntu, and Debian does not include the netmap by default. On Linux distributions, you may use the default installed NFQ framework or install the netmap by yourself. For more information about how to install netmap on Linux, please refer to netmap installation guide.
Zenarmor Free Edition is forever free-of-charge. We strongly recommend you register to keep in touch with updates and new features. You can register at Zenconsole Cloud Management Portal.
We advise you to read the Best Practices for Zenarmor Deployment Guide after installing Zenarmor on your network.
Install via One-Time Script from Zenconsole
This method generates a time-limited installer command that is bound to the Activation Key you select in Zenconsole. Run the command on the target device to install Zenarmor and automatically register the device as a Gateway in your deployment.
If you choose an Activation Key that is still in use on another firewall, that device will lose the key and fall back to the free tier.
You may follow these steps to install Zenarmor gateway using one-time installation script.
-
Open your browser and go to the Zenconsole login page.
-
Enter your username and password.
-
Navigate to the Global Deployments page.
-
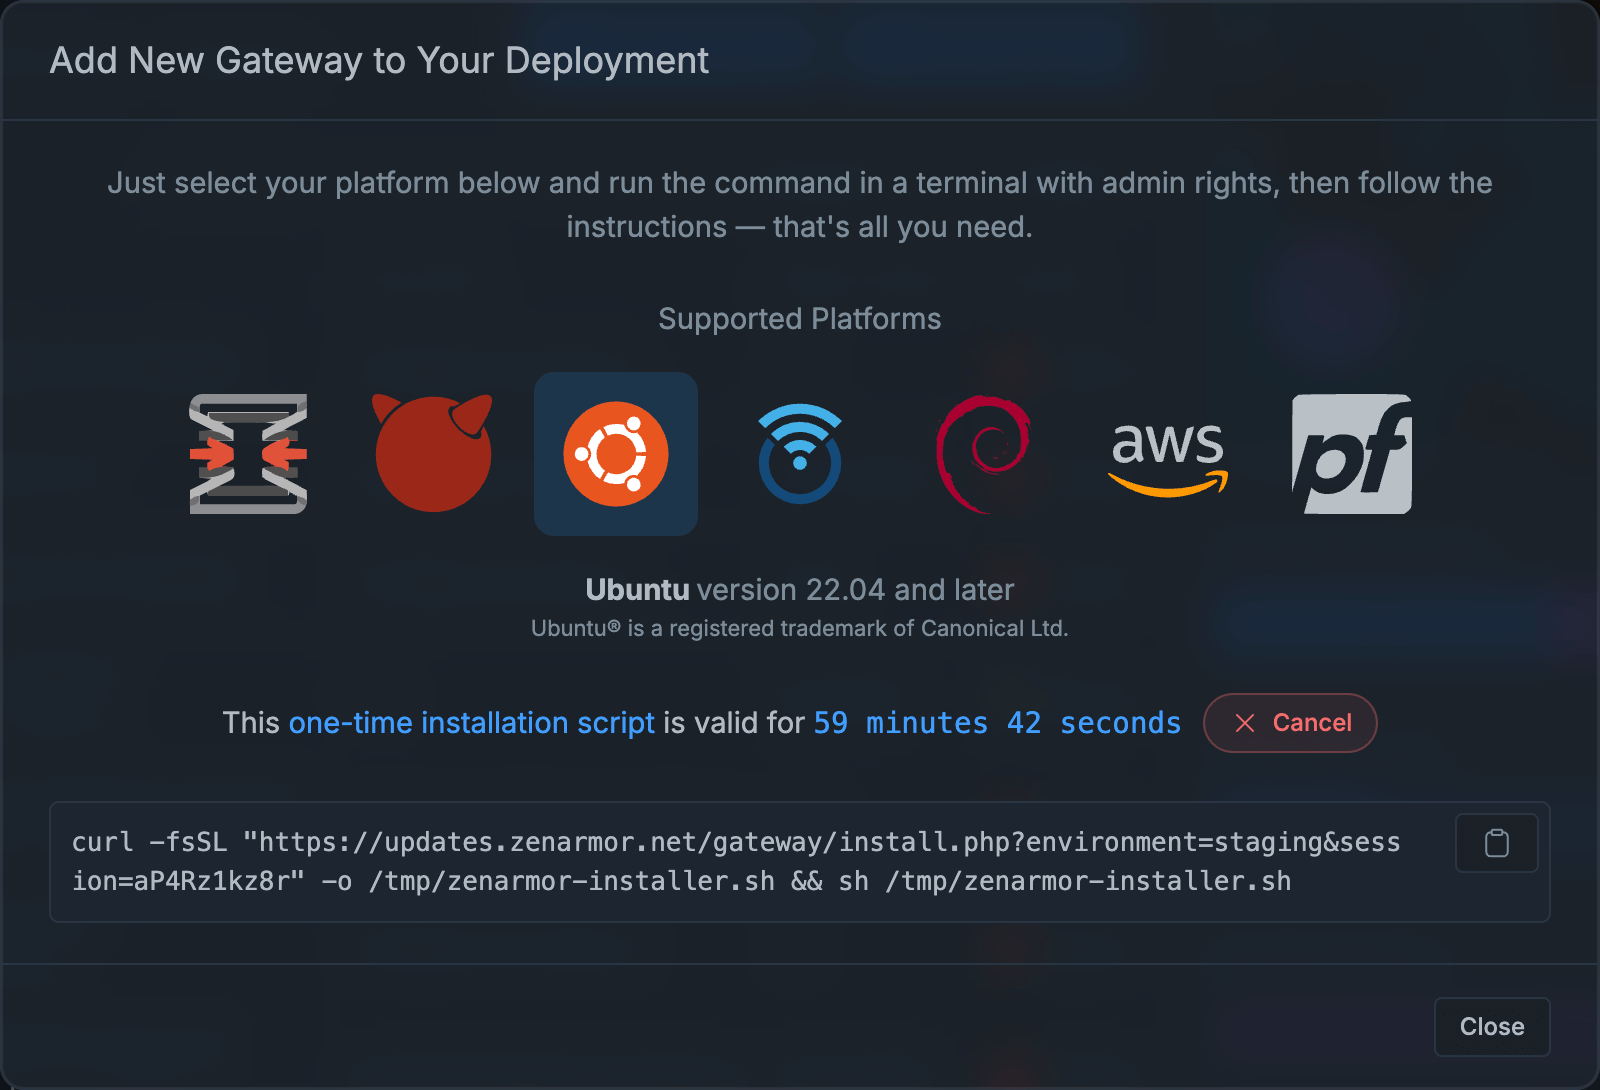
Click + Add Gateway button at the header of the page. This will display Add a Gateway to Your Deployment panel.

Figure 1. Adding a Gateway
-
At the top of this panel, a banner displays a one-time installation script with a countdown timer.

Figure 2. One-time Installation Script
-
Copy the command and run it in the terminal on your gateway with administrator/root privileges.
-
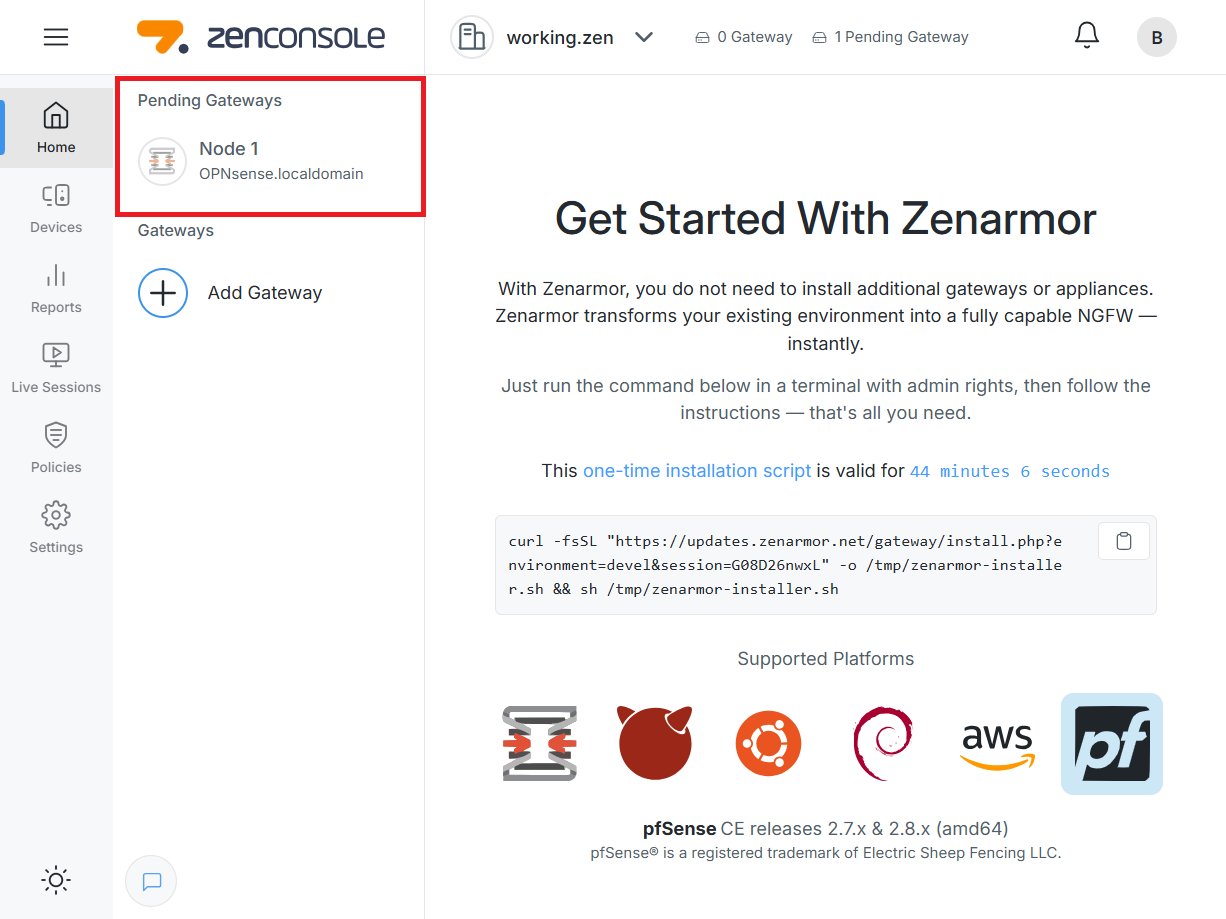
The installer downloads the required components and completes registration. Within a few minutes, the device appears under Pending Gateways in Zenconsole.

Figure 3. Pending Gateway
Now, you must authenticate register your gateway to your organization on the Zenconsole.
To be able to protect the gateway using Zenarmor, you need to register your gateway to Zenconsole.
Before starting registration, ensure that an organization is set up with an identity and access management configuration already completed on Zenconsole.
Organization features and endpoint support are only available on SSE and higher subscriptions.
Installing on OPNSense
Since Hardware Offloading feature is incompatible with netmap, make sure that hardware offloadings are disabled on your OPNsense node.
Zenarmor may be installed using the web interface in OPNsense or using the command line interface via SSH or local system access (see instructions here). The preferred method is the web interface. Once Zenarmor is installed, you will need to complete the initial configuration in the web interface so it is convenient to also complete the installation using the web interface.
To install plugins in OPNsense, you must use an account with administrative access.
Before installing Zenarmor, you should ensure you meet the minimum system requirements in order to run Zenarmor or to have the best user experience. See Hardware Requirements for more information.
Web Interface Installation
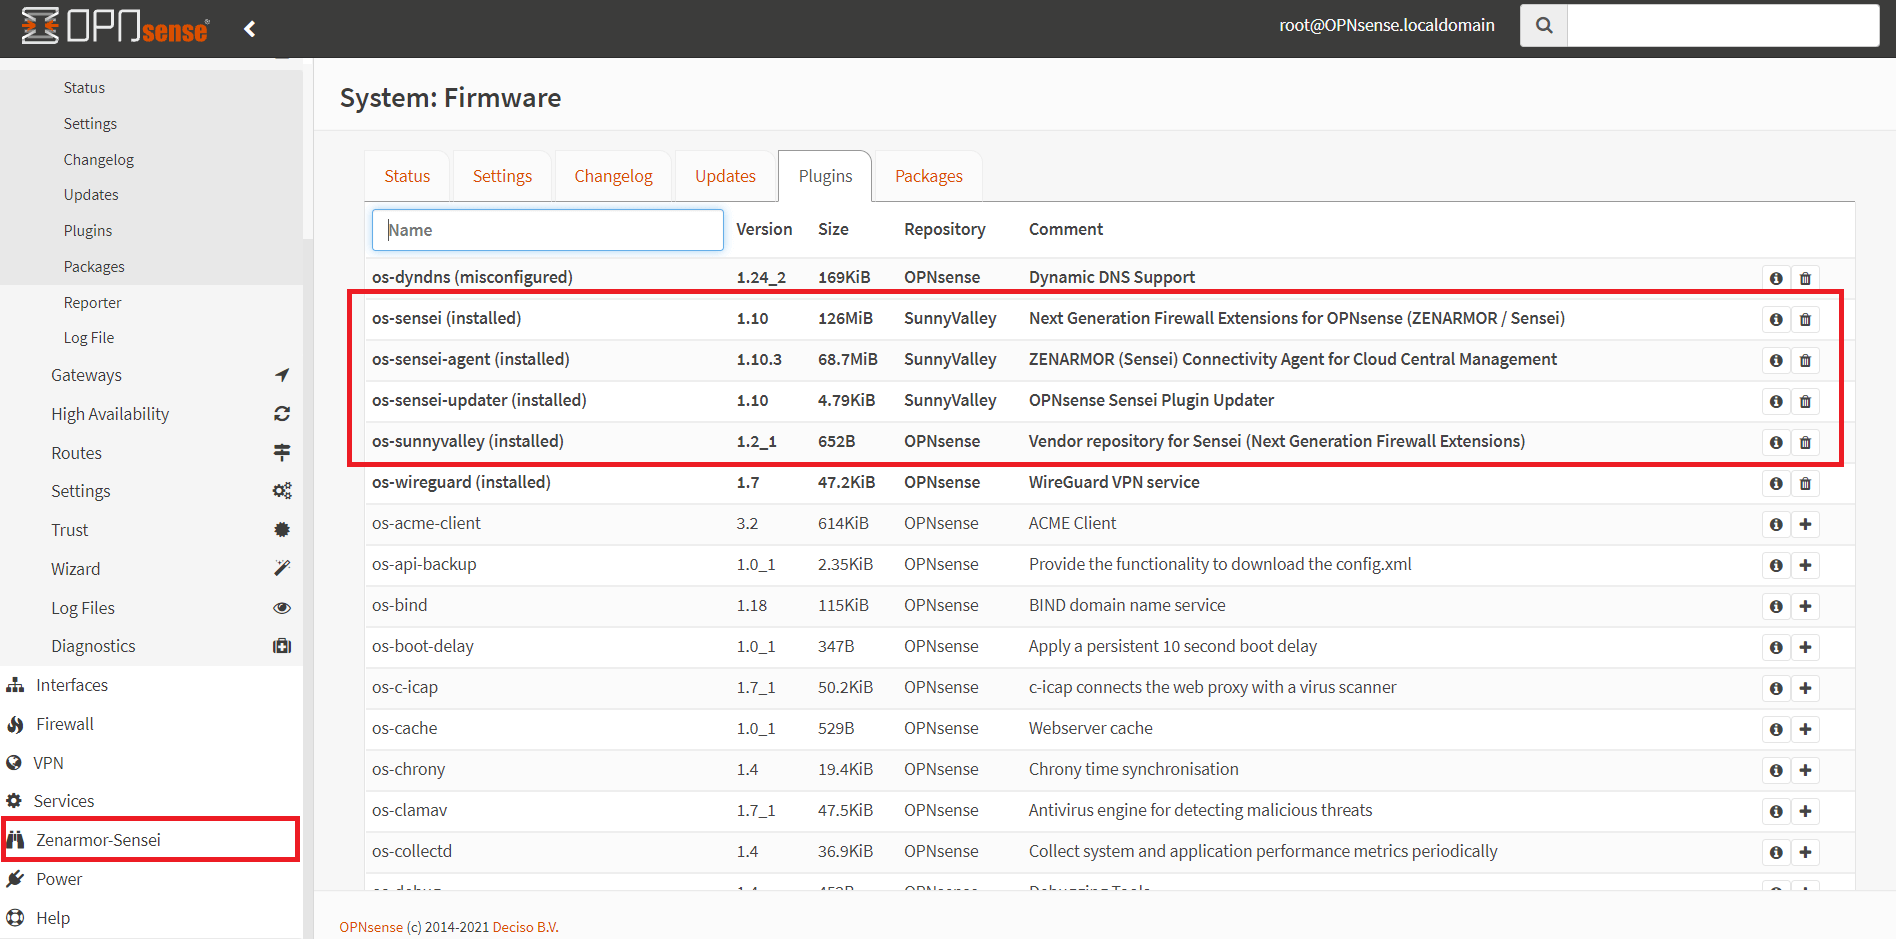
To install Zenarmor, you must first install the Sunny Valley Networks vendor repository plugin.
Go to the System → Firmware → Plugins page. Click on the + icon next to os-sunnyvalley to install the plugin.
Once the vendor plugin is installed, you should see the Zenarmor plugin available in the list of plugins as os-sensei. If you do not see the Zenarmor plugin, you may need to refresh the Plugins page. Click the + icon next to os-sensei to install the plugin.
After installing Zenarmor, you should see the Zenarmor menu in the left sidebar of the OPNsense web interface. If you do not see the new, top-level menu, you may need to refresh the page.
For more information, please refer to Zenarmor Installation on OPNsense Web UI.

Figure 4. Installed Zenarmor Plugins on OPNsense
Next, you will need to complete the Initial Configuration Wizard for Zenarmor to be fully operational.
Initial Configuration Wizard is quite self-explanatory; but if you still need detailed guide, please read on here:
Hands-on Video
Here is a video that will guide you through the steps of the Zenarmor® installation and initial configuration process on OPNsense:
Installing on FreeBSD
Since Hardware Offloading feature is incompatible with netmap, make sure that hardware offloadings are disabled on your FreeBSD node.
To install Zenarmor on FreeBSD, just run below one-liner which will install the package repository and the main package as root or user with sudo privileges:
curl https://updates.zenarmor.com/getzenarmor | sh
Authenticate & register your FreeBSD node to the Cloud Central Manager
(*) Sign-up for a new account from the Cloud Central Management Portal if you've not done so yet. For more information about creating a portal account, click here.
To register your FreeBSD node to the Cloud Central Manager run the following command as root or user with sudo privileges:
sudo zenarmorctl cloud register
As a final step, complete the Initial Configuration of your FreeBSD firewall for the cloud portal by following the instructions.
Installing on Ubuntu
To install Zenarmor on Ubuntu, just run below one-liner which will install the package repository and the main package as root or user with sudo privileges:
curl https://updates.zenarmor.com/getzenarmor | sh
Authenticate & register your Ubuntu node to the Cloud Central Manager
(*) Sign-up for a new account from the Cloud Central Management Portal if you've not done so yet. For more information about creating a portal account, click here.
To register your Ubuntu node to the Cloud Central Manager run the following command as root or user with sudo privileges:
sudo zenarmorctl cloud register
As a final step, complete the Initial Configuration of your Ubuntu firewall for the cloud portal by following the instructions.
Installing on OpenWRT
Zenarmor supports OpenWRT 24.10 and later.
To install Zenarmor on OpenWRT, run the one-line installer below on your device with root privileges:
curl https://updates.zenarmor.com/getzenarmor | sh
Authenticate & register your OpenWRT Gateway node to the Cloud Central Manager
(*) Sign-up for a new account from the Cloud Central Management Portal if you've not done so yet. For more information about creating a portal account, click here.
To register your OpenWRT gateway to the Cloud Central Manager run the following command as root:
zenarmorctl cloud register
As a final step, complete the Initial Configuration of your OpenWRT firewall for the cloud portal by following the instructions.
Installing on Debian
To install Zenarmor on Debian, just run below one-liner which will install the package repository and the main package as root or user with sudo privileges:
curl https://updates.zenarmor.com/getzenarmor | sh
Authenticate & register your Debian node to the Cloud Central Manager
(*) Sign-up for a new account from the Cloud Central Management Portal if you've not done so yet. For more information about creating a portal account, click here.
To register your Debian node to the Cloud Central Manager run the following command as root or user with sudo privileges:
sudo zenarmorctl cloud register
As a final step, complete the Initial Configuration of your Debian firewall for the cloud portal by following the instructions.
Installing on pfSense® software
To install Zenarmor on pfSense® software, just run below one-liner which will install the package repository and the main package:
curl https://updates.zenarmor.com/getzenarmor | sh
Authenticate & register your pfSense® software node to the Cloud Central Manager
(*) Sign-up for a new account from the Cloud Central Management Portal if you've not done so yet. For more information about creating a portal account, click here.
rehash
zenarmorctl cloud register
As a final step, complete the Initial Configuration of your firewall for the cloud portal by following the instructions.
Since Hardware Offloading feature is incompatible with netmap, make sure that hardware offloadings are disabled on your pfSense node.
Due to the recent changes to the pfSense+ software; pfSense+ package manager now blocks 3rd party applications from getting installed onto the platform.
To that end, regretfully, we have decided to remove pfSense+ support.
If you'd like to continue using Zenarmor, you can consider other platforms alternatives including OPNsense, pfSense CE and other Linux-based distributions.
Installing on Amazon Linux
To install Zenarmor on Amazon Linux, just run below one-liner which will install the package repository and the main package as root or user with sudo privileges:
curl https://updates.zenarmor.com/getzenarmor | sh
Authenticate & register your Amazon Linux node to the Cloud Central Manager
(*) Sign-up for a new account from the Cloud Central Management Portal if you've not done so yet. For more information about creating a portal account, click here.
To register your Amazon Linux node to the Cloud Central Manager run the following command as root or user with sudo privileges:
sudo zenarmorctl cloud register
As a final step, complete the Initial Configuration of your Amazon Linux firewall for the cloud portal by following the instructions.
Hands-on Video
Here is a video that will guide you through the steps of the installation and registration process for BSD-based, such as pfSense® software, and Linux-based, such as Debian and Ubuntu, systems.
