Installing Zenarmor on OPNsense via Command Line
Although the preferred method of installation is the web interface (see instructions here), Zenarmor may also be installed using the command line interface via SSH or direct system access. Once Zenarmor is installed, you will need to complete the initial configuration using the web interface.
To install Zenarmor in OPNsense with the command line interface, you must use an administrative account with shell access.
Command Line Installation
The command line installation method was the primary means for installing Zenarmor before it was available on the Plugins page in the OPNsense web interface. This option is still available for users who have local access to the OPNsense system yet prefer using command line tools or who may only have remote shell access via SSH to administrate their OPNsense installations. However, the web interface will need utilized after installation to complete the initial configuration of Zenarmor.
Local System Access
When you have local access to OPNsense, you may simply log into OPNsense using the root user or another administrator account. You should see a list of OPNsense menu options.

Figure 1. OPNsense console login menu
SSH Access
If you only have shell access to OPNsense, you may install Zenarmor remotely by logging into OPNsense using a SSH client using the following command where root is the administrator account and your-firewall-ip is the IP address or hostname of the OPNsense system. You should see a list of OPNsense menu options.
$ ssh root@your-firewall-ip
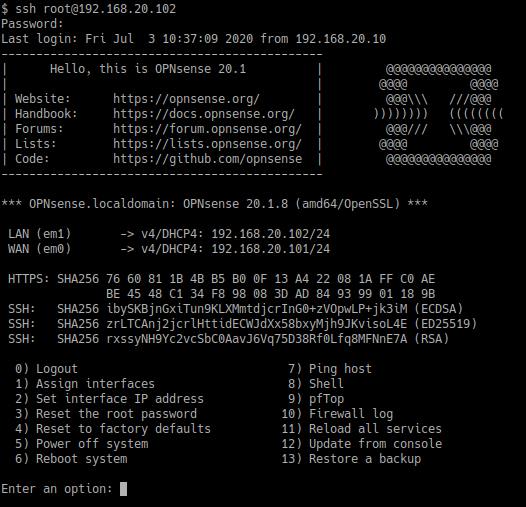
Figure 2. OPNsense SSH access
Install vendor repository and Zenarmor NGFW plugin
Follow the steps given below to install vendor repository and Zenarmor NGFW plugin:
- Once you are successfully logged into OPNsense either by local system access or SSH access, enter option
8to open the shell. - Run the following command to install vendor repository.
pkg install os-sunnyvalley
- Run the next command to install
os-senseiplugin.
pkg install os-sensei
Depending on the speed of your hardware and Internet connection, the installation may take several minutes to complete.
Once the installation has been completed, you may disconnect from your terminal session. You may also disable your firewall`s SSH service by unchecking the checkboxes mentioned above if you no longer wish to use the SSH service.
You will now need to complete the Initial Configuration Wizard for Zenarmor to be fully operational. To view the instructions, go to the Initial Configuration Wizard section of the web installation page.
We advise you to read the Best Practices for Zenarmor Deployment Guide after installing Zenarmor plugin on your firewall.