How to Set Up VLAN on OPNsense
Virtual Local Area Networks (VLANs) are one of the most effective ways to segment traffic within a network, improving both security and performance. In OPNsense, VLANs can be configured to isolate departments, services, or user groups, ensuring that each segment has its own dedicated path for communication. This segmentation helps reduce broadcast traffic, prevents unauthorized access between different parts of the network, and simplifies overall network management. By implementing VLANs, administrators gain more granular control over traffic flow, firewall rules, and bandwidth allocation, creating a network infrastructure that is both secure and efficient.
This guide provides a step-by-step walkthrough for OPNsense VLAN setup, from the fundamentals of VLAN functionality to advanced configurations. You will learn how to create VLAN interfaces, configure DHCP for each VLAN, and set up tailored firewall rules to enforce security policies. We will also explore use cases such as building an OPNsense guest network for visitors, maintaining configurations during updates, and expanding or modifying VLANs as your network grows. Whether you are starting from scratch or optimizing an existing environment, these instructions will help you perform a complete OPNsense VLAN configuration while ensuring your network remains reliable, scalable, and easy to manage.
In the following sections, we will begin with step-by-step instructions to create and configure VLANs in OPNsense.
1. Login to OPNsense Web Interface
Before setting up VLANs in OPNsense, you need to sign in to the system’s web interface with the following steps.
- Open your browser and navigate to the OPNsense web interface (e.g.,
https://192.168.1.1). - Enter your admin credentials to log in. Access to this interface is necessary to perform any network configuration, including VLAN setup.
Once you’re logged in, you’ll be ready to access and manage the settings required for VLAN configuration.
2. Open the VLAN Management Section
After accessing the OPNsense dashboard, the next step is to open the VLAN configuration section. This area allows you to create and manage VLAN interfaces that are essential for segmenting your network. To open the VLAN configuration section, follow the next steps.
-
In the left-hand menu, click on
Interfaces. -
From the dropdown options, select
Devices. -
Click on
VLANfrom the list of options. This will open the VLAN configuration page, where you can add and manage VLAN entries. All VLAN configurations are managed here.
Figure 1. VLAN Interfaces on OPNsense
3. Create a New VLAN
To begin setting up a new VLAN, you’ll need to create an entry that defines its core parameters, such as the VLAN tag and the parent interface it will use. To create a new VLAN, click the + Add button located at the top right of the VLANs page. This opens a form where you can input details about the VLAN.
Proceeding to this step prepares OPNsense to handle tagged traffic as part of a virtual LAN segment.

Figure 2. Adding VLAN Interface on OPNsense
4. Define VLAN Settings
The first step in creating a new VLAN in OPNsense is to choose the parent interface to which the VLAN will be connected. The physical interface that will carry the VLAN-tagged traffic is known as the parent interface. Here are the steps for selecting the parent interface and Configuring the VLAN Tagging.
-
In the
Devicefield, optionally enter a name for the VLAN device (leave blank for automatic assignment). -
From the
Parentdropdown, select the physical interface that will carry VLAN traffic (e.g., em0 for WAN or em1 for LAN). -
In the
VLAN Tagfield, enter a unique numeric ID (e.g., 20) to differentiate the VLAN traffic from other networks. This must match the VLAN ID configured on your switch. -
From the
VLAN Prioritydropdown, choose the priority level detailed below for this VLAN’s traffic.- Best Effort (0): This is the default priority. Traffic with this priority will be treated equally, regardless of the type of traffic.
- Background (1): Lowest priority, non-urgent traffic
- Excellent Effort (2): Higher than default, good for standard important traffic
- Critical Applications (3): Prioritized for essential applications
- Video (4): Optimized for video streams. It will be given higher priority than Best Effort and Voice traffic, so that video streaming is not interrupted.
- Voice (5): Optimized for VoIP traffic. This priority is used for voice traffic. It will be given higher priority than Best Effort traffic, so that voice calls are not interrupted by other types of traffic.
- Internetwork Control (6): This priority is used for network control protocols, such as DHCP, DNS, and NTP. It will be given higher priority than Best Effort, Voice, and Video traffic so that these protocols can function properly.
- Network Control (7): This highest priority is used for network control traffic. It is used for protocols such as routing and switching. It will be given higher priority than Best Effort, Voice, Video, and Control traffic so that these protocols can function properly.
-
Optionally, write a brief
Description(e.g., "IoT Devices") to identify the VLAN. -
Click
Saveto store the settings.
These parameters tell OPNsense how to recognize and handle traffic for this VLAN.
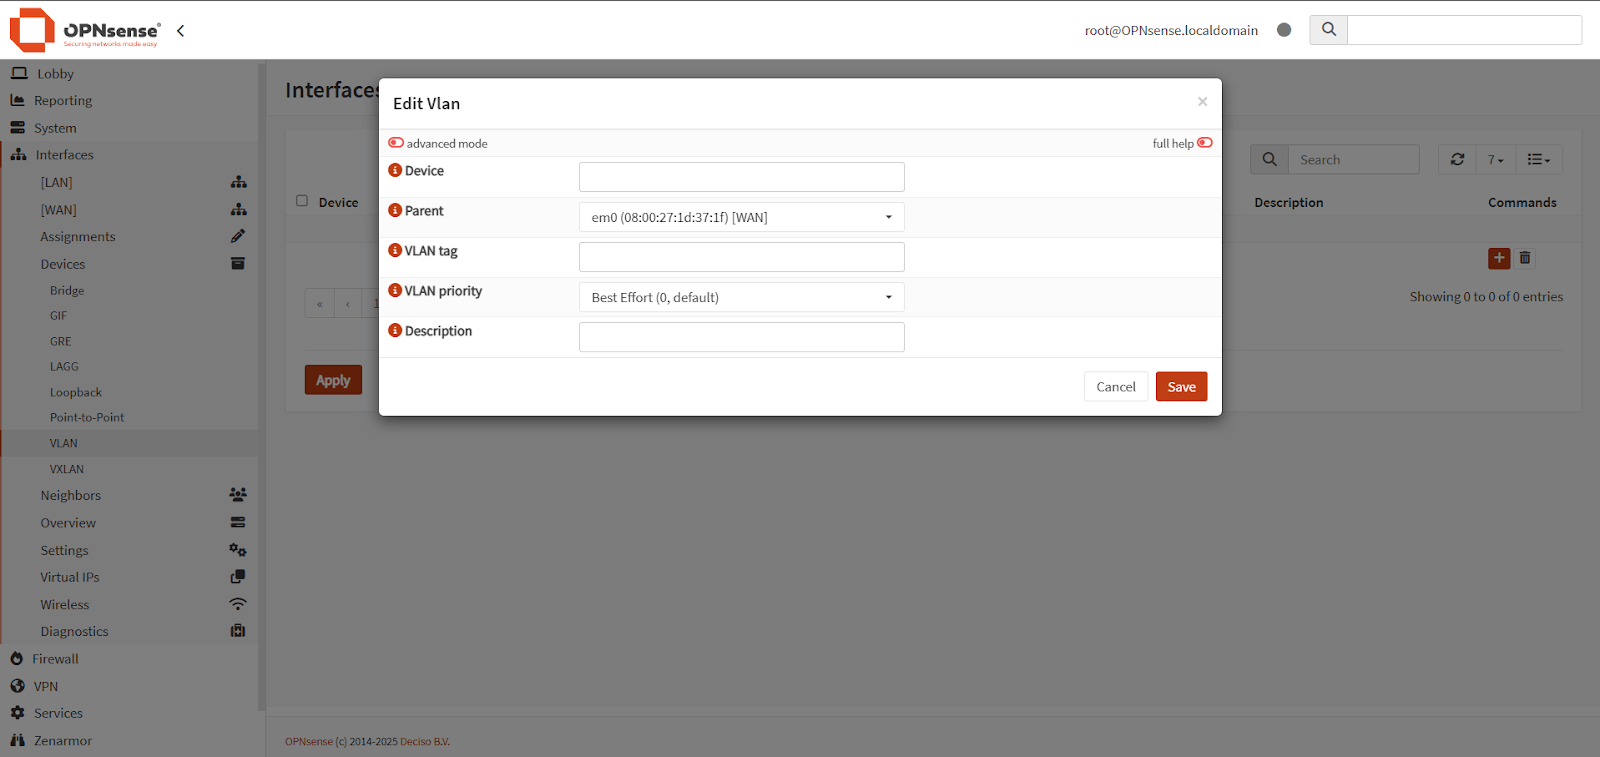
Figure 3. Define VLAN Settings
5. Assign the New VLAN to a Network Interface
After configuring the basic VLAN settings and specifying the parent interface, the next step is to assign logical interfaces to the newly created VLAN. These logical interfaces are used to manage VLAN traffic and apply various settings as needed. Multiple VLANs can be assigned to a single parent interface or spread across multiple parent interfaces. Because of this flexibility, you can define separate routing, firewalling, and other networking rules for each VLAN. To assign logical interfaces to a VLAN in OPNsense, you may follow the next steps:
-
Go to
Interfaces -> Assignments. -
In the dropdown menu, find and select the new VLAN interface.
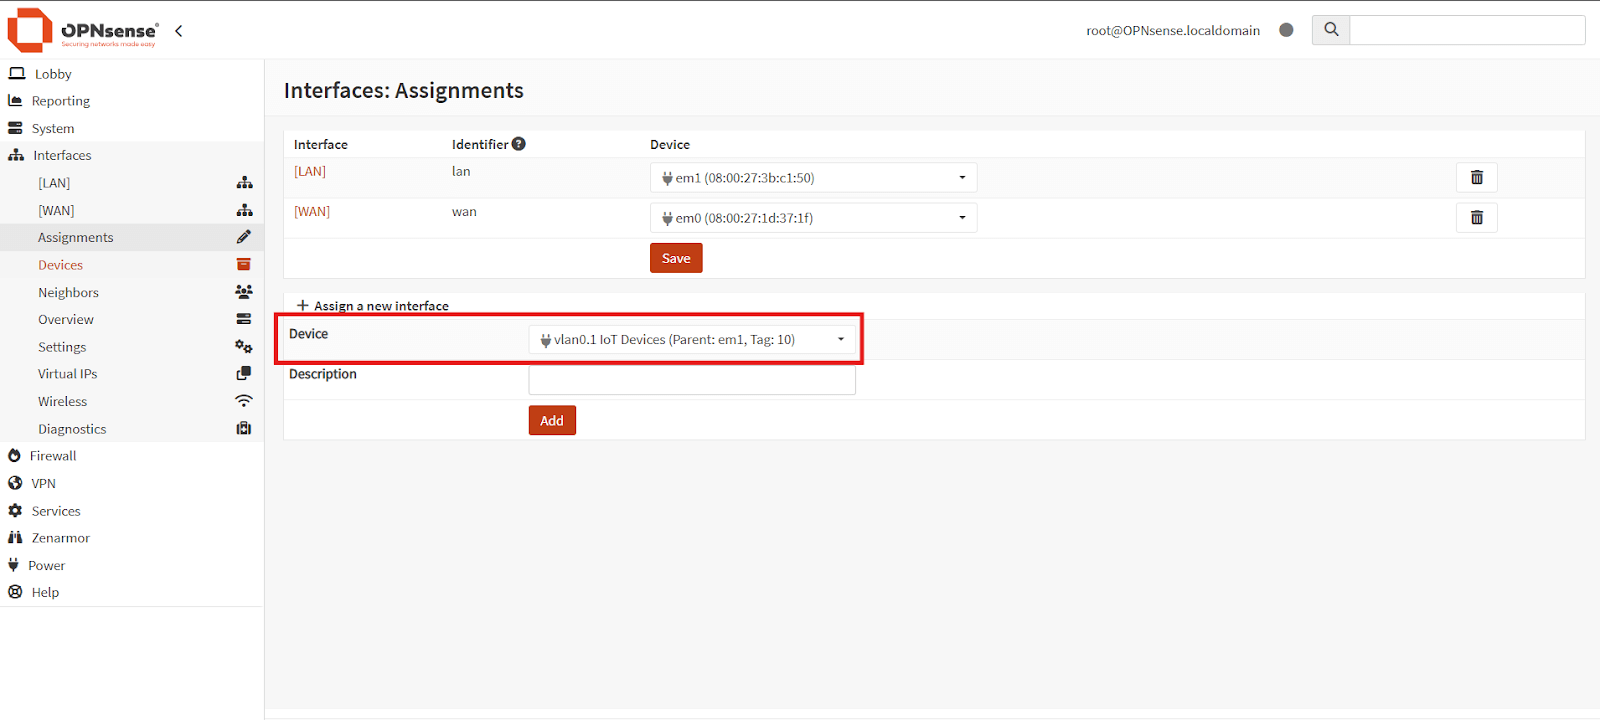
Figure 4. VLAN Interface Assignment on OPNsense
-
Click
Addto include it in the interface list.
The new interface will typically appear as something like OPT1 or VLAN_20.
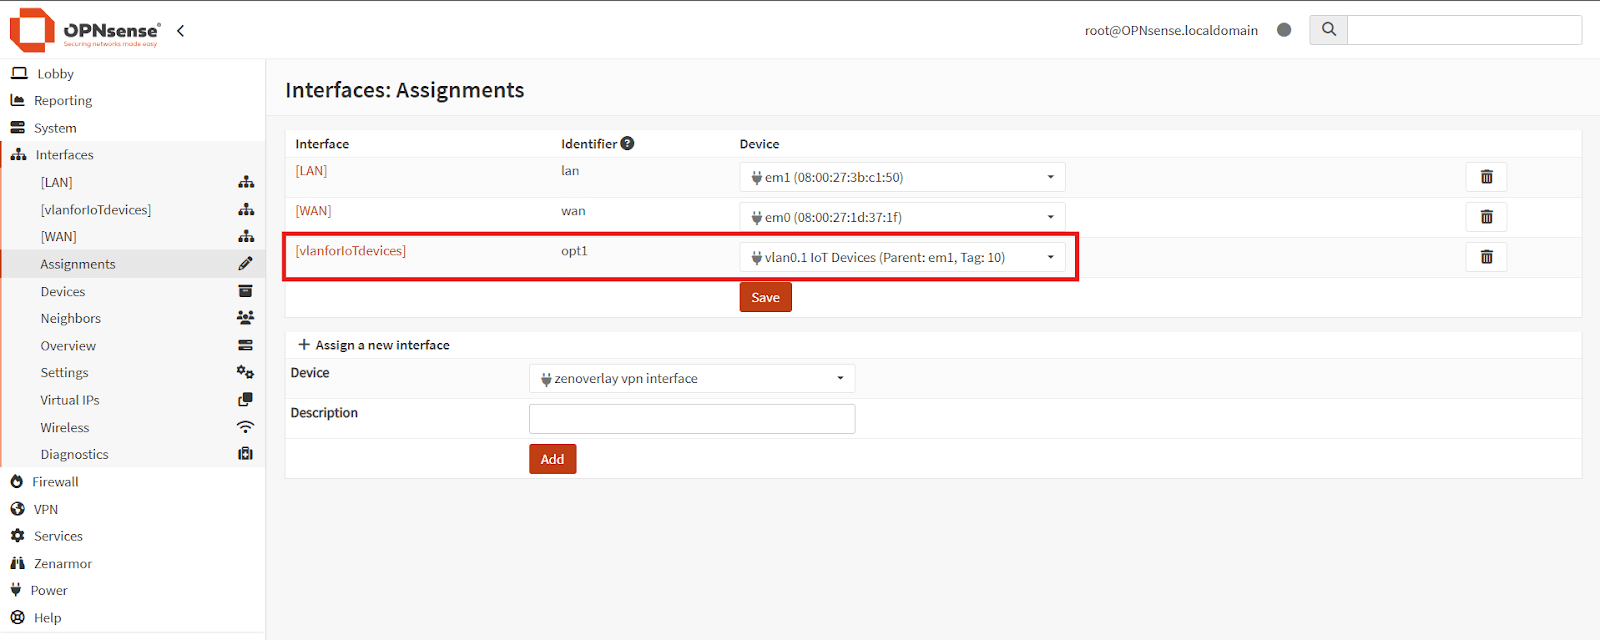
Figure 5. Interfaces on OPNsense
6. Enable and Configure IP Settings for the VLAN Interface
After assigning the VLAN to an interface, you must enable it and configure its IP settings so it can communicate with devices in the VLAN network. This IP will act as the default gateway for all devices connected to the VLAN. Follow the steps below to enable and configure IP settings for the VLAN settings.
- In the left sidebar under
Interfaces, click the new VLAN interface (it appears with the name you gave it). - On the
Basic configurationpanel, tick Enable Interface. - (Optional) In
Description, enter a clear label (e.g., vlanforIoTdevices). - Leave
Identifier(e.g., opt1) andDevice(e.g., vlan0.1) as they are, these are auto-assigned. - In
Generic configuration, setIPv4 Configuration Typeto Static IPv4. - (Optional) If you won’t use IPv6, keep
IPv6 Configuration Typeas None. - After choosing Static IPv4, an
IPv4 addressfield appears, enter the gateway address for this VLAN (e.g., 192.168.10.1) and select the prefix (e.g., /24). Make sure this subnet does not overlap with any other network on your firewall. - (Usually for LAN/VLANs) leave Block private networks and Block bogon networks unchecked. Enable them only on WAN-like interfaces.
- Click Save at the bottom, then click Apply Changes at the top to activate the configuration.
You may configure the following options for your new VLAN interface:
- Block private networks: This option blocks traffic from IP addresses that are reserved for private networks. This is useful for security purposes, as it prevents unauthorized access to your network.
- Block bogon networks: This option blocks traffic from IP addresses that are not yet assigned by IANA. This is also a security measure, as it prevents malicious traffic from reaching your network.
- IPv4 Configuration Type: This setting specifies how the IPv4 address for the interface will be configured. You can choose between static or DHCP.
- IPv6 Configuration Type: This setting specifies how the IPv6 address for the interface will be configured. You can choose between static or DHCP.
- MAC address: This is the MAC address of the interface. You can leave this blank if you are not sure what it is.
- Promiscuous mode: This setting allows the interface to receive all packets, even those that are not addressed to it. This can be useful for troubleshooting purposes, but it should be disabled unless necessary.
- MTU: This is the maximum transmission unit for the interface. This is the size of the largest packet that can be sent over the interface.
- MSS: This is the maximum segment size for TCP connections. This is the size of the largest TCP segment that can be sent over the interface.
- Dynamic gateway policy: This setting specifies whether the interface should use a dynamic gateway. A dynamic gateway is a gateway that is automatically configured by the router.
- Static IPv4 configuration: This section allows you to configure a static IPv4 address for the interface.
- IPv4 Upstream Gateway: This is the IP address of the gateway for the interface. The gateway is the device that routes traffic between your network and the rest of the internet.
If you want clients on this VLAN to get IPs automatically, go to Services → DHCPv4 → [your VLAN interface], check Enable DHCP server on…, set a pool (e.g., 192.168.10.100–192.168.10.200), and save/apply.
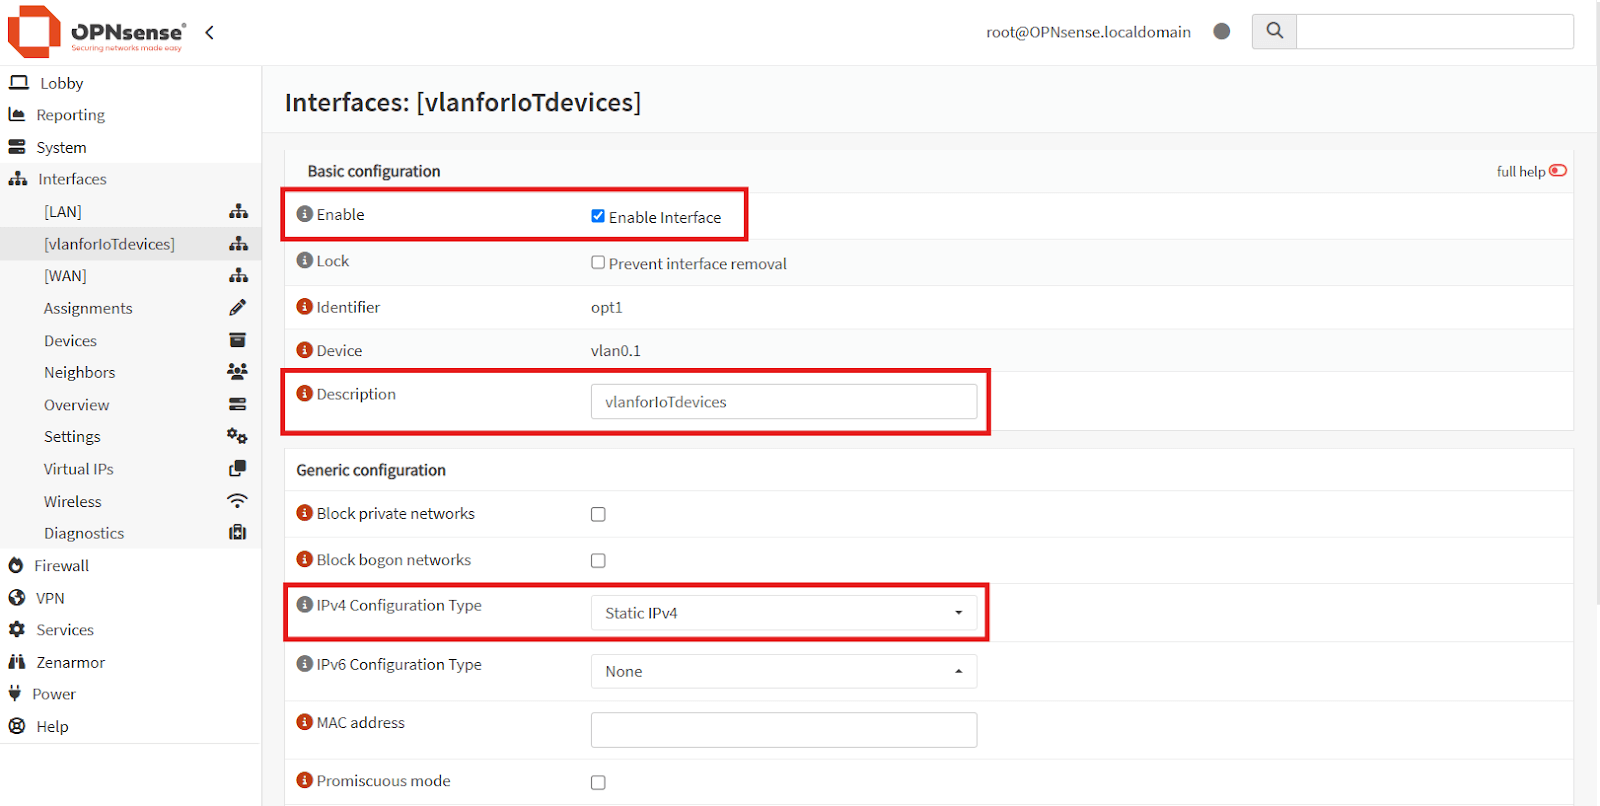
Figure 6. VLAN Interface Configuration
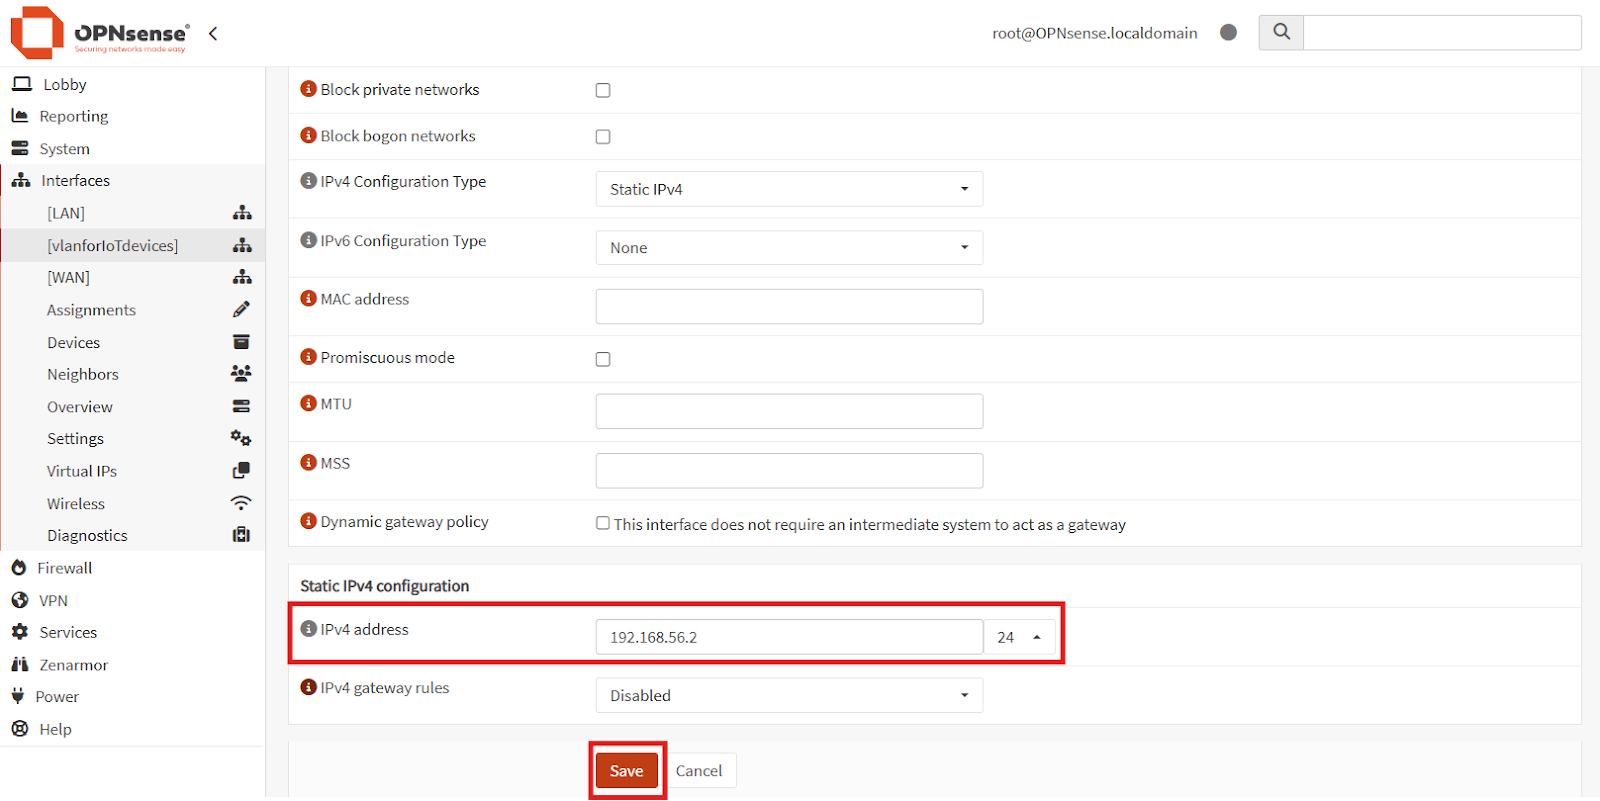
Figure 7. VLAN Interface Configuration-2
7. Set Up Firewall Rules for the VLAN Network
By default, OPNsense blocks all traffic on newly created interfaces, including VLANs.
To enable communication, you need to configure firewall rules for your VLAN interface. Firewall rules determine which traffic is allowed or denied based on parameters such as source, destination, port, and protocol. Properly configuring these rules ensures secure and controlled access between your VLAN and other networks. To define and apply specific firewall rules for your VLAN, follow the steps below.
-
Navigate to
Firewall -> Rules. -
Select the tab corresponding to your VLAN interface.
-
Click
Addto create a new rule.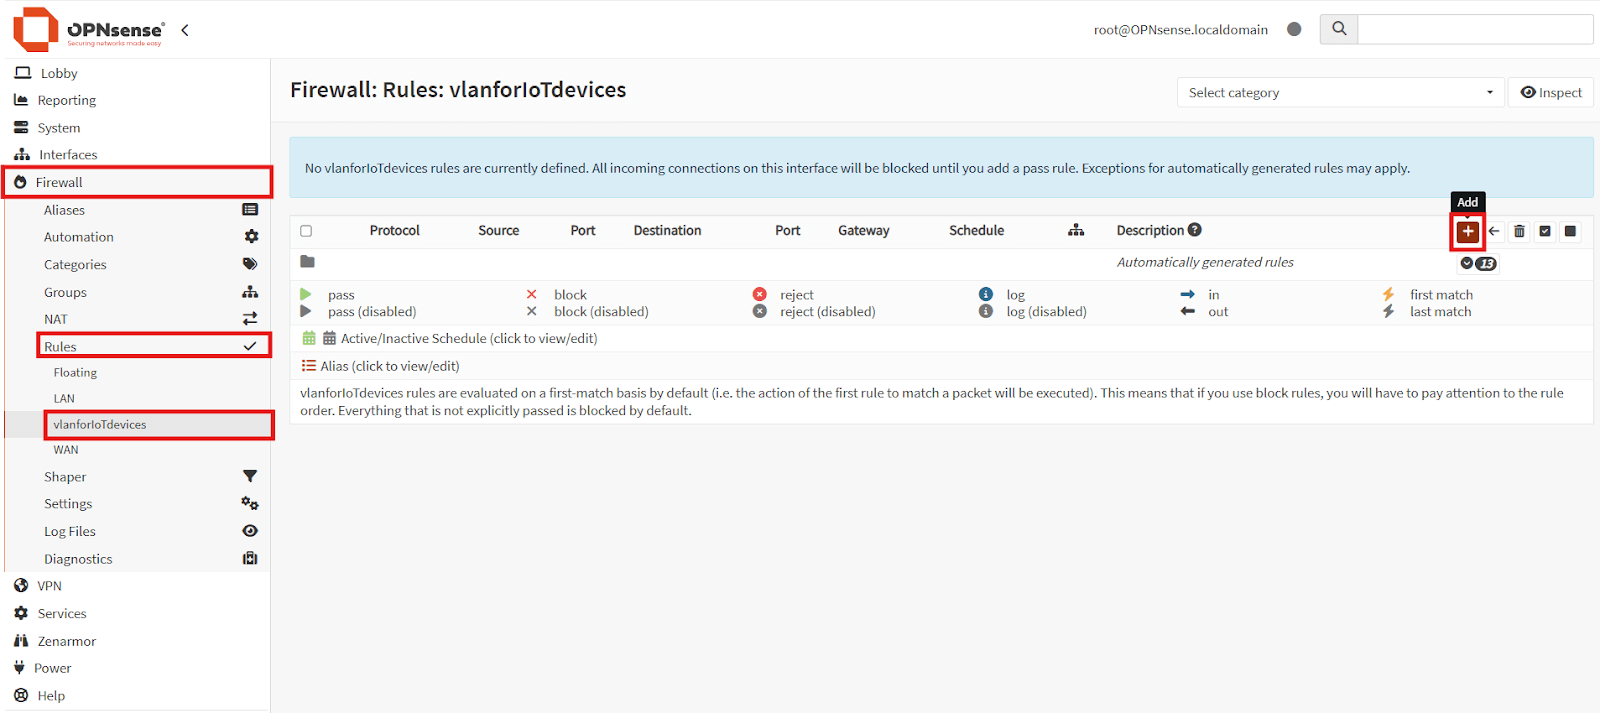
Figure 8. Creating a Firewall Rule
-
Configure the rule to allow required traffic (e.g., TCP/UDP, HTTP/HTTPS, ICMP).
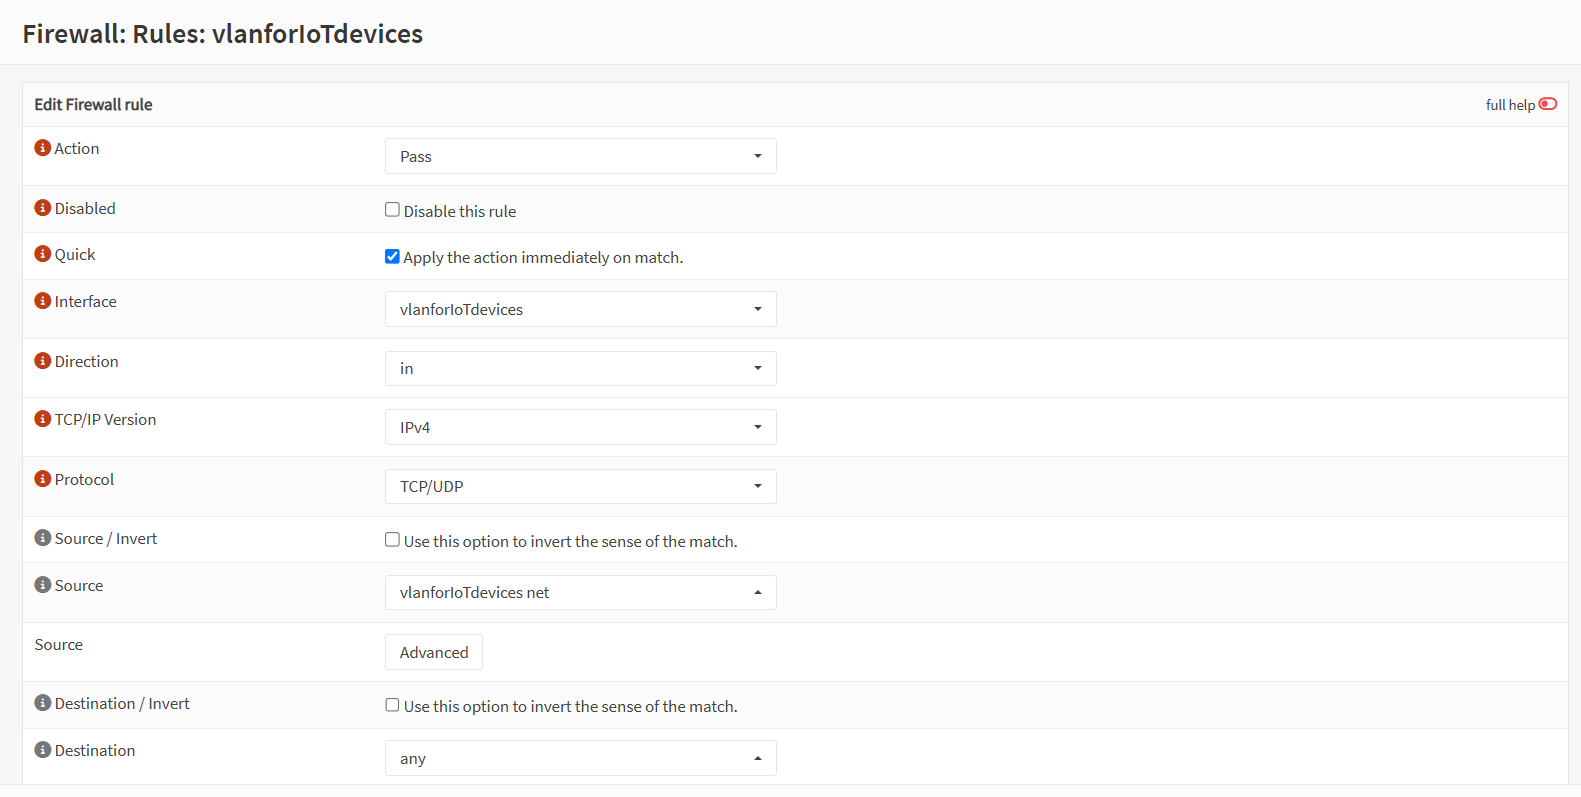
Figure 9. Edit Firewall Rule
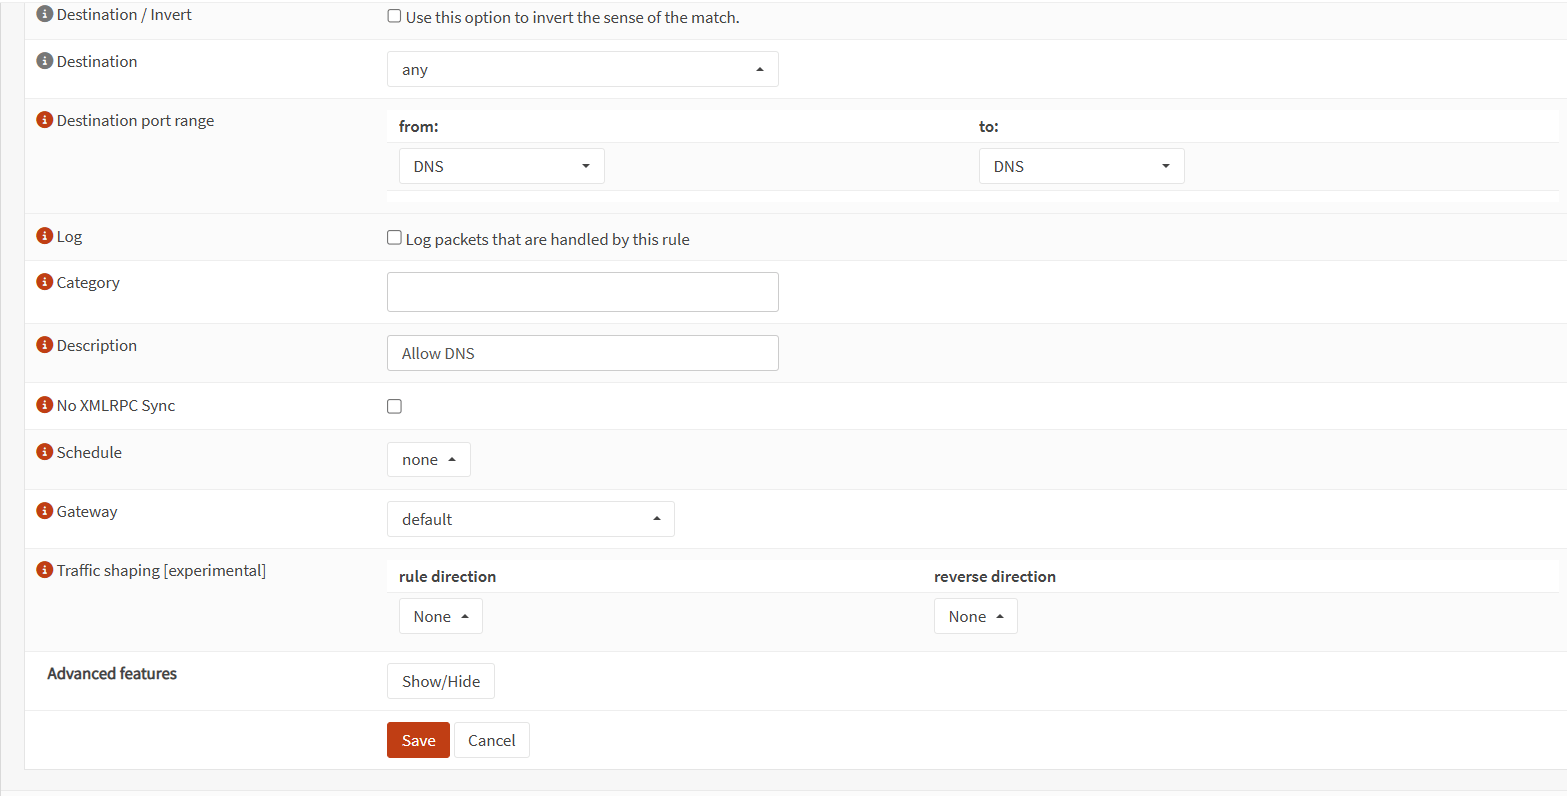
Figure 10. Edit Firewall Rule-2
-
Click Save and Apply Changes to activate the rule.
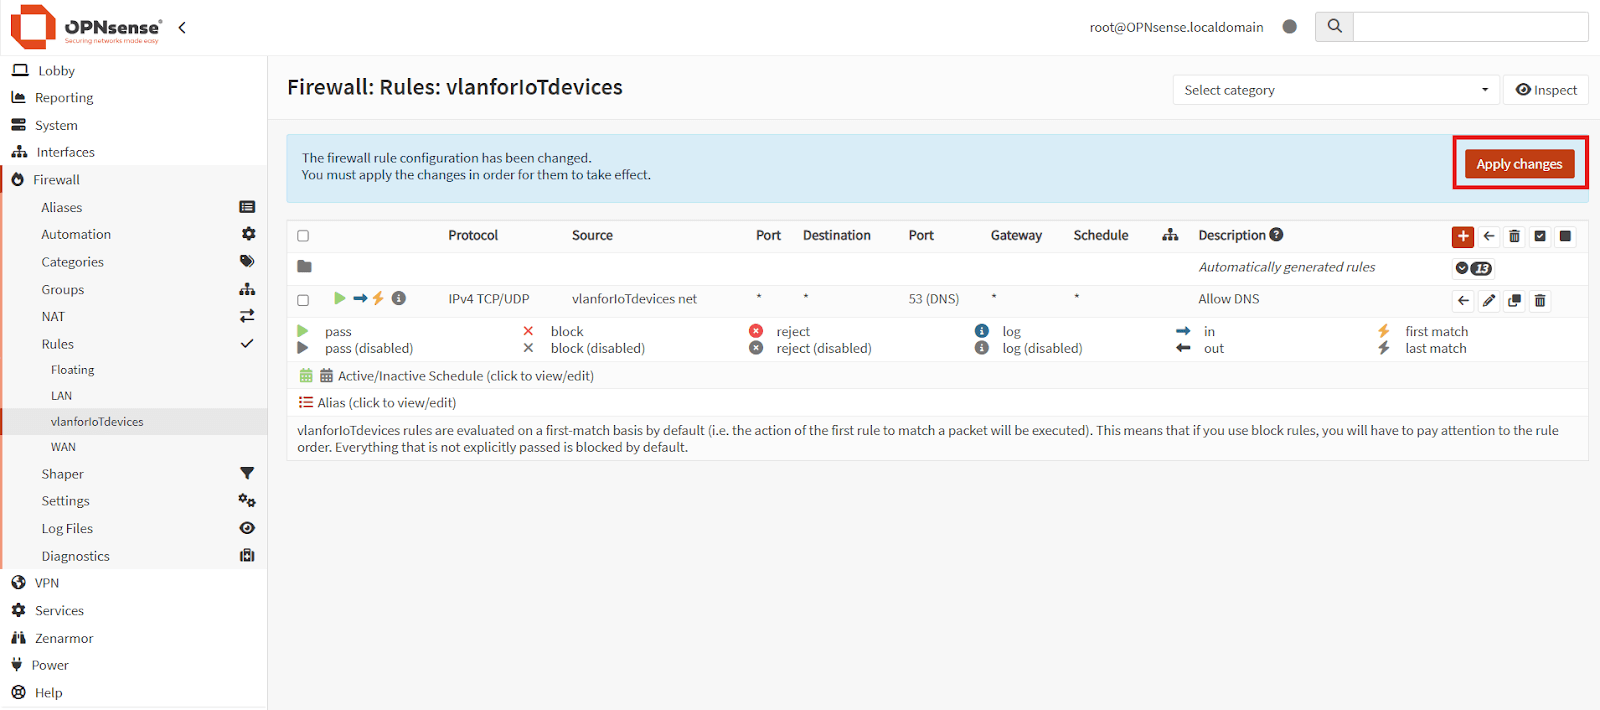
Figure 11. Applying Firewall Rule Changes
You can create more granular rules later to improve security.
8. Configure the Switch Port for the VLAN (if applicable)
If your network uses a managed switch, make sure the port connecting to OPNsense is properly configured to handle VLAN tags with the following steps.
- Log in to your managed switch's interface.
- Locate the port connected to OPNsense.
- Set the port as
Tagged (Trunk)for the VLAN ID you configured. - Optionally set other ports as
Untagged (Access) for end devices that will connect to the VLAN.
This ensures that VLAN-tagged traffic is properly recognized and routed.
9. Test the VLAN Connectivity with a Device
Testing confirms whether the VLAN works as expected before deploying it widely.
- Connect a device (e.g., laptop or VM) to a switch port assigned to the VLAN.
- Ensure it receives an IP address from the correct VLAN subnet.
- Test connectivity (e.g., ping the gateway or browse the internet).
- Verify that firewall rules are functioning as intended.
This helps identify and fix any misconfigurations early.
10. Apply and Save All Configuration Changes
Finalizing your changes ensures they are active and persistent across reboots with the following steps.
- Ensure that you click
Apply Changeson any page where changes were made. - Optionally, back up your configuration via
System > Configuration > Backups.
Your VLAN is now fully operational and integrated into the network.
Configuring VLANs on OPNsense empowers network administrators with improved performance, security, and scalability. By effectively segregating and managing traffic, businesses can streamline their network operations and protect sensitive data.
If you're familiar with configuring VLANs in OPNsense and are now transitioning to Zenarmor, you'll find that Zenarmor offers a powerful feature called Exempted VLANs & Networks. This feature allows you to define specific VLANs and IP/Network addresses that are exempted from Zenarmor processing. Essentially, any traffic associated with these exempted VLANs and addresses bypasses Zenarmor's packet processing entirely, being directly forwarded at the interface level. The key distinction from policy-based whitelisting is that these addresses won't generate any activity reports, ensuring a seamless experience.
A particularly beneficial aspect is that devices within the exempted VLANs and networks are excluded from Zenarmor's license count, meaning they won't contribute to license calculation. This is a handy feature to keep your licensing strategy precise and effective.
However, it's important to note that the Exempted VLANs & Networks feature is available exclusively in premium Zenarmor Editions.
To configure Exempted VLANs & Networks in Zenarmor, follow these straightforward steps:
- Open your OPNsense web UI and navigate to the Zenarmor section.
- From the left-hand sidebar, select the Settings menu.
- Look for the Exempted VLANs & Networks option and click on it.
- Add VLAN ID by clicking on the Exempt VLAN ID button.
For the best and most reliable service and support, sign up with Zenarmor today. Experience seamless VLAN implementation and bolstered network defense to safeguard your organization's critical assets. Don't wait; take the next step toward a robust and secure network environment by signing up with Zenarmor!
What is a VLAN?
A Virtual Local Area Network (VLAN) is a logical subdivision of a physical network, designed to group devices together as if they were on the same local segment, regardless of their physical location. Instead of relying solely on separate physical switches and cabling, a VLAN uses logical segmentation at the switch level, where specific ports or devices are assigned to a unique VLAN ID defined by the IEEE 802.1Q standard. This VLAN ID is embedded into Ethernet frames to distinguish traffic between different virtual networks.
By creating separate broadcast domains, VLANs prevent unnecessary broadcast traffic from spreading across the entire network. This not only reduces network congestion but also enhances security by isolating traffic between departments, user groups, or services. For example, a finance department’s devices can be placed in one VLAN, completely separated from the guest Wi-Fi VLAN, even if they share the same physical hardware.
The use of VLANs provides significant security benefits, as unauthorized devices outside a given VLAN cannot directly communicate with its members. Additionally, VLANs improve network flexibility, administrators can reorganize device groupings without altering physical connections, and allow centralized management by applying policies, firewall rules, or Quality of Service (QoS) settings to specific VLANs.
In an OPNsense environment, VLANs are a powerful tool for traffic separation and policy enforcement. By assigning each VLAN to its own virtual interface, administrators can apply firewall rules, routing policies, and monitoring configurations per segment, achieving both structured organization and enhanced security in multi-department or multi-tenant networks.
How do VLANs Work in an OPNsense Environment?
In an OPNsense environment, VLANs operate by using VLAN tagging to distinguish traffic from different virtual networks as it passes through the same physical connection. This tagging process follows the IEEE 802.1Q standard, where a VLAN ID is inserted into the Ethernet frame header. When a packet reaches OPNsense, the firewall reads this tag to determine which virtual interface it belongs to, allowing administrators to apply specific routing, firewall rules, and monitoring policies for each VLAN.
VLAN connectivity in OPNsense relies on the proper configuration of trunk ports and access ports on connected switches. A trunk port is designed to carry traffic for multiple VLANs simultaneously and keeps the VLAN tags intact, making it ideal for links between switches or between a switch and OPNsense. In contrast, an access port carries traffic for only one VLAN and strips away any VLAN tags before delivering the data to an end device. This distinction ensures that endpoint devices, such as PCs or printers, connect to the correct VLAN without requiring VLAN configuration on the device itself.
When integrated with OPNsense, trunk ports are typically used on the firewall interfaces to connect to managed switches, enabling the firewall to receive and process traffic for all defined VLANs. Access ports on the switch, then distribute this traffic to devices within the respective VLANs. This setup allows OPNsense to act as a central policy enforcement point, controlling inter-VLAN routing, applying security rules, and monitoring network activity across all segments.
By combining VLAN tagging, trunking, and access port assignment, OPNsense provides a flexible yet secure network architecture. This ensures clear traffic separation, minimizes broadcast overhead, and allows administrators to manage multiple logical networks from a single firewall platform.
What Equipment is Required to Set Up VLANs on OPNsense?
Setting up VLANs on OPNsense* requires networking hardware that fully supports IEEE 802.1Q VLAN tagging. While OPNsense handles the creation of VLAN interfaces and the application of firewall rules, your physical equipment ensures stable data transfer and proper traffic separation. Choosing the right devices is crucial for achieving reliable segmentation, strong network security, and smooth integration between wired and wireless connections.
-
Supported Firewall/Router: To implement VLANs, you first need an OPNsense-compatible firewall or router that can handle VLAN traffic efficiently. This is the core device where VLAN interfaces are created, tagged, and routed between network segments. The better the hardware performance, the more responsive your VLAN-based network will be.
- Dedicated OPNsense appliance (e.g., Netgate, Protectli, Qotom) or a custom-built PC/server running OPNsense
- Network interface cards (NICs) that support VLAN tagging (single or multi-port options available)
Optionally, multiple NICs to physically separate traffic if preferred
-
Managed Switches: A managed switch that supports 802.1Q VLAN tagging is essential for defining trunk ports (carrying multiple VLANs) and access ports (serving a single VLAN). The switch ensures that VLAN assignments are correctly applied to each connected device. Popular choices include Cisco Catalyst, HP/Aruba, Netgear ProSAFE, TP-Link Omada, and Ubiquiti UniFi. Must support per-port VLAN configuration and tagging/untagging rules
-
(Optional) Wireless Access Points: If you plan to extend VLANs to Wi-Fi networks, VLAN-aware access points allow you to map different SSIDs to specific VLAN IDs. This lets you separate guest Wi-Fi traffic from internal LAN traffic without additional cabling.
-
Additional Equipment: A reliable VLAN setup requires high-quality cabling and proper physical organization of the network environment.
- Ethernet cables (Cat5e or higher) for gigabit or faster speeds
- Patch panels or racks for larger deployments to keep cable management clean and accessible
When setting up an OPNsense guest network, assign it to a dedicated VLAN that has firewall rules preventing access to internal resources while still allowing internet connectivity. If wireless access is provided, configure the guest SSID on the access point to use this VLAN and ensure the switch port is set as a trunk carrying both guest and main VLAN traffic. This approach improves security and prevents cross-network interference, making it ideal for business or public environments.
How do I Enable VLAN Support on My Interface?
Enabling VLAN support in OPNsense is the first step to segmenting your network into multiple virtual LANs (VLANs) for better security, traffic management, and performance. By linking a VLAN ID to a physical interface, OPNsense can apply dedicated firewall rules, routing policies, and monitoring to that segment independently from the rest of the network.
To enable VLAN support in OPNsense, use the following steps.
- Open the OPNsense web interface and go to
Interfaces → Devices → VLAN. - Click
+ Add, choose theparent interface, and assign aVLAN tagbased on your network design (e.g., VLAN 10 for guests, VLAN 20 for VoIP). - Save and apply changes, then assign the VLAN under
Interfaces → Assignments. - Configure network settings such as IP address, subnet, and DHCP if required.
Once enabled, your VLAN is ready for integration into OPNsense firewall rules, DHCP services, and routing policies to ensure traffic isolation and optimized network performance.
How do I Assign a Parent Physical Interface for VLANs?
In OPNsense, a parent physical interface is the network port that carries VLAN-tagged traffic between the firewall and the rest of the network. When creating a VLAN in the GUI, you must choose this parent interface so OPNsense knows where to attach the VLAN ID.
The parent interface serves as the underlay for all VLANs associated with it. For example, if igb0 is your uplink to a managed switch, you can configure multiple VLANs, such as VLAN 10 for guests and VLAN 20 for VoIP, on top of that single physical connection. This approach avoids the need for separate cables or NICs for each VLAN, as the VLAN tags (defined by IEEE 802.1Q) are inserted into Ethernet frames before leaving the interface.
When selecting a parent interface in OPNsense, follow these steps.
- Choose the NIC that is physically connected to a VLAN-capable switch port configured as a trunk.
- Ensure the switch trunk is set to allow all VLAN IDs you plan to use.
- Avoid using an interface that is already assigned to another dedicated network unless you intend to combine it with VLANs on the same link.
By correctly assigning the parent physical interface, you establish a stable underlay for your VLANs, ensuring that tagged traffic is handled efficiently and passed to the correct logical interface. This design allows you to consolidate multiple networks over a single cable while maintaining complete separation between them at the logical level.
How do I Assign an IP Subnet to a VLAN Interface?
In OPNsense, assigning an IP subnet to a VLAN interface allows that VLAN to operate as its own independent network segment with its own addressing scheme. This is done by enabling the VLAN interface, selecting an IP configuration method, and defining the subnet details.
To assign an IP subnet to a VLAN interface:
- Go to
Interfaces → Assignmentsand make sure the VLAN interface is listed and enabled. - Click on the VLAN interface name (e.g., OPT1 or a custom label) to open its settings.
- In the IPv4 Configuration Type or IPv6 Configuration Type dropdown, choose either Static IPv4, Static IPv6, or DHCP depending on your design.
- If you choose
Static IPv4, enter the IP address and subnet mask in the format192.168.50.1/24. This example creates a network where devices can have addresses in the 192.168.50.0 to 192.168.50.254 range, with .1 being the gateway. - If you choose
DHCP(for IPv4 or IPv6), the VLAN interface will automatically obtain its IP address and subnet from an upstream DHCP server. This option is often used when the VLAN is part of a network managed by another router or DHCP-capable device.
After saving and applying the changes, you can configure Services → ISC DHCPv4 → [VLAN Interface] to enable OPNsense’s DHCP server for that VLAN, defining the address pool (e.g., 192.168.50.100 to 192.168.50.200) and other network options.
By assigning a proper IP subnet, each VLAN can function as a self-contained network, enabling precise traffic control, routing, and firewall policy application. This structure is essential for setups like guest networks, VoIP segments, or department-specific LANs.
How do I Set Up DHCP Server Per VLAN?
In OPNsense, you can configure a separate DHCP server for each VLAN so that devices in different network segments receive IP addresses from their own dedicated range. This ensures proper network isolation, accurate IP management, and the ability to apply unique settings such as DNS or gateway addresses per VLAN. Follow these steps to configure DHCP on a VLAN interface.
-
Ensure the VLAN interface is enabled and has a static IP. Go to
Interfaces → [VLAN Name]and verify it is enabled with a static IPv4 address (e.g., 192.168.50.1/24). -
Open the DHCP server settings. Navigate to
Services → ISC DHCPv4 → [VLAN Interface]. -
Enable the DHCP server for the VLAN. Check the box Enable DHCP server on [VLAN Interface] .
-
Define the address pool. Specify the IP range to be handed out, for example:
- From: 192.168.50.100
- to: 192.168.50.200
-
Configure optional settings.
- DNS servers: Enter internal or public DNS servers (e.g., 8.8.8.8).
- Gateway: Typically the VLAN interface IP (e.g., 192.168.50.1).
- Lease time: Adjust based on usage needs.
-
Save and apply changes. Click
Save, thenApply Changesat the top to activate the DHCP server.
If you are creating a guest network VLAN (e.g., VLAN 20), using a dedicated DHCP pool ensures guests cannot obtain IPs from your main LAN. For example, you might assign 192.168.20.1/24 to the guest VLAN interface and set the DHCP pool from 192.168.20.50 to 192.168.20.150. Combined with firewall rules blocking access to internal VLANs, this setup allows guests to have internet connectivity while maintaining security for your private network.
Can I Create Firewall Rules for VLAN Segmentation?
Yes, OPNsense allows you to create firewall rules for each VLAN interface, enabling precise control over traffic between VLANs and to the internet. By defining separate rule sets for each VLAN, you can enforce segmentation, apply security policies, and ensure that devices in one VLAN cannot access resources in another unless explicitly allowed.
In the Firewall → Rules section of OPNsense, each VLAN interface appears as a distinct tab. This means you can create tailored rules for the following puposes.
- Allowing or blocking inter-VLAN traffic (e.g., VLAN 10 to VLAN 20).
- Restricting guest network access so it only reaches the internet and not internal VLANs.
- Applying service-specific permissions, such as allowing only HTTP/HTTPS traffic from certain VLANs.
If you have a VLAN 30 for guests, you can add a default block rule preventing any traffic to private subnets (192.168.0.0/16, 10.0.0.0/8, 172.16.0.0/12). Then, add an allow rule for outbound internet traffic (e.g., destination any on ports 80 and 443). This ensures guests have internet access while your LAN remains secure.
For strong network security, it is important to place explicit block rules at the top of the rule list for sensitive networks, followed by specific allow rules for necessary services. Regularly reviewing these rules ensures there are no unintended access paths between VLANs and that your segmentation strategy remains effective over time.
What are Recommended Firewall Rules for a Guest VLAN?
When setting up a guest VLAN, the primary goal is to provide visitors with secure internet access while protecting internal network resources. The firewall rules should clearly define both traffic restrictions and permitted communication. Here are the recommended firewall rules for a typical guest VLAN.
- Deny Inter-VLAN Traffic: Block all traffic from the guest VLAN to other VLANs or internal networks. This prevents guests from accessing company servers, printers, or shared folders.
- Allow Internet Access: Permit only outbound traffic to the internet, typically HTTP, HTTPS, and DNS.
- Allow Captive Portal Access: If a captive portal is in use, ensure that access to the portal page is allowed so guests can log in or accept terms before internet access is granted.
To implement these rules in OPNsense, go to Firewall → Rules, select the guest VLAN interface, and create each rule on a separate line. Rule order matters; place blocking rules at the top and allow rules beneath them.
How to Test VLAN Isolation and Connectivity?
After configuring VLANs in OPNsense, it’s important to validate both isolation and connectivity to ensure your network segmentation is working as intended. Testing helps confirm that each VLAN can access only its permitted resources while remaining blocked from restricted areas.
The following steps outline a clear, step-by-step process to test VLAN isolation and connectivity:
-
Ping Test for Connectivity: From a client device within the VLAN, open a terminal or command prompt.
- Ping the VLAN gateway IP (e.g., 192.168.10.1) to confirm local communication.
- Ping a known external IP (e.g., 8.8.8.8) to verify internet access if it is allowed for that VLAN.
-
Ping Test for Isolation: Attempt to ping devices in other VLAN subnets (e.g., from VLAN 10 to VLAN 20). If there is no reply, isolation rules are functioning correctly.
-
Traceroute for Path Verification: Use traceroute (Linux/macOS) or tracert (Windows) to check the path to external and internal destinations.
Ensure that traffic follows expected routes without crossing into unauthorized VLANs.
-
Client Verification: Test with different device types (PC, mobile, IoT) to make sure VLAN tagging and firewall rules work consistently.
For guest VLANs, verify that the captive portal appears if configured.
How to Set Up a Guest Network VLAN on OPNsense?
A guest network VLAN allows you to provide internet access to visitors while keeping your internal network secure. By isolating guest devices, you can prevent unauthorized access to sensitive resources and ensure bandwidth control. The following instructions outline how to configure an OPNsense guest network step by step.
-
Create the Guest VLAN: To begin setting up your OPNsense guest network, you must first create a dedicated VLAN for guest devices. This VLAN will serve as the isolated segment where all guest traffic is routed, ensuring separation from internal systems.
- Log in to the OPNsense GUI.
- Navigate to
Interfaces → Devices → VLAN. - Click
Add, choose theparent interface(usually your LAN or trunk port), assign aVLAN ID(e.g., 30), and give it a descriptive name such as Guest_VLAN.
-
Assign the VLAN Interface: Once the VLAN is created, it needs to be assigned to the system so it can function as a separate interface. This step also includes defining the network’s subnet for guest traffic.
- Go to
Interfaces → Assignments. - Add the newly created VLAN to the list and enable it.
- Configure the interface with a unique subnet (e.g., 192.168.30.1/24).
- Go to
-
Set Up DHCP for the Guest VLAN: Guests should automatically receive an IP address when they connect. Setting up DHCP ensures that IP allocation is handled dynamically, making it easier for visitors to join the network.
- Navigate to
Services → ISC DHCPv4 → [Guest_VLAN]. - Enable DHCP and define the IP address pool (e.g., 192.168.30.10 to 192.168.30.100).
- Navigate to
-
Apply Firewall Rules: To maintain VLAN segmentation and protect your internal network, firewall rules must be configured to control what guest devices can and cannot access.
- Open
Firewall → Rules → Guest_VLAN. - Add a rule to allow traffic from the guest VLAN to the internet (WAN).
- Block all access to private networks and other VLANs.
- If using a captive portal, ensure access to the portal address is allowed so guests can authenticate before browsing.
- Open
-
Test the Configuration: The final step is to verify that your OPNsense guest VLAN is functioning as intended. Testing ensures guests can reach the internet but remain blocked from private resources.
- Connect a device to the guest network.
- Confirm it receives an IP in the guest subnet and has internet access.
- Verify that internal resources remain inaccessible.
How do I Monitor VLAN Traffic and Performance?
Monitoring VLAN traffic in OPNsense is crucial for identifying network bottlenecks, troubleshooting issues, and ensuring that your VLAN segmentation is functioning as intended. OPNsense provides built-in traffic graphs and diagnostic tools that allow you to track bandwidth usage, latency, and packet flow in real time.
To view VLAN-specific performance data, navigate to the OPNsense interface’s monitoring tools and select the desired VLAN from the available options.
-
Traffic Graphs: Visualizing network activity is essential for identifying usage patterns and spotting unusual spikes in traffic. OPNsense’s traffic graph feature provides real-time insights into VLAN performance, helping administrators monitor bandwidth usage and detect potential bottlenecks before they affect the network. The following steps outline a clear, step-by-step process to see traffic graph.
- Navigate to
Reporting → Traffic. - Select the VLAN interface you want to monitor from the drop-down list.
- Observe bandwidth trends, spikes, and usage patterns to detect unusual activity.
- Navigate to
-
Diagnostics Tools: Troubleshooting VLAN performance issues becomes faster and more precise when using the built-in diagnostic tools in OPNsense. These tools allow you to test connectivity, check packet flow, and identify problem points across different VLANs without requiring third-party software. Use the following steps to use the OPNsense diagnostics tools.
- Go to
Interfaces → Diagnosticsfor live interface statistics. - Use
pingandtrace routefrom the diagnostics menu to test connectivity and latency across VLANs. - Check
Interface Statisticsfor errors, dropped packets, or collisions, which may indicate physical or configuration issues.
- Go to
-
Historical Data and Reports: Analyzing past performance trends is crucial for capacity planning and maintaining optimal VLAN health. OPNsense offers historical data and reporting features that store long-term traffic statistics, making it easier to track growth, evaluate policy changes, and forecast future network needs.
- Enable RRD Graphs under
Reportingto log long-term performance trends. - This is especially useful for capacity planning and ensuring Quality of Service (QoS) for critical VLANs.
- Enable RRD Graphs under
By regularly monitoring these metrics, you can quickly spot abnormal patterns, verify firewall rule effectiveness, and maintain optimal network health.
How can I Backup and Restore VLAN Configurations?
Backing up your VLAN configurations in OPNsense ensures that all network segmentation settings, firewall rules, and interface assignments can be quickly recovered in case of hardware failure, system migration, or misconfiguration. Restoring from a backup file allows you to bring your VLAN setup back to its exact previous state, minimizing downtime and avoiding manual reconfiguration.
To perform a VLAN configuration backup in the OPNsense GUI, follow the steps below.
- Log in to the OPNsense Web Interface as an administrator.
- Navigate to
System → Configuration → Backups. - Select
Download Configurationand ensure that VLAN settings are included. - Save the configuration file to a secure, accessible location.
To restore VLAN configurations use the following steps.
- Return to
System → Configuration → Backups. - Choose
Restore Configurationand upload your saved file. - Confirm the restore operation and reboot if prompted.
This process preserves all VLAN assignments, IP configurations, and related firewall rules, making it a reliable safety net for any OPNsense-managed network.
What are Best Practices for VLAN Security on OPNsense?
Securing VLANs in OPNsense involves implementing measures that reduce the risk of unauthorized access, contain potential breaches, and maintain optimal performance across network segments. Strengthening VLAN security not only protects sensitive data but also helps maintain compliance with internal policies and industry standards.
Consider the following key measures to enhance VLAN security.
- Implement Access Control Lists (ACLs): Restrict traffic flow between VLANs to only what is necessary, preventing lateral movement across network segments.
- Keep Firmware and Packages Updated: Regularly apply OPNsense updates to patch vulnerabilities and enhance security features.
- Use Consistent VLAN Tagging Conventions: Adopt a clear and documented tagging scheme to avoid misconfigurations and ensure easier troubleshooting.
- Limit Management Access: Restrict administrative interfaces to secure management VLANs and trusted IP addresses.
- Enable Logging and Monitoring: Continuously review firewall logs and system alerts for unusual activity.
How do I Troubleshoot Common VLAN Issues?
When troubleshooting common VLAN issues in OPNsense, it’s important to follow a methodical process to quickly identify and resolve network disruptions. Problems often arise from VLAN tag mismatches, DHCP configuration errors, or physical link failures, and resolving them requires a structured approach.
The following steps outline a systematic method to diagnose and fix VLAN-related issues efficiently.
- Verify VLAN Tag Configuration: Ensure that the VLAN IDs match between the OPNsense configuration and connected switches or routers. Mismatched tags are one of the most common causes of connectivity loss.
- Check DHCP Settings: Confirm that the correct VLAN interface has a DHCP server enabled and properly configured, or verify static IP settings if applicable.
- Test Physical Connectivity: Inspect cables, switch ports, and network cards to rule out hardware failures or incorrect port assignments.
- Use Diagnostic Tools: Leverage OPNsense tools like
ping,trace route, and thePacket Capture utilityto trace traffic flow and pinpoint where communication fails. - Review Firewall Rules: Ensure that rules allow traffic within and out of the VLAN as intended, especially for inter-VLAN communication or internet access.
Can OPNsense be Updated While Maintaining VLAN Setups?
Yes, OPNsense can be updated while retaining your existing VLAN configurations, provided you follow proper upgrade procedures. Before applying a firmware upgrade, it’s essential to backup your OPNsense configuration so you can restore VLAN settings if needed.
When performing the update, you should follow a structured process to ensure that your VLAN configurations remain intact and your OPNsense system continues to operate without disruption.
- Backup Configuration: Go to
System -> Configuration -> Backupsand download a copy of your current setup. This ensures that all VLAN, firewall, and interface settings are preserved. - Check Current Firmware Status: Review release notes for potential changes affecting network drivers or VLAN behavior.
- Apply the Update: Navigate to
System -> Firmware -> Updatesand run the upgrade process. - Validate VLAN Functionality: After the system restarts, confirm that VLAN interfaces are still assigned and functional. Test connectivity between VLANs and to the internet.
- Restore if Necessary: If VLANs fail to function as expected, restore the configuration file to revert to the last working state.
By following these steps, you can safely setup OPNsense with VLANs, apply system updates, and maintain network segmentation without downtime.
Can VLANs be expanded or modified in the future?
Yes, VLAN configurations in OPNsense can be expanded or modified at any time to accommodate network growth or changes in security policies. Adjusting VLANs can involve adding new VLAN IDs, removing unused ones, editing parent interfaces, or updating firewall rules to match the new network segmentation strategy. This flexibility ensures your network remains adaptable to future requirements without needing a full reconfiguration.
Steps to expand or modify VLANs in OPNsense are listed below.
-
Access the VLAN Configuration menu: Go to
Interfaces -> Devices -> VLANto view your existing VLAN list. -
Add a New VLAN: Click
Add, choose the parent interface, assign a new VLAN ID, and save. -
Remove Unused VLANs: Select the VLAN you want to delete, confirm removal, and verify it’s no longer listed.
-
Edit an Existing VLAN: Click the edit icon to change its VLAN ID, description, or parent interface.
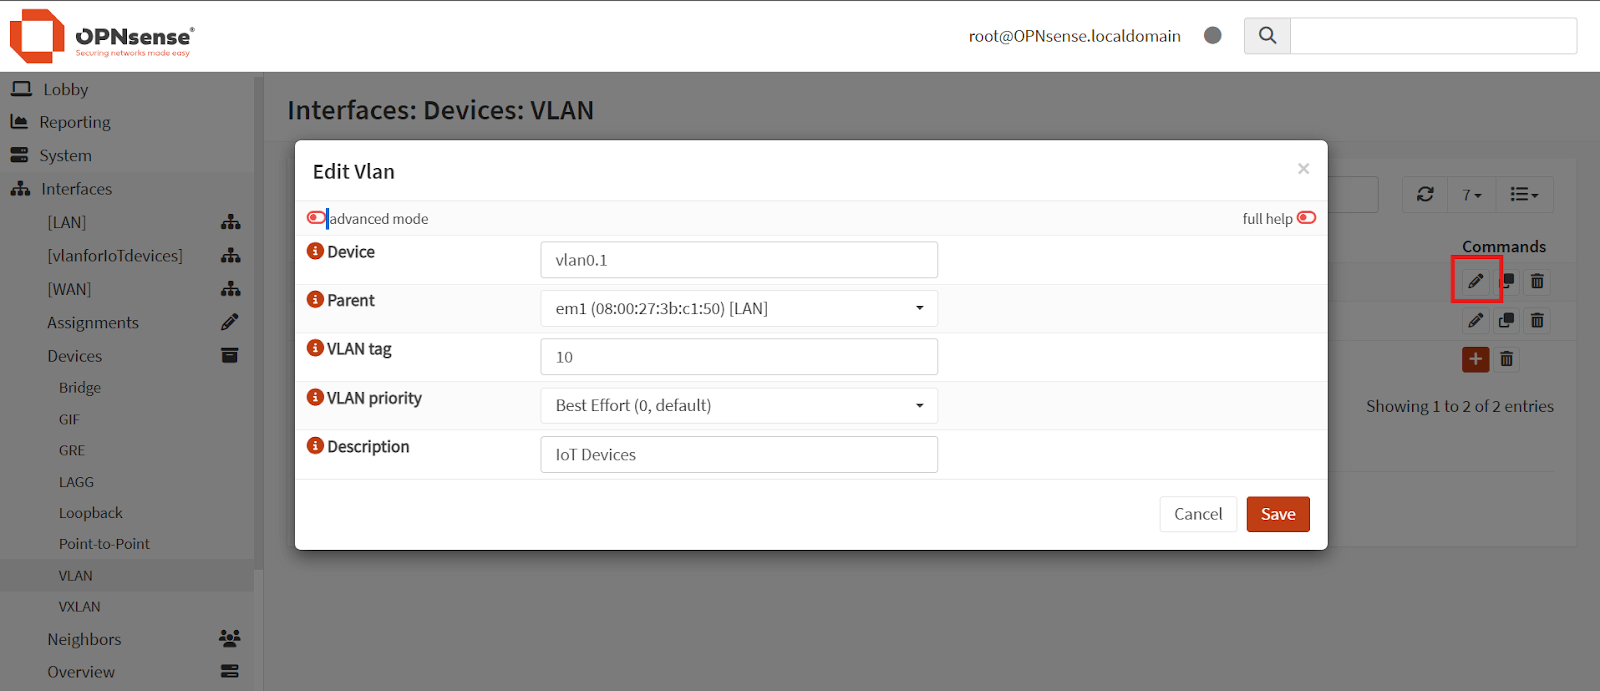
Figure 12. Editing an Existing VLAN Interface on OPNsense
-
Update Firewall Rules: Go to
Firewall -> Rules, select the VLAN interface, and adjust or create rules to reflect the changes. -
Apply Changes: Save and apply settings to activate the updated VLAN configuration.
Conclusion
Implementing and managing VLANs in OPNsense provides a flexible, secure, and efficient way to segment network traffic, control access, and improve overall performance. From assigning IP subnets and configuring DHCP servers per VLAN, to creating firewall rules, monitoring traffic, and troubleshooting issues, OPNsense offers a comprehensive set of tools to keep your network organized and responsive.
By following the outlined steps for VLAN creation, guest network setup, security hardening, and configuration backups, administrators can ensure long-term stability while retaining the ability to expand or modify VLANs as business needs evolve. Regular monitoring, timely firmware updates, and adherence to access control best practices will further strengthen network reliability and security.
Whether you are setting up your first VLAN or optimizing an existing multi-VLAN infrastructure, OPNsense VLAN management enables precise control and adaptability, helping you maintain a secure, high-performance network environment.