How to Set Up Traffic Shaper in OPNsense?
Traffic shaping, also known as packet shaping, is a bandwidth management strategy that delays the flow of specific network packets to ensure network performance for higher priority applications. It is generally used to ensure that business-related network traffic receives a high level of service. By delaying some packets, traffic shaping can enhance or ensure performance, reduce latency, or increase available bandwidth for critical applications.
Due to limited network resources, traffic shaping is a must-have feature for a network firewall for ensuring the delivery of time-sensitive data and the performance of critical applications. It is a powerful method of defending against distributed denial-of-service (DDoS) attacks and ensuring service quality. It safeguards your networks against network congestion, restricts abusive clients, and prevents cyberattacks.
You may need to limit Internet bandwidth for some users while providing maximum bandwidth to a business-critical application like Voice-over-IP (VoIP), which is particularly sensitive to latency.
OPNsense, which is one of the best open-source firewalls, has an extremely flexible and reliable traffic-shaping feature. The shaping rules are handled separately from the firewall rules and other configurations.
In addition the its Traffic Shaping features, OPNsense also provides next-generation firewall capabilities such as web control and application control. This is provided by an external tool called Zenarmor.
Zenarmor NGFW Plug-in for OPNsense is one of the most popular OPNsense plug-ins and allows you to easily upgrade your firewall to a Next Generation Firewall in seconds. NG Firewalls empower you to combat modern-day cyber attacks that are becoming more sophisticated every day.
Some of the capabilities are layer-7 application/user aware blocking, granular filtering policies, commercial-grade web filtering utilizing cloud-delivered AI-based Threat Intelligence, parental controls, and the industry's best network analytics and reporting.
Zenarmor Free Edition is available at no cost for all OPNsense users.
In this tutorial, we'll explain the OPNsense traffic shaping feature and how you can configure the traffic shaper in your OPNsense firewall for the following cases:
- Reserving Dedicated Bandwidth for Real-Time Traffic, such as VoIP
- Sharing Internet Bandwidth Evenly Among Clients
- Prioritize Critical Applications
- Shape Traffic Based on the Network Interface in OPNsense
What is Traffic Shaper in OPNsense?
OPNsense traffic shaping is a very useful solution for prioritizing traffic and limiting bandwidth. Also, it can be combined with other features such as a captive portal.
OPNsense traffic shaper is configured using pipes, queues, and corresponding rules:
-
Pipes: The pipes are used to define the allowed bandwidth.
-
Queues: The queues set a weight within the pipe. Traffic can be prioritized by creating queues and assigning weights to them. In other words, when total available bandwidth is limited, applications with higher weight can consume more bandwidth than others.
-
Rules: The rules apply the shaping to a specific package flow.
Bandwidth restrictions can be set based on the following criteria:
-
interface(s),
-
IP source and destination,
-
traffic direction (in/out), and
-
port numbers (application).
OPNsense traffic shaping feature allows you to distribute available bandwidth evenly among all users, ensuring peak performance at all times.
How does the Traffic Shaper in OPNsense Work?
OPNsense traffic shaper employs dummynet and IPFW to provide a dependable solution with a low CPU footprint.
Dummynet first classifies packets and divides them into flows using any match pattern that can be used in ipfw rules. Depending on local policies, a flow can contain packets for a specific protocol type, packets for an entire subnet, packets from/to a specific host, packets for a single TCP connection, and so on.
Packets from the same flow are then routed to one of the following objects that apply traffic rules:
-
Pipe: A pipe simulates a connection with the specified bandwidth, queue size, propagation delay, and packet loss rate. As network packets exit the classifier, they are queued in front of the pipe and then transferred to the pipe based on the pipe's parameters.
-
Queue: A queue is an abstraction that is used to implement the
WF2Q+(Worstcase Fair Weighted Fair Queueing) policy. Each flow is assigned a weight and a reference pipe by the queue. All backlogged flows connected to the same pipe share the pipe's bandwidth proportionally to their weights.
Weights are not priorities; a flow with a lower weight is still guaranteed to get its share of the bandwidth even if a flow with a higher weight is permanently backlogged.
Pipes can be used to set hard limits on how much bandwidth a flow can use, whereas Queues can be used to determine how different flows share the available bandwidth.
You can define the shaping rules in the rules page of the traffic shaper.
How to View Traffic Shaping Status or Statistics in OPNsense?
To see whether the traffic shaper is working properly or not, navigate to Firewall > Shaper > Status.
In the Status page of the traffic shaper, you can view the following details:
-
configured pipes, queues, and rules.
-
the amount of traffic that has passed through them since the last restart of the service.
-
the timestamp when that occurred.
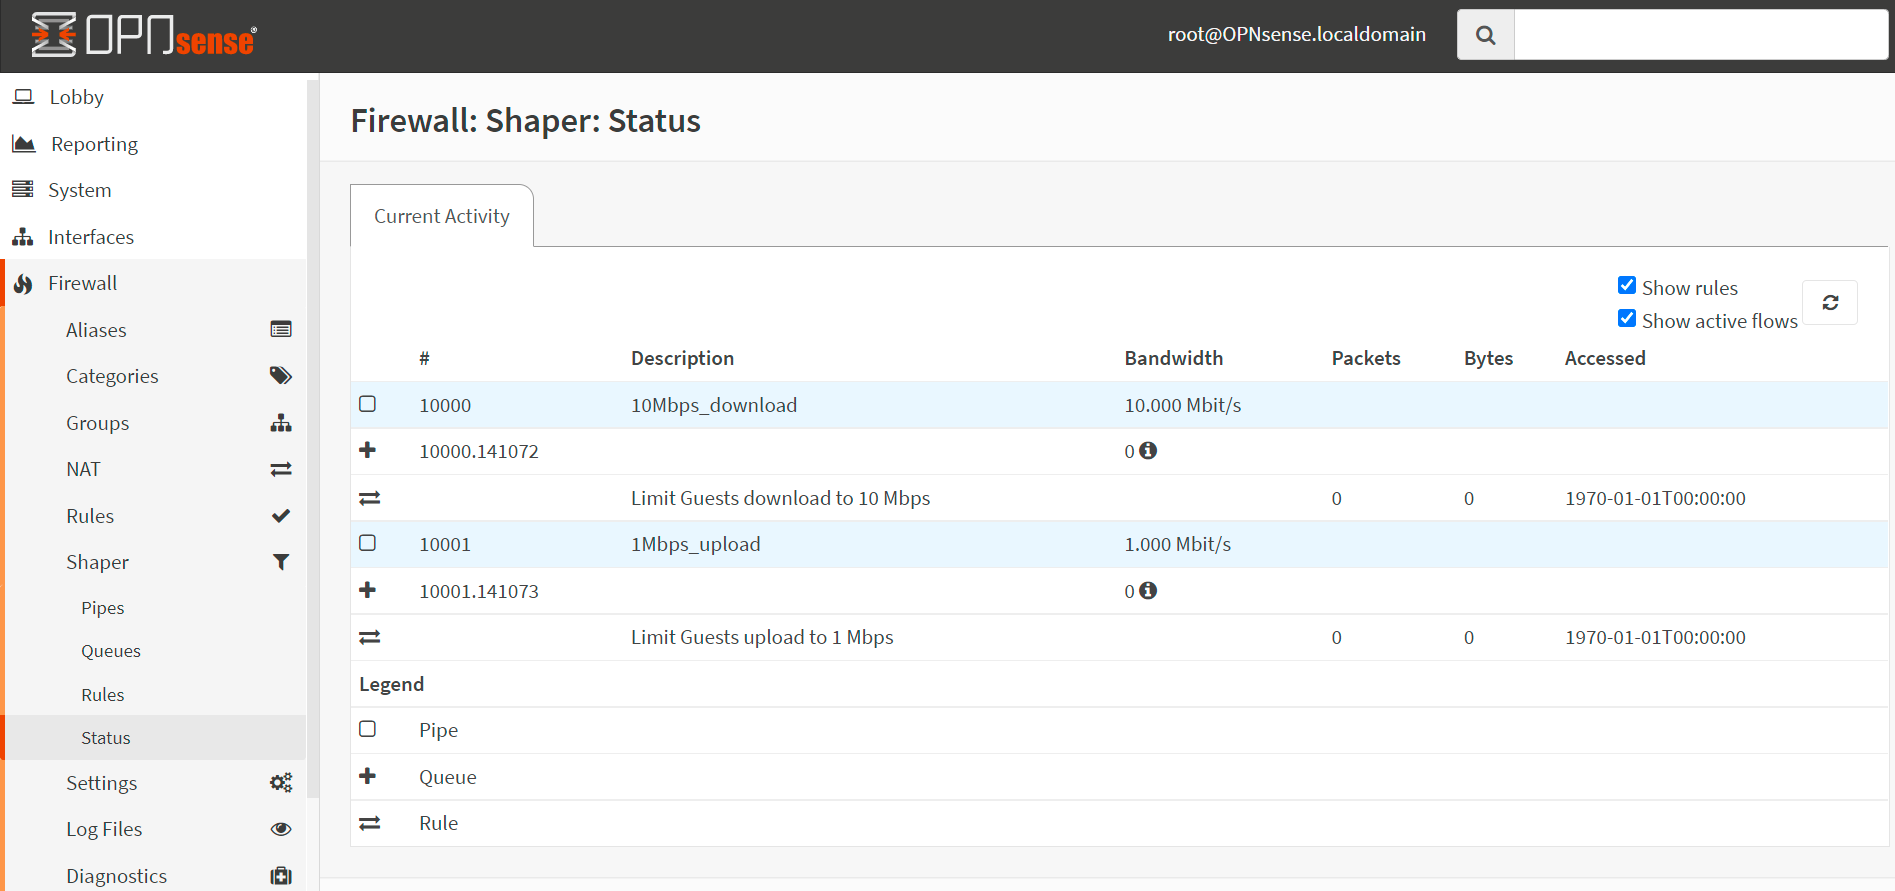
Figure 1. Viewing Traffic Shaping Status in OPNsense
Traffic Shaping Status page also provides the following options:
-
Show active flows: You can also view active flows details by checking the
Show active flowsbox; remember to refresh your view after making these changes. -
Show rules: Since ipfw keeps track of data on a per-rule basis, you may enable rules by checking the
Show rulesbox to recognize the misconfigurations more easily.
How to Reserve Dedicated Bandwidth for Real-Time Traffic?
Let's assume that you are an administrator of an enterprise network that is protected by an OPNsense firewall. However, your users complain about VoIP service. After an investigation, you determined that there is SIP packet loss and latency between the HQ office and the remote Data Center where VoIP/SIP server is hosted. To solve this issue, you have decided to reserve a dedicated bandwidth for VoIP traffic. Your requirements, in this case, are as follows:
-
HQ Office WAN connection has
20 MbpsDownload and2 MbpsUpload bandwidth. -
HQ Office has 10 uncompressed voice channels of 64 kbps, resulting in a total bandwidth of 640 kbps.
-
HQ LAN uses
10.10.10.0/24IP addresses. -
VoIP/SIP server IP address is
22.33.44.55.
You can easily reserve dedicated bandwidth for VoIP traffic by following the next two main steps:
-
Creating Upload and Download Pipes
-
Creating Traffic Shaping Rules
These steps are briefly explained in the following sections.
1. How to Create Upload and Download Pipes
You must create the next 4 pipes given below:
-
Pipe for VoIP traffic upload directed to VoIP/SIP server with
640 kbpslimit. -
Pipe for VoIP traffic download received from VoIP/SIP server with
640 kbpslimit. -
Pipe for all upload traffic except VoIP with 2048-640=
1.984 kbpslimit. -
Pipe for all download traffic except VoIP with 20480-640=
19.840 kbpslimit.
How to Create a Pipe to Reserve Upload Bandwidth for VoIP Traffic
You may add a pipe to reserve upload bandwidth for VoIP traffic by following the next steps given below.
-
Navigate to
Firewall→Shaper→Pipesin your OPNsense firewall web UI.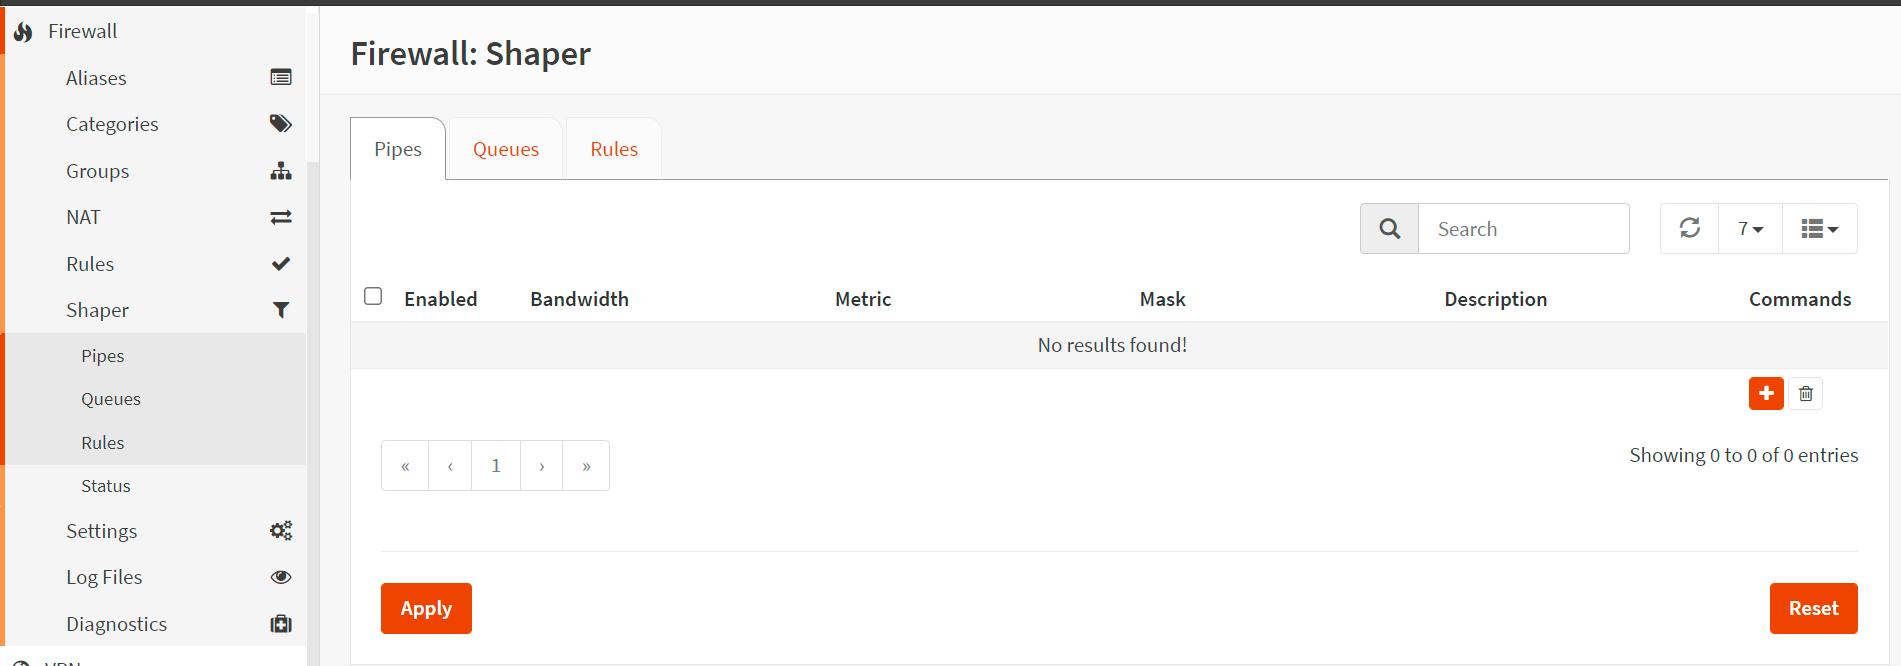
Figure 2. Creating Traffic Shaper Pipe in OPNsense
-
Click the
+in the lower right corner of the form to create a pipe for the VoIP upload. -
Enable it by clicking the checkbox. So that this pipe and its related queues and rules are enabled.
-
Set Bandwidth to
640that will be the total bandwidth for this pipe. -
Set Bandwidth Metric to
kbit/s -
Leave the Mask as
nonesince we'll create a pipe with a fixed bandwidth. -
Enter a Description such as
640Kbps_VoIP_upload -
Click
Save.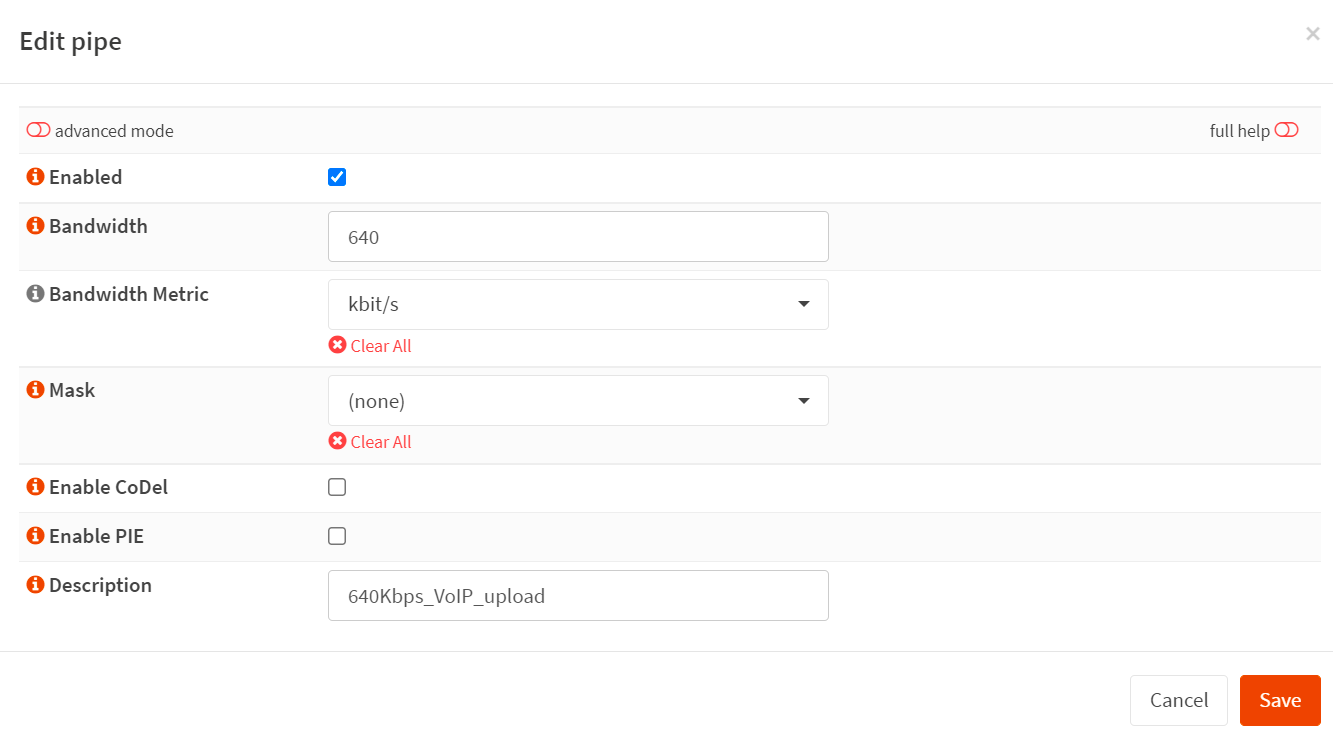
Figure 3. Creating a pipe for 640 Kbps VoIP upload bandwidth reservation
How to Create a Pipe to Reserve Download Bandwidth for VoIP Traffic
You may add a pipe to reserve download bandwidth for VoIP traffic by following the next steps given below.
-
Navigate to
Firewall→Shaper→Pipesin your OPNsense firewall web UI. -
Click the
+in the lower right corner of the form to create a pipe for the VoIP download. -
Enable it by clicking the checkbox.
-
Set Bandwidth to
640. -
Set Bandwidth Metric to
kbit/s -
Leave the Mask as
none. -
Enter a Description such as
640Kbps_VoIP_download -
Click
Save.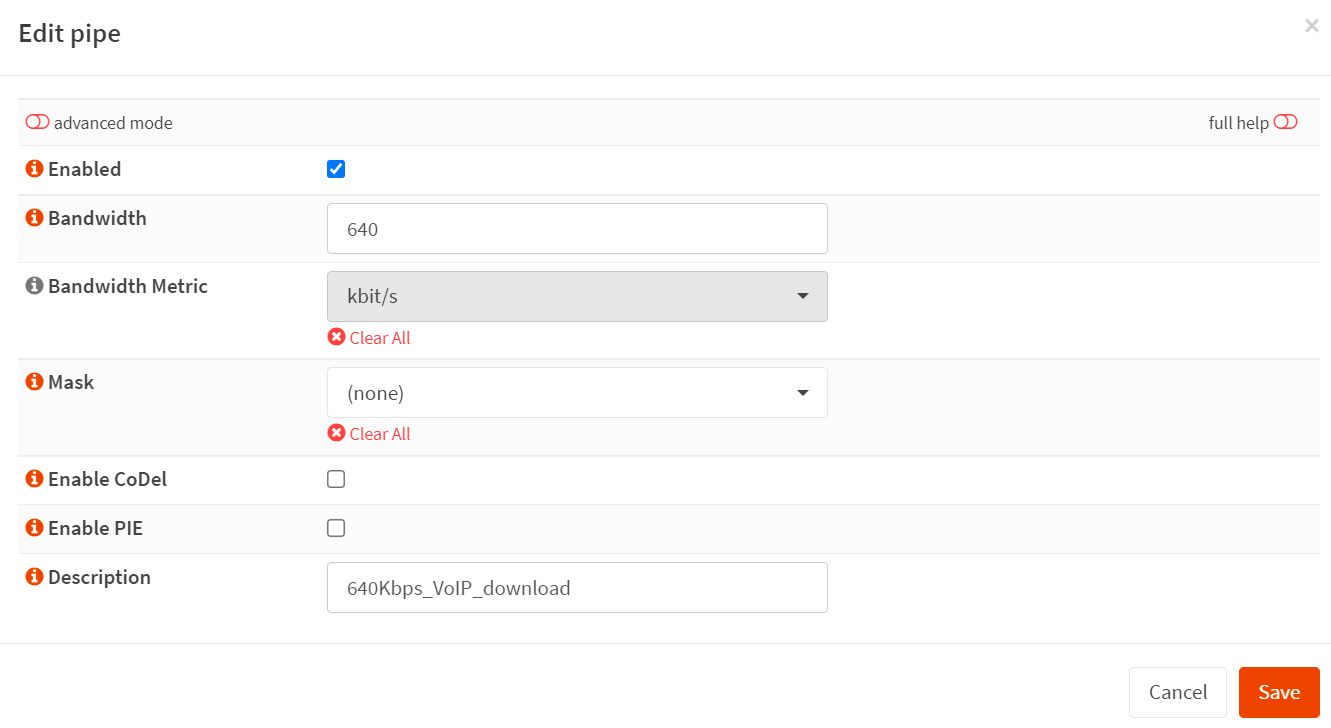
Figure 4. Creating a pipe for 640 Kbps VoIP download bandwidth reservation
How to Create a Pipe to Limit Upload Bandwidth for All Other Traffic Except VoIP
You may add a pipe to limit upload bandwidth for all other traffic except VoIP by following the next steps given below.
-
Navigate to
Firewall→Shaper→Pipesin your OPNsense firewall web UI. -
Click the
+in the lower right corner of the form to create a pipe for the other upload traffic. -
Enable it by clicking the checkbox.
-
Set Bandwidth to
1984. -
Set Bandwidth Metric to
kbit/s -
Leave the Mask as
none. -
Enter a Description such as
1984Kbps_Other_upload -
Click
Save.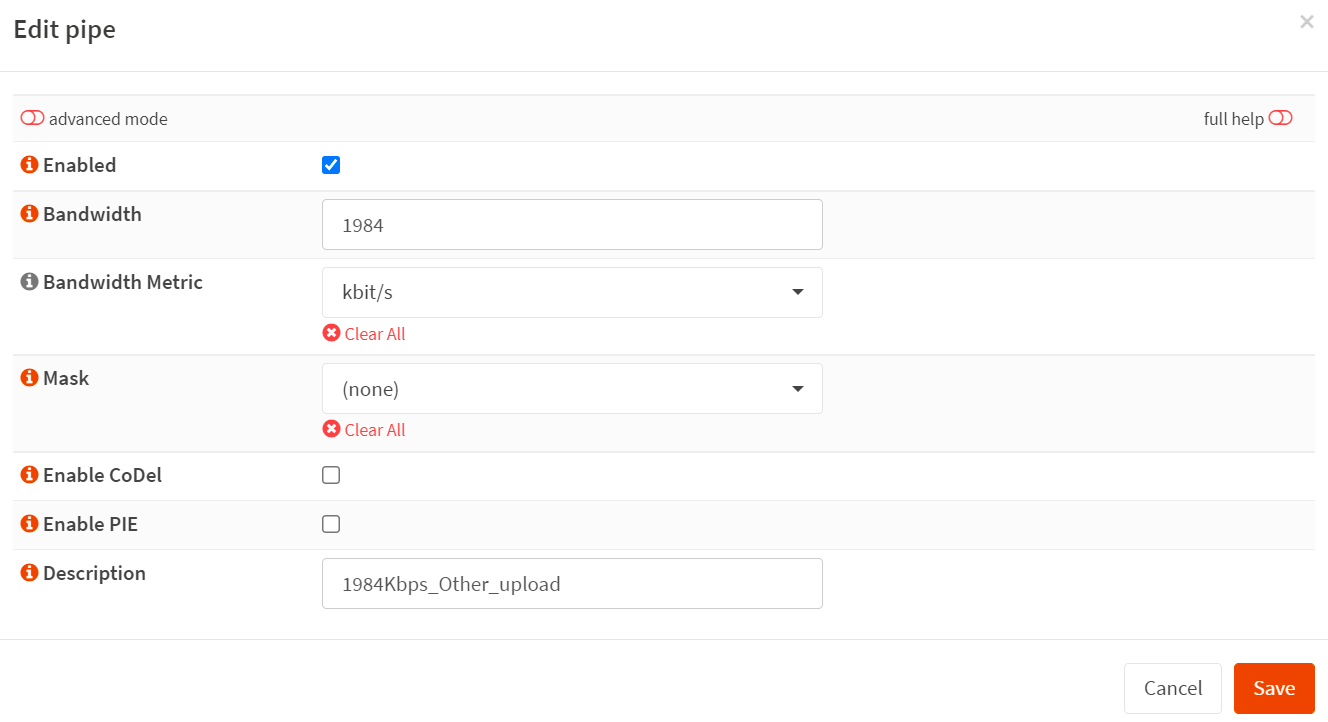
Figure 5. Creating a pipe for 1984 Kbps other upload traffic bandwidth limitation
How to Create a Pipe to Limit Download Bandwidth for All Other Traffic Except VoIP
You may add a pipe to limit download bandwidth for all other traffic except VoIP by following the next steps given below.
-
Navigate to
Firewall→Shaper→Pipesin your OPNsense firewall web UI. -
Click the
+in the lower right corner of the form to create a pipe for the other download traffic. -
Enable it by clicking the checkbox.
-
Set Bandwidth to
19840. -
Set Bandwidth Metric to
kbit/s -
Leave the Mask as
none. -
Enter a Description such as
19840Kbps_Other_download -
Click
Save.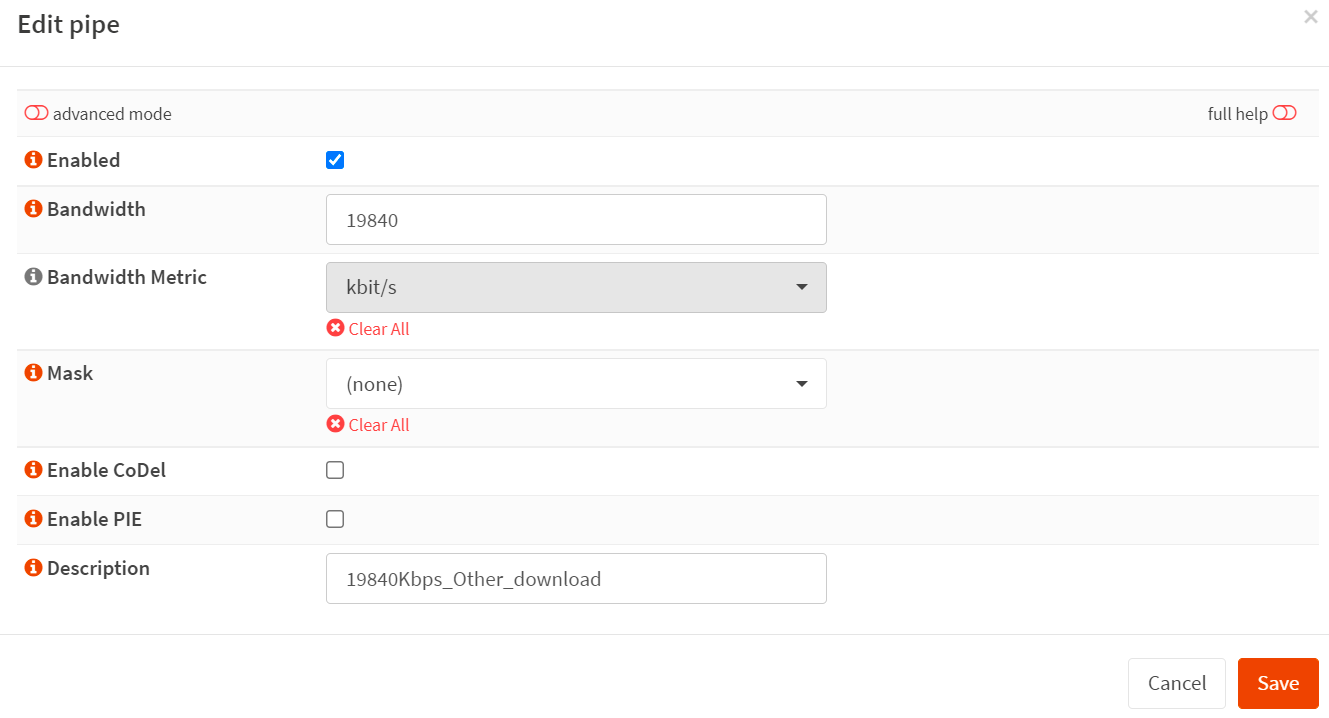
Figure 6. Creating a pipe for 19840 Kbps VoIP download bandwidth limitation
You may view all pipes you've created for bandwidth reservation in
Pipespane of the Traffic shaper in your OPNsense firewall.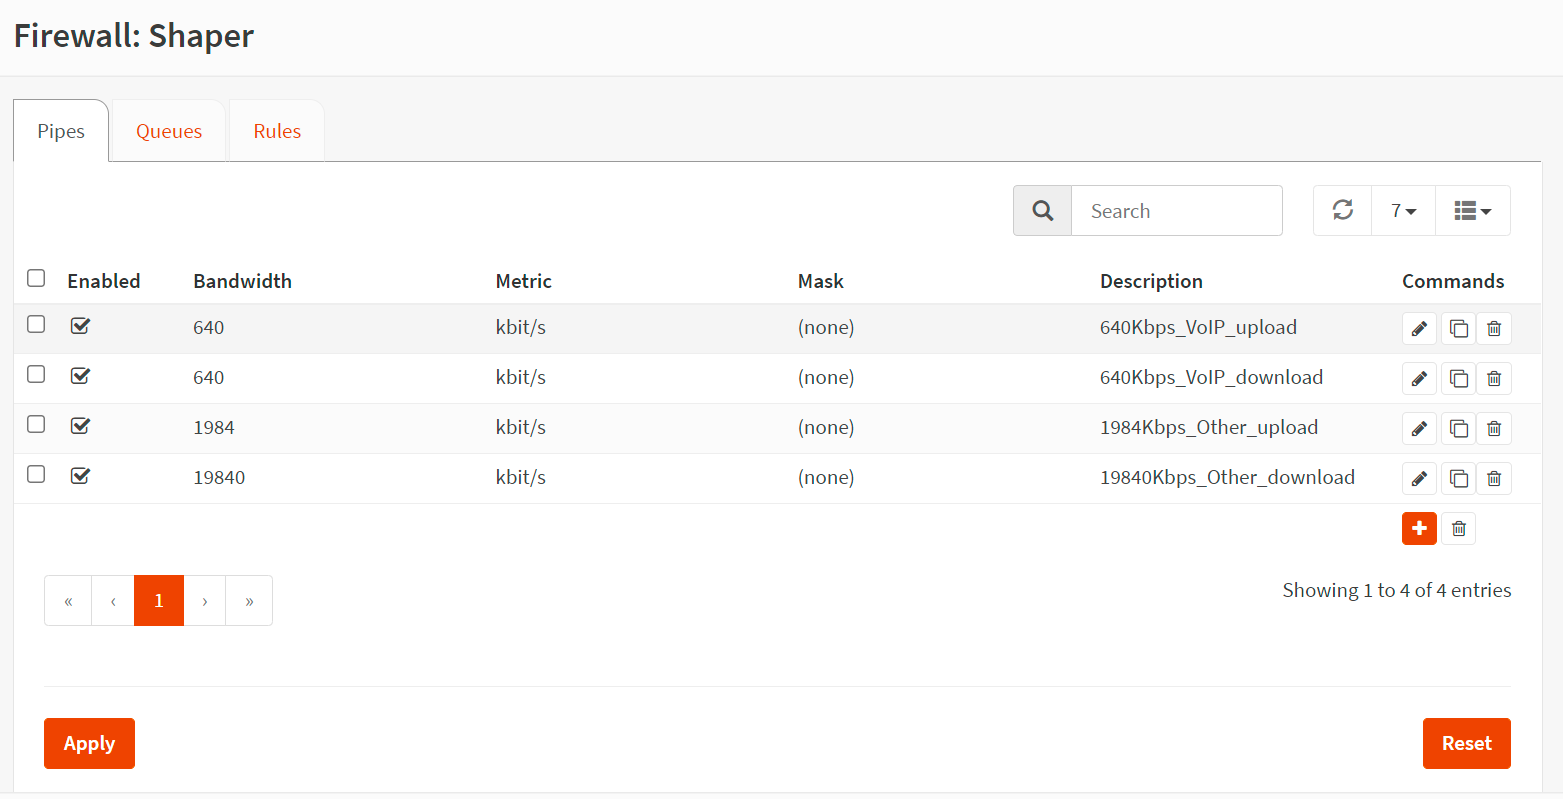
Figure 7. Pipes created for bandwidth reservation
-
Click
Applyto apply the changes.
2. How to Create the Traffic Shaper Rules
You must create the next 4 traffic shaper rules given below:
-
The rule for VoIP upload traffic directed to a VoIP/SIP server with
22.33.44.55IP address. -
The rule for VoIP download traffic received from VoIP/SIP server with
22.33.44.55IP address. -
The rule for all other upload traffic in LAN with
10.10.10.0/24IP address -
The rule for all other download traffic in LAN with
10.10.10.0/24IP address.
How to Create Rule for VoIP upload traffic directed VoIP/SIP server
You may follow the instructions given below to create the traffic shaper rules for VoIP upload traffic bandwidth reservation on the network.
-
Click on the tab
Rulesto create the traffic shaper rules in your in OPNsense firewall.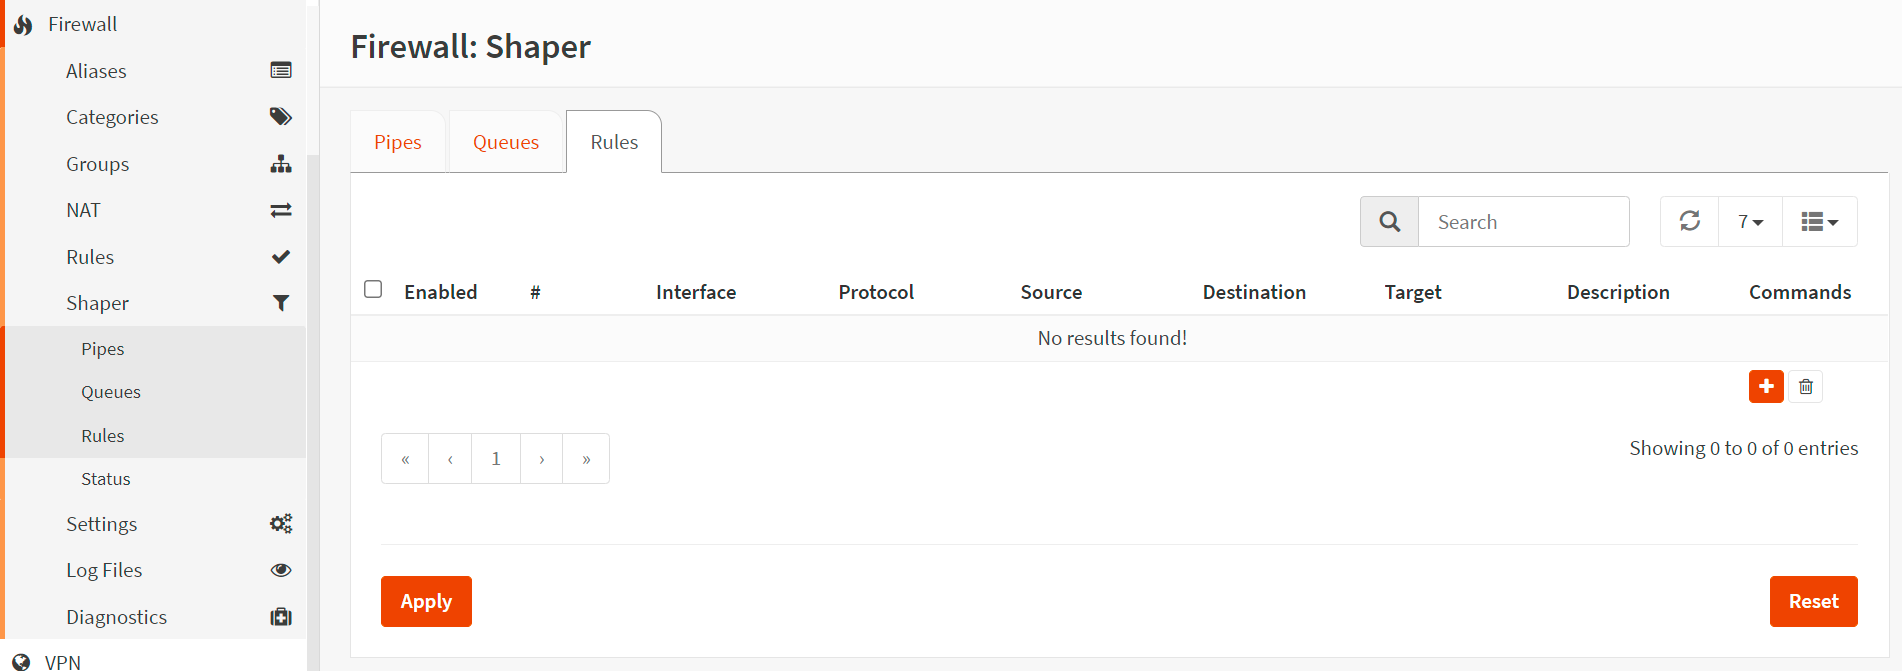
Figure 8. Traffic shaper rules in OPNsense
-
Click the
+icon. -
Set Interface to
WAN. -
Set Proto to
ip. -
Set Source to
any. -
Set Src-port to
any. -
Set Destination to
22.33.44.55. -
Set Dst-port to
any. -
Set Target to
640Kbps_VoIP_upload. -
Set Description
Shape_VoIP_upload. -
Click
Save.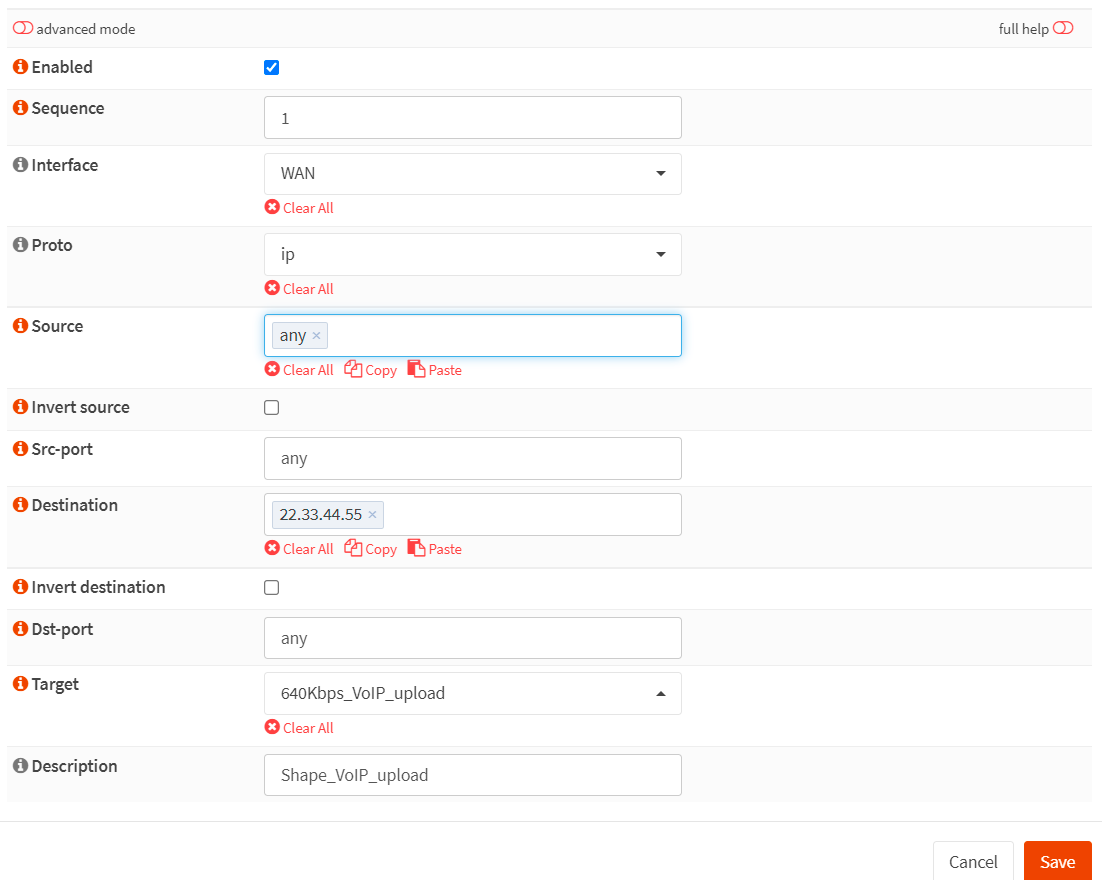
Figure 9. Creating traffic shaper rule for VoIP upload bandwidth reservation in OPNsense
How to Create Rule for VoIP download traffic coming from VoIP/SIP server
You may follow the instructions given below to create the traffic shaper rules to reserve download bandwidth for VoIP traffic on the network.
-
Click on the tab Rules to create the traffic shaper rules.
-
Click the
+icon. -
Set Interface to
WAN. -
Set Proto to
ip. -
Set Source to
22.33.44.55. -
Set Src-port to
any. -
Set Destination to
any. -
Set Dst-port to
any. -
Set Target to
640Kbps_VoIP_download. -
Set Description
Shape_VoIP_download. -
Click
Save.
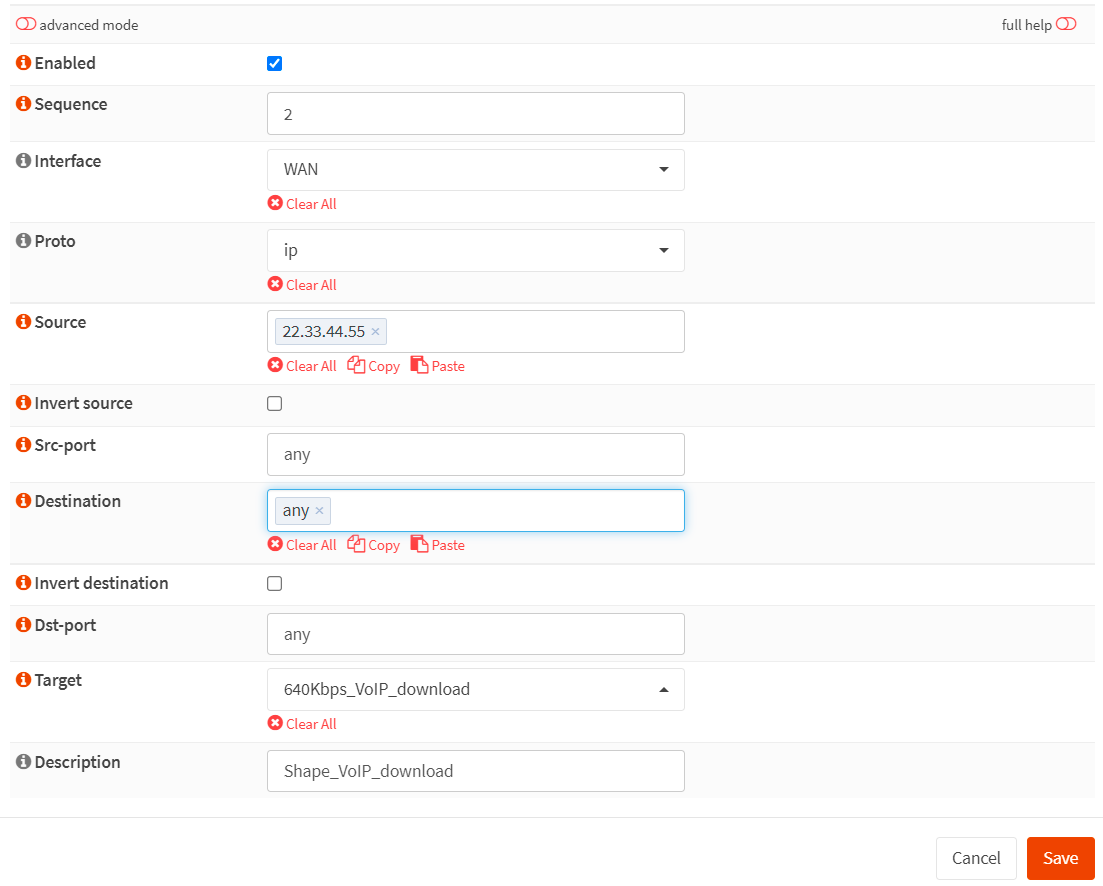
Figure 10. Creating traffic shaper rule for VoIP download bandwidth reservation in OPNsense
How to Create Rule for all other WAN upload traffic
You may follow the instructions given below to create the traffic shaper rules to limit upload bandwidth for all other WAN traffic on the network.
-
Click on the tab Rules to Create the traffic shaper rules.
-
Click the
+icon. -
Set Interface to
WAN. -
Set Proto to
ip. -
Set Source to
10.10.10.0/24. -
Set Src-port to
any. -
Set Destination to
any. -
Set Dst-port to
any. -
Set Target to
1984Kbps_Other_upload. -
Set Description
Shape_Other_upload. -
Click
Save.
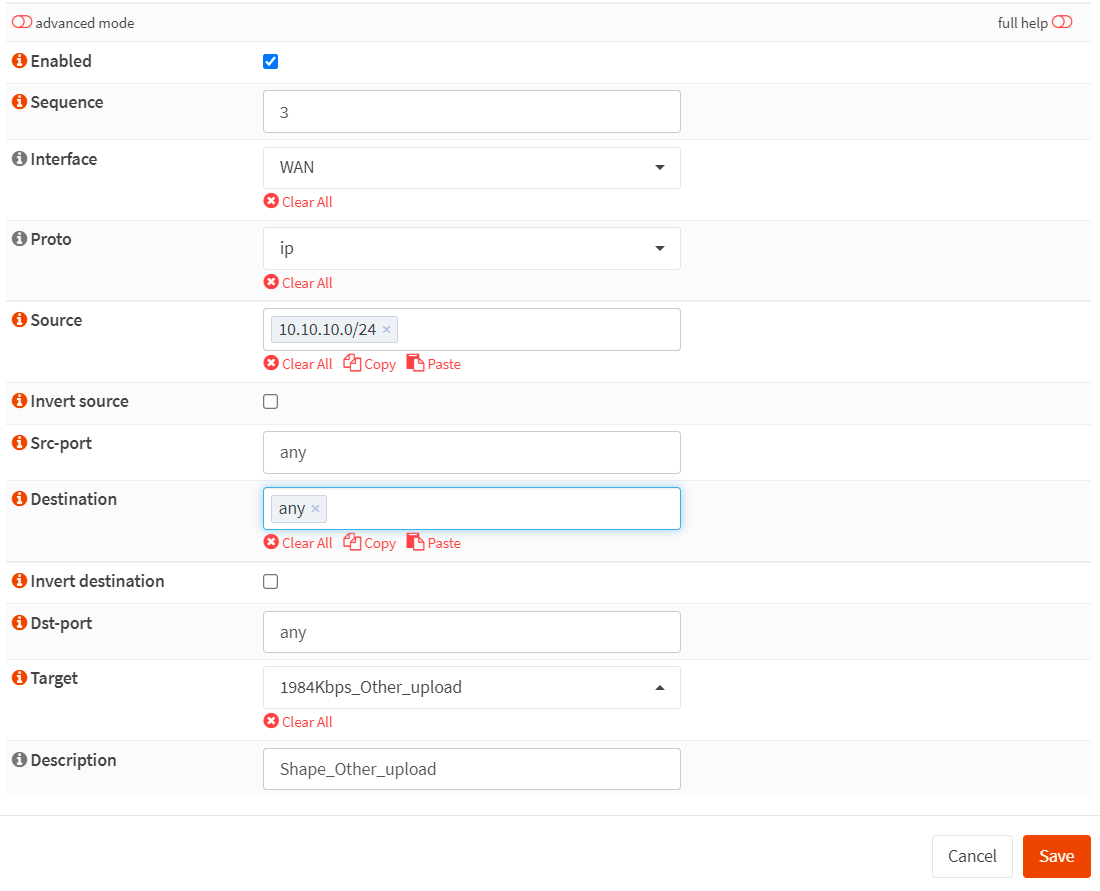
Figure 11. Creating traffic shaper rule for all other WAN upload bandwidth limitation in OPNsense
How to Create Rule for all other WAN download traffic
You may follow the instructions given below to create the traffic shaper rules to limit download bandwidth for all other WAN trafficn on the network.
-
Click on the tab Rules to Create the traffic shaper rules.
-
Click the
+icon. -
Set Interface to
WAN. -
Set Proto to
ip. -
Set Source to
any. -
Set Src-port to
any. -
Set Destination to
10.10.10.0/24. -
Set Dst-port to
any. -
Set Target to
19840Kbps_Other_download. -
Set Description
Shape_Other_download. -
Click
Save.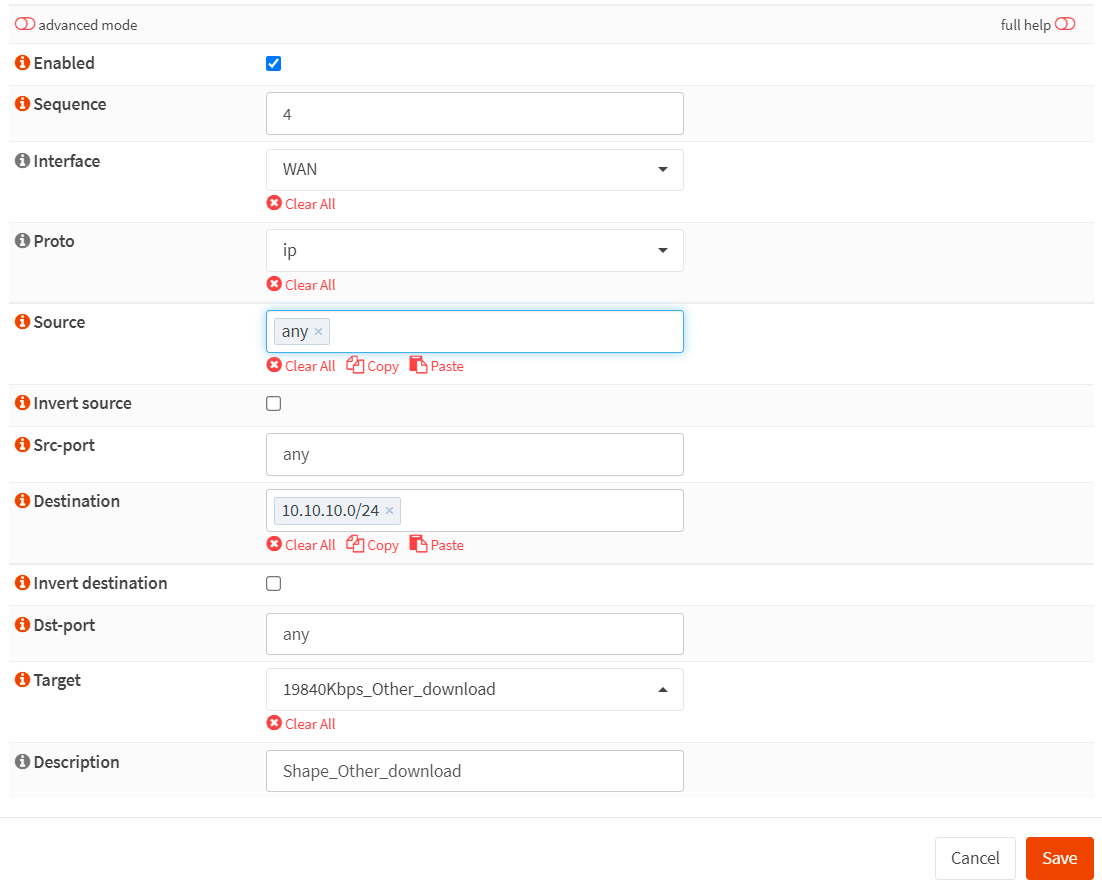
Figure 12. Creating traffic shaper rule for all other WAN download bandwidth limitation in OPNsense
You may view all rules you've created for bandwidth limitation and reservation in the
Rulespane of theTraffic Shaperin your OPNsense firewall.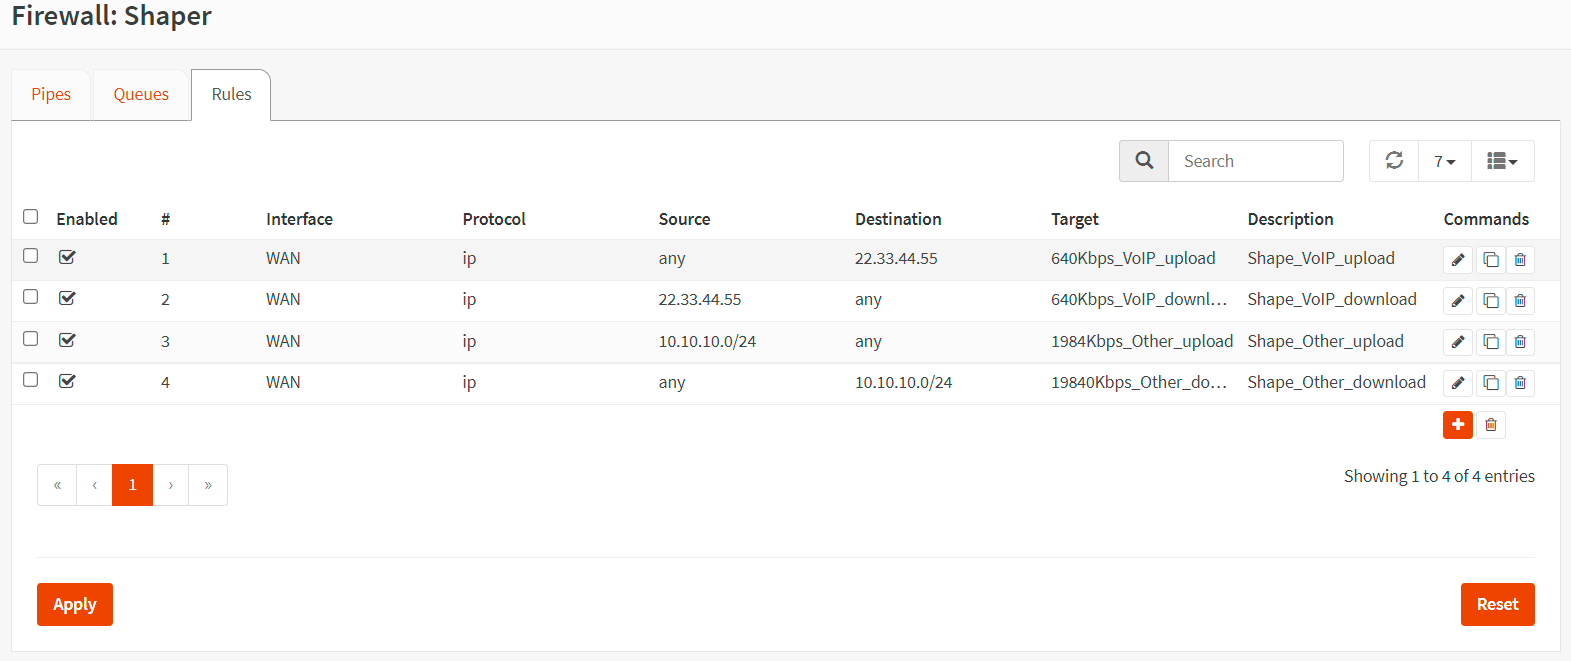
Figure 13. Rules created for bandwidth reservation and limitation in OPNsense
-
Click on
Applyto apply the changes.
Verifying the Bandwidth Reservation for VoIP/SIP Traffic
To verify the bandwidth reservation for VoIP/SIP traffic in your OPNsense firewall, you may navigate to the Firewall > Shaper > Status.
In the Status page of the traffic shaper, you can view the traffic flow similar to in figure 14.
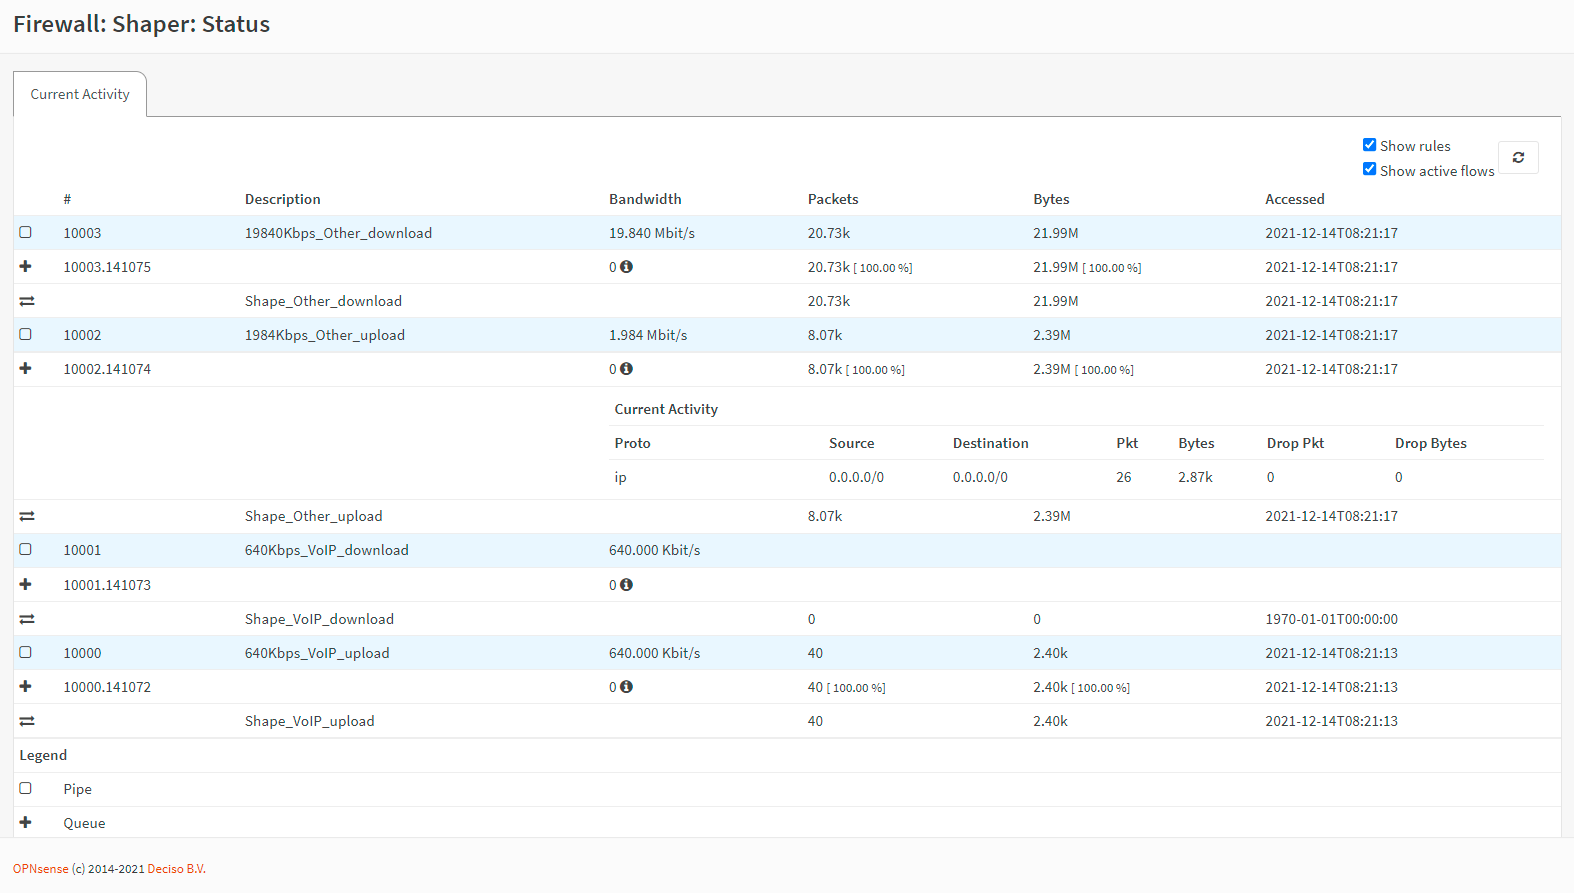
Figure 14. Verifying the Bandwidth Reservation for VoIP/SIP Traffic in OPNsense
How to Share Internet Bandwidth Evenly Among Clients
In this scenario, we'll assume that your clients complain about a slow internet connection. After an investigation, you determined that some of the users were exhausting the internet bandwidth by downloading large files from the FTP server of the business partners. However, you don't have enough budget to increase the internet bandwidth. To solve this issue, you have decided to distribute bandwidth evenly among all users. Your requirements, in this case, are as follows:
-
Company internet connection has
20 MbpsDownload and2 MbpsUpload bandwidth. -
Company LAN uses
10.10.10.0/24IP addresses.
You can easily share bandwidth evenly among all users by following the next 3 main steps:
-
Create Upload and Download Pipes
-
Create Queues
-
Create Traffic Shaping Rules
These 3 steps are briefly explained in the following sections.
1. How to Create Upload and Download Pipes
You must create the next 2 pipes given below:
-
Pipe for internet upload traffic with
2 Mbpsbandwidth. -
Pipe for internet download traffic with
20 Mbpsbandwidth.
How to Create a Pipe for Internet Upload Traffic
You may add a pipe for internet upload traffic by following the next steps given below.
-
Navigate to
Firewall→Shaper→Pipesin your OPNsense firewall web UI. -
Click the
+in the lower right corner of the form to create a pipe for the other upload traffic. -
Enable it by clicking the checkbox.
-
Set Bandwidth to
2. -
Set Bandwidth Metric to
Mbit/s -
Leave the Mask as
none. -
Enter a Description such as
2Mbps_Internet_upload -
Click
Save.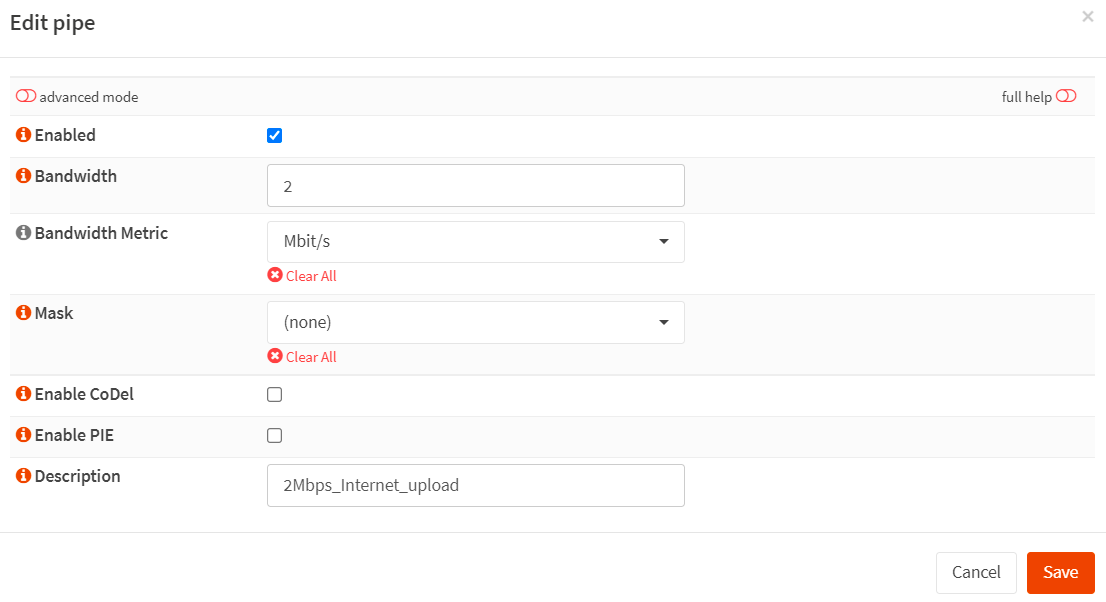
Figure 15. Creating a pipe for 2Mbps Internet upload traffic in OPnsense
How to Create a Pipe for Internet Download Traffic
You may add a pipe for Internet download traffic by following the next steps given below.
-
Navigate to
Firewall→Shaper→Pipesin your OPNsense firewall web UI. -
Click the
+in the lower right corner of the form to create a pipe for the internet download traffic. -
Enable it by clicking the checkbox.
-
Set Bandwidth to
20. -
Set Bandwidth Metric to
Mbit/s -
Leave the Mask as
none. -
Enter a Description such as
20Mbps_Internet_download -
Click
Save.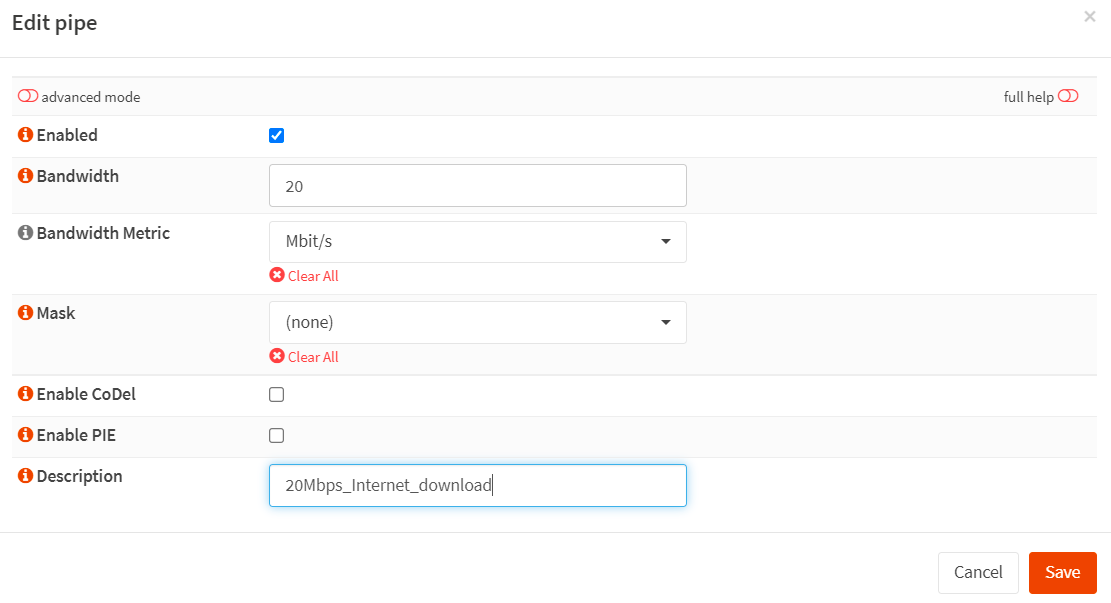
Figure 16. Creating a pipe for 20 Mbps Internet download traffic in OPnsense
You may view all pipes you've created for Internet bandwidth distribution in the
Pipespane of the Traffic shaper in your OPNsense firewall.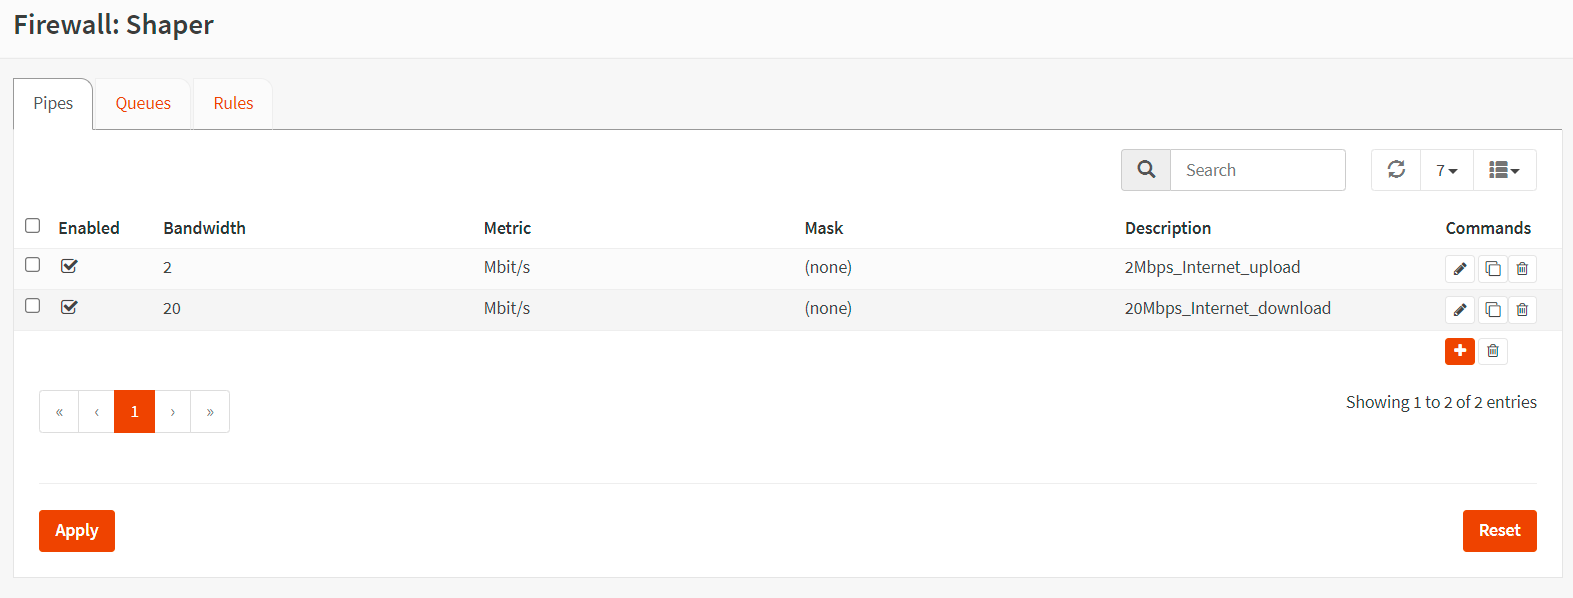
Figure 17. Pipes created for Internet bandwidth distribution in OPNsense
-
Click
Applyto apply the changes.
2. How to Create Upload and Download Queues
You must create the next 2 queues given below:
-
Queue for internet upload traffic with weight
100. -
Queue for internet download traffic with weight
100.
How to Create a Queue for Internet Upload Traffic
You may add a pipe for internet upload traffic by following the next steps given below.
-
Navigate to
Firewall→Shaper→Queuein your OPNsense firewall web UI.
Figure 18. Creating Traffic Shaper Queue in OPNsense
-
Click the
+in the lower right corner of the form to create a pipe for the internet upload traffic. -
Enable it by clicking the checkbox.
-
Select
2Mbps_Internet_uploadfor the pipe. -
Set Weight to
100to prioritize within the pipe. (1 is the lowest, 100 is the highest). -
Set the Mask to
sourceto evenly share the specified bandwidth among all IP addresses in the source field of rules. This is typically used for upload queues. -
Enter a Description such as
Queue_2Mbps_Internet_upload. -
Click
Save.Creating Traffic Shaper Queue for Internet Upload in OPNsense
Figure 19. Creating Traffic Shaper Queue for Internet Upload in OPNsense
How to Create a Queue for Internet Download Traffic
You may add a pipe for internet download traffic by following the next steps given below.
-
Navigate to
Firewall→Shaper→Queuein your OPNsense firewall web UI. -
Click the
+in the lower right corner of the form to create a pipe for the internet download traffic. -
Enable it by clicking the checkbox.
-
Select
20Mbps_Internet_downloadfor the pipe. -
Set Weight to
100to prioritize within the pipe. (1 is the lowest, 100 is the highest). -
Leave the Mask set to
destinationto evenly share the specified bandwidth among all IP addresses in the destination field of rules. A20Mbpspipe would allow10clients to lend2Mbpseach. This is typically used for download queues. -
Enter a Description such as
Queue_20Mbps_Internet_download. -
Click
Save.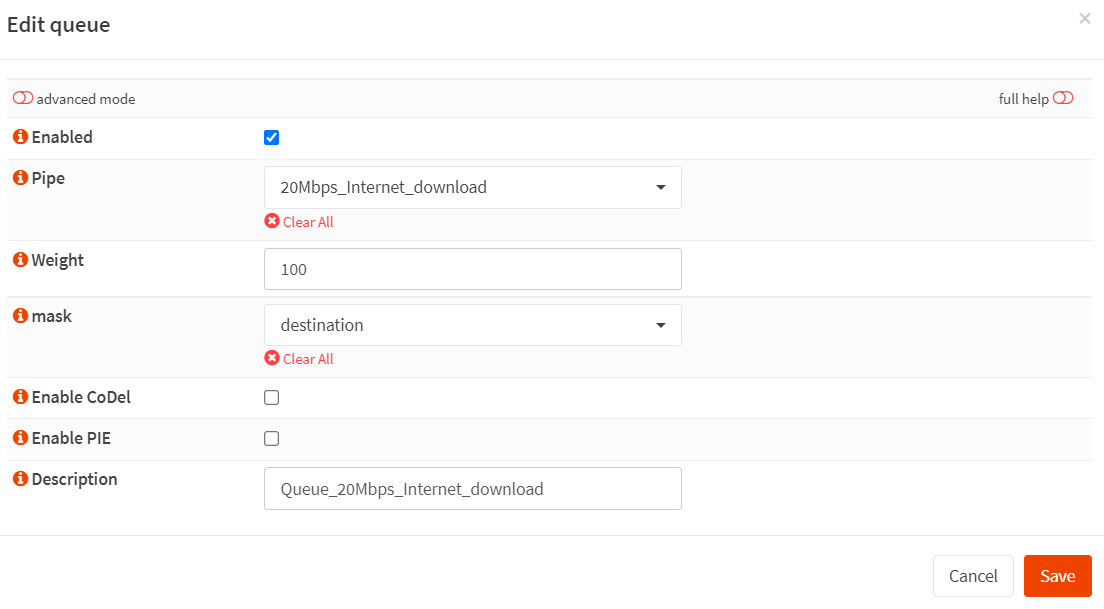
Figure 20. Creating Traffic Shaper Queue for Internet Download in OPNsense
You may view all queues you've created for Internet bandwidth distribution in the
Queuespane of the Traffic shaper in your OPNsense firewall.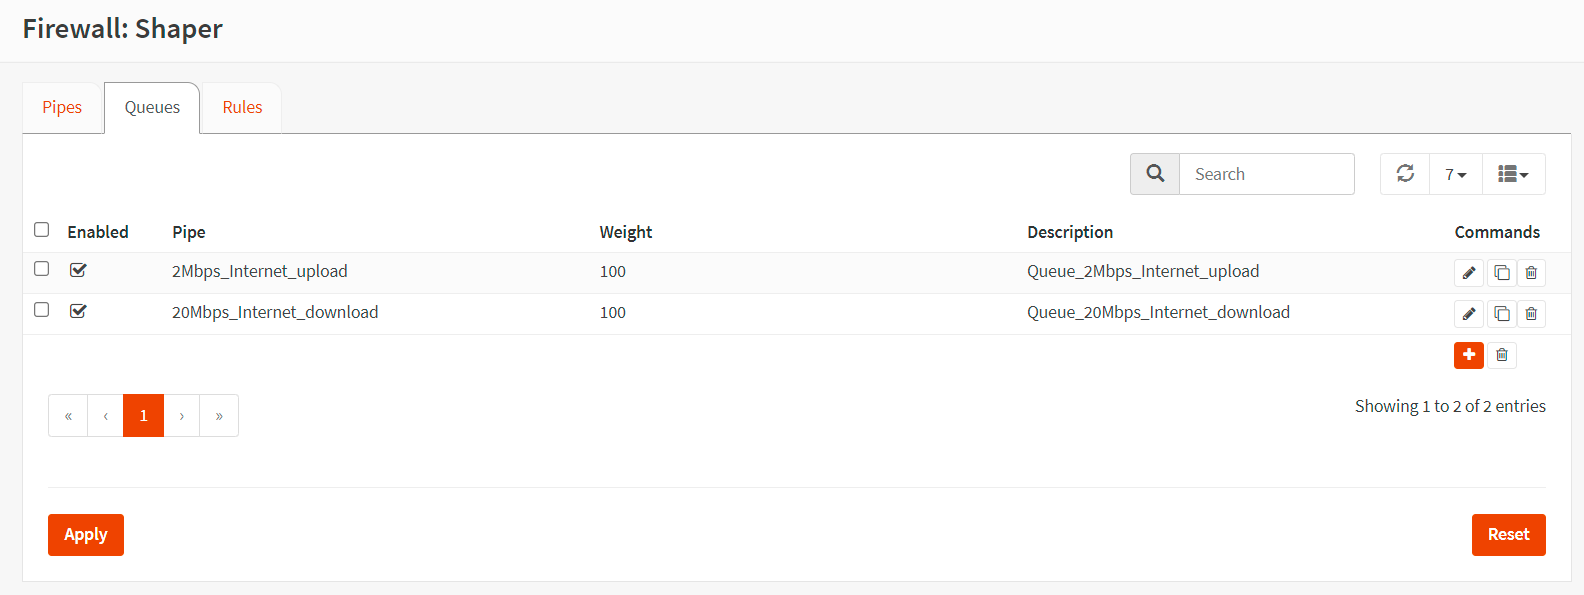
Figure 21. Queues created for Internet bandwidth distribution in OPNsense
-
Click
Applyto apply the changes.
3. How to Create Traffic Shaper Rules
You must create the next 2 traffic shaper rules given below:
-
Rule for internet upload traffic.
-
Rule for internet download traffic.
How to Create a Rule for Internet Upload Traffic
You may follow the instructions given below to create a traffic shaper rule for distributing evenly Internet upload bandwidth among LAN users (10.10.10.0/24) on the network.
-
Click on the tab Rules to create the traffic shaper rules.
-
Click the
+icon. -
Set Interface to
WAN. -
Set Proto to
ip. -
Set Source to
10.10.10.0/24. -
Set Src-port to
any. -
Set Destination to
any. -
Set Dst-port to
any. -
Set Target to
Queue_2Mbps_Internet_upload. -
Set Description
Shape_Internet_upload. -
Click
Save.
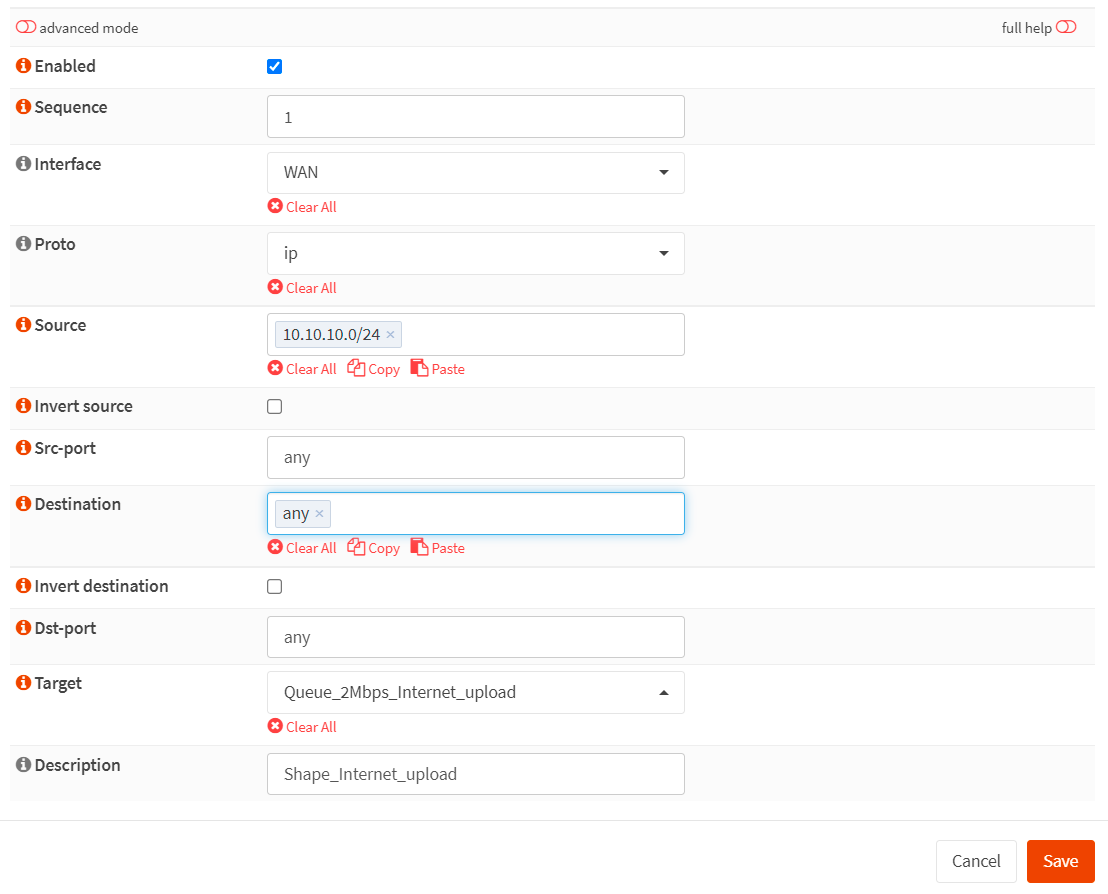
Figure 22. Creating traffic shaper rule for distributing evenly Internet upload bandwidth among LAN users in OPNsense
How to Create Rule for Internet Download Traffic
You may follow the instructions given below to create the traffic shaper rules for distributing evenly Internet upload bandwidth among LAN users (10.10.10.0/24) on the network.
-
Click on the tab Rules to create the traffic shaper rules.
-
Click the
+icon. -
Set Interface to
WAN. -
Set Proto to
ip. -
Set Source to
any. -
Set Src-port to
any. -
Set Destination to
10.10.10.0/24. -
Set Dst-port to
any. -
Set Target to
Queue_20Mbps_Internet_download. -
Set Description
Shape_Internet_download. -
Click
Save.
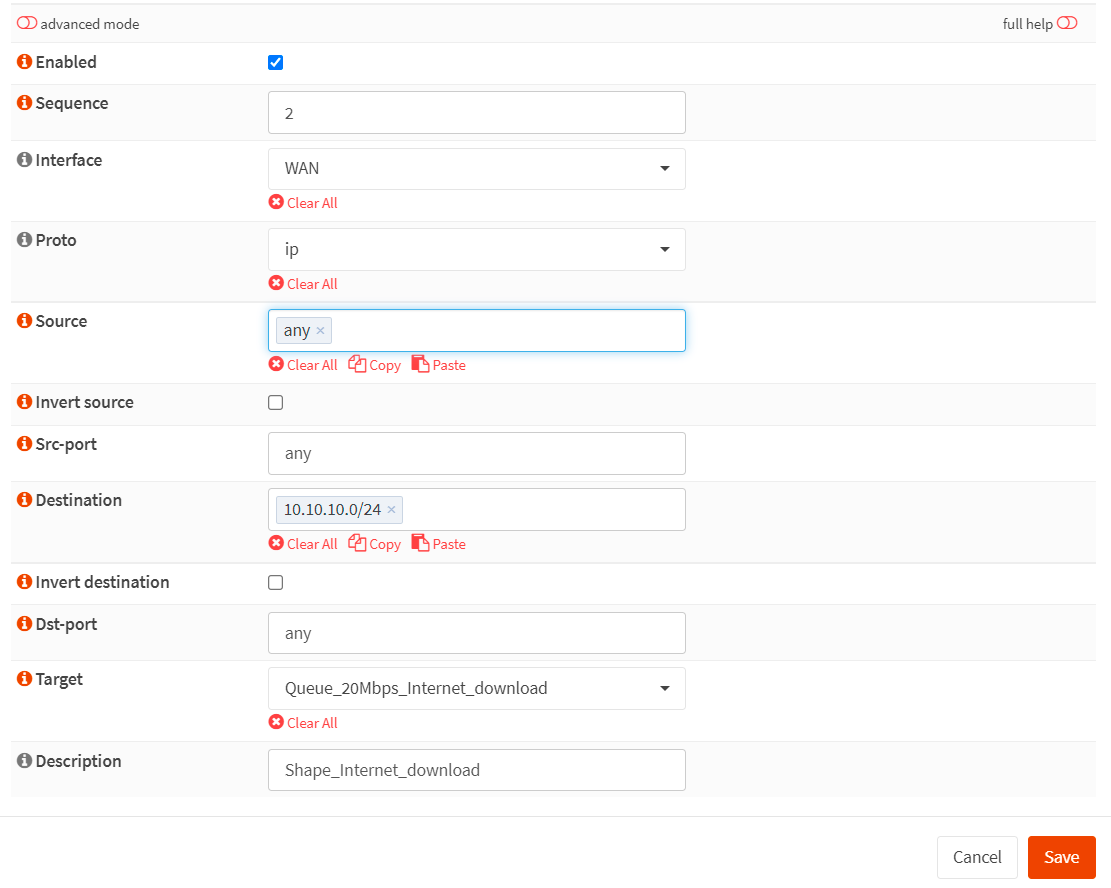
Figure 23. Creating traffic shaper rule for distributing Internet download traffic bandwidth evenly among LAN users in OPNsense
You may view all rules you've created for distributing Internet download traffic bandwidth evenly among LAN users in the Rules pane of the Traffic Shaper.
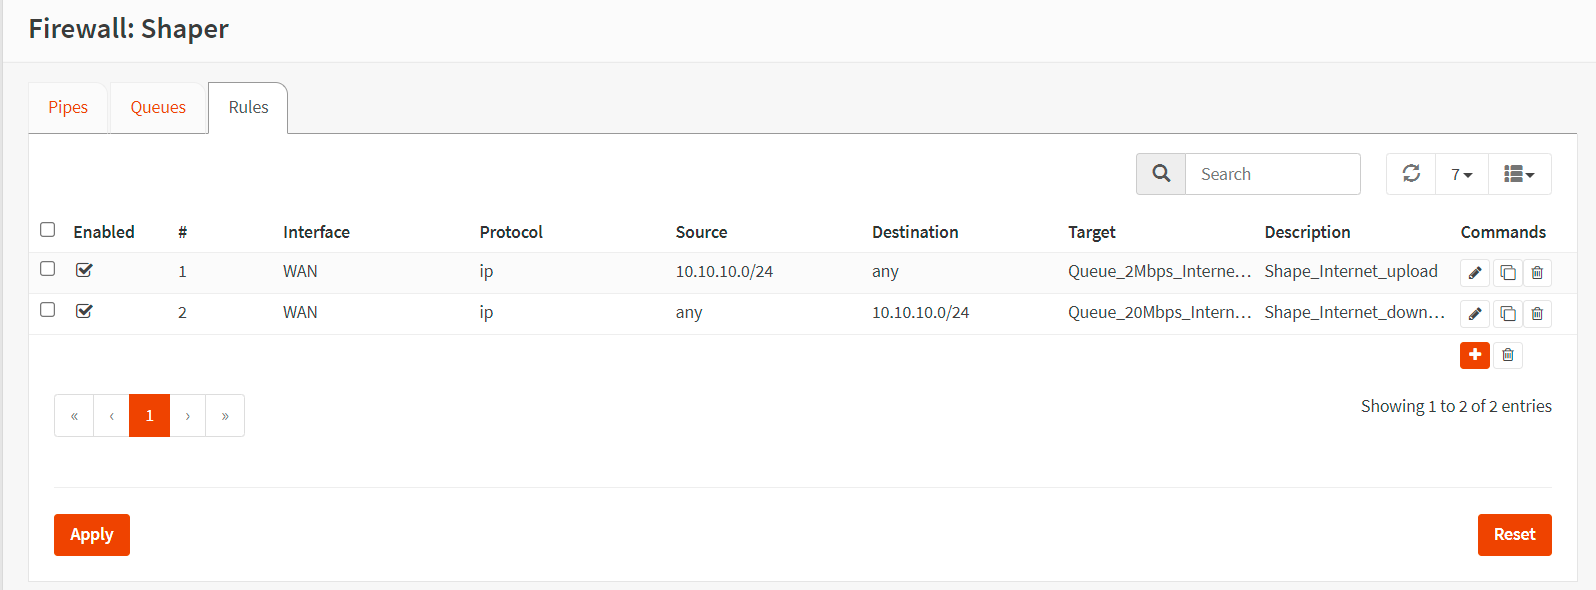
Figure 24. Rules created for distributing Internet download traffic bandwidth evenly among LAN users in OPNsense
- Click on
Applyto apply the changes.
Verifying the Sharing Internet Bandwidth Evenly
To verify the internet bandwidth distribution evenly among LAN users in your OPNsense firewall, you may navigate to the Firewall > Shaper > Status.
If one of the clients uploads or downloads a large file to/from the Internet, you will see dropped packets in the Current Activity of the client IP address similar to in figure 25.
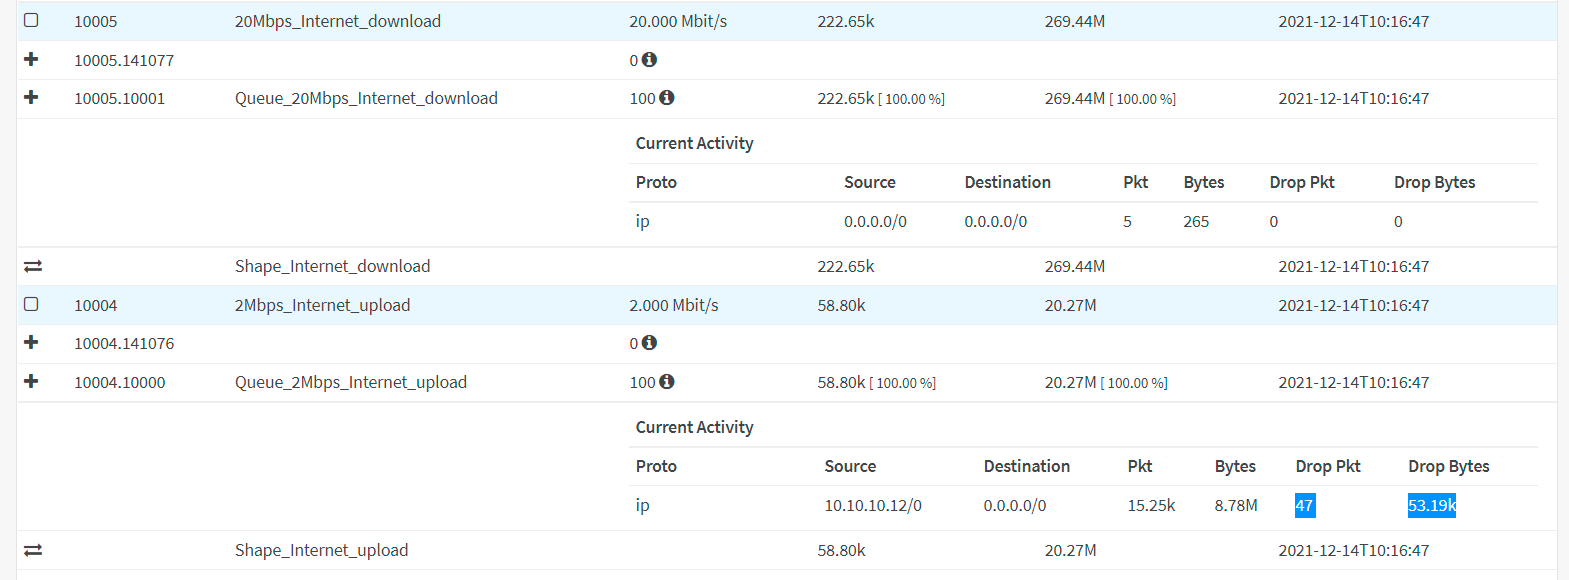
Figure 25. Verifying the internet bandwidth distribution evenly among LAN users in OPNsense
OPNsense traffic shaper also allows you to limit the internet bandwidth usage on your LAN or guest network easily. Then your users can not consume more Internet bandwidth than you have allocated.
How to Prioritize Applications Using Queues
In this scenario, we'll assume that your boss complains about watching remote office cameras. After an investigation, you determined that there is enormous video streaming packet loss on WAN connections between remote offices and HQ offices, and HTTP(S) connections are consuming most of the bandwidth capacity. However, you don't have enough budget to increase the WAN bandwidth. To solve this issue, you have decided to prioritize the applications. Your requirements, in this case, are as follows:
-
WAN connection has
10 MbpsDownload bandwidth. -
Company HQ LAN uses
10.10.10.0/24IP addresses. -
Video cameras use port
TCP/37777for streaming.
Traffic shaper allows us to influence the bandwidth within a pipe by using queues and giving certain applications more bandwidth than others based on a weighted algorithm. In our example, we only take into account download traffic and set the weight parameter for video streaming applications to 9 and HTTP(S) to 1.When all of our bandwidth capacity is used, the video streaming traffic will receive 9x more bandwidth than the HTTP(S) traffic, resulting in 1 Mbps for HTTP(S) and 9 Mbps for video streaming.
| Application | Weight | Minimum Bandwidth |
|---|---|---|
| Video Streaming (port 37777) | 9 | 9 Mbps |
| HTTP (80) / HTTPS (443) | 1 | 1 Mbps |
You can easily prioritize the applications for bandwidth usage by following the next 3 main steps:
-
Create Download Pipes
-
Create Queues
-
Create Traffic Shaping Rules
These 3 steps are briefly explained in the following sections.
1. How to Create Download Pipe
You may add a pipe for Internet download traffic by following the next steps given below.
-
Navigate to
Firewall→Shaper→Pipesin your OPNsense firewall web UI. -
Click the
+in the lower right corner of the form to create a pipe for the download traffic. -
Enable it by clicking the checkbox.
-
Set Bandwidth to
10. -
Set Bandwidth Metric to
Mbit/s -
Leave the Mask as
none. -
Enter a Description such as
10Mbps_download -
Click
Save.
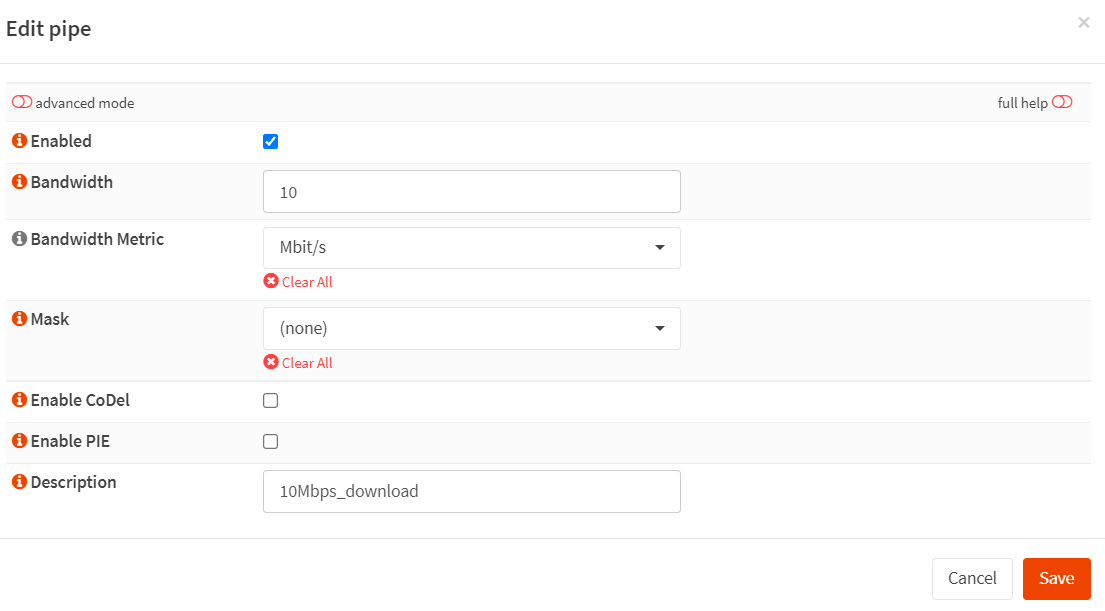
Figure 26. Creating a pipe for 10 Mbps download traffic in OPnsense
2. How to Create Video Streaming and HTTP(S) Queues
You must create the next 2 queues given below:
-
Queue for video streaming traffic with weight
9. -
Queue for HTTP(S) traffic with weight
1.
How to Create a Queue for Video Streaming Traffic
You may add a queue for video streaming traffic by following the next steps given below.
-
Navigate to
Firewall→Shaper→Queuein your OPNsense firewall web UI. -
Click the
+in the lower right corner of the form to create a pipe for the queue video streaming traffic. -
Enable it by clicking the checkbox.
-
Select
10Mbps_downloadfor the pipe. -
Set Weight to
9to prioritize within the pipe. -
Set the Mask to
none. -
Enter a Description such as
Queue_Video_Streaming. -
Click
Save.
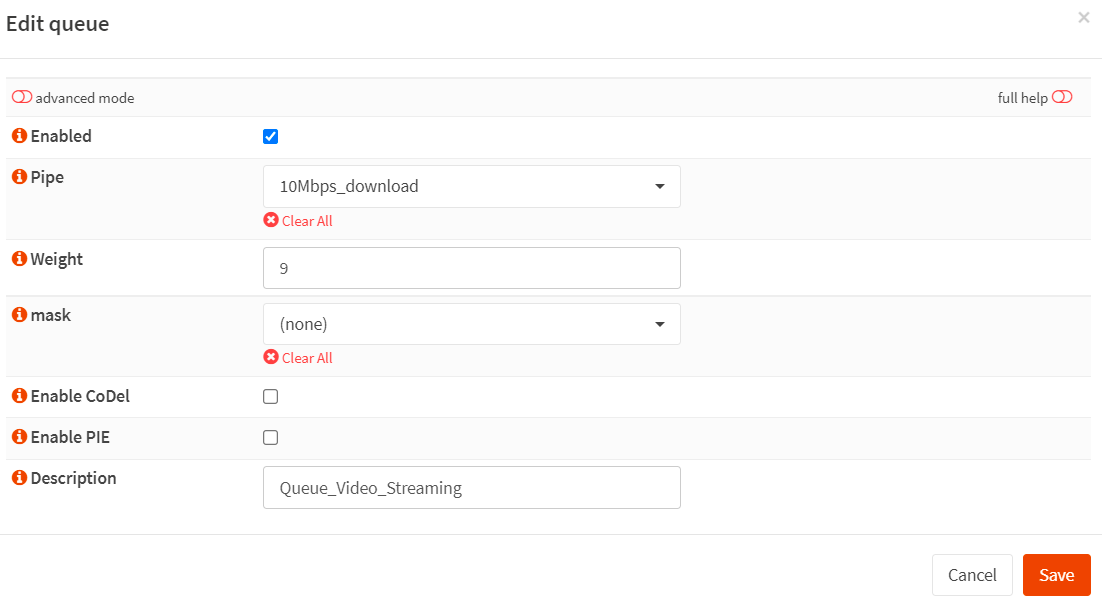
Figure 27. Creating Traffic Shaper Queue for video streaming traffic in OPNsense
How to Create a Queue for HTTP(S) Traffic
You may add a queue for HTTP(S) traffic by following the next steps given below.
-
Navigate to
Firewall→Shaper→Queuein your OPNsense firewall web UI. -
Click the
+in the lower right corner of the form to create a queue for the HTTP(S) traffic. -
Enable it by clicking the checkbox.
-
Select
10Mbps_downloadfor the pipe. -
Set Weight to
1to prioritize within the pipe. -
Set the Mask to
none. -
Enter a Description such as
Queue_HTTP. -
Click
Save.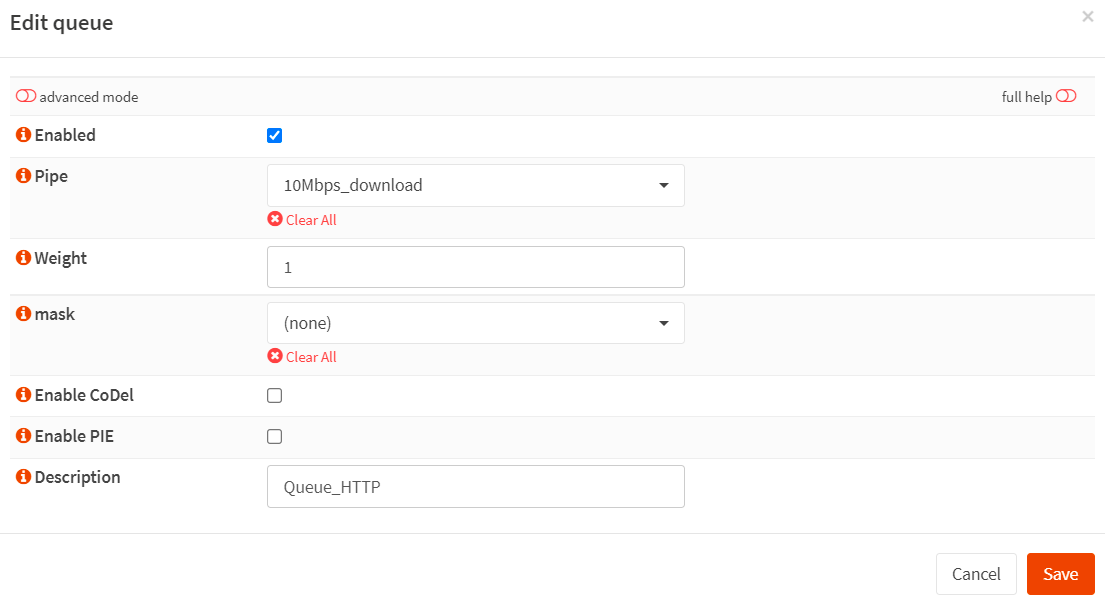
Figure 28. Creating Traffic Shaper Queue for HTTP(S) traffic in OPNsense
You may view all queues you've created for application prioritization in the
Queuespane of the Traffic shaper in your OPNsense firewall.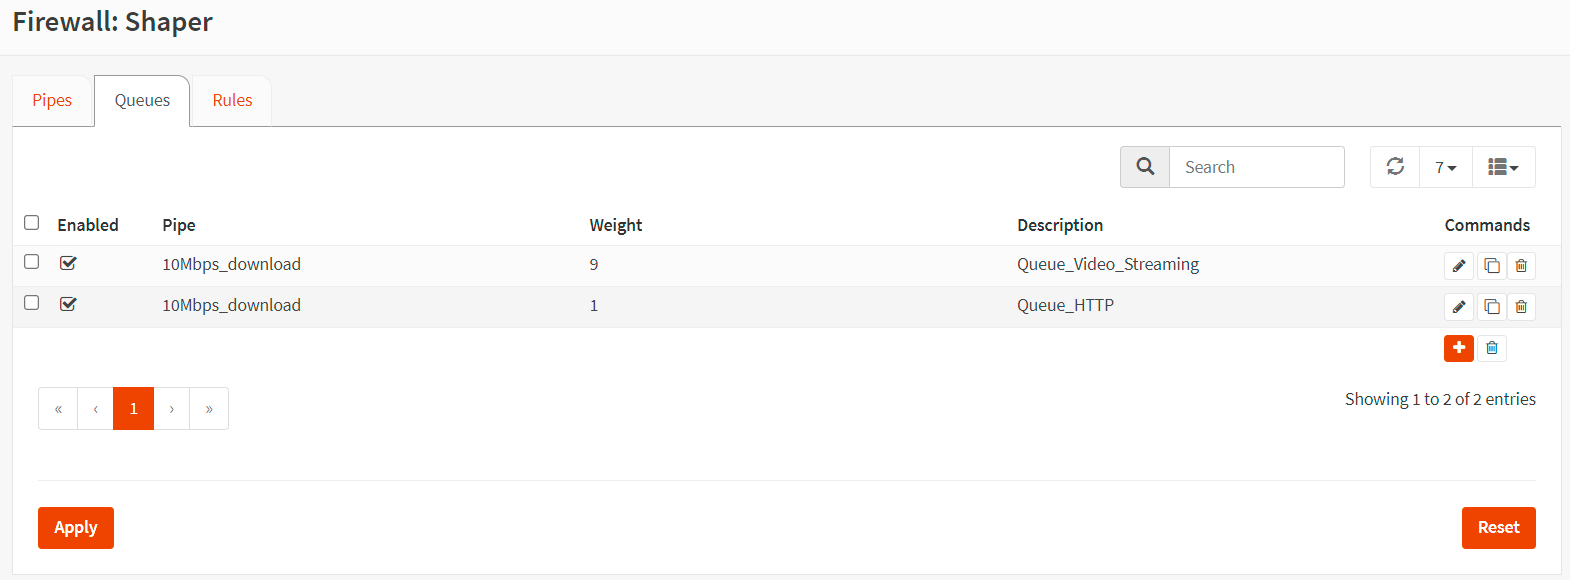
Figure 29. Queues created for application prioritization in OPNsense
-
Click
Applyto apply the changes.
3. How to Create Traffic Shaper Rules
You must create the next 2 traffic shaper rules given below:
-
Rule for video streaming download traffic.
-
Rule for HTTP/WEB download traffic.
-
Rule for HTTP(S)/WEB download traffic
How to Create a Rule for Video Streaming Download Traffic
You can create a traffic shaper rule to prioritize video streaming traffic by following the instructions below.
-
Click on the tab Rules to create the traffic shaper rules.
-
Click the
+icon. -
Set Interface to
WAN. -
Set Proto to
tcp. -
Set Source to
any. -
Set Src-port to
37777. -
Set Destination to
any. -
Set Dst-port to
any. -
Set Target to
Queue_Video_Streaming. -
Set Description
Shape_Video_Streaming. -
Click
Save.
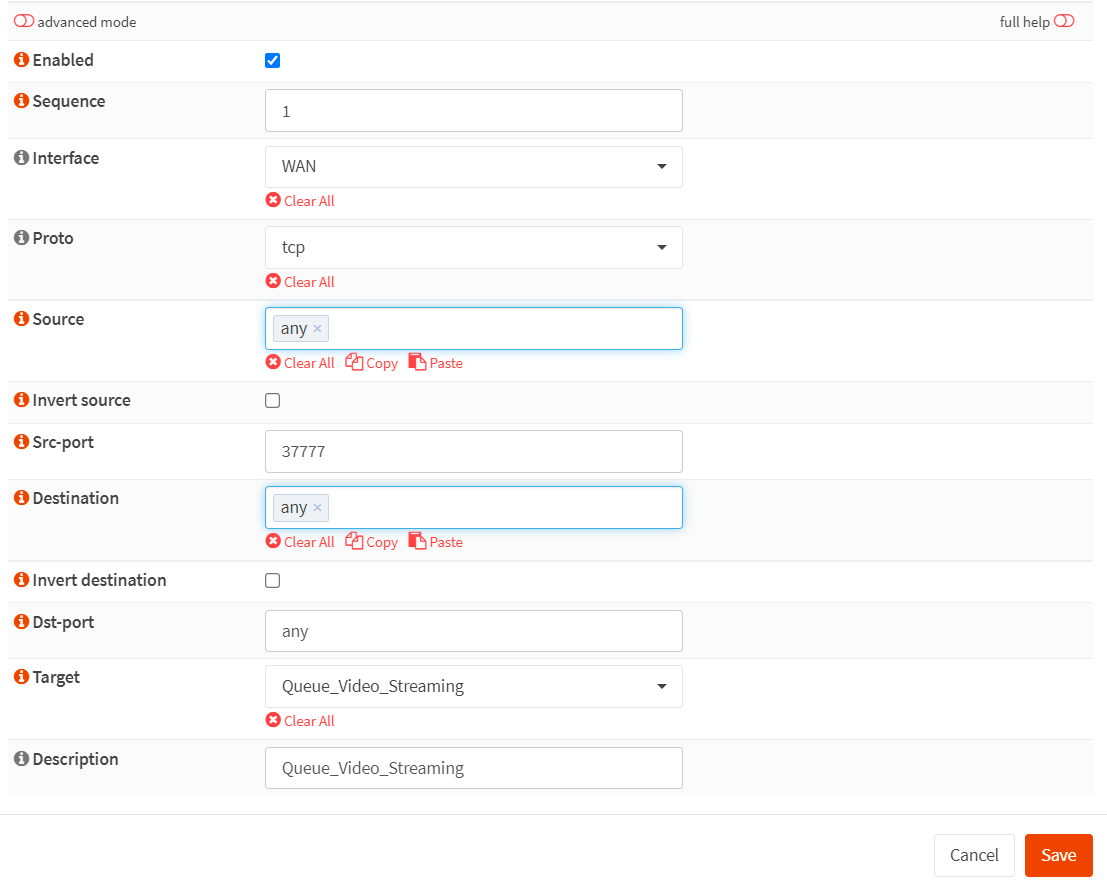
Figure 30. Creating a traffic shaper rule for prioritizing the video streaming traffic in OPNsense
How to Create a Rule for HTTP Traffic
You can create a traffic shaper rule to prioritize HTTP traffic by following the instructions below.
-
Click on the tab Rules to create the traffic shaper rules.
-
Click the
+icon. -
Set Interface to
WAN. -
Set Proto to
ip. -
Set Source to
any. -
Set Src-port to
HTTP. -
Set Destination to
any. -
Set Dst-port to
any. -
Set Target to
Queue_HTTP. -
Set Description
Shape_HTTP. -
Click
Save.
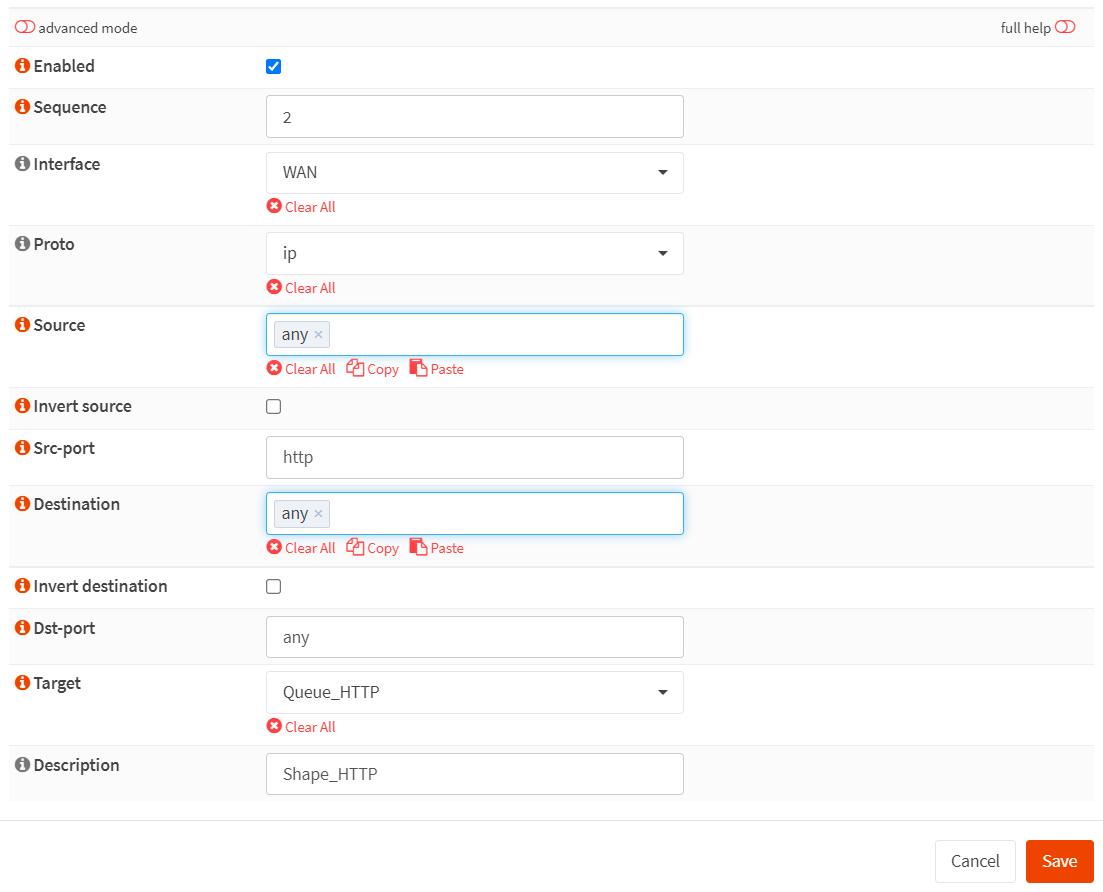
Figure 31. Creating a traffic shaper rule for prioritizing the HTTP traffic in OPNsense
How to Create a Rule for HTTPS Traffic
You can create a traffic shaper rule to prioritize HTTPS traffic by following the instructions below.
-
Click on the tab Rules to create the traffic shaper rules.
-
Click the
+icon. -
Set Interface to
WAN. -
Set Proto to
ip. -
Set Source to
any. -
Set Src-port to
HTTPS. -
Set Destination to
any. -
Set Dst-port to
any. -
Set Target to
Queue_HTTPS. -
Set Description
Shape_HTTPS. -
Click
Save.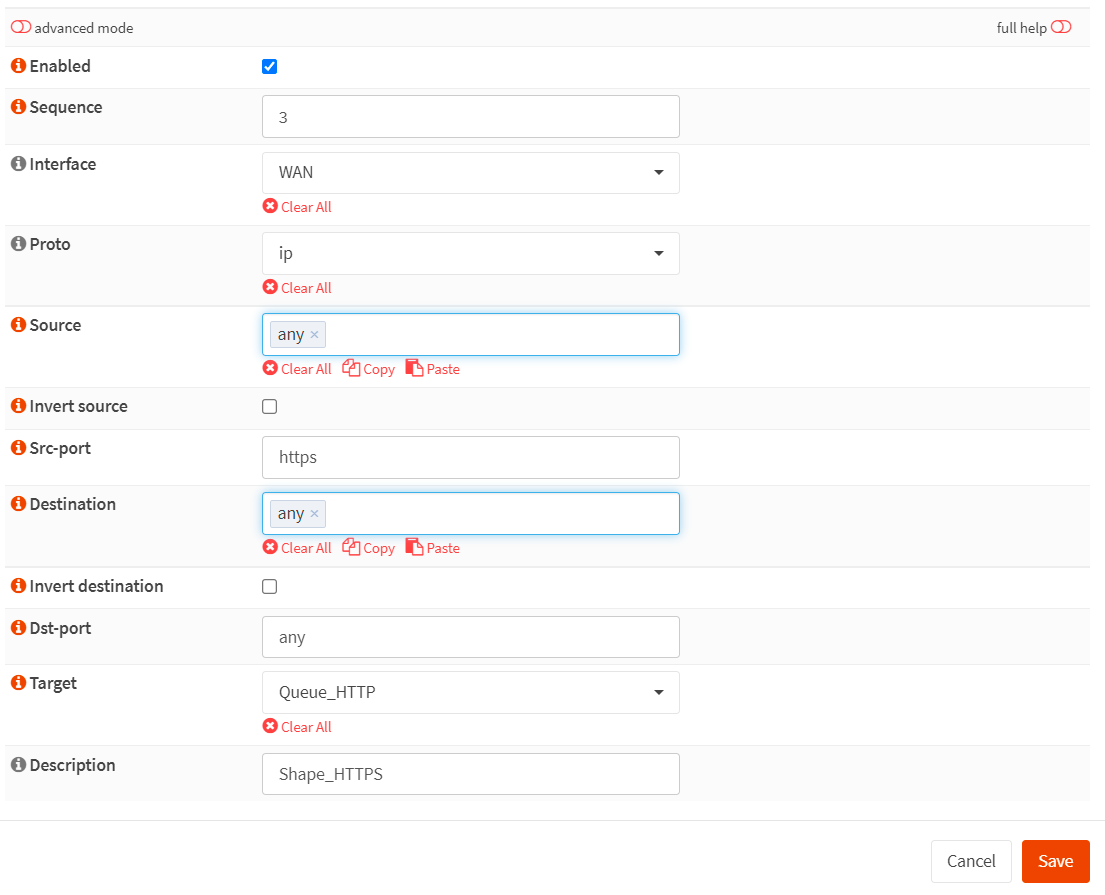
Figure 32. Creating a traffic shaper rule for prioritizing the HTTPS traffic in OPNsense
You may view all rules you've created for application prioritization in the
Rulespane of the Traffic shaper in your OPNsense firewall.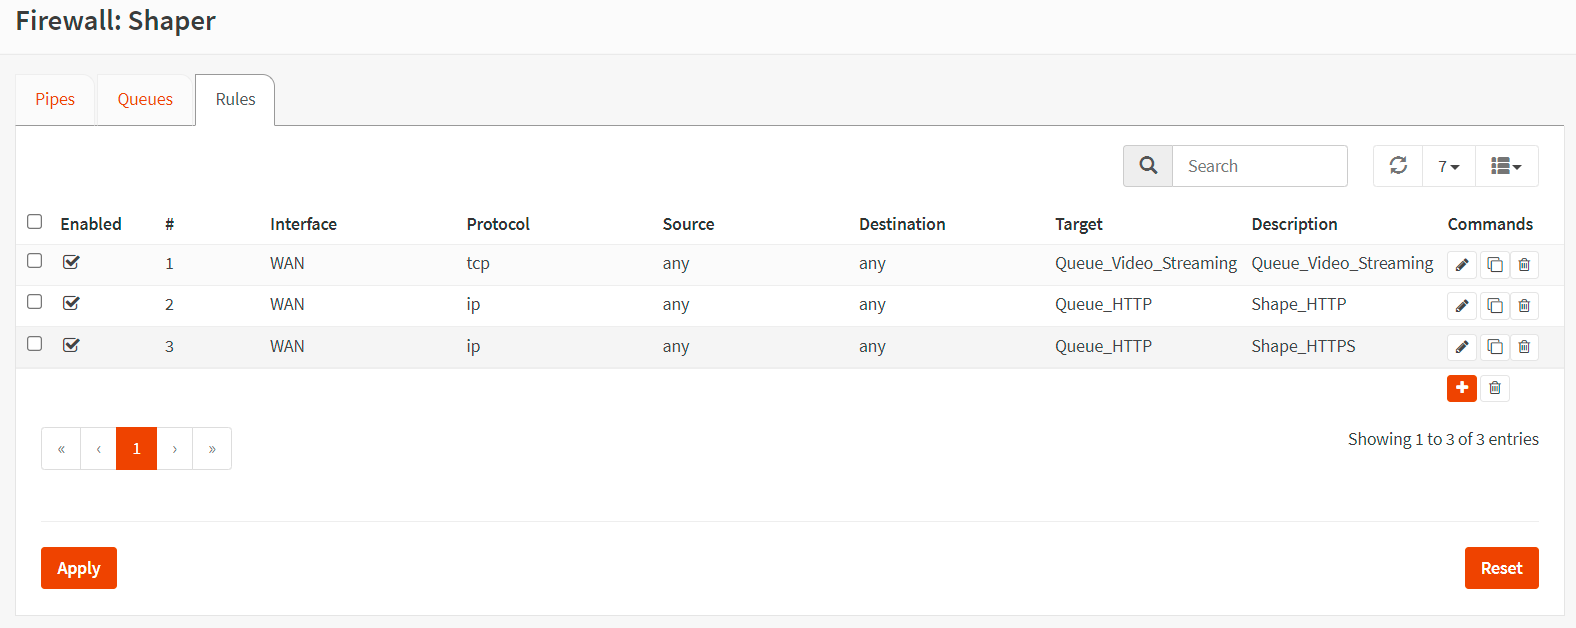
Figure 33. Rules created for application prioritization in OPNsense
-
Click
Applyto activate the settings.
How to Shape Traffic Based on the Network Interface in OPNsense
OPNsense traffic shaper feature allows you to shape traffic differently depending on the direction in which it moves between interfaces. Shape rules can be created based on two interfaces.
In this scenario, we'll assume that you have two interfaces for the local network in your OPNsense. The first one, LAN, is used for employees, and the second one, GUESTNET is used to provide visitors with a free internet connection. You need to limit internet usage for GUESTNET to prevent guests from exhausting the internet connection.
Your requirements, in this case, are as follows:
-
Internet connection has
10 MbpsDownload bandwidth. -
The LAN network will not be limited.
-
Guest Network will be limited to a total of 2 Mbps Download and 1 Mbps Upload.
You can easily prioritize the applications for bandwidth usage by following the next 2 main steps:
-
Create Upload and Download Pipes
-
Create Traffic Shaping Rules
These 2 steps are briefly explained in the following sections.
1. How to Create Upload and Download Pipes
You must create the next 2 pipes given below:
-
Pipe for internet upload traffic in GUESTNET with
1 Mbpsbandwidth. -
Pipe for internet download traffic in GUESTNET with
2 Mbpsbandwidth.
How to Create a Pipe for Internet Upload Traffic in GUESTNET
You may add a pipe for internet upload traffic by following the next steps given below.
-
Navigate to
Firewall→Shaper→Pipesin your OPNsense firewall web UI. -
Click the
+in the lower right corner of the form to create a pipe for the other upload traffic. -
Enable it by clicking the checkbox.
-
Set Bandwidth to
1. -
Set Bandwidth Metric to
Mbit/s -
Leave the Mask as
none. -
Enter a Description such as
1Mbps_GUESTNET_upload -
Click
Save.
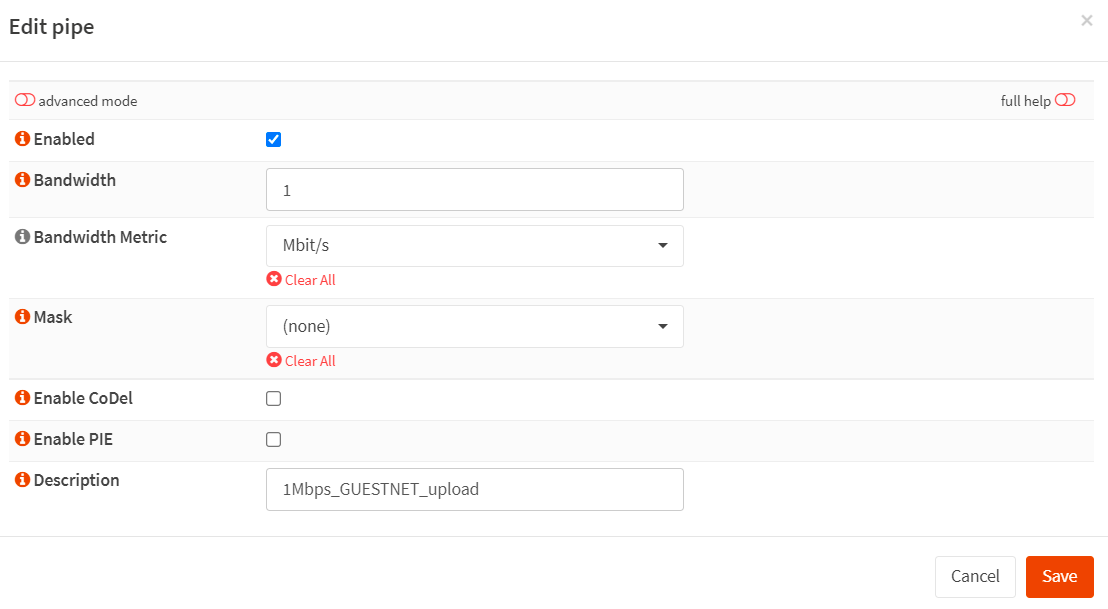
Figure 34. Creating a pipe for 1Mbps GUESTNET upload traffic in OPnsense
How to Create a Pipe for Internet Download Traffic in GUESTNET
You may add a pipe for Internet download traffic by following the next steps given below.
-
Navigate to
Firewall→Shaper→Pipesin your OPNsense firewall web UI. -
Click the
+in the lower right corner of the form to create a pipe for the other upload traffic. -
Enable it by clicking the checkbox.
-
Set Bandwidth to
2. -
Set Bandwidth Metric to
Mbit/s -
Leave the Mask as
none. -
Enter a Description such as
2Mbps_GUESTNET_download -
Click
Save.
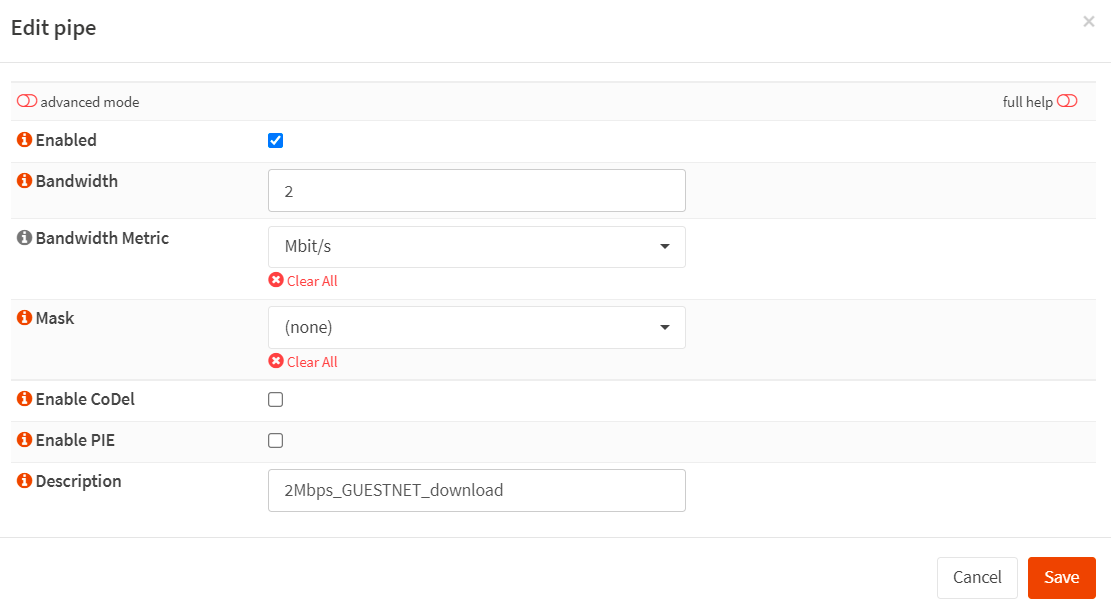
Figure 35. Creating a pipe for 2 Mbps Internet download traffic in OPnsense
2. How to Create Traffic Shaper Rules
You must create the next 2 traffic shaper rules given below:
-
Rule for internet upload traffic in GUESTNET.
-
Rule for internet download traffic in GUESTNET.
How to Create a Rule for Internet Upload Traffic in GUESTNET
You may follow the instructions given below to create a traffic shaper rule for limiting Internet upload traffic bandwidth for GUESTNET users.
-
Click on the tab Rules to create the traffic shaper rules.
-
Click the
+icon. -
Click on the
Advanced Modetoggle button at the top right corner of the window. -
Set Interface to
GUESTNET. -
Set interface2 to
WAN. -
Set Proto to
ip. -
Set Source to
any. -
Set src-port to
any.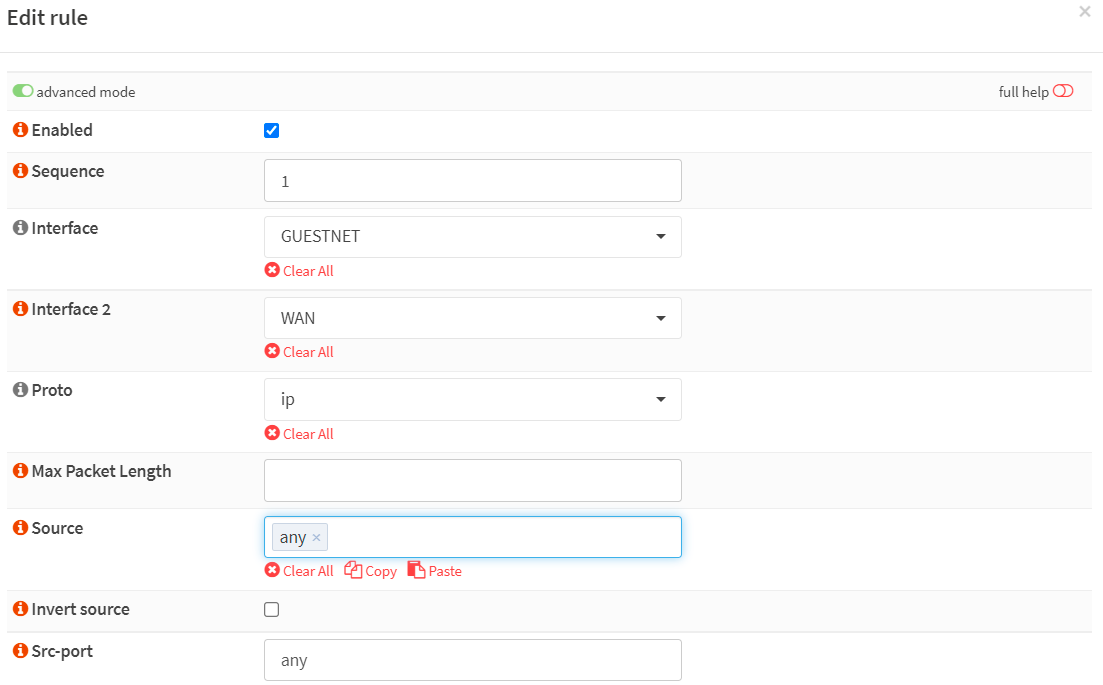
Figure 36. Creating traffic shaper rule for limiting Internet upload traffic bandwidth in GUESTNET-1
-
Set Destination to
any. -
Set Dst-port to
any. -
Set Direction to
out. -
Set Target to
1Mbps_GUESTNET_upload. -
Set Description
Shape_GUESTNET_upload. -
Click
Save.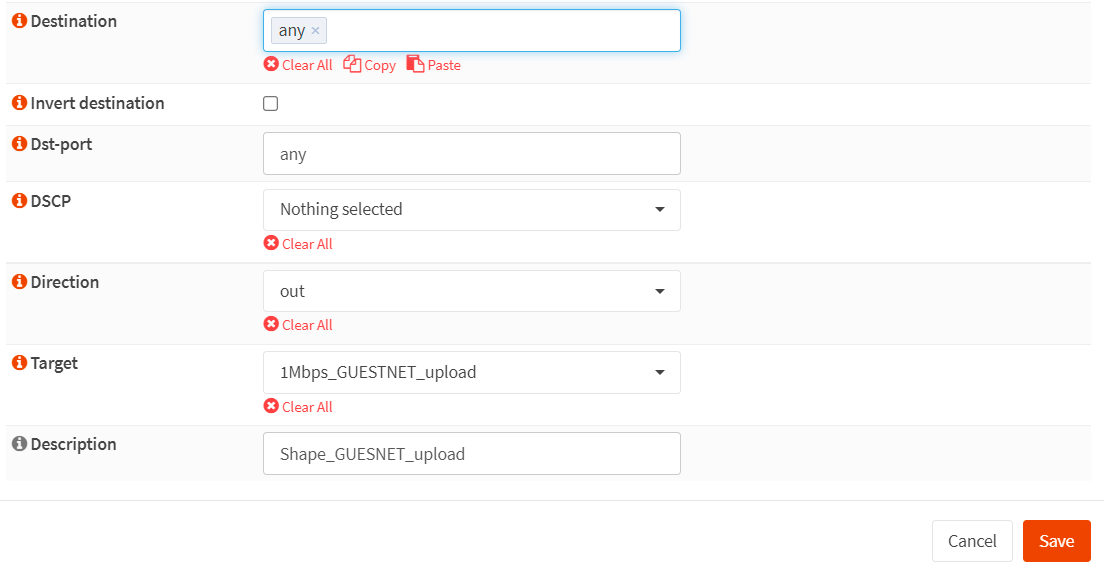
Figure 37. Creating traffic shaper rule for limiting Internet upload traffic bandwidth in GUESTNET-2
How to Create Rule for Internet Download Traffic
You may follow the instructions given below to create a traffic shaper rule for limiting Internet download traffic bandwidth for GUESTNET users.
-
Click on the tab Rules to create the traffic shaper rules.
-
Click the
+icon. -
Click on the
Advanced Modetoggle button at the top right corner of the window. -
Set Interface to
WAN. -
Set Interface2 to
GUESTNET. -
Set Proto to
ip. -
Set Source to
any. -
Set Src-port to
any.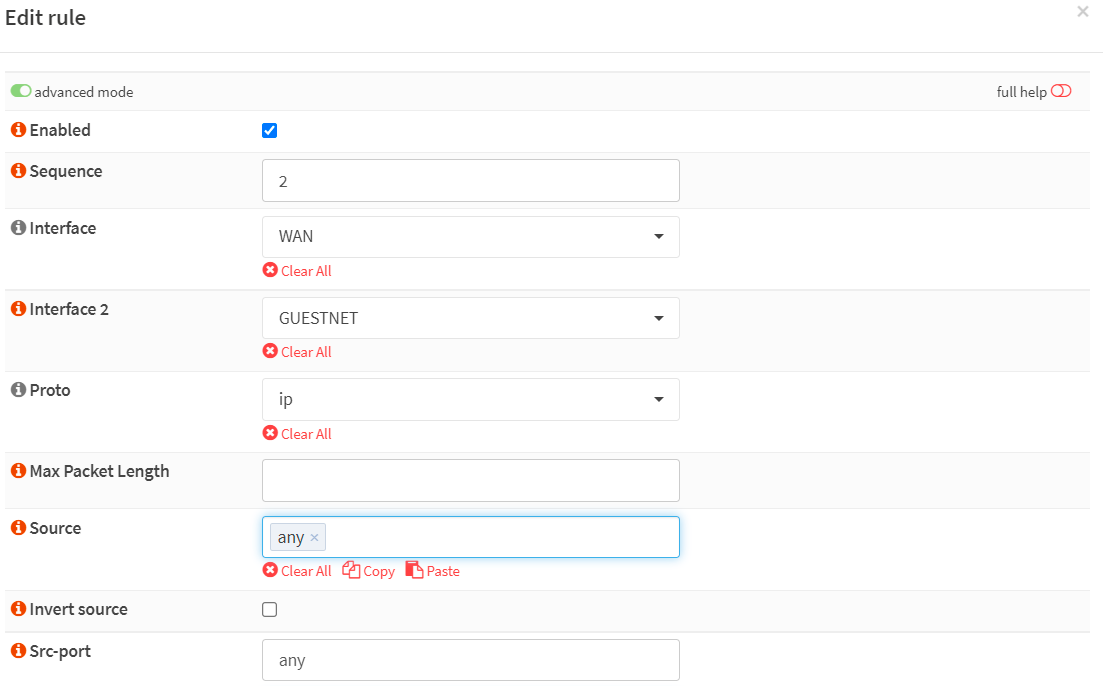
Figure 38. Creating traffic shaper rule for limiting Internet download traffic bandwidth in GUESTNET-1
-
Set Destination to
any. -
Set Dst-port to
any. -
Set Direction to
in. -
Set Target to
2Mbps_GUESTNET_download. -
Set Description
Shape_GUESTNET_download. -
Click
Save.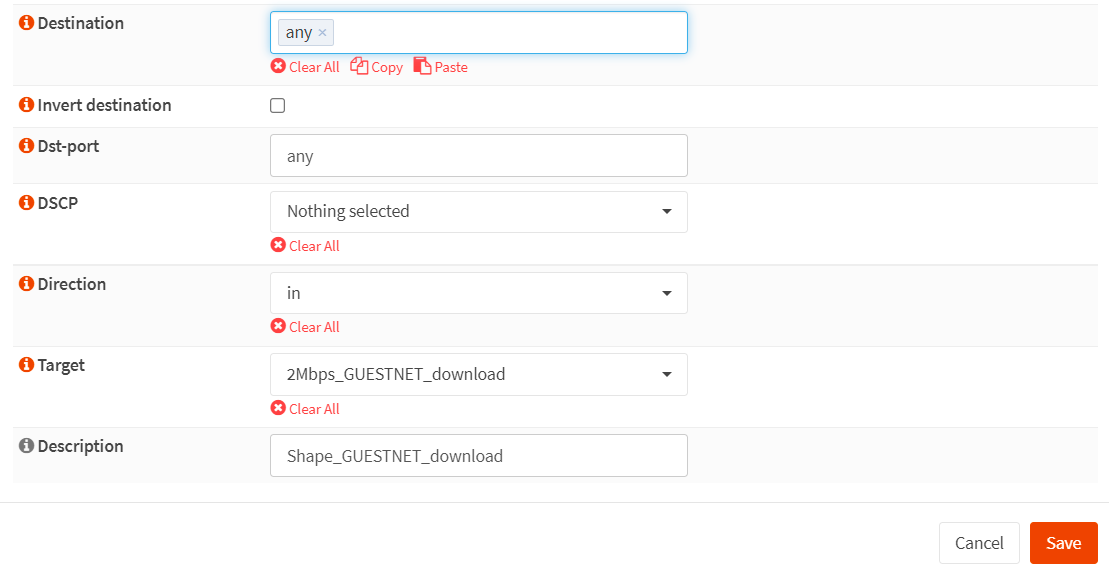
Figure 39. *Creating traffic shaper rule for limiting Internet download traffic bandwidth in GUESTNET-2
You may view all rules you've created for distributing Internet download traffic bandwidth evenly among LAN users in the
Rulespane of theTraffic Shaper.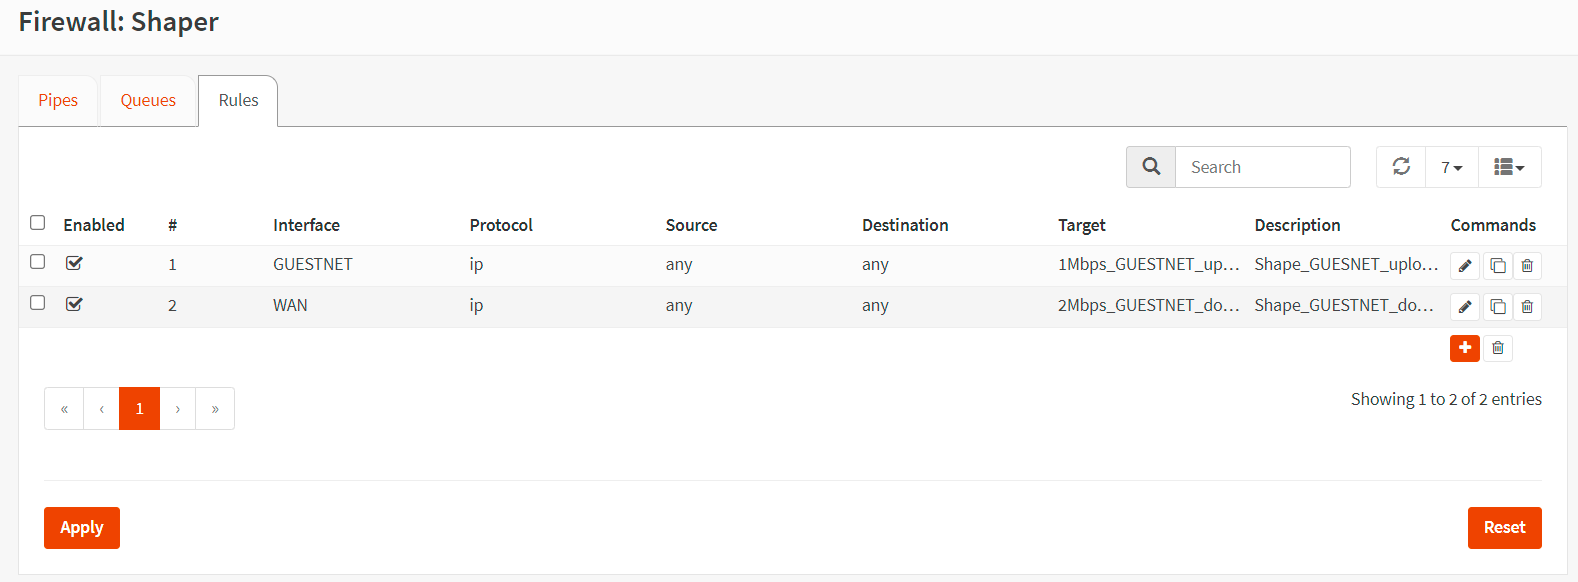
Figure 40. Rules created for limiting Internet usage for GUESTNET users in OPNsense
-
Click on
Applyto apply the changes.
Verifying the Limiting Internet Bandwidth for GUESTNET
To verify the internet bandwidth limitation for GUESTNET users in your OPNsense firewall, you may navigate to the Firewall > Shaper > Status.
If one of the clients exhausts the Internet bandwidth limits you defined, you will see dropped packets in the Current Activity of the client IP address similar to in figure 41.
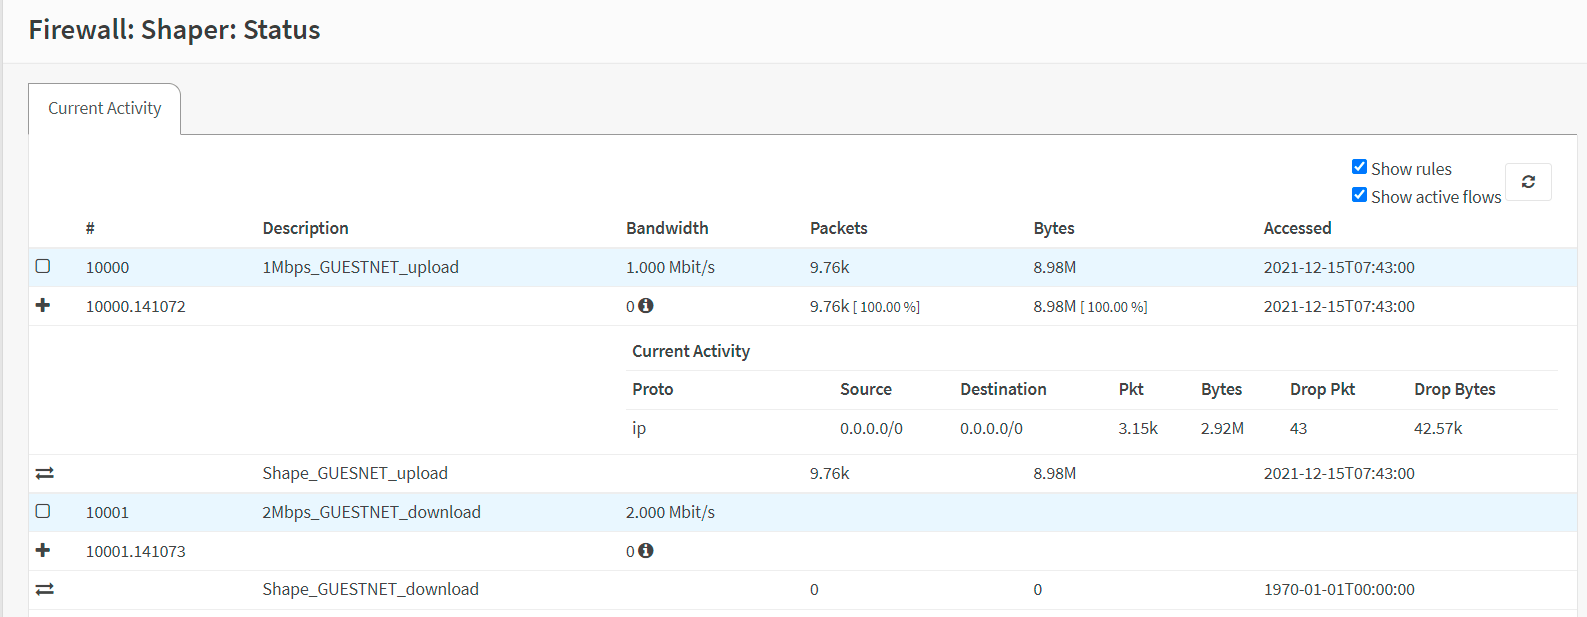
Figure 41. Verifying the internet bandwidth limitation for GUESTNET users in OPNsense
