How to Setup Unbound DNS on OPNsense
Unbound DNS is a validating, recursive, and caching DNS resolver designed for high performance and security. Unbound DNS is open-source software, under a BSD license, created by NLnet Labs, extensively used in various platforms to resolve domain names into IP addresses. System administrators, Internet service providers, and users concerned about privacy often use Unbound. It is compatible with OPNsense, pfSense, FreeBSD, Linux, macOS, and other Unix-like operating systems.
In this tutorial, we explain the main features of Unbound DNS and how you can configure Unbound DNS on your OPNsense firewall.
What are the Features of Unbound DNS?
Unbound supports DNSSEC (Domain Name System Security Extensions), which guarantees the authenticity and integrity of DNS data, safeguarding users against threats, such as DNS spoofing or cache poisoning. It may be set to execute recursive searches and cache DNS results to enhance efficiency and minimize latency for future requests.
Unbound DNS has the following features:
- Efficient and lightweight: Engineered for low resource use.
- Configurable: Accommodates an extensive array of configuration options for sophisticated installations.
- DNS-over-TLS/HTTPS: Offers encrypted DNS queries to improve privacy.
- Support for IPv6: Completely compatible with contemporary internet protocols.
- Access control: Facilitates the setup of client permissions for querying the server.

Configuring Unbound DNS on OPNsense
As of version 17.7, OPNsense uses Unbound as its DNS service by default. Although Dnsmasq, which is a lightweight DNS forwarder, is shipped on the OPNsense platform, Unbound DNS is the default enabled resolver.
You may easily configure Unbound DNS by navigating to Services > Unbound DNS on the OPNsense web UI.
General Settings
You may access the general settings of the Unbound service by clicking on the General submenu under Unbound DNS on the left sidebar. Unbound DNS General settings page has the following options.
-
Enable Unbound: By default, Unbound DNS resolver is enable. You may check/uncheck this option to enable/disable the service.
-
Listen Port: The TCP/UDP port used for responding to DNS queries. By default, Unbound listens port
53. -
Network Interfaces: Interface IP addresses are employed to address queries from clients Both IPv4 and IPv6 IP addresses are utilized when an interface contains both. Queries to interface IPs that are not specified below are discarded. The default behavior is to respond to queries on all available IPv4 and IPv6 addresses.
-
Enable DNSSEC Support: You may click the checkbox to validate DNS replies and cache DNSSEC data.
-
Enable DNS64 Support: You may enable this option so that IPv6-only clients can reach IPv4-only servers. Unbound will synthesize AAAA records from A records if no real AAAA records are present
-
DNS64 Prefix: The IPv6 prefix utilized by the NAT64 must correspond with the DNS64 prefix.
-
Enable AAAA-only mode: You may click the checkbox to enable this option so that Unbound will remove all A records from the answer section of all responses.
-
Register ISC Unbound DNS4 Leases: If this option is enabled, machines that specify their hostname when requesting a Unbound DNS lease will be registered in Unbound to facilitate the resolution of their names. The client-hostname in the
dhcpd.leasesfile is the source of this data. Additionally, this may be examined through the Leases page. -
Unbound DNS Domain Override: In the event that the domain name specified in the aforementioned registrations is not the same as the one configured on this firewall, you may specify a different one in this field.
-
Register Unbound DNS Static Mappings: Register static dhcpd entries to enable clients to resolve them. Supported on both IPv4 and IPv6.
-
Do not register IPv6 Link-Local addresses: Do not register link-local addresses for IPv6. This will inhibit the retrieval of inaccessible addresses when multiple listening interfaces are set.
-
Do not register system A/AAAA records: If this option is enabled, no A/AAAA records will be created for the specified listening interfaces. If desired, you may manually include them into Unbound DNS: Overrides. Utilize this to regulate the mapping of interface IP addresses to the system host/domain name and to limit the information disclosed in responses to inquiries on the system host/domain name.
-
TXT Comment Support: If this option is enabled, all descriptions linked to Host entries and Unbound DNS Static mappings will generate a matching TXT record.
-
Flush DNS Cache during reload: When this option is enabled, the DNS cache will be purged with every daemon reload. This is the normal behavior for Unbound, however it may be undesirable when several dynamic interfaces need frequent reloading.
-
Local Zone Type: The local zone type used for the system domain. Type descriptions may be found under "local-zone:" in the unbound.conf(5) documentation page. The default setting is 'transparent'.
-
Outgoing Network Interfaces: Employ several network interfaces that Unbound will use to transmit queries to authoritative servers and get their responses. All interfaces are used by default. Be aware that the configuration of explicit outgoing interfaces is effective just when they are statically assigned.
-
WPAD Records: If this option is enabled, CNAME records for the WPAD host of all specified domains will be automatically generated, along with overrides for TXT records for those domains. This facilitates automated proxy settings inside your network; however, it should not be enabled if you are not using WPAD or if you prefer manual configuration.
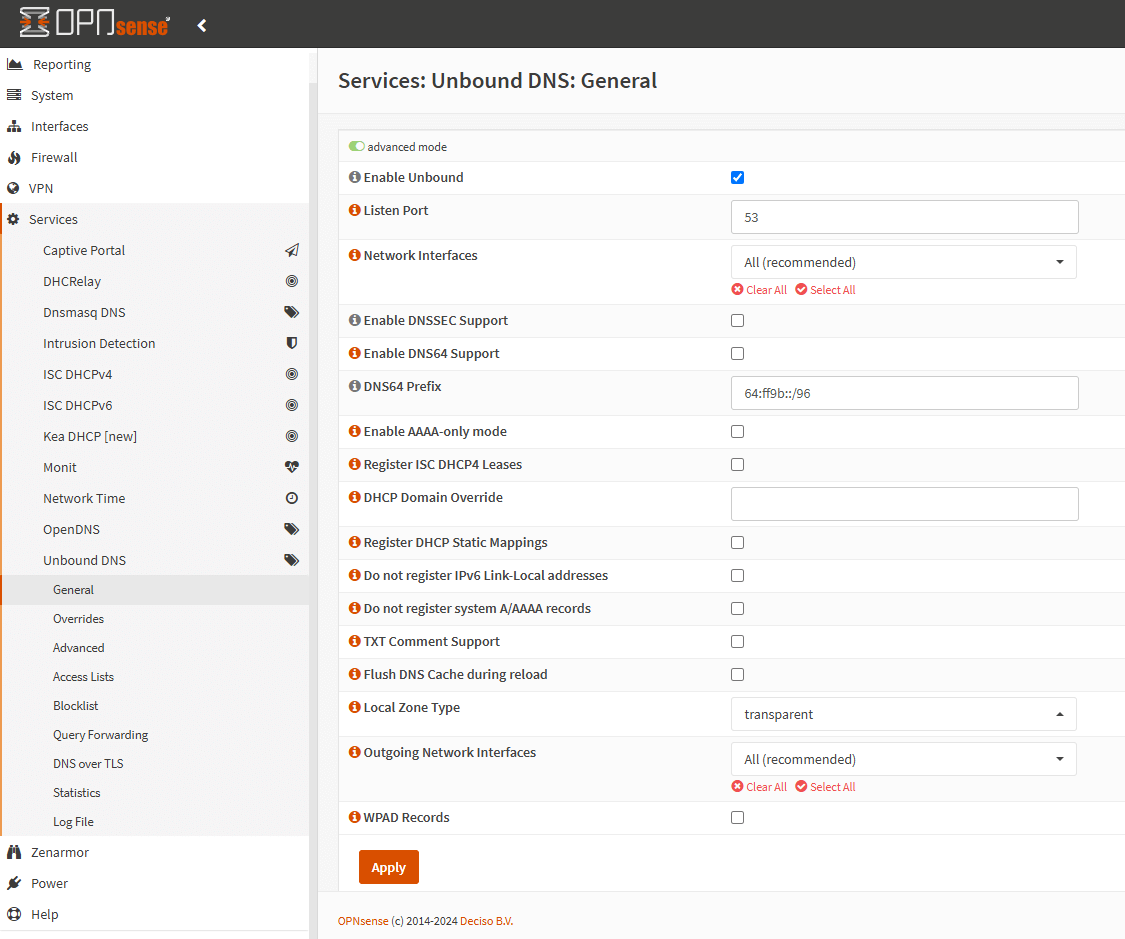
Figure 1. General Settings
After updating the general settings of Unbound DNS, you should click on the Apply button to activate new settings.
Override Settings
By navigating to the Services > Unbound DNS > Overrides section on the OPNsense web UI, you may establish distinct host definition entries and indicate whether requests for a certain domain should be sent to a designated server.
Host overrides might modify DNS outcomes from customer queries or include bespoke DNS records. PTR records are created internally to facilitate reverse DNS lookups. These are produced in the following manner:
-
If the System A/AAAA records option in General settings is deselected, a PTR record is generated for the main interface.
-
Every host override item that lacks a wildcard for a host is allocated a PTR record.
-
When a host override item contains a wildcard for a host, the first declared alias is allocated a PTR record.
-
All other aliases lack a PTR record.
Figure 2. Override Settings
How to Configure Unbound Override?
Entries in this section override individual outcomes from the forwarders. Utilize them for modifying DNS outcomes or for including bespoke DNS records. Be aware that all resource record types (e.g., A, AAAA, MX, etc.) for the provided host below are being overwritten.
DNS overrides are advantageous for a split-horizon DNS setup. It may be preferable for clients inside your network to use the local IP address of a publicly hosted service instead of your external IP address, particularly when using a DNS provider like Quad9, Google DNS, or Cloudflare, since local services would be inaccessible during an Internet outage. Furthermore, throughput will diminish and latency will increase due to routing via DNS provider and returning to your network.
You may easily define an override on Unbound DNS by following the next steps.
-
Navigate to the Services > Unbound DNS > Overrides section on the OPNsense web UI.
-
Click on the Add button with
+icon at the right side of the Host Overrides pane.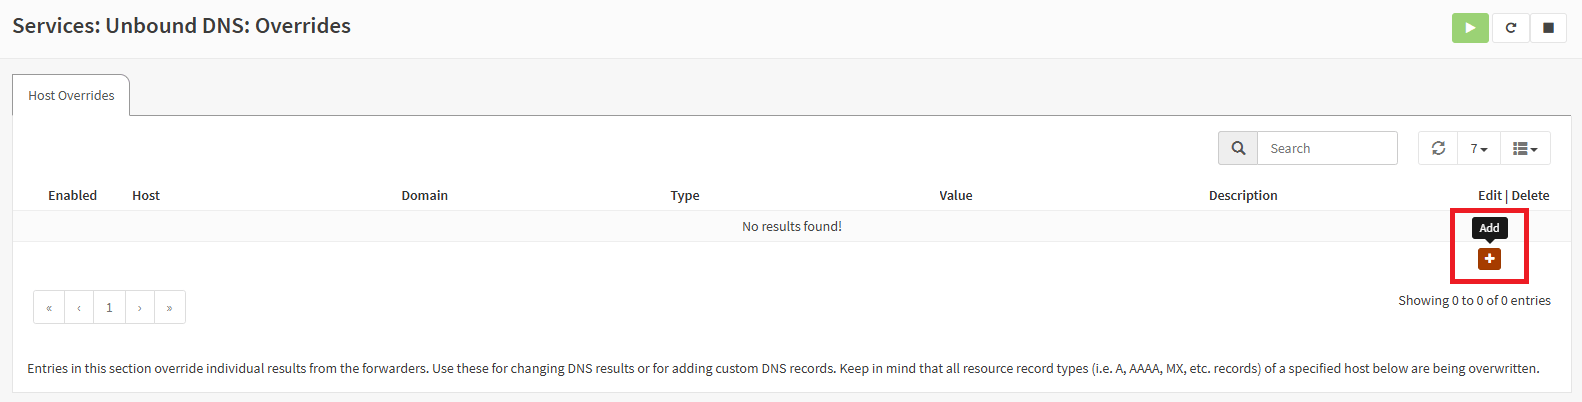
Figure 3. Host Overrides
-
Ensure that Enabled option is checked.
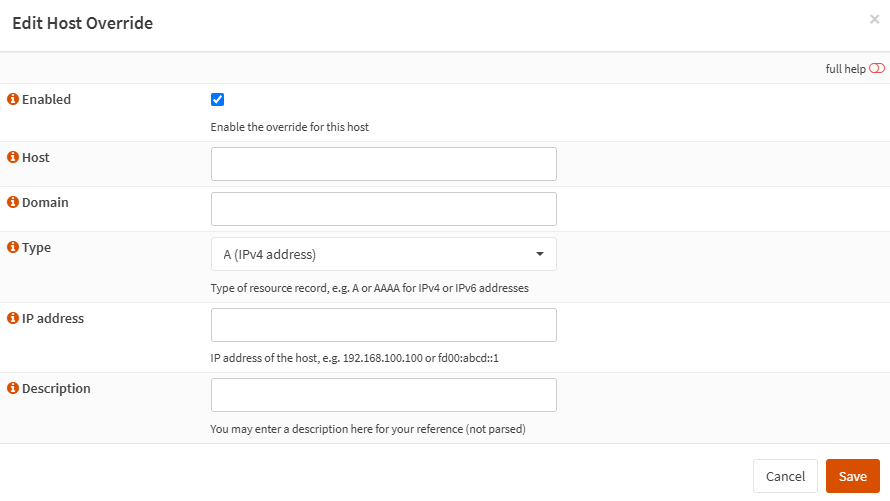
Figure 4. Edit Host Override
-
Type the name of the Host, without the domain part. You may use "*" to create a wildcard entry.
-
Type the Domain of the host, for example
zenarmor.com. -
Select the Type of resource record. Available options are
A for IPv4 address,AAAA or IPv6 address, andMX for mail server.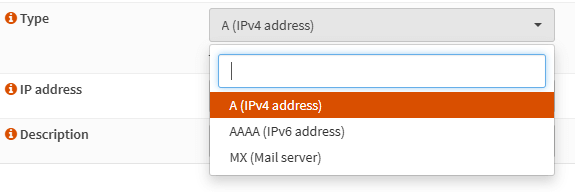
Figure 5. Selecting Override Type
-
Type the IP address of the host.
-
You may enter a Description for your reference.
-
Click Save button.
-
You may view the added host overrides in the Host Overrides pane.
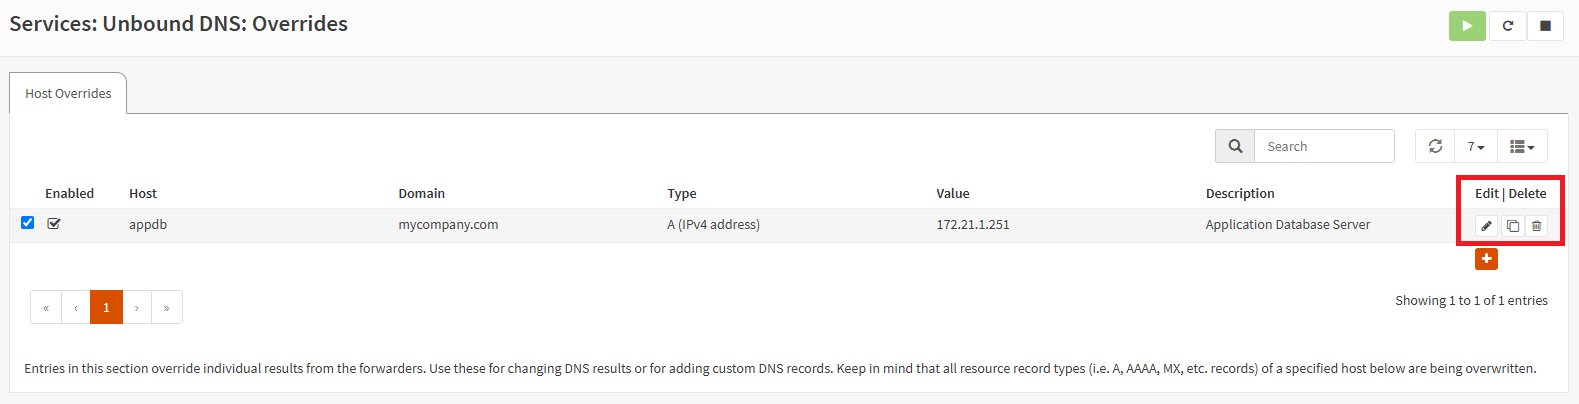
Figure 6. Viewing Host Overrides
-
You can easily edit a host override by clicking on Edit button with a pen icon at the end of the row.
-
You may remove a host override by clicking on Delete button with a trash icon at the end of the row.
Defining Aliases
Alternative names for a host may be generated. For instance, when configuring a web server with several virtual hosts, you establish a Host override item that includes the server's IP address and name, along with an alias for each virtual host on the server.
To define an alias for a host override, you may follow the next steps.
-
Navigate to the Services > Unbound DNS > Overrides section on the OPNsense web UI.
-
Click on the Add button with
+icon at the right side of the Aliases pane.
Figure 7. Host Override Aliases
-
Ensure that Enabled option is checked.
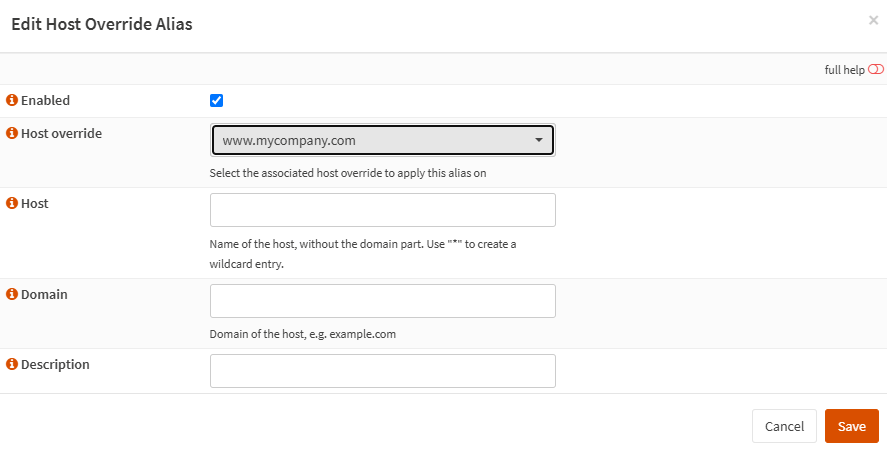
Figure 8. Edit Host Override Alias
-
Select the associated Host override to apply this alias.
-
Type the name of the Host, without the domain part. Use "*" to create a wildcard entry.
-
Type the Domain of the host, for example,
zenarmor.com. -
You may enter a Description for your reference.
-
Click Save button.
-
You may view the added host overrides in the Aliases pane. Select the host from the top list in the Host Overrides pane to see the allocated aliases in the bottom list.
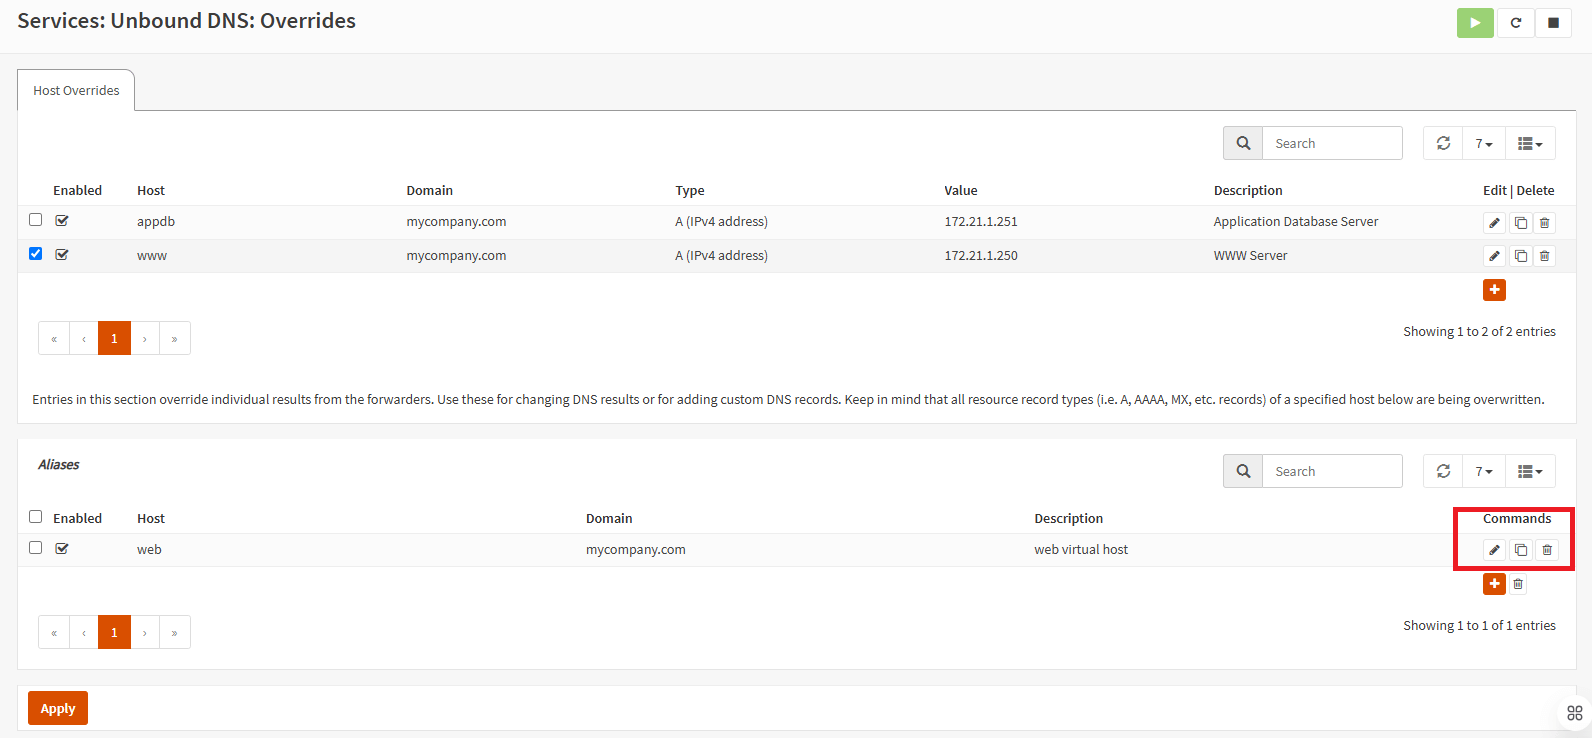
Figure 9. Viewing Host Override Aliases
-
You can easily edit an alias by clicking on Edit button with a pen icon in the Commands column.
-
You may remove an alias by clicking on Delete button with a trash icon in the Commands column.
Advanced Settings
While the default configurations are often enough for most installations, some instances need further adjustments or the implementation of special options. Certain parameters are activated and assigned a default value by Unbound.
You may access advanced Unbound settings by navigating to the Services > Unbound DNS > Advanced section on the OPNsense web UI. Available advanced Unbound options are listed under 4 categories.
-
General
-
Serve Expired
-
Logging
-
Cache
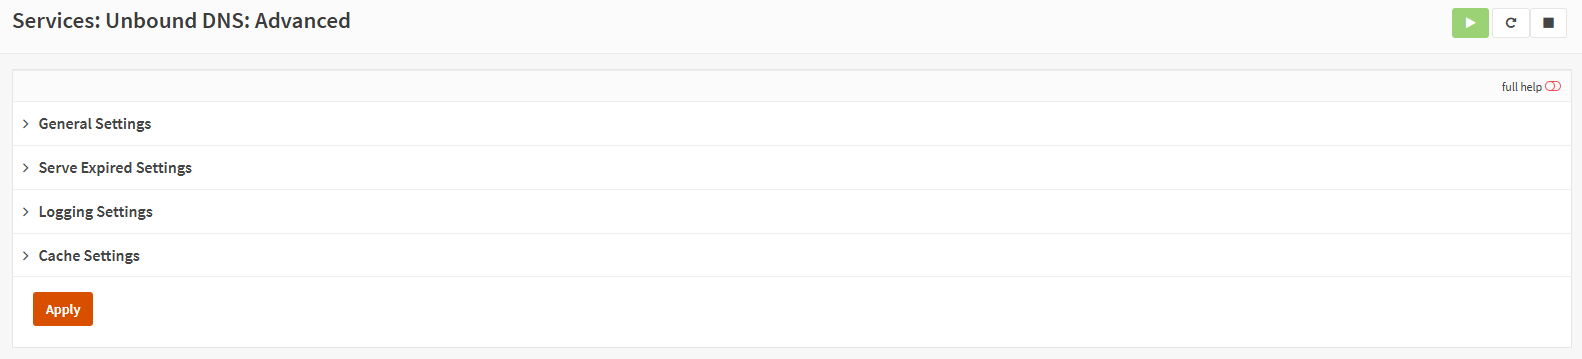
*Figure 10. Advanced Settings
General Settings
The Advanced General Settings page has the following options.
-
Hide Identity: When activated, searches for
id.serverandhostname.bindare denied. -
Hide Version: If activated, searches for
version.serverandversion.bindare denied. -
Prefetch DNS Key Support: DNSKEYs are retrieved sooner in the validation procedure upon encountering a Delegation Signer. This reduces request latency but slightly increases CPU use.
-
Harden DNSSEC Data: DNSSEC data is essential for trust-anchored zones. In the absence of such data, the zone is rendered invalid. If this is deactivated and no DNSSEC data is obtained, the zone becomes insecure.
-
Aggressive NSEC: Enable the aggressive implementation of the DNSSEC-Validated cache in accordance with RFC8198. Reduces the query rate to targets but may result in misleading negative results if there are mistakes in the zone configuration.
-
Strict QNAME Minimisation: Transmit the least amount of information to upstream servers to augment privacy. Avoid reverting to transmitting the whole QNAME to possibly malfunctioning nameservers. Numerous domains will remain unresolved when this option is activated. Utilize only if you possess the requisite knowledge.
-
Outgoing TCP Buffers: The quantity of outgoing TCP buffers to assign for each thread. If 0 is chosen, no TCP requests to authoritative servers will be executed.
-
Incoming TCP Buffers: The number of incoming TCP buffers designated for allocation per thread. If 0 is chosen, no TCP requests from clients will be permitted.
-
Number of queries per thread: The number of queries that each thread will concurrently handle. If more queries need servicing and no questions can be displaced (see to "Jostle Timeout"), then these requests will be discarded. This compels the client to retransmit after a timeout, giving the server the opportunity to process the ongoing requests.
-
Outgoing Range: The number of ports to be opened. A thread may open this number of file descriptors. Greater numerical values need more resources from the operating system. A very big number is optimal for performance. Typically, the quantity of inquiries per thread is doubled.
-
Jostle Timeout: This timeout is used when the server is under significant load. Configured to a setting that typically yields a single round-trip to the authoritative servers. In the event of excessive requests, 50% are permitted to execute fully, while the remaining 50% are substituted with fresh incoming queries if they have beyond their allocated time. This safeguards against denial of service caused by protracted queries or excessive query rates.
-
Discard Timeout: The duration in milliseconds after which recursive requests are discarded. This is intended to prevent the accumulation of many responses. If 'Serve Expired answers' is on, this field must be configured to exceed 'Client Expired Response Timeout'; otherwise, these delayed answers will fail to refresh the cache. A value of 0 deactivates it. Default 1900. This configuration may elevate the "request queue exceeded" metric.
-
Private Domains: List of domains to mark as private. These domains and all its subdomains are allowed to contain private addresses.
-
Rebind protection networks: These are addresses inside your private network and are prohibited from being retrieved for public internet names. Any instances of such addresses are eliminated from DNS responses. Furthermore, the DNSSEC validator may designate the responses as fraudulent. This safeguards against DNS Rebinding attacks. This is only relevant when the DNS rebind check is activated in System > Settings > Administration.
-
Insecure Domains: List of domains to mark as insecure. DNSSEC chain of trust is ignored towards the domain name.
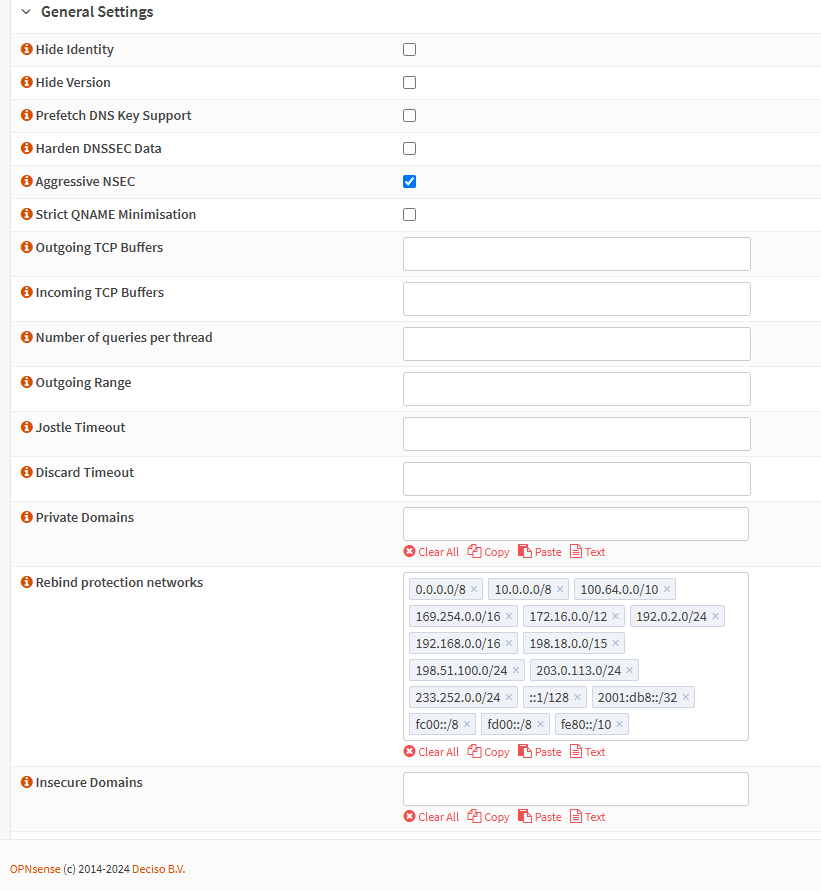
Figure 11. Advanced General Settings
Serve Expired Settings
The Advanced Serve Expired Settings page includes Serve Expired Responses option. Serve expired responses from the cache with a TTL of 0 without waiting for the actual resolution to finish.The TTL may be adjusted using the "Expired Record Reply TTL value".
Logging Settings
The Advanced Logging Settings page has the following options.
-
Extended Statistics: When activated, comprehensive statistics are logged to syslog.
-
Log Queries: If activated, logs one line each query, including the date, IP address, name, type, and class. Be aware that printing these lines takes time, hence considerably reducing the server's speed. Non-printable characters in names are represented as ‘?’.
-
Log Replies: If activated, logs a single line for each reply, including the date, IP address, name, type, class, return code, resolution time, cache status, and response size. Be aware that printing these lines takes time, resulting in a considerable decrease in server speed. Non-printable characters in names are represented as ‘?’.
-
Tag Queries and Replies: If activated, displays the terms 'query: ' and 'reply: ' alongside recorded inquiries and responses. This facilitates the filtration of logs.
-
Log local actions: Activate logging to report local zone activities. These lines resemble the local-zone type information outputs, although they are also generated for other categories of local zones.
-
Log SERVFAIL: When activated, log entries will provide the reasons for queries returning SERVFAIL to clients. This is distinct from the verbose debug logs, somewhat more concise, and recorded at the error level rather than the informational level of verbose debug data.
-
Log Level Verbosity: Choose the log verbosity level. Level 0 indicates the absence of verbosity, focusing only on mistakes. Level 1 provides operational data. Level 2 provides comprehensive operational data. Level 3 provides query-level information, detailing output for each query. Level 4 provides information on algorithmic proficiency. Level 5 records client identity for cache misses. The default setting is level 1.
-
Log validation level: Instruct the validator to record validation failures. Irrespective of the verbosity setting. The default setting is 0, indicating it is off. At 1, a line is recorded in the logs for each user query that fails. This method allows you to see the outcomes of validation. Utilize a diagnostic tool, such as dig or drill, to ascertain the reasons for validation failures in these queries. At 2, both the unsuccessful query and the rationale for Unbound's erroneous assessment, as well as the server that sent the incorrect data, are shown.
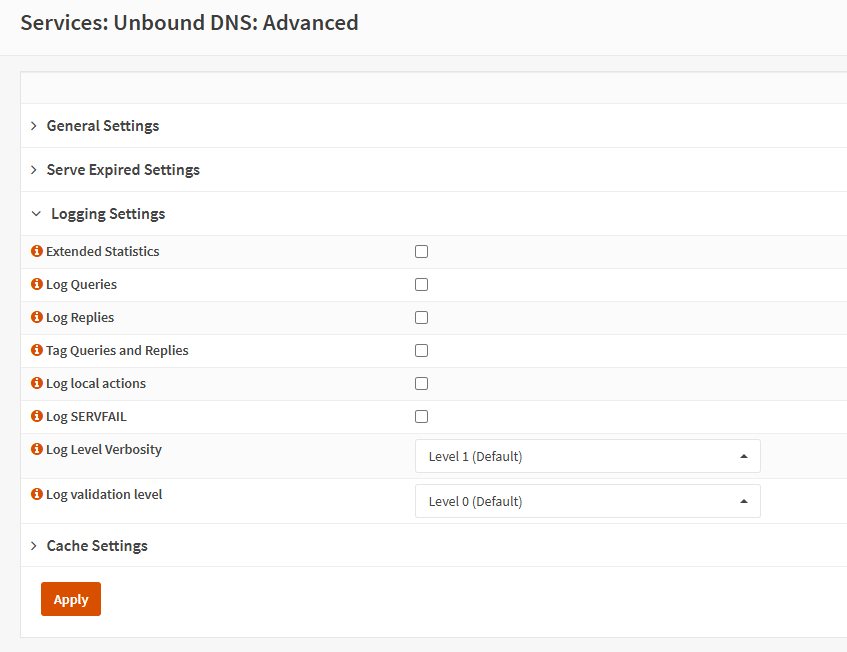
Figure 12. Logging Settings
Cache Settings
The Advanced Cache Settings page has the following options.
-
Prefetch Support: Message cache components are preloaded prior to expiration to maintain the currency of the cache. When used, this option may result in about a 10% increase in DNS traffic and server load, but frequently requested items will remain in the cache without expiration.
-
Unwanted Reply Threshold: If enabled, the cumulative count of undesirable responses is monitored in each thread. Upon reaching the threshold, a protective measure is implemented, and a warning is recorded in the log file. This protective measure aims to purge the RRSet and message caches, ideally eliminating any contamination.
-
Message Cache Size: Size of the message cache. The message cache retains DNS response codes and validation statuses. The RRSet cache, which holds the real RR data, will be automatically configured to double this quantity. Acceptable input consists of raw bytes, optionally suffixed with 'k', 'm', or 'g' to denote kilobytes, megabytes, or gigabytes, respectively.
-
RRset Cache Size: Size of the RRset cache. Includes the authentic RR data. Acceptable input consists of raw bytes, optionally suffixed with 'k', 'm', or 'g' to denote kilobytes, megabytes, or gigabytes, respectively. Automatically configured to double the Message Cache Size when vacant, however subject to user adjustment.
-
Maximum TTL for RRsets and messages: Set a maximum Time to Live in seconds for Resource Record sets and messages inside the cache. Upon the expiration of the internal TTL, the cache item becomes invalidated. This may be set to compel the resolver to inquire for data more often and to disregard (excessively high) TTL values.
-
Maximum Negative TTL for RRsets and messages: Specify a maximum negative time-to-live in seconds for resource record sets and messages inside the cache. Upon the expiration of the internal TTL, the negative response cache item is deemed expired. This may be adjusted to compel the resolver to inquire for data more often if a valid response is not obtained.
-
Minimum TTL for RRsets and messages: Set a basic configuration Time to live in seconds for resource record sets and messages in the cache. Should the minimum value be activated, the data is cached for a duration beyond the domain owner's intention, resulting in a reduced number of requests for data retrieval. The zero value guarantees that the cached data aligns with the domain owner's intentions. Elevated readings may result in complications, since the cached data may no longer correspond with the real data.
-
TTL for Host Cache entries: Time to live in seconds for items inside the host cache. The host cache includes round-trip time, lameness, and EDNS support data.
-
Keep probing down hosts: Continue to investigate hosts that are inactive in the infrastructure host cache. Hosts that are unresponsive are interrogated about every 120 seconds using an exponential backoff strategy. If hosts fail to react within this timeframe, they are designated as down for the life of the host cache TTL. This configuration may be used with “TTL for Host cache entries” to enhance responsiveness during frequent internet connection fluctuations.
-
Number of Hosts to cache: Number of hosts for which information is cached.
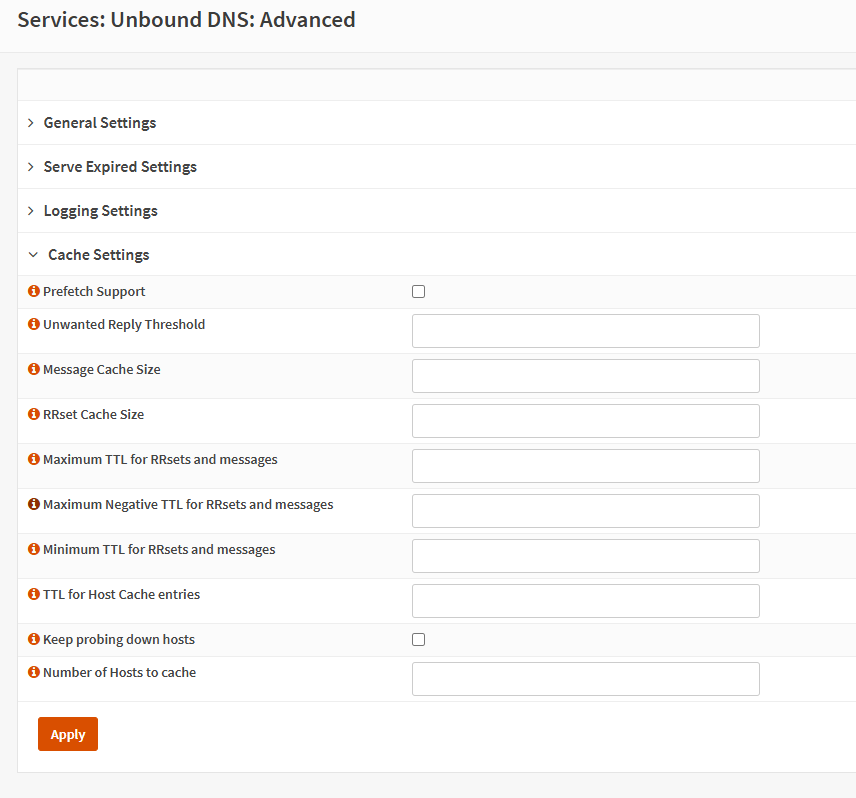
Figure 13. Cache Settings
Access Lists Settings
Access lists specify which clients are permitted to query our DNS resolver. Records for the designated interfaces will be generated automatically and shown in the overview. Custom policies may be established to implement actions on designated networks.
You may access Unbound Access Lists settings by navigating to the Services > Unbound DNS > Access Lists section on the OPNsense web UI.
Available actions are as follows.
-
Deny: This operation stops queries from hosts inside the specified networks.
-
Refuse: This operation also prevents queries from addresses inside the specified networks, while returning a DNS rcode REFUSED error message to the client.
-
Allow: This operation permits queries from hosts inside the specified networks.
-
Allow Snoop: This operation permits both recursive and nonrecursive access from hosts within the specified networks. Utilized for cache probing and should preferably be set only for your administrative host.
-
Deny Non-local: Permit just authoritative local-data queries from hosts inside the specified networks. Prohibited messages are discarded.
-
Refuse Non-local: Permit just authoritative local-data queries from hosts inside the specified networks. Returns a DNS rcode REFUSED error message to the client for prohibited communications.
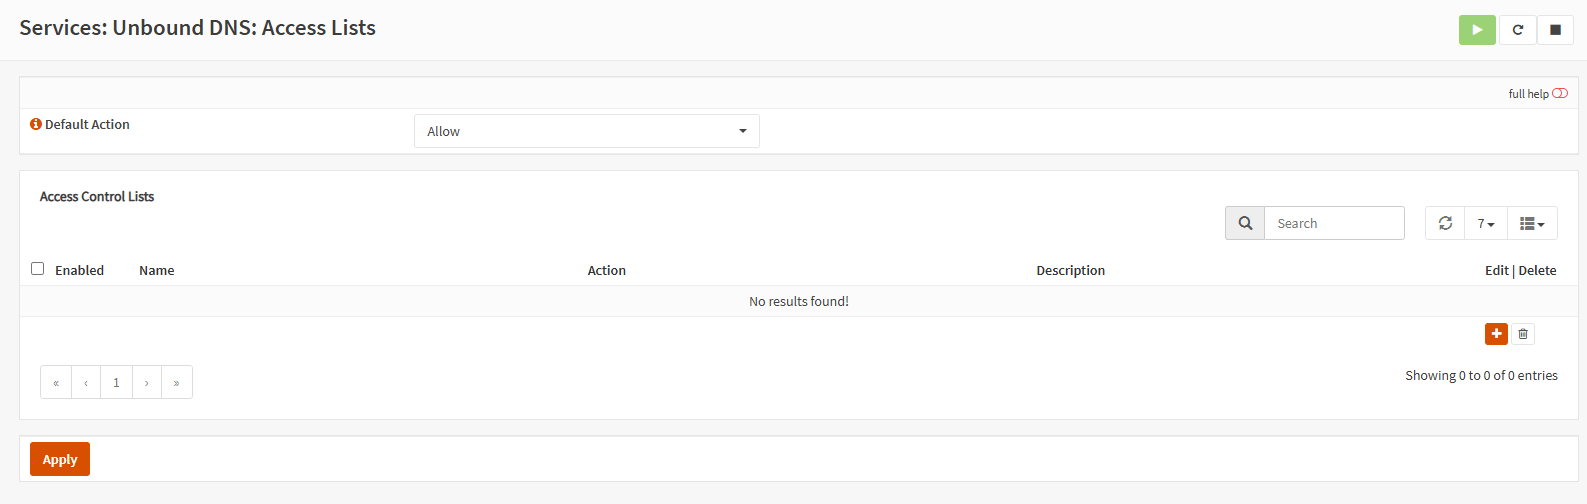
Figure 14. Access Lists Settings
By default, Unbound allows queries from all networks. Utilize this configuration to modify this behavior. The most specific net block takes precedence, hence the ACLs indicated in the grid below will take the place of the behavior of this option for the designated networks.
Defining Access List
You may easily add an access list by following the next steps.
-
Navigate to the Services > Unbound DNS > Access Lists section on the OPNsense web UI.
-
Click on the Add button with the
+icon at the bottom right of the Access Control Lists pane. -
Ensure that Enabled option is checked.
-
Specify the Access List Name.
-
Choose what to do with DNS requests that match the criteria from Action drop-down menu.
-
Specify the Networks in CIDR notation to apply this ACL, such as
192.168.1.0/24. -
You may enter a Description for your reference.
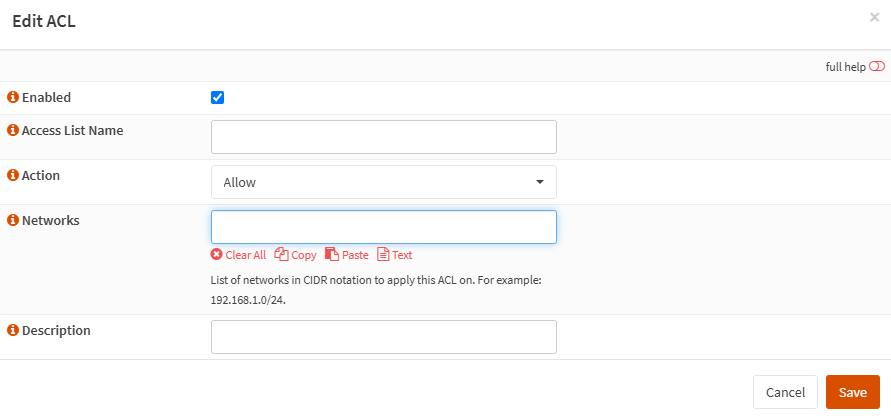
Figure 15. Defining Access List
-
Click Save button.
-
Click Apply to activate the access control list.
-
You may view the access control lists in the Aliases pane.

Figure 16. Viewing Access Control Lists
-
You can easily edit an access control list by clicking on Edit button with a pen icon at the end of the row.
-
You may remove an access control list by clicking on Delete button with a trash icon at the end of the row.
Blocklist Settings
You may easily add a blocklist by following the next steps.
-
Navigate to the Services > Unbound DNS > Blocklists section on the OPNsense web UI.
-
Click Advanced mode toggle bar at the top left of the page.
-
Click Enable checkbox to activate the usage of DNS blocklists.
-
You may click Force SafeSearch checkbox to activate the usage of SafeSearch on Google, DuckDuckGo, Bing, Qwant, PixaBay, and YouTube.
-
Select the predefined external DNSBL blocklist from the Type of DNSBL drop-down list. You may select as many DNSBL as you want. When any DNSBL type is used, the material will be retrieved straight from its original source.
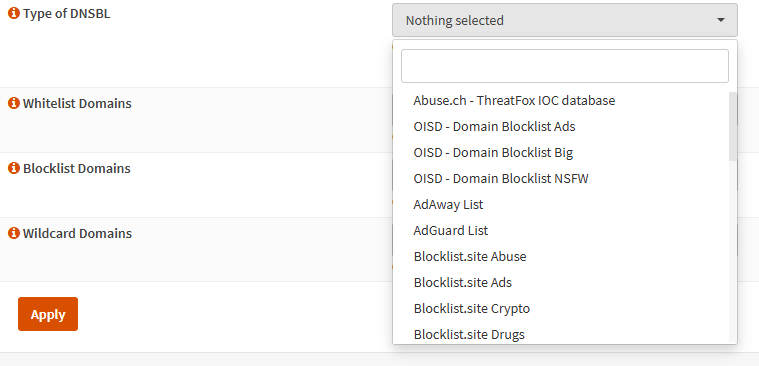
Figure 17. Types of DNSBL
-
Specify the Whitelist Domains. If a blacklist item matches a pattern specified in this list, it will be excluded from the results. For example,
.*.trwould exclude all.trdomains. Domains that are expressly whitelisted using the Reporting: Unbound DNS page will appear in this list. -
Specify the Blocklist Domains. Beware that only exact matches are supported.
-
Specify the Wildcard Domains. All subdomains of the given domain will be blocked. Blocking first-level domains, like
.comis not supported. -
You may specify an IP address in the Destination Address field to be returned when DNS records are blocked. This may redirect such sites to another web server, notifying the user that the content has been restricted. The default value is
0.0.0.0. If "Return NXDOMAIN" is selected, any value in this field will be disregarded. -
You may specify Return NXDOMAIN. Rather of providing the “Destination Address,” return the DNS response code “NXDOMAIN.” This is beneficial in situations when devices are unable to handle the 0.0.0.0 destination address, particularly some Apple devices.
-
Click Apply to activate the settings.
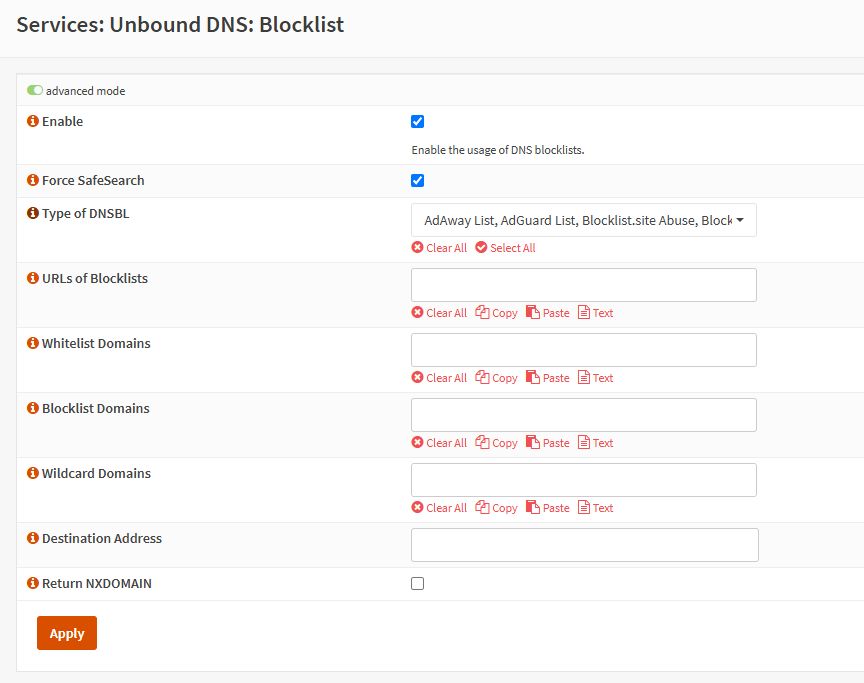
Figure 18. Blocklist Settings
Implementing the blocklist settings will not initiate a restart of Unbound; instead, it will instruct Unbound to dynamically process the blocklists immediately upon their download. A delay of up to one minute may occur until Unbound has fully loaded. Throughout this period, Unbound will remain equally responsive.
For an alternate solution to DNS filtering systems or an extra security measure complementing your DNS filtering method, we highly propose the Zenarmor next-generation firewall. It is a rapid, robust, economical solution that is simple to deploy. It offers both the security level of DNS filtering systems and extensive reporting and analytical capabilities, a vast real-time cyber threat information database, enhanced manageability, and flexibility. It utilizes its technologies to perpetually enhance its threat detection capabilities and to promptly react to emerging cyber threats. You may use the Zenarmor Free Edition indefinitely at no cost inside a non-commercial setting.
Predefined Unbound DNSBL Sources
Some of the predefined DNSBL sources that you can enable on your OPNsense Unbound service are as follows.
- Abuse.ch - ThreatFox IOC database:
https://threatfox.abuse.ch/ - AdAway List:
https://adaway.org/hosts.txt - AdGuard List:
https://v.firebog.net/hosts/AdguardDNS.txt - OISD - Domain Blocklist Ads*:
https://small.oisd.nl/domainswild - OISD - Domain Blocklist Big*:
https://big.oisd.nl/domainswild - OISD - Domain Blocklist NSFW*:
https://nsfw.oisd.nl/domainswild - Blocklist.site:
https://github.com/blocklistproject/Lists - EasyList:
https://v.firebog.net/hosts/Easylist.txt - Easyprivacy:
https://v.firebog.net/hosts/Easyprivacy.txt - NoCoin List:
https://github.com/hoshsadiq/adblock-nocoin-list/ - PornTop1M List:
https://github.com/chadmayfield/my-pihole-blocklists - Simple Ad List:
https://s3.amazonaws.com/lists.disconnect.me/simple_ad.txt - Simple Tracker List:
https://s3.amazonaws.com/lists.disconnect.me/simple_tracking.txt - StevenBlack/hosts:
https://raw.githubusercontent.com/StevenBlack/hosts/master/hosts - WindowsSpyBlocker:
https://github.com/crazy-max/WindowsSpyBlocker - YoYo List:
https://pgl.yoyo.org/adservers/
How to Update Unbound DNSBL automatically
To automatically refresh the Unbound DNSBL lists at scheduled intervals, you must create a cron job by folloying the next steps:
-
Navigate to System > Settings > Cron page.
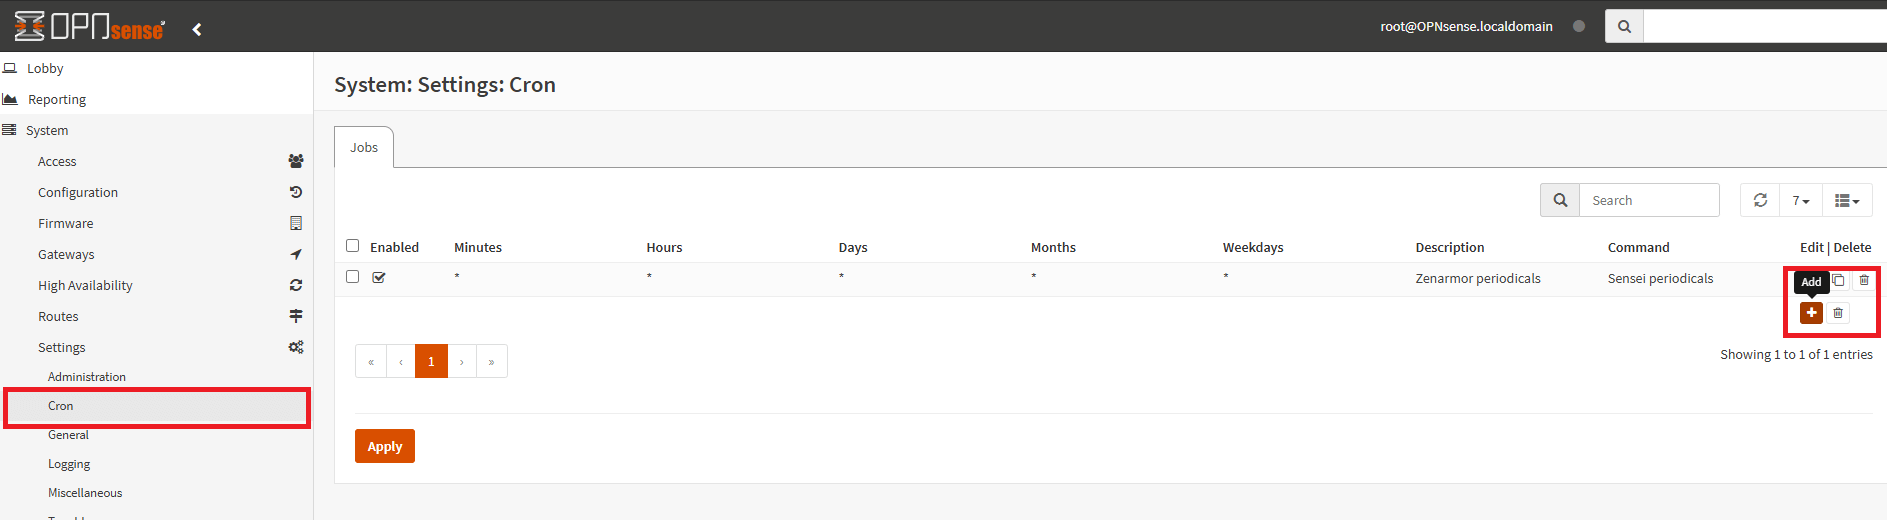
Figure 19. Cron Settings
-
Add a new task by clicking on the Add button with
+icon at the bottom right of the page. -
Ensure that Enabled option is selected.
-
Select Update Unbound DNSBLs.
-
Type a Description, such as Update Unbound DNSBLs.
-
You may leave other settings as default. Typically, a daily interval suffices for these types of jobs.
-
Click Save button.
-
Click Apply to activate the cron job.
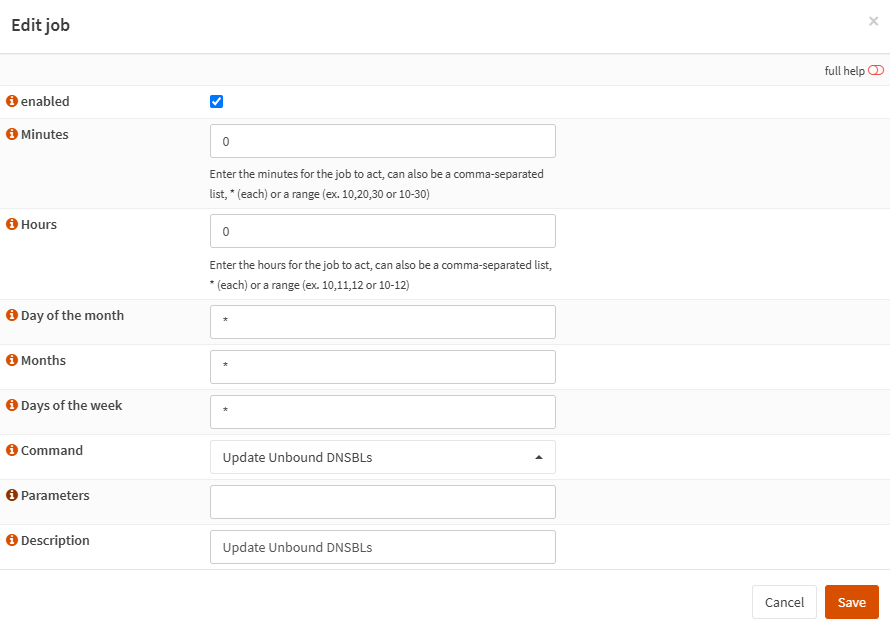
Figure 20. Update Unbound DNSBL automatically
Query Forwarding Settings
The Query Forwarding section permits the input of custom nameservers for query redirection. The nameservers specified here are presumed to manage additional recursion for any query. This section allows you to choose nameservers for particular domains requested by customers, manage catch-all domains, and set non-default ports.
You may access Unbound Query Forwarding settings by navigating to the Services > Unbound DNS > Query Forwarding section on the OPNsense web UI.
Avoid using the system nameservers option in a multi-WAN configuration when Unbound operates concurrently with numerous DNS servers established in General, each allocated different gateways. Unbound will use the locally established routes to access the system nameservers, which will be ineffective if the gateway is down.
Note that if the “Use System Nameservers” option is selected, the system nameservers will take precedence over any catch-all item in both Query Forwarding and DNS-over-TLS, meaning that entries with a particular domain will still be sent to the designated nameserver.
You may easily configure query forwarding by following the next steps.
-
Navigate to the Services > Unbound DNS > Query Forwarding section on the OPNsense web UI.
-
Click on the Add button with the
+icon at the bottom right of the Custom Forwarding pane. -
Click Advanced mode toggle bar at the top left of the page.
-
Ensure that Enabled option is checked.
-
You may specify a Domain. When a domain is inputted here, queries for that particular domain will be sent to the designated server. Leave empty to redirect all inquiries to the designated server (default).
-
You may specify the IP address of the DNS server to forward all requests in Server IP field.
-
You may specify Server Port for DNS service. For usual DNS, you may use
53, if you use DoT set it to853. This option may be useful when configuring DNSCrypt-Proxy. -
You may enable Forward TCP upstream option. Upstream queries use TCP exclusively for transport, irrespective of the global flag tcp-upstream. This option pertains to the domain; hence, when numerous forwarders are configured for the same domain, it is presumed that all use TCP exclusively.
-
You may enter a Description for your reference.
Figure 21. Editing Custom Forwarding
-
Click Save button.
-
Click Apply to activate the query forwarding.
-
You can easily edit a custom forwarding setting by clicking on Edit button with a pen icon at the end of the row.
-
You may remove a custom forwarding setting by clicking on Delete button with a trash icon at the end of the row.
Exercise caution while activating "DNS Query Forwarding" with DNSSEC, since no DNSSEC validation will occur for forwards to a specified domain, given that the upstream server may be a local controller. If all queries are sent and the upstream server lacks DNSSEC capability, its responses will not be delivered to the client due to the inability to execute DNSSEC validation.
DNS over TLS Settings
DNS over TLS (DoT) is a security protocol that uses Transport Layer Security (TLS) to encrypt DNS communication and is among the most prevalent DNS security solutions. The primary objective is to augment individual security and privacy. Several benefits of configuring DNS over TLS on OPNsense include the prevention of DNS manipulation, the elimination of man-in-the-middle attacks, and the mitigation of espionage.
Statistics
The statistics page offers insights into the operational server, including the quantity of performed queries, cache use, and uptime. You may access Unbound Statistics page by navigating to the Services > Unbound DNS > Statistics section on the OPNsense web UI.
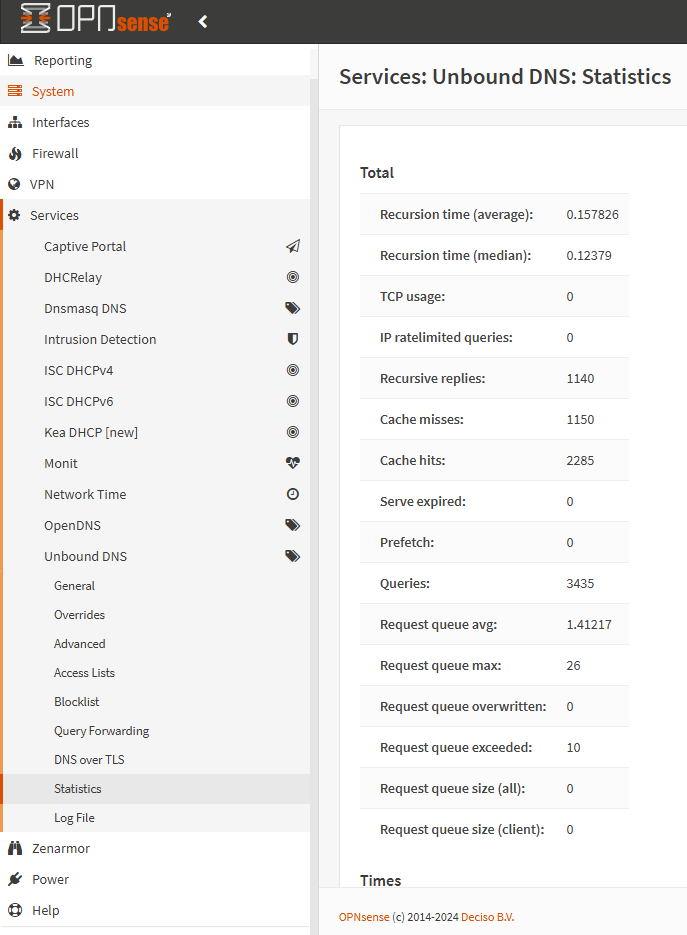
Figure 22. Statistics
How to Restart Unbound DNS Server
You may easily restart the Unbound DNS service for your networks on the OPNsense firewall by following the next steps.
-
Navigate to the Services > Unbound DNS > General on your OPNsense web UI.
-
Click on the Restart button at the top right of the page.
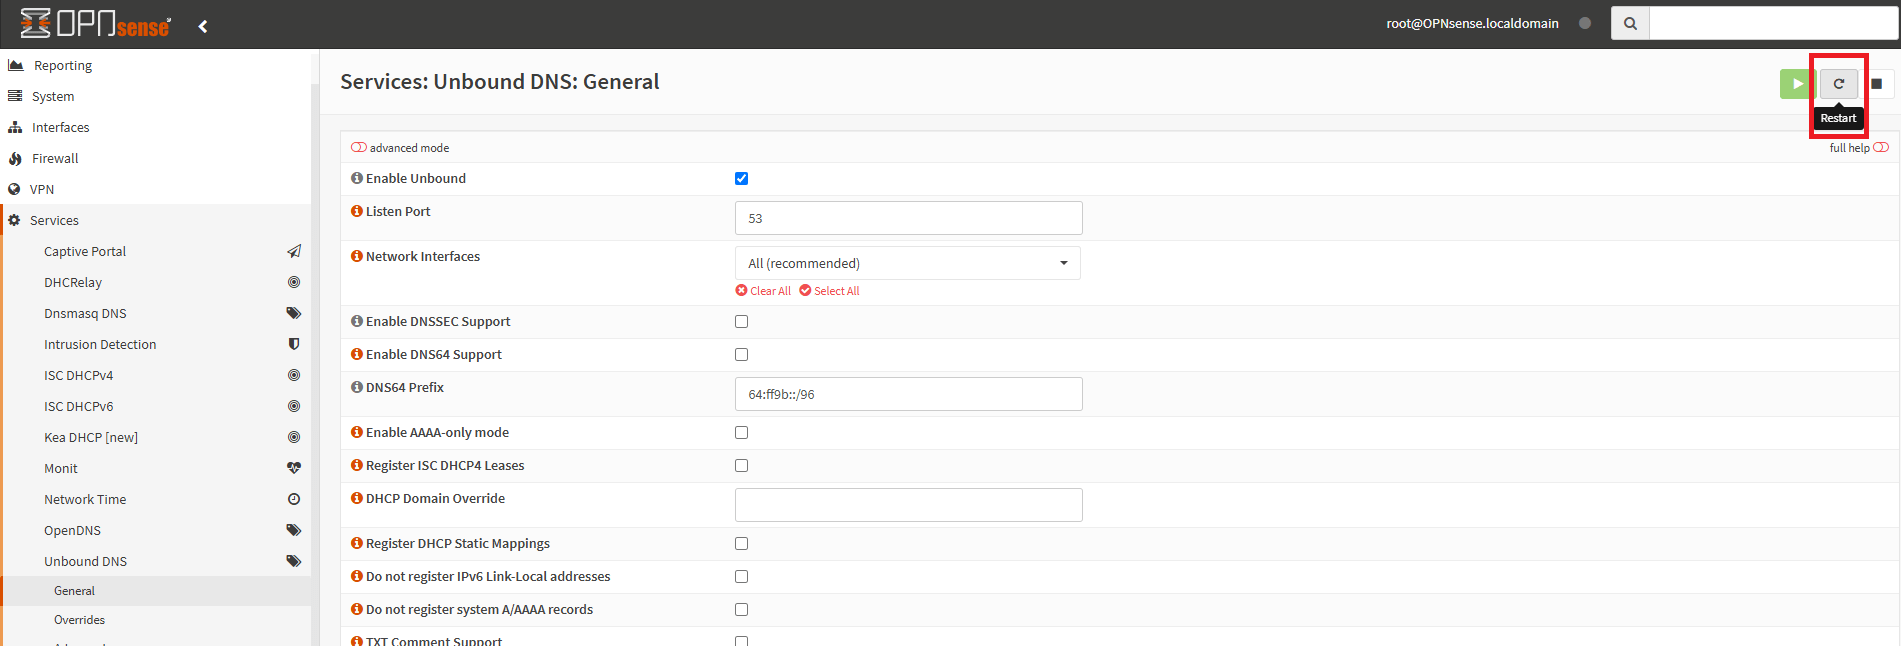
Figure 23. Restart Unbound DNS
How to Start/Stop Unbound DNS Server
You may easily start or stop Unbound DNS service for your networks on the OPNsense firewall by following the next steps.
-
Navigate to the Services > Unbound DNS > General on your OPNsense web UI.
-
Click on the Stop button at the top right of the page. This will immediately stop the service.
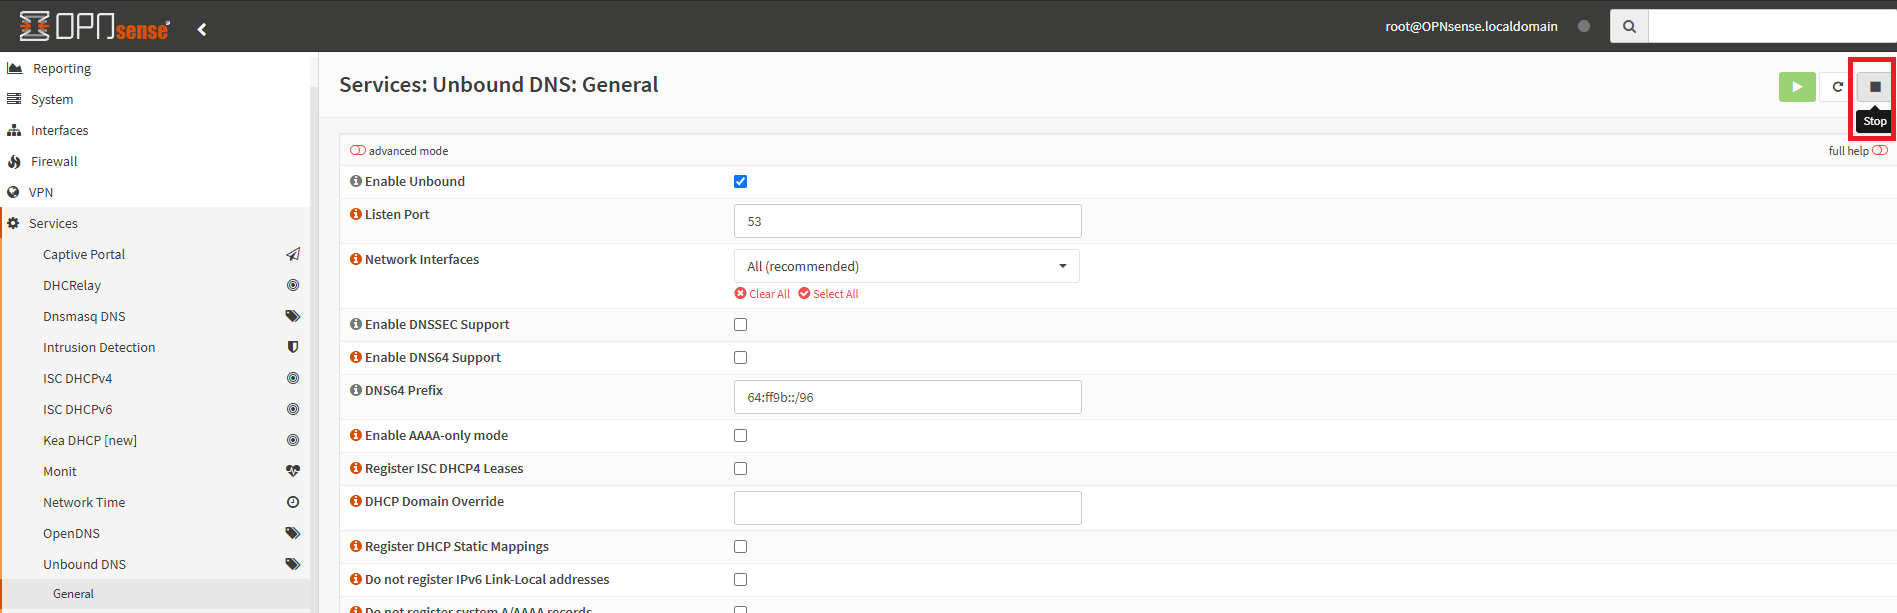
Figure 24. Stop Unbound DNS
-
Click on the Start button at the top right of the page to start the Unbound DNS service. This will immediately start the server.
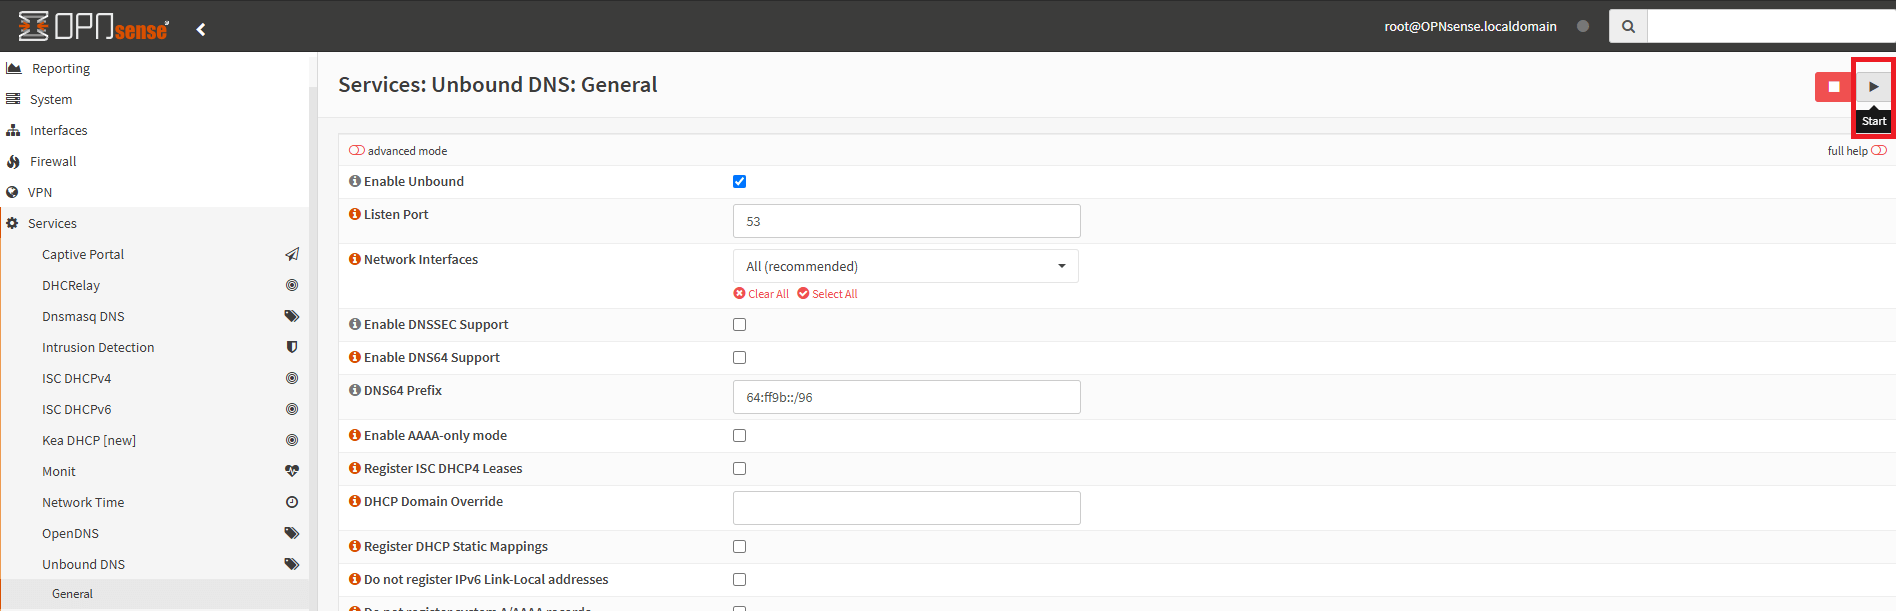
Figure 25. Start Unbound DNS
You may view or start/stop/restart Unbound DNS services by navigating to the System > Diagnostics > Services page on OPNsense web UI.
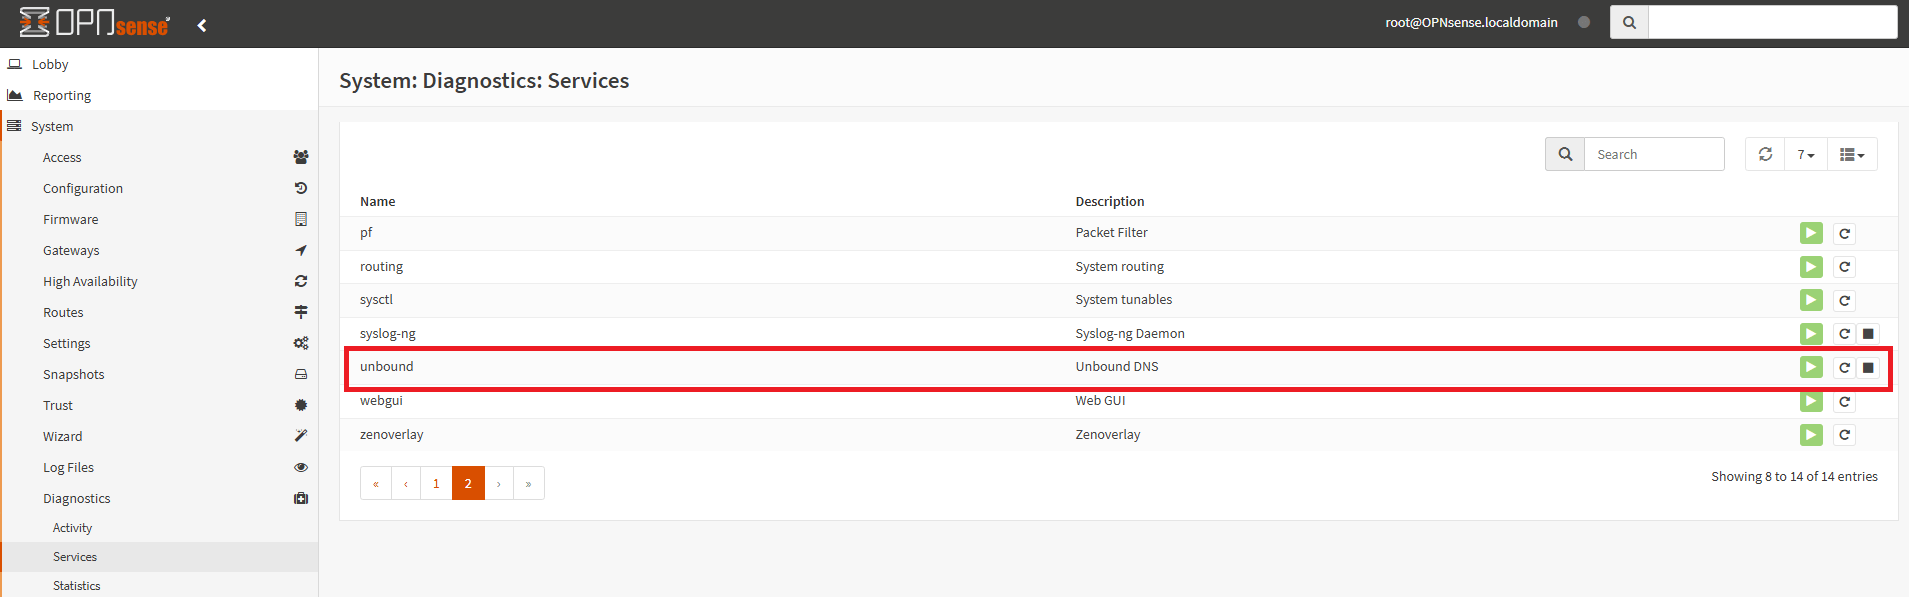
Figure 26. Diagnostic Services