pfSense® Software Best Practices Guide
Firewalls are the first line of defense against cyber threats, but they need to be protected and hardened to be effective. The network is protected against viruses, hacking attempts, and unauthorized access by means of a firewall. The term "firewall hardening" refers to the practice of bolstering the security of a firewall by adding additional safeguards against potential vulnerabilities. Updating software routinely, eliminating unused services, setting access limitations, and implementing strong authentication procedures are all part of this.
We explain why it's crucial to implement firewall security hardening and provide guidance on how to do so using the pfSense® Software platform's recommended methods. Following is a list of what this piece addresses:
-
Updating and Upgrading pfSense Software
-
Changing Default Passwords
-
Enabling Two-Factor Authentication
-
Configuring Country Blocking
-
Disabling SSH Connections
-
Taking Regular Backups and Protecting Backup Files
-
Configuring pfSense Software for high availability
-
Disabling root access For the WebGUI
-
Restricting access to Management Portal
-
Enabling IPS/IDS
-
Creating Notifications for Changes

After applying the best practices explained in this article on your pfSense Software firewall you may read and deploy the best practices of FreeBSD security as well to enhance hardening.
Updating and Upgrading pfSense
It is critical to keep a network security appliance up to date. Given the regular updates to mobile devices, web browsers, and desktop operating systems, it is even more important to refresh a network's firewall. Experts in information technology should regularly evaluate and improve the firewall design and implementation at their company.
If a vulnerability in pfSense software is considered critical, a fix may be released. Evaluate each fix in light of the specific risks faced by your company. There are several options available for updating a pfSense system. The Web GUI or the console may be used.
How to Update via Web UI?
The Automatic Update check function contacts a Netgate server to discover whether a release version is available that is newer than the firewall's version. When an administrator accesses the dashboard or System > Update, this check is conducted.
Your pfSense software firewall may be updated quickly and simply via the Web user interface by following the steps given below:
-
Go to System > Update or click fa-cloud-download next to the new version notice in the System Information dashboard widget.
-
Click Confirm to initiate the update.
-
Attend till the update is complete.
It takes a few minutes to download and install the update, depending on the speed of the Internet connection and the firewall hardware. The firewall will restart automatically upon completion.
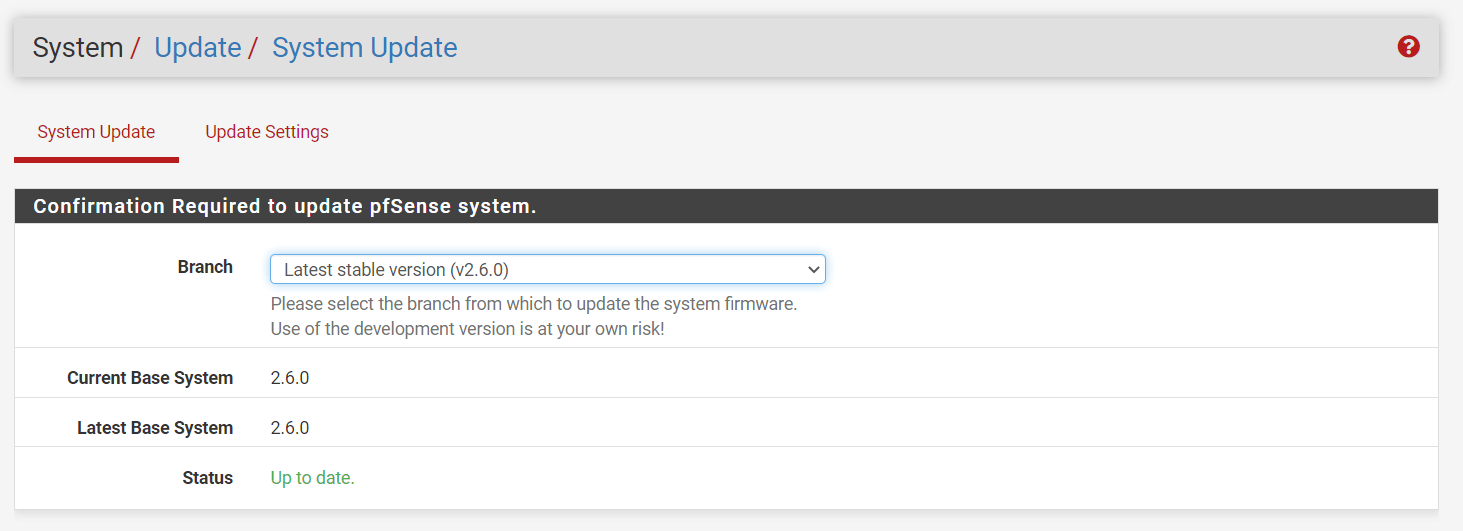
Figure 1. Update pfSense System via Web UI
You may upgrade installed pfSense packages quickly and simply via the Web user interface by following the steps given below:
-
Go to System > Package Manager > Installed Packages.
-
Click Upgrade button next to the package name you want to update.
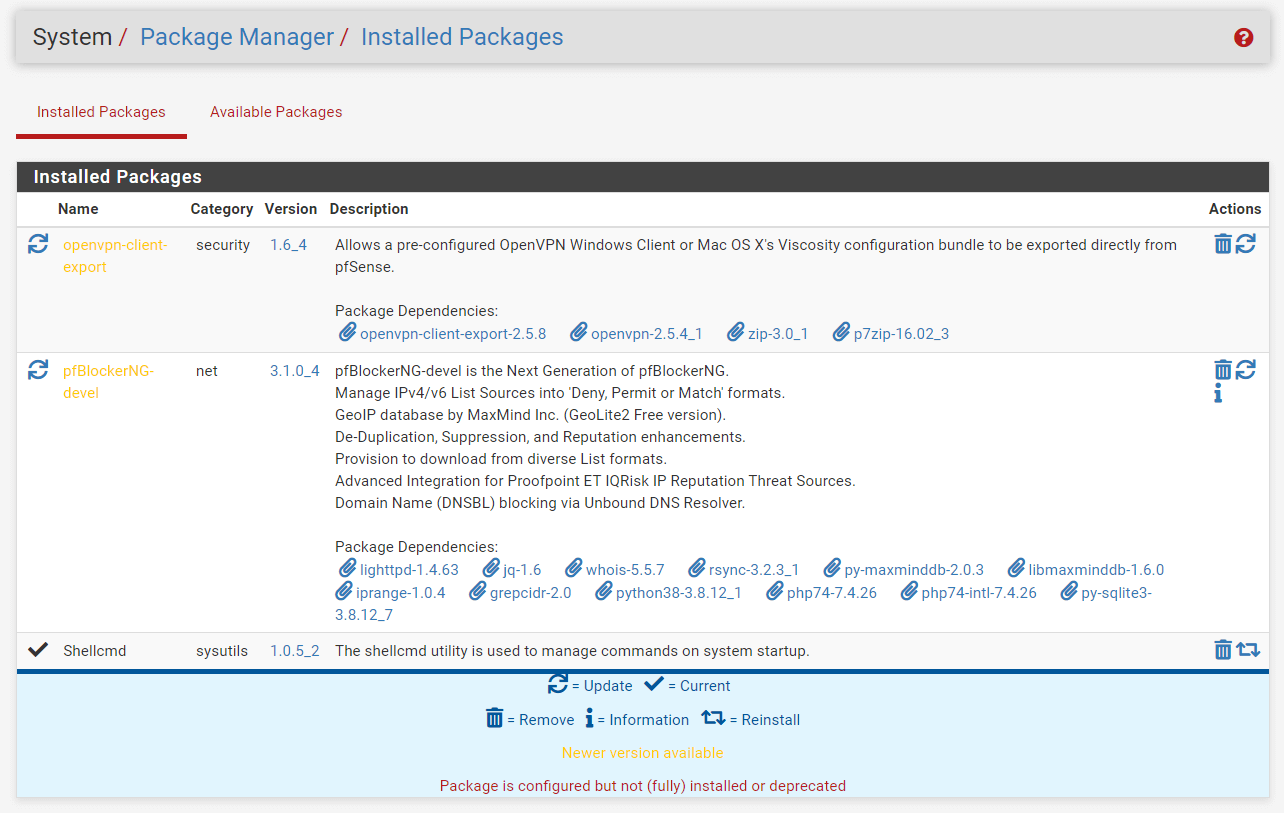
Figure 2. Update pfSense Packages via Web UI
-
Click Confirm button to start the package upgrade.
Figure 3. Confirming pfSense Packages Update
-
Wait till the update is complete.
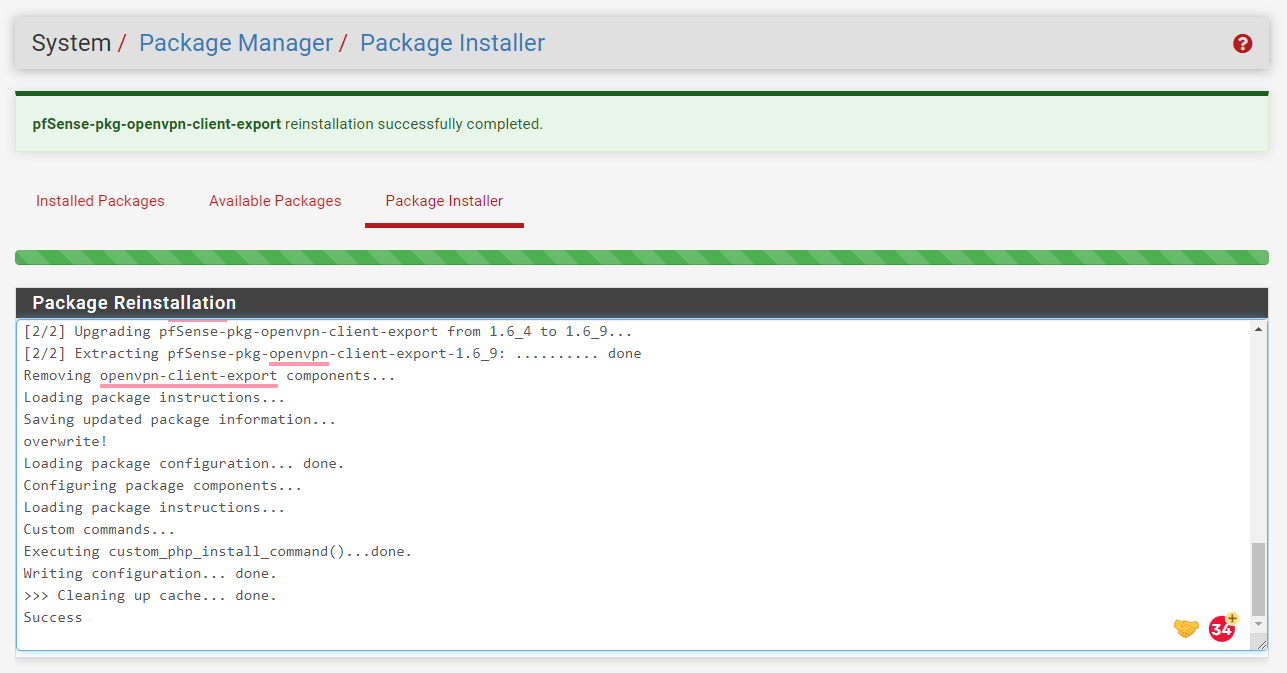
Figure 4. pfSense Package Update Completed
How to Update via Console?
You may update your pfSense node from the console by following the next steps:
-
Connect to the firewall console or login via ssh.
-
Enter menu option
13.0) Logout (SSH only) 9) pfTop
1) Assign Interfaces 10) Filter Logs
2) Set interface(s) IP address 11) Restart webConfigurator
3) Reset webConfigurator password 12) PHP shell + pfSense tools
4) Reset to factory defaults 13) Update from console
5) Reboot system 14) Disable Secure Shell (sshd)
6) Halt system 15) Restore recent configuration
7) Ping host 16) Restart PHP-FPM
8) Shell
Enter an option: 13 -
Wait for the upgrade to complete.
The pfSense software offers pfSense-upgrade tool for swiftly patching the system.
-
pfSense-upgrade: ThepfSense-upgradeutility provides integrated kernel and base system upgrades through remotely acquired binary sets, in addition to package upgrades viapkg. The syntax of thepfSense-upgradecommand is given below:pfSense-upgrade -help
Usage: pfSense-upgrade [-46bdfhnRUy] [-l logfile] [-p socket] [-c|-u|[-i|-d] pkg_name]
-4 - Force IPv4
-6 - Force IPv6
-b - Platform is booting
-d - Turn on debug
-f - Force package installation
-h - Show this usage help
-l logfile - Logfile path (defaults to /cf/conf/upgrade_log.txt)
-n - Dry run
-p socket - Write pkg progress to socket
-R - Do not reboot (this can be dangerous)
-U - Do not update repository information
-y - Assume yes as the answer to any possible interaction
The following parameters are mutually exclusive:
-c - Check if upgrade is necessary
-i pkg_name - Install package PKG_NAME
-r pkg_name - Remove package PKG_NAME
-u - Update repository information
Changing Default Passwords
Passwords are now one of the most important security methods used. It is essential that the administrator and all users have secure, hard-to-guess passwords. Password strength is the most important security safeguard you can take.
We suggest that you change the default password to increase security. The inability to do so exposes the client to the risk of hacking.
How to reset/change the default password on pfSense?
You may reset the pfSense password via CLI by following the steps below:
-
Connect your pfSense node via SSH or console.
-
Login using default root credentials. The default credentials are "admin" and "pfsense". This will display the console menu similar to the one given below:
*** Welcome to pfSense 2.6.0-RELEASE (amd64) on pfSense ***
WAN (wan) -> vtnet0 -> v4/DHCP4: 192.168.0.35/24
LANMANAGEMENT (lan) -> vtnet1 -> v4: 10.1.1.1/24
LAN (opt1) -> vtnet2 ->
WANBRIDGE (opt2) -> vtnet3 ->
0) Logout (SSH only) 9) pfTop
1) Assign Interfaces 10) Filter Logs
2) Set interface(s) IP address 11) Restart webConfigurator
3) Reset webConfigurator password 12) PHP shell + pfSense tools
4) Reset to factory defaults 13) Update from console
5) Reboot system 14) Disable Secure Shell (sshd)
6) Halt system 15) Restore recent configuration
7) Ping host 16) Restart PHP-FPM
8) Shell
Enter an option: 3
The webConfigurator admin password and privileges will be reset to the default (which is "pfsense").
Do you want to proceed [y|n]? y
The password for the webConfigurator has been reset and the default username has been set to "admin".
Remember to set the password to something else than
the default as soon as you have logged into the webConfigurator.
Press ENTER to continue. -
Type
3for selecting3) Reset webConfigurator passwordoption. This option restores the password to the default credentials. This functionality may save you from having to undertake a full reinstallation of pfSense from a memory stick, as well as the installation and configuration of any packages or rules. After resetting the webConfigurator password, you must update it immediately. You cannot risk a security compromise by keeping the default password in place.
You may change the default pfSense password via Web UI by following the steps below:
-
Connect your pfSense node via your favorite browser.
-
Login using default root credentials. The default credentials are "admin" and "pfsense".
-
Navigate to the System > User Manager > Users.
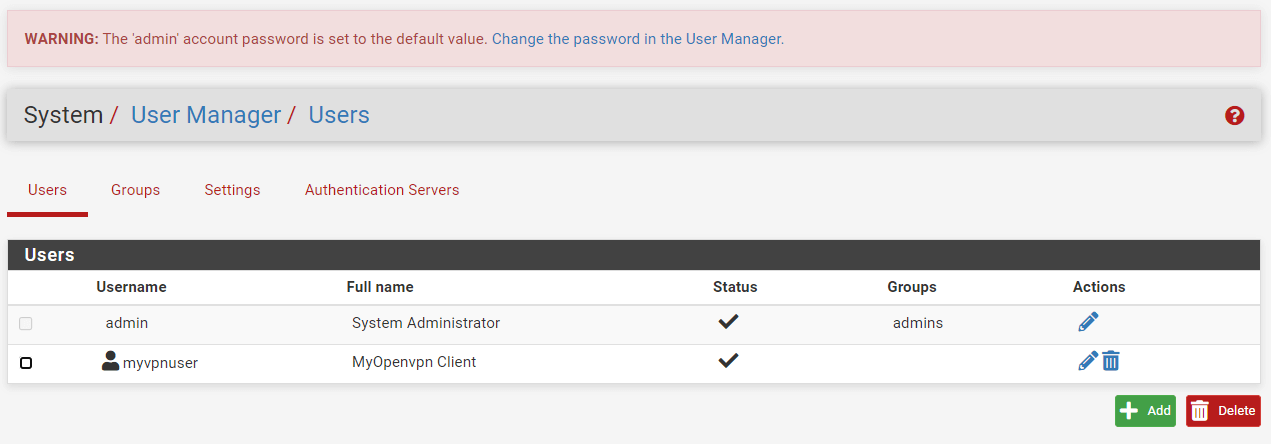
Figure 5. System Users Settings on pfSense
-
Click the
Editbutton with a pen icon next to theadminuser. -
Type a new admin password in the Password field.
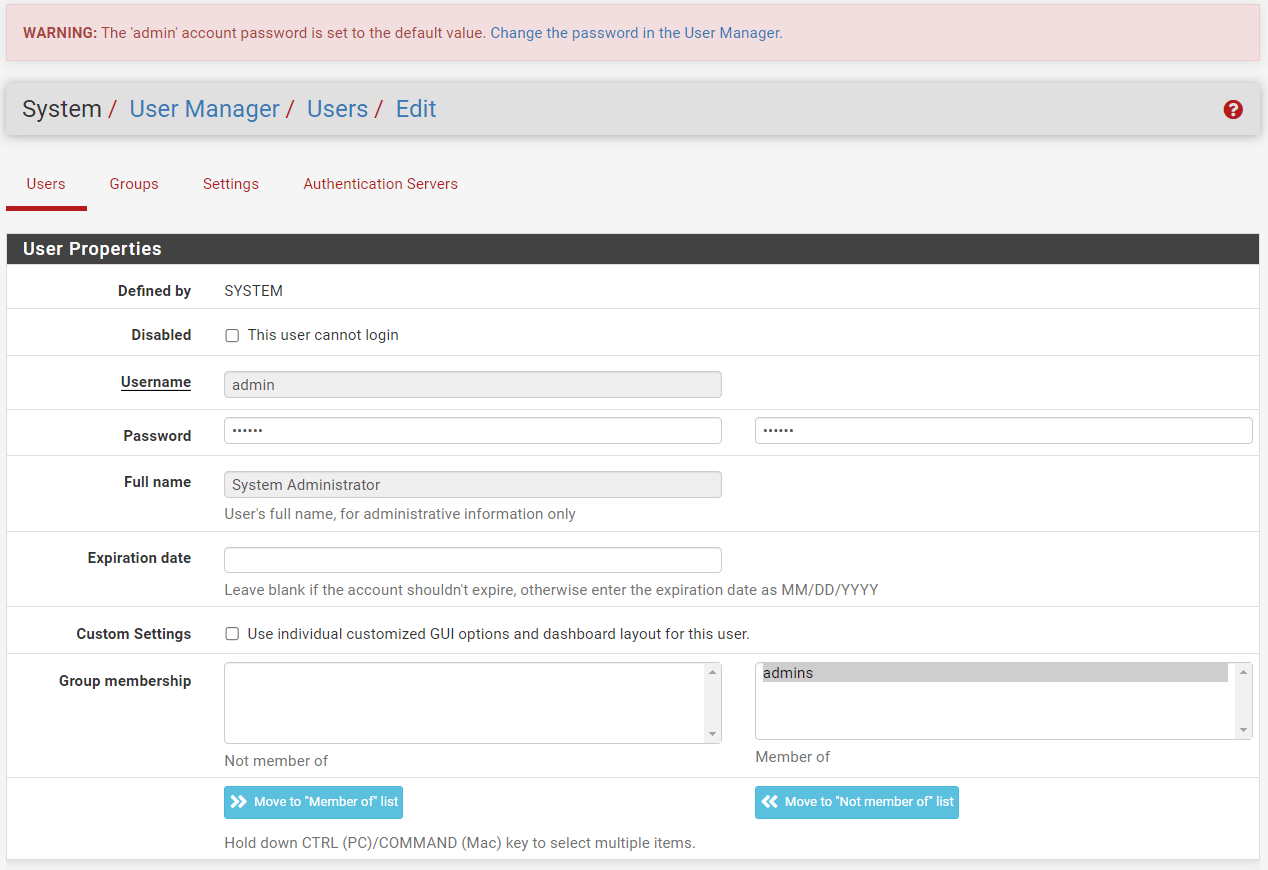
Figure 6. Setting New admin Password on OPNsense
-
Click the Save button at the bottom of the page.
Enabling Two-Factor Authentication
Traditional password-based authentication methods are vulnerable to phishing efforts and the use of weak or repeated passwords. Since many systems are accessible from anywhere on the Internet, a hacked password lets an attacker gain unauthorized access to a user account.
The purpose of two-factor authentication, often known as two-step verification, is to enhance the security of user accounts. In addition to a password, the user must supply an additional authentication factor when logging into a 2FA-enabled account.
Two-factor authentication, often known as 2FA or 2-Step Verification, is a two-component authentication system consisting of a PIN/password and a token. Two-factor authentication offers another degree of security to an application or service. Also, it is often easy to implement and requires little work. You may simply activate 2FA on your pfSense node. OPNsense offers complete support two-factor authentication (2FA) using Google Authenticator support for OpenVPN Virtual Private Networking service:
Configure Country Blocking
There is no one-size-fits-all approach to country blocking since the countries that should be blocked on a firewall depends on the specific requirements and goals of the business. These are the reasons why country blocking is used:
-
Prevent users from accessing unlawful or restricted material in the jurisdiction.
-
To comply with government rules or limits on certain material genres.
-
To prevent the possibility of legal responsibility for hosting or sending unlawful or restricted information.
-
To defend against cyberattacks emanating from certain nations.
When deciding which countries to limit on their firewall, businesses must analyze their own requirements and ambitions.
You may limit the IP address based on a locality by installing and configuring the pfBlockerNG package on your pfSense software frewall. pfBlockerNG is a free and open-source tool built for pfSense® software that blocks advertisements, harmful content, and geo-locations. Geolocation is the identification or estimate of the physical location of an IP address. MaxMind, an industry leader in IP geolocation precision, produces and maintains the lists that pfBlockerNG uses. Websites contain material and media on servers located all over the globe; thus, excessive blocking should be avoided. Inadvertently blocking some of these IP addresses may cause websites to malfunction or make downloads inaccessible.
You may configure country blocking on your pfSense firewall by following the 3 main steps:
-
Install and configure the pfBlockerNG tool on the pfSense firewall
-
Generate MaxMind GeoIP License Key
-
Complete MaxMind GeoIP Configuration on pfBlockerNG
-
Enable and configure GeoIP on pfBlockerNG for Country Blocking
Disable SSH Connections
By default, SSH is only accessible to clients on the local area network. If SSH access must be permitted for clients on the WAN, it is recommended practice to limit access to key-based authentication to prevent brute-force assaults. Switching the daemon to a different port is also a smart security measure, but changing the port alone is insufficient.
The firewall automatically prohibits users whose authentication attempts fail. This behavior and its configuration parameters are discussed in Login Protection.
If password authentication is enabled, verify that any user accounts with shell access have secure, difficult-to-guess passwords.
If you do not need remote access, deactivate any services, such as SSH, that are not essential to the operation of your network. One of the first measures you may do to enhance pfSense software is to disable SSH connections. By reducing the number of exposed ports and possible attack vectors, disabling SSH improves system security overall. Certain regulations or company practices may require the deactivation of unnecessary or supplementary services, such as SSH.
By following the steps you can disable ssh access on pfSense software:
-
Connect to your pfSense console via VGA or Serial.
*** Welcome to pfSense 2.6.0-RELEASE (amd64) on pfSense ***
WAN (wan) -> vtnet0 -> v4/DHCP4: 192.168.0.35/24
LANMANAGEMENT (lan) -> vtnet1 -> v4: 10.1.1.1/24
LAN (opt1) -> vtnet2 ->
WANBRIDGE (opt2) -> vtnet3 ->
0) Logout (SSH only) 9) pfTop
1) Assign Interfaces 10) Filter Logs
2) Set interface(s) IP address 11) Restart webConfigurator
3) Reset webConfigurator password 12) PHP shell + pfSense tools
4) Reset to factory defaults 13) Update from console
5) Reboot system 14) Disable Secure Shell (sshd)
6) Halt system 15) Restore recent configuration
7) Ping host 16) Restart PHP-FPM
8) Shell
Enter an option: 14 -
Type 14 for selecting
14) Disable Secure Shell (sshd)option.
You may disable Secure Shell (SSH) service by navigating to the System > Advanced > Admin Access and unchecking the Enable Secure Shell option.

Figure 7. Disabling Secure Shell on pfSense
If the pfSense firewall is implemented in a risky setting that necessitates unlimited SSH access through firewall rules, the recommended practice is to perform one of the following actions:
-
Modify the SSH Port: Switching to a random alternative port eliminates log noise from many brute-force SSH login attempts and casual scans, but not all. Nonetheless, it may still be discovered with a port scan.
-
Implement Key-Based Authentication: SSH servers with public access must always employ key-based authentication to avoid the risk of brute force attacks. Configure SSHd Key Only to either Need Both Password and Public Key or Public Key Only.
Repeated failed login attempts from the same IP address will result in the IP address being blocked, however, this is not considered adequate security.
Regularly Backup and Protect Backup Files
A software or hardware failure, a human-caused catastrophe, or even natural disasters such as floods, fires, earthquakes, and tornadoes might trigger a complete system wipeout. And sometimes unpleasant occurrences occur when we expect them the least or are the least prepared for them. The data backup makes the information available in the case of data corruption or loss. Only if you have a backup may you access data from an earlier time period.
To protect system data and guarantee its accessibility, you must routinely back up your pfSense installation. To strengthen the security of the pfSense software firewall, you must safeguard your backup data. pfSense software offers backup and restore feature one of the diagnostic tools.
How to Backup Configuration Manually?
You may manually backup your pfSense software configuration by following the steps given below:
-
Navigate to the Diagnostics > Backup & Restore on pfSense Web UI.
-
You may enable Encryption option. If you select this option, fill in the
PasswordandConfirmationfields with a strong password. -
You may leave other options as default.
-
Click Download configuration as XML to download the configuration file. The web browser will then request the user to save the file on the computer. It will be titled
config-<hostname>-<timestamp>.xml, however, the filename may be altered prior to saving.
Figure 8. Backup pfSense Configuration Manually
Available backup options are explained below:
-
Backup Area: Instead of backing up the whole configuration, this option is used to restrict the backup to a specified configuration section. The default backup configuration includes all sections. Beware that the
Restore areavalue must be set to match when restoring a configuration containing a single area.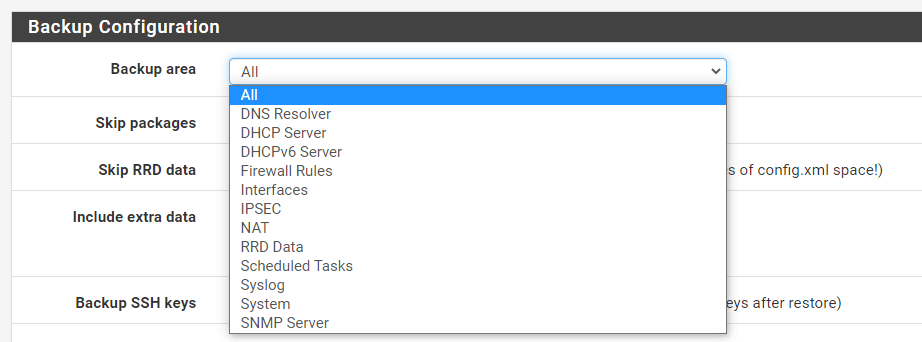
Figure 9. Backup Area Options on pfSense
-
Skip Packages: Controls whether the backup will include package installation data and settings. When troubleshooting, excluding this data from a backup, might be a valuable technique to swiftly delete any traces of packages from a setup. The default setting is unchecked so that all package data is backed up. When restoring a configuration without package data, it is necessary to reinstall and reconfigure all packages.
-
Include Extra Data: Regulates whether the backup file will contain extra, optional data. This comprises databases for the Captive Portal and DHCP leases. These databases are not permanent. The data may be beneficial for moving to different hosts or for regular backups, but it is less useful for long-term backups. This option is unchecked by default, since it may greatly increase the size of backup files.
-
Backup SSH Keys: Determines whether the backup file will include a copy of the SSH host keys. Clients utilize these keys to uniquely identify the firewall; thus, retaining the keys during restoration makes it simpler for clients to recognize the firewall after reinstallation or restoration to new hardware. Furthermore, AutoConfigBackup utilizes the SSH host keys to identify the firewall while producing and restoring backups; thus, retaining the keys enables the firewall to maintain a consistent backup history after a reinstallation.
-
Encryption: Controls whether the backup file is encrypted before it is downloaded. When enabled, the GUI displays the Password and Confirmation boxes, whose values are utilized by the pfSense® software to encrypt the backup file using AES-256. Unchecking the default behavior generates plain text XML backup files.
How to Restore Configuration Manually?
For assessing backup compatibility, the version of pfSense Plus or pfSense CE software is less significant than the Configuration Revision number. Variations in the configuration revision number imply modifications to the configuration data's format, which renders them incompatible.
Whole configuration backups and partial (section-based) backups using the same configuration revision may be restored to their original state.
Full backups of a previous configuration revision may be restored to the current revision. The upgrade code will modify the configuration's settings to conform to the current format.
It is not possible to recover partial (section-based) backups if they were created on a version with a different configuration revision since there is no mechanism in the upgrade code to handle partial backups.
It is not possible to restore backups with a higher configuration revision to an earlier version. There is no means to downgrade a configuration since the earlier version will be unaware of modifications made in subsequent software releases.
Restoring from pfSense CE to pfSense Plus or vice versa may work in many situations, but the outcome is dependent on the target hardware and version. For example, manual modifications may be required when reinstalling pfSense Plus on hardware with an integrated Ethernet switch.
You may restore configuration files from the same page where you generate backups. You may choose a particular section of the configuration to restore or "ALL" for a complete restoration. In circumstances when a firewall or NAT rule has been removed but the remainder of the system remains functional, selecting a specific region is beneficial. When the configuration file has been restored, pfSense immediately restarts.
You may manually restore your pfSense configuration from a backup file by following the steps given below:
-
Navigate to the Diagnostics > Backup & Restore on pfSense Web UI.
-
Select the Restore Area, such as
Allto store the full configuration. -
Click the Choose File button in the
Configuration fileoption to select the backup configuration file. -
You may select
Configuration file is encryptedand type the encryption password used during the backup operation. -
Click Restore Configuration button to apply the configuration and reboot the firewall with the settings obtained from the backup file.

Figure 10. Restoring pfSense Configuration Manually
This approach requires prerequisites in order to do a complete restoration to a fresh installation. First, it must be performed after the new target system is completely installed and operational. Second, another computer linked to a functional network or crossover connection is required behind the firewall being repaired.
In addition to the Restore options given in the Restore steps, the Preserve Switch Configuration configuration is available for Netgate hardware with integrated switches. When enabled, the active switch configuration will be copied into the restored configuration for future usage. This facilitates configuration restoration from devices without an inbuilt switch.
This merely duplicates the integrated switch configuration and does not transfer any VLAN or LAGG interface entries that may be significant to the switch's operation. This approach is safer, since the configuration being restored may include crucial configuration data in these places.
How to Restore from the Configuration History?
Using one of the internal backups on the firewall is the simplest approach to undo a modification for small issues. In addition to the current configuration, the 30 configurations before it is saved in the configuration history.
Each entry in the configuration history list contains the following details:
-
the date the configuration file was created
-
the configuration version
-
the user and IP address of a user making a change in the GUI
-
the page that performed the change
-
a short explanation of the modification.
As the mouse hovered over the action buttons to the right of each row, an explanation of what they perform is shown.
To restore a configuration from its previous state you may follow the steps listed below:
-
Navigate to Diagnostics > Backup & Restore on the pfSense UI.
-
Select the Configuration History tab.
-
Find the required backup in the list.
-
Click the Revert button,
, to restore this configuration file,
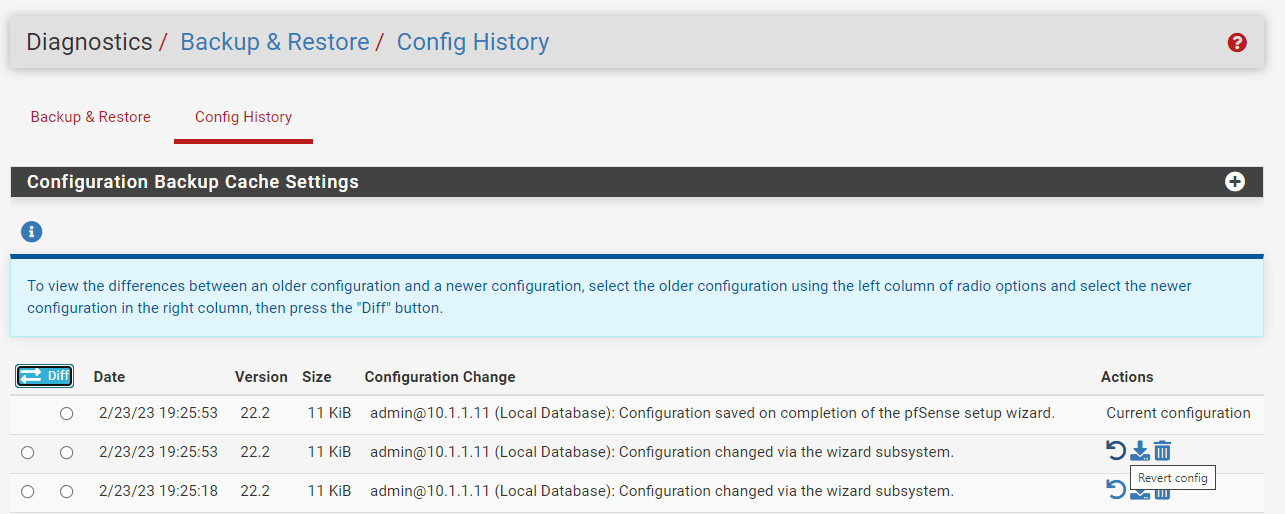
Figure 11. Restoring pfSense Configuration
Restoring a configuration using this approach does not automatically restart the system. Small changes do not need a restart, but undoing some big changes must.
If just a single component, such as the firewall rules, was modified, force a GUI refresh in that part to allow the changes. For firewall rules, reloading the filter would suffice. Edit and save the VPN instance for OpenVPN. The required activities depend on the modifications made to the restored configuration, but rebooting is the best approach to verify that the whole configuration is active.
You may reboot the firewall if required by selecting Diagnostics > Reboot System and clicking Yes.
You may erase previously stored configurations by hitting Delete button with a trash icon, , but you should not manually delete them to preserve space; old configuration backups are automatically destroyed when new ones are produced. To avoid mistakenly restoring a backup following a known-bad configuration update, it is preferable to delete it.
You may obtain a copy of the previous configuration by clicking Download button, .
You may see the changes that have been made to your settings and even go back to a previous version by following the steps given below:
-
Navigate the Diagnostics > Backup & Restore > Configuration History menu on the pfSense UI.
-
Pick the older configuration using the left column of radio choices, then select the updated configuration using the right column.
-
Click Diff button in the first column at the top or bottom to see the changes between the two.

Figure 12. Viewing pfSense Configuration Differences
How to Change Backup Cache Configurations?
The number of backups saved in the configuration history is adjustable. You may configure the backup cache settings by following the steps below:
-
Navigate the Diagnostics > Backup & Restore > Configuration History menu on the pfSense UI.
-
To expand the options, click the
Expandbutton with a plus icon at the right end of the Configuration Backup Cache Settings bar. -
Input the updated quantity of configurations to keep in the Backup Count box.
-
Click Save to activate the settings.

Figure 13. Configuration Backup Cache Settings on pfSense
In addition to displaying the number of configurations, this page also indicates the amount of space used by the backup cache.
How to Restore Configuration via Console?
By following the steps you can restore configuration via console on pfSense software:
-
Connect to your pfSense console via VGA or Serial.
*** Welcome to pfSense 2.6.0-RELEASE (amd64) on pfSense ***
WAN (wan) -> vtnet0 -> v4/DHCP4: 192.168.0.35/24
LANMANAGEMENT (lan) -> vtnet1 -> v4: 10.1.1.1/24
LAN (opt1) -> vtnet2 ->
WANBRIDGE (opt2) -> vtnet3 ->
0) Logout (SSH only) 9) pfTop
1) Assign Interfaces 10) Filter Logs
2) Set interface(s) IP address 11) Restart webConfigurator
3) Reset webConfigurator password 12) PHP shell + pfSense tools
4) Reset to factory defaults 13) Update from console
5) Reboot system 14) Disable Secure Shell (sshd)
6) Halt system 15) Restore recent configuration
7) Ping host 16) Restart PHP-FPM
8) Shell
Enter an option: 15 -
Type
15for selecting15) Restore recent configurationoption. This will display the following menu:Restore Backup from Configuration History
1) List Backups
2) Restore Backup
Q) Quit
Please select an option to continue: -
Type
1to list the display recent configuration files. You may see the output similar to the given below:Please select an option to continue: 1
12. Unknown v22.2 Unknown Page
Unknown
11. 2/23/23 18:23:36 v22.2 (system)
Console assignment of interfaces
10. 2/23/23 18:24:12 v22.2 (system)
Generated new self-signed SSL/TLS certificate for HTTPS (63f7af4c59cf6)
09. 2/23/23 18:48:44 v22.2 (system)
lan IP configuration from console menu
08. 2/23/23 19:14:39 v22.2 admin@10.1.1.11 (Local Database)
Configuration changed via the wizard subsystem.
07. 2/23/23 19:17:11 v22.2 admin@10.1.1.11 (Local Database)
Configuration changed via the wizard subsystem.
06. 2/23/23 19:19:39 v22.2 admin@10.1.1.11 (Local Database)
Configuration changed via the wizard subsystem.
05. 2/23/23 19:20:22 v22.2 admin@10.1.1.11 (Local Database)
Configuration changed via the wizard subsystem.
04. 2/23/23 19:21:40 v22.2 admin@10.1.1.11 (Local Database)
Configuration changed via the wizard subsystem.
03. 2/23/23 19:23:34 v22.2 admin@10.1.1.11 (Local Database)
Configuration changed via the wizard subsystem.
02. 2/23/23 19:25:18 v22.2 admin@10.1.1.11 (Local Database)
Configuration changed via the wizard subsystem.
01. 2/23/23 19:25:53 v22.2 admin@10.1.1.11 (Local Database)
Configuration saved on completion of the pfSense setup wizard.
Restore Backup from Configuration History
1) List Backups
2) Restore Backup
Q) Quit -
Type
2for restoring the backup. This will ask you the backup configuration file listed on the previous step:Which configuration would you like to restore?
1-12 : -
Type the ID of the configuration file you want to restore.
Restoring via CLI is helpful if a recent modification has disabled the GUI or removed the firewall from the network.
How to Backup/Restore Configuration with AutoConfigBackup (ACB)?
Automatic Configuration Backup (AutoConfigBackup, or ACB) is a basic component of the pfSense® software. The service is free for all Plus and CE users of the pfSense software.
This functionality may be found under Services > Auto Config Backup.
When a modification is made to a firewall's configuration, AutoConfigBackup immediately encrypts the contents using the password specified in the AutoConfigBackup settings and uploads the backup to Netgate servers via HTTPS. This provides automatic, rapid, and secure offsite backups of a firewall.
On Netgate servers, only the 100 most recent encrypted settings for each device are stored.
Before transmitting the configuration to Netgate servers, the firewall encrypts the backup using the AES-256-CBC method and a password specified on the Settings page by the firewall administrator. AutoConfigBackup only uses this password locally and does not communicate it to external servers.
When restoring a backup from the list of accessible remote backups, the backup's contents are downloaded and decrypted using the configured encryption password.
The contents of the backup cannot be retrieved if the password is forgotten. The password is confidential and known only to the local firewall. Without the password, neither Netgate nor anyone else will be able to aid in reading the encrypted backups.
To identify a given firewall, the AutoConfigBackup servers need a unique identity, which is called as Device Key. Device Key is necessary to save or restore a configuration backup. For this reason, ACB employs the SHA256 hash of the SSH public key on the firewall.
The device key is accessible by navigating to the Services > Auto Config Backup > Backup now on the pfSense UI.
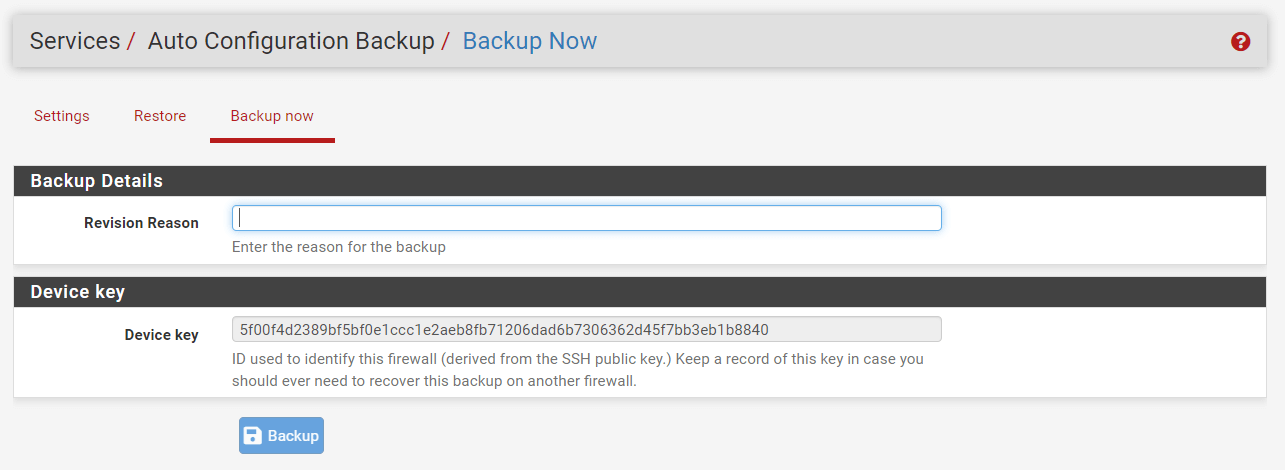
Figure 14. Viewing Device Key on pfSense
Keep track of this Device Key carefully. If a firewall's Device Key is lost, it may be possible to retrieve it. The Settings page allows the addition of a Hint that is saved with encrypted backup records in the data store. The Netgate support staff may be able to retrieve the device key if the clue is unique. Do not rely on this though.
To enable and configure the Automatic Configuration Backup (AutoConfigBackup, or ACB) settings, you may follow the steps given below:
-
Navigate to the Services > Auto Config Backup > Settings on the pfSense UI.
-
Select the
Enable automatic configuration backupsoption to Enable ACB. This automatically encrypts configuration backup information using the specified Encryption Password and then uploads the encrypted backup to Netgate servers via HTTPS. -
Set the Backup Frequency option as you wish. When
Automatically backup on every configuration changeoption is enabled, ACB will make a backup whenever an important configuration change occurs.Automatically backup on a regular scheduleoption Instead of making a backup after each change, schedule controls to run timed backups. This may be more efficient for systems that undergo regular modifications. You must fill in the Schedule options when you select this backup frequency setting. -
Set and confirm the Encryption Password.
-
You may set Hint/Identifier option that will be saved with the encrypted settings as plain text information. This suggestion may enable Netgate TAC to identify a misplaced device key.
-
You may leave Manual backups to keep option as default. Up to 50 manual backups may be maintained, and will not be overwritten by automated backups. These manual backups continue to count towards the maximum of 100 allowed.
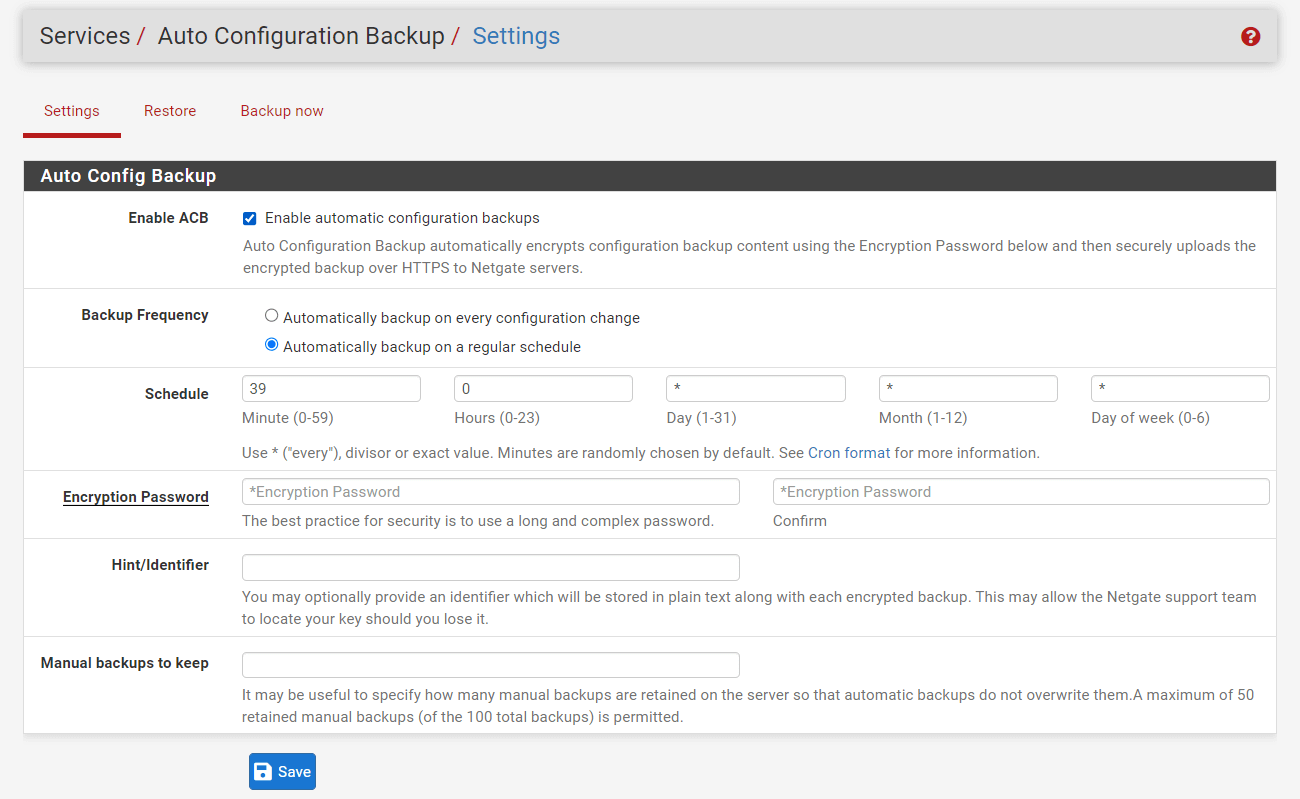
Figure 15. Configuring Auto Config Backup on pfSense
How to Backup Manually?
Before an update or substantial changes, manual backups should be performed. ACB will maintain a manual backup with the reason specified, making it simple to restore if required. As each configuration change initiates a new backup, it might be difficult to determine where a process began when a sequence of modifications are done.
To force a backup of the settings manually, you may follow the next steps:
-
Navigateto the Services > Auto Config Backup > Backup now on the pfSense UI.
-
Enter a reason for the backup in the Revision Reason.
-
Click Backup button.
How to Restore Configuration?
To restore of the pfSense configuration, you may follow the next steps:
-
Navigateto the Services > Auto Config Backup > Restore on the pfSense UI.
-
Find the desired backup in the list.
-
Click
Restore this revisionbutton withicon under the
Actionscolumn.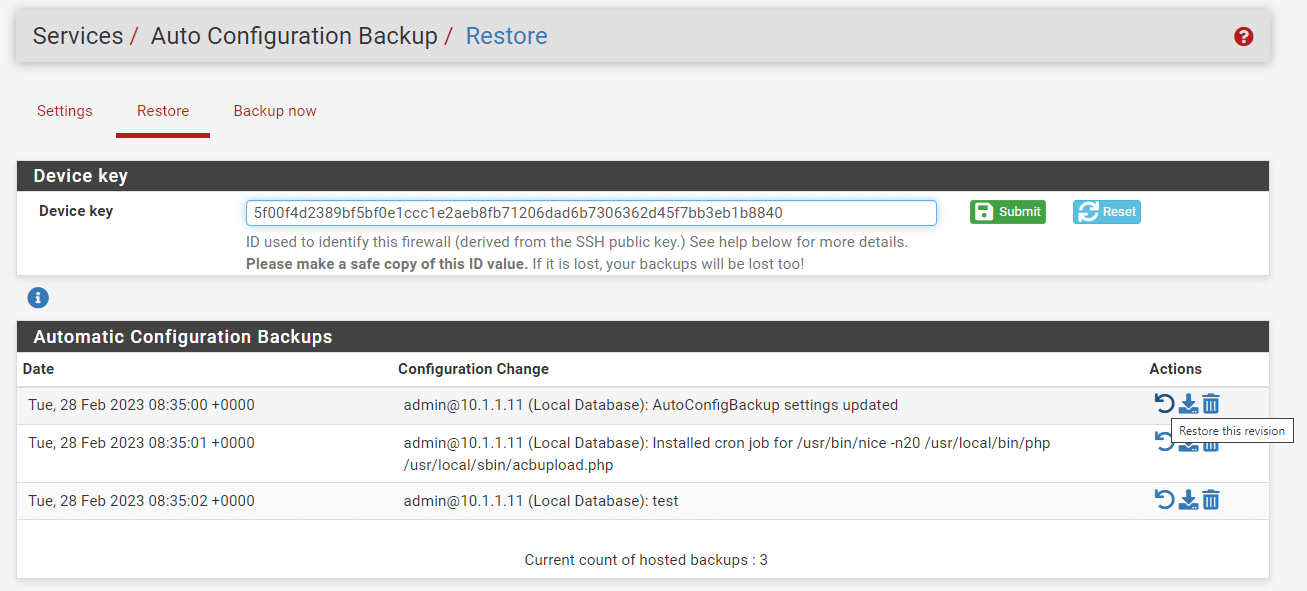
Figure 16. Restoring Configuration with Auto Config Backup on pfSense
The firewall will get the requested configuration from the AutoConfigBackup server, decrypt it using the Encryption Password, and then restore it.
By default, the firewall will not reboot the system. Depending on the configuration elements that were restored, a restart may or may not be required. When recovering a configuration, firewall and NAT rules are immediately refreshed, however interface settings are not.
The GUI provides a prompt to reboot after a restore. Choose Yes if the restored configuration changes anything but the NAT and firewall rules.
How to Check AutoConfigBackup Status?
You may check the progress of an AutoConfigBackup run by examining the backups shown on the Restore tab. The AutoConfigBackup servers provide this list. If the backup is displayed here, backup operation was completed successfully. If a backup fails, an alarm is registered and shown in the user interface.
How to Restore Configuration for Bare Metal?
The ACB service may restore a backup from the prior installation as long as the Device Key and Encryption Password are known, if the disk in the firewall dies or the SSH key changes due to a re-installation of pfSense software. You may follow the steps given below to restore configuration for bare metal:
-
Replace the defective disk drive
-
Install the pfSense software on the new hard drive.
-
Set up LAN and WAN.
-
Navigate to the Services > Auto Config Backup > Settings on the pfSense UI.
-
Adjust the Encryption Password to match that of the prior installation.
-
Click on the Restore tab.
-
Copy the previous
Device Keyand paste it into theDevice Keyfield. -
Click the Submit button. This enables ACB to briefly show a list of backups for an alternative Device Key.
-
Click Reset to restore the firewall's native ID.
After the firewall has been restarted, its settings will be restored from before the failure.
Configure pfSense for High Availability
The pfSense® software is one of the very few open source solutions that offers enterprise-class high availability with stateful failover, enabling the firewall to be eliminated as a single point of failure.
High Availability on the pfSense software is accomplished by a combination of the following features:
-
CARP for redundant IP address
-
XMLRPC for synchronization of configuration
-
State table synchronization with
pfsync
In this arrangement, nodes function as a "active/passive" cluster, with the primary node functioning as the master node and the secondary node serving as a backup, assuming control if the primary node fails.
Two or more redundant firewalls are more accurately referred to as a "High Availability Cluster" or "HA Cluster", since CARP is just one of many methods used to achieve high availability with pfSense software, and CARP might be replaced in the future with a different redundancy protocol.
Each cluster node will have a specific interface for synchronization duties. This interface is often referred to as "Sync", and it is used for configuration synchronization and pfsync state synchronization. Every interface that is accessible may be utilized.
The most popular setup for a High Availability cluster consists of just two nodes. It is feasible to have more nodes in a cluster, although doing so would not give a substantial benefit. More than two node configurations are not officially supported.
It is essential to differentiate between the three functions (IP address redundancy, configuration synchronization, and state table synchronization) since they occur in separate locations. On the sync interface, configuration synchronization and state synchronization occur through direct communication between firewall units. CARP heartbeats are sent on each CARP VIP-equipped interface. Failover signaling does not occur on the sync interface but on all CARP-enabled interfaces.
What is CARP?
OpenBSD engineers established Common Address Redundancy Protocol (CARP) as a free, open redundancy solution for sharing IP addresses across a set of network devices. Similar options previously existed, including the IETF standard for Virtual Router Redundancy Protocol (VRRP). Cisco, however, asserts that VRRP is protected by its patent on its Hot Standby Router Protocol (HSRP) and has informed the OpenBSD developers that it would enforce its patent. So, the OpenBSD developers built a new open and free protocol to achieve roughly the same purpose without violating Cisco's patent. CARP became accessible in OpenBSD in October 2003, and was subsequently introduced to FreeBSD as well.
A CARP-type Virtual IP address (VIP) is shared across cluster nodes. One node is the master and accepts IP address traffic, while the other nodes retain backup status and check for heartbeats to determine whether they must take the master role if the previous master fails. As only one cluster member uses the IP address at a time, there is no IP address conflict for CARP VIPs.
For failover to function successfully, incoming traffic such as routed upstream traffic, VPNs, NAT, local client gateway, DNS queries, etc. must be delivered to a CARP VIP and outgoing traffic such as Outbound NAT must be sent from a CARP VIP. If traffic is routed directly to a node and not a CARP VIP, then other nodes will not receive that traffic.
CARP functions similarly to VRRP and HSRP, and in certain situations may even clash with them. Heartbeats are sent on every interface that has a CARP VIP, one per VIP per interface. With the default parameters for skew and base, each VIP transmits heartbeats about per second. The skew decides at any given moment which node is the master. The master role is assigned to the node that broadcasts heartbeats at the quickest rate. A larger skew number causes heartbeats to be sent with more latency; hence, a node with a lower skew will be the master unless a network or other problem causes the heartbeats to be delayed or lost.
Never use a CARP VIP to access the firewall GUI, SSH, or any other administration tool. Use just the real IP address on the interface of each independent node and not the VIP for management reasons. Otherwise, it is impossible to anticipate which unit will be accessed.
What are the IP Address Requirements for CARP?
A High Availability cluster using CARP requires three IP addresses in each subnet as well as a distinct, unused subnet for the Sync interface. This indicates that for WANs, a subnet of /29 or bigger is necessary for optimum design. Each node use a single IP address and a shared CARP VIP address for failover. The interface for synchronization just needs one IP address per machine.
Technically, it is feasible to establish an interface with a CARP VIP as the sole IP address in a particular subnet, but it is not advised. This setup only permits connection from the main node to the WAN when utilized on a WAN, which substantially hinders operations requiring external access from the secondary node, such as updates, package installs, gateway monitoring, and anything else. Internal connections often do not suffer from the same IP address constraints as WANs, but it is still recommended to set IP addresses on all nodes.
What are the Switch/Layer 2 Issues?
CARP heartbeats employ multicast and may need specific treatment on the cluster's switches. Certain switches filter, restrict the transmission rate, or otherwise interfere with multicast in ways that might cause CARP to fail. Moreover, some switches use port security mechanisms that may not be compatible with CARP.
The minimal requirements for a switch are:
-
Permit the transmission and reception of communications using multiple MAC addresses.
-
Permit Multicast traffic to be transmitted and received interference-free on CARP VIP-equipped ports.
-
Permit the CARP VIP MAC address to change ports.
Almost all difficulties with CARP not reflecting the intended status are caused by switch failures or other layer 2 issues, therefore ensure the switches are correctly set before proceeding.
Disable admin Access for the WebGUI
The default login after installing pfSense is the admin user. Because the admin user has complete access to files and processes, it is typically not recommended to log in as admin. A system-critical account with a generic and easy-to-guess name is not advised from a security standpoint, since a prospective hacker would just need to guess the proper password to get complete access to your system. We propose that you establish an additional system administrator account and deactivate the default "admin" account to protect against this situation.
To disable the root access you may follow the next steps listed below:
-
Navigate to the System > User Manager > Users.
-
Click
+Addbutton to create a new user. -
Set the Username.
-
Set the Password.
-
Set Fullname.
-
Select
adminsin Group Membership and clickMove to Member of listbutton to set the group. -
You may leave other options as default.
-
Click Save at the bottom of the page.
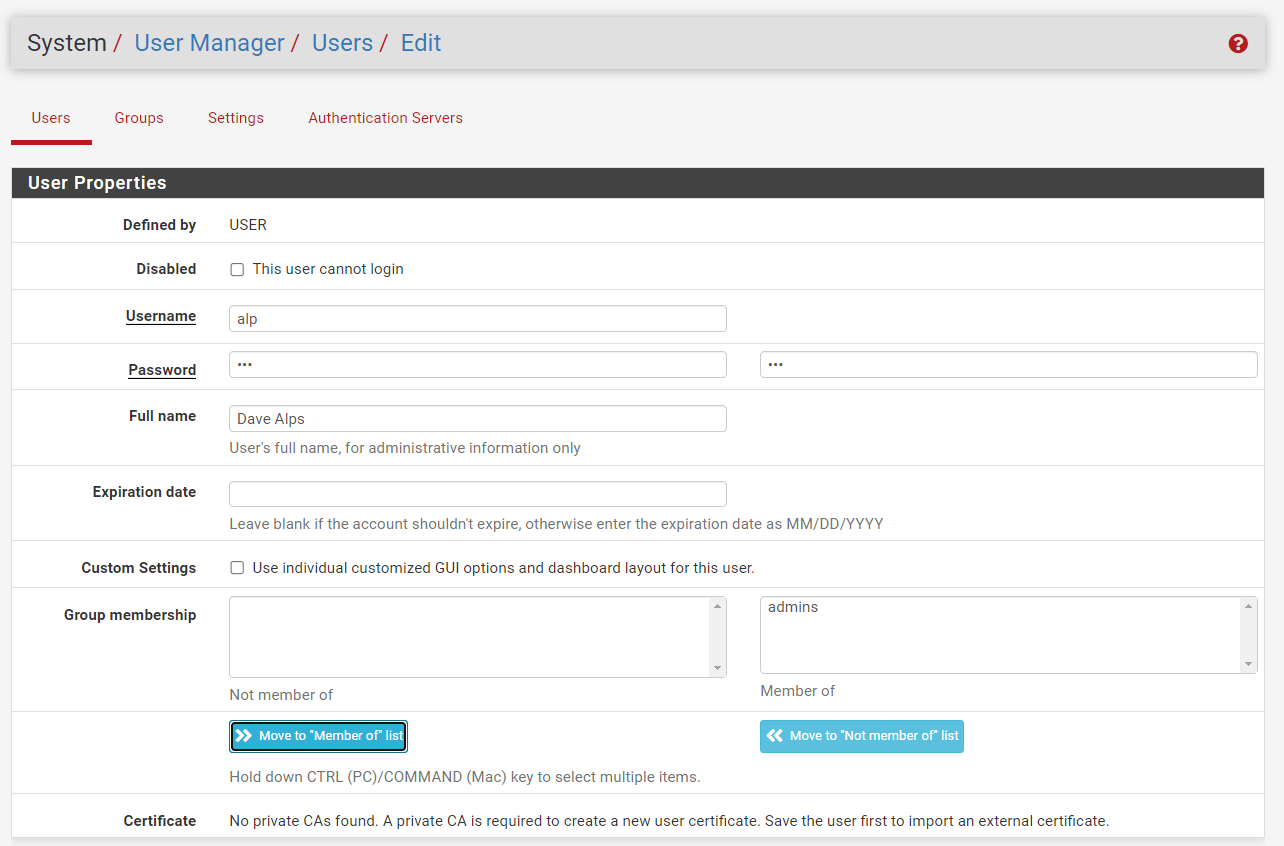
Figure 17. Adding new account with admin privilege on pfsense
-
Click
Editbutton with a pen icon to edit theadminaccount. -
Check the
This user cannot loginoption to disable admin account.
Figure 18. Disabled admin account on pfsense
Restrict Access to Management Portal
Using a management network to gain administrative access to your network devices has numerous advantages:
-
Reliability: When management traffic is separate from production or business traffic, management access can be preserved during production network reconfiguration because it won't have to compete for resources.
-
Simpler policies: By separating the management from the production traffic, policies are more easily implemented. Policies with specific purposes are easier to understand and troubleshoot.
-
Security: When network devices' management access is on a different network, accessing those devices on the production network is more challenging.
With more severe vulnerabilities, unauthenticated users with access to the administrative interface may be able to do malicious acts. To proactively defend your network against vulnerabilities like these that may be found in the future, limit as much access as possible to the management interface. Secondly, never expose the port of a web administration interface to the Internet. If you need access from the WAN side, limit source IPs or networks as much as feasible. If there is a static IP address at the site from which you will administer, you should only permit traffic from that IP address or subnet. Aliases are equally useful, as they may include fully qualified domain names. Add the dynamic DNS address of remote management clients to a management alias.
Using a VPN connection and accessing the admin interface using an internal IP address through VPN is a more secure method for remote management. The pfSense software provides numerous VPN options, such as IPsec, OpenVPN and SSH tunneling. You may access the GUI securely using a local address on the firewall, such as the LAN IP address, after a VPN is established. The specifics differ based on the VPN settings.
The ideal practice is to always encrypt access to the GUI port using HTTPS. Newer browsers may protest about the certificate, but in most cases, an exception may be maintained so that the browser will only complain once.
To deactivate (or re-enable) HTTPS for the GUI, visit to System > Advanced and use the Protocol option in the webConfigurator section under the Admin Access tab. Switching the GUI to a random, non-standard port is also advantageous. This does not increase the GUI's security, but it may minimize the amount of brute force attempts. The GUI is still discoverable by scanners if the port is not properly filtered. Under System > Advanced > Admin Access, the TCP Port option in the webConfigurator section may be used to alter the GUI port. Avoid popular ports like 443, 31337, 8080, 8888, etc.
In many circumstances, you should additionally limit management access to your internal network. If you manage a modest home network, you likely don't care. If the network has dozens, hundreds, or thousands of devices, it is highly suggested to limit internal access.
All administrative access should be restricted to a single interface or VLAN interface in the management network. All other interfaces should have administrative access disabled.
To do this in pfSense, you would utilize firewall rules, keeping in mind that the default is to deny all (implicit deny) incoming connections with the exception of the LAN interface of pfSense firewall.
Enable IPS/IDS
Intrusion detection and prevention systems (IDPS) should be activated in pfSense for hardening since they give an extra layer of protection to the firewall by detecting and blocking hostile or unauthorized network activity. IDPS systems identify threats and preventing them from reaching their intended targets using approaches such as signature-based detection, anomaly-based detection, and reputation-based detection. By activating IDPS in pfSense , enterprises proactively defend their network against threats and reduce the likelihood of data breaches and other security issues.
Create Notifications for Changes
Change management notifications are essential for firewall hardening because they give a transparent record of any configuration changes. This helps guarantee that no illegal modifications are done and makes it easier to recognize and resolve any problems that may arise as a consequence of changes. Moreover, change management notifications can assist firms in meeting legal obligations and demonstrating due care in the case of a security problem. By giving a clear record of modifications, change management alerts make it simpler to debug and restore to a prior configuration if necessary, mitigating the impact of any potential issues.
By showing a bell symbol in the menu bar, the pfSense firewall may warn administrators of critical events and failures. The pfSense firewall supports the following remote notification techniques in addition to GUI notifications:
-
E-mail using SMTP
-
Telegram notification API
-
API for Pushover notification
-
Slack notification API
How to General Notifications Settings?
You may configure the General Settings for Notifications on your pfSense by following the next steps:
-
Navigate to the System > Advanced > Notifications on pfSense UI.
-
Check
Enable daily notifications of expired and soon-to-expire certificatesoption to enable Certificate Expiration. When enabled, the firewall will alert administrators when certificates are about to expire, allowing them to take the necessary steps to renew or replace them. Notices are also provided for certifications that have expired.Daily expiry checks are performed, and alerts are presented in the user interface and delivered remotely. -
You may leave
Ignore notifications for revoked certificatesoption as unchecked. When it is enabled, the firewall will NOT check expiring for revoked (at least once) certificates. -
You may leave Certification Expiration Limit as default. With this amount, certificates are deemed to be nearing their expiry date. Currently, the default value is 27 days. Certificates issued by Let's Encrypt (ACME package) normally renew 30 days before to expiration. The default setting is sufficiently lengthy so that it does not alert needlessly, but leaves enough time for issues to be resolved.
-
Click Save at bottom of the page.
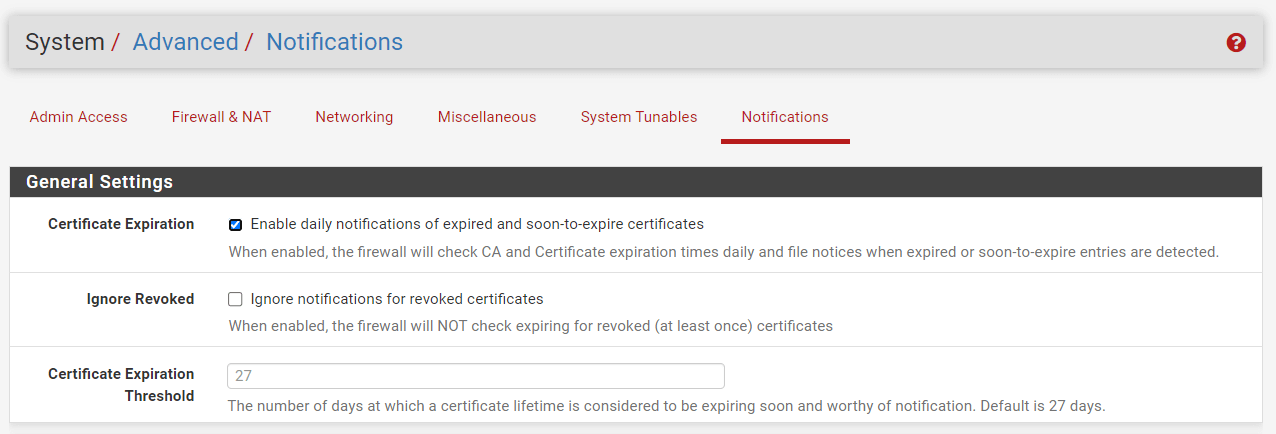
Figure 19. General Settings for Notifications on pfsense
If certificates are imported into the firewall from third party sources that need more time to process, this number should be increased so that administrators have adequate time to get a new certificate before it expires.
How to Configure SMTP E-mail Notifications?
It is advantageous to configure SMTP email notifications in pfSense. For example, if we are away from the system and get an email alert that pfSense has rebooted 10 times in a row, we may take the appropriate precautions against potential problems. We may get messages about IP changes and updates from DynDNS, as well as notifications regarding major issues and failures. Notifications are sent over a direct SMTP connection to the mail server. The server must be configured to accept authenticated SMTP connections or enable relaying from the firewall by following the steps given below:
-
Navigate to the System > Advanced > Notifications on pfSense UI.
-
Leave Disable SMTP option as unchecked. When enabled, the firewall will not deliver SMTP alerts. This is handy for silencing alerts while maintaining SMTP settings for usage by other applications, such as email-using apps.
-
Enter the IP Address of the E-Mail server.
-
Enter the SMTP Port of the E-Mail server. The most often used ports are 25 and 587. In many situations, port 25 will not function unless it is directed to a local or internal mail server. ISPs typically prohibit outbound connections to port 25, therefore if feasible, utilize port 587.
-
Leave the Connection Timeout to E-Mail Server option which is the number of seconds that the firewall will wait for an SMTP connection to finish as default.
-
You may leave Secure SMTP Transmission as default. When configured, the firewall will try to establish an SSL/TLS connection while sending email. The server must allow SSL/TLS or STARTTLS connections.
-
You may leave Validate SSL/TLS as default. When enabled, the mail server's supplied certificate is validated against the trusted root certificates by the firewall. The ideal procedure is to confirm its authenticity. In rare instances, a mail server may have a self-signed certificate or a certificate that fails validation in another way. Unchecking this option will enable SSL/TLS notification delivery to certain servers. In this scenario, communication is still encrypted, but the server's identity cannot be verified.
-
Enter the From e-Mail address. The email address that will appear in the
From:header of notification messages, which identifies the source. The recommended practice is to provide an actual address in this field, since some SMTP servers try to verify it. Typically, this is set to the same address as the Notification E-mail address. -
Enter the Notification E-Mail address. The email address for the message's
To:header, which is the location where the firewall will send notice e-mails. -
You may optionally type the Notification E-Mail auth username. If the mail server authentication needs a username and password, provide the username here.
-
You may optionally type the Notification E-Mail auth password. If the mail server needs a username and password for authentication, put the password in this area as well as the confirmation field. This field specifies the authentication mechanism required by the mail server. The majority of e-mail servers work with PLAIN authentication, others such as MS Exchange may require LOGIN style authentication.
-
Click on the Test SMTP Settings button to test your configuration.
-
Verify if the e-mail was received successfully.
-
Click Save at bottom of the page.
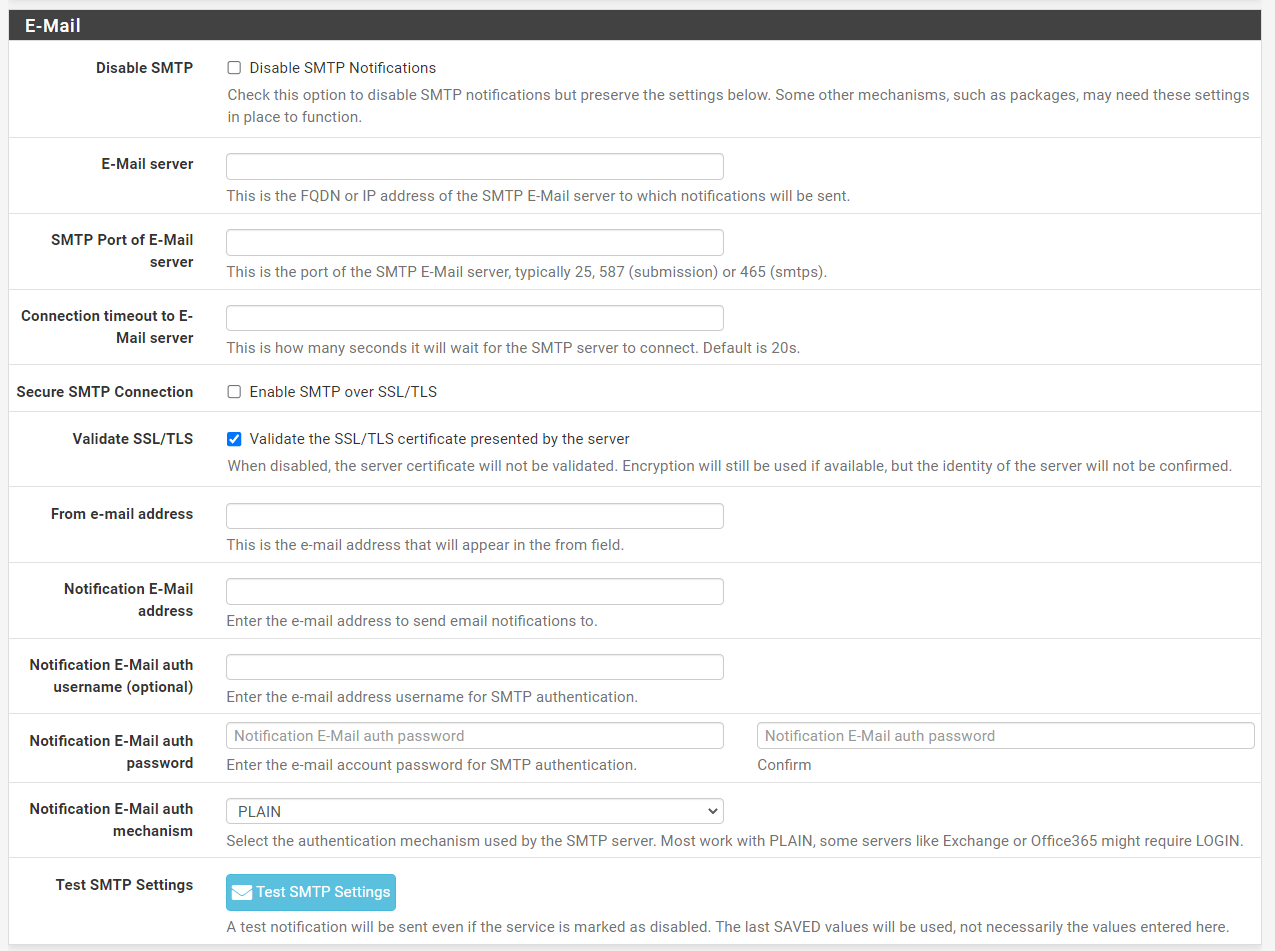
Figure 20. SMTP Email Settings for Notifications on pfsense
How to Enable Sound Notifications?
If the hardware of the firewall includes a PC speaker, it will play a sound when startup is complete and when shutdown is commenced.
To enable/disable sound notifications, you may follow the next steps.
-
Navigate to the System > Advanced > Notifications on pfSense UI.
-
Check/uncheck Disable the
startup/shutdown beepto start/stop the firewall from emitting these noises. -
Click Save at bottom of the page.
Figure 21. Enabling Sound Notifications on pfsense
How to Enable Slack Notifications?
To enable/disable Slack notifications, you may follow the next steps.
-
Navigate to the System > Advanced > Notifications on pfSense UI.
-
Scroll down to the Slack pane.
-
Check Enable Slack Notifications option.
-
Generate a Slack API key by following the guide given on
https://api.slack.com/tutorials/tracks/getting-a-tokenpage. -
Fill in the API Key field.
-
Type the Slack Channel name that will be used to send the notifications to.
-
Click on the Test Slack Settings button to test your configuration.
-
Verify if the Slack message was received successfully.
-
Click Save at bottom of the page.
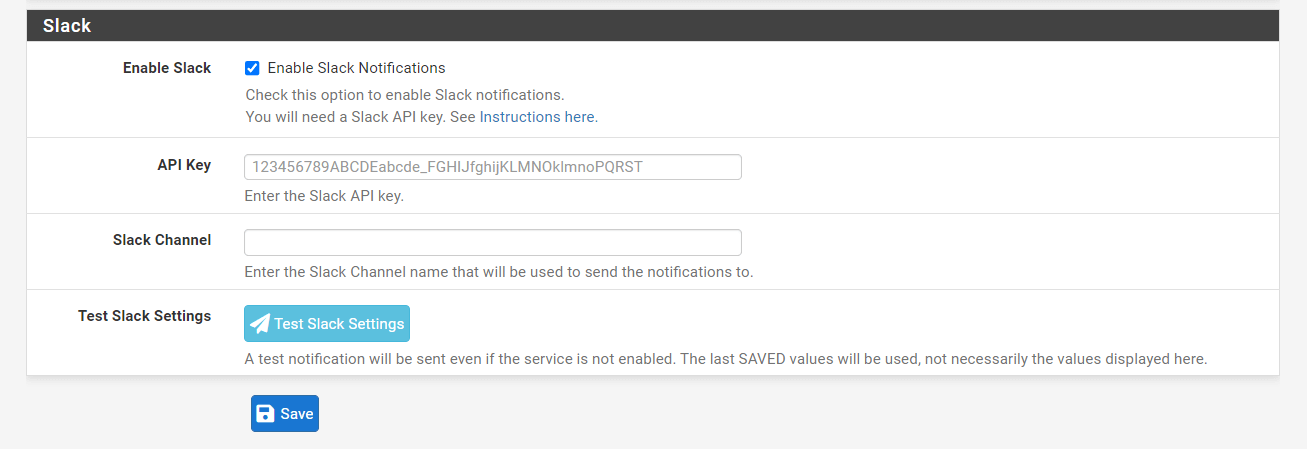
Figure 22. Enabling Slack Notifications on pfsense
Why are Security and Hardening Important?
Systems hardening refers to a collection of tools, methods, and guidelines for bolstering the security of computer systems, networks, applications, and firmware. Reducing the attack surface and eliminating possible entry points are two primary goals of systems hardening. Attackers and viruses would have a more difficult time breaking into your network if you get rid of unused software, account features, applications, ports, permissions, and access.
For an organization to successfully harden its systems, it must first develop a comprehensive plan for auditing, locating, fixing, and managing any security holes. The following are examples of several types of system-hardening measures:
-
Server hardening
-
Endpoint hardening
-
Operating system hardening
-
Network hardening
-
Database hardening
While there are commonalities across the many types of system hardening, the specific tools and techniques used to accomplish each hardening task might vary greatly. It is important to harden systems from the time they are first installed until they are shut down for good at the end of their useful lives. Regulations like PCI DSS and HIPAA, as well as cyber insurance companies, increasingly necessitate systems hardening.
The term "firewall hardening" is used to describe the process of securing a firewall by lowering its vulnerability to attacks via the use of various configuration changes and targeted measures.
The following are some of the many advantages of a well-fortified firewall:
-
Improved Security: The risk of security breaches and unauthorized access to the network is reduced when the firewall is hardened.
-
Compliance: Firewall hardening aids in compliance with PCI DSS, HIPAA, and other regulations.
-
Improved Performance: Strengthening the firewall may improve its performance, preventing slow network speeds or even complete failures due to an increase in traffic.
-
Increased Visibility: Hardening the firewall increases network visibility, which aids in detecting and preventing attacks in real-time.
-
Better Risk Management: Improved methods for assessing and handling dangers by lowering the number of entry points and exit points, firewall hardening aids in risk management.
-
Increased Reliability: Strengthening the firewall reduces the possibility of an outage or data loss, improving reliability.