How to Configure NAT on pfSense?
Network address translation (NAT) is the process of translating one Internet Protocol (IP) address to another by modifying the IP packet header as it traverses a router. As part of this approach, NAT configurations expose just a single IP address for a complete network to the outside world, thereby masking and bolstering the security of the entire internal network. Network address translation is often used in remote-access scenarios because it conserves addresses while boosting security. This improves security while reducing the number of IP addresses required by an enterprise.
In this article we will give some real-world scenarios for NAT configuration on the pfSense software firewall:
-
Port Forwarding for Web Servers
-
Port Forwarding for SSH and RDP Services on Custom Ports
-
Outbound NAT for Accessing a Remote Service via External IP
How to Configure Port Forwarding For Web Services?
Internet-based service providers must make their apps and web servers available over the Internet. Imagine your organization has two distinct web servers in the DMZ network, but only one public IP address. These web servers' HTTP and HTTPS ports should be accessible from anywhere in the globe using the same IP address. To do this, you may configure pfSense's port forwarding rules. You may design your rules such that requests sent to ports 80 and 443 are routed to the first web server, while requests sent to ports 81 and 8443 are forwarded to the second web server. For this setup, please follow the below instructions.
| Server Name | External IP | External Port | Local IP | Local Port |
|---|---|---|---|---|
| WebServer1 | Public Internet IP | 80 | 10.1.1.13 | 80 |
| WebServer1 | Public Internet IP | 443 | 10.1.1.13 | 443 |
| WebServer2 | Public Internet IP | 81 | 10.1.1.14 | 80 |
| WebServer2 | Public Internet IP | 8443 | 10.1.1.14 | 443 |

Figure 1. Port Forwarding topology for web services
After completing the port forwarding configurations on your pfSense firewall, HTTP(80) and HTTPS(443) requests for your WAN IP will be redirected to the WebServer1(10.1.1.13), while port 81 and port 8443 requests for your WAN IP will be redirected to the WebServer2(10.1.1.14).
Port Forwarding For HTTPS(443) Service of WebServer1
You may follow the instructions below to add a port forwarding rule for the HTTPS service of WebServer1.
-
Navigate to Firewall > NAT > Port Forward on pfSense web UI.
-
Click the
Addbutton with a UP icon. This will open the port forwarding configuration window.

Figure 2. Firewall Port Forwarding Rules
-
Set the Interface to
WAN. -
Select
IPv4for the Address Family to choose the Internet Protocol version to which this rule applies. -
Set the Protocol to
TCP. -
Set the Destination to
WAN Address. -
Set the Destination Port Range to
HTTPS. -
Select
Single Hostfrom the Redirect Target IP dropdown menu. Then, set the field to the private IP address of the WebServer1, such as10.1.1.13.

Figure 3. Port forwarding rule configuration for HTTPS-1
-
Set the Redirect Target Port to
HTTPS. -
Fill in the Description field, such as
Allow HTTPS access to Webserver_10.1.1.13. -
Select
Add associated filter rulefrom the Filter rule association option. -
Leave other options as default.
-
Click
Savebutton at the bottom of the page.

Figure 4. Port forwarding rule configuration for HTTPS-2
- Click the Apply Changes button to activate the settings.

Figure 5. Applying changes port forwarding rule for HTTPS
- Navigate to Firewall > Rules > WAN to double-check the firewall rule. As illustrated in the next Figure, the rule indicates that HTTPS traffic is permitted to enter the internal IP address on the specified port.

Figure 6. HTTPS Port Forwarding Firewall Rule on WAN Interface
Port Forwarding For HTTP(80) Service of WebServer1
To create a port forwarding rule for the HTTP(80) service of the WebServer1, you may clone the port forwarding rule for the HTTPS(443) service created above and change the related settings by following the step given below.
- Navigate to Firewall > NAT > Port Forward on pfSense web UI.
2 Click the clone icon under the Actions column to copy the port forwarding rule for the HTTPS(443) service created above.
3 Change the Destination Port Range option to HTTP.

Figure 7. Port forwarding rule configuration for HTTP in pfSense-1
-
Set the Redirect Target Port to
HTTP. -
Change the Description field to
Allow HTTP access to Webserver_10.1.1.13. -
Verify that the Filter rule association option is set to
Add associated filter rule -
Leave other options as they are.

Figure 8. Port forwarding rule configuration for HTTP in pfSense-1
-
Click
Savebutton at the bottom of the page. -
Click the Apply Changes button to activate the settings.

Figure 9. Applying changes port forwarding rule for HTTP
Port Forwarding For HTTP Service of WebServer2 on Custom External Port(81)
To create a port forwarding rule for the HTTP service of the WebServer2 on a custom port(81), you may clone the port forwarding rule for the HTTP(80) service created above and change the related settings by following the step given below.
-
Navigate to Firewall > NAT > Port Forward on pfSense web UI.
-
Click the clone icon to copy the port forwarding rule for the HTTP(80) service created above.
-
Change the Destination Port Range option to
otherand enter81in the related field.
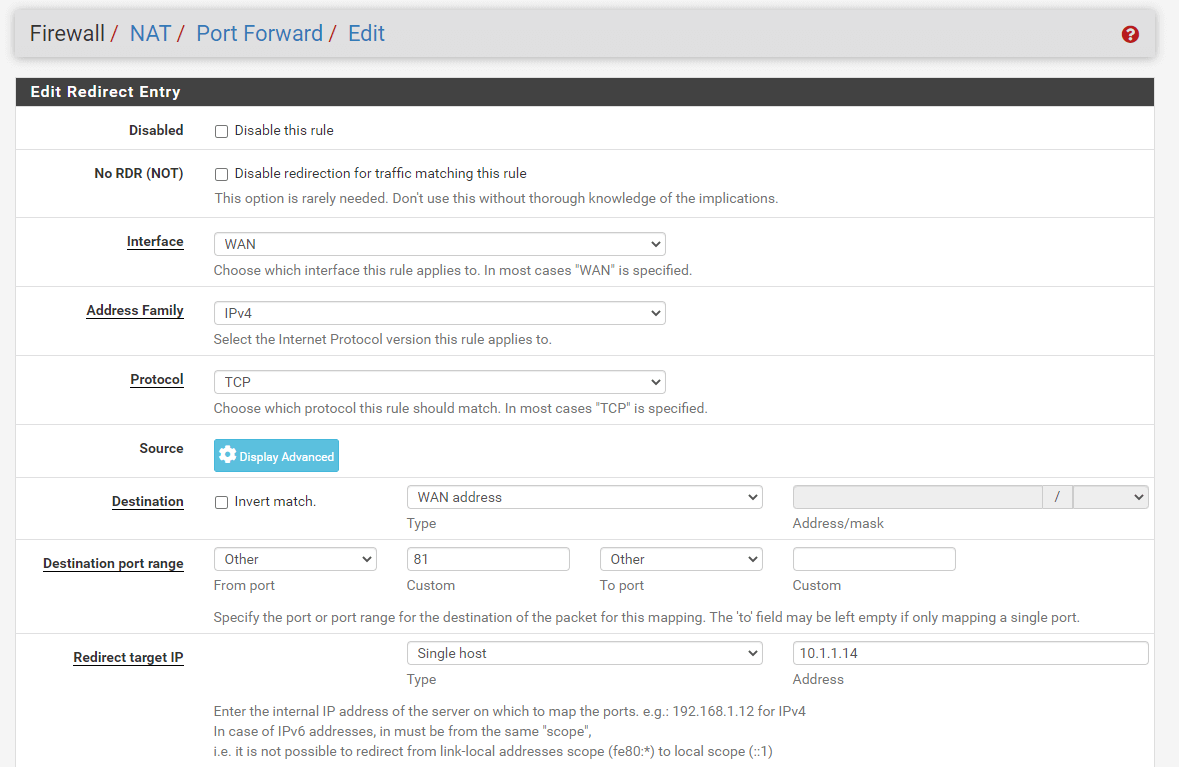
Figure 10. Port forwarding rule configuration for HTTP(81) on pfSense-1
-
Set the Redirect Target IP to
10.1.1.14 -
Set the Redirect Target Port to
HTTP. -
Change the Description field to
Allow HTTP access to Webserver_10.1.1.14. -
Verify that the Filter rule association option is set to
Add associated filter rule -
Leave other options as they are.

Figure 11. Port forwarding rule configuration for HTTP(81) on pfSense-2
-
Click
Savebutton at the bottom of the page. -
Click the Apply Changes button to activate the settings.
Figure 12. Applying changes port forwarding rule for HTTP(81)
Port Forwarding For HTTPS Service of WebServer2 on Custom External Port (8443)
To create a port forwarding rule for the HTTPS service of the WebServer2 on a custom external port(8443), you may clone the port forwarding rule for the HTTP(81) service created above and change the related settings by following the step given below.
-
Click the clone icon to copy the port forwarding rule for the HTTP(81) service created above.
-
Change the Destination Port Range option to
8443.
 in pfSense-1")
Figure 13. Port forwarding rule configuration for HTTPS(8443) on pfSense-1
-
Set the Redirect Target Port to
HTTPS. -
Change the Description field to
Allow HTTPS access to Webserver_10.1.1.14. -
Verify that the Filter rule association option is set to
Add associated filter rule -
Leave other options as they are.
-
Click
Savebutton at the bottom of the page.
 in pfSense-2")
Figure 14. Port forwarding rule configuration for HTTPS(8443) on pfSense-2
- Click the Apply Changes button to activate the settings.
Now, you have completed the port forwarding configurations of both web servers. Your port forwarding rules list should look like this.

Figure 15. Port forwarding rules list for web servers on pfSense
Since we have selected the Add associated filter rule option, the related firewall rules are created on the WAN interface automatically. To view the automatically added associated rules, navigate to the Firewall > Rules > WAN. The firewall rules list on WAN interfaces should look like this:

Figure 16. WAN firewall rules for web server port forwarding on pfSense
Although internal users should access the web servers by connecting to the private IP address (local IP) of the servers, they may try to connect to a local server by using the public IP addresses. To allow local users to access the public IP addresses of these servers, you must allow the NAT reflection. For NAT reflection, you should enable the NAT reflection by selecting Pure NAT on the NAT Reflection mode for port forwards option on the System > Advanced > Firewall & NAT page.

Figure 17. Enabling Reflection for port forwards
Also, be sure that NAT reflection is enabled in the port forwarding rule configuration.

Figure 18. Enabling NAT reflection in port forwarding rule
How to Configure Port Forwarding For SSH and RDP Services on Custom Ports
Imagine a web administrator who requires remote (SSH and RDP) access from home to the web servers. At home, he uses a static public IP address. As management services such as SSH and RDP are essential and offer a significant security risk, it is advised that they not be available from the whole Internet. As a consequence, you will construct a port forwarding rule to enable the IP address of the site administrator to access the web servers. you must allow SSH and RDP on custom ports since the default ports are already in use by other servers.
| Server Name | External IP | External Port | Local IP | Local Port | Client IP |
|---|---|---|---|---|---|
| WebServer1 | Public Internet IP | 2222 | 10.1.1.13 | 22 | 1.1.1.1 |
| WebServer2 | Public Internet IP | 5555 | 10.1.1.14 | 3389 | 1.1.1.1 |

Figure 19. Port Forwarding topology for SSH and RDP services
After completing the port forwarding configurations on your pfSense firewall, port 2222 requests coming from the web administrator IP address(1.1.1.1) to your WAN IP will be redirected to the WebServer1(10.1.1.13), while port 5555 requests coming from web administrator IP address(1.1.1.1) to your WAN IP will be redirected to the WebServer2(10.1.1.14).
Port Forwarding For SSH Service of WebServer1 on Custom External Port(2222)
To create a port forwarding rule for the SSH service of the WebServer1 on a custom port(2222), you may clone the port forwarding rule for the HTTP(80) service created above and change the related settings by following the step given below.
-
Click the clone icon to copy the port forwarding rule for the HTTP(80) service created above.
-
Click the
Display Advancedbutton in the Source option. This will display the details of theSourceoption. -
Select
Single Host or aliasfrom the Type dropdown menu and type the Web Administrator's static public IP address, such as1.1.1.1, in theAddress/maskfield. -
Leave Source Port Range as
any.
 on pfSense-1")
Figure 20. Port forwarding rule configuration for SSH(2222) on pfSense-1
-
Select
otherfor the Destination Port Range option and type2222for theCustomfield. -
Set the Redirect Target Port to
SSH. -
Change the Description field to
Allow SSH access to Webserver_10.1.1.13. -
Verify that the Filter rule association option is set to
Add associated filter rule -
Leave other options as they are.
-
Click the
Savebutton at the bottom of the page.
 on pfSense-2")
Figure 21. Port forwarding rule configuration for SSH(2222) on pfSense-2
- Click the Apply Changes button to activate the settings.
Port Forwarding For RDP Service of WebServer2 on Custom External Port(5555)
To create a port forwarding rule for the RDP service of the WebServer2 on a custom port(5555), you may clone the port forwarding rule for the SSH(2222) service created above and change the related settings by following the step given below.
-
Click the clone icon to copy the port forwarding rule for the SSH(2222) service created above in the port forward rules list.
-
Change the Destination Port Range option to
5555. -
Set the Redirect Target IP to WebServer2 local IP address, such as 10.1.1.14.
-
Set the Redirect Target Port to
MS RDP.
 on pfSense-1")
Figure 22. Port forwarding rule configuration for MS-RDP(5555) on pfSense-1
-
Change the Description field to
Allow RDP access to Webserver_10.1.1.14. -
Verify that the Filter rule association option is set to
Add associated filter rule -
Leave other options as they are.
 on pfSense-2")
Figure 23. Port forwarding rule configuration for MS-RDP(5555) on pfSense-2
-
Click
Savebutton at the bottom of the page. -
Click the Apply Changes button to activate the settings.
Now, you have completed the port forwarding rule configurations of both management services. Your port forwarding rules list should look like this.

Figure 24. Port forwarding rules list for web servers remote access on pfSense*
Since we have selected the Add associated filter rule option, the related firewall rules are created on the WAN interface automatically. To view the automatically added associated rules, navigate to the Firewall > Rules -> WAN. The firewall rules list on WAN interfaces should look like this:

Figure 25. WAN firewall rules for SSH and RDP access port forwarding on pfSense
Outbound NAT For Accessing a Remote Service Via Specific External IP Address
Imagine that one of your application servers (WebServer1 with the IP address 10.1.1.13) must connect to a MySQL database on the network of another firm through the Internet. In line with the agreements between your business and the other firm, you must guarantee that WebServer1 is the only device on your Network with access to the distant MySQL DB server (public IP address: 3.3.3.3). No other devices on your LAN may access the remote DB.
To do this, you must first acquire a second public IP address that will be used to provide WebServer1 access to the distant MySQL database. As a result of the fact that your initial public IP address is being utilized for Internet access by local users and servers, you must get a second IP address. We will utilize 2.2.2.2 as our second IP address, and WebServer1 will use this external IP address to connect to the remote MySQL database.
| Packet Type | Source IP Before NAT | Destination IP Before NAT | Source IP After NAT | Destination IP After NAT |
|---|---|---|---|---|
| MySQL Request | 10.1.1.13 | 3.3.3.3 | 2.2.2.2 | 3.3.3.3 |
| MySQL Reply | 3.3.3.3 | 2.2.2.2 | 3.3.3.3 | 10.1.1.13 |

Figure 26. Outbound NAT/SNAT topology for accessing remote Database server
You may follow the next steps given below:
-
Define an alias, such as
RemoteCompany_DB. -
To create a Virtual IP address for your second public IP address, navigate to the Firewall > Virtual IPs.
-
Click the
+Addbutton to add Virtual IP address. -
Select
IP Aliasas Type. -
Select
WANas Interface. -
Set Address to your second public IP address which is used for accessing the database server by your WebServer1, such as
2.2.2.2/32 -
Enter
WAN VIP_2.2.2.2in the Description field. -
Leave other options as default.
-
Click
Save.

Figure 27. Setting Virtual IP address configuration on pfSense
- Click
Apply Changesto activate the VIPs settings.

Figure 28. Virtual IP address settings on pfSense
-
Navigate to the Firewall > NAT > Outbound to define Outbound NAT.
-
Select
Hybrid outbound NAT rule generationoption. -
Click
Savebutton.

Figure 29. Setting Outbound NAT mode on pfSense
-
Click Add button with a UP arrow icon to add a manual Outbound NAT rule at the top of the list.
-
Set Interface to
WAN. -
You may set Address Family to
IPv4+IPv6. -
Set Protocol
TCP. -
Set Source add to
Network -
Enter the WebServer1 IP address such as
10.1.1.13/32. -
You may leave the source port field empty.
-
Select
Networkfor Destination andRemoteCompany_DBin the Destination Address field. -
Select Destination Port as
3306.

Figure 30. Defining Outbound NAT rule on pfSense -1
-
Select
2.2.2.2 (WAN IP_2.2.2.2)for Address in Translation pane. -
You may check
Static Portbox for Port or Range option used for remapping the original source port on connections matching the rule. -
Enter
Remote MySQL DB accessin the Description field.

Figure 31. Defining Outbound NAT rule on pfSense -2
-
Click
Save -
Click
Apply Changesto activate the Outbound NAT rule.
Your Outbound NAT rules list should look something like this:
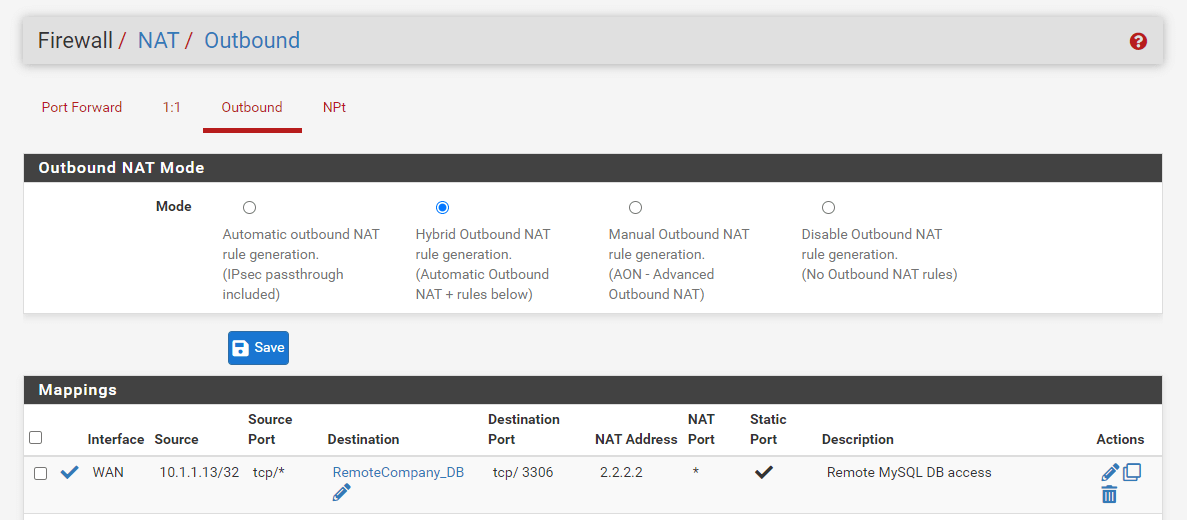
Figure 32. Outbound NAT rules on pfSense
When WebServer1 tries to connect to a remote database server, you should see that it connects the DB using the 2.2.2.2 IP address in your firewall logs. To view the firewall logs navigate to Status > System Logs > Firewall.