How to Configure pfSense Firewall Rules?
pfSense® software is a free, open-source variant of FreeBSD that has been modified for use as a firewall and router. In addition to being a robust and adaptable firewall and router platform, it includes a comprehensive list of capabilities and an attractive package structure. This package structure not only allows the operating system to grow flexibly but also avoids distribution security vulnerabilities. Global enterprises rely on pfSense® software to offer reliable, feature-rich firewall protection in the cloud. In this tutorial, we guide you in defining pfSense® software firewall rules with real-world examples. The following topics are covered briefly:
-
Managing Aliases
-
Managing firewall ruleset
-
Allowing Only Specific DNS Servers
-
Allowing Local Services between different Network Segments(VLANs)
-
Block Access to Other VLANs
-
Blocking All Traffic with implicit deny all rule
-
Allowing unrestricted access for administrator
-
Blocking All Devices in LAN from accessing a malicious IP on the Internet
-
Allowing ICMP messages for troubleshooting/monitoring
-
Allowing WireGuard/OpenVPN VPN Server access from the Internet
1. Managing Alias
Aliases are groups of addresses that enable a small number of firewall rules to affect a large number of hosts. Aliases may be referenced in firewall rules, port forwarding, outbound NAT rules, and other firewall GUI locations. Using aliases dramatically shortens, self-documents, and makes rulesets more manageable. They may considerably simplify a ruleset, making it simpler to comprehend and administer.
Aliases can be used in firewall rules to make it easier to manage large lists. For example, we may require a list of remote IP addresses that should have access to specific services; if anything changes, we simply update the list.
Aliases are found under Firewall > Aliases. The aliases page is separated into different tabs for each sort of alias:
-
IP
-
Ports
-
URLs
-
All tab that displays all aliases in a single long list.

Figure 1. Firewall Rule Aliases on pfSense firewall
While establishing an alias, you may add it to any tab, and it will be placed in the appropriate position depending on the selected type.
How to Nest Aliases?
The majority of aliases are nested inside other aliases of the same kind. For instance, a single alias may nest an alias holding web servers, an alias containing mail servers, and a servers alias including both the web and mail server aliases inside a larger Servers alias.
How to Use Hostnames in Aliases
Host and network type aliases enable entries with a fully qualified domain name (FQDN)-style hostnames (e.g. host.domain.com). For these entries to operate, the firewall must be able to resolve the hostname using A or AAAA type DNS queries. This implies that the firewall must have functional DNS and that the FQDN must exist in the firewall's DNS servers.
This technique only supports forward name resolution for fully qualified domain names with A and AAAA records, such as host.domain.com. Aliases do not enable pattern matching, wildcard matching (such as *.domain.com), or any other kind of record comparison.
If the DNS query for a hostname produces several IP addresses, each of those IP addresses is added to the alias.
This capability is ineffective for granting or denying access to huge public websites, such as those supplied by content delivery network (CDN) providers. The contents of the alias on the firewall do not necessarily correspond to the answer a user would obtain when resolving the same site name when such sites have replies that are continually changing or random. It can work for smaller sites with a limited number of servers that do not provide DNS replies with partial sets of addresses.
Every few minutes, the firewall resolves and updates each hostname item in an alias for a host or network type. The period is altered by navigating to System > Advanced > Firewall & NAT tab and modifying the value of Aliases Hostnames Resolve Interval on the Advanced Options pane. The default interval is 300 seconds (5 minutes). This is important for keeping track of dynamic DNS entries that provide access to specified users from dynamic IP addresses.

Figure 2. Aliases Hostnames Resolve Interval option on pfSense firewall
Aliasing IPv4 and IPv6 Addresses Together
It is possible to blend IPv4 and IPv6 addresses under an alias. When an alias is mentioned in a particular rule, the firewall will use the proper address type.
Size-Related Alias Issues
The total size of all tables must be about half of the default value for Firewall Maximum Table Entries, which is 400000 by default. The rules fail to load if the maximum number of table entries is insufficient to hold all of the entries. Due to how aliases are loaded and reloaded, the aliases must fit twice in the total space. The new list is loaded alongside the old list, and then the old list is deleted.
This value may be raised as much as necessary, providing the firewall has enough Memory to store the entries. The RAM utilization is comparable to, but less than, that of the state table, however, it is prudent to estimate around 1K of memory per entry, to err on the side of caution.
What are Alias Configuration Options?
While modifying an Alias entry, the following options are accessible:
-
Name: Identifier for the alias. The allowed characters for the name are
a-z,A-Z,0-9, and_. -
Description: A summary of the alias.
-
Type: The Type of the alias, modifies its functionality and informs the firewall of the sorts of entries that may be added to it. The following types are offered:
Host: Aliases holding single IP addresses or fully qualified domain names.Network: Aliases include CIDR-masked networks, FQDN hostnames, IP address ranges, or individual IP addresses.Port: These aliases include listings of TCP or UDP port numbers or port ranges.URL (IP or Port): The alias is constructed using the content returned by the supplied URL, but is only read once. It becomes a typical network or port type alias once inserted.URL Table (IP or Port): The alias is constructed using the material provided by the supplied URL, but is regularly updated by retrieving the list from the URL.
-
Entries: The entries for the alias are located in the bottom area of the alias page.
This section's functionality differs depending on the specified alias type. The following sections elaborate on the behavior of each alias type.
Host Aliases
Host type aliases include IP address groupings. Entries are supplied by IP address or fully qualified domain name (FQDN) for Host type aliases.
If an IP address range like 192.168.0.1-192.168.0.10 or a tiny subnet like 192.168.0.16/28 is supplied in this box, the firewall will convert it into a list of individual IP addresses when storing the alias.
The following Figure Example Hosts Alias demonstrates an instance of a host-type alias that is used to store a list of public web servers.

Figure 3. Hosts Alias Example on pfSense firewall
Other host-type aliases may be included inside this item. Hostnames may likewise be used as entries, as previously mentioned.
Network Aliases
Entries for Network type aliases are supplied in CIDR format for subnets or fully qualified domain names (FQDN) for individual addresses.
Choose the CIDR mask that corresponds to each subnet entry.
-
/32: designates a single IPv4 address -
/128: specifies a single IPv6 host -
/24: specifies255.255.255.0 -
/64: specifies a typical IPv6 network, etc.
Hostnames (FQDNs) may also be supplied with a /32 mask for IPv4 and a /128 mask for IPv6.
The following Figure provides an illustration of a network alias.

Figure 4. Networks Alias Example on pfSense firewall
Other host or network aliases may be included inside this entry. Hostnames may likewise be used as entries, as previously mentioned.
When an alias entry includes an IPv4 range, the firewall automatically converts it to an equivalent set of IPv4 CIDR networks that contain the specified range precisely. After the alias is saved, the range is then enlarged, and the resultant list of IPv4 CIDR networks will perfectly match the desired range.
Port Aliases
Groups of ports and port ranges are included inside Port type aliases. A single port is a number between 1 and 65535. A port range consists of two ports separated by a colon (:), such as 1194:1199, and corresponds to the given ports and any ports in between.
The firewall rule where the alias is used will describe the protocol as TCP, UDP, or both. The following Figure demonstrates a port type alias.

Figure 5. Ports Alias Example on pfSense firewall
Insert the name of another port-type alias in the Port box to nest other port-type aliases inside this alias.
URL Aliases
Each item with a URL type alias has a URL that provides text content including a list of entries. Several URLs are permitted.
When the Save button is pressed, up to 3,000 items from each URL are imported into a network type alias.
If URL (IPs) is chosen, the URLs must include IP addresses or CIDR-masked network entries, and the firewall produces a network type alias based on the contents.
If URL (Ports) is chosen, the URL must include only port numbers or ranges, and the firewall will build a port type alias from the contents of the URL.
The firewall re-fetches the contents of an alias of the URL type every 24 hours from the saved URL.
URL Table Aliases
The behavior of a URL Table alias differs dramatically from that of a URL alias. To begin with, it does not import the file's contents into a standard alias. It uploads the URL's contents to a designated area on the firewall and utilizes them to create a persist table, also known as a file-based alias. The whole contents of an alias are not immediately editable from the graphical user interface but may be examined via the Tables viewer.
The drop-down list after the / for a URL Table alias determines how many days must pass before the firewall re-fetches the alias contents from the cached URL. When the time comes, the contents of the alias will be changed overnight by a script that retrieves the data again.
URL Table aliases might have hundreds upon thousands of entries. Some admins use them to store lists of all IP blocks in a certain nation or area, which may easily exceed 40,000 entries. This sort of alias is used by the pfBlocker package for processing country lists and related activities.
Currently, URL Table aliases do not support nesting.
If URL Table (IPs) is chosen, the URLs must include IP address or CIDR-masked network entries, and the firewall generates a network type alias based on the contents.
If URL Table (Ports) is chosen, the URL must include only port numbers or ranges, and the firewall will generate a port type alias based on the contents.
How to Define Alias?
Let's make a simple alias that allows three remote IP addresses to connect to an IPSec server for a site-to-site VPN tunnel connection. The alias name will be remote_ipsec. To define and update the related firewall rule this alias will be used:
-
172.16.1.1
-
172.16.2.2
-
172.16.3.3
To create an alias on pfSense firewall Web GUI, follow the next steps given below:
-
Navigate to the Firewall > Aliases > IP page.
-
Click on the +Add button at the right bottom of the pane
-
Enter the Name of the alias, such as
remote_ipsec. -
Type a Description that will assist you in understanding the purpose or details of the alias.
-
Select
Host(s)in the Type dropdown menu. -
Enter the IP addresses range separated by comma
-in the IP or FQDN field, such as172.16.1.1-172.16.1.3, and fill in theDescriptionfield. -
Click Save.
-
Click Apply Changes button to activate the settings.

Figure 6. Adding an IP alias on pfSense firewall
tipEach manually entered alias is restricted to 5,000 members, however, certain browsers have difficulty showing or accessing the page when it has more than 3,000 entries. Use an alias of the URL Table type that is capable of handling huge lists for large numbers of items.

Figure 7. Viewing aliases on pfSense firewall
To remove members from an alias, click Delete Alias button with a trash icon ,, at the end of the row on
Alias page.
How to Import Network Aliases?
You may use the bulk import option to import several entries into an alias by following the next steps.
-
Navigate to the Firewall > Aliases page.
-
Click on the Import button at the right bottom of the pane.
-
Complete the Alias Name and Description fields.
-
Insert the alias contents, one per line, in the Aliases to import text section.
-
Click Save.
-
Click Apply Changes button to activate the settings.

Figure 8. Importing aliases on pfSense firewall
Typical examples of this page's use include IP address and network listings, as well as blacklists. The list might include IP addresses, CIDR-masked networks, IP ranges, and port numbers. The firewall will try to automatically identify the target alias type.
The firewall imports items into a standard alias that may be changed in the future.
How to Use Alias?
On pfSense Web UI, when a letter is entered into an input field that accepts aliases, the user interface shows a list of aliases that match. Then, you may choose the appropriate alias from the list or fill it in manually.
Alias autocompletion is case-insensitive, but type-restricted. A Network or Host type alias will appear in autocomplete for a Network field, but a Port type alias will not. A port alias may be entered in a port field, but a Network alias will not appear in the drop-down menu.
When the mouse cursor hovers over an alias on the Firewall > Rules page, a tooltip containing the alias' contents and descriptions is shown.
2. Creating a Firewall Rule
You can easily create a packet-filtering firewall rule on pfSense by following the steps given below.
-
Navigate to the Firewal `> Rules on pfSense web GUI.
-
Select the interface that you want to define a rule, such as WAN, LAN, VLAN10 or GUESTNET, etc. This will list the existing firewall rules on the selected interface.
-
Click the green Add button with UP arrow icon,
, at the top right corner of the rule list to add a rule to the top of the list. Or, Click the green Add button with DOWN arrow icon,
, at the top right corner of the rule list to add a rule to the bottom of the list. This will redirect you to the rule configuration page.
-
Select
Passto allow a connection or selectBlockorRejectto deny a connection for the Action` option. -
Set the
Sourceeither by entering a single host/network or selecting one of the existing aliases. -
Specify the source port or port range. Usually, it is left as
anyby default. -
Set the
Destinationeither by entering a single host/network or selecting one of the existing aliases. -
Specify the destination port or port range.
-
You may enable logging.
-
You should also enter a description for the rule which may be useful for rule maintenance.
-
You may leave other fields as default or set them properly as you wish.
-
Click the
Savebutton to save the rule. This will take you to the interface rule list. -
Click
Applybutton to apply the changes and activate the newly created rule.
What Are the Key Parameters of a pfSense Firewall Rule?
Firewall rules are implemented in pfSense to regulate the passage of traffic through the firewall. The pfSense firewall's filtering, routing, and management of traffic are collectively determined by parameters. The secure and efficient operation of the network is guaranteed by the proper configuration of these parameters. The primary parameters of a pfSense firewall rule are as follows:
- Action: Determines the course of action for traffic that matches the criteria. This parameter has the following options.
- Pass: Permits traffic.
- Block: Rejects the traffic without providing a response.
- Reject: The traffic is denied, and a response is sent to the source.
- Interface: Indicates the network interface to which the rule applies (e.g., LAN, WAN, OPT1). Identifies the point of origin or destination of the traffic.
- Protocol: Indicates the protocol that is to be matched. Common options are TCP, UDP, ICMP and Any.
- Source: Indicates the origin of the traffic.This parameter has the following options.
- Source Address: This can be a specific IP address, subnet, or alias.
- Source Port (optional): Indicates the port(s) on the originating device.
- Destination: Indicates the final destination of the traffic.This parameter has the following options.
- Destination Address: This can be a specific IP address, subnet, or alias.
- Destination Port (optional): Indicates the port(s) on the destination device.
- Address Family Indicates the IP version of the traffic. Options are IPv4, IPv6, Any.
- Description: A text field that is used to provide a meaningful description of the rule.It is beneficial for the administration of rules and documentation.
- Advanced Options: Additional parameters for adjusting the rule. This parameter has the following options.
- Logging: Facilitates the logging of traffic that complies with the rule.
- Schedule: Defines a time-based schedule for the rule's active period.
- Gateway: Enables the designation of a gateway for the purpose of routing traffic.
- Queue/QoS: Assigns traffic to specific queues for bandwidth management.
- States: Regulates the manner in which pfSense manages stateful connections.This parameter has the following options.
- Keep State: Preserves the state of matching connections (default for TCP).
- Sloppy State: Certain protocols exhibit looser state monitoring.
- None: Prevents the monitoring of state.
- Source/Destination Inversion - Enables the inversion of the match condition for the source or destination (e.g., "not this IP").
3. Selecting Firewall Rules
To perform a task, such as enabling, disabling, deleting, or moving, etc, on some of the firewall rules on an interface, you may select them by clicking on the checkbox icon at the first column of the rule list. You can also select all rules by clicking on the checkbox icon header bar of the list.

Figure 9. Selecting firewall rules on pfSense firewall
Which Rule Option Is Used to Match Traffic Based on Direction in pfSense?
The Interface configuration is the rule option used for the purpose of matching traffic based on direction in the pfSense firewall. During the development of firewall rules, the direction of the traffic being filtered is determined by specifying the interface (e.g., WAN, LAN, or any other configured interface). pfSense firewall rules are applied to traffic entering an interface, not leaving it. In order to regulate traffic entering your network from the internet, you would establish policies on the WAN interface. Similarly, in order to regulate traffic that originates from your local network, you would establish protocols on the LAN interface. Key points are as follows:
- Inbound Traffic: Rules applied to the WAN interface typically handle traffic coming into the network from external sources.
- Outbound Traffic: Rules applied to the LAN interface typically manage traffic leaving the internal network toward external destinations.
4. Moving a Firewall Rule
To block or allow network traffic, you may need to reorder the firewall rules on the list. Drag-and-drop or select-and-click options are used to rearrange the order of the rules on an interface.
To reorganize rules by dragging and dropping:
-
The cursor will change when you move the mouse over a firewall rule to show that movement is possible.
-
Click and hold the mouse button down.
-
Move the mouse to the appropriate rule place.
-
Release the mouse button.
-
Click
Saveto save the updated rule order.
Figure 10. Reordering firewall rule with drag and drop
warningIf you attempt to move away from the page after changing a rule but before storing the order, the browser will display an error message asking whether you want to depart the page. If the browser leaves the page without saving it, the rule will remain in its initial place.
Use the select-and-click approach to move rules in the list individually or in groups by following the next steps:
-
Choose the rule(s) that you want to move by clicking a single time on its/their line or by ticking the box at the beginning of the row.
-
Click the Anchor icon on the row underneath where the rule has to be relocated.
tipHolding Shift while clicking on the anchor icon will shift the rule below the specified rule, rather than above.
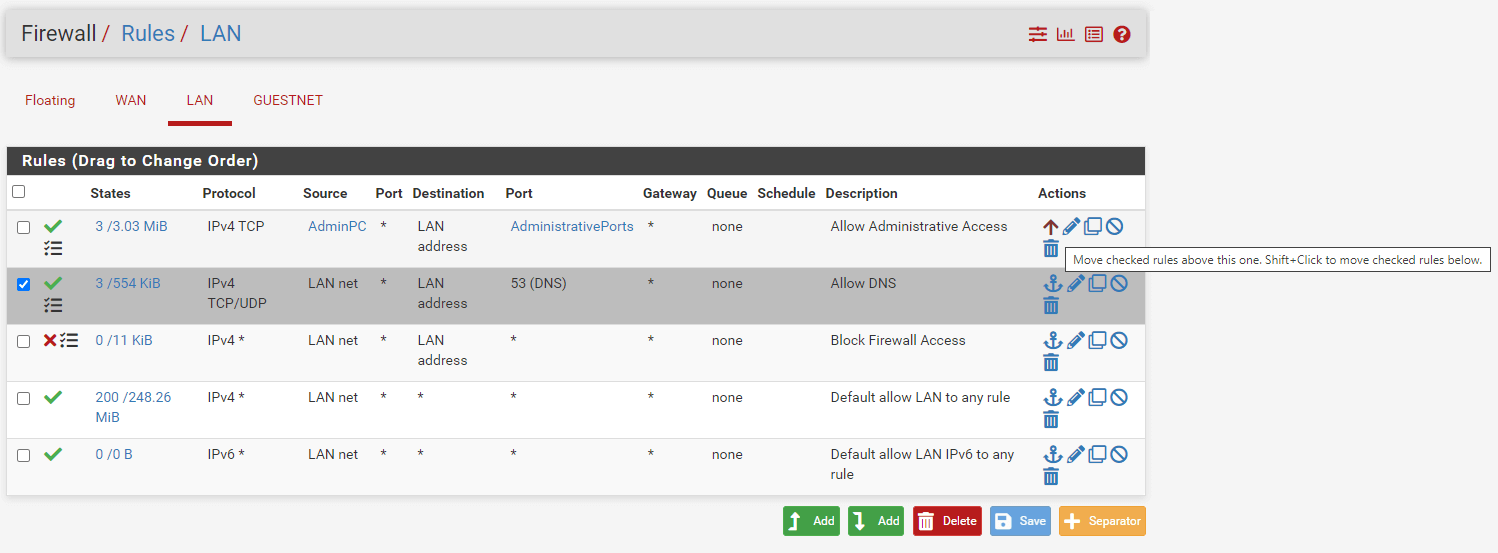
Figure 11. Reordering firewall rule with select-and-click
When rules are rearranged using the select-and-click approach, the new order is immediately saved.
5. Deleting Firewall Rules
You may delete firewall rules either by clicking on the trash icon at the end of the related rule after selecting the rules that you wish to remove.
To remove multiple firewall rules:
-
Pick rules by clicking a single time on their line or by ticking the box at the row's beginning.
-
Click the
Delete button below the rule list.
-
Confirm the removal.
-
Click on the
Apply Changesbutton to activate the new rule settings.
Figure 12. Deleting multiple firewall rules
How to Remove Firewall Rules from an Interface in pfSense?
You may easily remove firewall rules from an interface in pfSense by following these steps.
- In the pfSense menu, go to Firewall > Rules. You will see a list of interfaces (e.g., WAN, LAN, OPT1).
- Click on the interface where the rules are applied.
- Locate the rule(s) you want to delete from the interface. If you're unsure which rule to remove, review the descriptions or settings to confirm.
- Click the trash can icon next to the rule you want to remove.A confirmation prompt will appear.
- Confirm the deletion.
- After deleting the rule(s), click the Apply Changes button at the top of the page. This ensures the firewall reloads with the updated configuration.
If you're unsure about permanently removing a rule, you can disable it by clicking the checkbox next to the rule and selecting Disable from the options at the bottom of the page. Then apply changes.
Before making changes, consider backing up your pfSense configuration. Go to Diagnostics > Backup & Restore to save the current settings.
6. Enabling/Disabling Firewall Rules
To deactivate a rule, click on the ban icon at the end of the firewall rule that you wish to enable. The rule's look will become lighter to signify that it has been deactivated, and the ban symbol will transform into a square box with a check icon.
Lastly, Click on the Apply Changes button to activate the new rule settings.

Figure 13. Disabling firewall rule
To activate a previously disabled rule, click on the square box with a check icon at the end of its row. The rule's look will return to normal, and the icon for enable/disable will revert to the original fa-ban.
Then, Click on the Apply Changes button to activate the new rule settings.

Figure 14. Enabling firewall rule
7. Validating Rule Usage
States is a column containing usage statistics for each rule. It displays the number of active states produced by a rule and the amount of traffic those states use. When the mouse hovers over these counters, extra data are shown.
While the firewall attempts to keep these data, the numbers may reset over time due to reloads of the firewall's ruleset and other similar events.
By clicking the value in this column, a list of states produced by the rule will be shown.

Figure 15. Viewing Firewall rule states details
What Are the Valid Actions of a Rule-Based Firewall in pfSense?
The rule-based firewall in pfSense enables the definition of traffic actions based on specific criteria. These actions enable you to effectively manage traffic flow and customize the firewall's behavior to accommodate your network's security and performance requirements. The actions that are considered valid for pfSense firewall rules are as follows.
- Pass: Enables the firewall to forward traffic that complies with the rule. This feature is employed to authorize specific traffic, such as facilitating communication between devices on various networks or permitting HTTP/HTTPS traffic.
- Block: Denies traffic that satisfies the rule without transmitting a rejection message to the source. It is utilized to silently transmit packets, thereby creating the illusion that the destination is unreachable. It is beneficial for preventing superfluous responses and achieving concealment.
- Reject: Sends a rejection message (e.g., ICMP unreachable or TCP reset) to the source and denies traffic that matches the rule. This is a useful tool for troubleshooting or enforcing policies, as it informs the sender that their traffic has been explicitly denied.
- Match: Matches traffic according to criteria but does not explicitly approve, deny, or reject it. Alternatively, it implements other configurations, including traffic shaping or Quality of Service (QoS). It is utilized in sophisticated configurations, including the application of bandwidth restrictions or the prioritization of specific classes of traffic.
8. Editing Firewall Rules
To edit a firewall rule, click on the pencil icon on the actions column of the rule that you wish to edit. This will redirect you to the firewall rule editing page. After making the changes to the rule settings, click the Save button at the bottom of the page.
Lastly, Click on the Apply Changes button to activate the new rule settings.

Figure 16. Editing a firewall rule
9. Cloning Firewall Rules
Sometimes you may need to define very similar firewall rules with only a few different options, such as destination or interface. In such cases, cloning a rule is a very useful feature of the pfSense.
To clone a firewall rule, click on the clone icon with two cascaded squares. This will redirect you to the firewall rule editing page. After making the changes to the rule settings, click the Save button at the bottom of the page. Your new rule is created now.
Lastly, Click on the Apply Changes button to activate the new rule on the firewall.

Figure 17. Cloning a firewall rule
10. Using Rule Separators
Firewall Rule Separators are colored bars in the ruleset that include content but have no effect on traffic. They are handy for visually dividing sections of the ruleset or adding remarks. Rule Separators are not editable. If the wording or color needs to be modified, create a new Rule Separator and remove the previous one.
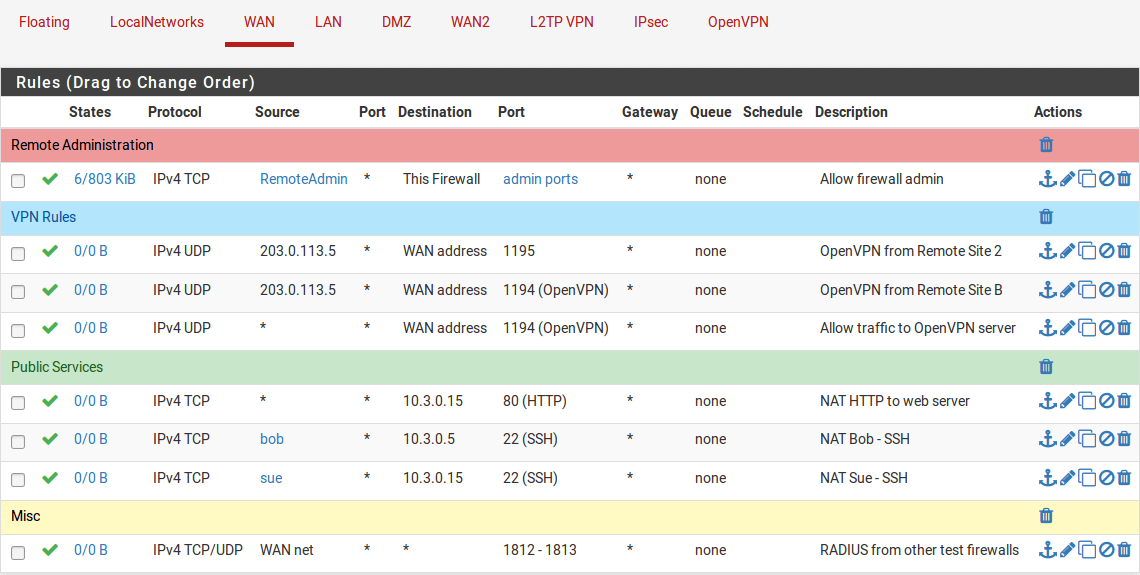
Figure 18. Firewall rule seperators
You may add a new Rule Separator by following the next steps:
-
Open the firewall ruleset tab where the Rule Separator will reside
-
Click +Separator button at the end of the page.
-
Enter the description text for the Rule Separator.
-
Choose the color for the Rule Separator by clicking the color palette icon of the desired color.
-
Click and drag the Rule Separator to its new location
-
Click
Save inside the Rule Separator to store its contents
-
Click
Save at the bottom of the rule list

Figure 19. Adding Firewall rule seperator
You may move Rule Separator by following the next steps:
-
Open the firewall ruleset tab containing the Rule Separator
-
Click and drag the Rule Separator to its new location.
-
Click Save at the bottom of the rule list
You may delete Rule Separator by following the next steps::
-
Open the firewall ruleset tab containing the Rule Separator
-
Click Delete button with a trash icon,
, inside the Rule Separator on the right side
-
Click Save button at the bottom of the rule list.
pfSense Firewall Rules Examples
Some common firewall rules examples which might be very useful for home users and small businesses to get their firewalls ready are given below.
1. Allowing Only Specific DNS Servers
One of the firewall rules you should define for preventing cyber threats is to block your LAN devices accessing the DNS servers except for your own DNS servers or specific external DNS that offer content filtering/blocking. These rules keep clients from going rogue and circumventing the filtering/blocking policies you've put in place for your LAN or home network.
To restrict the DNS service in your network for increasing the cybersecurity, you may follow the next two main steps:
1.1. Define a rule to Allow the internal DNS server(s)
Click the Add button with the UP arrow icon for defining a rule to allow the internal DNS server(s), and then follow the instructions below.
| Option | Value |
|---|---|
| Action | Pass |
| Interface | LAN |
| Protocol | TCP/UDP |
| Source | LAN net |
| Source Port | any |
| Destination | LAN address |
| Destination Port | DNS (53) |
| Description | Allow internal DNS |
-
Select
Passfor the allowed rule. -
Select the
InterfaceasLAN. -
Select
TCP/UDPfor theProtocol. -
Select the source as
LAN net. This captures all traffic on the LAN interface bound for the specified destination. -
Select the
destinationasLAN address. You may choose the LAN address of the pfSense as the destination address. Or, enter the IP address of your own DNS server on LAN. -
Select
DNSpredefined port alias for theDestination Port Range.
Figure 20. Allow Internal DNS firewall rule
Because the DNS service is advertised on each interface's IP address, the LAN address is used as the destination. The IP address of the interface is also used as the gateway address for devices on that network. When you look at the DHCP information for each device, you'll notice that the LAN address serves as both the gateway server and the DNS server.
Depending on your network configuration, the DNS IP address may differ from the gateway IP address. However, for this example, it is assumed that we're using the DNS server configuration in pfSense.
-
Check
Log packets that are handled by this ruleoption to enable logging.
Figure 21. Setting Extra Options for Firewall Rule to allow internal DNS
-
Set
Allow Internal DNSforDescription. -
Click
Save. -
Click
Apply Changesto activate the rule.
1.2. Define the rule to deny the external DNS server(s)
You may add a firewall rule to block external DNS server(s) access by following the instructions below:
| Option | Value |
|---|---|
| Action | Block |
| Protocol | TCP/UDP |
| Source | any |
| Destination | any |
| Destination Port | DNS (53) |
| Description | Block external DNS |
-
Select "Block" for the deny rule.
-
Select
TCP/UDPfor theProtocol. -
The source address and port on the LAN network must be configured to
anydevice. -
The destination must be
anyfor that block rule since we want to block attempts to use any other DNS server. -
Choose destination port
DNS.
Figure 22. Block External DNS firewall rule
-
Check
Log packets that are handled by this ruleoption to enable logging.
Figure 23. Setting Extra Options for Firewall Rule to Block external DNS
-
Set
Block external DNSforDescription. -
Click
Save. -
Click
Apply Changesto activate the rule.
Recall that any attempt to contact the specified DNS server in the above allow rule is successful because of the rule order processing and rule treatment for that request ceases. However, if a device attempts to access a DNS external server, the block rule will be reached as it does not pass the allow rule which prohibits that server access.
The first rule permits access to your local DNS server whilst the second rule blocks access to all other DNS servers irrespective of whether local or remote. You may need to move these rules to the top of your rule list. Don't forget to click on the Apply Changes button to activate the newly created DNS rules.

Figure 24. Internal and external DNS firewall rules on ruleset
2. Allowing Local Services between different Network Segments(VLANs)
As a rule of thumb, you should isolate critical servers from client devices by implementing network segmentation in your infrastructure. pfSense firewall allows you to build internal zones separating functional areas so as to minimize attack surfaces and prevent threats from propagating beyond the zone.
For example, human resources (HR) database servers should only be accessible by HR department staff computers in a company network. To define the required pfSense firewall rules, you may follow the next steps given below.
| Option | Value |
|---|---|
| Action | Pass |
| Protocol | TCP |
| Source | HR_PCs |
| Source Port | any |
| Destination | HR_DBserver |
| Destination Port | MySQL |
| Description | Allow access to HR Database Server |
-
Define an Hosts alias, such as HR_PCs, for the HR client devices(such as 10.10.10.11-10.10.10.20).
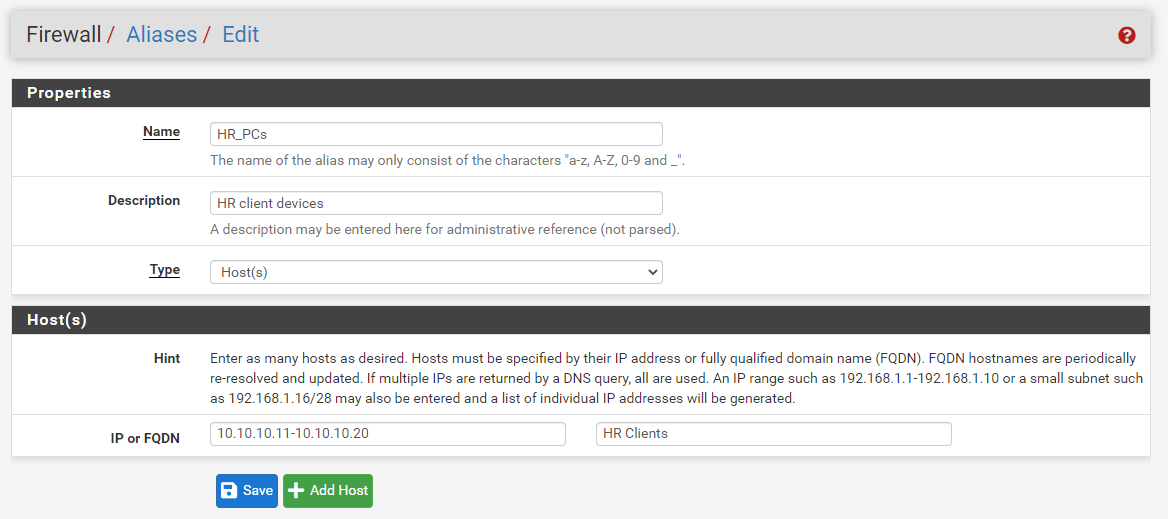
Figure 25. Defining an alias for Human Resources PCs
-
Define a Hosts alias, such as HR_DBserver, for the HR Database Server(such as 172.16.10.20)
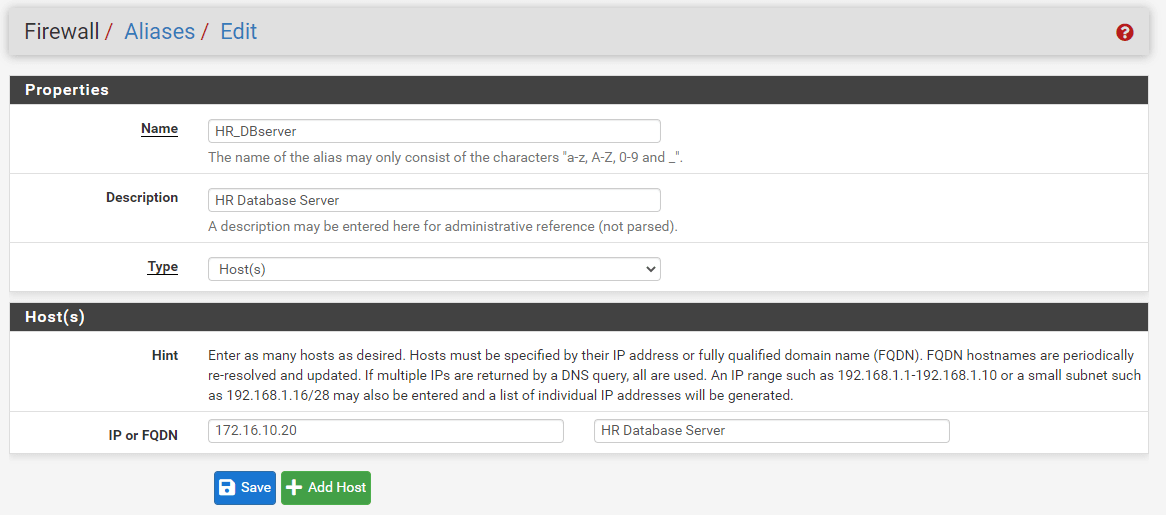
Figure 26. Defining alias for Human Resources Database Server
-
Define a Port alias, such as MySQL, for the HR Database Server MySQL service(the default port for MySQL)
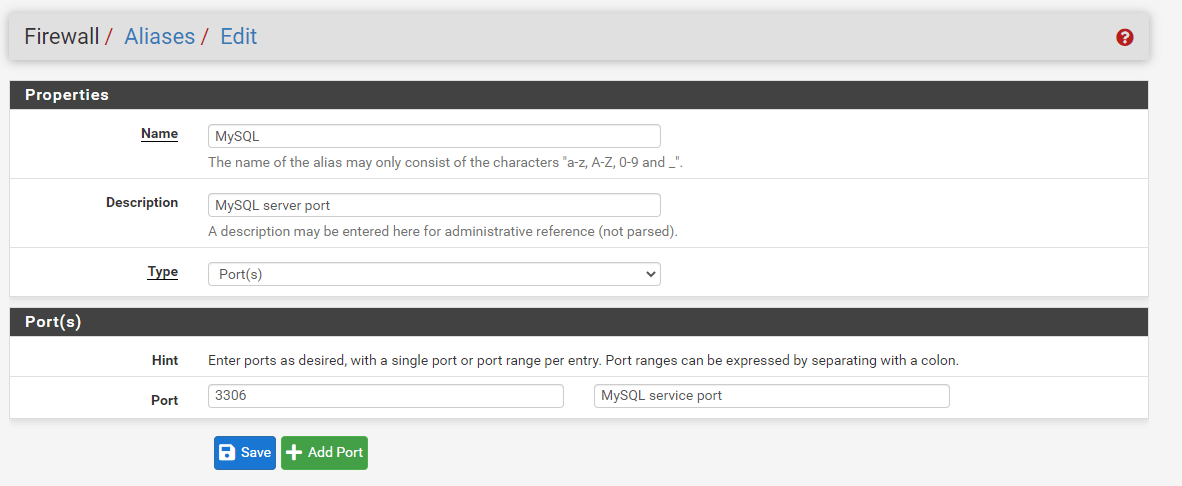
Figure 27. Defining an alias for MySQL default service port(3306/TCP)
-
Navigate to the interface in which the HR client device resides, such as LAN, on the Firewall Rules. Then click Add to add a firewall rule for allowing access to port 3306.
-
Select
Passfor the allow rule. -
Set
TCPas the Protocol -
Select
Single host or aliasand set theHR_PCsas the source. -
Select
Single host or aliasand setHR_DBserveron the destination -
Set
MySQLas the destination port range.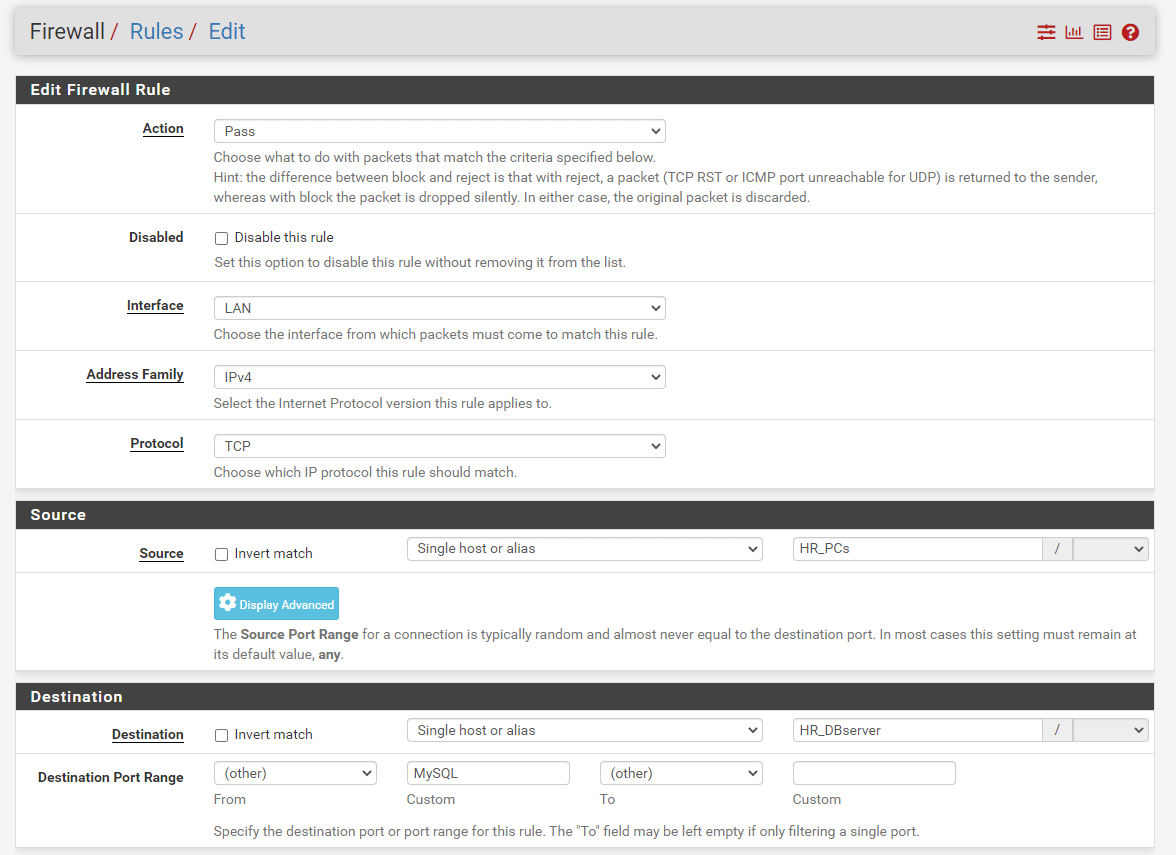
Figure 28. Defining HR Database server access rule
-
Check
Log packets that are handled by this ruleoption to enable logging. -
Set
Allow HR Database server accessforDescription. -
Click
Save. -
Click
Apply Changesto activate the rule.
This rule provides network access from your HR staff PCs to the HR Database server. There should be either Deny all rule at the end of the list or another deny rule for preventing other devices' access to the HR DB server. Don't forget to reorder the firewall rules depending on your needs.
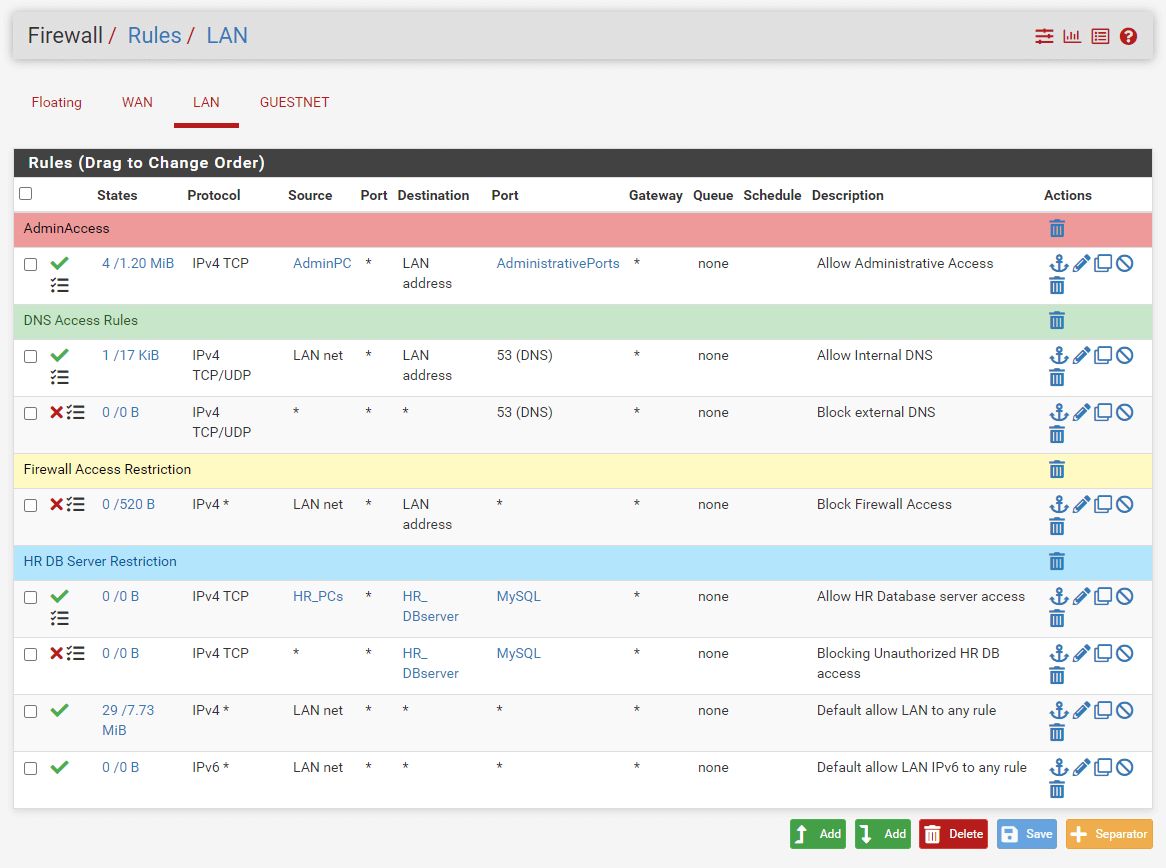
Figure 29. Firewall rules set after DB access restriction
It is recommended to create a DMZ network that grants external sources restricted access to publicly available information while protecting the internal networks from outside attacks. As a second example, we will allow internal clients to access the web server located in the DMZ network.
| Option | Value |
|---|---|
| Action | Pass |
| Protocol | TCP |
| Source | LAN net |
| Source Port | any |
| Destination | Web_server |
| Destination Port | HTTPS |
| Description | Allow access to Web Server |
-
Define a Hosts alias, such as WebServers, for the Web server location in DMZ.
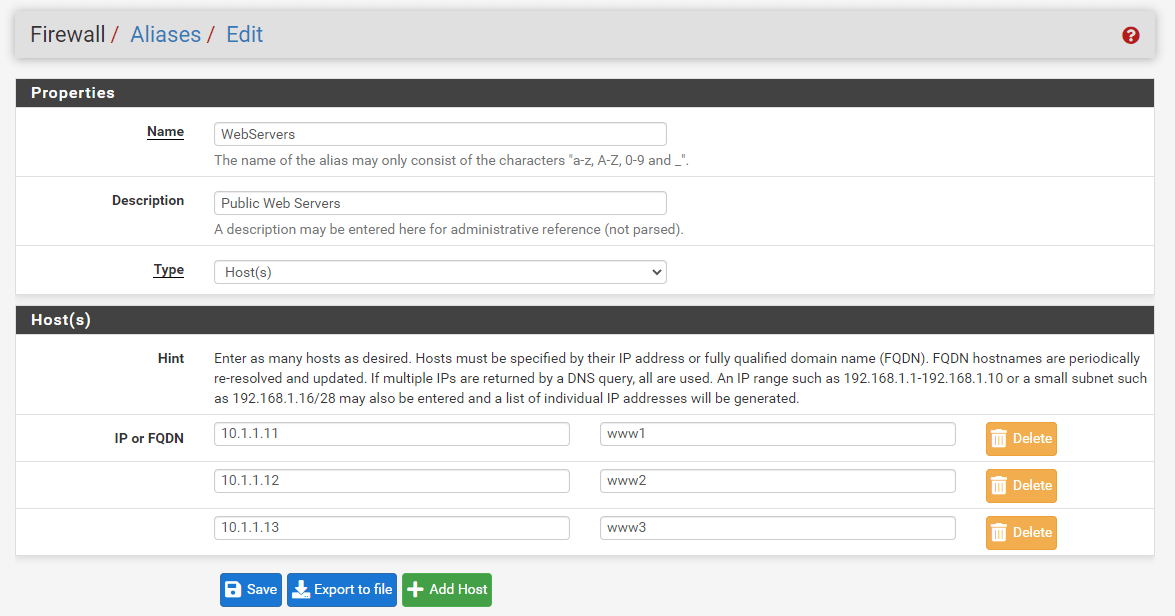
Figure 30. Defining an alias for Web Servers on the DMZ network
-
Navigate to the LAN interface. Then click Add to add a firewall rule for allowing access to HTTPS port 443.
-
Select
Passfor allow rule. -
Set the
LANnetas the source. -
Select
Single host or aliasand setWebServerson the destination. -
Set
HTTPSas the destination port range.
Figure 31. Adding DMZ Web Server access rule
-
Check
Log packets that are handled by this ruleoption to enable logging. -
Set
Allow DMZ Web servers accessforDescription. -
Click
Save. -
Click
Apply Changesto activate the rule. Don't forget to reorder the firewall rules depending on your needs.
3. Block Access to Other Internal Networks
It is advised to block any unnecessary service access between internal networks(VLANs). pfSense software uses default deny on the WAN and default allow on the LAN in a setup with two LAN and WAN interfaces. Everything incoming from the Internet is forbidden, but everything outbound from the LAN to the Internet is allowed. Avoid keeping the default allow all rule on the LAN and putting block rules for "bad stuff" above the permit rule. Therefore, you should define a specific rule to block connections between the VLANs in your networks. Otherwise, any device on a network can communicate with any other device on other VLANs which means that all advantages of the network segmentation are lost.
| Option | Value |
|---|---|
| Action | Block |
| Protocol | any |
| Source | LAN net |
| Source Port | any |
| Destination | Private_IP_Ranges |
| Destination Port | any |
| Description | Block access to all other private networks |
To define the required pfSense firewall rule, you may follow the next steps given below.
-
Create an alias, such as
Private_IP_Rangesfor all private IP address ranges by navigating to theFirewall>Aliases.
Figure 32. Defining an alias for Private IP ranges
-
Navigate to the LAN interface. Then click Add to add a firewall rule for blocking access to other private networks (VLANs).
-
Select "Block" for the deny rule.
-
Select
Anyfor the Protocol option. -
The source address and port on the LAN network must be configured to
anydevice. -
Select
Single host or aliasand setPrivate_IP_Rangeson the destination since we want to block attempts to use any other internal networks. -
Check
Log packets that are handled by this ruleoption to enable logging. -
Set
Block access to all other private networksforDescription. -
Click
Save. -
Click
Apply Changesto activate the rule. Don't forget to reorder the firewall rules depending on your needs.
Figure 33. Deny rule for accessing other internal networks
Don't forget to reorder the firewall rules depending on your needs.

Figure 34. Firewall rules set after other internal networks access restriction
4. Allow Internet Web Access
At the bottom of the pfSense firewall rule list, there is an implicit allow all rule by default. However, we will remove these rules and add an implicit deny all rule at the bottom of the ruleset. Before making this change in the following section, we should define a firewall rule to allow LAN clients to access the internet web(HTTP/HTTPS) services.
| Option | Value |
|---|---|
| Action | Pass |
| Interface | LAN |
| Protocol | TCP |
| Source | LAN net |
| Source Port | any |
| Destination | any |
| Destination port range | WebServices |
| Description | Allow Internet Web Access |
To define the required pfSense firewall rule, you may follow the next steps given below.
-
Create an alias, such as
WebServicesfor all private IP address ranges by navigating to theFirewall>Aliases.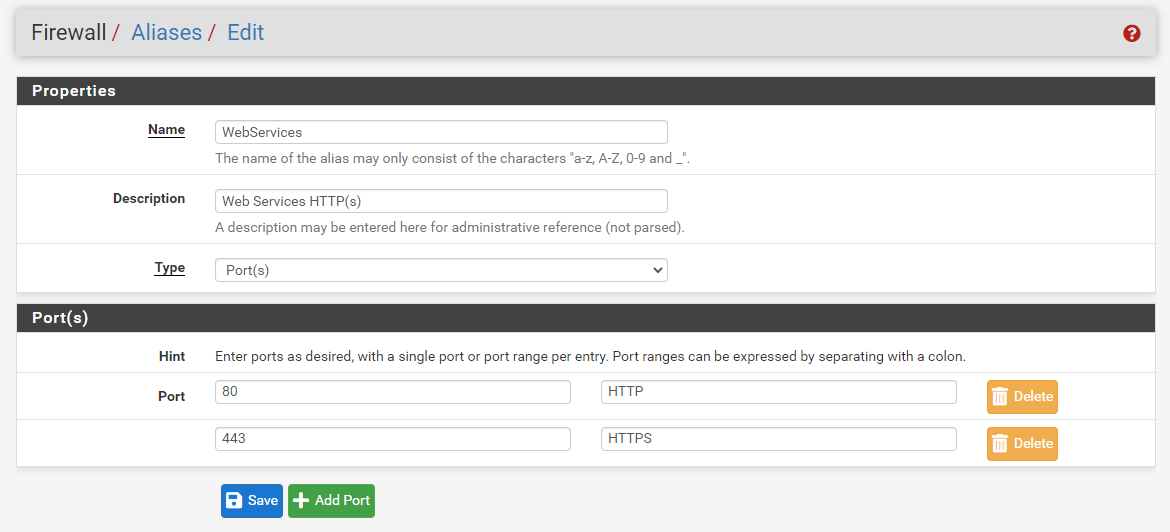
Figure 35. Defining an alias for Web service ports
-
Navigate to the LAN interface firewall ruleset and click the Add button with a DOWN arrow icon for defining a rule to allow the LAN clients to access the Internet web.
-
Select
Passfor the allow rule. -
Select the Interface
LAN. -
Select
TCPfor theProtocol. -
Select the source
LAN net. -
Select the destination as
any.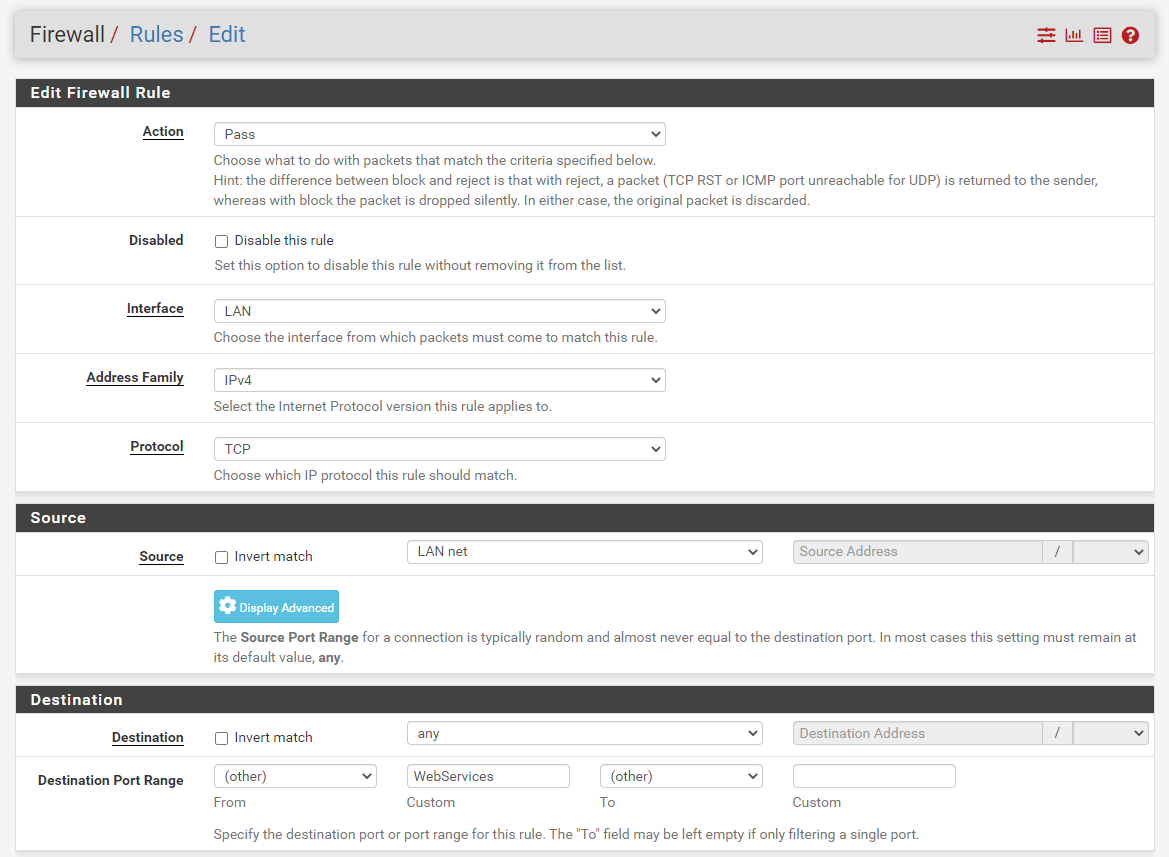
Figure 36. Adding Firewall Rule to Allow Internet Web access from LAN on pfSense
-
Select
otherand setWebServicesfor Destination port range. -
Check
Log packets that are handled by this ruleoption to enable logging. -
Set
Allow Internet Web Accessfor Description -
Click
Save. -
Click
Apply Changesto activate the rule.
5. Blocking All Traffic
There is an implicit allow all rule by default at the bottom of the pfSense firewall rule list. In this section, we will remove this rule and add an implicit deny all rule by following the next instructions:
-
Navigate to the LAN interface firewall ruleset.
-
Select the
Default allow LANrules for IPv4 and IPv6 by checking the box at the beginning of the rule lines. -
Click Delete button at the bottom of the page.

Figure 37. Deleting Default Allow all rules
-
Click
OKto confirm the rule removal. -
Click
Addbutton with a DOWN arrow icon for defining a implicitdeny allrule. -
Select
Blockfor the deny rule. -
Select the Interface
LAN. -
Select
anyfor theProtocol. -
Select the source
LAN net. -
Select the destination as
any. -
Select the destination port range as
any. -
Check
Log packets that are handled by this ruleoption to enable logging. -
Set
Block All Trafficfor Description -
Click
Save.
Figure 38. Adding Firewall Rule to Implicit Deny All Traffic from LAN on pfSense
-
Click
Apply Changesto activate the rule.
Now, your firewall ruleset for the LAN interface should look similar to the Figure given below:

Figure 39. Firewall ruleset after implicit deny all rule
6. Allowing unrestricted access for administrator
In case of any IT service outage, the administrator should access any device from his/her PC or a server that he can physically access for quick troubleshooting. Therefore, it is a suitable approach to defining a rule which allows unrestricted access for an administrator at the top of the rule list before the block rules. To define the required pfSense firewall rule, you may follow the next steps given below.
| Option | Value |
|---|---|
| Action | Pass |
| Interface | LAN |
| Protocol | any |
| Source | AdminPC |
| Source Port | any |
| Destination | any |
| Destination Port | any |
| Description | Allow admin devices access to anywhere without any restriction |
-
Create an alias, such as
AdminPCfor all administrator devices by navigating to theFirewall>Aliases. -
Navigate to the interface in which the admin devices reside, such as LAN, on the Firewall Rules. Then click the
Addbutton with a UP arrow icon to allow admin access anywhere. -
Select
Passfor the allow rule. -
Select
AdminPCas Source. -
Select
anyas Source port, destination, and destination port range. -
Check
Log packets that are handled by this ruleoption to enable logging. -
Set
Allow admin devices access without any restrictionfor Description -
Click
Save. -
Click
Apply Changesto activate the settings.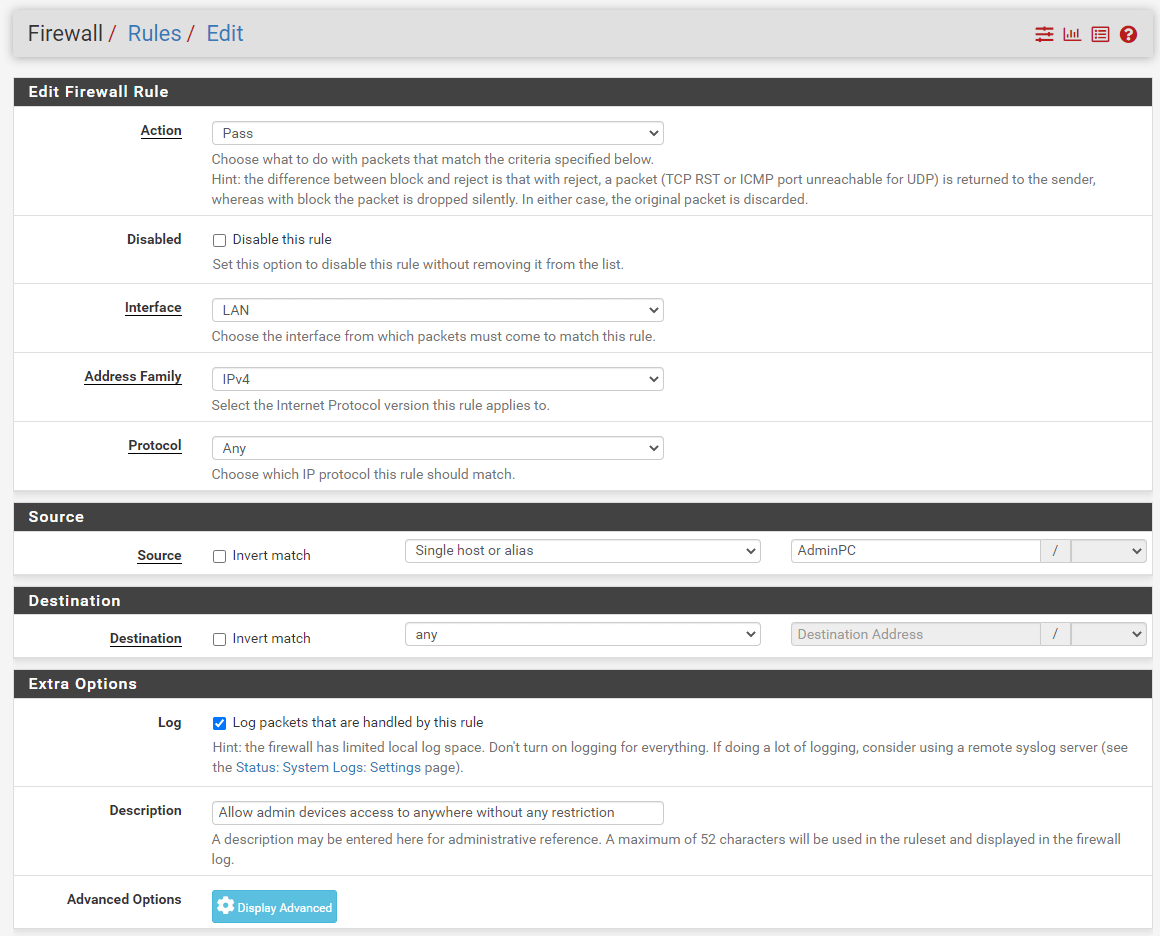
Figure 40. Allow admin devices access without any restriction
7. Blocking All Devices in LAN from accessing a malicious IP on Internet
Sometimes you may notice that there is a cyber threat that comes from a malicious IP, such as a phishing server, on the Internet. To block all clients and servers in your internal network from reaching the harmful IP address on the Internet, you may define a specific block rule at the top of the rule list before the allow rules. You may also put all suspicious IPs you detected in a Hosts alias, such as Harmful-IPs.
| Option | Value |
|---|---|
| Action | Block |
| Interface | LAN |
| Protocol | any |
| Source | LAN net |
| Source Port | any |
| Destination | Harmful_IPs |
| Destination Port | any |
| Description | Block access to the harmful hosts/servers on the Internet |
-
Create an alias, such as
Harmful_IPsfor all administrator devices/servers by navigating to theFirewall>Aliases.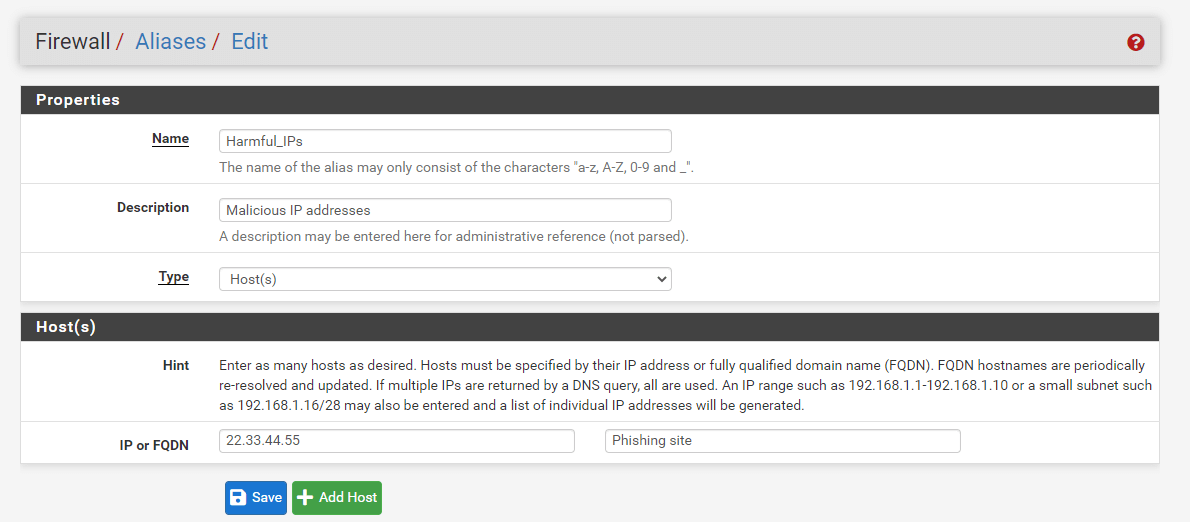
Figure 41. Defining an alias for harmful IPs
-
Navigate to the LAN interface on the Firewall Rules .
-
Click
Addbutton with a UP arrow icon to define a rule for blocking malicious IP access. -
Select
Blockfor the deny rule. -
Select
anyas the Protocol. -
Select
LAN netas the Source. -
Select
Single host or aliasand setHarmful_IPsas destination. -
Check
Log packets that are handled by this ruleoption to enable logging. -
Set
Block access to the harmful hosts/servers on the Internetfor Description -
Click
Save. -
Click
Apply Changesto activate the settings.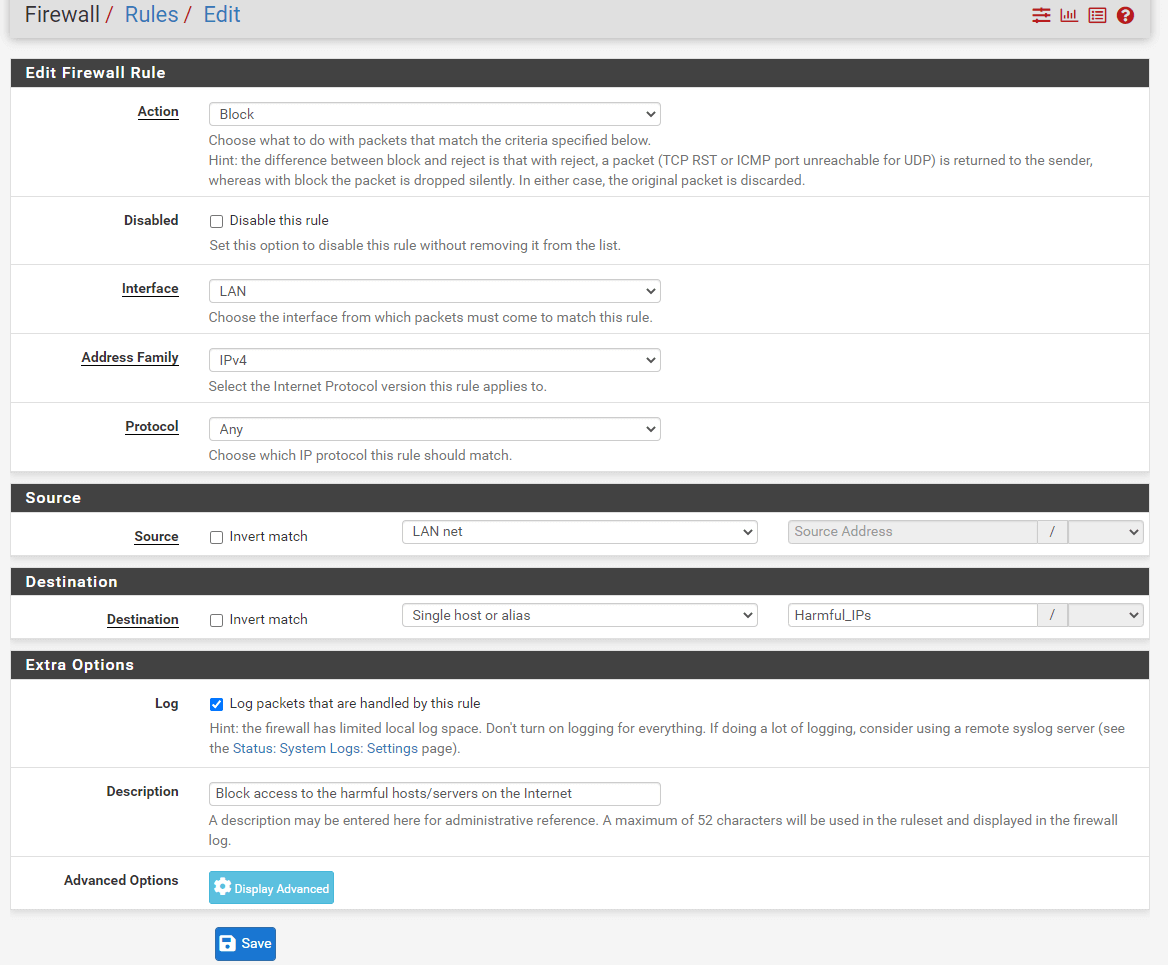
Figure 42. Defining a rule to Deny access to the harmful IPs on the Internet
8. Allowing ICMP messages for troubleshooting
If you use the deny all rule at the end of the firewall rule list, any of the devices cannot ping anywhere in other networks. However, for troubleshooting or monitoring purposes, you may need to allow ICMP messages for a specific PC or server. To accomplish this, you may define the following allow rules and alias, such as Monitoring-servers.
| Option | Value |
|---|---|
| Action | Pass |
| Interface | LAN |
| Protocol | ICMP |
| ICMP type | any |
| Source | Monitoring_Servers |
| Source Port | any |
| Destination | any |
| Description | Allow ICMP request messages |
-
Create an alias, such as
Monitoring_Serversfor monitoring servers by navigating to theFirewall>Aliases. -
Navigate to the interface where monitoring servers reside on the Firewall Rules.
-
Click the
Addbutton with a UP arrow icon to add a new rule to the top of the list. -
Select
Passfor the allow rule. -
Select
ICMPas protocol. -
Select
anyas ICMP Subtypes. -
Select
Single host or aliasandMonitoring_Serversas the source. -
Select
anyas the destination. -
Select
anyas the destination port range.
10 Check Log packets that are handled by this rule option to enable logging.
-
Set
Allow ICMP request messagesfor Description -
Click
Save. -
Click
Apply Changesto activate the settings.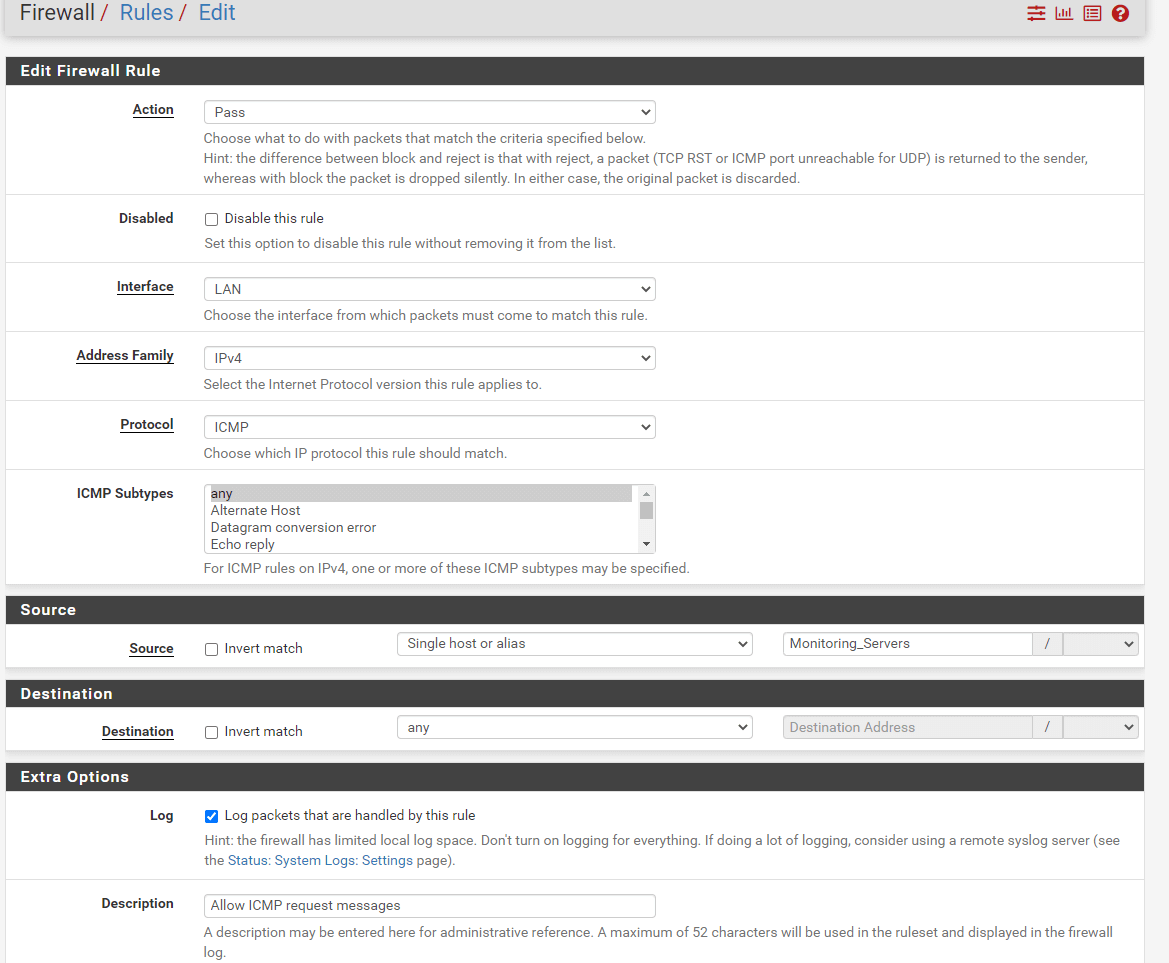
Figure 43. Allowing Monitoring servers for ICMP access
9. Allowing WireGuard/OpenVPN VPN Server access from the Internet
You may have a WireGuard or OpenVPN VPN server to access the internal home/company network remotely. However, your WireGuard/OpenVPN VPN server should be accessible from the Internet. To allow access to the WireGuard/OpenVPN VPN service, you should define a firewall rule and may define an alias for the VPN service port, such as vpn_port.
OpenVPN server listen port is 1194 UDP by default.
WireGuard VPN server listen port is 51820 UDP by default.
| Option | Value |
|---|---|
| Action | Pass |
| Interface | WAN |
| Protocol | UDP |
| Source | any |
| Source Port | any |
| Destination | WAN address |
| Destination Port | vpn_port |
| Description | Allow remote access to OpenVPN/WireGuard VPN |
1 Create an alias, such as vpn_port for monitoring servers by navigating to the Firewall > Aliases.
-
Navigate to the WAN interface on the Firewall Rules.
-
Click the
Addbutton with a UP arrow icon to add a new rule to the top of the list. -
Select
Passfor the allow rule. -
Select
UDPas the Protocol. -
Select
anyas the source -
Select
WAN addressas the destination. -
Select
vpn_portas the destination port range. -
Check
Log packets that are handled by this ruleoption to enable logging. -
Set
Allow VPN accessfor Description -
Click
Save. -
Click
Apply Changesto activate the settings.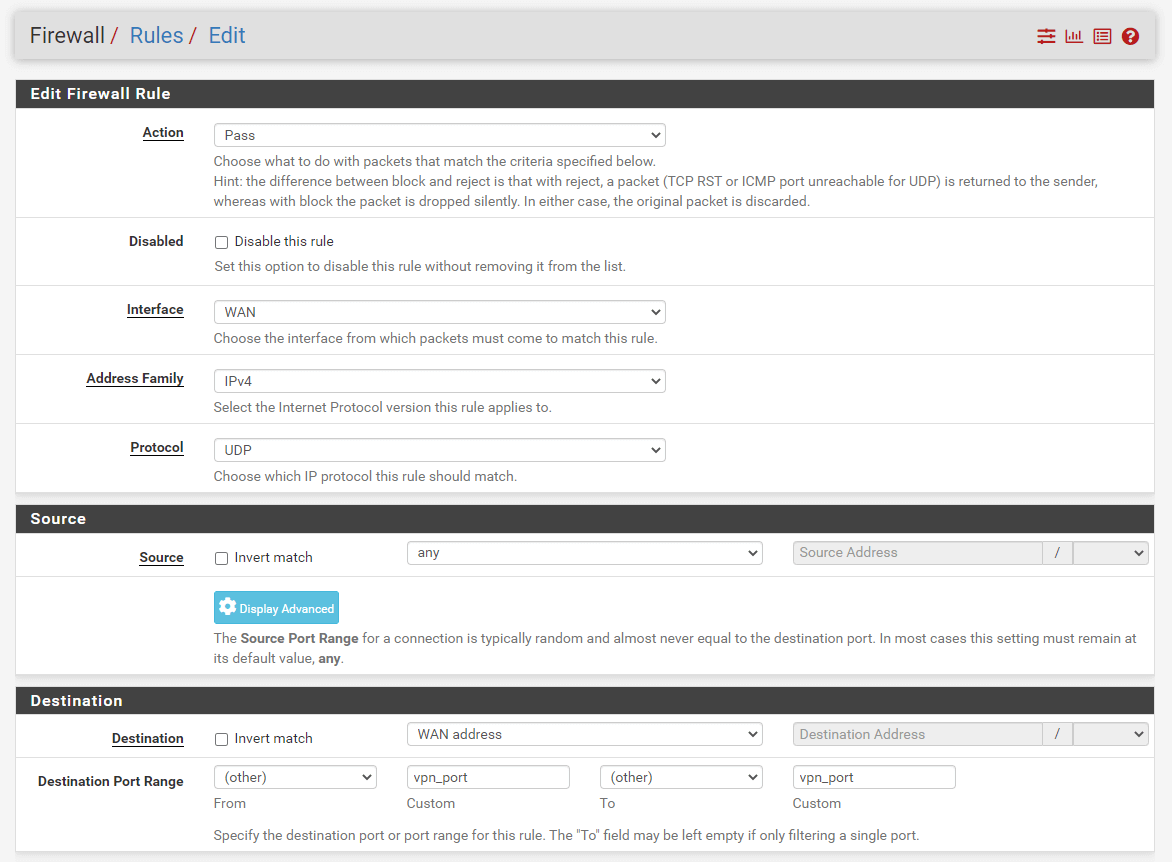
Figure 44. Defining firewall rule for VPN access

Figure 45. Firewall ruleset after vpn access rule