How to Configure Captive Portal on pfSense® Software?
pfSense captive portal is a network security solution that automates user access to public and private networks. For guest access control in open access networks, such as those found in hospitals, hotels, airports, restaurants, and business networks, captive portals are often used. It is generally used for wireless hot spots or for extra authentication prior to enabling wireless clients access to internal networks. Access to the Internet is limited when the captive portal is activated unless the user gives personal information such as name, e-mail, and Social Security number, or authentication through a voucher via a web-based registration form filled in a web browser.
Captive Portal in the pfSense® Software requires users to login before giving Internet access. When feasible, the firewall automatically displays a login page requiring the user to input credentials such as a username and password, a voucher code, or a simple click-through agreement.
The pfSense® software Captive Portal solution has the following restrictions:
-
Captive Portal does not yet support IPv6.
-
A reverse portal, which requires authentication for Internet traffic entering a local network, is not conceivable.
We will cover the following topics briefly in this Captive Portal Configuration on pfSense tutorial.
-
Captive Portal Setup on pfSense
-
Captive Portal Configuration on pfSense
-
Using Custom Template for pfSense Captive Portal
-
What are the Benefits of Configuring the pfSense Captive Portal?
-
How Does Captive Portal Work on pfSense?

How to Setup Captive Portal on pfSense?
As a best practice, to provide your organization's guests with free Internet access you should implement network segmentation in your infrastructure by isolating the guest network from private LAN. And then, you can deploy a captive portal to let the guests access the Internet.
In this tutorial, we will enable and configure a captive portal for a guest network on pfSense 2.6.0 with at least three network interfaces/zones: WAN, LAN and GUESTNET.
You may set up the Captive Portal on your pfSense firewall by following the 4 steps easily.
- Interface Configuration
- DHCP Server Configuration
- Defining the Firewall Rules
- Captive Portal Creation
Step 1 - Interface Configuration
You can create a new interface for the Guest Network by following the instructions given below.
-
Navigate to
Interfaces→Assignmentson pfSense Web UI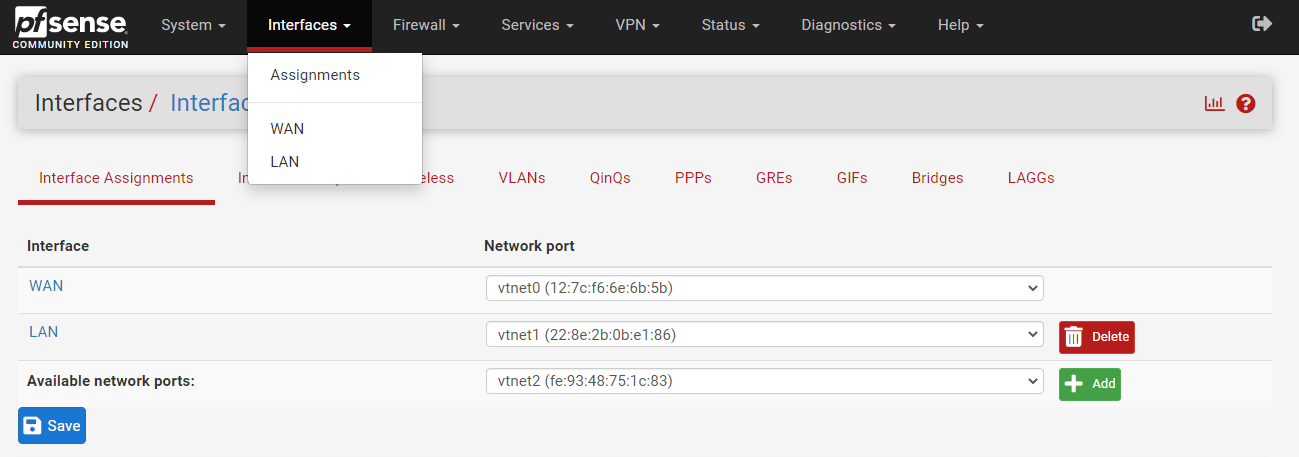
Figure 1. Interface assignment on pfSense
-
Click the
+Addbutton to add a new interface. This will add available network port asOPT1. -
Click
OPT1to edit the newly added interface. -
Check
Enable Interfaceoption. -
Enter a descriptive name for the interface, such as GUESTNET, in the
Descriptionfield -
Select
Static IPv4asIPv4 Configuration Type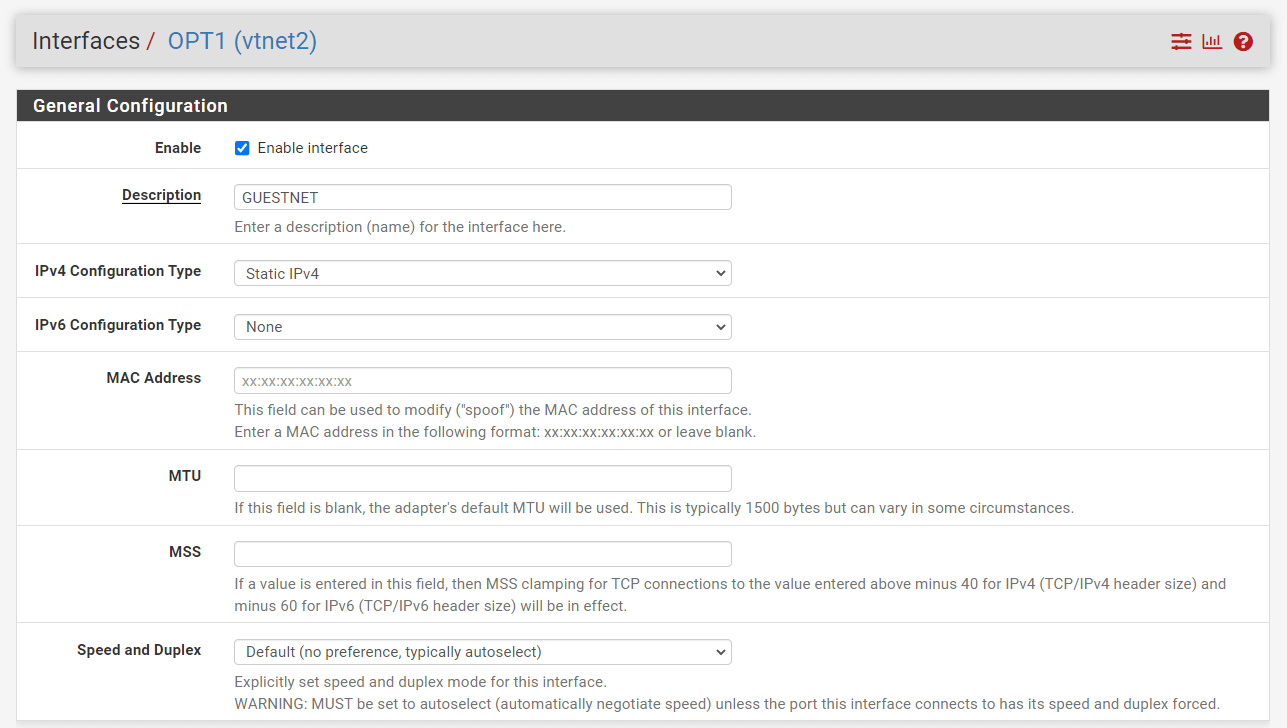
Figure 2. Enabling GuestNet interface on pfSense
-
Set Static IPv4 address such as
172.16.10.1with netmask24. -
You may leave other settings as default.
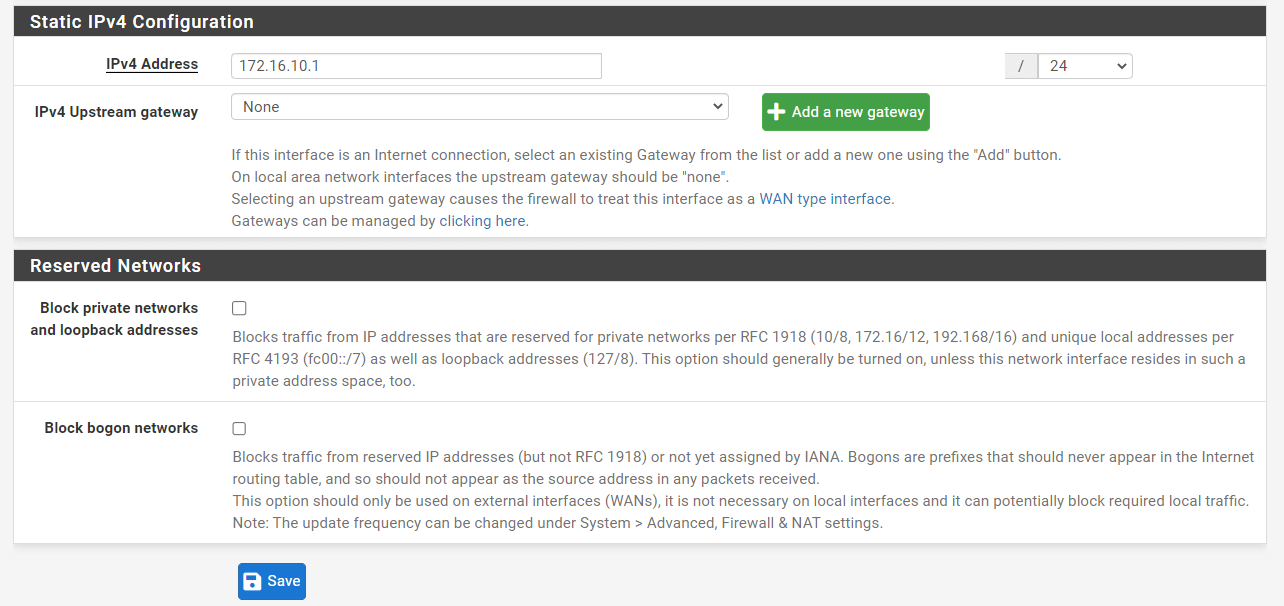
Figure 3. IP configuration of GuestNet interface on pfSense
Figure 4. Applying GuestNet interface changes on pfSense
-
Click
Saveand thenApply changes.
Figure 5. Viewing interfaces on pfSense
Step 2 - DHCP Server Configuration
You can configure a DHCP server for the Guest Network by following the instructions given below.
-
Navigate to
Services→DHCPv4→[GUESTNET]. -
Enable the DHCP server on the GUESTNET interface
-
Set DHCP pool Range, such as from
172.16.10.11to172.16.10.200.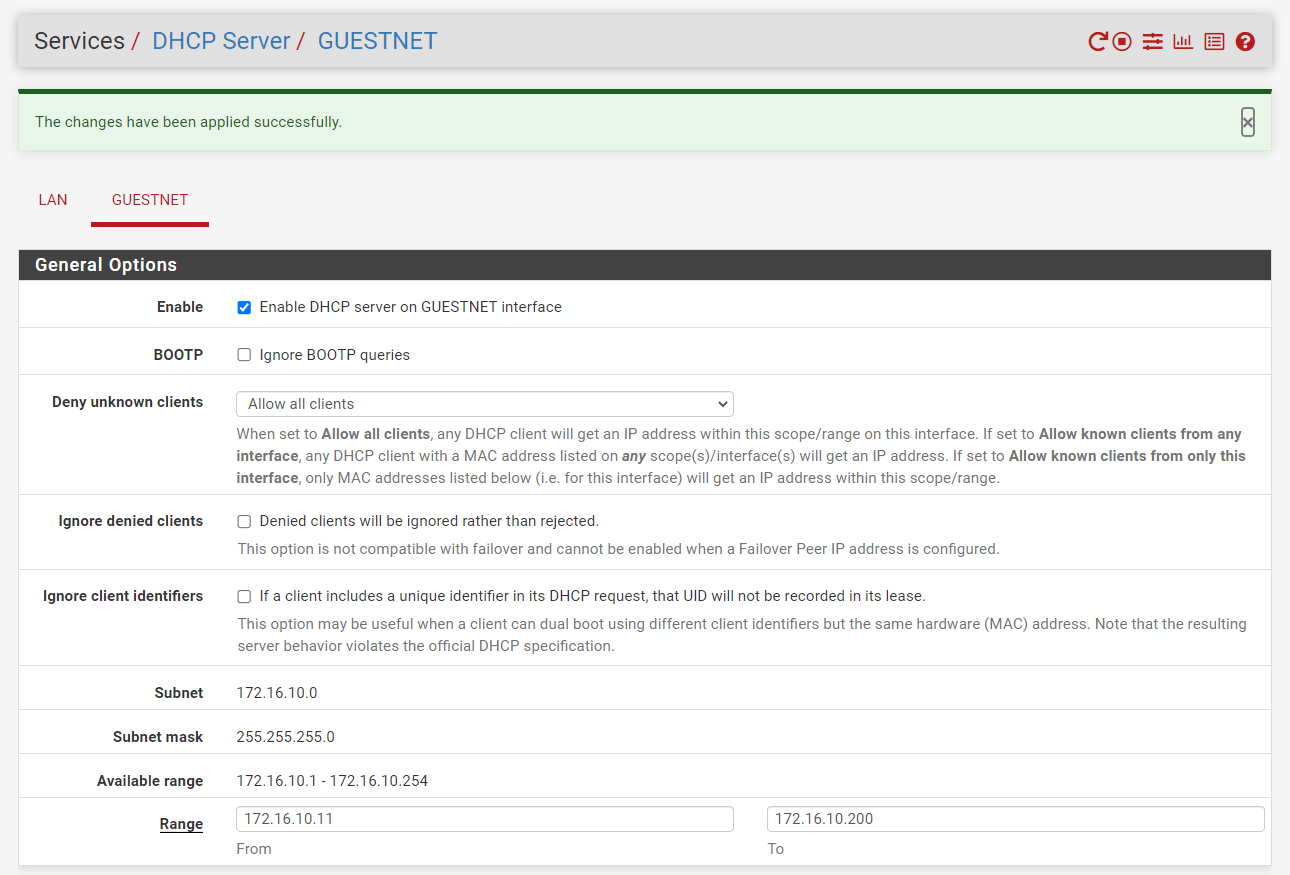
Figure 6. Enabling DHCP server for GuestNet interface on pfSense
-
You may leave blank to use the system default DNS servers or set
DNS server, such as8.8.8.8. -
You may leave other options as
default. -
Click
Saveat the bottom of the page.
Step 3 - Defining the Firewall Rules
You should configure firewall rules on your pfSense firewall in the given order after navigating Firewall → Rules → GUESTNET.

Figure 7. Defining Firewall Rules for GuestNet interface on pfSense
3.1. Allow Accessing DNS Service
Click the Add button with the UP arrow icon for defining a rule to allow the internal DNS server(s), and then follow the instructions below.
| Option | Value |
|---|---|
| Action | Pass |
| Interface | GUESTNET |
| Protocol | TCP/UDP |
| Source | GUESTNET net |
| Source Port | any |
| Destination | GUESTNET address |
| Destination Port | DNS (53) |
| Description | Allow DNS |
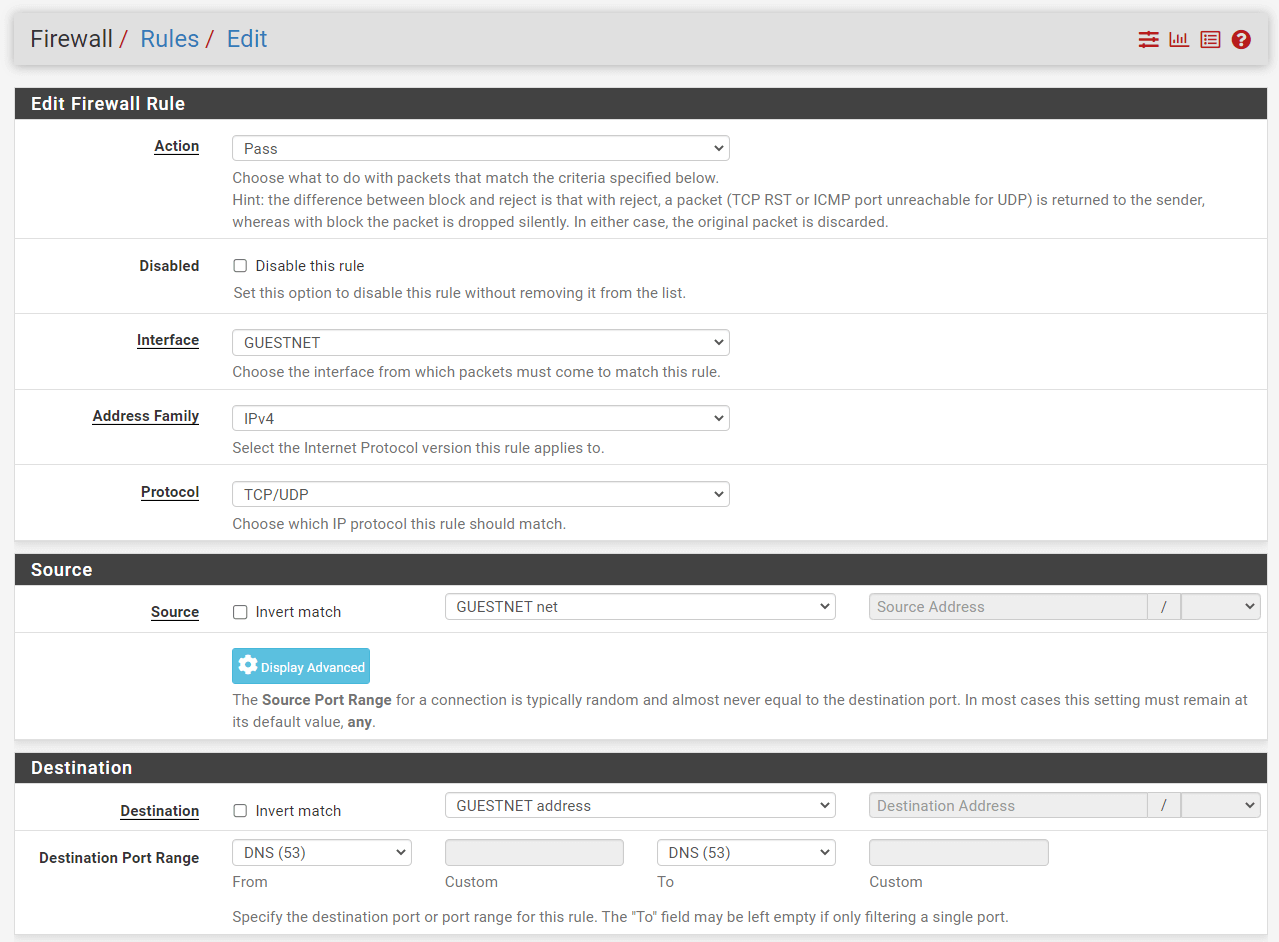
Figure 8. Adding Firewall Rule to allow DNS
-
Select
Passfor the allowed rule. -
Select the
InterfaceasGUESTNET. -
Select
TCP/UDPfor theProtocol. -
Select the source as
GUESTNET net. This captures all traffic on the GUESTNET interface bound for the specified destination. -
Select the
destinationasGUESTNET address. -
Select
DNSpredefined port alias for theDestination Port Range. -
Check
Log packets that are handled by this ruleoption to enable logging.
Figure 9. Setting Extra Options for Firewall Rule to allow DNS
-
Set
Allow DNSforDescription. -
Click
Save. -
Click
Apply Changesto activate the rule.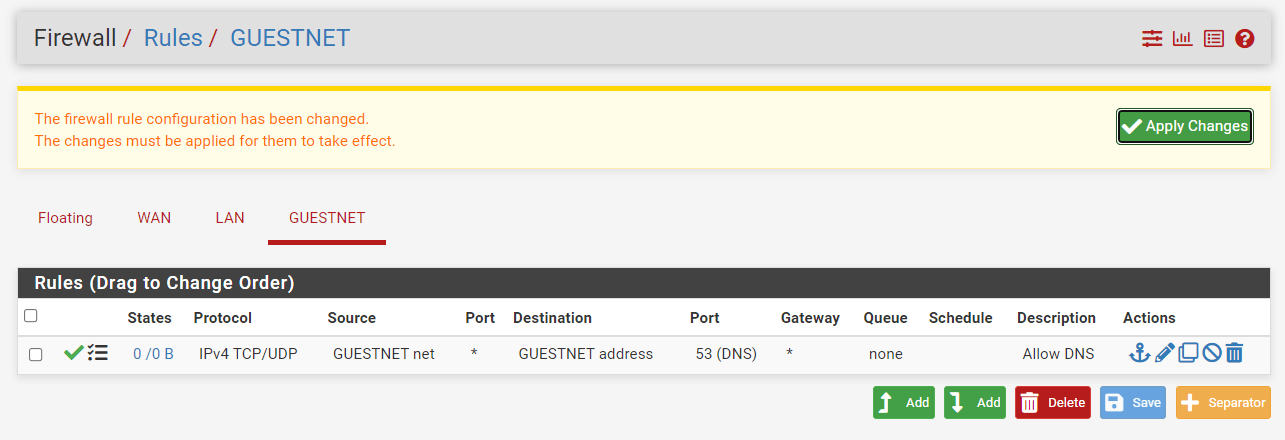
Figure 10. Applying Firewall Rule to allow DNS
3.2. Allow Captive Portal Login
Click Add button with a UP arrow icon for defining a rule to allow the guest to access the Captive Portal, and then follow the instructions below.
| Option | Value |
|---|---|
| Action | Pass |
| Interface | GUESTNET |
| Protocol | TCP |
| Source | GUESTNET net |
| Source Port | any |
| Destination | GUESTNET address |
| Destination Port | 8000/10000 |
| Description | Allow Captive Portal Login |
-
Select
Passfor the allowed rule. -
Select
TCPfor theProtocol. -
Select the Interface
GUESTNET. -
Select the source
GUESTNET net. This captures all traffic on the GUESTNET interface bound for the specified destination. -
Select the destination as
GUESTNET address. -
Select
Otherand set from:8000and to:10000for theDestination Port Range.
Figure 11. Adding firewall rule to allow Captive Portal login on pfSense
-
Check
Log packets that are handled by this ruleoption to enable logging. -
Set
Allow Captive Portal Loginfor Description -
Click
Save.
Figure 12. Setting Extra Options for Firewall Rule to allow Captive Portal Login
-
Click
Apply Changesto activate the rule.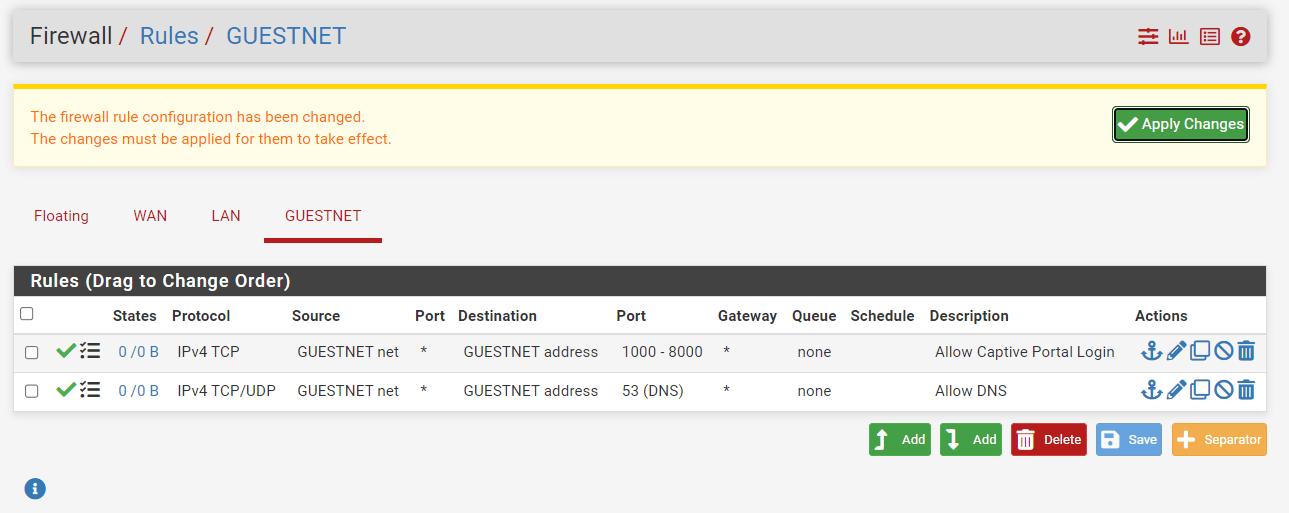
Figure 13. Applying Firewall Rule to allow Captive Portal Login
3.3. Block LAN Access
Click Add button with a UP arrow icon for defining a rule to block the guest to access the corporate LAN, and then follow the instructions below.
| Option | Value |
|---|---|
| Action | Block |
| Interface | GUESTNET |
| Protocol | any |
| Source | GUESTNET net |
| Source Port | any |
| Destination | LAN net |
| Description | Block LAN Access |
-
Select
Blockfor the deny rule. -
Select
anyfor theProtocol. -
Select the Interface
GUESTNET. -
Select the source
GUESTNET net. -
Select the destination as
LAN net.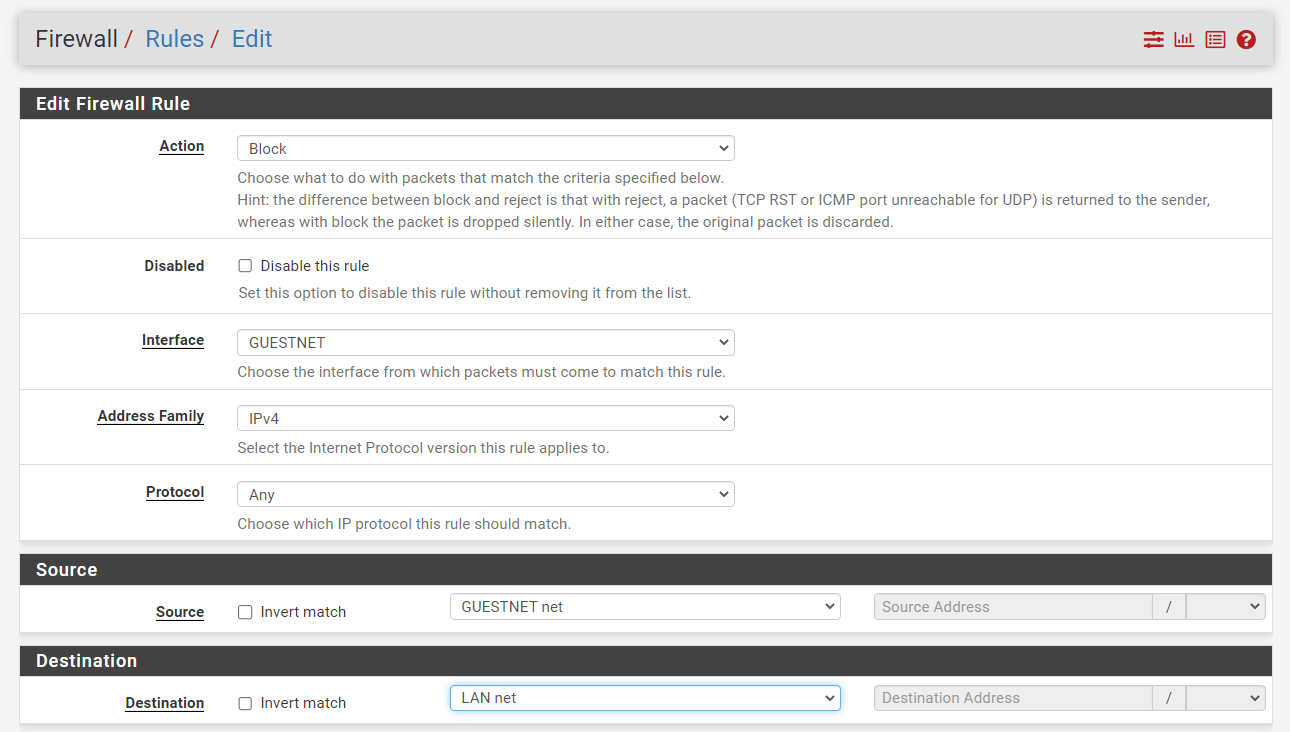
Figure 14. Adding Firewall Rule to Block LAN access from GuestNet on pfSense
-
Check
Log packets that are handled by this ruleoption to enable logging. -
Set
Block LAN Accessfor Description
Figure 15. Setting Extra Options for Firewall Rule to Block LAN access from GuestNet on pfSense
-
Click
Save.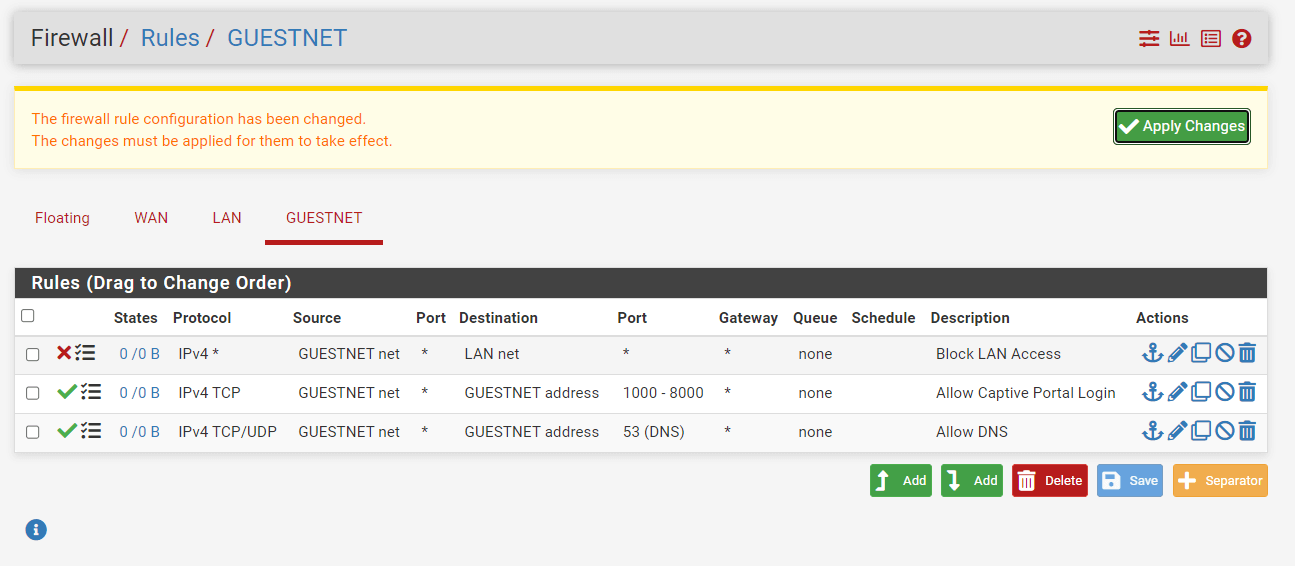
Figure 16. Applying Firewall Rule to Block LAN access
-
Click
Apply Changesto activate the rule.
3.4. Block Firewall Access
Click the Add button with a DOWN arrow icon for defining a rule to block the guest to access the Firewall and then follow the instructions below.
| Option | Value |
|---|---|
| Action | Block |
| Interface | GUESTNET |
| Protocol | any |
| Source | GUESTNET net |
| Source Port | any |
| Destination | GUESTNET address |
| Description | Block Firewall Access |
-
Select
Blockfor the deny rule. -
Select
anyfor theProtocol. -
Select the Interface
GUESTNET. -
Select the source
GUESTNET net. -
Select the destination as
GUESTNET address.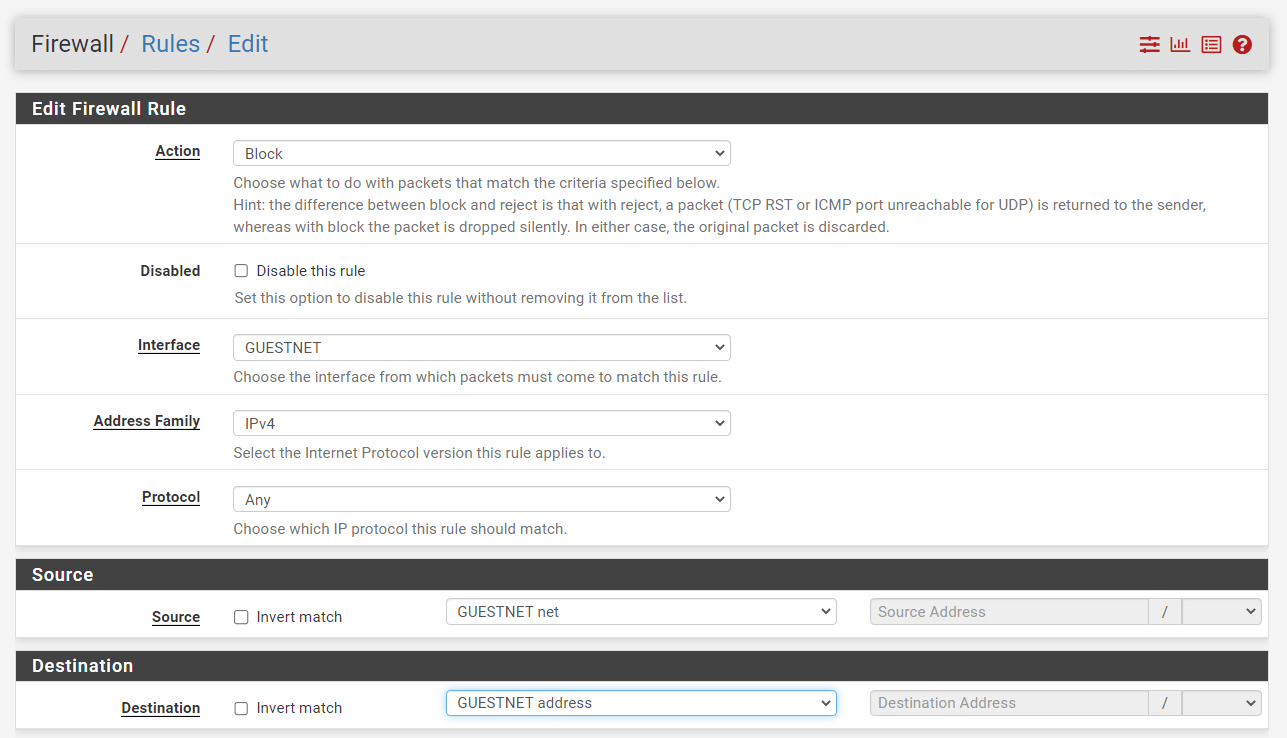
Figure 17. Adding Firewall Rule to Block Firewall access from GuestNet on pfSense
-
Check
Log packets that are handled by this ruleoption to enable logging. -
Set
Block Firewall Accessfor Description
Figure 18. Setting Extra Options for Firewall Rule to Block Firewall access from GuestNet on pfSense
-
Click
Save. -
Click
Apply Changesto activate the rule.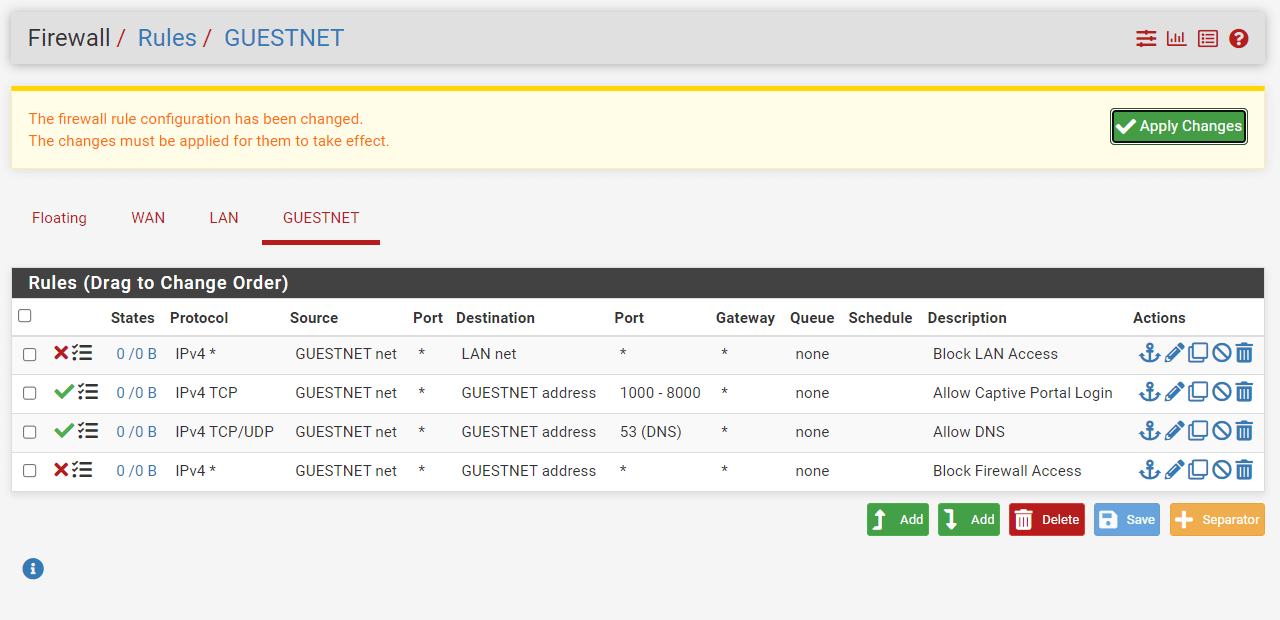
Figure 19. Applying Firewall Rule to Block Firewall access
3.5. Allow Guest Access
Click the Add button with a DOWN arrow icon for defining a rule to allow the guests to access the Internet, by following the instructions below.
| Option | Value |
|---|---|
| Action | Pass |
| Interface | GUESTNET |
| Protocol | any |
| Source | GUESTNET net |
| Source Port | any |
| Destination | any |
| Destination port range | any |
| Description | Allow Guest Network |
-
Select
Passfor the allow rule. -
Select
anyfor theProtocol. -
Select the Interface
GUESTNET. -
Select the source
GUESTNET net. -
Select the destination as
any.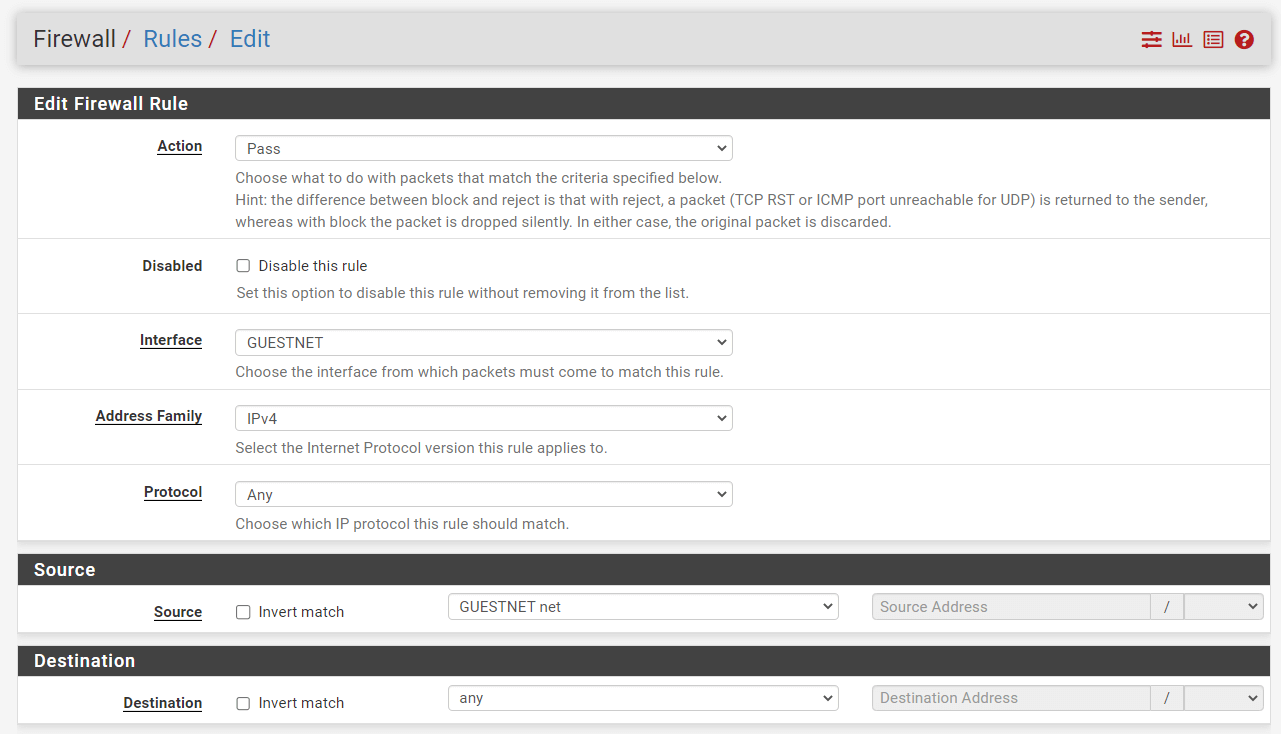
Figure 20. Adding Firewall Rule to Allow Internet access from GuestNet on pfSense
-
Check
Log packets that are handled by this ruleoption to enable logging. -
Set
Allow Internet Accessfor Description
Figure 21. Setting Extra Options for Firewall Rule to Allow Internet access from GuestNet on pfSense
-
Click
Save. -
Click
Apply Changesto activate the rule.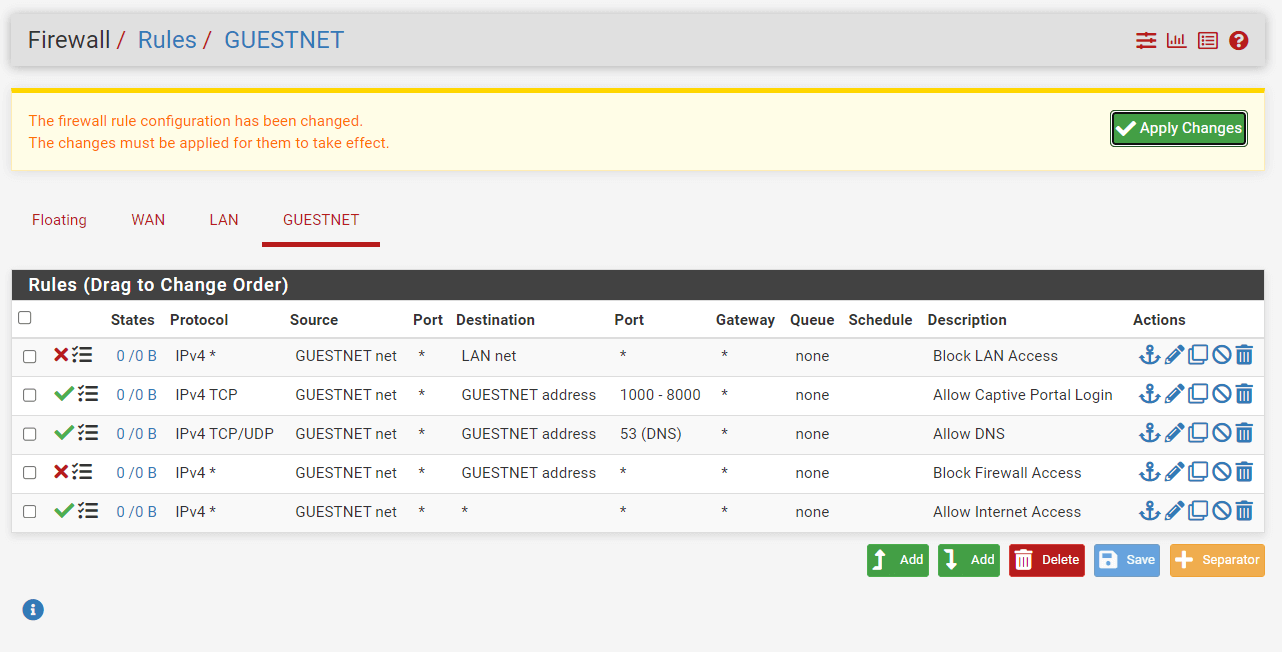
Figure 22. Applying Firewall Rule to Allow Internet access
You may need to reorder the newly created firewall rules for the GUESTNET interface. The rule list should be similar to the figure given above. Then, you must click Apply changes to activate the rules.
Step 4 - Captive Portal Creation
Captive Portal zones create distinct portals for various interface sets. For instance, LAN and WIFI Guetnet may use the same portal, however a conference room would have its own portal page. Each zone has unique configurations for HTML pages, authentication, permitted addresses, etc. A zone must be established prior to its settings being modified.
A zone may have many interfaces, but an interface may belong to only one zone. If you attempt to add the same interface to numerous zones, an error will occur.
You can create a Captive Portal for the Guest Network by following the instructions given below.
-
Navigate to
Services→Captive Portal.
Figure 23. Captive Portal Zones on pfSense
-
Press the
+Addin the lower right corner of the form to add a new Captive Portal Zone. -
Set the Zone name, such as
guestnet. -
Type a descriptive name, like
Guest Networkin the Zone description.
Figure 24. Adding Captive Portal Zone on pfSense
-
Click Save & Continue button. This will redirect you to the configuration pages of newly added captive portal zone.
-
Check
Enable Captive Portaloption to activate the captive portal.This will display the captive portal settings on the same configuration page.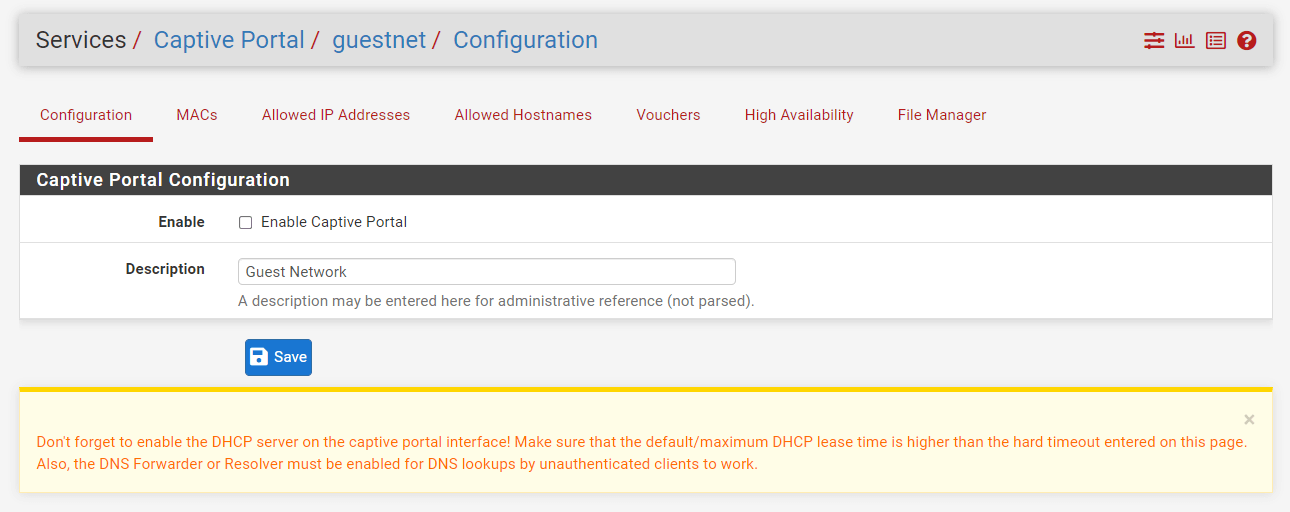
Figure 25. Enabling Captive Portal Zone on pfSense
-
Set
InterfacesasGUESTNET.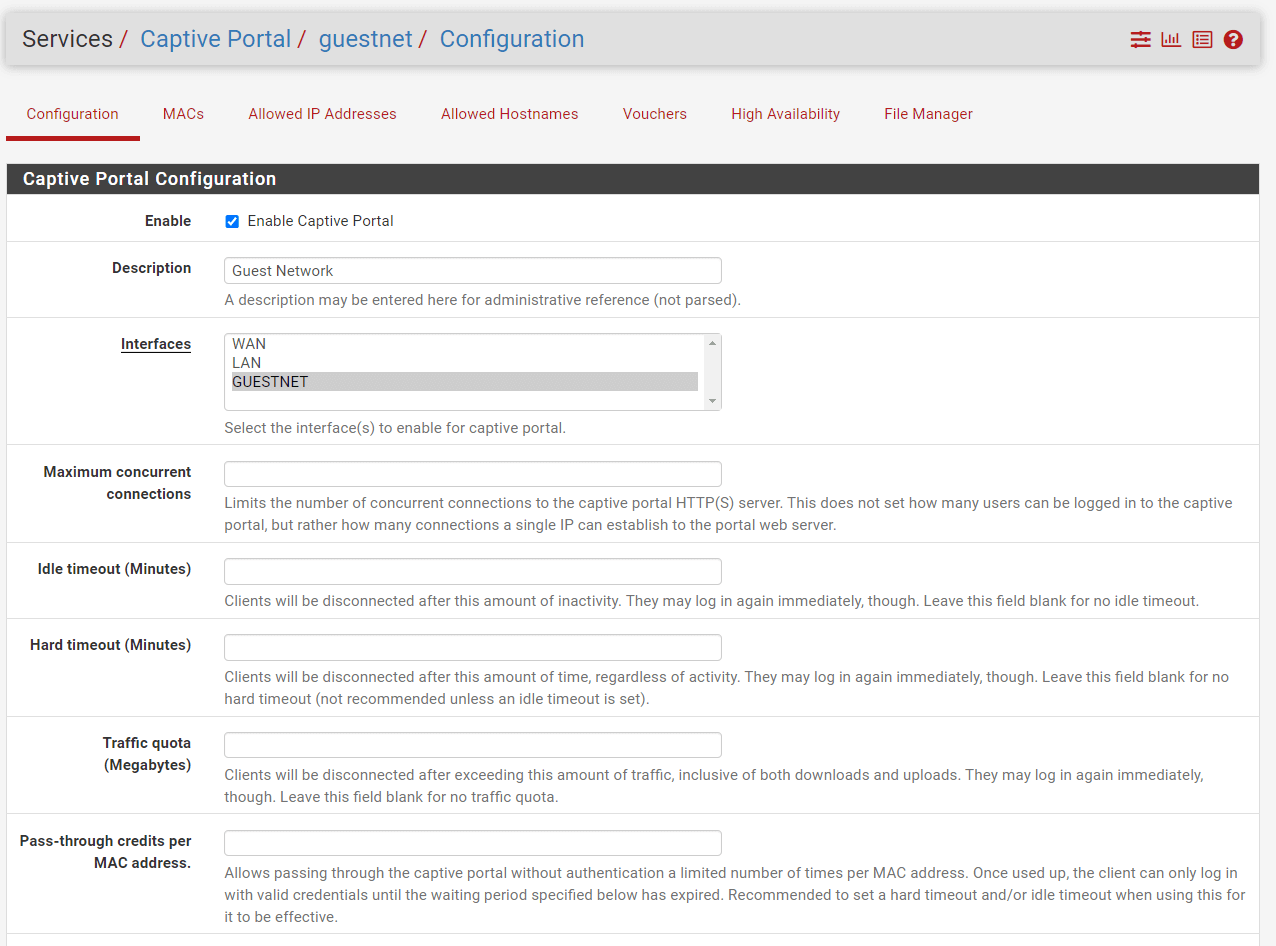
Figure 26. Captive Portal Zone Configuration on pfSense-1
-
You may select
None, don't authenticate usersfor Authentication method. This method will force the login page to be displayed but will accept any visitor that clicks the "submit" button. -
You may leave other options as default.
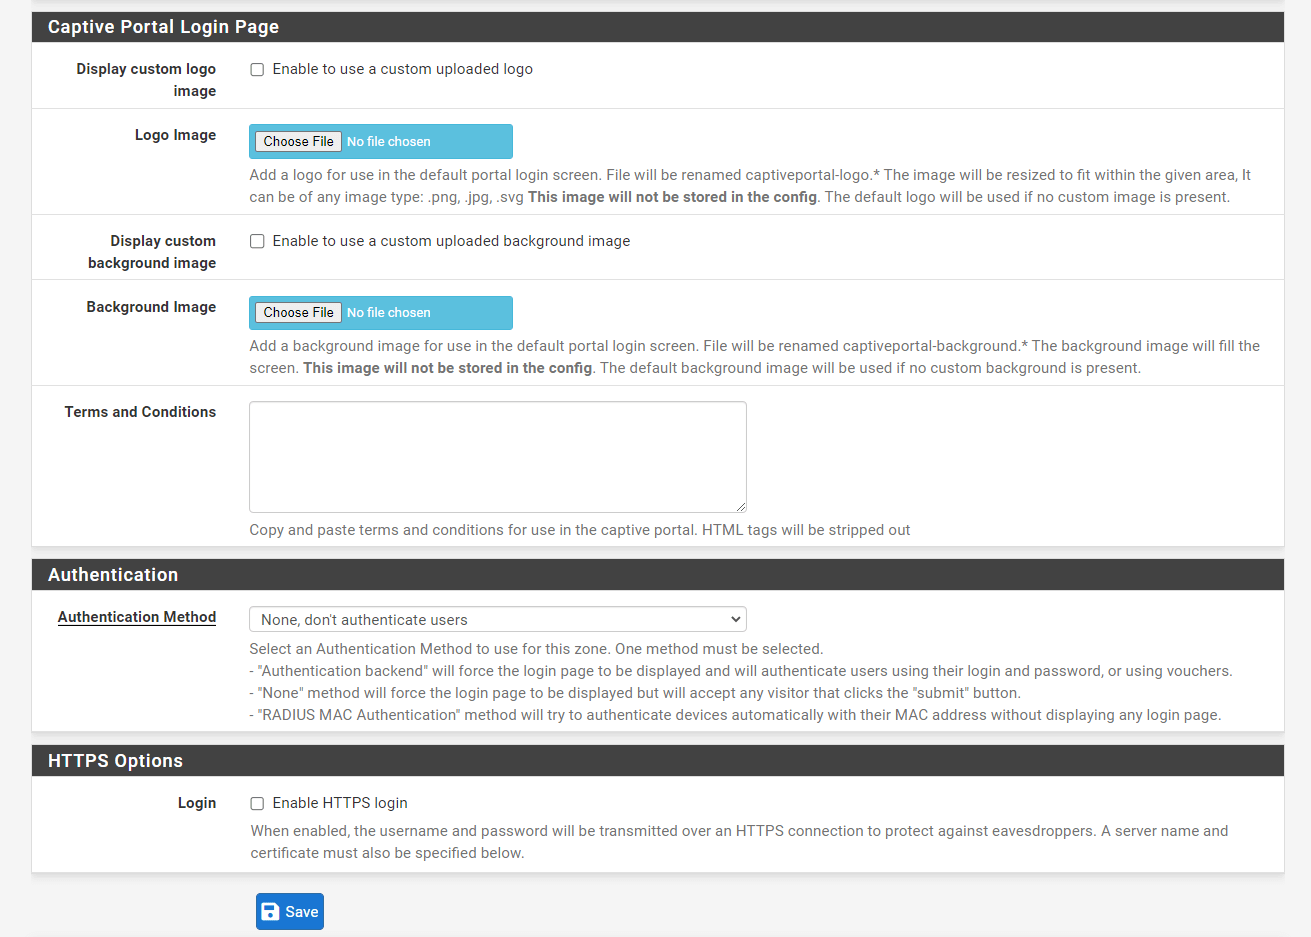
Figure 27. Captive Portal Zone Configuration on pfSense-2
-
Click
Save. -
Click
Apply.
Captive Portal installation on pfSense is completed and ready to use.

Figure 28. Guest Network Captive Portal is created on pfSense Firewall
You may edit an existing captive portal zone by clicking on the Edit button with a pen icon at the end of its row.
You may delete an existing captive portal zone, by clicking on the Delete button with a trash icon, at the end of its row.
Accessing the Internet From the Guest Network
When you connect your device to the guest network and open your favorite browser, you will be redirected to the captive portal splash page similar to figure below. Since we did not configure any authentication method in our example above, you can start to surf by clicking on the Login button without any authentication.

Figure 29. pfSense Captive Portal default LoginPage without any authentication
pfSense Captive Portal supports a variety of authentication methods, such as local, and LDAP. Radius, or Vouchers. It is strongly recommended to use at least one of the authentication methods on the Captive Portal.
What are the Captive Portal Zone Configuration Options?
This section details the configuration options available for a Captive Portal zone. A zone's options are distinct from those of other zones. For example, entries for permitted IP addresses in a zone only affect that zone.
To access this page, visit Services > Captive Portal and click the Edit button with a pen icon to modify an existing zone or +Add to establish a new zone.
Available captive portal zone configuration options on pfSense are explained below:
-
Enable: Verify that this Captive Portal zone is enabled.
-
Description: Short paragraph summarizing the zone's function.
-
Interface: Identifies the interfaces that this Captive Portal zone uses. This interface cannot be WAN-capable. It may be a bridge interface as long as it is the real bridge (for example, bridge0) and the bridge interface has an IP address.
-
Maximum concurrent connections: Sets the maximum number of concurrent connections per IP address to the portal web server. The default number is 4, which is enough for the vast majority of settings. This restriction exists to prevent a single host from accidentally or intentionally depleting all firewall resources. A worm-infected host is an example of a situation where this would ordinarily be problematic. The hundreds of connections issued to cause the captive portal page to be produced continuously if the host is not previously authenticated, which might lead the firewall to become unusable due to the excessive load.
-
Idle timeout: The number of minutes after which inactive users will be disconnected from the site. Users may re-login instantly.
-
Hard timeout: The number of minutes after which the portal will automatically log off users. Users may re-login instantly if their credentials are still valid after the hard timeout (for local accounts, not expired, and for RADIUS authentication, user can still successfully authenticate to RADIUS).
tipSpecify either a hard timeout, an idle timeout, or both to guarantee that portal sessions are terminated if users do not explicitly log out.
noteIf a timeout number is specified, it must be smaller than the DHCP lease period; otherwise, captive portal connections for IP addresses that have migrated to other devices may stay active. Raising the timeout to a lower value will guarantee that portal sessions terminate prior to the lease being reassigned to a new customer.
-
Traffic Quota: The quantity of traffic that, if surpassed by a client, will cause the portal to disconnect that client. This covers both download and upload activity. Users may quickly re-login if their credentials are still valid.
-
Pass-Through Credits: These credits provide devices with a grace period before portal authentication is required. For instance, a device may connect three times a day without viewing the portal page, but after that, it must login. By setting the hard timeout to an hour, the portal would effectively restrict a client's access to three hours before requiring authentication. This is deactivated by default, and all customers are shown the portal login page and are required to login.
tipSet a hard timeout and/or idle timeout for this to work properly.
-
Pass-through credits allowed per MAC address: The maximum number of times a certain MAC address may connect to the portal. The client may only log in with legitimate credentials until the waiting time expires after using all of its credits.
-
Waiting period to restore pass-through credits: The number of hours after which the portal will restore a client's pass-through credits to their initial total after using the first one. This must exceed zero hours.
-
Reset waiting period on attempted access: If enabled, the portal will restore the waiting time to its initial length if entry is attempted after all pass-through credits have been used. This stops continually attempting users from obtaining access to the site too rapidly.
-
Logout popup window: When checked, the portal tries to provide a logout pop-up window to the user, allowing clients to log out explicitly before the idle or hard timeout occurs. Due to the fact that most browsers restrict pop-up windows, this window may not function for the majority of customers.
-
Pre-authentication redirect URL: This option, as its name indicates, redirects visitors to the provided Website prior to authentication. Often, this is used to show a locally or remotely hosted bespoke landing page detailing the device's location. This landing page must have a link that redirects readers to the portal page, such as
http://x.x.x.x:8002/index.php?zone=somezone&redirurl=http://somesite.example.com]. The custom captive portal page must have an additional code at the top to handle this redirect correctly. -
After authentication Redirection URL: Users will be sent to this URL after logging in or browsing via the portal, rather than the one they first attempted to view. If this box is left empty, the portal will redirect the user to the original URL that they intended to view.
-
Blocked MAC address redirect URL: Address to which users with banned MAC addresses will be redirected when they try to access the site.
-
Preserve user database: When enabled, the portal retains the database of logged-in users throughout firewall restarts.
-
Concurrent user logins: Controls whether or not users are permitted numerous connections. This is a per-account restriction, not a limit for the whole site. Possible settings are as follows:
Disabled: The portal prohibits consecutive logins for a given user or voucher.Multiple: (Default) There are no concurrent login limits imposed by the site on users or vouchers.Last Login: The site will only permit a single login per account or coupon. Just the most recent login is allowed, and all prior logins are terminated.First Login: The site will only permit a single login per account or coupon. The portal allows the first login but blocks further attempts.
-
MAC filtering: When configured, the portal disables MAC filtering. This is required when the MAC address cannot be obtained reliably, such as when numerous subnets exist behind a single router using the portal. In such a scenario, all users behind the router would display the MAC address of the intermediary router on the site. If this option is enabled, the portal will not try to maintain clients' MAC addresses while they are signed into the portal. This option is incompatible with MAC authentication using RADIUS.
-
Pass-through MAC Auto Entry: In some use situations, users may only need to authenticate once per device, and the client should not see the portal login again until the device is changed. Putting up pass-through MAC entries may do this automatically.
-
Pass-through MAC automatic additions: Upon successful authentication, the gateway will immediately add a MAC passthrough entry if this option is enabled. Users with this MAC address will never be required to authenticate again so long as the configuration item is present. Log in and delete the entry manually from the Passthrough MAC tab to remove the passthrough MAC entry.
-
Pass-through MAC automatic addition with username: If this option is enabled, the portal will save the username used for login with the pass-through MAC entry. Log in and delete the entry manually from the Passthrough MAC tab to remove the passthrough MAC entry.
-
Per-user bandwidth restrictions: Optionally, Captive Portal may rate-limit users to prevent them from using excessive bandwidth. The Default download and Default upload columns provide, in Kilobits per second, the default settings for user bandwidth. RADIUS (Passing back settings from RADIUS Servers) may override these values to provide different restrictions for certain users. If the fields are left blank or if they are set to zero, users have limitless bandwidth.
-
Use Custom Captive Portal Page: Enables upload controls on manually constructed portal pages when configured.
Verification of the Captive Portal Firewall Rules
If you can access the Internet from the guest network, it means that related firewall rules which allow the GUESTNET to access the Internet and DNS server are working. You may test the blocking rules which deny access to the firewall and LAN from the GUESTNET. To verify these Captive Portal firewall rules, you can run the following command from a device connected to the guest network. If your ping requests are timeout for both firewall and LAN access, your firewall rules are correct and work properly.
-
Try to ping to the firewall GuestNet address
ping 172.16.10.1
Pinging 172.16.10.1 with 32 bytes of data:
Request timed out.
Request timed out. -
Try to ping to a device on LAN or the firewall LAN address
ping 10.1.1.1
Pinging 10.1.1.1 with 32 bytes of data:
Request timed out.
Request timed out.
Request timed out.
Captive Portal Configuration on pfSense
You may optionally configure the Captive Portal by following the instructions given below:
- Configure Captive Portal Login Page
- Configure Custom Template for pfSense Captive Portal
- Configure Authentication for Captive Portal
- Enable HTTPS Login
- Define MAC Address Control
- Define Allowed IP Address
- Define Allowed Hostnames
1. How to Configure Captive Portal Login Page?
You may enable small changes to the captive portal login page without writing custom HTML. To configure the captive portal login page on pfSense follow these steps:
-
Navigate to the
Services>Captive Portal. -
Edit the Captive Portal Zone, like
guestnetby clicking on the Edit button with a pen icon. -
Scroll down to the
Captive Portal Login Pagepane. -
Check
Enable to use a custom uploaded logooption to Display Custom Logo Image instead of the default logo. -
Click
Choose Filebutton to upload Logo Image for use in the default portal login screen. The file name will be changed tocaptiveportal-logo.*. The picture will be downsized to suit the specified area. It may be of any of the following file types:.png,.jpg, or.svg. This picture will not be saved to the configuration file. If no custom picture is available, the standard logo will be utilized. -
Check
Enable to use a custom uploaded background imageoption to Display Custom Background Image instead of the default background. -
Click
Choose Filebutton to upload Background Image for setting a custom background image. -
You may enter content that will be presented by the portal to the user and to which the user must consent prior to gaining access to the login page in the Terms and Conditions field.

Figure 30. Captive Portal Login Page Configuration on pfSense Firewall
-
Click the Save button at the end of the page to activate the settings.
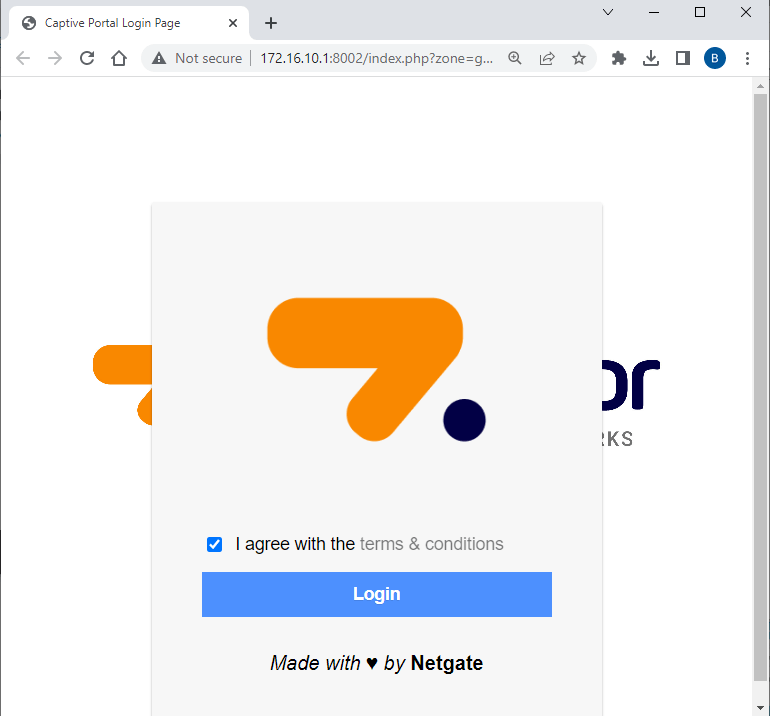
Figure 31. Captive Portal Login Page with custom logo and background on pfSense Firewall
2. Using Custom Template for pfSense Captive Portal
One of the most powerful features of pfSense's Captive Portal solution is the template feature, which is also very simple to use. When the Use custom captive portal page option is enabled for a zone, the portal shows these buttons for uploading custom HTML pages to modify the appearance of the page shown to visitors when they are routed to the portal.
Personalization of these pages is optional. Any blank page content will be filled with internal defaults. Pages of a portal may include PHP code, as well as other resources like photos and CSS files.
As PHP may run on custom portal pages, the code should be reviewed for security so that the page cannot be abused by connected users. Additionally, avoid extending rights to this page to administrators who cannot be trusted.
To make a custom landing page, you may follow the steps given below.
-
Navigate to the
Services>Captive Portal. -
Edit the Captive Portal Zone, like
guestnetby clicking on the Edit button with a pen icon. -
Scroll down to the bottom of the
Captive Portal Configurationpane. -
Check
Enable to use a custom captive portal login pageoption to Use custom captive portal page instead of the default page. This will display the HTML Page Contents pane. -
Click
Choose Filebutton to upload your custom Portal page contents. -
You may click
Choose Filebutton to upload your custom Auth error page contents. This error page is merely the login page by default. Optionally upload a custom HTML page to be shown when login issues occur using this feature. An authentication error happens when a user inputs an invalid username or password, or in the case of RADIUS authentication when the RADIUS server is possibly inaccessible. -
You may click
Choose Filebutton to upload your custom Logout page contents. The uploaded HTML/PHP file's contents are shown upon successful login when the logout prompt is enabled. After logging in, the logout page is displayed to the user in a pop-up window. Most browsers have pop-up blockers that will likely prevent this logout window from displaying; thus, you should study other ways to generate a JavaScript pop-up using identical code. Sample Logout page file,example-logout.htmlis given below:<html>
<head><title>Redirecting...</title></head>
<body>
<span style="font-family: Tahoma, Verdana, Arial, Helvetica, sans-serif; font-size: 11px;">
<b>Redirecting to <a href="<?=$my_redirurl;?>"><?=$my_redirurl;?></a>...</b>
</span>
<script type="text/javascript">
//<![CDATA[
LogoutWin = window.open('', 'Logout', 'toolbar=0,scrollbars=0,location=0,statusbar=0,menubar=0,resizable=0,width=256,height=64');
if (LogoutWin) {
LogoutWin.document.write('<html>');
LogoutWin.document.write('<head><title>Logout</title></head>') ;
LogoutWin.document.write('<body style="background-color:#435370">');
LogoutWin.document.write('<div class="text-center" style="color: #ffffff; font-family: Tahoma, Verdana, Arial, Helvetica, sans-serif; font-size: 11px;">') ;
LogoutWin.document.write('<b>Click the button below to disconnect</b><p />');
LogoutWin.document.write('<form method="POST" action="<?=$logouturl;?>">');
LogoutWin.document.write('<input name="logout_id" type="hidden" value="<?=$sessionid;?>" />');
LogoutWin.document.write('<input name="zone" type="hidden" value="<?=$cpzone;?>" />');
LogoutWin.document.write('<input name="logout" type="submit" value="Logout" />');
LogoutWin.document.write('</form>');
LogoutWin.document.write('</div></body>');
LogoutWin.document.write('</html>');
LogoutWin.document.close();
}
document.location.href="<?=$my_redirurl;?>";
//]]>
</script>
</body>
</html> -
Click the Save button at the end of the page to activate the settings.

Figure 32. Enabling Custom Captive Portal Page on pfSense Firewall
Now you can test your new captive portal template by opening a browser. Splash page should look similar to the page given below.
Figure 33. Customized captive portal login page on pfSense
Figure 34. Captive Portal Logout window on pfSense Firewall
What are the Examples of Custom Captive Portal Page Contents?
You may use one of the following examples as a starting point for a custom page, based on the portal settings you've chosen.
The following HTML code is used for a portal page requiring authentication:
<html>
<head>
<title>Welcome to our portal</title>
</head>
<body>
<p>Welcome to our portal</p>
<p>Enter your username and password and click Login to access the Internet</p>
<form  method="post"  action="$PORTAL_ACTION$">
<input  name="auth_user"  type="text">
<input  name="auth_pass"  type="password">
<input  name="redirurl"  type="hidden"  value="$PORTAL_REDIRURL$">
<input  name="zone"  type="hidden"  value="$PORTAL_ZONE$">
<input  name="accept"  type="submit"  value="Login">
</form>
</body>
</html>
The following HTML code is used for a portal page without authentication:
<html>
<head>
<title>Welcome to our portal</title>
</head>
<body>
<p>Welcome to our portal</p>
<p>Click Continue to access the Internet</p>
<form  method="post"  action="$PORTAL_ACTION$">
<input  name="redirurl"  type="hidden"  value="$PORTAL_REDIRURL$">
<input  name="zone"  type="hidden"  value="$PORTAL_ZONE$">
<input  name="accept"  type="submit"  value="Continue">
</form>
</body>
</html>
The following HTML code is used for a portal page requiring vouchers:
<html>
<head>
<title>Welcome to our portal</title>
</head>
<body>
<p>Welcome to our portal</p>
<p>Enter your voucher code and click Login to access the Internet</p>
<form  method="post"  action="$PORTAL_ACTION$">
<input  name="auth_voucher"  type="text">
<input  name="redirurl"  type="hidden"  value="$PORTAL_REDIRURL$">
<input  name="zone"  type="hidden"  value="$PORTAL_ZONE$">
<input  name="accept"  type="submit"  value="Login">
</form>
</body>
</html>
3. How to Configure Authentication for Captive Portal?
Captive Portal Authentication may be performed using the local user database, RADIUS, or LDAP if necessary for the zone. You may configure authentication for the captive portal by following the next steps:
-
Navigate to the
Services>Captive Portal. -
Edit the Captive Portal Zone, like
guestnetby clicking on the Edit button with a pen icon. -
Scroll down to the bottom of the
Authenticationpane. -
Choose an Authentication Method for the zone. Available options are as follows:
Authentication backendwill show the login page and authenticate users using their username and password, or with vouchers. The local user database (User Management and Authentication) or an authentication server handles authentication. Vouchers are pre-generated access codes that provide users with temporary access. Vouchers may be used in lieu of or in addition to user authentication.
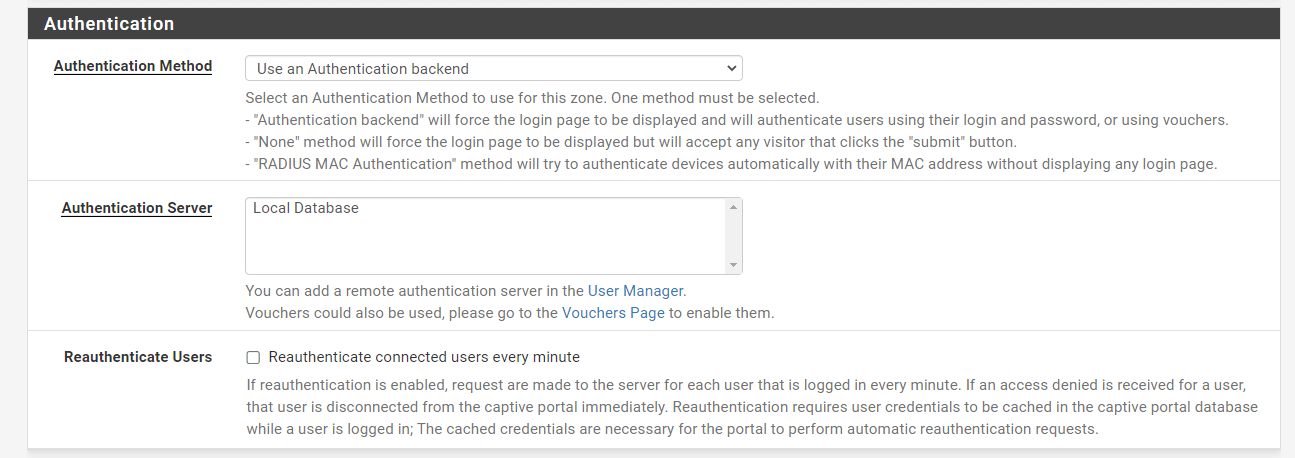
Figure 35. Using Authentication backend for Captive Portal on pfSense Firewall
Noneapproach will show the login screen but will accept any visitor who hits the "submit" button.RADIUS MAC Authenticationapproach will attempt to automatically authenticate devices using their MAC address without presenting a login page. The portal tries to authenticate users by transmitting their MAC address as the username and the password supplied into the MAC authentication secret field to the RADIUS server.

Figure 36. Using Radius MAC Authentication for Captive Portal on pfSense Firewall
-
Select the Authentication Server. Available options are as follows:
Local Database: In this configuration, Captive Portal users are handled using the pfSense® software Interface. User Manager is used to adding local users. In addition, the Local Authentication Privileges option may restrict access to people with the appropriate access capabilities.
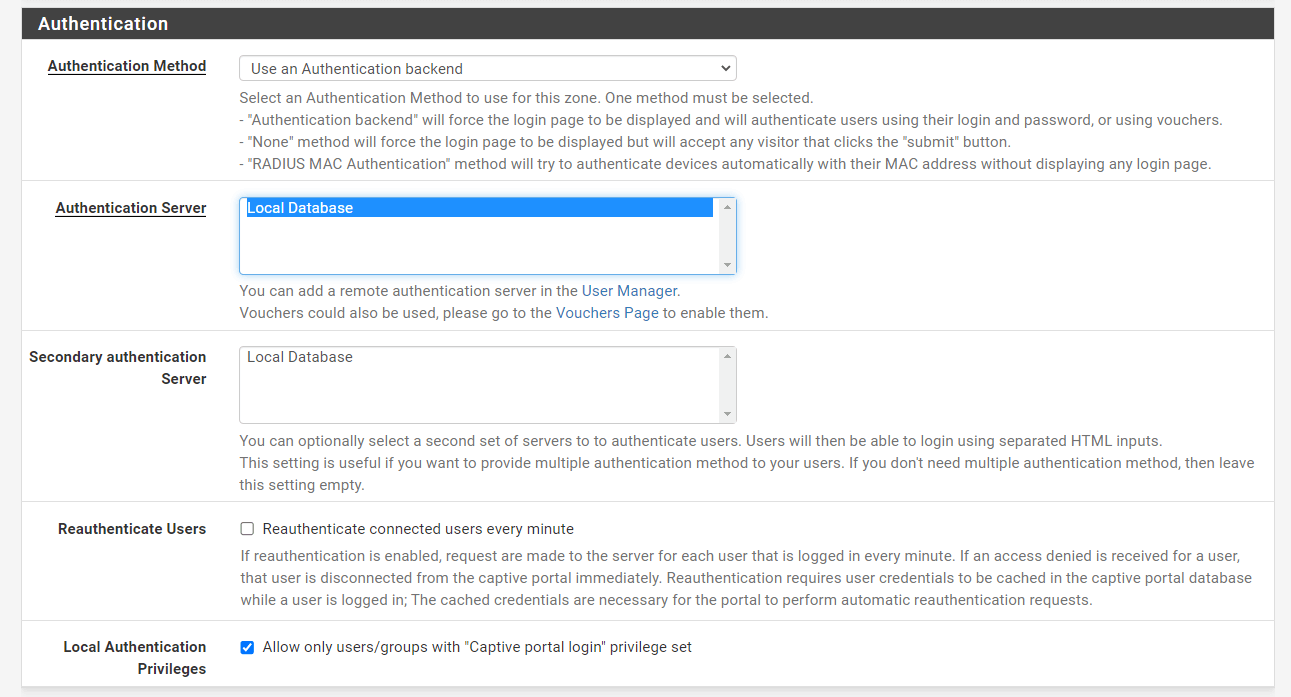
Figure 37. Using Local Database Authentication server for Captive Portal on pfSense Firewall
LDAP Server: When an LDAP server is operational in the control, the portal uses it for authentication without modification. There are no more LDAP server behavior choices.RADIUS Server: When a RADIUS server is active in the control, the GUI displays several RADIUS server choices, and Captive Portal users in this zone will be verified against the selected RADIUS server (s).
-
You may optionally set
Secondary authentication Serverto authenticate users. Users will be able to log in using HTML inputs that are separated. This feature is helpful if you wish to give your users various authentication methods. If you do not need additional authentication methods, leave this field blank. -
You may check
Reauthenticate connected users every minute. If reauthentication is enabled, the server will get a request for each logged-in user every minute. If an access refused response is returned for a user, the user is instantly disconnected from the captive portal. Reauthentication needs user credentials to be cached in the captive portal database while a user is signed in; The cached credentials are required for the portal to automatically request reauthentication. -
You may check the
Allow only users/groups with "Captive portal login" privilege setoption to limit access to only users who have Captive Portal privilege. The privilege can be directly on their account or inherited via group membership.. -
Click the Save button at the end of the page to activate the settings.
What are the RADIUS Authentication Options?
RADIUS is a method for authenticating users against a central server containing account data. On Windows servers, there are several RADIUS implementations, such as FreeRADIUS, Radiator, and NPS. RADIUS accounting may be configured to transmit each user's use data to the RADIUS server. Those with a Microsoft Active Directory network architecture may utilize RADIUS to authenticate captive portal users using Microsoft NPS and Active Directory.
Passing back configuration from RADIUS Servers
Several default Captive Portal settings may be changed by RADIUS server reply characteristics. The precise properties may vary by vendor, and not all RADIUS servers may support them.
-
User bandwidth restrictions: Specifies the user's bandwidth using parameters likeWISPr-Bandwidth-Max-Up/WISPr-Bandwidth-Max-Down, orChilliSpot-Bandwidth-Max-Up/ChilliSpot-Bandwidth-Max-Down. -
Session Timeout: Derived from the RADIUS attribute Session-Timeout, it disconnects the user after the RADIUS server-specified duration. -
Idle Timeout: Derived from the RADIUS attribute Idle-Timeout, it disconnects the user after the RADIUS server-specified time. -
Accounting Interval Interim: It is derived from Acct-Interim-Interval and instructs the portal to transmit interim accounting updates at the interval given. -
URL Redirection: Permits the RADIUS server to specify the after-authentication redirect URL throughWISPr-Redirection-URL
RADIUS options
These parameters fine-tune the behavior of RADIUS authentication.
-
NAS Identifier: Configures an alternative NAS Identifier to be sent with RADIUS queries. The default value isCaptivePortal-<zone name>. -
Reauthentication: If enabled, the portal will send Access-Request packets to the RADIUS server every minute for each logged-in user. If an Access-Reject is received for a user, the user's captive portal connection is instantly severed. This enables active session termination from the RADIUS server.warningIf concurrent login limitations are configured in RADIUS, this option may not function effectively, since the reauthentication attempt would be seen as a second concurrent login. If reauthentication is coupled with RADIUS accounting, Interim accounting updates must be utilized to monitor usage during sessions; otherwise, the RADIUS server won't know whether a user has exceeded limits until the user logs out.
-
Session-Timeout: When enabled, clients will be disconnected after the duration specified by the RADIUS Session-Timeout attribute supplied to the portal upon login. -
Traffic Quota: When enabled, the portal utilizes the pfSense-Max-Total-Octets reply attribute delivered by the RADIUS server to establish a user's traffic limit. This identifies a traffic threshold that, when surpassed by a client, will cause the portal to disconnect that client. This covers both download and upload activity. -
Per-user Bandwidth Restrictions: When enabled, the portal leverages the RADIUS server's pfSense-Bandwidth-Max-Up and pfSense-Bandwidth-Max-Down reply attributes to create per-user bandwidth constraints. -
MAC address format:: This option modifies the format of the MAC address used by RADIUS. Modify this to change the format of the username for RADIUS MAC authentication to one of the following:Default: Colon-separated pairs of numbers by default: 00:11:22:33:44:55Single Dash: Digits divided into two groups by a single dash: 001122-334455IETF: Digits separated by hyphens: 00-11-22-33-44-55Cisco: Four-digit groups separated by a period: 0011.2233.4455Unformatted: None of the digits are formatted or separated: 001122334455.
RADIUS MAC Authentication options
RADIUS MAC Authentication options are listed below:
-
RADIUS MAC Secret: When the portal tries RADIUS MAC authentication, it transmits this value as the password and the MAC Address as the username. -
Login Page Fallback: If MAC Authentication fails, the portal will send the client to the login page.
Accounting
RADIUS accounting returns session information to the RADIUS server, showing when a user session begins, terminates, and how much data was delivered.
Not all RADIUS servers support accounting data or are configured to receive it. Before using this functionality, configure the RADIUS server accordingly.
-
Accounting Server: An authentication server entry for a RADIUS server that will receive accounting data from the portal (Authentication Servers). -
Send Accounting Updates: Configures the kind of accounting that the server supports. -
No updates: If accounting is off, the portal will not submit accounting changes to the server. -
Stop/start: The portal only transmits START and STOP data for a single user session. -
Stop/start (FreeRADIUS): The gateway delivers START and STOP records compatible with FreeRADIUS for a single user session. -
Interim: During an active user session, the portal transmits START and STOP data, as well as frequent updates to the server. This strategy reduces the likelihood that session data will be lost if the firewall restarts without sending a STOP message to the RADIUS server, but will increase database consumption on the RADIUS server. -
Accounting Style: When Invert Acct-Input-Octets and Acct-Output-Octets are enabled, data counts for RADIUS accounting packets are determined from the client's viewpoint rather than the NAS's. Acct-Input-Octets will indicate download, whereas Acct-Output-Octets will indicate upload. -
Idle Time Accounting: This option modifies the time delivered in the STOP message for users disconnected by the portal due to inactivity. When unset (the default), the transmitted time is the time of the previous action. When set, idle time is accounted for.
4. How to Enable HTTPS Login?
To prevent eavesdropping, the username and password will be transferred via an HTTPS connection when the HTTPS Login option is enabled. You may easily enable HTTPS login on the captive portal by following the next steps:
-
Navigate to the
Services>Captive Portal. -
Edit the Captive Portal Zone, like
guestnetby clicking on the Edit button with a pen icon. -
Scroll down to the bottom of the
HTTPS Optionspane. -
Check
Enable HTTPS loginoption. This will display other HTTPS settings since this option requires an SSL/TLS Certificate.. -
Type HTTPS server name. This name will be used in the HTTPS POST form action and should correspond to the Common Name (CN) in the certificate (otherwise, the client browser will most likely display a security warning). Verify that captive portal clients can resolve this name in DNS and that the IP resolves to the right interface IP on pfSense.
-
Select the SSL certificate used by the portal for HTTPS connection.
-
You may check Disable HTTPS Forwards option. If this option is enabled, connection attempts to HTTPS (SSL/TLS on port 443) sites will not be routed to the captive portal. This stops the user from seeing certificate issues even if HTTPS logins are enabled. To be sent to the captive portal, users must try a connection to an HTTP (Port 80) site. The user will be sent to the HTTPS login page if HTTPS logins are enabled.
-
Click the Save button at the end of the page to activate the settings.
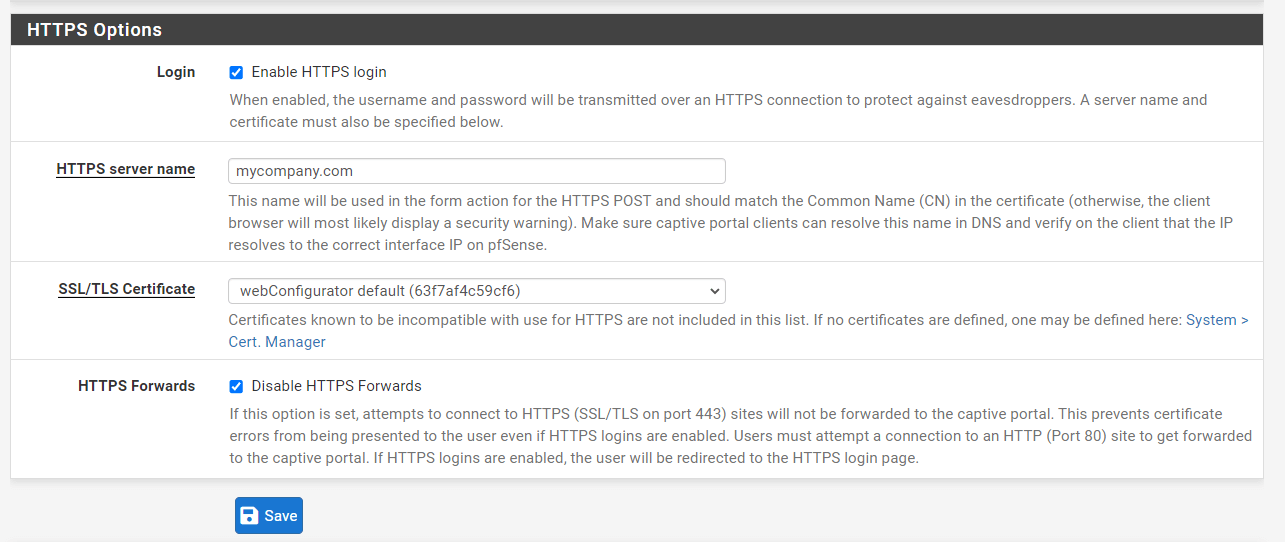
Figure 38. Enabling HTTPS logins for Captive Portal Page on pfSense Firewall
5. How to Define MAC Address Control?
The MACs tab specifies actions for MAC addresses that may either pass through the captive portal for the zone without authentication or be denied access to the portal. To administer MAC entries for the captive portal you may follow the next steps:
-
Navigate to the
Services>Captive Portal. -
Edit the Captive Portal Zone, like
guestnetby clicking on the Edit button with a pen icon. -
Click the MACs tab on the header bar.

Figure 39. Managing MAC addresses for Captive Portal on pfSense Firewall
-
Click
+Addbutton to add a new entry -
Select the Action. Available options are given below:
Pass: Always allow traffic through from this MAC address without authentication.Block: Always deny traffic from this MAC address
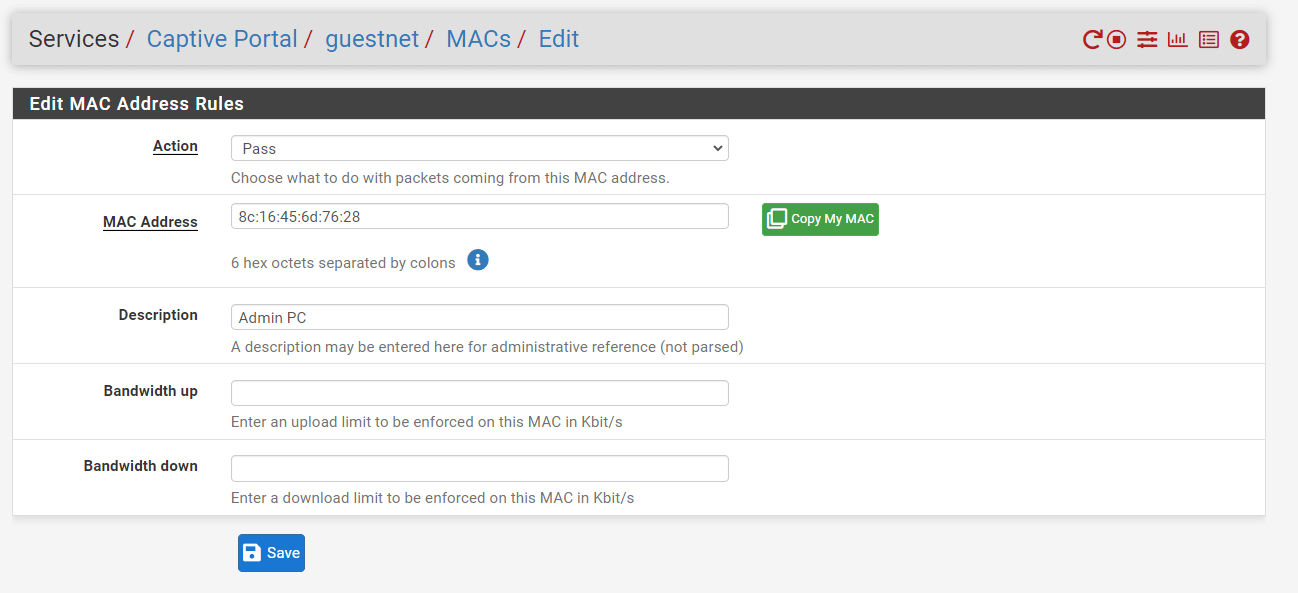
Figure 40. Defining MAC address rules for Captive Portal on pfSense Firewall
-
Type the MAC Address of the device you want to manage. The value must be colon-separated pairs of digits, such as
00:11:22:33:44:55. You may clickCopy My MACbutton for your device. -
Type a Description, like
Admin PC. -
You may type an upload limit to be enforced on this MAC in Kbit/s in the Bandwidth up field. You may leave it blank to not specify a limit.
-
You may type a download limit to be enforced on this MAC in Kbit/s in the Bandwidth down field. You may leave it blank to not specify a limit.
-
Click Save to activate the settings.
A warning message is displayed on the captive portal login page as given below when a MAC address is blocked due to the MAC rules.
Figure 41. MAC address blocked by Captive Portal on pfSense Firewall
6. How to Define Allowed IP Address?
The Authorized IP Address tab functions similarly to the MACs tab, except that IP addresses are checked instead of MAC addresses. In this zone, traffic matching the provided IP address and the route will always be permitted via the portal without authentication. To administer IP address entries for the captive portal you may follow the next steps:
-
Navigate to the
Services>Captive Portal. -
Edit the Captive Portal Zone, like
guestnetby clicking on the Edit button with a pen icon. -
Click the Allowed IP Address tab on the header bar.

Figure 42. Managing Allowed IP Addresses for Captive Portal on pfSense Firewall
-
Click
+Addbutton to add a new entry -
Set the IP address of the device that must always pass via the portal.
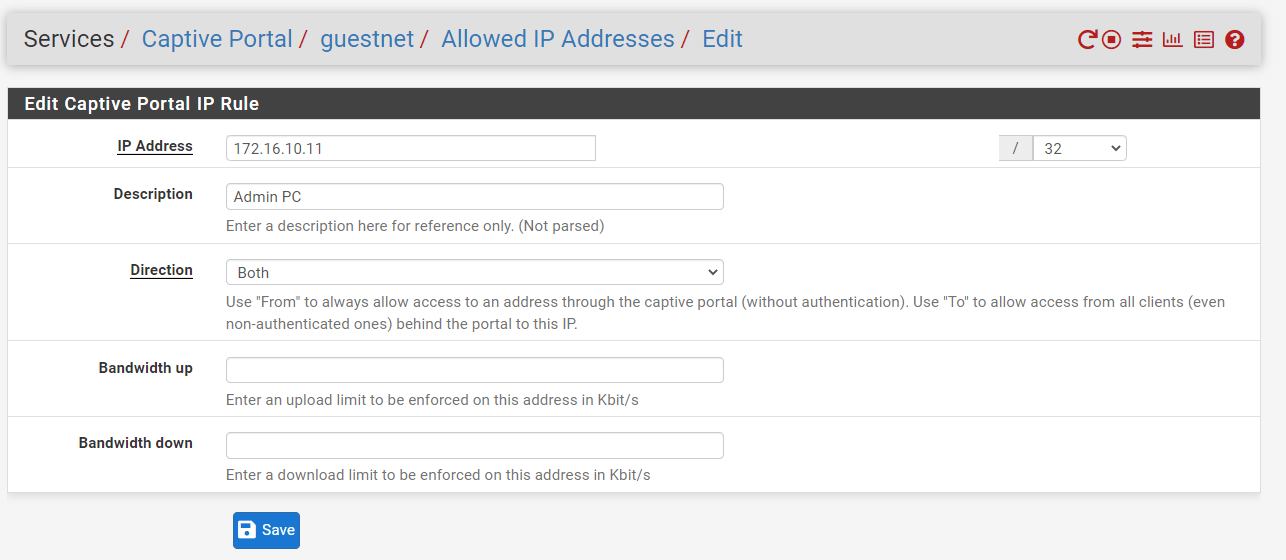
Figure 43. Adding Allowed IP Addresses for Captive Portal on pfSense Firewall
-
Type a Description, like
Admin PC. -
Select the Direction to allow this IP address's traffic. Available options are as follows:
From: Permit traffic originating from this IP address to pass through the portal, such as a local client IP address wanting to connect to the Internet or the IP address of a management client requiring access to hosts on the portal network.To: Permit traffic using this IP address as a destination, such as a local web server IP address that must be accessed through port forwarding, or a faraway web server IP address that clients must always access.Both: Allow both inbound and outbound traffic.
-
You may set the maximum available bandwidth for this IP by typing an upload limit in Kbit/s in the Bandwidth up field. You may leave it blank to not specify a limit.
-
You may set the maximum available bandwidth for this IP by typing a download limit in Kbit/s in the Bandwidth down field. You may leave it blank to not specify a limit.
-
Click Save to activate the settings.
7. How to Define Allowed Hostnames?
Allowed Hostnames function similarly to Allowed IP Address entries, but are defined by hostname instead of the IP address. A daemon translates hostnames to IP addresses on a periodic basis and grants them access to the portal in this zone without requiring authentication.
The most popular use of this functionality is to create a "walled garden"-style portal in which users may view a limited range of sites without authenticating to the portal. This is also widely used with the Pre-authentication Redirect URL if the page is externally hosted.
Often, sites include many hostnames, content delivery networks, or ad servers inside their content. All of these extra hostnames must be added to the list of permitted hostnames for a website to load completely.
To administer Hostname entries for the captive portal you may follow the next steps:
-
Navigate to the
Services>Captive Portal. -
Edit the Captive Portal Zone, like
guestnetby clicking on the Edit button with a pen icon. -
Click the Allowed Hostnames tab on the header bar.

Figure 44. Managing Allowed Hostnames for Captive Portal on pfSense Firewall
-
Click
+Addbutton to add a new entry -
Select the Direction to allow this Hostnames's traffic. In the majority of frequent use cases using hostnames, the To or Both directions are optimal. Available options are as follows:
From: Permit traffic originating from this hostname to pass through the portal, such as a local client seeking to access the InternetTo: Permit unauthenticated traffic from local clients to a distant site whose hostname matches this one. For instance, a distant web server must always be accessible to local clients, even if they are not signed in.Both: Allow both inbound and outbound traffic.
-
Set the Hostname of the device that must always pass via the portal. The fully qualified domain name (FQDN) of the host or site being targeted. The hostname must exist in DNS for IP address resolution to occur.
-
Type a Description.
-
You may set the maximum available bandwidth for this hostname by typing an upload limit in Kbit/s in the Bandwidth up field. You may leave it blank to not specify a limit.
-
You may set the maximum available bandwidth for this hostname by typing a download limit in Kbit/s in the Bandwidth down field. You may leave it blank to not specify a limit.
-
Click Save to activate the settings.
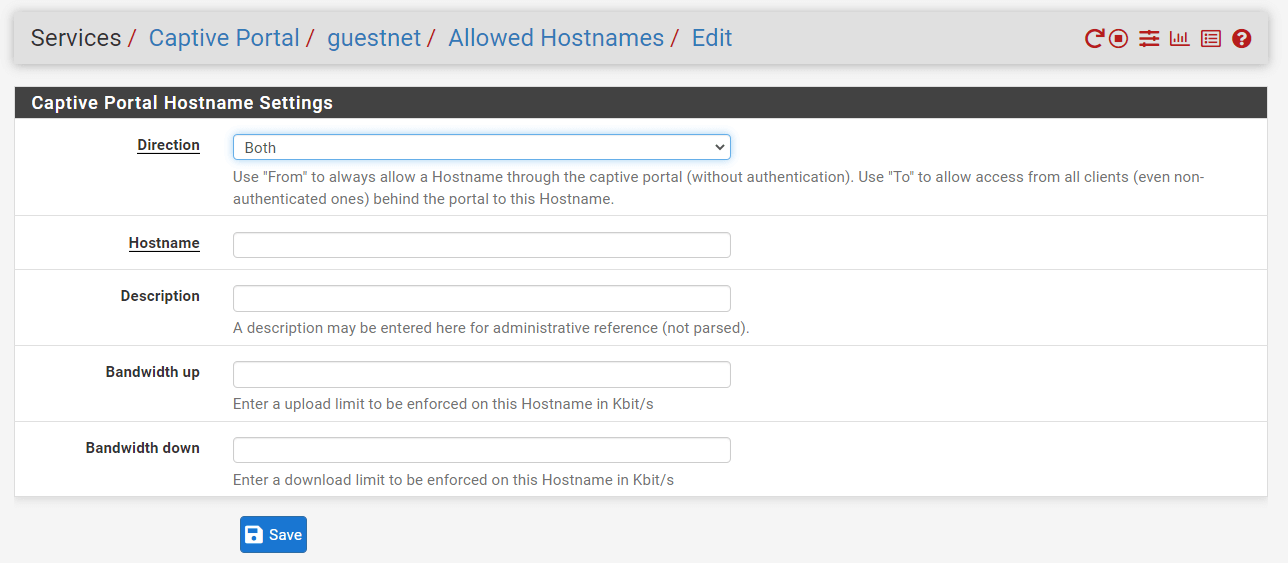
Figure 45. Adding Allowed Hostnames for Captive Portal on pfSense Firewall
What are the Benefits of Configuring the pfSense Captive Portal?
The main advantages of the pfSense Captive Portal are explained below:
- Security
- Bandwidth Management
- Marketing
Security
The implementation of a captive portal can help you keep your business in accordance with regulatory standards and good practices in providing Internet access to users via hotspots.
A captive portal typically displays terms of service to the user, which they must accept before using the company's Wi-Fi hotspot. Administrators often do this to ensure that their own users take responsibility for their acts and that they are not held legally liable. Property owners can protect themselves from legal liability by requiring their users to agree to a Terms of Service (ToS) page before getting access to the network via a Captive Portal. The Captive Portal operates by "redirecting" any Web request to a specific page until the user clicks I Agree to the Terms of Service. As a result, regardless of what URL your browser asks, the Captive Portal page will appear first when you start a Web browser. The captive portal may, in some situations, need a password. This type of safeguard protects you from legal liability in the event of illegal or otherwise harmful online behavior, while similar security features safeguard company assets.
Bandwidth Management
Some users always misuse Internet services, for instance by remaining online many hours a day, accessing multiple times a day, or even connecting to them over several terminals. And depending on the sort of activity performed on your connection, it might also occupy a bandwidth.
The Captive Portal provides a number of measures for ensuring sufficient access to all users: connection time can be controlled, the number of terminals per user, bandwidth use.
You can regulate your bandwidth using a captive portal and create configurable time limitations as far as each user can stay connected to your network.
Marketing
In commercial terms, captive portals offer an ideal chance for seamless marketing that makes it possible for users to become involved during their internet experience at a vital time and is a powerful medium for a wide variety of business demands. To fill in a survey, watch a sponsored ad, or highlight current promotions, you may use a captive portal.
This means that the provider of this service can display or send ads to people connecting to the Wi-Fi connection. This type of service is frequently called "social WiFi" because it can prompt you to log in to a social network account. These social wireless Internet portals have been prevalent over the last several years with several companies offering marketing focusing on Wi-Fi data collection.
How Does Captive Portal Work in pfSense?
pfSense provides a Captive Portal to force clients who request network access to authenticate or redirect them to a click-through page. This solution is generally used on hotspot networks, but it is also broadly used in enterprise networks to provide an extra layer of security for Internet or wireless access.
pfSense Captive Portal has the following features.
-
Category-based Web Filtering: By combining the Captive Portal and the caching proxy, you may use category web filtering and block specific content for users, as well as reduce Internet bandwidth usage and improve response times by enabling the cache.
-
Timeouts & Welcome Back: Connections can be terminated after a set amount of time (idle timeout) and/or forced to disconnect after a set number of minutes, even if the user is still active (hard timeout). If a user reconnects within the idle and/or hard timeouts, no login is required, and the user's active session can be resumed.
-
Bandwidth Management: pfSense firewall has a traffic-shaping feature. Its built-in traffic shaper can be used to do the following:
- Priority can be given to protocol port numbers and/or IP addresses.
- Distribute bandwidth evenly.
-
Authentication: pfSense Captive Portal provides HTTPS-secured authentication or a splash-only portal with URL redirection to a specific page. To authenticate a user in a zone, the following sources can be used:
-
Local user manager
-
Vouchers / Tickets
-
Radius
-
LDAP [Microsoft Active Directory]
-
No authentication (Splash Page Only)
-
-
Portal Bypass: You can use the whitelisting option to allow some IP addresses or MAC addresses to bypass the portal.
-
Template Management: The unique template manager in pfSense makes creating your own login page effortless. At the same time, it provides additional features such as:
-
Option for creating your own Pop-up
-
URL redirection: After authenticating or clicking through the captive portal, users can be forcibly redirected to the specified URL.
-
Start page customization
-
-
Zone Management: Different zones may be configured on each interface, or multiple interfaces may share a single zone configuration. Each zone can use its own unique Captive Portal Template or share one with another.
-
Voucher Manager: pfSense's Captive Portal includes a simple voucher creation system that exports vouchers to a `CSV file for use with your preferred application. The export allows you to print vouchers by combining them with your LibreOffice or Microsoft Word template, resulting in a professional-looking handout that includes your company logo and style.
Why Need a Captive Portal in pfSense?
It is becoming increasingly popular for public and private locations to provide users with free Internet access, delivering convenience, connecting organizations and people, and serving a variety of objectives. However, certain formalities must be observed for providing an Internet connection. Free Internet access should be provided in public and private spaces following a variety of safety standards to minimize the usage of harmful people for illegal activities. Captive Portal is one of the most common security solutions for this problem.
Typical applications of Captive Portal on pfSense are listed below.
-
Camping & Hotel Wi-Fi
-
Bring Your Own Device
-
Guest Network
-
Wifi Internet access in public areas, such as cafes.
Companies generally offer their visitors internet access and show them a landing page with a welcome message and some guidelines and network access policies. At the same time, it is critical to ensure that visitors cannot access the private LAN and exhaust the Internet bandwidth.
Hotels and RV parks typically use a captive portal to provide guests with limited Internet access. Guests must log in using a voucher that can be purchased or obtained for free at the reception desk. pfSense includes voucher support and can quickly generate them on the fly.
Hackers today steal information in one of the easiest ways by acting as a lawful wireless network. When one of your clients logs into the fake network, the hacker has a simple way to gather their information. If your company is a coffee shop or a hospital that provides your clients or patients with free Wi-Fi in the waiting area, your network should thus be identified correctly with your end customers so that they do not log in to any potential falsification. pfSense captive portal is one of the best solutions to protect your customers from being a victim of cybercrime.