Configuring Split DNS on Zenconsole
Zenarmor now introduces Split DNS support within Zero Trust Secure Networks, empowering administrators to define custom internal DNS servers and search domains for their secure environments. This feature allows organizations to manage internal and external DNS resolution independently, providing greater security, privacy, and control over how domain names are resolved across their Zero Trust environments.
With Split DNS enabled, internal resources such as intranet portals, file servers, or internal APIs can be resolved only within the organization’s secure environment, while public users continue to reach external-facing domains through standard public DNS.
This dual-resolution capability helps prevent data leakage of internal IPs, improves latency for internal queries, and ensures a consistent name resolution policy across distributed networks.
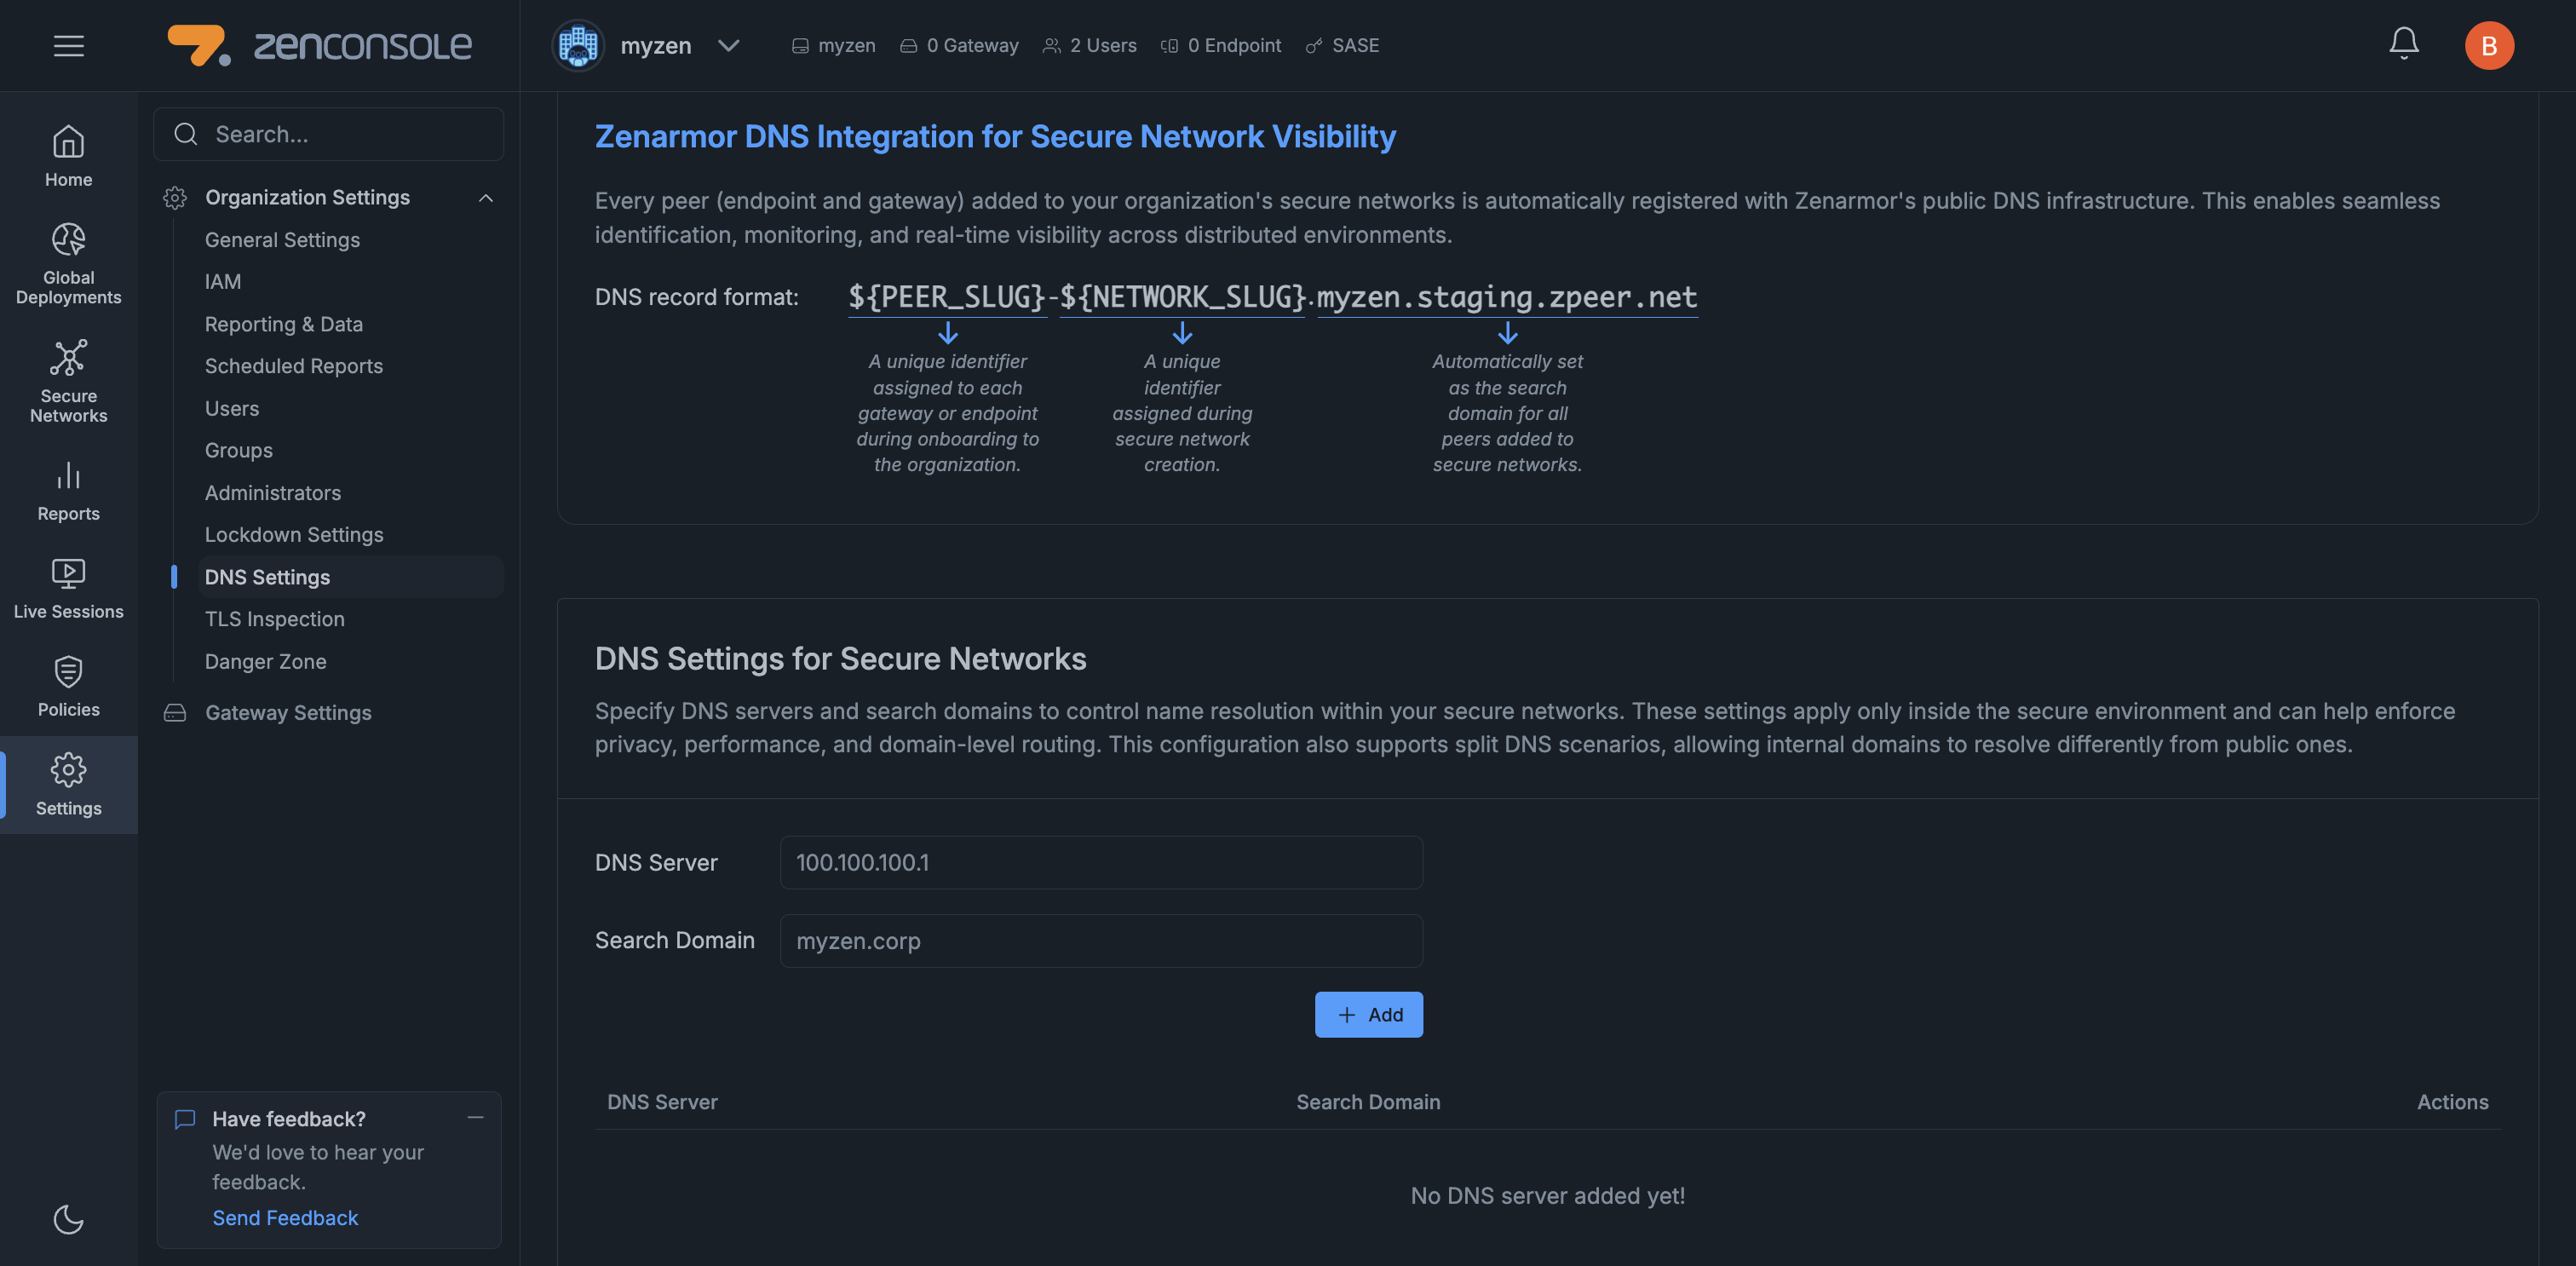
Figure 1. DNS Settings
Core Components of Zenarmor’s Split DNS
Zenarmor’s Split DNS capability is built upon an integrated DNS infrastructure that automatically registers and maintains all network peers and their associated domain records.
This architecture ensures that every gateway and endpoint within a secure network can be consistently identified and resolved through Zenarmor’s DNS system, providing a reliable foundation for secure, adaptive, and context-aware name resolution.
This capability is built upon two primary components that define its core functionality.
1. DNS Record Integration Layer
Every peer (gateway or endpoint) added to a secure network is automatically registered within Zenarmor’s DNS infrastructure. This process enables seamless peer identification, monitoring, and visibility across distributed environments.
Each peer is assigned a unique DNS record format as shown below.
${PEER_SLUG}-${NETWORK_SLUG}.myzen.zpeer.net
This structure ensures a globally consistent naming convention for all peers and secure networks managed under your organization.
It also simplifies network diagnostics and maintains reliable resolution across distributed setups.
Figure 2. DNS Record Format
2. DNS Settings for Secure Networks
This component allows administrators to define internal DNS servers and search domains that apply exclusively within their Zero Trust Secure Network. Through Zenconsole, you can specify which domains should resolve via internal DNS and which should continue to use public resolvers, forming the foundation of Split DNS behavior.
Administrators can perform the following actions:
-
Add multiple internal DNS servers for redundancy
-
Assign search domains (e.g., corp.local, hq.internal)
-
Control internal vs. external query routing
-
Improve privacy and reduce latency for internal domain resolution
For instance, a query to intranet.myzen.corp resolves through the internal DNS server 100.100.100.1, while a query to google.com continues to resolve via the public DNS resolver.
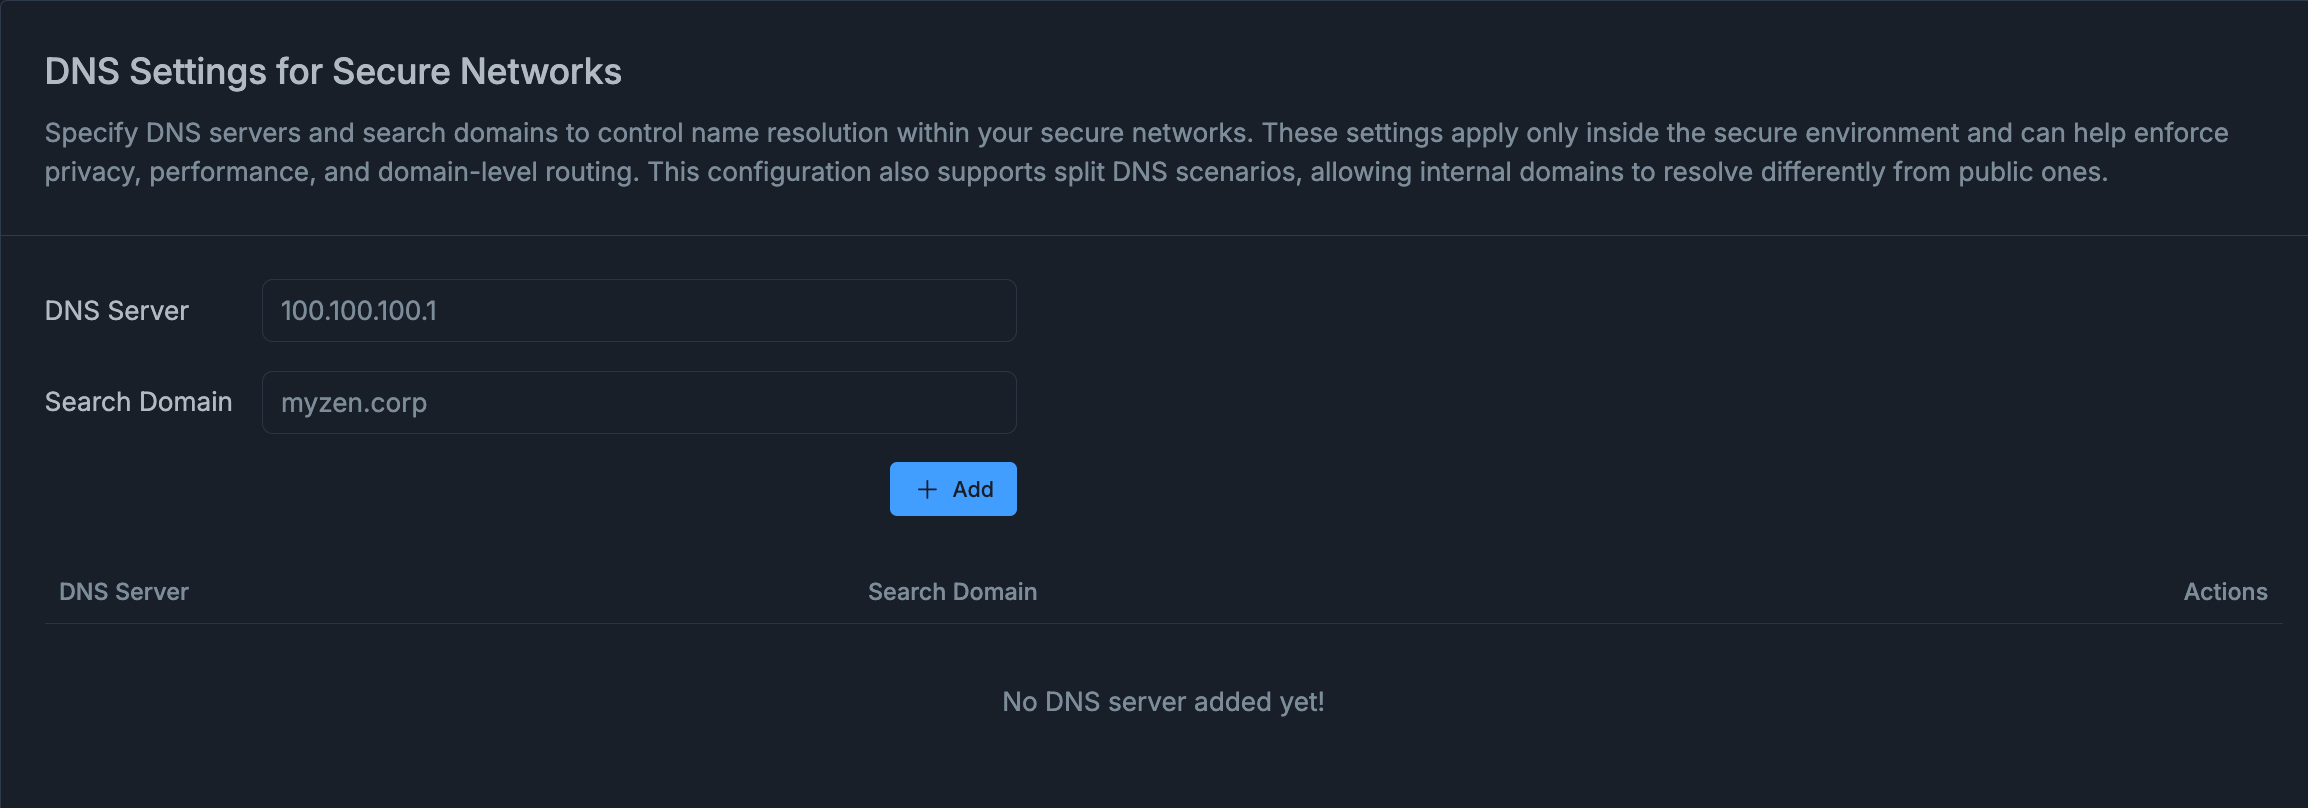
Figure 3. DNS Settings for Secure Networks
How to Configure Split DNS in Zenconsole
Zenarmor allows administrators to easily configure Split DNS directly through Zenconsole, ensuring internal and external domain resolutions are handled appropriately across secure networks.
Follow the steps below to define DNS server and domain settings for your organization.
-
Log in to your Zenconsole account and select your organization.
-
From the left-hand navigation menu, navigate to Settings → Organization Settings → DNS Settings.
-
On the DNS configuration page, you’ll find two key sections:
i. Zenarmor DNS Integration for Secure Network Visibility
ii. DNS Settings for Secure Networks
-
Under DNS Settings for Secure Networks, you’ll see two configuration fields:
i. DNS Server
ii. Search Domain
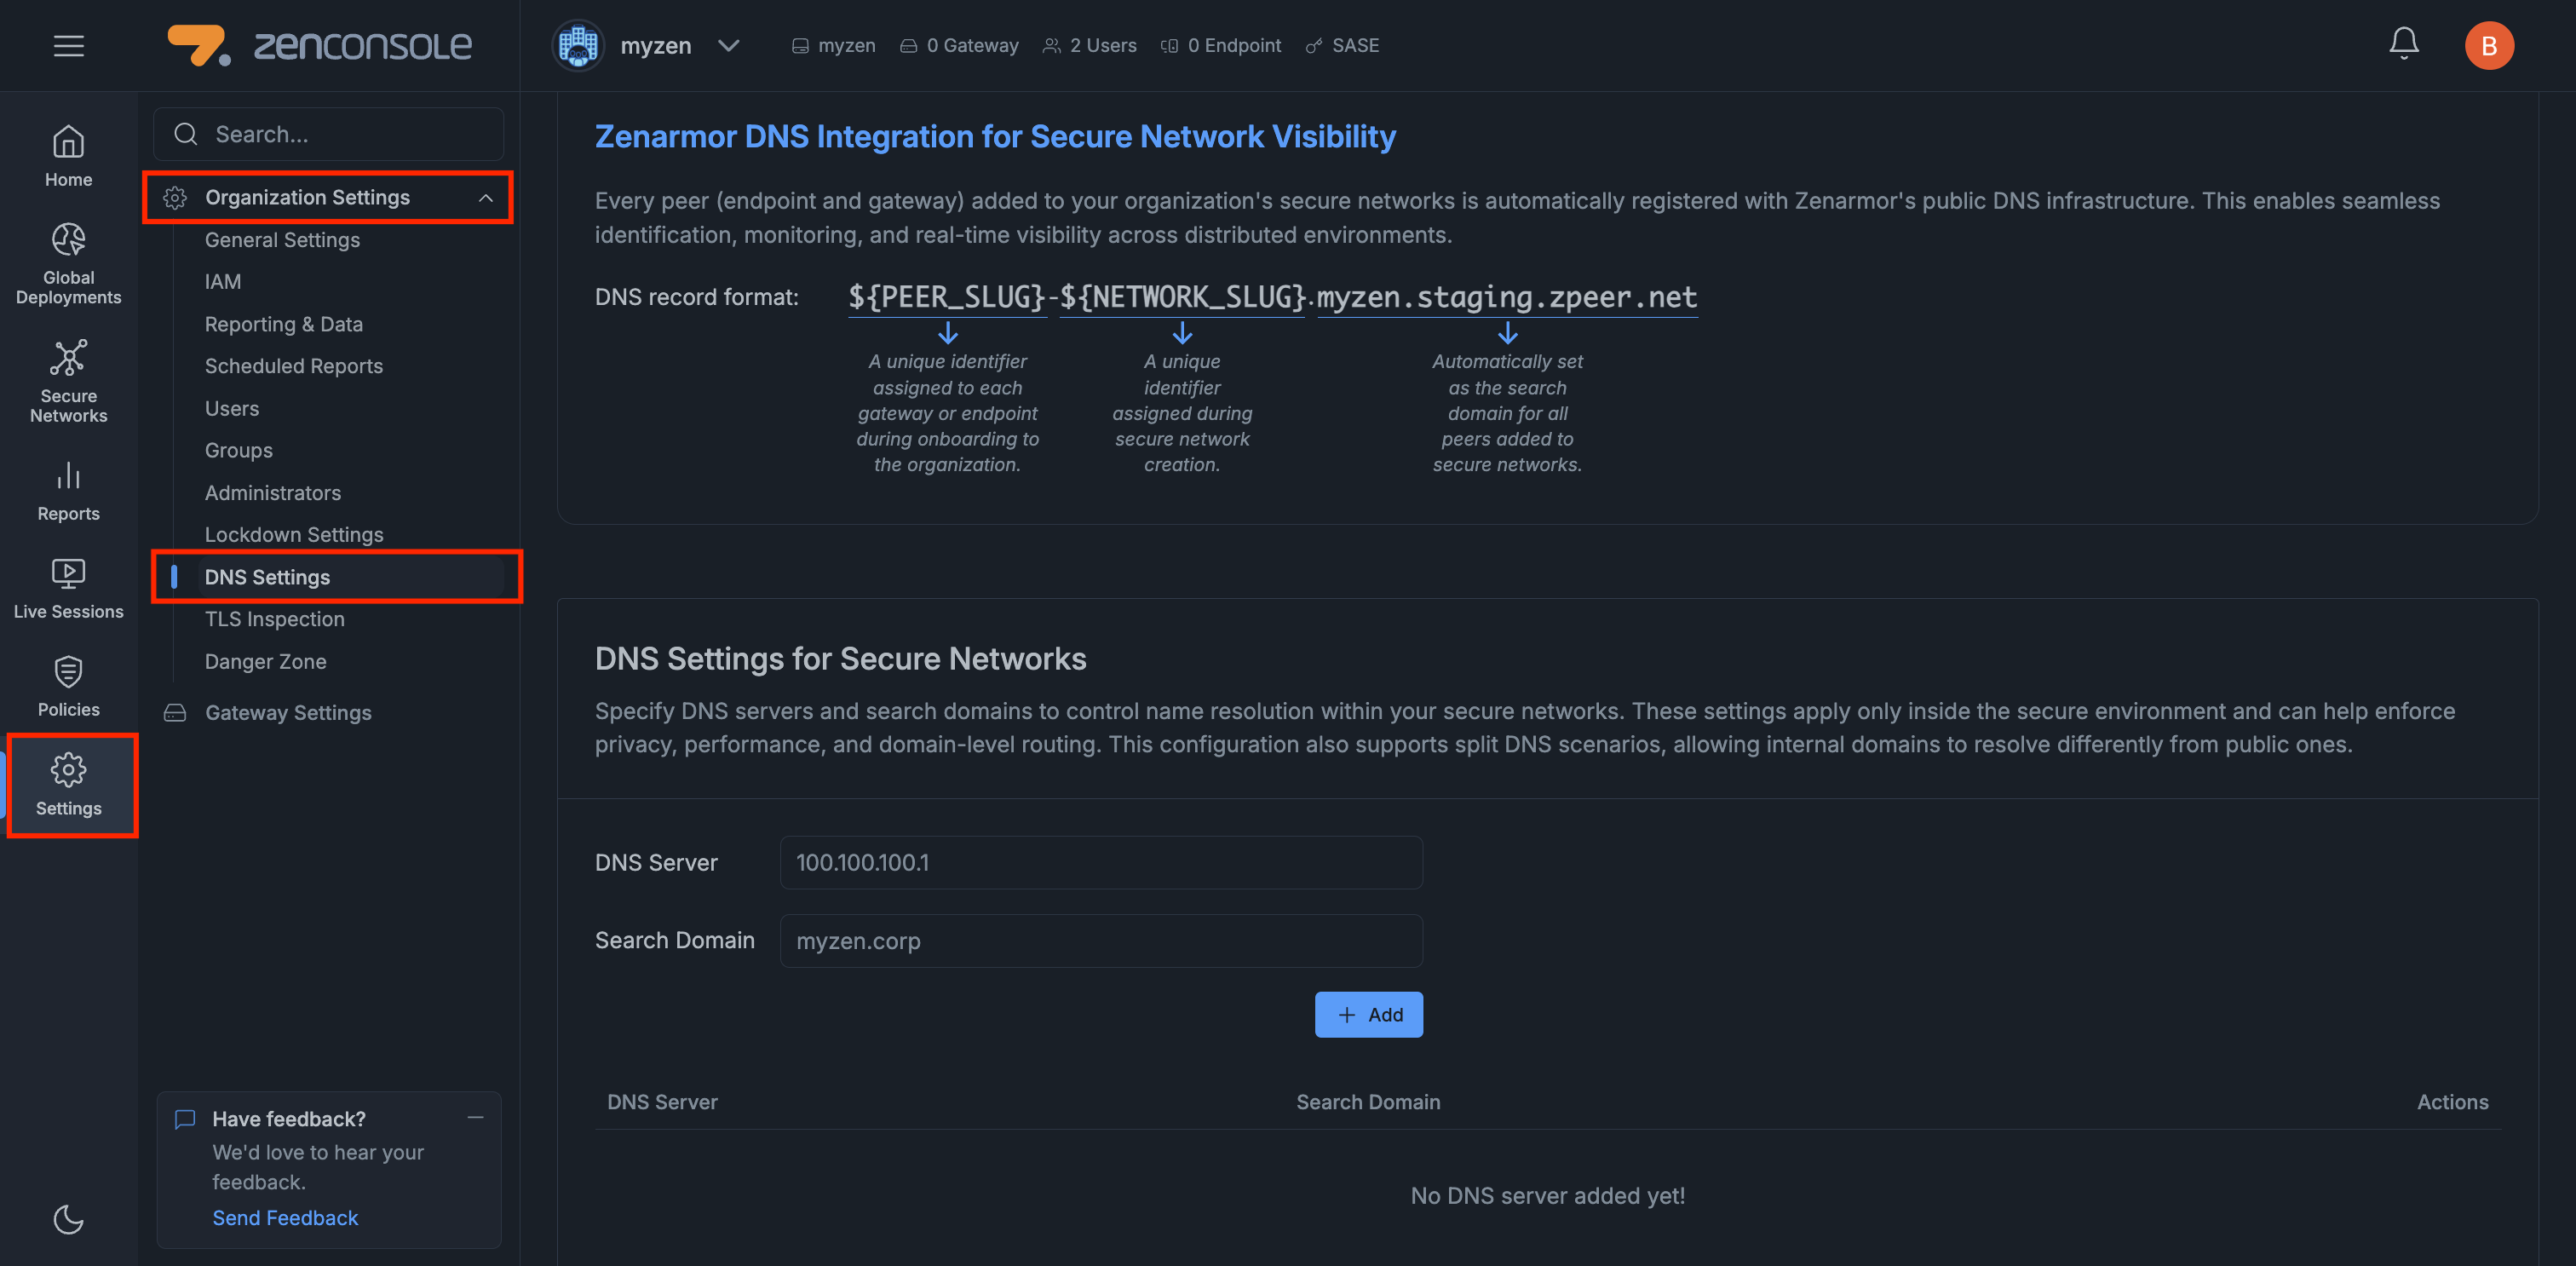
Figure 4. DNS Settings for Secure Networks Page
-
In the DNS Server field, enter the IP address of your internal DNS server. (e.g.,
100.100.100.1). -
In the Search Domain field, type the internal domain name that should be resolved internally. (e.g.,
myzen.corp). -
Click + Add to save the configuration.
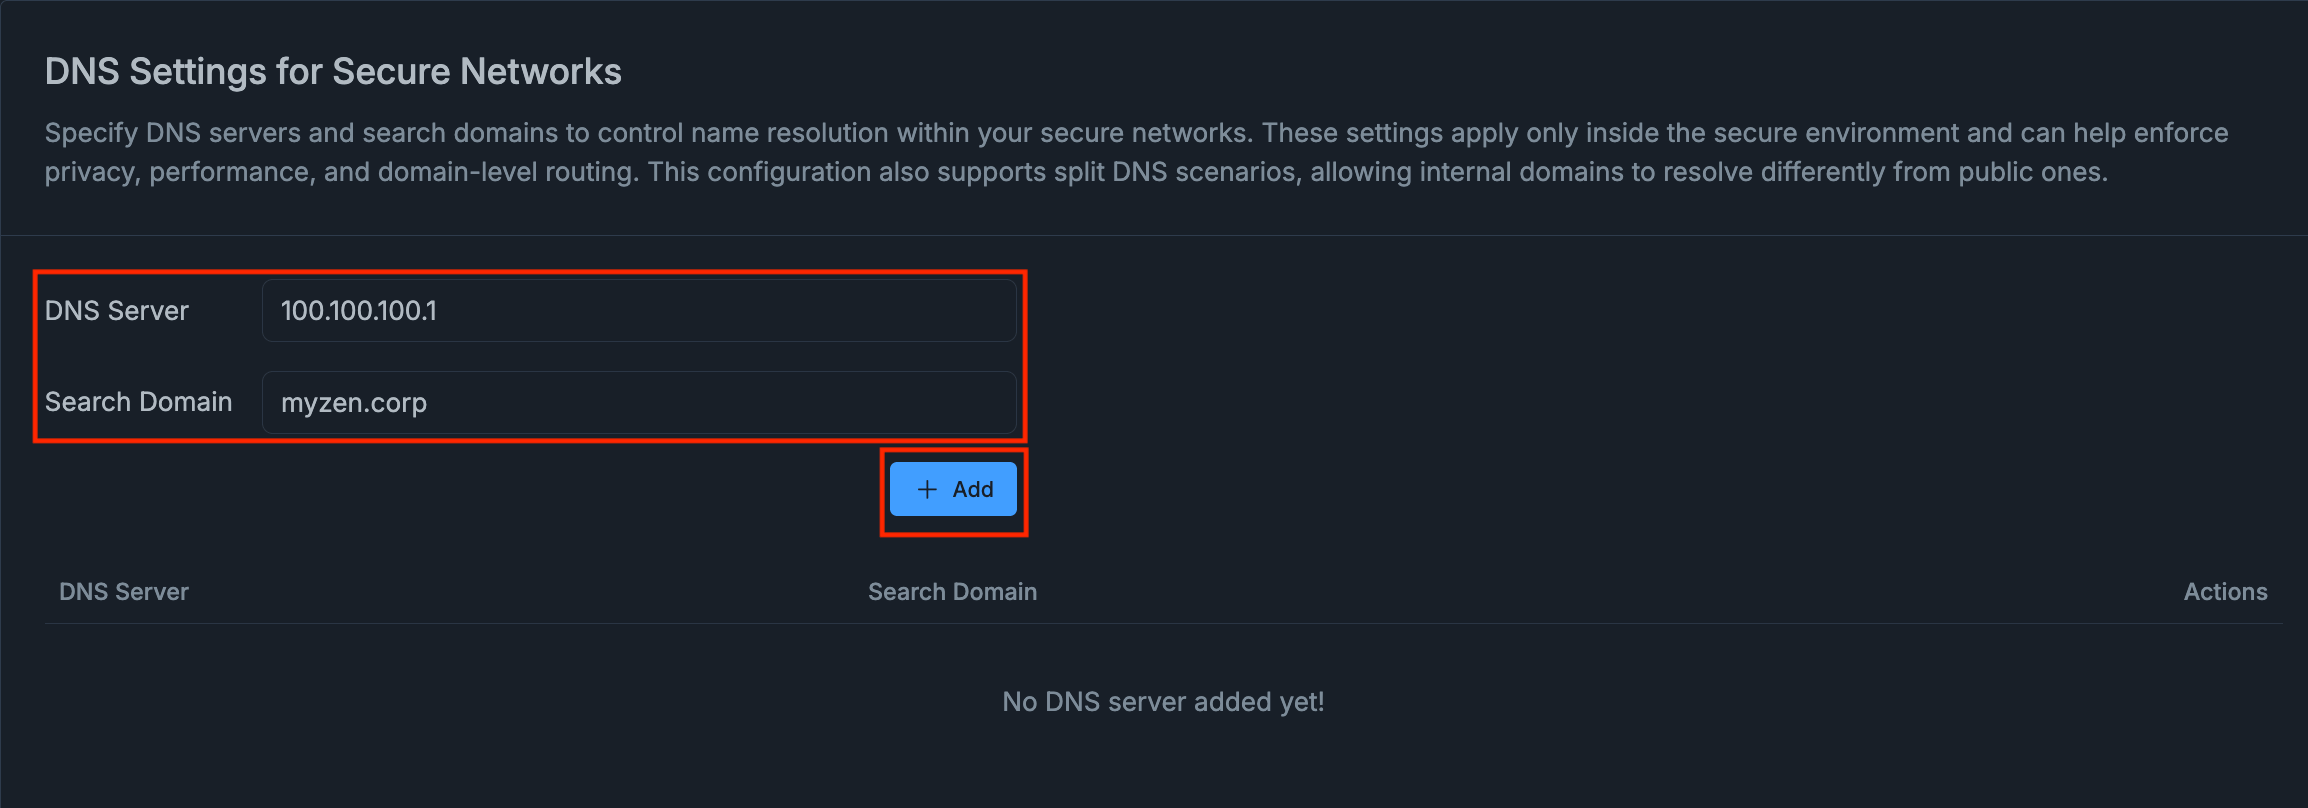
Figure 5. Adding DNS Server
-
After clicking the Add button, a confirmation message appears at the bottom-right corner of the screen.
This notification indicates that the new DNS configuration has been successfully added.
You can either click Sync Now to apply the changes immediately or wait for the next automatic synchronization cycle, which occurs every 15 minutes.
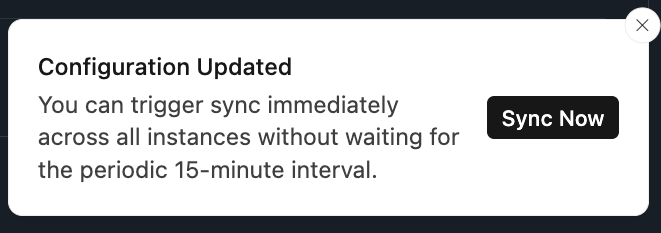
Figure 6. Sync Now
After configuration, internal domains (e.g., myzen.corp) are resolved through the designated internal DNS servers, while all other requests continue to use external resolvers.
This ensures privacy, performance, and network control without requiring any manual client-side setup.
You can add multiple DNS servers and domains for different internal zones such as corp.local, hq.internal, or dev.corp.
Editing or Updating an Existing DNS Entry
If you need to change the IP address or domain name of an existing DNS configuration, you can easily update it directly from the DNS Settings for Secure Networks section.
To update a DNS entry, follow the steps below.
-
Log in to your Zenconsole account.
-
From the left-hand navigation menu, select: Settings → Organization Settings → DNS Settings.
Figure 7. DNS Settings for Secure Networks Page
-
Locate the DNS server entry you want to modify in the list. In the Actions column, click the three-dot (⋯) menu next to that entry.
-
From the dropdown menu, select Edit.
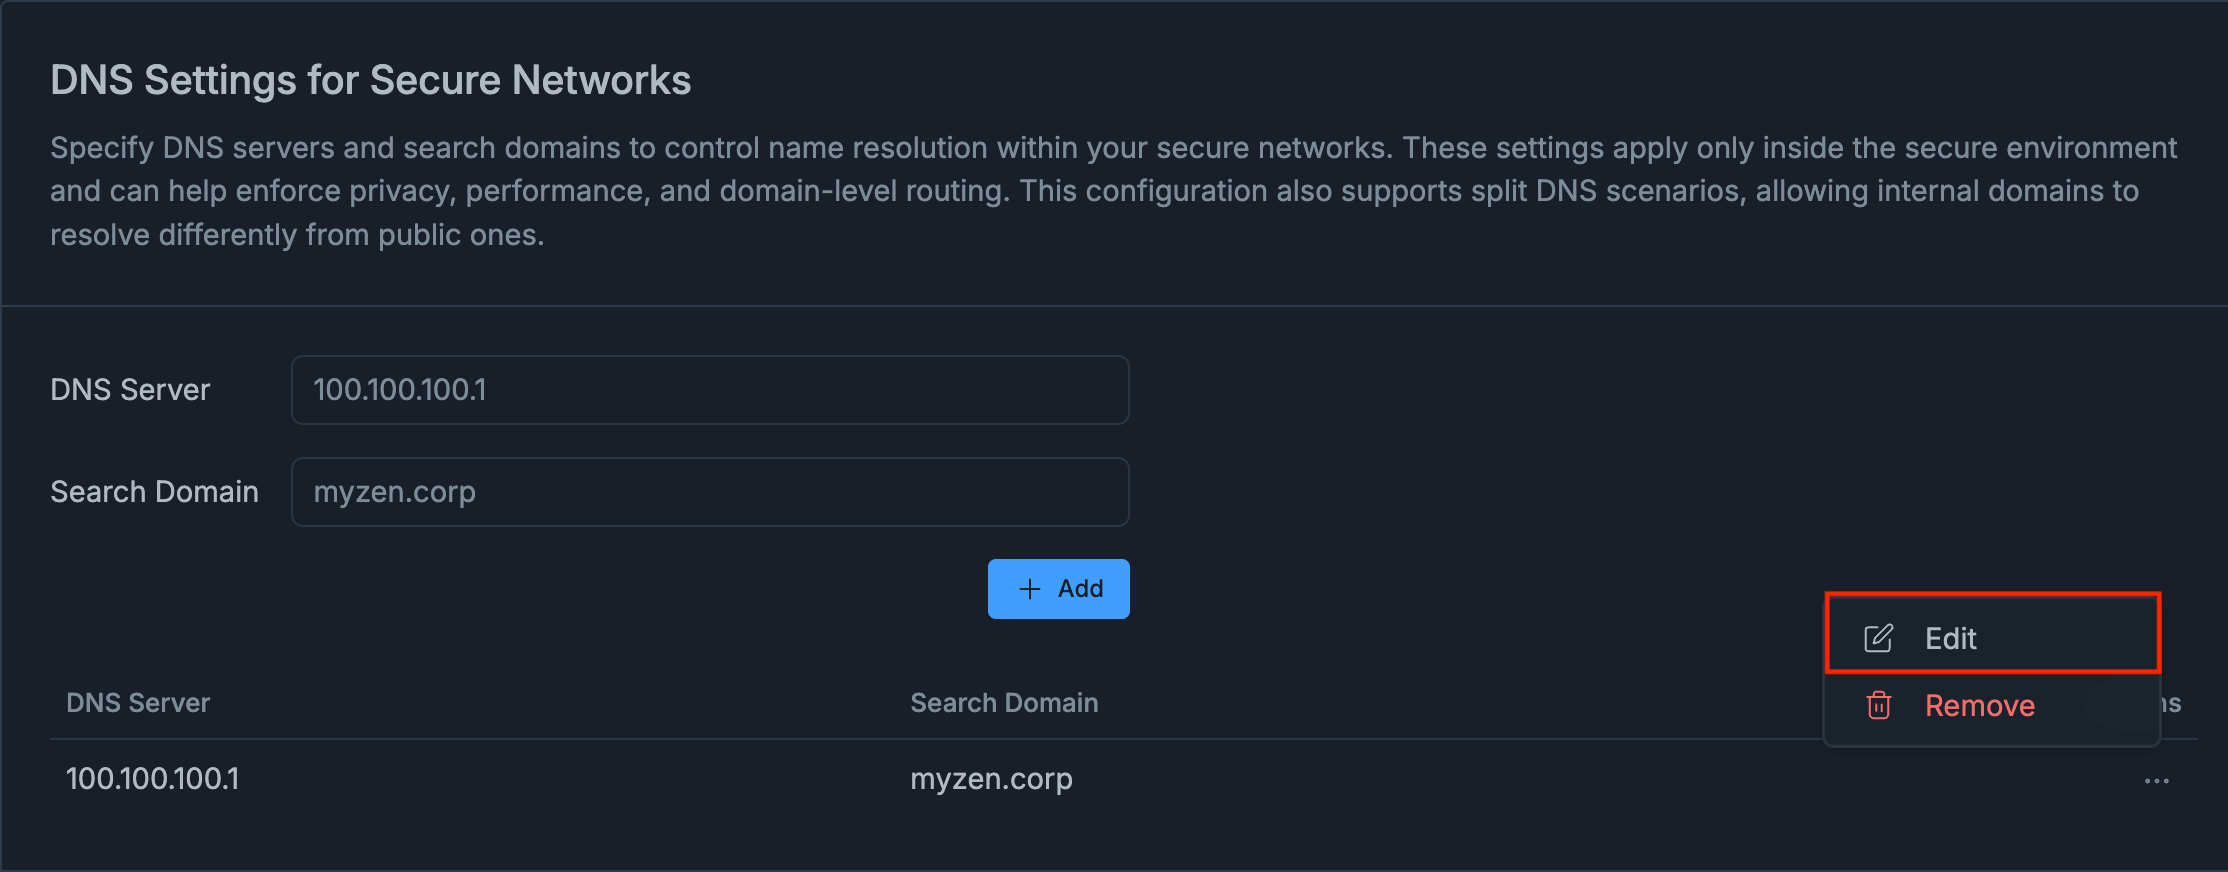
Figure 8. Editing DNS Settings
-
A popup window titled Update DNS Server will appear. In this window:
-
Update the DNS Server field with the new IP address (e.g.,
100.100.100.1). -
Update the Search Domain field with the desired internal domain (e.g.,
test.test).
-
-
Click Update to save your changes.
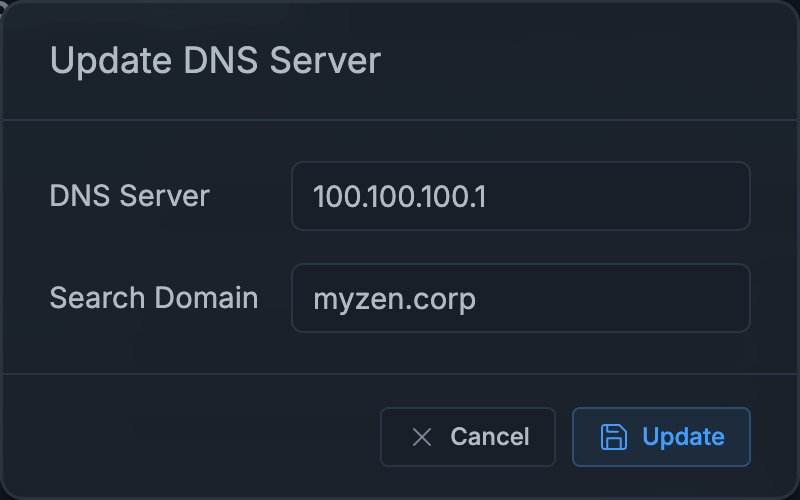
Figure 9. Update DNS Server
-
After clicking the Update button, a confirmation message appears at the bottom-right corner of the screen.
This notification indicates that the new DNS configuration has been successfully added.
You can either click Sync Now to apply the changes immediately or wait for the next automatic synchronization cycle, which occurs every 15 minutes.Figure 10. Sync Now
You can also click Remove to delete any outdated or unused DNS entries.