Bypass Code Management on OPNsense
When Zenarmor blocks a page, a landing page is displayed. Users are presented with a landing page that explains why access to a website has been restricted, either as part of a corporate internet usage policy or in response to a threat detected by Zenarmor's real-time monitoring.
Zenarmor enables security teams to generate and distribute Bypass Codes, which end users can enter on the blocked landing page to bypass and whitelist it. A bypass code is a basic alphanumeric pin that is used to circumvent the landing page. The landing page provides an input field for the user to enter these bypass codes. If the bypass code matches one of these admin/user codes, the site is promptly whitelisted (without the need to log in to the OPNsense UI or Zenconsole). This provides an alternative, yet still controlled, method for whitelisting websites without requiring a security team member to manually modify the whitelist using Zenarmor UI.
IT security team members and end-users can both benefit from the Bypass Code capability, which provides a fast and controlled way to whitelist websites on the fly, thereby reducing the end-user frustration typically associated with waiting for IT to manually whitelist the website. IT helpdesk staff can provide fast turnaround times by simply supplying a PIN code, relieving the cybersecurity technical staff responsible for administering the organization's firewall while maintaining control.
Zenarmor has two types of Bypass Codes:
-
Admin: Admin Bypass codes whitelist a site permanently for all users/devices in the network.
-
User: User Bypass codes whitelist the blocked site temporarily to the individual endpoint that submits the bypass code on the landing page.
The primary distinction between Admin bypass codes and User bypass codes is that Admin bypass codes whitelist websites for all devices on the network, whereas User bypass codes only whitelist websites for the device where the code is input. Additionally, with User bypass codes, websites are whitelisted for 12 hours, whereas, with the Admin bypass code, they are whitelisted permanently.
Both types have an expiration time/date. After the expiration date, the codes cannot be used to whitelist new sites anymore. However, sites that were whitelisted using the expired codes still remain whitelisted.
The Bypass Code configuration page allows you to perform the following tasks:
- Adding New Bypass Code
- Viewing Bypass Codes
- Deleting Bypass Codes
- Editing Bypass Codes
To access the Bypass Code page you can follow the steps listed below:
- Click Zenarmor on your OPNsense web UI.
- Click Settings menu on the left-hand sidebar.
- Click Block Bypass Codes menu.
Adding New Bypass Code
You can easily create a new Bypass Code by following the next steps:
- Navigate to the Zenarmor → Settings → Block Bypass Codes on your OPNsense web UI.
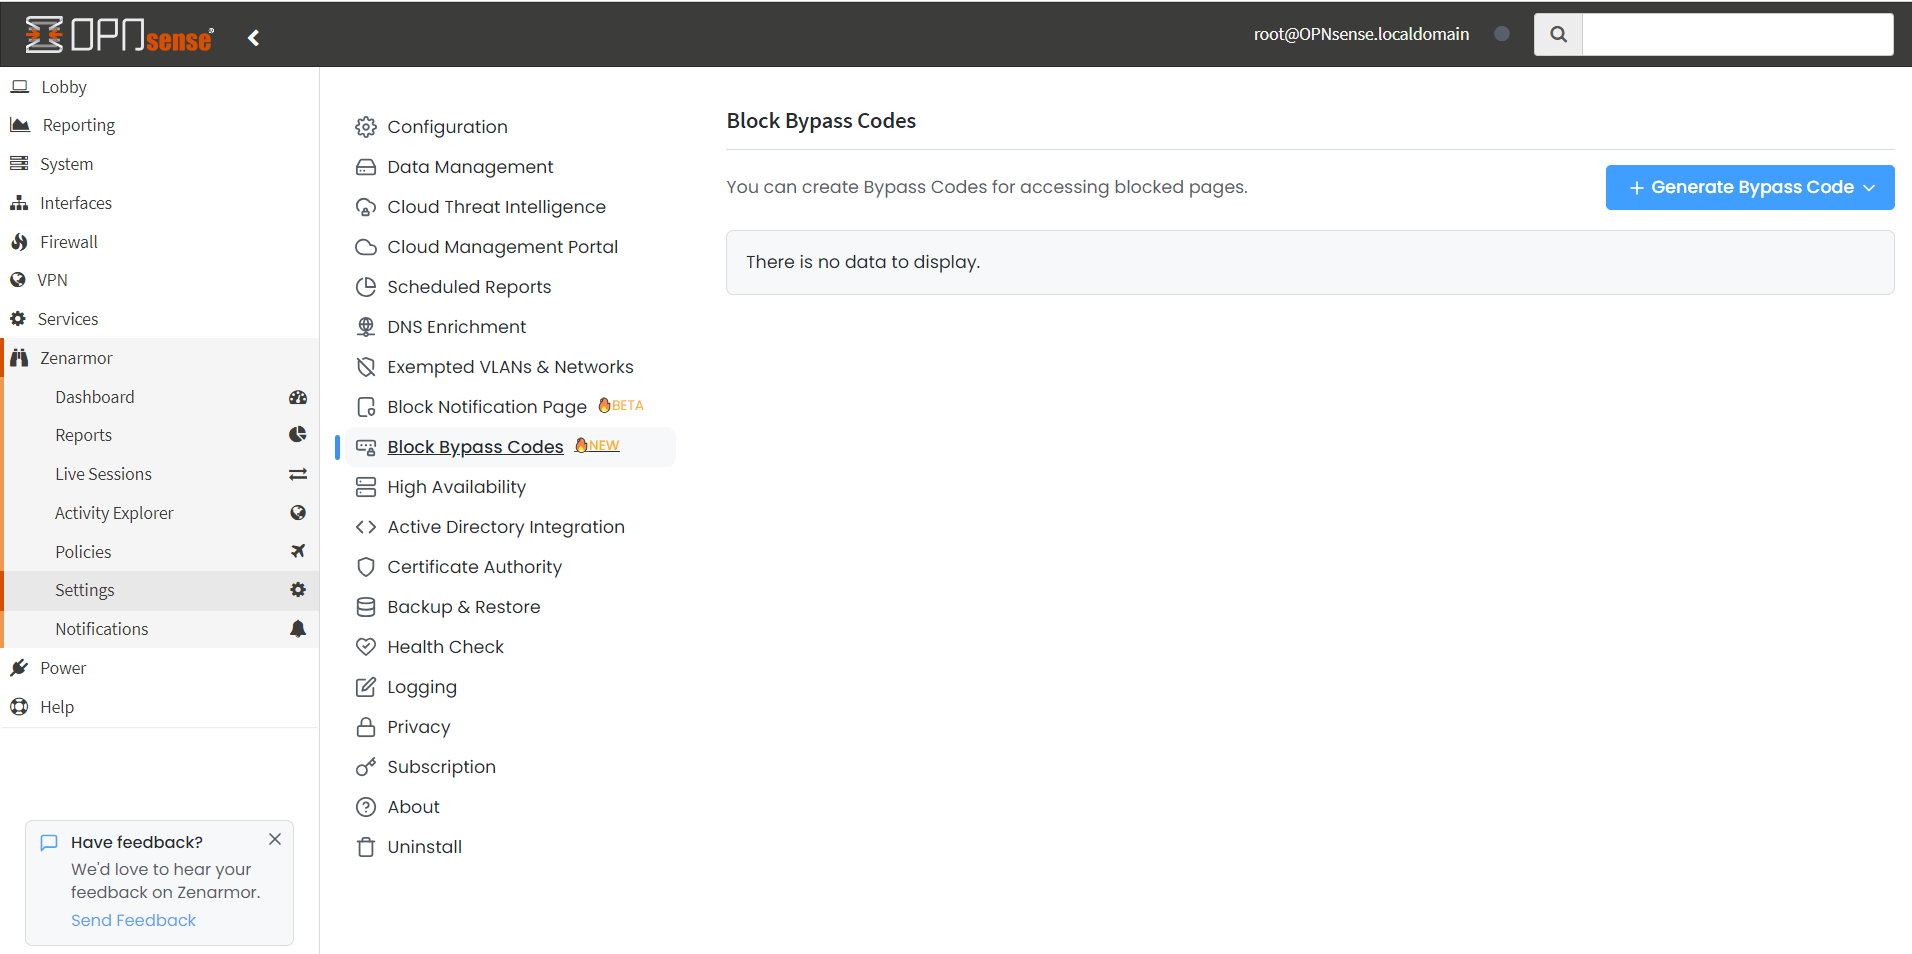
Figure 1. Bypass Code Management
- Click +Generate Bypass Code button. This will drop down a menu. Saved bypass code templates are displayed here.
Figure 2. Generate Bypass Code
- Click New to add a new bypass code. This will open a new window.
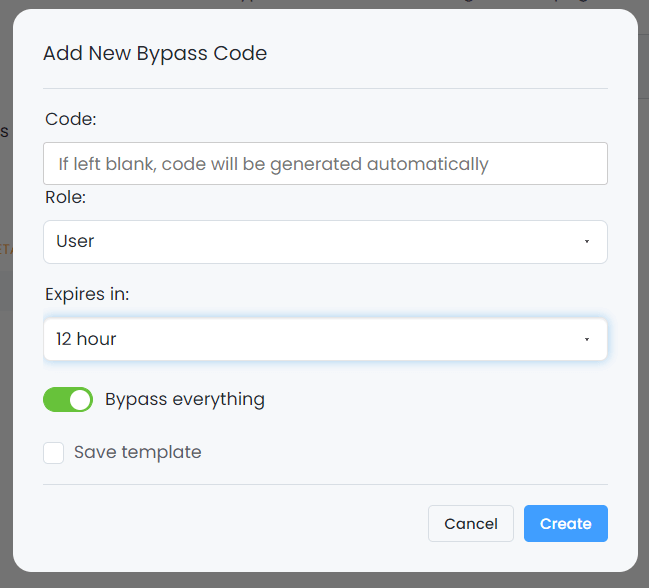
Figure 3. Adding Bypass Code
- You may leave the Pin field empty or type an alphanumeric code as you want. When you leave this field empty a code will be generated automatically for you.
Pin must have 6 characters and include any combination of numbers, letters, or special characters, like 1Q2W3E, !@#$%A, or 12345^.
Pin is not case sensitive.
-
Select the Role which may be User or Admin.
-
Select the expiration time from the Expires in drop-down menu. There are seven options that you can select for expiration time:
- 1 Hour
- 12 Hours
- 1 Day
- 1 Week
- 1 Month
- 1 Year
- Custom duration (second)
When you select the Custom duration option, a new field appears in which you can specify the bypass code validity period.

Figure 4. Setting custom expiration time for new Bypass Code
- You may enable Bypass Everything option if you need to whitelist websites for all applications and web categories.
Enabling the Bypass Everything option for a bypass code might be dangerous since users can access malicious sites, such as phishing, malware, or botnet, using this pin.
- You may select application categories that you would like to allow to bypass the landing page if you disable the Bypass Everything option. When a website/application under this category is blocked user may use this bypass code to access the site. You may add an application category by clicking on the
+button under the Application Categories list. This will move the category into the whitelist under the right side of the window. You may remove a category from the whitelist by clicking the-button next to the category. The total number of the whitelisted categories is displayed on the Application Categories tab within parentheses, likeApplication Category (2).
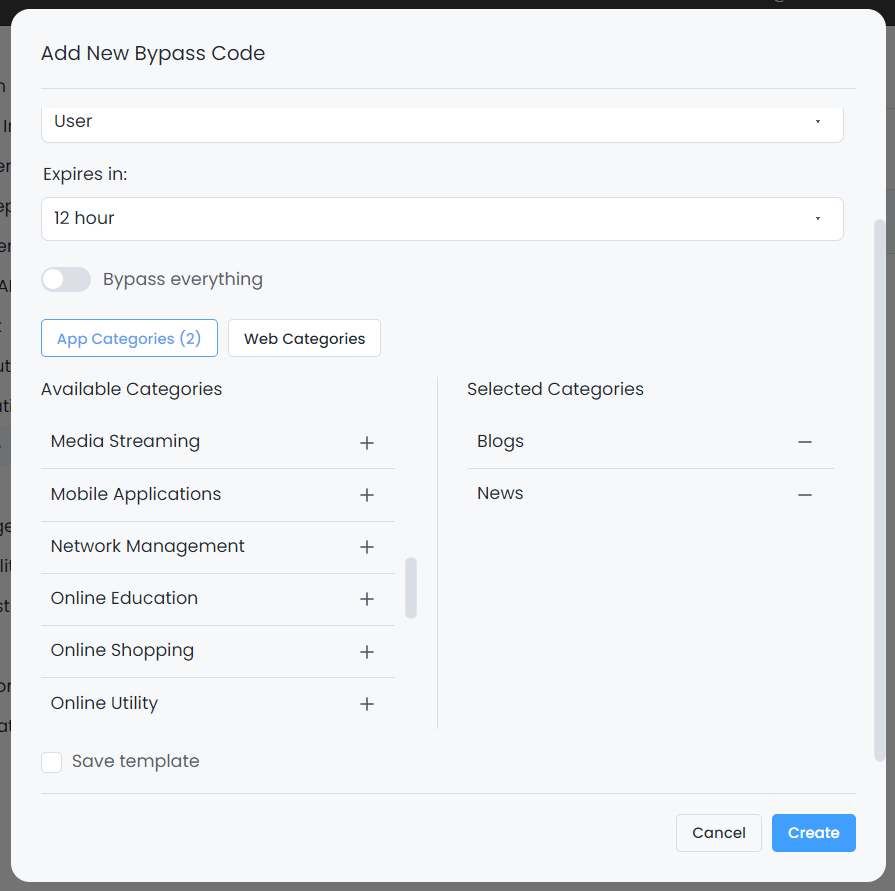
Figure 5. Selecting Application Category
- You may select web categories that you would like to allow to bypass the landing page if you disable the Bypass Everything option. When a website under this category is blocked users may use this bypass code to access the site. You may add a web category by clicking on the
+button under the Web Categories list. This will move the category into the whitelist under the right side of the window. You may remove a category from the whitelist by clicking the-button next to the category. The total number of the whitelisted categories is displayed on the Web Categories tab within parentheses, likeWeb Category (3).
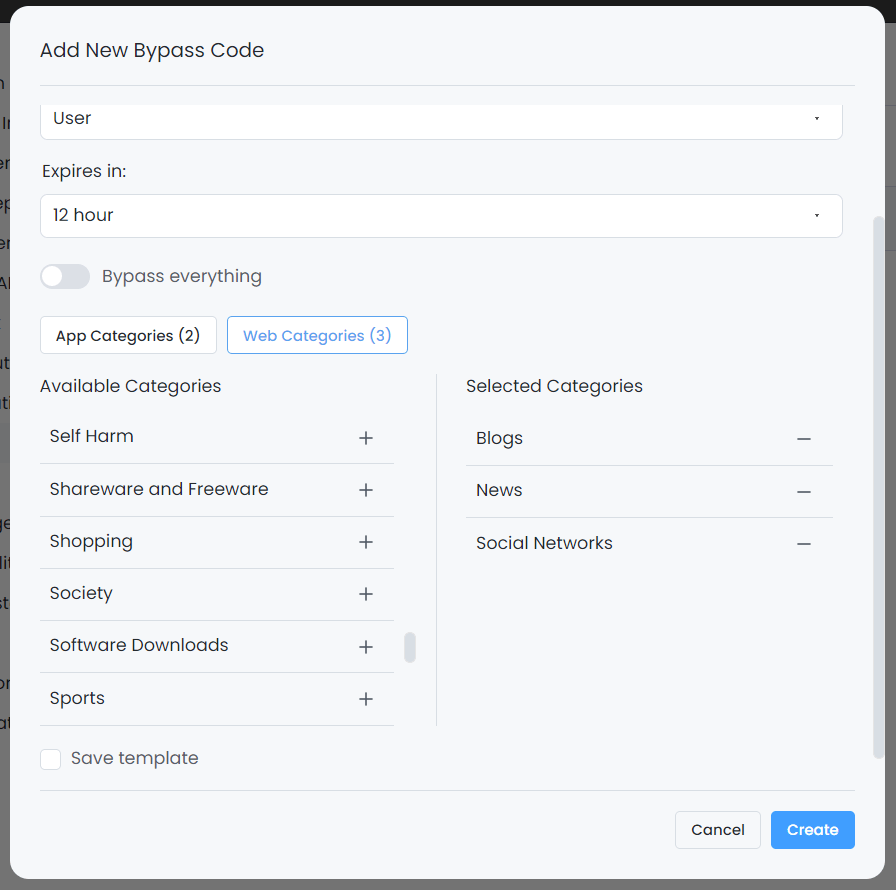
Figure 6. Selecting Web Category
- You may save a template by checking the Save Template option. This will display a new field in which you can type the Template name.
Figure 7. Saving template
- Click Create to add the bypass code.
Adding New Bypass Code Using Template
You can easily create a new Bypass Code using existing bypass code templates by following the next steps:
-
Navigate to the Block Bypass Codes page on your OPNsense UI.
-
Click +Generate bypass code button at the upper right corner of the page. This will drop down a menu. Saved bypass code templates are displayed here.

Figure 8. Selecting template
-
Select the template that you want to use for creating a new bypass code.
-
You may change bypass code settings depending on your requirements.
-
You may check Update template option and type a new Template name if you want to change the name of the existing template.
-
Click Create to add the bypass code.
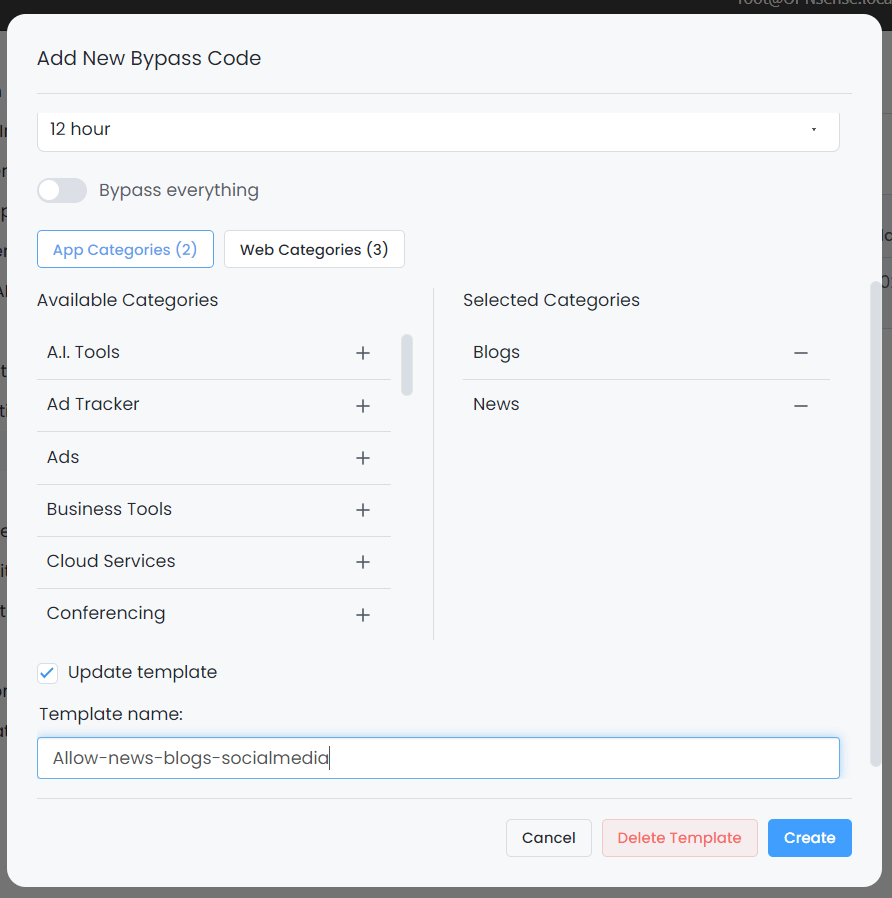
Figure 9. Adding new bypass code using template
Viewing Bypass Codes
The following Bypass Code fields are displayed on the Block Bypass Codes page:
-
Code: Pin used for bypassing the landing page.
-
Role: Type of the bypass code. It may be
adminoruser. -
Apps: Number of whitelisted application categories / Total number of the application categories.
-
Webs: Number of whitelisted web categories / Total number of web categories.
-
Expires: Expiration date of the bypass code.
-
Action: Action column includes a drop down menu with
...icon. When you click on this icon the following items are displayed:- Copy: Copy link is used for copying the bypass code into the clipboard.
- Edit: Edit link is used for editing the bypass code.
- Remove: Remove link is used for removing the bypass code.
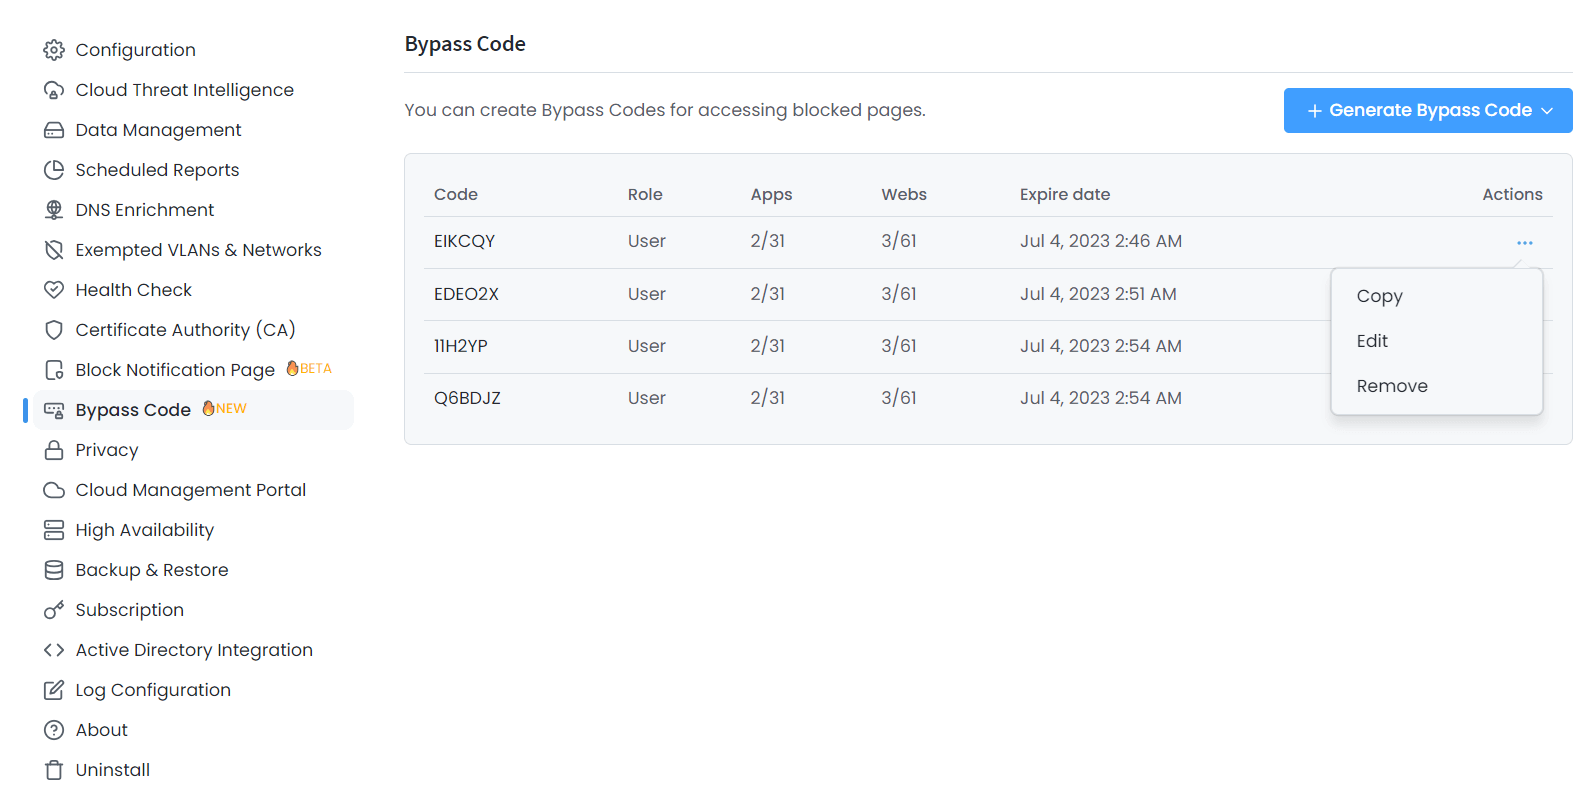
Figure 10. Viewing Bypass Codes
Deleting Bypass Codes
You can quickly delete a bypass code by following the next steps:
-
Navigate to the Block Bypass Codes page on your OPNsense UI.
-
Click on the drop-down menu with a
...icon under the Actions column of the bypass code that you want to remove. -
Click Remove to delete the bypass code. This will pop up a dialog box for confirmation.
-
Click Delete button to confirm the bypass code removal.
Editing Bypass Codes
You can easily edit a bypass code by following the next steps:
-
Navigate to the Block Bypass Codes page on your OPNsense UI.
-
Click on the drop-down menu with a
...icon under the Actions column of the bypass code that you want to edit. -
Click on the Edit to edit the bypass code. This will pop up a bypass code configuration window.
-
You may set a new Pin by clicking on the Regenerate button.
-
You may change the Role option depending on your requirements.
-
You may update the pin expiration date by selecting a new value from the Extend the expires date: dropdown menu.
-
You may enable/disable the Bypass everything option.
-
You may add or remove application categories depending on your needs.
-
You may add or remove web categories depending on your needs.
-
Click Save to activate the new Bypass Code settings.
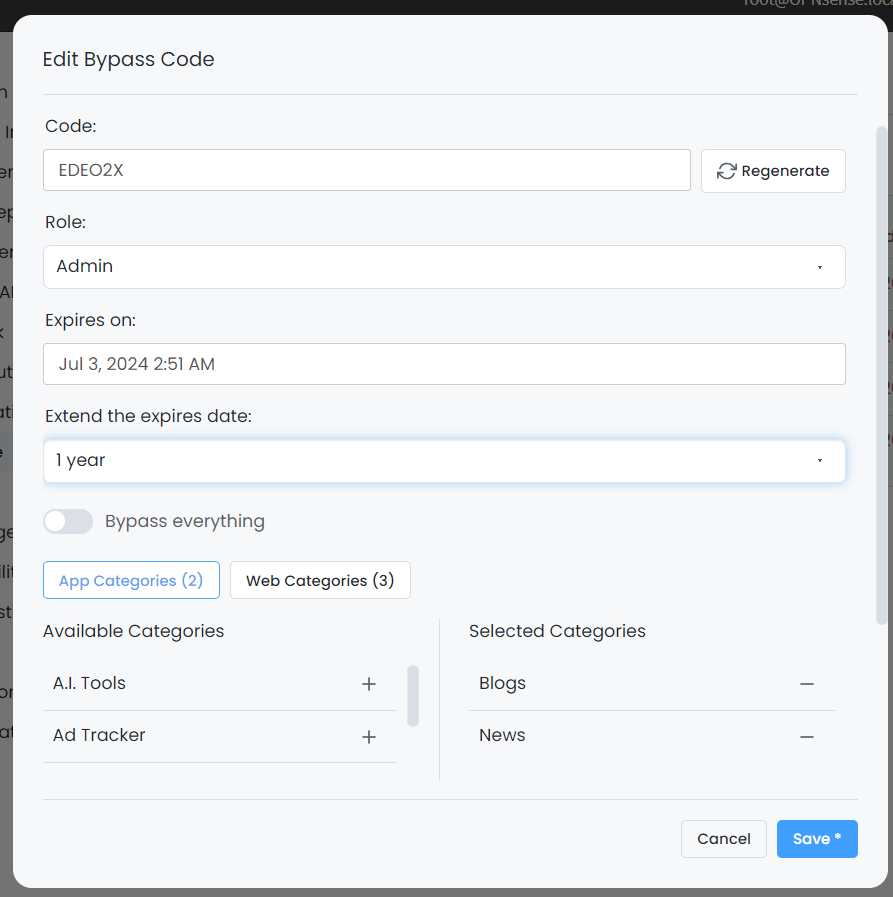
Figure 11. Editing Bypass Code
Deleting Bypass Code Templates
You can easily create a new Bypass Code using existing bypass code templates by following the next steps:
-
Navigate to the Block Bypass Codes page on your OPNsense UI.
-
Click +Generate bypass code button at the upper right corner of the page. This will drop down a menu. Saved bypass code templates are displayed here.

Figure 12. Selecting template
-
Select the template that you want to remove.
-
Click Delete Template at the bottom of the window. This will pop up a dialog box for confirmation.
-
Click Delete button to confirm the template removal.
Using Bypass Code
When a web connection is blocked by Zenarmor according to your defined policies, a landing page with a blue lock icon is displayed in the browser.
![]()
Figure 13. Landing Page with a Lock Icon
To be able to access the website using your bypass code, you may follow the next steps:
- Click on the blue circle with a lock icon at the bottom right of the landing page.
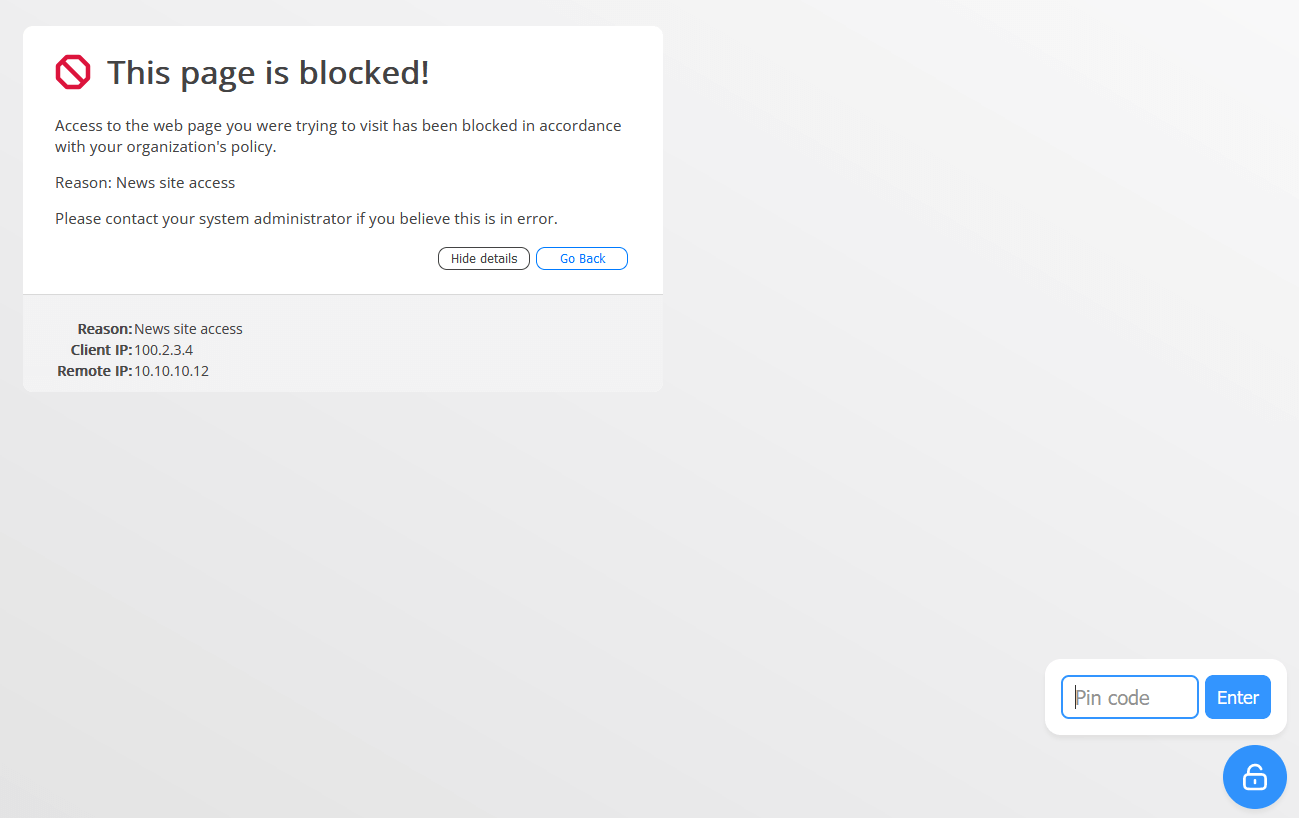
Figure 14. Using Bypass Code
-
Type your pin code into the input field.
-
Click Enter. This may display a warning message indicating that you must restart your browser.
Figure 15. Notification for Restarting Browser
-
Restart your browser to access the website that is bypassed by using the pin number.
-
Try to access the website.