Setting Up Linux Development Environment
A Linux-based development environment offers a powerful, customizable, and secure platform for developers across all fields, from web development to systems programming and data science. Whether you`re a beginner taking your first steps in programming or an experienced developer looking to optimize your workflow, configuring your development tools properly on Linux can dramatically improve productivity and efficiency. Ubuntu is one of the best Linux distributions for developers.
In this guide, we will walk through everything you need to set up a modern development environment on Linux. You`ll learn how to choose the right Linux distribution based on your goals, install and manage programming languages such as Node.js, Python, and Java, and configure your terminal, editor, and version control tools.

How to Set Up a Linux Development Environment Node.js?
Setting up a Linux development environment for Node.js involves installing the right runtime, managing versions effectively, using a code editor, and understanding how to initialize and run Node applications. Whether you`re building APIs, web apps, or command-line tools, a clean and functional environment helps avoid compatibility issues and improves your development workflow.
Below is a step-by-step guide to help you install Node.js, configure your tools, and get started writing and running Node applications on any Debian-based Linux system (such as Ubuntu).
1. Update System Packages
Before installing new software, always ensure your package list is current with the following commands.
sudo apt update && sudo apt upgrade -y
This helps avoid installation errors and ensures you're getting the latest stable packages. apt update refreshes the list of available packages and versions. apt upgrade installs the newest versions of all packages currently installed.
2. Install Node.js and npm (Node Package Manager)
Node.js is the JavaScript runtime, and npm is the Node Package Manager used to install packages like frameworks and utilities. npm is essential for installing libraries, frameworks (like Express), and development tools. To install node.js and npm use the following commands.
sudo apt install nodejs npm
Check versions to confirm the installation with the following command.
node -v
npm -v
3. Install nvm (Node Version Manager) - (Optional but Recommended)
If you're working on multiple projects or want more flexibility with Node versions. nvm (Node Version Manager) allows you to install and switch between multiple Node.js versions, which is especially useful if you work on different projects. To install nvm use the following commands.
curl -o- https://raw.githubusercontent.com/nvm-sh/nvm/v0.39.3/install.sh | bash
source ~/.bashrc
nvm install --lts
curl command downloads and runs the official installation script for nvm (Node Version Manager) from GitHub.
source ~/.bashrc command loads the new nvm environment into your current terminal session. Without this, nvm commands won’t be recognized until you restart your shell.
With nvm, you can easily switch between versions using nvm use <version>.
4. Install Git for Version Control
Version control is essential for tracking your code and collaborating with others. Git lets you track changes in your project and collaborate with others. Even for solo projects, version control prevents mistakes and allows safe experimentation.
The following commands set up your Git identity. These details appear in your commit history.
sudo apt install git
git config --global user.name "Your Name"
git config --global user.email [you@example.com](mailto:you@example.com)
Verify with the following command.
git --version
5. Initialize a Node.js Project
Start by creating a project folder and generating a package.json file, which keeps track of your project's dependencies and scripts. Create your project folder and set up package.json with the following commands.
mkdir my-node-app
cd my-node-app
npm init -y
This file will track your project’s dependencies and scripts.
6. Install Project Dependencies
You can now install packages your app will use, for example, the popular Express.js framework. To install express.js use the following commands.
npm install express
Installed modules are added to node_modules and listed under dependencies in package.json.
7. Create and Run a Basic Application
Create a file named index.js and paste the following code.
const express = require(`express`);
const app = express();
app.get(`/`, (req, res) => res.send(`Hello Node!`));
app.listen(3000, () => console.log(`Server is running on port 3000`));
Run the app with the following command.
node index.js
Visit [http://localhost:3000](http://localhost:3000) in your browser to see your server running.
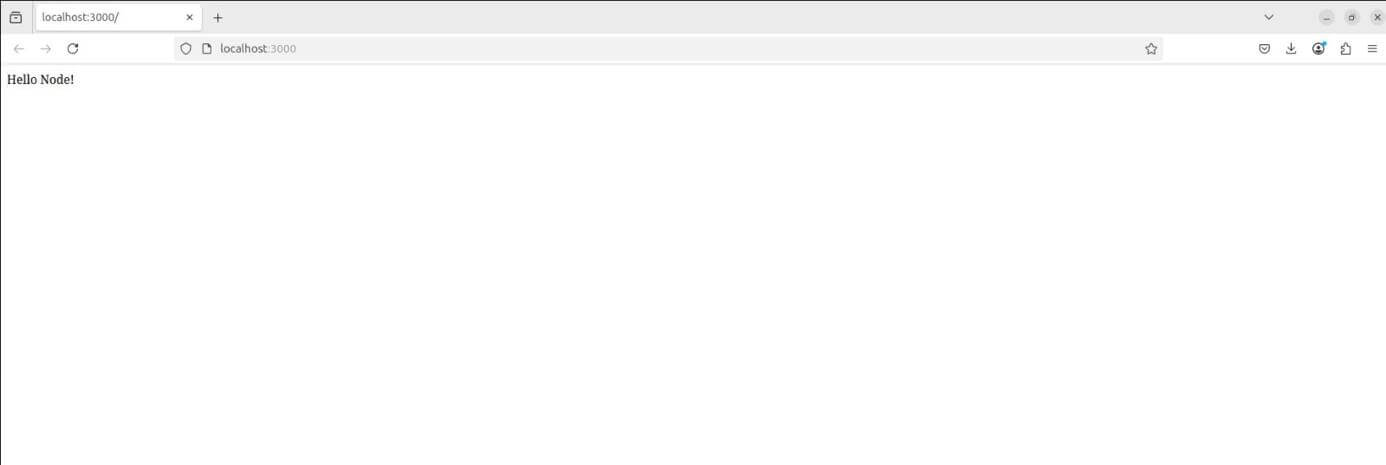
Figure 1. Visiting Localhost to See the Server Running
8. (Optional) Install nodemon for Auto-Restart During Development
Install nodemon, a development tool that automatically restarts your app whenever file changes are detected. Use the following command to install.
npm install --save-dev nodemon
Then run your app with the following command.
npx nodemon index.js
This allows you to make changes to your code and see the updates instantly without needing to restart the server manually each time, speeding up your development workflow.
9. (Optional) Configure Firewall for External Access
If you want to test your application on another device or access it over a local network (LAN), you need to allow incoming traffic through the firewall. Otherwise, the app may only work on your local machine and appear unreachable from external devices, even if it’s running correctly.
Use the following command to allow traffic on port 3000.
sudo ufw allow 3000/tcp
10. Install a Code Editor (e.g., VS Code)
Using a feature-rich code editor improves your development experience with tools like syntax highlighting, linting, debugging, and built-in Git integration. One of the most popular editors for Node.js development is Visual Studio Code (VS Code), which offers a rich extension marketplace and seamless terminal support.
To install it via Snap, use the following command.
sudo snap install code --classic
How to Set Up a Linux Development Environment for Python?
Python is a widely used, beginner-friendly programming language known for its simplicity and versatility. Whether you’re building web applications, writing scripts for automation, or exploring data science, setting up a reliable Python development environment on Linux is essential.
This guide walks you through the fundamental steps to prepare your system, install Python and pip, isolate project environments, and get started with code, all tailored for a Linux (Debian-based) system.
1. Install Python 3 Using the Package Manager
Most Linux distributions come with Python pre-installed, but it’s good practice to ensure you have the latest supported version.
You can do this by running the following commands.
sudo apt update
sudo apt install python3
To verify the installation and check the version, use the command below. This ensures you`re working with Python 3.x, which is the standard for modern projects.
python3 --version
2. Install pip (Python Package Installer)
pip is used to install third-party libraries and tools from the Python Package Index (PyPI).
To install and verify the installation, use the following commands.
sudo apt install python3-pip
pip3 --version
3. Install Development Tools (Optional but Recommended)
Some Python packages require C libraries and headers to compile properly. Install them with the following command.
sudo apt install build-essential python3-dev
4. Create a Virtual Environment Using venv
Virtual environments isolate your project`s dependencies, preventing conflicts with global packages.
To create and activate a virtual environment, use the following commands.
python3 -m venv myenv
source myenv/bin/activate
After activation, you'll see (myenv) in your terminal prompt, which indicates you’re working inside the environment. This step is essential for working on multiple projects safely.
5. Install Project Dependencies Using pip
Once inside the virtual environment, you can install the required libraries using pip.
For example, to install Flask and Requests, run the following command.
pip install flask requests
You can also create a requirements.txt file and later install all dependencies with the following commands.
pip freeze > requirements.txt
pip install -r requirements.txt
6. Create and Run a Python Script
Now you can write and test a simple Flask web application by following the next steps.
-
Create a file called
app.pyand paste the following code.from flask import Flask
app = Flask(__name__)
@app.route(`/`)
def hello():
return `Hello, Python!`
if __name__ == `__main__`:
app.run(port=5000) -
Run the application with the following command.
python app.py -
Then open your browser and go to
http://localhost:5000to see the result.
Figure 2. Visiting Localhost
7. (Optional) Configure Firewall for Web Apps
If you’re testing the app on another device over the same network, you’ll need to allow external access to port 5000. Use the command below to configure the firewall.
sudo ufw allow 5000/tcp
8. Install an IDE or Editor (e.g., VS Code or PyCharm)
Using an editor with Python support improves your workflow with features like autocompletion, linting, and debugging. To install Visual Studio Code use the following command.
sudo snap install code --classic
Alternatively, you can use PyCharm, which offers excellent Python integration and built-in tools for web frameworks and data science.
How to Set Up a Linux Development Environment for Java?
Java is a powerful, object-oriented programming language used in everything from Android apps to large-scale enterprise systems. To develop Java applications on a Linux system, you need to install essential tools such as a Java Development Kit (JDK), a build tool like Maven or Gradle, and a suitable code editor or IDE. This guide walks you through the process of installing and configuring a complete Java development environment on a Debian-based Linux system.
1. Install OpenJDK (e.g., version 17)
The Java Development Kit (JDK) includes everything you need to develop Java applications ,both the runtime (java) and the compiler (javac).
To install Java 17, which is widely supported and stable, run the following commands.
sudo apt update
sudo apt install openjdk-17-jdk
You can install the default version available in your distribution using the following command. This is useful if you`re not targeting a specific Java version.
sudo apt install default-jdk
2. Verify Java Installation
After installation, check that both the runtime and compiler are correctly recognized by the system with the following commands. This ensures your system recognizes the JDK and that you`re ready to compile and run Java code.
java -version
javac -version
3. Set the JAVA_HOME Environment Variable
Many tools (like Maven and Gradle) rely on the JAVA_HOME variable to locate your Java installation.
-
First, find the path to your Java installation with the following command.
readlink -f $(which java)It will return something like
/usr/lib/jvm/java-17-openjdk-amd64/bin/java. -
Remove the
/bin/javapart and use the remaining path forJAVA_HOME. -
Now, add the following lines to your
~/.bashrcor~/.zshrcfile with the following commands.export JAVA_HOME=/usr/lib/jvm/java-17-openjdk-amd64
export PATH=$JAVA_HOME/bin:$PATH -
To apply the changes immediately, run the following command. This step ensures all tools and editors know where Java is installed.
source ~/.bashrc
4. Install Build Tools (Optional but Recommended)
Most Java projects use Maven or Gradle for compiling, dependency management, and project automation. To install and verify the Maven installation, run the following commands.
sudo apt install maven
mvn -v
You can use Gradle, especially useful in Android or Kotlin-based projects. Gradle is best installed with SDKMAN, a version manager for JVM tools.
5. Compile and Run Java Programs
Now test your setup with a simple Java program by following these steps.
-
Create a file called
HelloWorld.javapublic class HelloWorld {
public static void main(String[] args) {
System.out.println("Hello, Java!");
}
} -
Compile the program with the following command.
javac HelloWorld.java -
Use the following command to run the program. This confirms your compiler and runtime are correctly installed.
java HelloWorld
6. Install an IDE (e.g., IntelliJ IDEA, Eclipse, or VS Code)
An IDE provides powerful features like code completion, debugging, project structure navigation, and build integration. To install IntelliJ IDEA Community Edition, run the following command.
sudo snap install intellij-idea-community --classic
To install Eclipse use the following command.
sudo snap install eclipse –classic
You can use VS Code with the "Java Extension Pack" from Microsoft.
What is Linux Development Environment?
A Linux Development Environment (LDE) refers to a configured workspace on a Linux-based operating system that provides all the essential tools and settings a developer needs to build, test, and deploy software. This environment commonly includes a terminal-based shell (such as Bash or Zsh), programming language interpreters or compilers (like Python, Java, or Node.js), text editors or Integrated Development Environments (IDEs), version control tools such as Git, and package managers for handling dependencies.
One of the defining characteristics of a Linux development environment is its deep integration with the system. Developers interact with the environment primarily through the command line, which provides powerful control over software installation, automation, and system configuration. Tools like apt, dnf, or pacman (depending on the distribution) enable users to install and manage packages efficiently.
For example, a Python developer working on Linux can quickly set up their workspace by running a few terminal commands to install Python 3, pip, and virtual environments. This level of flexibility and speed is one of the reasons why Linux is the preferred platform for backend development, scripting, DevOps, and systems programming.
In addition, Linux offers compatibility with widely used open-source tools and libraries. Editors like VS Code, Sublime Text, or Vim can be seamlessly installed and customized. Git comes pre-installed or can be easily added, enabling smooth version control workflows directly from the terminal.
Most servers and cloud infrastructures run on Linux, which makes local development on Linux more aligned with production environments. This reduces compatibility issues and ensures smoother deployments.
In short, a Linux Development Environment is not just a collection of tools, it is a cohesive, customizable ecosystem that empowers developers to write robust and efficient code in an environment that closely mirrors real-world deployment systems.
What Linux Distribution Should I Choose for Development?
Selecting the right Linux distribution is a critical decision that depends on your development goals, level of experience, hardware compatibility, and the type of software you plan to build. While all Linux distributions are built on the same core (the Linux kernel), they differ in their package management systems, release models, community ecosystems, and user experience. For developers, especially those new to Linux, it’s important to strike a balance between ease of use, stability, and access to up-to-date development tools.
One of the most popular choices for developers is Ubuntu, known for its user-friendliness and vast community support. Ubuntu is particularly beginner-friendly and offers long-term support (LTS) versions that provide stable environments ideal for software development. Ubuntu has excellent compatibility with IDEs like VS Code, supports Snap and APT package systems, and is widely adopted both in desktop and server environments. Its robust documentation and community forums make it a great starting point for new developers.
For those who prefer a more open-source focused and cutting-edge system, Fedora stands out. Sponsored by Red Hat, Fedora is often the testing ground for technologies that later make their way into enterprise environments. It uses the RPM package system and provides the latest software versions by default. This makes it suitable for developers who want to experiment with the newest libraries and frameworks. However, since Fedora has a shorter release cycle, it requires more frequent updates and may be less suited to developers seeking long-term stability.
If you are interested in a highly customizable and modern system but don’t want the steep learning curve of Arch Linux, Manjaro is a compelling option. It is based on Arch but designed to be much more accessible, offering a graphical installer and preconfigured desktop environments. Manjaro uses a rolling release model, meaning you always have access to the latest packages without reinstalling the system. That said, this introduces a slightly higher risk of breakages compared to fixed-release distros, which may not be ideal for production-level development.
Debian, the base upon which Ubuntu is built, is another great choice for developers who value maximum stability. Its packages are thoroughly tested, making it a solid choice for server-side development or for users running critical applications where stability matters more than having the latest features. However, because of its slower release cadence, developers may need to manually install newer versions of tools and languages if required.
Lastly, Pop!_OS, developed by System76, is a modern and developer-focused distribution that builds upon Ubuntu’s foundation but offers additional polish, especially for those using NVIDIA graphics or doing machine learning. It includes out-of-the-box features such as tiling window management and improved hardware support, making it particularly attractive for developers working on high-performance laptops or with specialized hardware.
Ultimately, there is no one-size-fits-all solution. Beginners are generally advised to start with Ubuntu or Pop!_OS due to their simplicity and reliability. More advanced users who want greater control or access to the latest features might prefer Fedora or Manjaro. Developers targeting server environments might find Debian’s rock-solid stability unmatched. A practical tip before fully committing is to try out distributions using live USBs or set up a dual-boot configuration. This allows you to test hardware compatibility and workflow preferences without affecting your main system.
Can I Set Up Linux Development Environment on a Chromebook?
Yes, you can set up a Linux development environment on a Chromebook, thanks to a feature in Chrome OS called Linux (Beta), also known as Crostini. This functionality allows users to run a lightweight Linux container alongside Chrome OS, enabling access to the Linux terminal and the ability to install popular development tools. While it’s not a full Linux distribution in the traditional sense, it offers a practical and user-friendly way to perform development tasks directly from a Chromebook.
To enable Linux on a Chromebook, you need to go into Settings > Advanced > Developers and turn on the “Linux development environment”. Once activated, Chrome OS sets up a Debian-based container where you can use the apt package manager to install essential tools. For example, you can run commands like sudo apt install python3, sudo apt install nodejs, or sudo apt install git to begin developing in Python, JavaScript, or to work with Git repositories. You can install code editors like VS Code (via the .deb package) or use terminal-based editors like Nano and Vim.
That said, there are some important limitations when compared to using a full Linux distribution. Since Crostini runs in a container, you don’t get direct access to the hardware in the same way as you would on a native Linux install. Some low-level system commands and services may be restricted, and access to devices like USB or GPU hardware can be limited. This means it`s not suitable for certain tasks such as kernel-level development, GPU-accelerated computing, or running Docker in full.
Performance is another consideration. Most Chromebooks come with relatively modest hardware (e.g., 4–8 GB RAM, limited storage, and lower-end CPUs). Running Chrome OS, the Linux container, and development tools simultaneously can strain system resources. To mitigate this, it’s recommended to expand storage using an SD card, regularly delete unused packages, and keep the number of active services minimal. Lightweight editors and terminal tools are a good alternative to resource-heavy IDEs on lower-end devices.
Despite these limitations, Linux on Chrome OS is a surprisingly capable environment for learning programming, writing scripts, working with Git, or even building basic web apps. It offers a convenient entry point for students, beginners, or anyone who wants to develop on the go without installing a full Linux system.
How can I Use WSL2 to Set Up a Linux Development Environment on Windows?
Windows Subsystem for Linux 2 (WSL2) provides an efficient way to run a full-fledged Linux environment directly on a Windows 10 or 11 system, without the need for dual-booting or using a virtual machine. With WSL2, developers can seamlessly access Linux tools, use the terminal, and even integrate with Windows-based editors like Visual Studio Code. This makes it an excellent option for setting up a Linux development environment within the comfort of a Windows desktop.
To get started with WSL2, first ensure your system supports it. On Windows 10, you need version 2004 or later, and for Windows 11, WSL2 is available by default.
To install WSL2 on Windows 10 (version 2004 or later) or Windows 11, follow these steps.
-
Open PowerShell as Administrator. Right-click on the Start Menu and select “Windows PowerShell (Admin)”
-
Run the installation command, which is shared below. This command installs the Virtual Machine Platform, WSL2 as the default version, and a default Linux distribution (usually Ubuntu).
wsl --install -
Reboot your computer if prompted.
-
Choose your Linux distribution (optional). If you don’t want to use the default Ubuntu, you can list and install other distributions from the Microsoft Store. Just search for “Linux” and you`ll find options like:
- Ubuntu (best for general use)
- Debian (lightweight and stable)
- Kali Linux (for security testing)
- openSUSE, Alpine, etc.
-
To install a specific distro via PowerShell with this command. Once installed, launch your distribution from the Start Menu. On first run, you’ll be prompted to create a username and password for the Linux environment.
wsl --install -d <DistroName>
Once your Linux distribution is installed, you can configure your WSL2 environment for development.
Start by updating package lists with sudo apt update and installing common development tools. For instance, use sudo apt install python3 python3-pip for Python development or sudo apt install nodejs npm for JavaScript-based projects. Git can be installed via sudo apt install git, enabling version control inside the WSL environment.
One of the most powerful aspects of WSL2 is its integration with Windows-based IDEs. Visual Studio Code, for example, can detect WSL2 environments and allows you to open and edit Linux-side files using the Remote - WSL extension. This setup lets you run code in Linux while using a GUI-based editor in Windows, offering the best of both worlds.
Moreover, WSL2 uses a real Linux kernel, which offers better compatibility with Linux-specific tools and applications compared to WSL1. It supports full systemd integration in newer versions, enabling services and daemons to function more like a native Linux install.
In conclusion, WSL2 is a powerful and flexible option for developers who prefer or require Linux tools but want to continue using Windows as their main operating system. It simplifies the development workflow, minimizes context switching, and provides an excellent bridge between two ecosystems. Whether you`re building web applications, compiling code, or managing containers, WSL2 can serve as a capable and convenient development environment.
How do I Customize and Enhance the Linux Terminal for Development?
The Linux terminal is a powerful tool for developers, and one of the key advantages of using Linux is how deeply customizable the terminal environment is. By enhancing the terminal with better visuals, features, and shortcuts, developers can significantly improve their productivity, code clarity, and workflow speed.
The first step in terminal customization is choosing a shell, which is the program that interprets your commands. The most commonly used shells are Bash (Bourne Again Shell) and Zsh (Z Shell). While Bash is the default on many Linux distributions and works well for scripting, Zsh is widely preferred by developers for its enhanced interactivity, advanced tab completion, and plugin support.
To further enhance Zsh, a popular open-source framework called Oh My Zsh is commonly used. It provides a structured way to manage configuration, install plugins, and apply stylish themes to your terminal prompt. Installing it is simple:
sh -c "$(curl -fsSL [https://raw.githubusercontent.com/ohmyzsh/ohmyzsh/master/tools/install.sh](https://raw.githubusercontent.com/ohmyzsh/ohmyzsh/master/tools/install.sh))"
Once installed, developers can explore hundreds of community-created plugins and themes by editing the .zshrc configuration file.
To make the most out of your terminal environment, consider adding the following tools and plugins.
-
Syntax Highlighting: Tools like
zsh-syntax-highlightingcolor-code your commands as you type them, helping catch errors before execution. -
Autosuggestions: The
zsh-autosuggestionsplugin offers intelligent command predictions based on your history. It`s especially useful for repetitive tasks. -
Custom Prompt Themes: Oh My Zsh supports themes like
agnoster,powerlevel10k, orrobbyrussell, which display contextual information such as the current Git branch, execution status, or Python environment. -
Terminal Multiplexers: Tools like
tmuxallow you to split the terminal into multiple panes, manage sessions, and work more efficiently on remote systems. -
CLI Tools for Developers
Htop: interactive process viewerbat: enhanced cat with syntax highlightingfzf: fuzzy file finderexa: modern replacement for lsthefuck: suggests corrections for mistyped commands
Installing these tools can usually be done via the system package manager. For example, you can use the following commands to install some of the tools.
sudo apt install tmux htop fzf
For plugins like zsh-autosuggestions, you typically clone them into the Oh My Zsh custom plugin directory and enable them in .zshrc.
Customizing the Linux terminal transforms it from a plain command-line tool into a personalized development dashboard. Whether you’re streamlining your workflow with autosuggestions or monitoring system processes with stylish prompts, enhancements like Zsh and its ecosystem empower you to work faster and smarter. Even a few minutes of setup can lead to long-term productivity gains.
How can I Install and Configure Git for Version Control on Linux?
Git is one of the most widely used version control systems in modern software development. It allows developers to track changes in code, collaborate with others, and maintain clean, organized version histories.
Installing and configuring Git on Linux is straightforward. You can use your Linux distribution’s package manager to get started. Below is a complete guide to get you started.
1. Install Git via Package Manager
Depending on your Linux distribution, for Debian/Ubuntu-based systems use one of the following commands.
sudo apt update
sudo apt install git
After installation, verify that Git is correctly installed by checking the version with the following command.
git --version
2. Configure Global Git Settings
Once Git is installed, you should configure your identity and default editor. These settings are stored in your global .gitconfig file and are used whenever you initialize or contribute to repositories.
-
Set your username with the following command.
git config --global user.name "Alice Pearl" -
Set your email with the following command.
git config --global user.email [alice@example.com](mailto:alice@example.com)tipUse the email associated with your GitHub or GitLab account if you plan to push to remote repositories.
-
Set your default text editor (optional) with the following command. You can replace
nanowithvim,code --wait, or any editor of your choice.git config --global core.editor "nano"
3. View Your Configuration
To confirm that your settings have been saved correctly, run the following command. This will display all global Git settings currently applied to your user profile.
git config --list
4. Start Using Git
Now that Git is installed and configured, you can start using it in your projects. To create a new local repo, use the following commands.
git init turns the directory into a Git repository by creating a hidden .git folder.
mkdir myproject
cd myproject
git init
You can clone an existing repo with this command. This command will copy the entire remote repository into a new local folder called repo.
git clone [https://github.com/username/repo.git](https://github.com/username/repo.git)
What are Best Practices for Setting Up a Native Linux Kernel Development Environment?
Setting up a native Linux kernel development environment requires careful preparation, as working with the kernel involves low-level system components. Whether you’re customizing a kernel, contributing to its development, or exploring system internals, following best practices helps ensure stability, clarity, and safety.
Below are the essential components and steps, organized into key categories.
-
Install Essential Tools and Kernel Source: To build and modify the Linux kernel, you’ll need a set of development tools and the actual kernel source code. On Debian-based systems, run the following commands.
sudo apt update
sudo apt install build-essential libncurses-dev bison flex libssl-dev libelf-dev
These packages install the following essential tools;
- gcc: GNU Compiler Collection for compiling C code
- make: For running kernel build scripts
- libncurses-dev: Used by make menuconfig for terminal-based configuration menus
- bison and flex: For parsing and lexical analysis tools used in kernel builds
- libelf-dev and libssl-dev: For building modules and signing kernels
-
Download and Extract Kernel Source Code: Download the latest stable version from
kernel.orgor use your distribution’s preferred method with the following commands.wget https://cdn.kernel.org/pub/linux/kernel/v6.x/linux-6.9.tar.xz
tar -xvf linux-6.9.tar.xz
cd linux-6.9tipAlways use a separate directory for experimental builds. Avoid modifying your current system kernel unless you`re confident in your changes.
-
Configure the Kernel: Before compiling the kernel, it must be configured. There are several methods available. Use one of the following commands to configure your kernel options.
- make menuconfig: Opens a terminal-based GUI to customize the build
- make defconfig: Generates a default configuration for your system
-
Compile the Kernel: This step compiles the kernel source code and its loadable modules. It can take a while, depending on your hardware. Use the following command.
make -j$(nproc) # Compiles the kernel using all available CPU corestipEnsure at least 10 GB of free disk space before starting the build process.
-
Install the Compiled Kernel: After compilation, install the kernel and its modules to the system directories with the following commands so it can boot properly.
sudo make modules_install
sudo make install -
Reboot and Select Your New Kernel: Once installed, reboot your system with the following command and select the new kernel version from the GRUB menu.
sudo rebootAfter logging in, verify the running kernel version with the following command.
uname -r -
Test Kernel Builds in a Virtual Machine: Testing a new kernel directly on your main system is risky. Instead, use a virtual machine like VirtualBox, QEMU/KVM, GNOME Boxes.
-
Set Up Kernel Debugging and Logging: Debugging the kernel is crucial when developing modules or diagnosing crashes. Use tools like
dmesgandjournalctlto monitor kernel messages and errors during boot or runtime.dmesg | grep error -
Version Control Your Kernel Changes: Initialize a Git repository if you`re modifying the kernel source with the following commands. This makes it easier to track changes, revert mistakes, or collaborate.
git init
git add .
git commit -m "Initial kernel source"
What are the Best Code Editors and IDEs for Linux Development?
Choosing the right code editor or Integrated Development Environment (IDE) can greatly influence your productivity and development experience. Linux offers a wide selection of both lightweight editors and full-featured IDEs that cater to different programming needs, from scripting and web development to system programming and data science. Below are some of the most popular tools available for Linux users, each explained with its strengths and intended use cases.
Code Editors
Code editors are lightweight tools designed primarily for writing and editing source code. They typically offer syntax highlighting, basic code formatting, and file navigation. While they don’t always include features like built-in debugging or project management, they can be extended with plugins to meet specific needs. Editors like VS Code, Sublime Text, Vim, and Emacs are favored for their speed, simplicity, and customizability.
-
Visual Studio Code (VS Code): Visual Studio Code (VS Code) is one of the most popular and versatile code editors on Linux. Developed by Microsoft and open-source, it supports a wide range of programming languages, including Python, JavaScript, C++, and Go. Its rich extension marketplace allows developers to customize their workflow with linters, debuggers, themes, and more. Features like an integrated terminal, built-in Git support, and live debugging make it a favorite for modern web and backend development. Despite being feature-rich, it remains lightweight and responsive even on modest hardware.
-
Sublime Text: Sublime Text is known for its speed, elegance, and responsiveness. It’s a proprietary tool but offers a free-to-use evaluation version. Sublime is ideal for users who value performance and simplicity. It provides multiple cursors, fuzzy file search, and extensive keyboard shortcuts for rapid coding. While it doesn’t have built-in debugging tools like VS Code, its plugin ecosystem (via Package Control) makes it a flexible choice for scripting, small-to-medium projects, and quick file editing.
-
Vim: Vim is a terminal-based editor that’s highly respected among experienced Linux users. It has a steep learning curve due to its modal editing and keyboard-driven navigation, but once mastered, it offers unmatched speed and efficiency. Vim is extremely lightweight, starts instantly, and can be run even over SSH on remote servers. It is highly customizable through
.vimrc, and thanks to plugins likevim-plug, you can add syntax highlighting, Git integration, and even autocompletion. -
Emacs: Emacs is another terminal and GUI-compatible editor known for its power and extensibility. It goes beyond text editing: many developers use Emacs as an all-in-one platform that handles compiling, version control, terminal emulation, and even email. Customization is done using Emacs Lisp, which makes the editor endlessly flexible but also more complex to learn. Emacs is often favored by researchers, developers with specialized workflows, and those who want deep control over their development environment.
Integrated Development Environments (IDEs)
IDEs are comprehensive software suites that integrate code editing with additional tools like compilers, debuggers, version control, and project management. They are designed to provide a full development workflow in a single interface. IDEs such as IntelliJ IDEA, PyCharm, and Eclipse are ideal for large-scale applications and enterprise development, especially when deep language support and advanced tooling are required out of the box.
-
IntelliJ IDEA: IntelliJ IDEA is a full-featured IDE primarily built for Java and Kotlin development, but with plugins, it supports JavaScript, Python, and other languages. It includes advanced features like code analysis, intelligent code completion, refactoring, unit testing, and version control integration. IntelliJ’s interface is robust and offers deep language awareness, which makes it ideal for large enterprise projects. While it is heavier on system resources, many developers feel that its productivity gains justify the cost.
-
PyCharm: PyCharm, also developed by JetBrains, is the go-to IDE for Python development. It offers excellent support for Django, Flask, data science tools, Jupyter Notebooks, and virtual environments. Features like an interactive debugger, test runner, and database tools make it a strong choice for backend developers and data engineers. The Community Edition is free and covers most basic needs, while the Professional Edition unlocks web development and scientific tools.
-
Eclipse: Eclipse is a long-standing, open-source IDE with strong support for Java and plugin-based extensibility. It offers support for C/C++, PHP, and Python through additional plugins. While its interface feels dated compared to JetBrains products, it remains a solid and modular environment for developers who need fine-grained control over their toolchain. Eclipse is especially popular in academic environments and with developers working on Java-based frameworks or embedded systems.
Each of these editors and IDEs brings its own set of advantages. If you’re looking for a versatile, lightweight editor, VS Code is often the best all-around choice. Sublime Text is great for speed and minimalism. Vim and Emacs* cater to users who prefer keyboard-driven workflows and deep customization. On the IDE side, IntelliJ IDEA is unbeatable for Java-centric projects, PyCharm is the best for Python, and Eclipse serves well in plugin-rich enterprise environments.
Your ideal choice depends on your language preferences, system resources, and personal workflow. Many developers even combine tools, using Vim for quick edits, VS Code for main development, and PyCharm or IntelliJ when deep debugging is required.
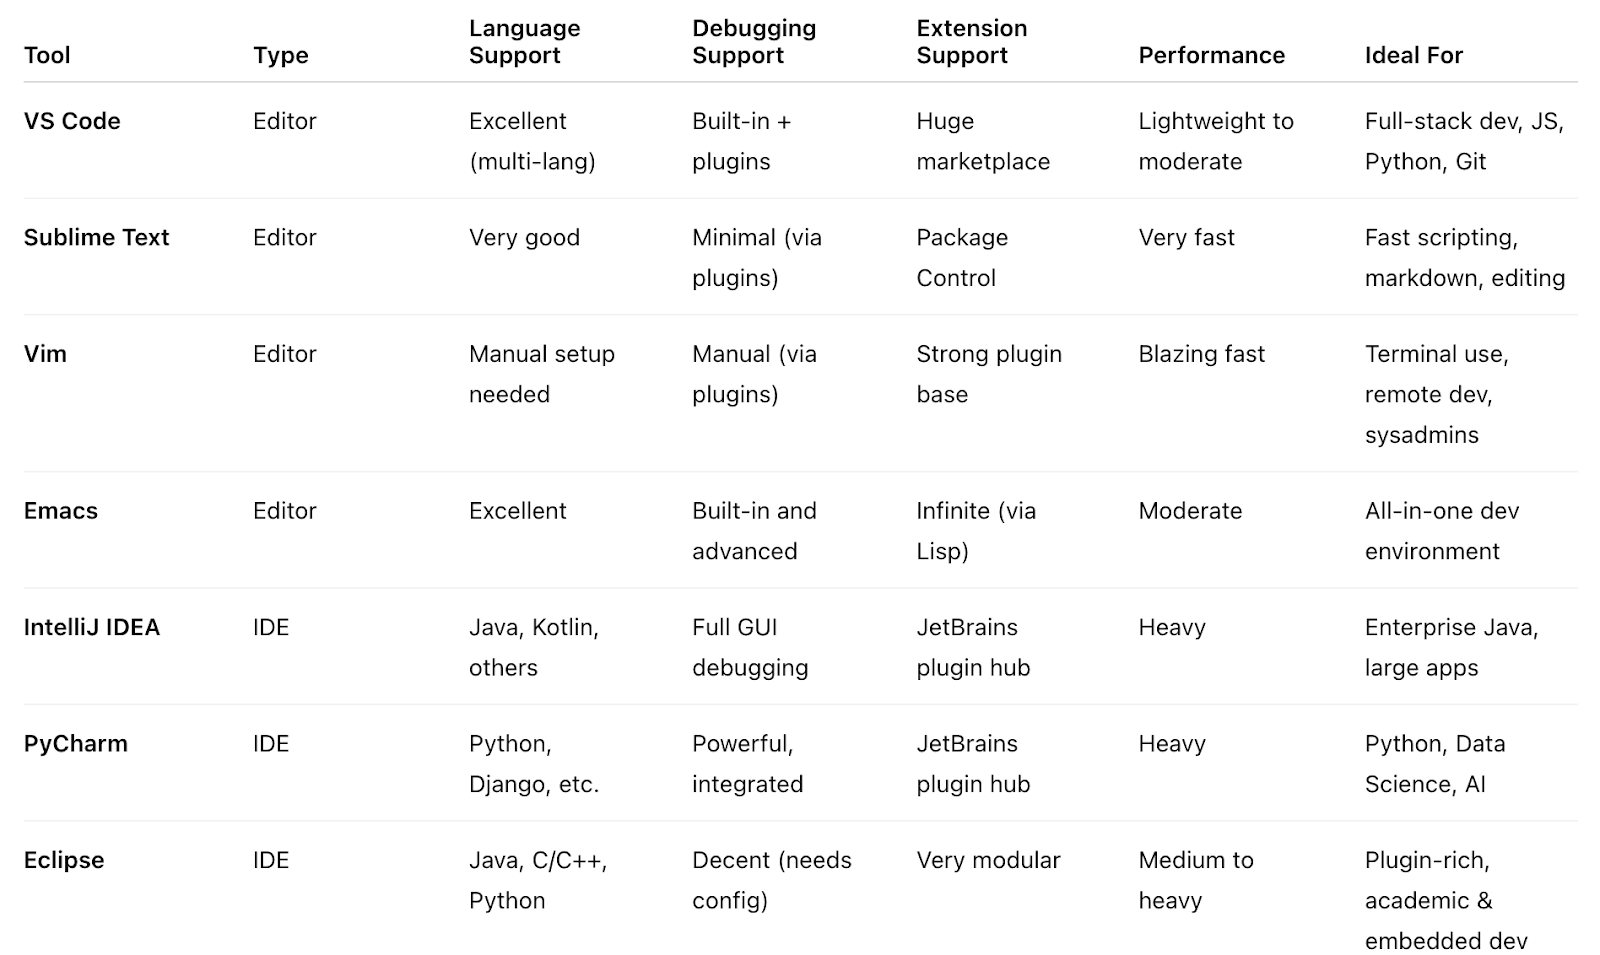
Figure 3. Comparison Table: Code Editors vs IDEs for Linux Development
What Tools Are Essential for Developing with Node.js, Python, and Java on Linux?
Linux is a powerful and flexible platform for software development, offering native and efficient support for popular programming languages like Node.js, Python, and Java. These languages are widely used in backend systems, automation scripts, enterprise applications, and cloud services. To work efficiently with them on Linux, developers need specific tools, including runtimes, package managers, and environment management utilities.
-
Node.js: Runtime and Package Management Tools: To start developing with Node.js, you need both the Node.js runtime and its package manager, npm. Node.js allows you to run JavaScript code on the server side, and npm helps manage dependencies such as libraries and frameworks.
-
Python: Interpreter, pip, and Virtual Environments: Python is another core development language on Linux, widely used in automation, data science, scripting, and web frameworks like Django or Flask. It comes preinstalled on most Linux distributions, but to ensure you have the latest supported version and proper development tools, it`s best to install it manually along with pip, the standard Python package installer.
-
Java: OpenJDK and Build Tools: Java is a compiled, object-oriented programming language widely used in large-scale applications, mobile development (Android), backend services, and enterprise software. To begin developing in Java on Linux, the most essential requirement is a Java Development Kit (JDK). This includes both the Java compiler (
javac) and the Java runtime (java), which are needed to compile and run Java programs.
Can I Install and Configure Java Development Tools on Linux?
Yes, Linux is an excellent platform for Java development due to its performance, scriptability, and compatibility with enterprise-grade tools. By installing the JDK and configuring essential environment variables, you can create a powerful and professional Java development setup.
How Does a Firewall Affect Your Linux Development Environment?
A firewall plays a critical role in a Linux development environment. While its primary purpose is to enhance security by controlling network traffic, it can introduce unintended side effects. These include blocking local servers, debugging tools, or even package managers. Understanding how a firewall interacts with your development setup is essential to maintain both security and workflow efficiency.
On Linux, a firewall is a network security tool that filters traffic based on predefined rules. The most common tools include ufw (Uncomplicated Firewall), typically used on Debian/Ubuntu; firewalld, which is standard on Fedora, RHEL, and CentOS; and iptables/nftables, the lower-level frameworks beneath them all.
Firewalls protect your system by blocking unauthorized inbound connections (such as SSH or HTTP), restricting outbound traffic (including API calls or database access), and controlling communication between services over different ports. These features are vital for security, but if left misconfigured, they can interfere with regular development activities.
In a development context, firewalls can affect your workflow in the following ways.
-
Localhost APIs or Web Servers Not Working: If you’re developing an app that runs on port 3000, 5000, or 8000 and you can’t access it via browser, the firewall may be silently blocking that port.
-
Package Managers Fail to Connect: Tools like
apt,pip, ornpmrequire outbound internet access. If the firewall restricts external traffic, these may fail to download packages or throw cryptic network errors. -
Remote Debugging or Device Testing Blocked: Testing your app from another device or using mobile debugging tools might not work if the firewall blocks external requests to your system.
-
SSH/SFTP or VM Networking Fails: A firewall may block port 22 (SSH) or internal communication between a host and virtual machines (like in WSL2 or VirtualBox), breaking remote access and file transfers.
Firewalls are not just for production servers; they directly impact your local development experience. They can block the traffic your applications need to send or receive, causing problems that seem like software bugs but are actually network restrictions.
A well-configured firewall allows development freedom without compromising system security. The key is to understand how your development tools interact with the network and to adjust your firewall rules accordingly for a safe yet flexible environment.