LAMP Stack Tutorial: How to Install and Configure LAMP Stack
The LAMP stack is a powerful and reliable open-source solution for hosting dynamic websites and web applications. The term LAMP is an acronym for four key components.
-
Linux: the operating system that everything runs on,
-
Apache: the web server that delivers pages to users through their browsers,
-
MySQL: the database system used to store information such as user accounts, blog posts, and more.
-
PHP: a scripting language that makes websites interactive and dynamic (e.g., showing personalized content or handling form submissions).
These components work seamlessly together to provide a flexible, secure, and efficient environment for building websites, from small personal blogs to large-scale enterprise platforms.
One of the main advantages of the LAMP stack is its modularity and ease of customization. Each layer can be adjusted to match the needs of a specific project. In addition, it's widely supported, actively maintained, and compatible with popular content management systems (CMSs) like WordPress, Joomla, and Drupal, making it a top choice for both beginners and professional developers.
This tutorial will walk you through the LAMP installation process step by step. You'll learn how to set up the entire stack on a Linux-based system such as Ubuntu, configure firewall settings, and test each component using real-world examples. This guide will help you build a strong foundation for web development, whether you're just starting out or looking to sharpen your DevOps skills.
In this tutorial we will outline the following topics.
- What is LAMP Stack?
- How does Lamp Server Work?
- What are the Benefits of Using LAMP Stack for Web Development?
- How LAMP Stack Powers Web Applications?
- Why Choose LAMP Stack for Your Server Setup?
- What are the Common Use Cases for LAMP Stacks in Web Hosting?
- What are the Prerequisites for Installing LAMP Stack?
- How is Firewall Configuration in LAMP Stack?
- How do you Configure Permissions in LAMP Stack?
- What are Troubleshooting Common Issues in LAMP Stack?

1. Install Apache
Apache is the web server component of the LAMP stack. It handles HTTP requests from users' browsers and serves web content in response. On Debian-based Linux, installing Apache is straightforward using the APT package manager. The steps below guide you through installing and verifying Apache on your system.
Step 1: Update Your Package Index
Before installing any new software, it is recommended to update the system package index to ensure you get the latest available packages.
sudo apt update
Step 2: Install Apache
Now, install the Apache2 package by running the next command.:
sudo apt install apache2 -y
Step 3: Start and Enable Apache Service
Once installed, you can start the Apache service and ensure it runs on system boot.
sudo systemctl start apache2
sudo systemctl enable apache2
Step 4: Verify Apache is Running
To verify that Apache is running successfully, use the following command.
sudo systemctl status apache2
You should see active (running) in green text. This indicates that Apache is up and running correctly.
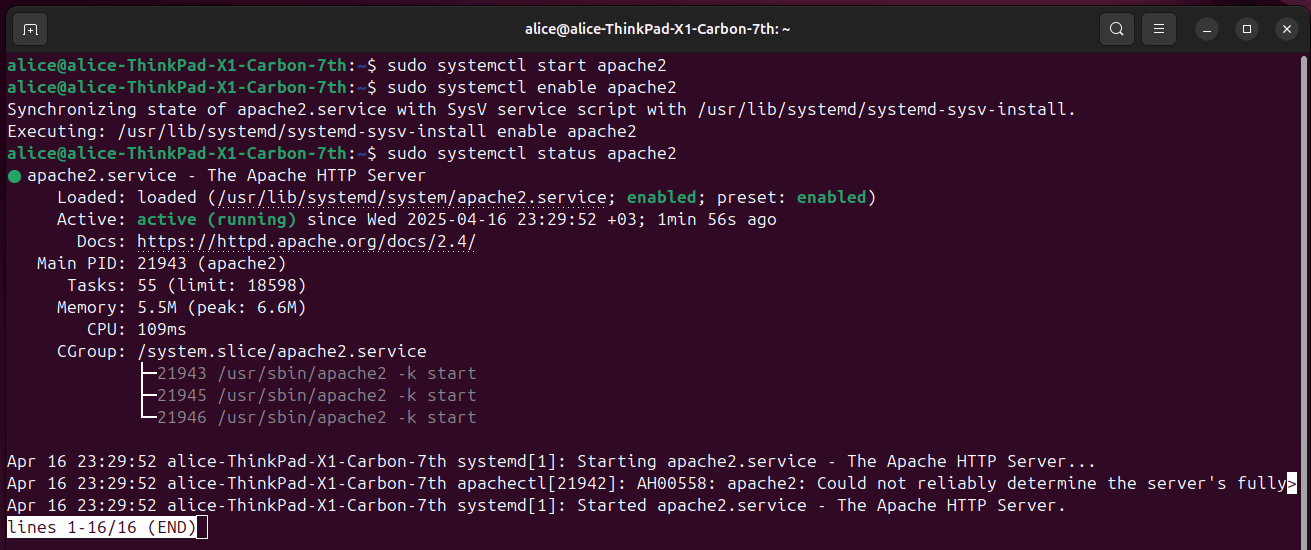
Figure 1. Starting and Enabling Apache Service
Step 5: Test Apache in Your Browser
Open your web browser and visit http://localhost
If everything was set up correctly, you should see the "Apache2 Debian Default Page", which confirms that your web server is working.
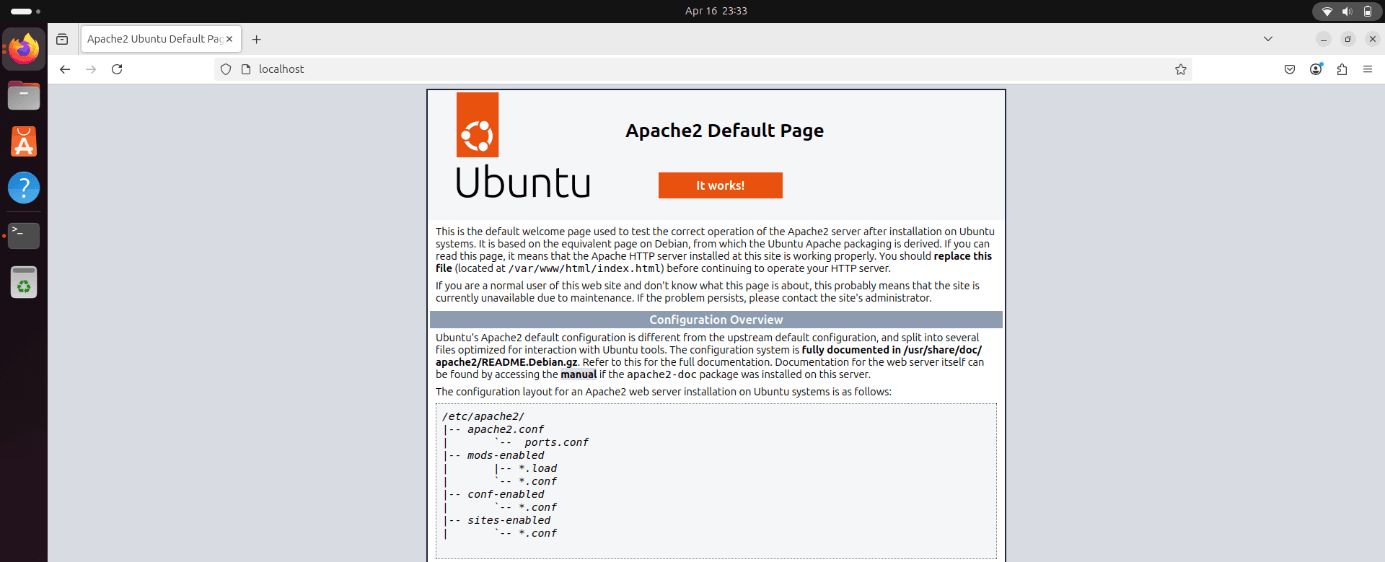
Figure 2. Testing Apache in Your Browser
2. Install MySQL
MySQL is the database component of the LAMP stack. It allows you to store, retrieve, and manage data efficiently for your dynamic web applications. On Debian-based Linux, installing MySQL is simple with the APT package manager. The steps below will guide you through the installation and initial setup.
Step 1: Install MySQL Server
Use the following command to install MySQL.
sudo apt install mysql-server -y
This will install the MySQL server package and all required dependencies.
Step 2: Start and Enable MySQL Service
Once the installation is complete, you need to start the MySQL service and ensure it launches automatically at system boot.
sudo systemctl start mysql
sudo systemctl enable mysql
Step 3: Secure MySQL Installation (Recommended)
To improve security (e.g., setting a root password, removing anonymous users, disabling remote root login), run the built-in secure installation script:
sudo mysql_secure_installation
You will be asked a series of prompts given below during secure MySQL installation.
- Set up the root password (if not already set),
- Remove anonymous users: Yes
- Disallow root login remotely: Yes
- Remove test database and access to it: Yes
- Reload privilege tables: Yes
This script helps secure your MySQL instance by disabling unnecessary or insecure default settings. It’s highly recommended that you complete this step.
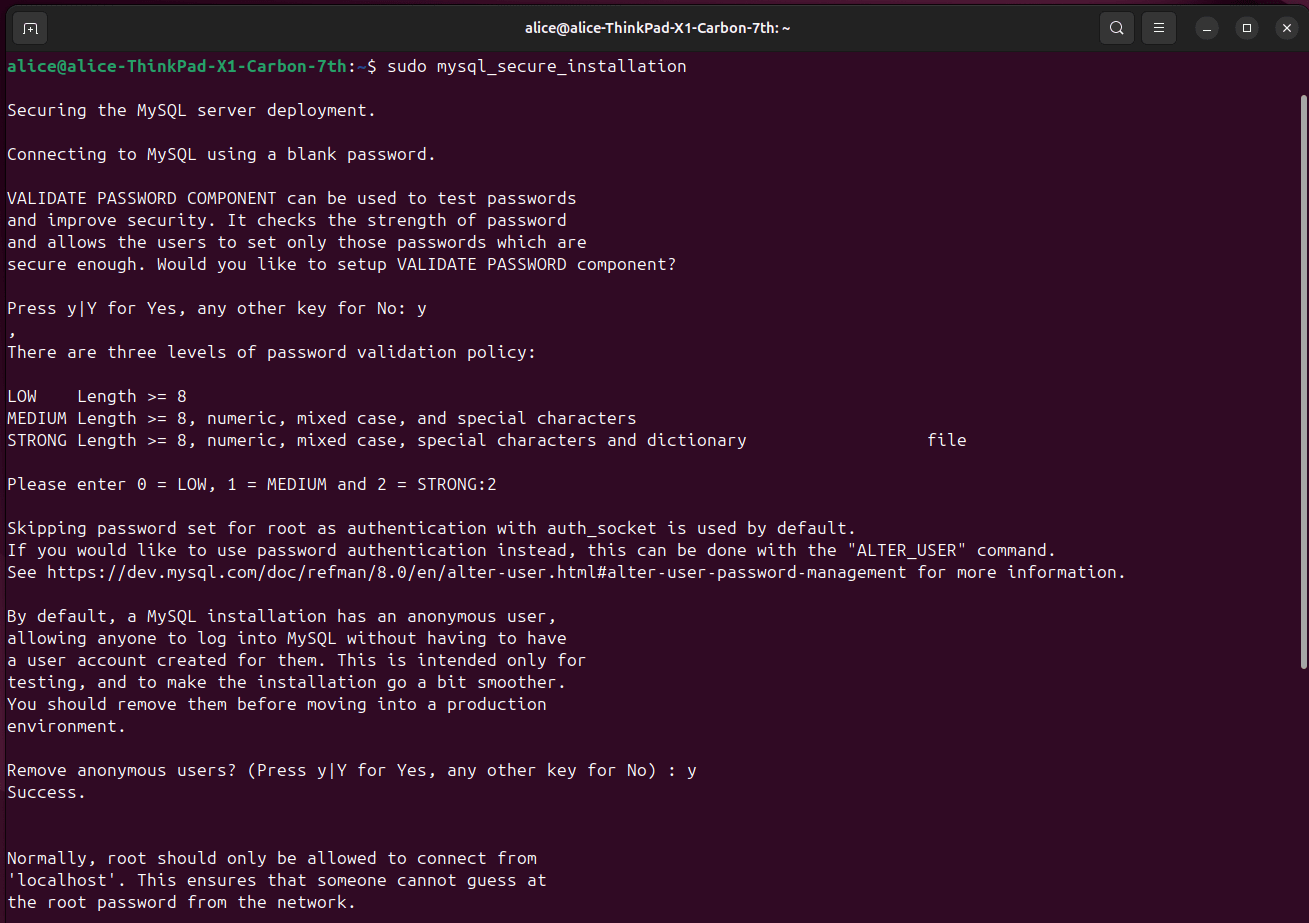
Figure 3. Secure MySQL Installation-1
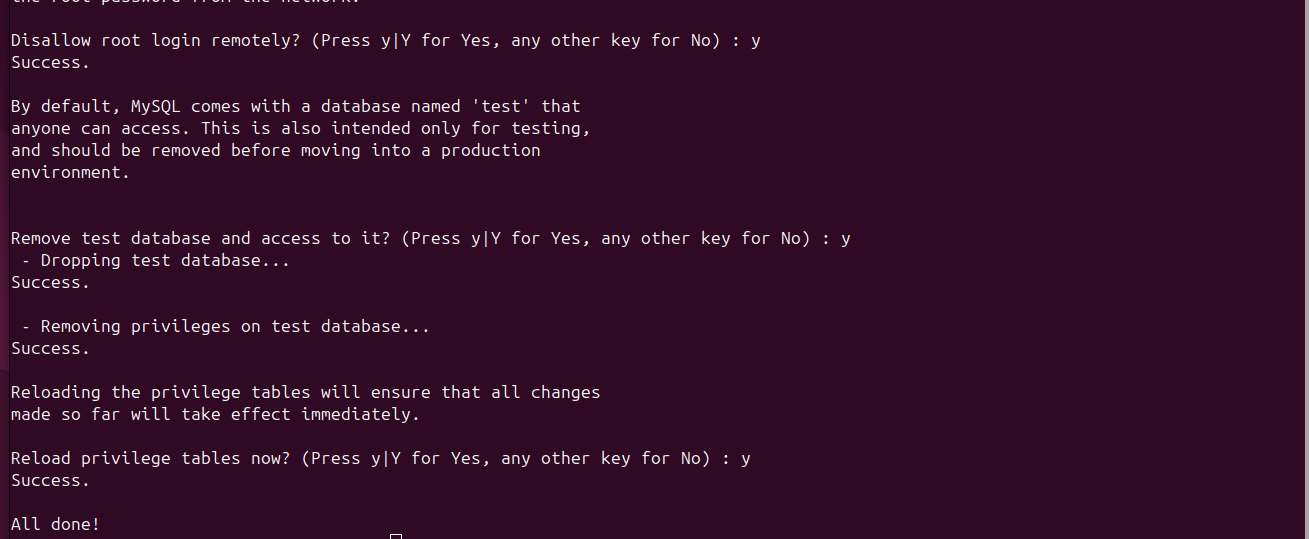
Figure 4. Secure MySQL Installation-2
Step 4: Verify MySQL is Running
To confirm that MySQL is active and running correctly, you may run the next command.
sudo systemctl status mysql
You should see active (running) in the output.
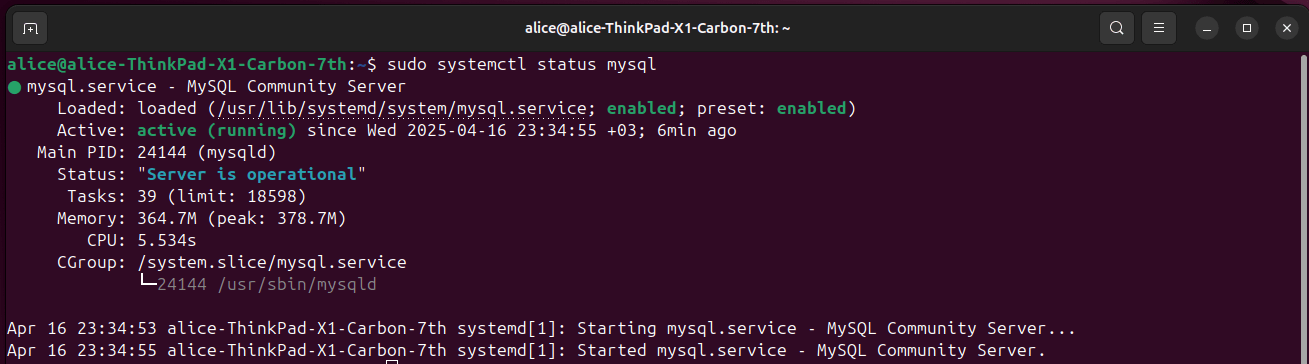
Figure 5. Verify MySQL is Running
Step 5: Log in to MySQL (Optional Test)
To test access to your MySQL server, you can log in using the MySQL root account.
sudo mysql -u root -p
After entering your password, you should see the MySQL shell prompt.
mysql>
To exit the MySQL shell, type exit;
3. Install PHP
PHP is the scripting language used in the LAMP stack to process dynamic content. Apache serves the pages, and PHP generates the content within those pages, for example, by retrieving data from a MySQL database or handling form submissions. The steps below will guide you through the installation and initial setup.
Step 1: Install PHP and Required Modules
Use the following command to install PHP along with some common modules like php-mysql, which enables communication between PHP and MySQL.
sudo apt install php libapache2-mod-php php-mysql -y
This will install the following packages.
- php: The main PHP interpreter
- libapache2-mod-php: Enables Apache to process PHP files
- php-mysql: Allows PHP to communicate with MySQL databases
Step 2: Check PHP Version
After installation, verify that PHP was installed correctly. You should see output similar to “PHP 8.x.x (cli) ...”. Use the following command:
php -v
4. Test PHP Installation
After installing PHP on your Ubuntu system, it's important to make sure it was installed correctly and that the Apache web server can process PHP scripts. The easiest way to do this is by creating a test file that displays PHP configuration details.
Step 1: Create a Test PHP File
To create a test PHP file, you may follow the next steps.
-
Navigate to Apache's default web directory.
cd /var/www/html -
Create a file called
info.php.sudo nano info.php -
Add the following code to the file.
<?php
phpinfo();
?>
This function will generate a detailed page showing all your PHP settings and modules.
Save and close the file.
- Press
CTRL + Oto save. - Press ENTER to confirm.
- Press
CTRL + Xto exit the editor.
Step 2: Open the File in Your Browser
Open a web browser and go to http://localhost/info.php.
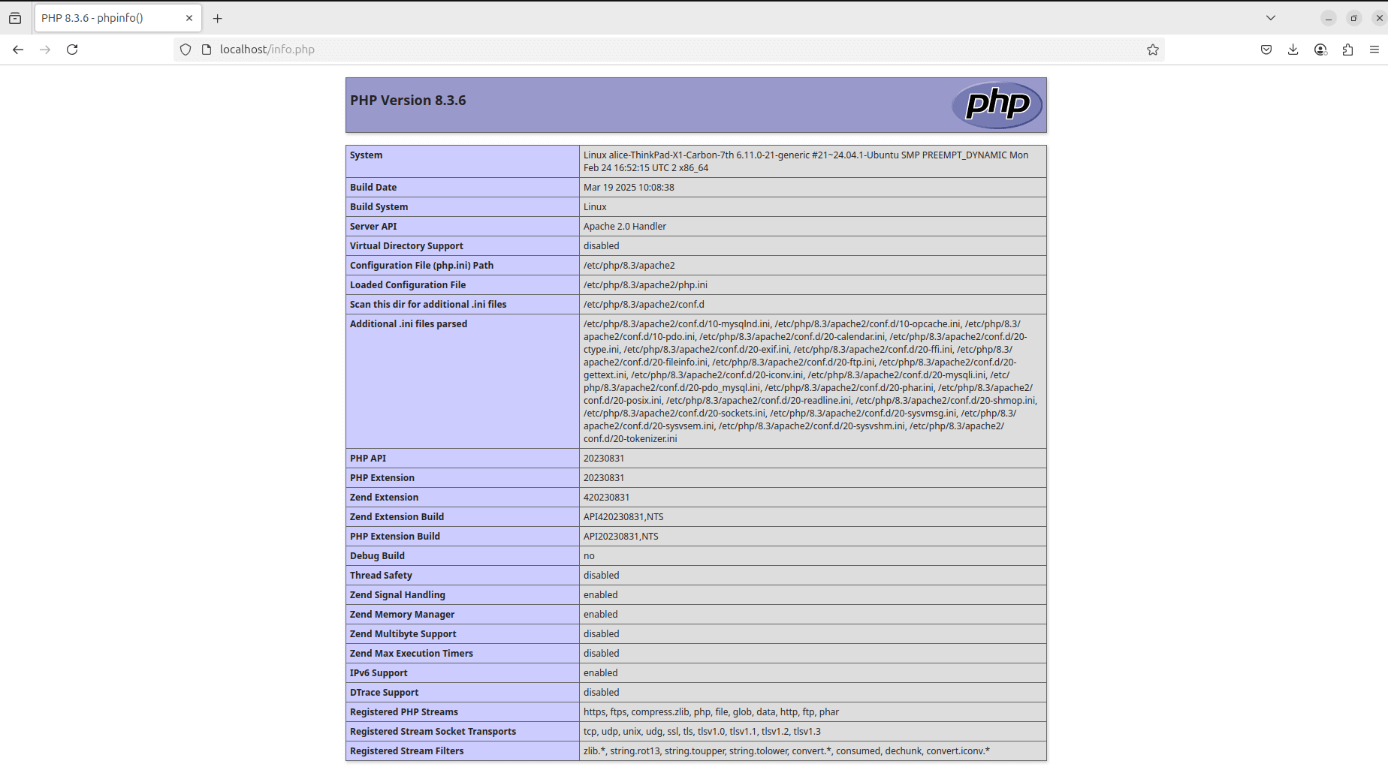
Figure 6. Visiting Localhost
If everything is working correctly, you will see the PHP info page. This page includes details on PHP version, loaded modules, environment variables, and configuration paths.
Step 3: Delete the Test File (Recommended)
For security reasons, it’s a good idea to delete this file after testing, as it reveals sensitive server information:
sudo rm /var/www/html/info.php
5. Configure Apache for PHP
After installing PHP, Apache is usually configured to handle .php files automatically using the mod_php module. However, it’s a good practice to ensure that the configuration is correct, especially if PHP files are not being interpreted properly or if you're using custom settings.
Step 1: Check if PHP Module is Enabled in Apache
To see if Apache’s PHP module is enabled, use the following command.
apache2ctl -M | grep php
You should see output like, php_module (shared)
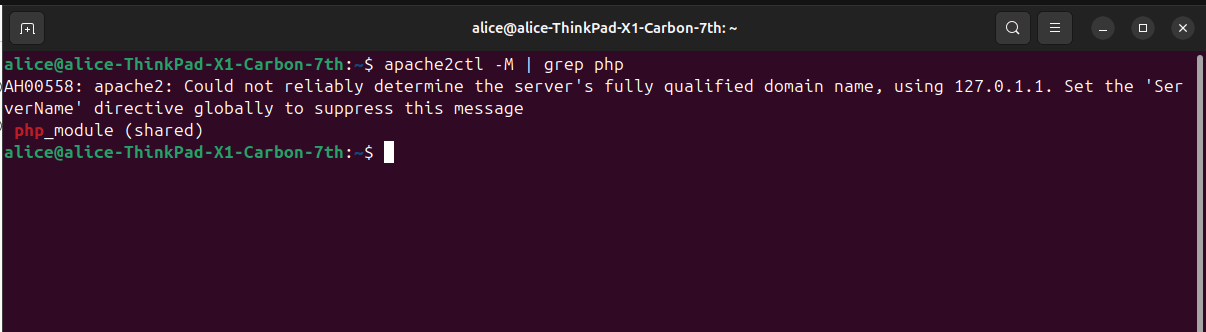
Figure 7. Checking if PHP Module is Enabled
If it’s not enabled, you can manually enable the PHP module in Apache by running the next command.
sudo a2enmod php
Then reload Apache to apply the changes:
sudo systemctl restart apache2
Step 2: Prioritize PHP Files (Optional)
Apache uses a default order when looking for index files (like index.html, index.php). To make sure index.php is prioritized, you may follow the next steps.
-
Open the
dir.conffile.sudo nano /etc/apache2/mods-enabled/dir.conf -
Look for the following line. “DirectoryIndex index.html index.cgi index.pl index.php index.xhtml index.htm”
-
Move index.php to the front like given below:
“DirectoryIndex index.php index.html index.cgi index.pl index.xhtml index.htm”
-
Save and exit (CTRL + O, ENTER, CTRL + X).
-
Restart Apache by running the next command.
sudo systemctl restart apache2
Step 3: Test the Configuration
You may test Apache configuration by following the next steps.
-
Create a new file in your web root.
sudo nano /var/www/html/test.php -
Add the following code.
<?php
echo "PHP is working with Apache!";
?> -
Visit
http://localhost/test.phpIf you see the message “PHP is working with Apache!”, the configuration is successful.
6. Test MySQL with PHP
Once PHP and MySQL are installed, it's important to verify that they can work together. This test ensures that your PHP scripts can successfully connect to a MySQL database, a critical part of any dynamic web application.
Step 1: Create a Test MySQL User (Optional but Recommended)
Let’s create a new user for testing purposes instead of using the root account by following the next steps.
-
Run the next command.
sudo mysql -u root -p -
Inside the MySQL shell, run the following commands.
CREATE DATABASE testdb;
CREATE USER 'testuser'@'localhost' IDENTIFIED BY 'password123';
GRANT ALL PRIVILEGES ON testdb.* TO 'testuser'@'localhost';
FLUSH PRIVILEGES;
EXIT;
This creates a test database called testdb and a user testuser with password Password.123 who has access to testdb.
Never use simple passwords like this in production environments.
Step 2: Create a PHP File to Test MySQL Connection
You may create a PHP file for testing MySQL connection by following the next steps.
-
Create a new PHP file.
sudo nano /var/www/html/mysqltest.php -
Paste the following code.
<?php
$servername = "localhost";
$username = "testuser";
$password = "password123";
$dbname = "testdb";
// Create connection
$conn = new mysqli($servername, $username, $password, $dbname);
// Check connection
if ($conn->connect_error) {
die("Connection failed: " . $conn->connect_error);
}
echo "Connected to MySQL database successfully!";
$conn->close();
?> -
Save and close the file.
Step 3: Run the Test
Open your browser and go to http://localhost/mysqltest.php
If you see the message: “Connected to MySQL database successfully!”
Then your PHP and MySQL integration is working perfectly.
If not, you'll see a specific error message that will help diagnose the issue (e.g., wrong credentials, MySQL not running, etc.).
Step 4: Clean Up (Optional)
Once you're done testing, you can remove the test file for security.
sudo rm /var/www/html/mysqltest.php
7. Install phpMyAdmin (Optional)
phpMyAdmin is a free and open-source web interface that allows you to manage MySQL databases using a browser. It’s especially helpful for beginners or those who prefer visual tools over command-line operations.
Step 1: Install phpMyAdmin Package
Run the following command to begin installation.
sudo apt install phpmyadmin php-mbstring php-zip php-gd php-json php-curl -y
During installation, you’ll be prompted with a few setup questions:
-
Web server selection: Use the arrow keys and space bar to select apache2, then press TAB to select OK, and press ENTER.

Figure 9. Web Server Selection
-
Configure database for phpMyAdmin with dbconfig-common: Select Yes.
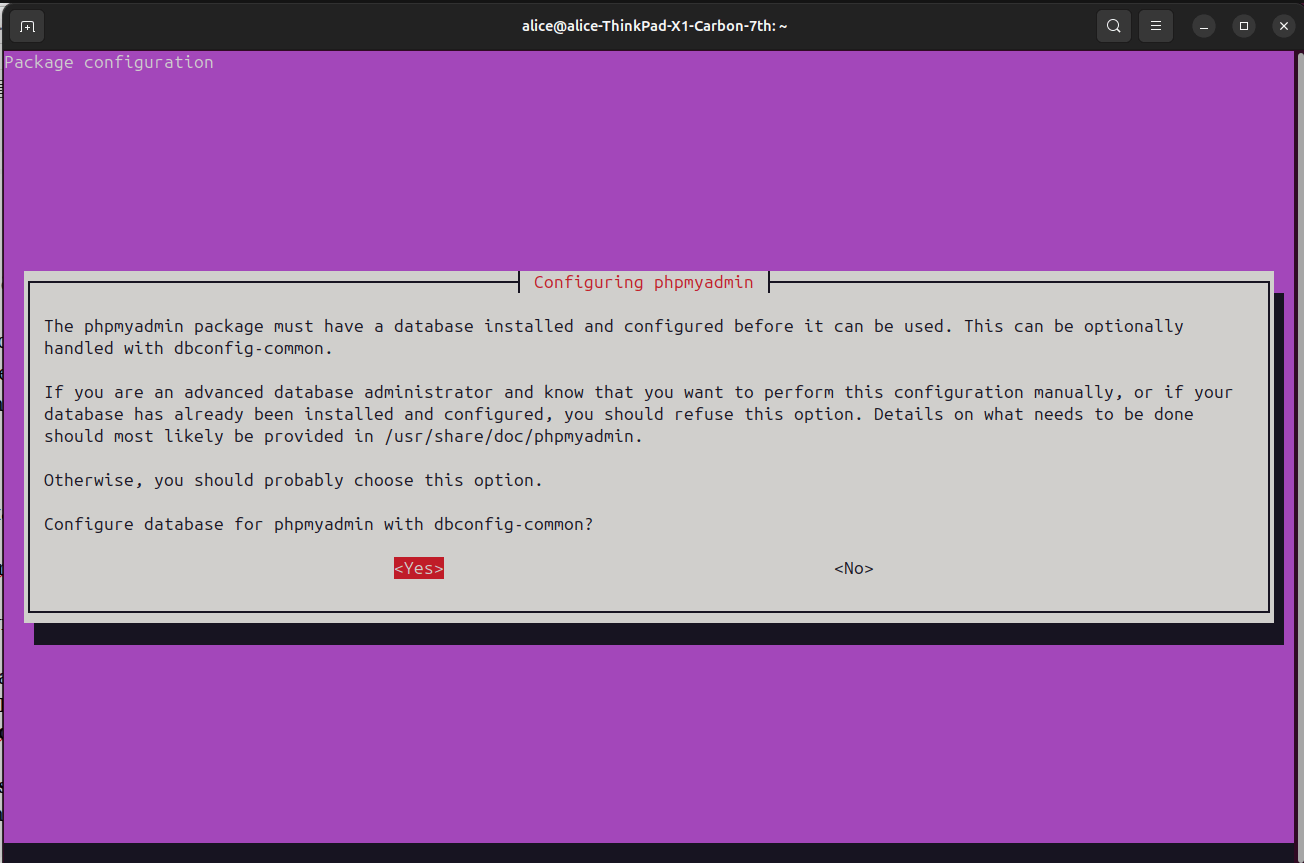
Figure 10. Configuring Database
-
Set phpMyAdmin application password: Create and confirm a password (or leave it blank for automatic generation).
Step 2: Enable Required PHP Modules
Make sure the required PHP extensions are enabled by running the following command.
sudo phpenmod mbstring
Then, restart Apache with this command.
sudo systemctl restart apache2
Step 3: Access phpMyAdmin in Browser
Now open your browser and go to: http://localhost/phpmyadmin
You’ll see the phpMyAdmin login screen. Log in using the MySQL credentials (e.g., root or testuser).
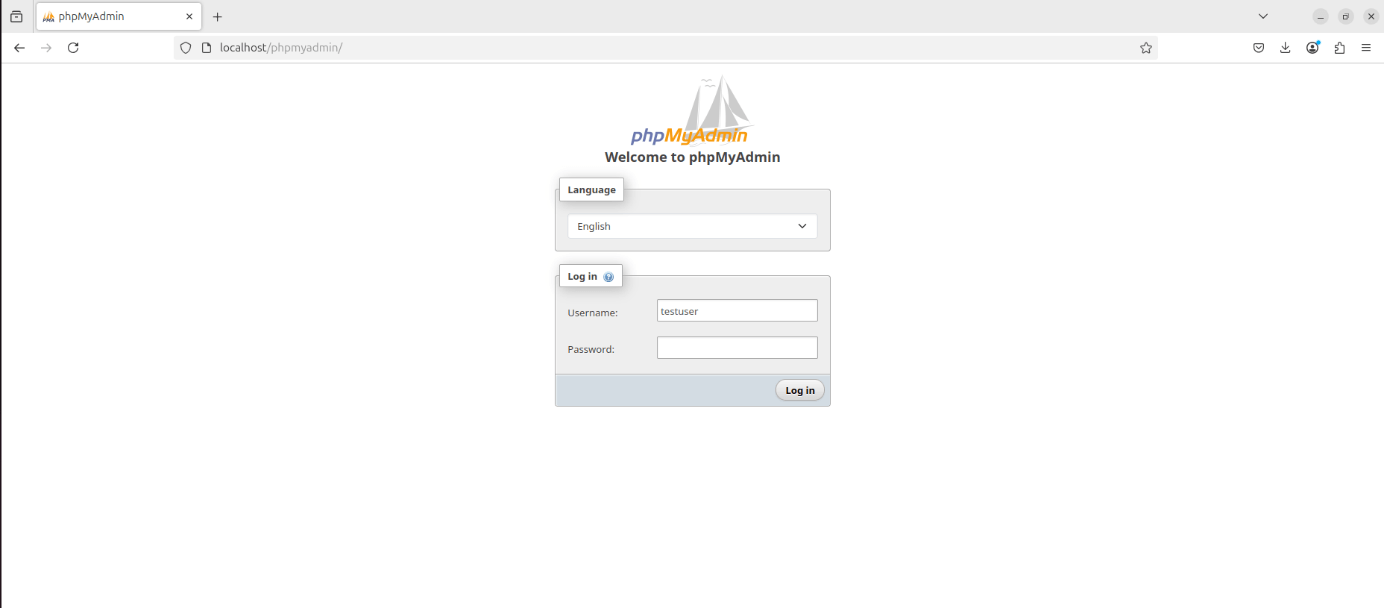
Figure 11. Visiting http://localhost/phpmyadmin
8. Check for Firewall
If your Linux system has a firewall enabled, you need to ensure that HTTP (port 80) and HTTPS (port 443) traffic is allowed. Otherwise, users won’t be able to access your web server through a browser.
Step 1: Check if UFW is Active
To see if UFW (Uncomplicated Firewall) is active, use the command.
sudo ufw status
If it says Status: inactive, no firewall rules are currently blocking access.
If it's active, continue with the steps below.
Step 2: Allow Apache Traffic
Ubuntu includes predefined application profiles for UFW. To allow Apache:
sudo ufw allow 'Apache Full'
This command enables Port 80 (HTTP) and Port 443 (HTTPS).
You can verify with:
sudo ufw status
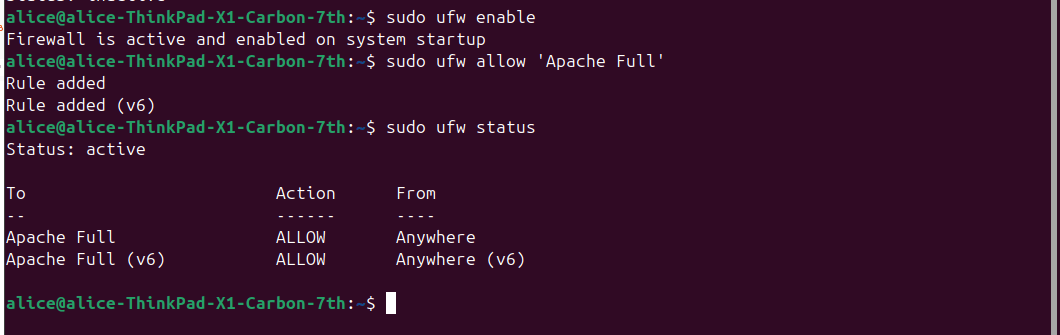
Figure 12. Allowing Apache Traffic
Step 3: Enable UFW (if needed)
If UFW is inactive and you want to enable it, run the next command.
sudo ufw enable
You may be asked to confirm, type y and press Enter.
9. Configure Permissions (Optional)
After installing and configuring your LAMP stack, it's important to set the correct file and folder permissions for your web server directory (/var/www/html/). This ensures your web applications can run properly without compromising system security.
Step 1: Set the Correct Ownership
By default, Apache runs under the www-data user and group. So your website files should be owned by this user.
sudo chown -R www-data:www-data /var/www/html
This command changes the owner of all files and subdirectories to www-data and ensures Apache has access to serve and run your site content.
Step 2: Set Directory and File Permissions
It's a good practice to set the following permissions.
- Directories to 755 permissions (read, write, execute for owner; read and execute for others).
- Files to 644 (read/write for owner; read-only for others).
You may run the following commands to set directory and file permissions for LAMP stack.
sudo find /var/www/html -type d -exec chmod 755 {} \;
sudo find /var/www/html -type f -exec chmod 644 {} \;
These permissions prevent unauthorized users from editing files while still allowing Apache to read and serve them.
What is LAMP Stack?
The LAMP (Linux, Apache, MySQL, Perl/PHP/Python) stack is one of the most widely used open-source software stacks, used primarily for building and deploying web applications. The acronym "LAMP" refers to the individual components of the stack that are essential for the establishment of a completely functional web development environment. The four components of LAMP are as follows.
- Linux is an operating system that runs all the components.
- Apache HTTP Server is a web server software that provides consumers with both static and dynamic web pages.
- MySQL is a relational database management system that is employed to generate web databases and to store and manage dynamic content.
- Python, Perl, and PHP are programming languages that are optimized for the development of web applications. Developers have the option of selecting one of the three languages to construct backend solutions.
All four of these technologies are open source, which means they are community-maintained and readily accessible to all. LAMP systems are employed by developers to generate, host, and preserve web content. Many of the websites you frequently access today are powered by this widely used solution.
How does LAMP Server Work?
A LAMP incorporates four services that developers employ to develop robust websites and applications. The fundamental layer is the Linux operating system, while Apache serves as the web server layer. MySQL serves as the database layer, and PHP serves as the programming language. These four strata facilitate the hosting, creation, and maintenance of websites and web applications when implemented correctly. Here's how each component works together.
- Linux (Operating System): Linux serves as the foundation or operating system for the LAMP stack. It manages the hardware, file system, and processes while providing a stable and secure environment for running the other components. Linux handles requests from the software stack and ensures the server is operational. It is responsible for managing resources such as CPU, memory, and storage.
- Apache (Web Server): Apache is the web server software that handles HTTP requests and serves web pages to users. When a user types a website's URL in their browser, the request is sent to the Apache server. Apache processes the request and delivers static files (like HTML, CSS, and JavaScript) or forwards the request to PHP for dynamic content. It listens on port 80 (HTTP) or 443 (HTTPS) for incoming connections.
- MySQL (Database Management System): MySQL is the database management system that stores and retrieves data for the website or application. Data such as user information, blog posts, or product details are stored in the MySQL database. When the application needs data, it sends SQL queries to MySQL, which processes the query and returns the requested data. For example, if a user logs in, MySQL checks the database for the username and password.
- PHP (Programming Language): PHP is the server-side scripting language used to create dynamic content. When a user requests a webpage that requires dynamic content (e.g., retrieving user-specific data), Apache forwards the request to PHP. PHP processes the request, interacts with the MySQL database if needed, and generates an HTML response. The generated HTML is sent back to Apache, which serves it to the user's browser.
Here is the summary of how the LAMP components work together.
- User Request: A user visits a website hosted on the LAMP server (e.g.,
http://example.com). - Apache: The request is received by the Apache web server.
- PHP: If the request involves dynamic content (e.g.,
index.php), Apache sends it to PHP for processing. - MySQL: PHP interacts with the MySQL database to fetch or store data as required.
- Response: PHP generates the final HTML content, which is sent back to Apache.
- Browser: Apache delivers the response to the user's browser, which displays the webpage.
What are the Benefits of Using LAMP Stack for Web Development?
The LAMP stack (Linux, Apache, MySQL, PHP/Perl/Python) is a widely used open-source platform for web development. Developers favor it due to its numerous advantages. The LAMP framework continues to be a cost-effective, dependable, and adaptable option for web development. It is an exceptional choice for the development of secure, scalable, and dynamic web applications due to its open-source nature, robust community support, and established track record. The following are the primary benefits of the LAMP stack.
- Open Source and Cost-Effective: The LAMP stack is a cost-effective solution for web development, as all of its components are free and open source. Developers are able to allocate resources to other aspects of the project without incurring licensing costs.
- Customizability and Flexibility: Developers have the ability to customize each component of the framework to meet the specific needs of a project. It supports a diverse array of programming languages, including Perl, Python, and PHP, which allows for the selection of the most appropriate language for a specific assignment.
- Cross-Platform Compatibility: The LAMP architecture is highly versatile, as it can operate on any platform, such as Linux, Windows (via WAMP), and macOS (via MAMP).
- Ease of Deployment: The process of configuring a LAMP architecture is simple, as there are a plethora of pre-configured packages and guides (e.g., XAMPP, LAMP server configurations) available. It is user-friendly, which facilitates the transition for novice developers into the field of web development.
- Scalability: The LAMP architecture is highly scalable, rendering it appropriate for both small-scale initiatives and large, complex applications. It enables developers to manage the expansion of user bases by optimizing server configurations and databases.
- Security: The community provides regular updates and upgrades to resolve vulnerabilities. To improve the safety of the system, developers may implement supplementary security measures.
- Performance: The efficient management of web requests and database operations is guaranteed by the integration of Linux, Apache, MySQL, and PHP. It is designed to provide users with rapid response times, making it an ideal choice for dynamic websites and applications.
- Stability and Reliability: LAMP is a technology framework that has been in use for decades, ensuring the stability and reliability of web applications. The robustness of LAMP has been demonstrated by the use of large-scale websites and applications, including WordPress and Facebook (in its early days).
- Integration with Other Tools: LAMP is well-integrated with a variety of third-party tools, APIs, and technologies, enabling developers to expand its functionality.
- Wide Adoption: The LAMP architecture is widely adopted, resulting in a plethora of tools, frameworks (e.g., Laravel for PHP), and libraries that can be used to improve development. LAMP environments are frequently supported by hosting providers by default, which simplifies the deployment process.
- Strong Community Support: A substantial and engaged developer community exists for each component of the system. Tutorials, forums, and extensive documentation are accessible for the purpose of learning and troubleshooting.
How LAMP Stack Powers Web Applications?
The LAMP stack is a widely used open-source software stack that is employed to fuel dynamic web applications and websites. Each LAMP component is essential for the efficient operation of web applications. The seamless experience for both developers and end-users is achieved through the collaboration of each component. The LAMP stack architecture supports the operation of web applications in the following manner.
The Linux operating system guarantees the stability and scalability of web applications. It offers a secure platform for the server and database.
Apache web server supports modules and configurations to accommodate a diverse array of web application requirements. It collaborates seamlessly with PHP to generate dynamic content and process server-side programs.
MySQL database management system offers a methodical approach to data storage, retrieval, and manipulation. It enables the dynamic retrieval of data through SQL queries in response to user interactions and guarantees the security, integrity, and scalability of data for large-scale applications.
Python provides intelligibility and flexibility for applications that are more intricate. Perl facilitates the generation of dynamic content by analyzing user inputs and retrieving data from MySQL.
Why Choose LAMP Stack for Your Server Setup?
There are numerous reasons for selecting a LAMP stack for your web server. First of all, the LAMP architecture is entirely open-source, which means that it is free to use, modify, and distribute. This decreases the overall cost in comparison to proprietary software systems. Secondly, years of use in production environments have demonstrated reliability, stability, and security. Ongoing stability is guaranteed by consistent updates and community-driven enhancements of LAMP. Moreover, LAMP stack is extremely adaptable to a wide range of project specifications. Each component can be easily customized and configured to meet the specific requirements of a project. Another reason to choose LAMP is its scalability. It is easily scalable to accommodate increasing data and traffic demands and offers the capacity for future expansion by supporting both horizontal and vertical scaling. Compatibility is also important factor that attracts developers to use LAMP. It is compatible with a variety of popular Content Management Systems (CMS) and frameworks, including Drupal, Joomla, Laravel, Symfony, and WordPress. Many cloud platforms and hosting providers support LAMP. Although Apache, MySQL, and PHP are predominantly Linux-based, they can also be utilized on other operating systems, which provides flexibility in development environments. Lastly, LAMP is designed to efficiently and effectively manage high-traffic web applications, with a focus on performance. It has simple optimization and caching mechanisms to enhance performance.
What are the Common Use Cases for LAMP Stacks in Web Hosting?
The LAMP stack is a solution that is frequently selected for a variety of use cases due to its reliability and adaptability. It is used to support a diverse array of web hosting and development requirements, including complex enterprise applications and basic websites. LAMP is a potent option for both developers and enterprises due to its open-source nature and extensive community support. The most common applications of LAMP systems in web hosting are as follows.
- Content Management Systems (CMS): The LAMP architecture is the foundation of numerous popular CMS platforms, including WordPress, Drupal, and Joomla. These systems enable users to effortlessly administer website content without necessitating a high level of technical expertise.
- Dynamic Websites: LAMP is the optimal choice for hosting dynamic websites that necessitate server-side processing, including blogs, forums, and small business websites. The backend database is managed by MySQL, while PHP (or Perl/Python) is employed for dynamic content generation.
- Web Applications: The LAMP framework is a preferred solution for the development and hosting of custom web applications, including social networking platforms, inventory management systems, and customer portals. Application logic is implemented in PHP or Python, while application data is stored in MySQL.
- E-commerce Platforms: LAMP is frequently employed to enable e-commerce platforms such as OpenCart, WooCommerce (via WordPress), and Magento.
- Enterprise Applications: LAMP is employed by numerous enterprises for internal tools and applications, including employee portals, project management systems, and CRM platforms. It is a dependable option due to its server-side scripting and comprehensive database capabilities.
- RESTful APIs: LAMP can be employed to develop and host RESTful APIs for mobile applications, single-page applications, or other web services. The data is stored in MySQL, while PHP or Python is employed to manage API requests and responses.
- Educational Platforms: The LAMP framework is frequently used to construct online learning platforms and Learning Management Systems (LMS) such as Moodle. It offers the necessary adaptability to efficiently manage content, users, and courses.
- Websites for Small Businesses and Startups: The low cost and simplicity of deployment of LAMP make it a popular choice for small businesses and entrepreneurs to host their websites.
- Personal Projects: LAMP is frequently employed by freelancers and developers for personal projects, including experimental applications, portfolios, and blogs.
- Media and File Hosting: LAMP can be employed to host multimedia content, file-sharing platforms, or image galleries. MySQL organizes metadata for the hosted files, while Apache manages file requests.
- Prototyping and Development: Developers frequently employ LAMP for the rapid prototyping and development of web applications because of its simplicity, flexibility, and accessibility to tools.
- Data Analysis and Reporting Tools: LAMP can host web-based data visualization and reporting tools that retrieve and display data from MySQL databases. The data is processed and rendered using PHP or Python.
- Community and Collaboration Platforms: LAMP is the foundation of forums, wikis, and collaboration tools such as Group Office, MediaWiki, and phpBB. The stack's capacity to efficiently manage user-generated content is essential for these platforms.
- IoT Dashboards - LAMP can be employed to create and host IoT dashboards, which are based on data from IoT devices that are stored in MySQL and displayed using PHP or Python.
What are the Prerequisites for Installing LAMP Stack?
In order to guarantee a seamless installation and configuration process, it is necessary to satisfy specific requirements before installing a LAMP system on a server or local workstation. The primary prerequisites for installing LAMP stack are listed below.
-
Server or Local Machine: A server or local machine on which the LAMP framework will be implemented. You need to guarantee that the system is equipped with an adequate amount of resources to accommodate the intended purpose.
- CPU: A minimum of 1 GHz (more for high-traffic websites)
- RAM: A minimum of 512 MB is required, with a recommendation for 1 GB or more.
- Storage: A minimum of 10 GB of free disk space
-
A Linux-Based Operating System: The LAMP framework necessitates a Linux-based operating system, such as Ubuntu, Debian, RHEL (Red Hat Enterprise Linux) or Fedora. You should guarantee that your Linux operating system is current with the most recent upgrades and updates.
-
Fundamental understanding of the Linux command line: It is imperative to possess a fundamental understanding of Linux commands in order to navigate directories, manage/install software, and edit configuration files.
-
Sudo or Root Privileges: In order to install and configure the LAMP stack components, you must have administrative privileges (e.g., root or a user with
sudoaccess). This is necessary for the installation of software programs and the modification of system configurations. -
Software Dependencies: The LAMP stack components, Apache, MySQL/MariaDB, and PHP/Perl/Python, are typically installed individually. You should guarantee that your Linux distribution has access to compatible versions of these components.
-
Text Editor: A text editor, such as nano, vim, emacs, is necessary to configure files during the installation process. Typical alternatives consist of:
-
Internet Connection: In order to obtain and install the LAMP stack components and their dependencies from official repositories, an active internet connection is necessary.
-
SSL/TLS Certificate (Optional): An SSL/TLS certificate is required if you intend to enable HTTPS. A certificate can be obtained for free by utilizing tools such as Let's Encrypt or by purchasing one from a certificate authority.
-
Configuration of the Firewall: If a firewall (e.g., UFW, iptables, or firewalld) is enabled, allow traffic on the necessary ports (e.g., 80, 443, etc.).
-
Open Ports: Ensure that the following ports are unblocked by a firewall:
- Port 80: For HTTP traffic (Apache web server)
- Port 443: For HTTPS traffic (provided that SSL/TLS is enabled)
- Port 3306: For remote access to MySQL/MariaDB databases (if necessary)
-
Optional Tools: Additional tools that may be beneficial for the management and monitoring of the LAMP stack.
- phpMyAdmin: A web-based interface for the management of MySQL databases.
- Git: For the purpose of version control.
- Monitoring Tools: Server performance and services can be monitored using tools such as htop, netstat, or systemctl.
How is Firewall Configuration in LAMP Stack?
It is imperative to configure a firewall in a LAMP stack (Linux, Apache, MySQL, PHP) to secure your server by managing network traffic. The proper configuration of a firewall guarantees that only essential services and protocols are accessible while simultaneously preventing unauthorized access. The following is a guide on how to configure a firewall for a LAMP stack:
- Comprehend the Ports Necessary for the LAMP Stack: Typically, the following ports must be accessible in order to operate a LAMP stack.
- Port 22: For remote server management via SSH.
- Port 3306 (Optional): For MySQL, only if remote access to the database is necessary (this port is not recommended for public access).
- Port 443: For HTTPS (secure web communications).
- Port 80: For HTTP (web transmission).
- Select a Firewall Tool: You may select one of the following frequently used Linux firewall tools.
- UFW (Uncomplicated Firewall): Suitable for novices and user-friendly.
- firewalld: A dynamic firewall management utility that is frequently employed in RHEL-based systems.
- iptables: A more sophisticated firewall tool (now frequently superseded by
nftables).
- Utilize UFW to Configure Firewall (Example): You may configure UFW by following the next steps for your LAMP stack.
- Install UFW: If UFW is not already installed, execute the following commands:
sudo apt update
sudo apt install ufw - Allow the Required Ports: Execute the subsequent commands to permit traffic to the specified ports.
sudo ufw allow 22/tcp # Allow SSH
sudo ufw allow 80/tcp # Allow HTTP
sudo ufw allow 443/tcp # Enable HTTPS. - Permit MySQL remote access: Allow port 3306 if MySQL remote access is necessary (replace
x.x.x.xwith the trusted IP address).sudo ufw allow from x.x.x.x to any port 3306tipFor security purposes, it is not recommended to expose port 3306 to the public.
- Enable UFW: To enable and verify the status of UFW, execute the following commands.
sudo ufw enable
sudo ufw status
- Install UFW: If UFW is not already installed, execute the following commands:
- Configure Firewall Using Firewalld (Example): You may configure Firewalld by following the next steps for your LAMP stack.
- Installing firewalld In the event that firewalld is not installed, run the next command.
sudo yum install firewalld - To activate firewalld on RHEL-based systems, execute the following commands:
sudo systemctl start firewalld
sudo systemctl enable firewalld - Allow the Required Ports: To enable the necessary ports, execute the subsequent commands.
sudo firewall-cmd --permanent --add-port=22/tcp # Allow SSH
sudo firewall-cmd --permanent --add-port=80/tcp # Allow HTTP
sudo firewall-cmd --permanent --add-port=443/tcp # Enable HTTPS. - Permit MySQL remote access (Optional): Allow port 3306 for specific IP addresses if necessary.
sudo firewall-cmd --permanent --add-rich-rule='rule family="ipv4" source address="x.x.x.x" port port="3306" protocol="tcp" accept' - Reload the firewalld: To implement modifications, restart the firewall:
sudo firewall-cmd --reload
- Installing firewalld In the event that firewalld is not installed, run the next command.
- Advanced Configuration of Firewall Using iptables: You may configure iptables by following the next steps for your LAMP stack.
- Install iptables: If it has not already been installed, install iptables.
sudo apt install iptables # For Debian-based systems
sudo yum install iptables # For RHEL-based systems - Incorporate Rules: Add regulations to permit traffic to the necessary ports:
sudo iptables -A INPUT -p tcp --dport 22 -j ACCEPT # Allow SSH
sudo iptables -A INPUT -p tcp --dport 80 -j ACCEPT # Allow HTTP
sudo iptables -A INPUT -p tcp --dport 443 -j ACCEPT # Allow HTTPS - Save Rules: Preserve the iptables rules indefinitely.
- On Ubuntu/Debian:
sudo apt install iptables-persistent
sudo netfilter-persistent save- On RHEL/CentOS:
sudo service iptables save
- Install iptables: If it has not already been installed, install iptables.
- Verify the firewall: Test the firewall to verify that only the essential protocols are accessible after it has been configured. You may employ
nmapor an equivalent utility to scan open ports.nmap -p 1-65535 your-server-ip
As a best practice of LAMP stack, you should restrict MySQL access by modifying /etc/mysql/mysql.conf.d/mysqld.cnf or /etc/my.cnf, you can bind MySQL to 127.0.0.1 by adding this line. bind-address = 127.0.0.1 . Also, SSL/TLS certificates should be configured to ensure that HTTPS is always enabled, such as through the use of Let's Encrypt. And regularly monitor firewall logs for unauthorized access attempts.
How do you Configure Permissions in LAMP Stack?
Configuring permissions in a LAMP stack is essential for ensuring the security and proper functionality of your web application. Below are the steps to configure permissions effectively:
-
Directory Structure: Before setting permissions, ensure your web application files are in the correct directory. By default, Apache serves files from
/var/www/htmlor a custom directory specified in the Apache configuration. -
Set Ownership: The web server (Apache) typically runs as a specific user (e.g.,
www-dataon Ubuntu/Debian orapacheon CentOS/Red Hat). Assign ownership of your web files to this user by running the next command. (Replace/var/www/htmlwith the path to your web directory.)sudo chown -R www-data:www-data /var/www/html -
File and Directory Permissions: Set appropriate permissions for files and directories to ensure security while maintaining functionality. Recommended permission for directories is
755(rwxr-xr-x) and for files is644(rw-r--r–). You may set directory permissions by running the following command.sudo find /var/www/html -type d -exec chmod 755 {} \;To set file permissions run the next command.
sudo find /var/www/html -type f -exec chmod 644 {} \; -
Special Permissions for Writable Directories: You need to adjust permissions for those specific directories if your application requires certain directories to be writable (e.g., for file uploads or caching). Setting permission to
775allows the owner and group to write to the directory. You may run the next commands for writable folders, such asuploads.sudo chown -R www-data:www-data /var/www/html/uploads
sudo chmod -R 775 /var/www/html/uploads -
SELinux Configuration (if enabled): On systems with SELinux (e.g., CentOS/RHEL), you might need to configure SELinux to allow Apache to access the files. By running the next commands, you may allow Apache to read/write files and make the changes permanent.
sudo chcon -R -t httpd_sys_rw_content_t /var/www/html
sudo semanage fcontext -a -t httpd_sys_rw_content_t "/var/www/html(/.*)?"
sudo restorecon -R /var/www/html -
Apache Configuration: Ensure Apache has the proper permissions to serve files. Check the
DocumentRootand<Directory>directives in your Apache configuration file (e.g.,/etc/apache2/sites-available/000-default.confor/etc/httpd/conf/httpd.conf). It must have the following lines.<Directory /var/www/html>
Options Indexes FollowSymLinks
AllowOverride All
Require all granted
</Directory>Do not forget to restart Apache after making changes by running the next command.
sudo systemctl restart apache2 # On Debian-based systems
sudo systemctl restart httpd # On CentOS/RHEL -
Protect Sensitive Files: You should restrict access to sensitive files like configuration files (
config.php,.env, etc.) by running the similar command given below.sudo chmod 600 /var/www/html/config.php
sudo chown www-data:www-data /var/www/html/config.phpYou may add rules in your
.htaccessor Apache configuration to deny web access to these files:<FilesMatch "\.(env|config\.php)$">
Require all denied
</FilesMatch> -
Avoid Using
777Permissions: You should never set777permissions (read, write, and execute for everyone) on files or directories unless absolutely necessary. It poses a serious security risk. -
Test Permissions: After configuring permissions, test your application to ensure it functions correctly. You should check file uploads, caching, and other features requiring writable directories. Looking for errors in Apache logs (
/var/log/apache2/error.logor/var/log/httpd/error_log) is beneficial as well.
What are Troubleshooting Common Issues in LAMP Stack?
Troubleshooting common issues in a LAMP (Linux, Apache, MySQL, PHP) stack involves diagnosing and resolving problems related to the four components of the stack. By systematically diagnosing each component, you can resolve most issues in a LAMP stack. Always check logs for detailed error messages, as they provide the best clues for troubleshooting. Below is a guide to address common issues.
- Apache Not Starting: In this issue, running
sudo systemctl start apache2orsudo systemctl start httpdfails, and you may seeAddress already in useorJob for apache2.service failederrors in your logs. To resolve the issue, you may check if another process is using port 80 or 443 (default HTTP/HTTPS ports) by running the following command.If another service is using the port, stop it or reconfigure Apache to use a different port. You may check Apache configuration for syntax errors by running the following command, and then fix any errors reported.sudo netstat -tuln | grep ':80'sudo apachectl configtest - Apache Displays Default Page Instead of Website: In such cases, accessing your server IP shows the default Apache page. To troubleshoot this issue, ensure your website files are in the correct directory, typically
/var/www/html, by checking the Apache virtual host configuration and confirming theDocumentRootpoints to your website directory. - 403 Forbidden Error: In this issue, accessing the website shows a "403 Forbidden" error. For troubleshooting, you may follow the next steps.
- Check file and directory permissions by running the following commands.
sudo find /var/www/html -type d -exec chmod 755 {} \;
sudo find /var/www/html -type f -exec chmod 644 {} \; - Ensure the Apache user (
www-dataorapache) owns the files. Run the next command on Debian/Ubuntu servers.Run the next command on CentOS/RHEL servers.sudo chown -R www-data:www-data /var/www/htmlsudo chown -R apache:apache /var/www/html - Check
.htaccessrules for restrictions.
- Check file and directory permissions by running the following commands.
- MySQL Not Starting: In this issue, running
sudo systemctl start mysqlorsudo systemctl start mariadbfails. Troubleshooting steps are listed below- Check MySQL logs (
/var/log/mysql/error.logor/var/log/mysqld.log) for errors. - Ensure there is enough disk space by running
df -Th - Check MySQL configuration (
/etc/mysql/my.cnfor/etc/my.cnf) for errors.
- Check MySQL logs (
- Cannot Connect to MySQL: In this issue, you get the
Access denied for user 'root'@'localhost'error message when you attempt to connect to the MySQL DB. To troubleshoot the issue, you may follow the following steps.- Reset the MySQL root password.
sudo mysql
ALTER USER 'root'@'localhost' IDENTIFIED BY 'new_password';
FLUSH PRIVILEGES;
EXIT;
- Reset the MySQL root password.
- Ensure MySQL is listening on the correct IP address. Look for the
bind-addressdirective and set it to0.0.0.0for all interfaces or a specific IP in the MySQL configuration file (/etc/mysql/my.cnfor/etc/my.cnf). - Allow remote connections (if needed):
GRANT ALL PRIVILEGES ON *.* TO 'root'@'%' IDENTIFIED BY 'password';
FLUSH PRIVILEGES;
-
PHP Not Executing: In this issue, the browser displays raw PHP code instead of executing it. To resolve the case, you may follow the following steps.
- Ensure PHP is installed by running
php -vcommand. - Check if the PHP module is enabled in Apache by running
sudo a2enmod php - Verify the MIME type in Apache configuration file
/etc/apache2/mods-enabled/php*.confand ensure it contains the next lines.<FilesMatch "\.php$">
SetHandler application/x-httpd-php
</FilesMatch>
- Ensure PHP is installed by running
-
PHP Errors Not Displaying: In this issue, PHP errors are not shown on the website. To resolve the case, you may enable error reporting in the PHP configuration file
php.iniby adding the following lines.display_errors = On
error_reporting = E_ALL -
Website Loading Slowly: To solve this issue, you should check server resource usage using
toptool. You may optimize Apache by adjusting worker settings inmpm_prefork.conformpm_event.confand using caching (e.g.,mod_cache,Redis, orMemcached). -
SSL/TLS Not Working: In this issue, HTTPS does not work and shows certificate errors. For troubleshooting the case you may follow the next steps.
- Check if SSL module is enabled by running
sudo a2enmod sslandsudo systemctl restart apache2 - Verify your SSL certificate and key paths in the Apache configuration.
SSLCertificateFile /path/to/certificate.crt
SSLCertificateKeyFile /path/to/private.key - Test SSL configuration by running
sudo apachectl configtest.
- Check if SSL module is enabled by running
-
Logs Not Updating: If you LAMP logs are not being updated, you may check file permissions for log files by running
sudo ls -l /var/log/apache2/on Debian/Ubuntu servers orsudo ls -l /var/log/httpd/on CentOS/RHEL servers. You may restart the logging service by running thesudo systemctl restart rsyslogcommand.