How to Install Kubernetes on Ubuntu
Kubernetes has become the industry standard for managing containerized applications at scale. Kubernetes provides developers and system administrators with a powerful platform to automate deployment, scaling, and operations across clusters of machines. For beginners, however, the first step, setting up Kubernetes, can feel overwhelming. That’s why using Ubuntu, one of the most widely adopted Linux distributions, is often the preferred choice. Ubuntu is known for its stability, strong community support, and compatibility with the Kubernetes ecosystem, making it a solid foundation for learning and production use.
Before jumping straight into the installation, it is important to understand that proper system preparation is crucial. A successful setup not only depends on installing the right tools but also on ensuring your system is ready to handle Kubernetes workloads. In this guide, we’ll walk through the entire process step by step, covering preparation, installation, and post-installation checks.
By the end, you’ll not only have a running Kubernetes cluster on Ubuntu but also understand the core tools, testing methods, and scaling options that come with it. This structured approach will help you build confidence in managing Kubernetes clusters and prepare you for more advanced scenarios.

Step 1: Prepare Ubuntu Nodes.
Before installing Kubernetes on Ubuntu, you must properly prepare your machines. Careful preparation prevents most of the common errors and ensures a smoother cluster setup.
Minimum Setup Requirement: To build a real Kubernetes cluster, you need at least 2 Ubuntu nodes.
-
1 Control Plane Node (also called the master), where the cluster is managed.
-
1 Worker Node, where your applications (pods) will run.
If you only have a single Ubuntu machine, you can still try a single-node cluster (all-in-one setup), but it won’t represent a true multi-node environment.
For learning purposes, the most beginner-friendly approach is to use Virtual Machines (VMs) on your computer (e.g., VirtualBox or VMware). In production, these nodes could be physical servers or cloud instances, but for this guide, we’ll focus on using VMs to keep things simple and safe.
Each Ubuntu node must meet the following requirements:
-
Running a supported Ubuntu version (22.04 LTS or 24.04 LTS).
-
Assigned a unique hostname.
-
Synchronized in time (NTP enabled).
-
Connected to the network with reachable IPs.
-
Configured with either open firewall ports or a disabled firewall for learning setups.
Let’s go through these requirements and prepare the Ubuntu machines.
-
Check system version and resources: Make sure you are running Ubuntu 20.04 or 22.04 LTS with at least 2 CPUs and 2 GB RAM per node. Check Ubuntu version and system resources with the following commands.
lsb_release -ds
nproc && free -hnoteNote on Ubuntu 24.04 While these steps work on Ubuntu 24.04, most Kubernetes documentation and tutorials still assume Ubuntu 22.04. For beginners, we recommend starting with Ubuntu 22.04 LTS to avoid compatibility issues and to have easier troubleshooting.
-
Set a unique hostname: Each node must have its own name so Kubernetes can identify it. Use the following commands to set hostnames.
# On the control plane:
sudo hostnamectl set-hostname cp-1
# On a worker node:
sudo hostnamectl set-hostname worker-1 -
Update
/etc/hostsfor simple name resolution (optional but helpful): This lets nodes talk to each other by name. Add hostnames and IPs of all nodes to/etc/hosts.-
Use the following command to open the /etc/hosts file in a text editor.
sudo nano /etc/hosts -
Add the IP addresses and hostnames of all your nodes. Replace the IPs with yours.
192.168.1.8 cp-1
192.168.1.9 worker-1 -
Once you’re done editing, save and exit Nano.
CTRL + O,ENTER, thenCTRL + X.
-
-
Enable time synchronization: Consistent time is critical for certificates and cluster stability. Enable and start time synchronization service by running the next command.
sudo timedatectl set-ntp onThen verify it’s working by running the next command.
timedatectl status -
Decide firewall settings: If you are just learning, disable firewall for simplicity.
sudo ufw disableIf you want to keep the firewall active, open the required ports (
6443,10250, etc.). -
Check unique system identifiers: Kubernetes requires each node to have a unique identity.
sudo cat /sys/class/dmi/id/product_uuid
ip link | awk '/link\/ether/ {print $2}'noteApply these steps on both cp-1 and worker-1. If you add more nodes later (e.g., worker-2), append their entries on all machines too.
tipKubernetes relies on distinct node identity, synchronized time, and open network paths. Skipping these steps often results in kubeadm join failures or unstable clusters. By preparing your Ubuntu nodes properly, you build a reliable foundation for the rest of your Kubernetes.
Step 2. Update and Install Dependencies
Before installing Kubernetes components, make sure each Ubuntu node is fully updated and has the required base packages installed. This step ensures stability and prevents common errors during the cluster setup.
-
Update the package index and upgrade existing packages with the following command.
sudo apt-get update && sudo apt-get upgrade -y -
Next, install the required dependencies with the command below.
sudo apt-get install -y apt-transport-https ca-certificates curl gnupg lsb-release -
Run these commands on both the control plane and all worker nodes so that every node is prepared in the same way.
On freshly created VMs, this step might take a while because many updates will be applied. Be patient; having updated nodes is critical for a smooth Kubernetes installation.
Step 3. Disable swap
Kubernetes requires swap to be disabled on all nodes. Why? Because the kubelet (the agent that runs on every node) expects to manage memory directly. If swap is enabled, the kernel can move memory pages to disk, which causes performance issues and makes resource scheduling unpredictable. Use the following steps to disable swap.
-
To disable swap temporarily (until next reboot) use the following command.
sudo swapoff -a -
To disable swap permanently, edit the
/etc/fstabfile and remove or comment out the swap entry. Use the following command to open the/etc/fstabfile in a text editor.sudo nano /etc/fstab -
Look for a line that contains the word swap, for example:
swapfile none swap sw 0 0. -
Add a
#at the beginning of that line to comment it out. Save and exit Nano (CTRL + O,ENTER, thenCTRL + X).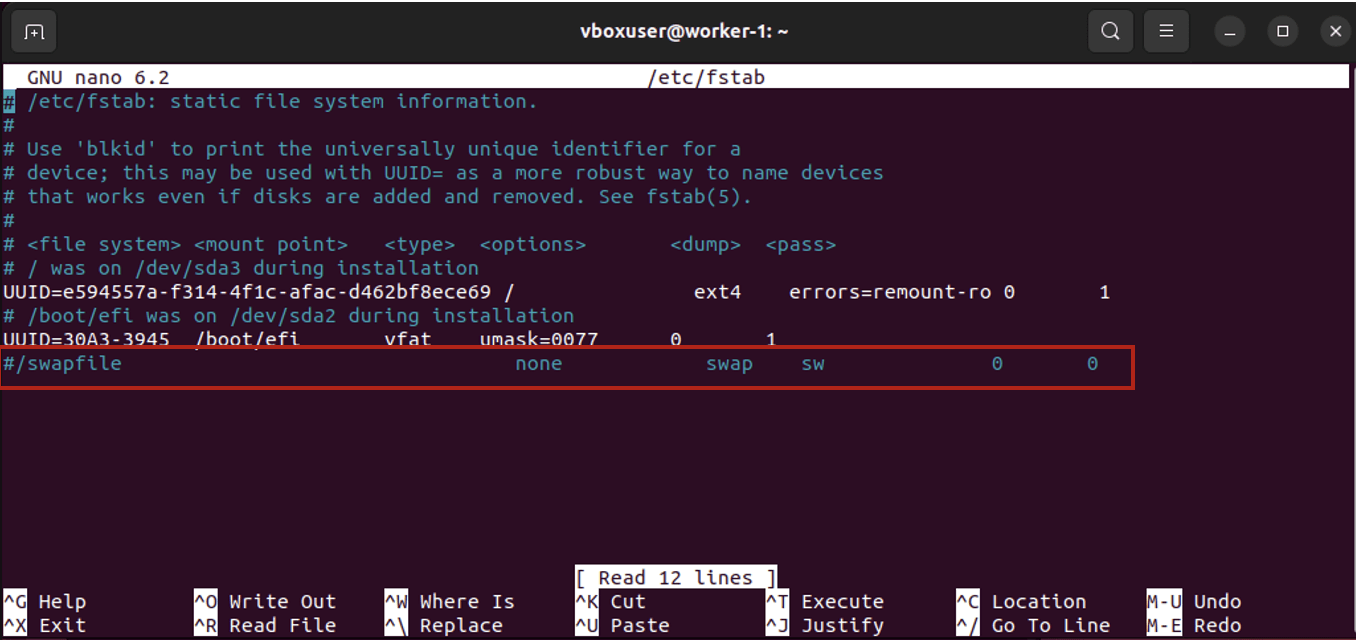
Figure 1. Edit the /etc/fstab file
-
To verify that swap is disabled, run the following command. You should see 0B under the Swap column.
free -h -
Apply this step to all nodes(both control plane and workers).
If you skip this step, kubeadm init or kubeadm join will usually fail with errors related to the kubelet not starting.
Step 4. Load Kernel Modules & sysctl Network Settings
Kubernetes networking requires certain Linux kernel modules and sysctl parameters to be enabled. Without these, your pods may not communicate across nodes. To configure this correctly, follow the steps below on each Ubuntu node.
-
Open the config file with the following command to enable kernel modules.
sudo nano /etc/modules-load.d/k8s.conf -
Paste the following lines inside the file.
overlay
br_netfilter -
Save and exit Nano (
CTRL + O,ENTER, thenCTRL + X). -
Load the modules immediately (without rebooting) with the following commands.
sudo modprobe overlay
sudo modprobe br_netfilter -
Check that the modules are loaded to verify settings with the following commands.
lsmod | grep br_netfilter
lsmod | grep overlay -
Open the sysctl config file to configure sysctl networking.
sudo nano /etc/sysctl.d/k8s.conf -
Paste the following lines inside the file:
net.bridge.bridge-nf-call-iptables = 1
net.bridge.bridge-nf-call-ip6tables = 1
net.ipv4.ip_forward = 1 -
Save and exit Nano, then apply the settings with the following command.
sudo sysctl --system -
Run the following commands to check sysctl values. Both should return = 1.
sysctl net.bridge.bridge-nf-call-iptables
sysctl net.ipv4.ip_forward
If you skip this, your pods may start, but you won’t be able to talk to each other.
Step 5. Install Container Runtime
Before Kubernetes can launch Pods, it needs a container runtime. Think of Kubernetes as the orchestrator (the manager) and the container runtime as the engine that actually runs containers.
-
Kubernetes schedules and instructs nodes on what to run.
-
The container runtime (like containerd) does the heavy lifting: pulling images, creating containers, starting/stopping them, and managing their lifecycle.
In short: Kubernetes doesn’t run containers directly; it relies on a runtime.
In this guide, we’ll use containerd, because it is lightweight, stable, and officially recommended by the Kubernetes community for production and learning environments.
To set it up properly, follow the steps below on each Ubuntu node (control plane and workers).
-
Install required packages with the following commands.
sudo apt update
sudo apt install -y curl gnupg2 software-properties-common apt-transport-https ca-certificates -
Install containerd with the command below.
sudo apt install -y containerd -
Configure containerd. Generate the default config and enable SystemdCgroup (required by Kubernetes) with the following commands.
sudo mkdir -p /etc/containerd
containerd config default | sudo tee /etc/containerd/config.toml > /dev/null -
Open the config file in a text editor.
sudo nano /etc/containerd/config.tomlFind the section
[plugins."io.containerd.grpc.v1.cri".containerd.runtimes.runc.options]and set as shown below.SystemdCgroup = true -
Save and exit (
CTRL + O,ENTER,CTRL + X). -
Restart containerd with the command below.
sudo systemctl restart containerd
sudo systemctl enable containerd
At this point, your nodes have a working container runtime. Kubernetes will use containerd to pull images and run pods.
Step 6: Install Kubernetes Components (kubeadm, kubelet, kubectl)
Now that the container runtime is ready, the next step is to install the core Kubernetes tools that are shared below.
-
kubeadm: bootstraps the cluster. It simplifies the process of setting up Kubernetes by handling certificates, networking, and control plane components.
-
kubelet: the node agent. Runs on all nodes, starts and manages Pods as instructed by the control plane.
-
kubectL: the command-line tool used to interact with your cluster (deploy apps, check logs, scale workloads, etc.).
These three tools are the foundation of your Kubernetes setup. Without them, the cluster can’t be created or managed.
Follow these steps on all nodes (control plane + workers).
-
Update the package index and install prerequisites with the command below. These tools allow secure communication (HTTPS), certificate handling, and package verification.
sudo apt update
sudo apt install -y apt-transport-https ca-certificates curl gpg -
Download the Google Cloud public signing key with the command below. This downloads and stores Kubernetes’ official signing key. It ensures that the packages you install really come from Kubernetes and are not tampered with.
sudo curl -fsSL https://pkgs.k8s.io/core:/stable:/v1.30/deb/Release.key | sudo gpg --dearmor -o /etc/apt/keyrings/kubernetes-apt-keyring.gpg -
Add the Kubernetes apt repository with the following commands. This tells Ubuntu where to download Kubernetes packages from.
echo "deb [signed-by=/etc/apt/keyrings/kubernetes-apt-keyring.gpg] https://pkgs.k8s.io/core:/stable:/v1.30/deb/ /" | sudo tee /etc/apt/sources.list.d/kubernetes.list -
Update the package index again and install components with the following commands.
sudo apt update
sudo apt install -y kubelet kubeadm kubectl -
Prevent automatic upgrades with the command below. This locks the versions so that an apt upgrade won’t break your cluster by upgrading Kubernetes unexpectedly.
sudo apt-mark hold kubelet kubeadm kubectl -
Check installation with the following command.
kubeadm version
kubectl version --client
kubelet --version
Make sure the versions match across all nodes. Keeping them in sync avoids compatibility errors when initializing or joining the cluster.
Step 7: Initialize the Control Plane
So far, we’ve only prepared the nodes and installed the tools. Now we’ll bootstrap the cluster on the control plane node using kubeadm init. The control plane is where Kubernetes runs its API server, scheduler, and controller manager. Without this step, there is no cluster yet.
-
Run
kubeadm initon the control plane.sudo kubeadm init --pod-network-cidr=10.244.0.0/16--pod-network-cidr=10.244.0.0/16tells Kubernetes what IP range Pods will use.(We’ll install a network plugin later; this range matches Flannel, a common choice.)
noteThis command must be run only on the control plane node (not on workers).
-
Save the join command from the output. At the end of
kubeadm init, you’ll see an output like this:kubeadm join 192.168.1.50:6443 --token abcdef.0123456789abcdef \
--discovery-token-ca-cert-hash sha256:1234567890abcdef...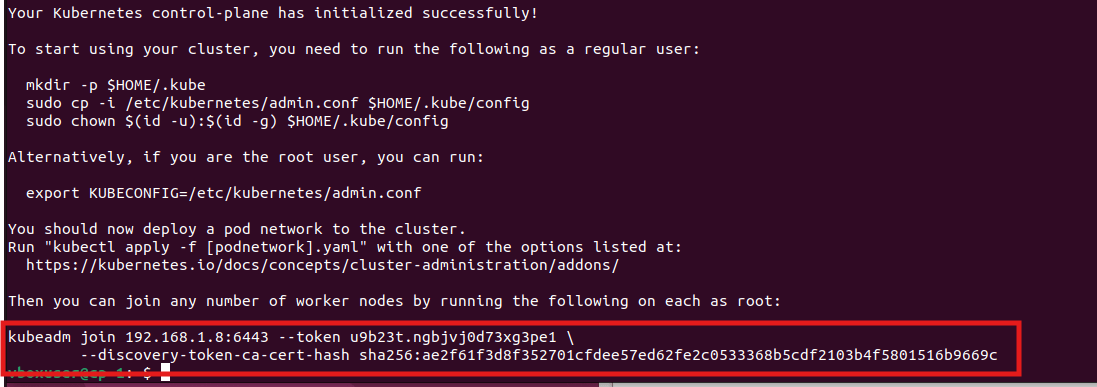
Figure 2. Join Command
-
Copy this command somewhere safe. You’ll need it later to join worker nodes to the cluster.
At this point, you have a control plane node initialized and ready to accept worker nodes.
Step 8: Set Up kubectl Access
When you run kubeadm init, Kubernetes generates an admin kubeconfig file. This file contains the certificates and connection details that kubectl uses to talk to the control plane. By default, it is stored under /etc/kubernetes/admin.conf.
To use kubectl as a normal user (not root), you need to copy this file into your home directory and set the proper permissions. Without this step, you would need to run every kubectl command as sudo, which is not ideal.
Follow these steps on the control plane node.
-
Create
.kubedirectory in your home (if not exists) with the following command.mkdir -p $HOME/.kube -
Copy the
admin.conffile into this directory with the command below.sudo cp -i /etc/kubernetes/admin.conf $HOME/.kube/config -
Fix permissions with the command below so your user can access it.
sudo chown $(id -u):$(id -g) $HOME/.kube/config -
To verify kubectl access, run the command below.
kubectl get nodes
At this point, the control plane node should appear as NotReady, that’s normal until you install a CNI plugin in the next step.
Step 9: Install a CNI Plugin
At this point, the control plane is running, but nodes are still marked NotReady. That’s because Kubernetes needs a Container Network Interface (CNI) plugin to allow Pods to communicate with each other across nodes.
There are several options (Calico, Cilium, Weave, Flannel). In this guide we’ll use Flannel because it’s simple, widely used, and works well for most beginner and test clusters. We need a CNI plugin for the following reasons.
-
Kubernetes itself does not implement networking.
-
The CNI plugin handles Pod-to-Pod networking and Pod-to-Service communication.
-
Without it, Pods stay in a Pending state, and the cluster won’t be usable.
Follow these steps to install a CNI Plugin on the control plane node.
-
Run the following command to deploy the Flannel DaemonSet and related resources into the cluster.
kubectl apply -f https://raw.githubusercontent.com/flannel-io/flannel/master/Documentation/kube-flannel.yml -
After a minute or two, check the Pods in the
kube-flannelnamespace with the following command. You should see one Flannel Pod per node.kubectl get pods -n kube-flannel -
Check the node status again with the following command. The control-plane node should transition from NotReady → Ready once networking is up.
kubectl get nodes
At this point in your Kubernetes setup you have the following.
-
A working Kubernetes control plane initialized with kubeadm.
-
A CNI plugin (Flannel) installed and configured to provide Pod networking.
-
Functional Kubernetes networking, meaning Pods can communicate across nodes.
-
A cluster that is ready for worker nodes to join (next step).
This is a critical milestone in building your Kubernetes cluster. With the control plane operational and networking in place, you are prepared to expand the cluster by adding worker nodes, which will allow you to schedule and run workloads.
Step 10: Join Worker Nodes
Now that the control plane is ready, it’s time to add worker nodes to the cluster. Worker nodes are where your Pods (applications) actually run, and they connect back to the control plane to receive instructions.
When you ran kubeadm init on the control plane, it provided a join command at the end of the output. It looks something like below.
kubeadm join 192.168.1.50:6443 --token abcdef.0123456789abcdef --discovery-token-ca-cert-hash sha256:1234567890abcdef...
Run the join command on each worker node. Replace the IP address (192.168.1.50), token, and hash with the values generated on your setup.
This command contains three critical parts:
-
Control plane IP & port (6443): tells the worker where to connect.
-
Bootstrap token: a temporary secret to authenticate the node.
-
CA certificate hash: ensures the worker trusts the control plane.
This must be done on all worker nodes you want to add. Each worker will register itself with the control plane.
If you didn’t save the command, you can regenerate it anytime on the control plane by running the following command.
kubeadm token create --print-join-command
Step 11: Verify Everything is Running
Both the control plane and worker nodes are set up, let’s confirm that the cluster is healthy and ready to run workloads.
-
Verify worker nodes joined: Go to the control plane node and run the following command.
kubectl get nodesExpected output looks like:
-
The control plane node: Ready
-
Each worker node: Ready
This confirms that nodes are successfully registered and available for scheduling Pods.
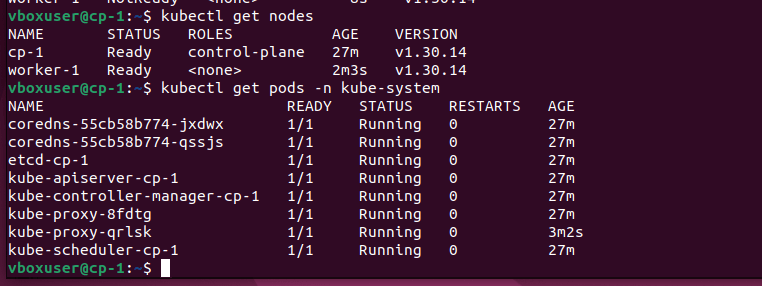
Figure 3. The confirmation that nodes are registered
-
-
Check system Pods: Kubernetes runs several core system Pods (DNS, networking, controllers). List them with the command below.
kubectl get pods -n kube-systemAll Pods should be in a Running or Completed state. Common system Pods you’ll see. If any are stuck in
CrashLoopBackOfforPending, check logs with the following command.kubectl logs <pod-name> -n kube-system -
Deploy a simple test application: To confirm that Pods can be scheduled on worker nodes, deploy a sample Nginx application with the commands below.
kubectl create deployment nginx --image=nginx
kubectl get pods
You should see an
nginxPod created and running on one of the worker nodes. -
Expose the Application: Expose Nginx as a service to access it externally with the commands below. The output will show the assigned NodePort (e.g., 31234).
kubectl expose deployment nginx --type=NodePort --port=80
kubectl get svc nginx -o wide -
Access Nginx from Browser / Host: Use the node’s IP and the NodePort in your browser.
http://192.168.1.8:31234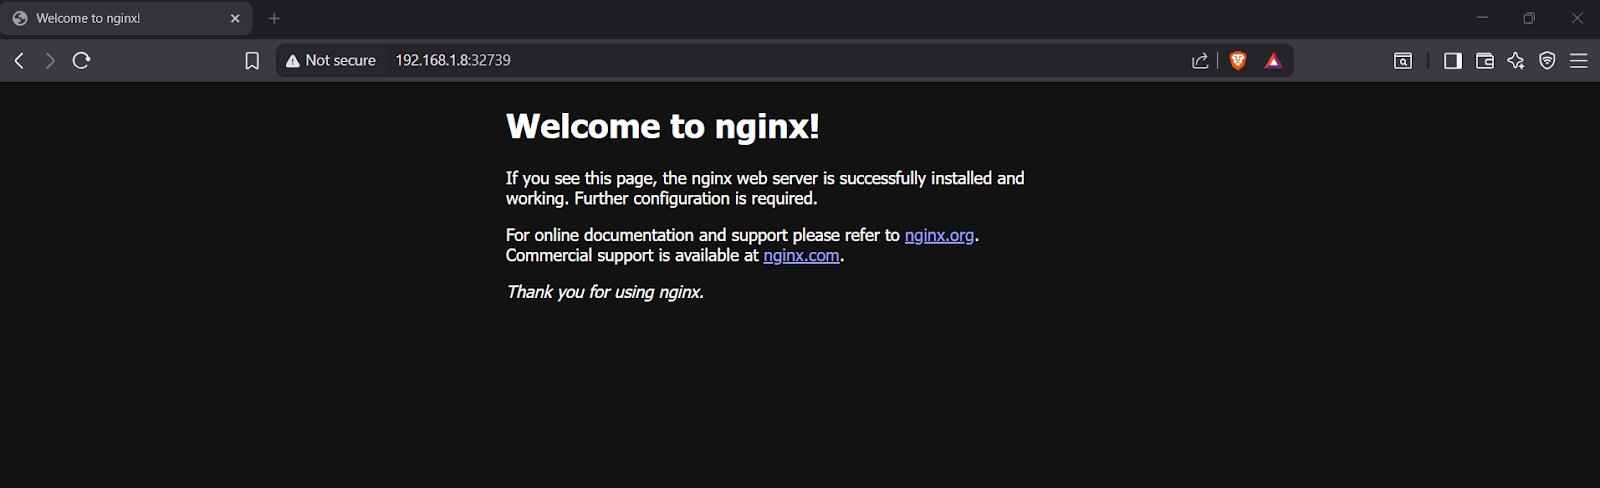
Figure 4. Access Nginx from Browser
-
Confirm Pod Placement: Finally, check where the Pod is running with the command below. This shows which worker node is hosting the Nginx Pod.
kubectl get pods -o wide
You now have a multi-node Kubernetes cluster on Ubuntu, ready for learning or testing workloads.
Why Install Kubernetes on Ubuntu?
When setting up Kubernetes, choosing the right operating system is just as important as configuring the cluster itself. Ubuntu is one of the most widely used Linux distributions in the world, and it has become a preferred choice for running Kubernetes.
First, Ubuntu’s popularity and wide compatibility make it an ideal base system. Most Kubernetes tutorials, documentation, and community examples are written with Ubuntu in mind, which makes troubleshooting and learning much easier for beginners and professionals alike.
Second, Ubuntu has strong community support and direct backing from Canonical (the company behind Ubuntu). Canonical works closely with the Kubernetes upstream community, ensuring that Ubuntu stays aligned with the latest Kubernetes releases and security patches. This means you get a reliable, well-maintained platform for your cluster.
Third, Ubuntu is known for its performance, security, and cloud-readiness. It provides a lightweight, efficient environment that runs well both on bare metal and in virtualized or cloud environments. Its built-in security updates and long-term support (LTS) versions make it a stable choice for production-grade Kubernetes clusters.
In summary, Ubuntu combines ease of use, community backing, and enterprise-grade stability, making it one of the best operating systems for installing and running Kubernetes.
What are the Prerequisites for Installing Kubernetes on Ubuntu?
Before setting up Kubernetes on Ubuntu, you need to make sure your system meets some hardware, software, and configuration requirements. These prerequisites help ensure that your cluster runs smoothly and avoids common issues during installation.
System Requirements
To install Kubernetes successfully, your system must meet some minimum hardware and operating system requirements. These ensure that each node has enough power and resources to run pods and manage workloads.
-
Operating System: Use Ubuntu 20.04 or 22.04 (64-bit). Kubernetes is tested and stable on these versions, so using them reduces compatibility problems.
-
CPU: At least 2 CPU cores are required per machine. The control plane node should have more resources because it manages the entire cluster.
-
Memory (RAM): Each node needs at least 2 GB of RAM. For the control plane, 4 GB or more is recommended so it can handle cluster management tasks.
-
Storage: A minimum of 20 GB free disk space per node is recommended to store container images, logs, and system files.
-
Network: All nodes must be connected over a reliable network. Each node should have a unique hostname, MAC address, and product_uuid so that Kubernetes can identify them correctly.
Software Requirements
In addition to hardware, certain software and configurations must be in place for Kubernetes to function correctly. These requirements make sure the cluster components can communicate and manage workloads without errors.
-
Container runtime: A container runtime is necessary to run containers inside pods. The recommended runtime is containerd, although Docker can still be used in some cases.
-
Swap disabled: Kubernetes requires swap to be turned off. Swap interferes with how the kubelet manages memory, so you must disable it permanently.
-
Time synchronization: Nodes must have synchronized clocks. Install and enable tools to avoid scheduling and certificate errors.
-
Firewall rules: Open the necessary ports, such as 6443 (API server), 10250 (kubelet), and others depending on your setup. Without this, nodes cannot communicate properly.
Which Kubernetes Tools Do I Need to Install First?
Before creating a Kubernetes cluster, you need to install a few essential tools that allow you to set up, manage, and interact with the cluster. These tools work together to initialize the control plane, keep the cluster running, and provide a way for you to communicate with it.
-
kubeadm: This is the official tool for bootstrapping Kubernetes clusters. It simplifies the process of initializing the control plane and joining worker nodes. Instead of configuring everything manually,
kubeadmhandles the setup and generates the commands you need to connect nodes. -
kubelet: This is the agent that runs on every node in the cluster. It communicates with the control plane and ensures that containers (Pods) are running as expected. Without
kubelet, the control plane cannot schedule or monitor workloads on the node. -
kubectl: This is the command-line interface (CLI) tool that you, as an administrator or developer, use to interact with the cluster. With
kubectl, you can deploy applications, check logs, scale Pods, and manage cluster resources.
The recommended way to install Kubernetes tools on Ubuntu is via the APT package manager. Run the following commands to install these tools.
-
Update system packages by running the next commands.
sudo apt-get update
sudo apt-get install -y apt-transport-https ca-certificates curl gpg -
Create the keyring directory by running the next commands.
sudo mkdir -p /etc/apt/keyrings -
Download and add the Kubernetes GPG key by running the next commands.
sudo curl -fsSL https://pkgs.k8s.io/core:/stable:/v1.30/deb/Release.key \
| sudo gpg --dearmor -o /etc/apt/keyrings/kubernetes-apt-keyring.gpg -
Add the Kubernetes APT repository by running the next commands.
echo "deb [signed-by=/etc/apt/keyrings/kubernetes-apt-keyring.gpg] \
https://pkgs.k8s.io/core:/stable:/v1.30/deb/ /" \
| sudo tee /etc/apt/sources.list.d/kubernetes.list -
Update package list by running the next commands.
sudo apt-get update -
Install Kubernetes components by running the next commands.
sudo apt-get install -y kubelet kubeadm kubectl -
Hold the versions to prevent unintended upgrades by running the next commands.
sudo apt-mark hold kubelet kubeadm kubectl
Alternatively, tools like Snap can be used, but APT is generally preferred because it stays closer to Kubernetes’ official release and is well-documented.
What do I do After Installing the Kubernetes Binaries?
Once you have successfully installed kubeadm, kubelet, and kubectl, the next step is to set up your Kubernetes cluster. This involves initializing the control plane, configuring access for your user, and enabling networking so Pods can communicate.
-
Initialize the Control Plane: Run the following command on your control-plane node to initialize Kubernetes. The
--pod-network-cidroption defines the IP address range for Pods. It is required by most CNI plugins (like Flannel).# Initialize the Kubernetes control plane with a pod network CIDR
sudo kubeadm init --pod-network-cidr=10.244.0.0/16 -
Configure
kubectlfor your use:. After initialization, you need to set upkubectlso the current user can interact with the cluster. Run the following command for configuration.This allows you to run
kubectl get nodes,kubectl get pods, and other commands without root access.-
Create a kubeconfig directory for your user by running the next commands.
mkdir -p $HOME/.kube -
Copy the admin.conf file to your user directory by running the next commands.
sudo cp -i /etc/kubernetes/admin.conf $HOME/.kube/config -
Adjust file ownership by running the next commands.
sudo chown $(id -u):$(id -g) $HOME/.kube/config
-
-
Install a CNI Plugin (Networking): Kubernetes requires a Container Network Interface (CNI) plugin so Pods can communicate across nodes. Run following commands to install Flannel. Without a CNI plugin, Pods will stay in a
Pendingstate.kubectl apply -f https://raw.githubusercontent.com/flannel-io/flannel/master/Documentation/kube-flannel.yml
Can I Deploy a Test Application to Test the Cluster?
Yes, once your Kubernetes control plane and worker nodes are up and running, you can deploy a simple test application to verify that the cluster is working correctly. This step ensures that Pods are scheduled properly and networking between nodes functions as expected. Run the following commands to deploy a test application.
-
Create a namespace with the following command.(Optional but Recommended). Namespaces help organize workloads in Kubernetes.
# Create a namespace called 'test'
kubectl create namespace test -
Deploy a sample application (Nginx). We’ll use the Nginx image since it’s lightweight and widely available. Use the following command.
# Deploy an Nginx Pod inside the 'test' namespace
kubectl create deployment nginx --image=nginx -n test
Check the status of the Pod with the command below. You should see an nginx Pod in the
Runningstate.kubectl get pods -n test -
Expose the application. To make the Nginx deployment accessible outside the cluster, expose it as a NodePort service with the command below.
kubectl expose deployment nginx --type=NodePort --port=80 -n testCheck the service with the following command. You will see a
NodePortassigned (e.g., 30080) along with the service details.kubectl get svc -n test -
Verify access. Use the worker node’s IP and the NodePort to access the application in your browser. If successful, you’ll see the default Nginx welcome page, confirming that your cluster is functional.
http://<Worker-Node-IP>:<NodePort>
Can I Set Up High Availability for the Control Plane?
Yes, you can set up High Availability (HA) for the Kubernetes control plane to eliminate single points of failure. In production environments, HA ensures that your cluster continues working even if one of the control plane nodes crashes or becomes unreachable.
-
Multiple Control Plane Nodes with a Load Balancer: To achieve HA, Kubernetes relies on running several control plane nodes instead of just one. These nodes are fronted by a load balancer, which distributes incoming traffic across them and provides a stable endpoint for clients to connect to.
-
Deploy two or more control plane nodes.
-
Place a load balancer in front of the nodes.
-
Use the load balancer DNS or IP in
kubeadmwith the--control-plane-endpointflag.
-
-
Shared etcd Cluster and Certificate Distribution: A highly available control plane also requires a resilient etcd cluster, since etcd stores all Kubernetes state data. Additionally, certificates and kubeconfig files must be consistently shared across all control plane nodes.
-
Configure multi-node etcd for redundancy.
-
Use kubeadm to upload and distribute certificates with the following command.
kubeadm init phase upload-certs --upload-certs -
Ensure all control plane nodes have the correct configuration files.
-
-
Control Plane Initialization with kubeadm: The setup process begins on the first control plane node, where you initialize the cluster with HA support. Then, additional control plane nodes can join using the proper flags and certificate key.
-
On the first node, initialize with the following command.
sudo kubeadm init --control-plane-endpoint "LOAD_BALANCER_DNS:6443" --upload-certs -
On subsequent nodes, join with the following command.
sudo kubeadm join LOAD_BALANCER_DNS:6443 --token <token> \
--discovery-token-ca-cert-hash sha256:<hash> \
--control-plane --certificate-key <certificate-key>
Setting up HA for Kubernetes requires multiple control plane nodes, a load balancer for traffic distribution, a multi-node etcd cluster, and proper certificate sharing. With
kubeadm, you can easily bootstrap and expand the HA control plane. -
Can I Upgrade My Kubernetes Cluster Later?
Yes, Kubernetes clusters can be upgraded later to newer versions. Upgrades are an essential part of cluster lifecycle management, ensuring you get the latest features, performance improvements, and security patches. The process is typically managed with kubeadm, which provides a step-by-step way to upgrade both the control plane and worker nodes.
-
Check available versions with kubeadm: Before upgrading, you should always check which versions are available. This ensures compatibility and avoids unexpected issues. Run the following command.
This command shows the current cluster version, available upgrade versions, and recommendations for upgrading.
sudo kubeadm upgrade plan -
Upgrade the Control Plane: The upgrade process starts with the control plane node(s). Run the following command. After this step, the API server and other control plane components are updated.
# Upgrade kubeadm itself
sudo apt-get update && sudo apt-get install -y kubeadm
# Apply the upgrade
sudo kubeadm upgrade apply v1.31.0 # Example: upgrade to v1.31 -
Upgrade Worker Nodes: Once the control plane is upgraded, proceed with the worker nodes. Run the following commands. This ensures kubelet and kube-proxy are updated correctly on each worker node.
# Upgrade kubeadm on worker node
sudo apt-get update && sudo apt-get install -y kubeadm
# Join node upgrade
sudo kubeadm upgrade node -
Update kubelet and kubectl: On all nodes (control plane and workers), you also need to upgrade
kubeletandkubectlwith the commands below.sudo apt-get install -y kubelet kubectl
sudo systemctl daemon-reload
sudo systemctl restart kubelet
Upgrading a Kubernetes cluster with kubeadm involves four main steps: (1) check available versions, (2) upgrade the control plane, (3) upgrade worker nodes, and (4) update kubelet and kubectl on every node. By following these steps, you can keep your cluster secure, stable, and up to date.
What are Common Kubernetes Troubleshooting Steps on Ubuntu?
When running Kubernetes on Ubuntu, you may encounter issues related to networking, nodes, pods, or cluster configuration. Troubleshooting effectively requires checking both the cluster state and the underlying system. Below are the most common troubleshooting steps that every beginner and advanced user should know.
-
Check node status: Ensure that all nodes are registered and in a Ready state with the command below.
kubectl get nodesIf a node is not ready, verify kubelet logs with the following commands.
sudo journalctl -u kubelet -f -
Inspect pod health: Check if pods are running and look at their events with command below.
kubectl get pods -A kubectl describe pod <pod-name> -n <namespace>If a pod is stuck in
CrashLoopBackOfforPending, logs can provide more details. Run the following command.kubectl logs <pod-name> -n <namespace> -
Verify container runtime: A common error comes from the container runtime (e.g., containerd). Check its status with the command below.
sudo systemctl status containerd
sudo ctr version -
Review network configuration: Kubernetes requires a working CNI plugin (like Flannel, Calico). If pods cannot communicate, verify with the command below. Look for CNI pods (flannel/calico) and ensure they are running.
kubectl get pods -n kube-system -
Restart core services: Sometimes restarting critical services resolves transient issues. Run the following commands to restart.
sudo systemctl restart kubelet
sudo systemctl restart containerd -
Examine cluster events: Kubernetes events can quickly reveal misconfigurations. Use command below.
kubectl get events --sort-by=.metadata.creationTimestamp -
Validate configuration files: If errors persist, check kubeadm and kubelet config files with these commands
cat /etc/kubernetes/kubelet.conf
cat /etc/kubernetes/manifests/kube-apiserver.yaml
Can I Set Up Monitoring and Logging After Installation?
Yes, you can (and should). Once your Kubernetes cluster is up and running, monitoring and logging are essential to ensure stability, performance, and security. Without them, it becomes very hard to detect issues, debug applications, or optimize resources.
Here’s how you can approach monitoring and logging after installation.
-
Monitoring the Cluster: Monitoring helps track metrics such as CPU, memory, disk usage, and pod health. The most popular tools are shared below.
-
Prometheus: Collects and stores time-series data (metrics) from the cluster.
-
Grafana: Provides dashboards to visualize Prometheus metrics in a user-friendly way.
-
-
Logging the Cluster: Logs allow you to analyze system and application behavior. Some recommended solutions are shared below.
-
Fluentd: A flexible log collector that can forward logs to various storage backends.
-
EFK Stack (Elasticsearch, Fluentd, Kibana): Widely used for centralized log management.
-
Loki + Grafana: Lightweight alternative to EFK, integrates logs directly into Grafana dashboards.
-
-
Visual Cluster Insights: Besides raw metrics and logs, you can also use visual tools for better cluster management.
-
Lens: A desktop Kubernetes IDE that shows real-time pod health, logs, and cluster metrics.
-
K9: A terminal-based UI to navigate resources interactively.
-
Conclusion
Installing Kubernetes on Ubuntu may seem complex at first, but by following a structured, step-by-step approach, you can set up a fully functional cluster with ease. In this guide, we prepared the system, installed core dependencies, disabled swap, configured networking, and deployed Kubernetes components with kubeadm, kubelet, and kubectl. We also covered how to join worker nodes, verify the installation, deploy a test application, and explore options for high availability, upgrades, and monitoring.
Ubuntu stands out as a reliable, community-driven operating system that integrates smoothly with Kubernetes, making it one of the best platforms for both beginners and production-grade deployments.
By completing this setup, you now have a multi-node Kubernetes cluster ready for real-world workloads. From here, you can explore advanced topics like scaling, high availability, persistent storage, monitoring, and logging to build a resilient and production-ready environment.