How to Dual Boot Linux and Windows
Dual booting is a setup strategy that allows a single computer to host and run two separate operating systems, such as Windows and Linux. Instead of using virtual machines, each OS is installed on its own partition, allowing direct access to the hardware and full performance. It’s ideal for users who want to take advantage of both systems, for example, using Windows for gaming or office tools and Linux for development, privacy, or learning purposes.
In this beginner-friendly guide, you'll learn the following topics.
- What dual booting is and how it works
- What you need before setting up a dual boot
- Which Linux distributions are best for dual-booting
- How to prepare your computer for installation
- Step-by-step instructions to install Ubuntu alongside Windows
- How to troubleshoot common issues
- Tips to optimize performance in a dual-boot setup
- How to remove Windows or switch fully to Linux (if desired)
Whether you're a curious beginner or an aspiring developer, this guide will help you get started with dual-booting confidently and without confusion.

1. Back Up Your Data
Always back up your personal files (documents, photos, etc.) to an external drive or cloud service. While dual-booting is safe, it's best to protect your data just in case something goes wrong.
2. Create Free Space for Linux
You’ll need unallocated space on your hard drive to install Ubuntu. You may create free space on your Windows for Linux by following the next steps.
-
Open Disk Management on Windows.

Figure 1. Disk Management
-
Right-click your main partition (usually C:).
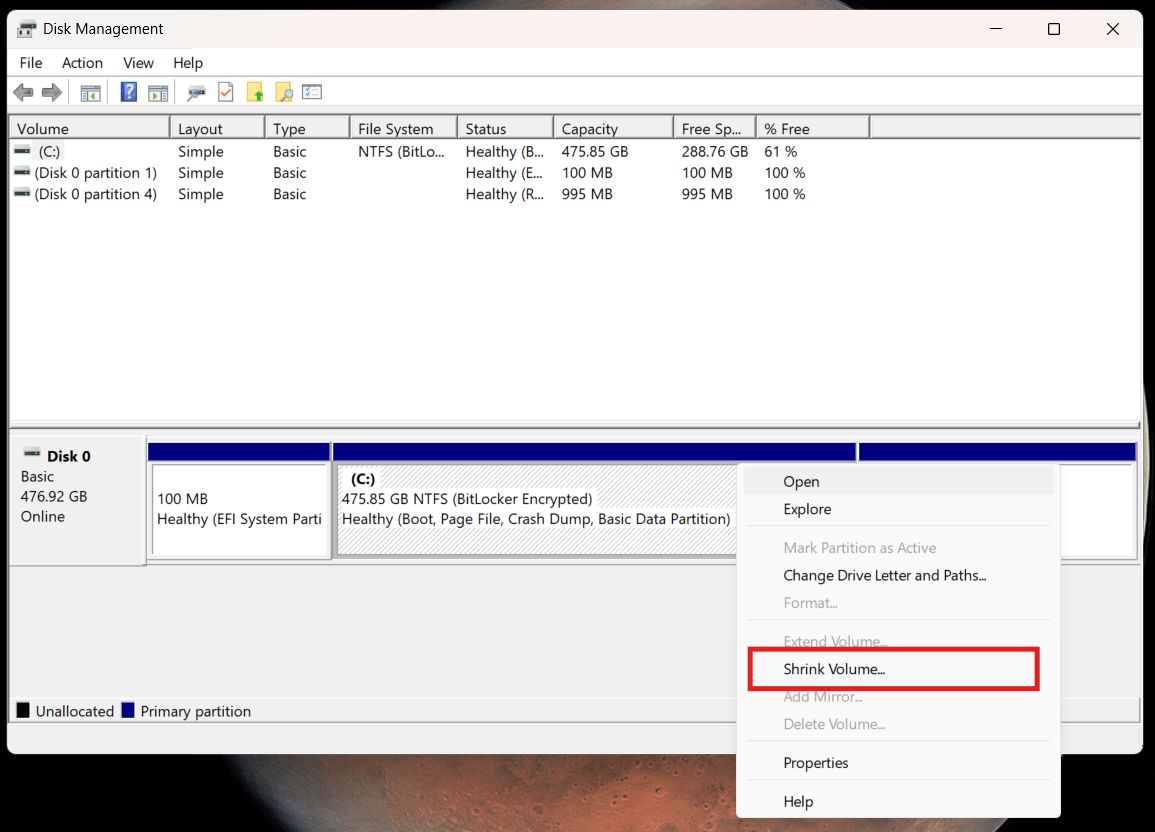
Figure 2. Shrinking Volume
-
Select "Shrink Volume" and shrink it by at least 20 GB (or more if you want).
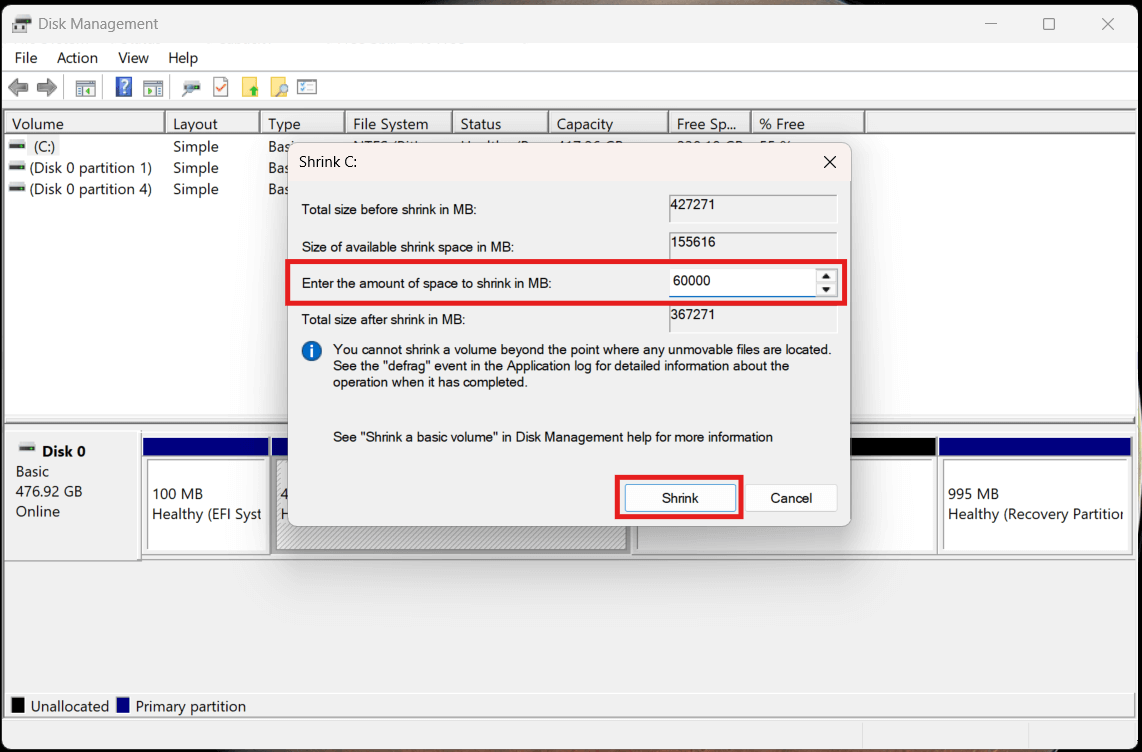
Figure 3. Specifying the Amount of Space for Ubuntu
This space will be used for the Ubuntu installation.
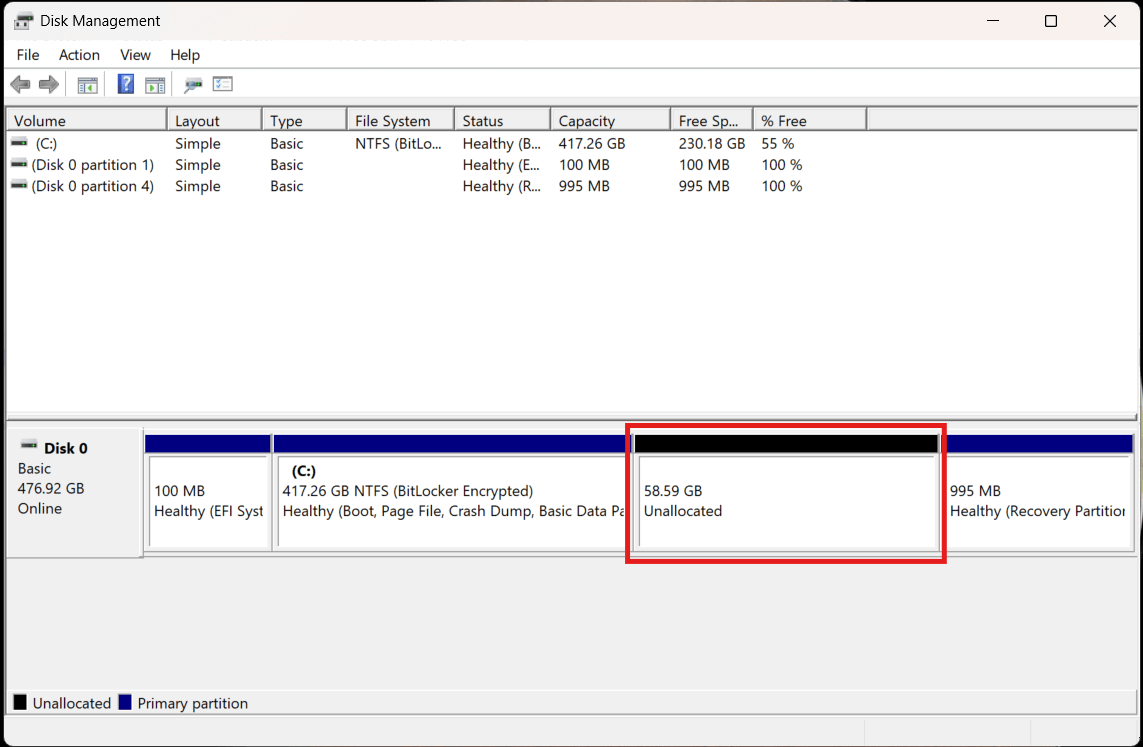
Figure 4. The Space for Ubuntu
3. Download Linux ISO File
You may go to the official Ubuntu website (https://ubuntu.com/download/desktop) and download the latest version of Ubuntu as an .iso file.
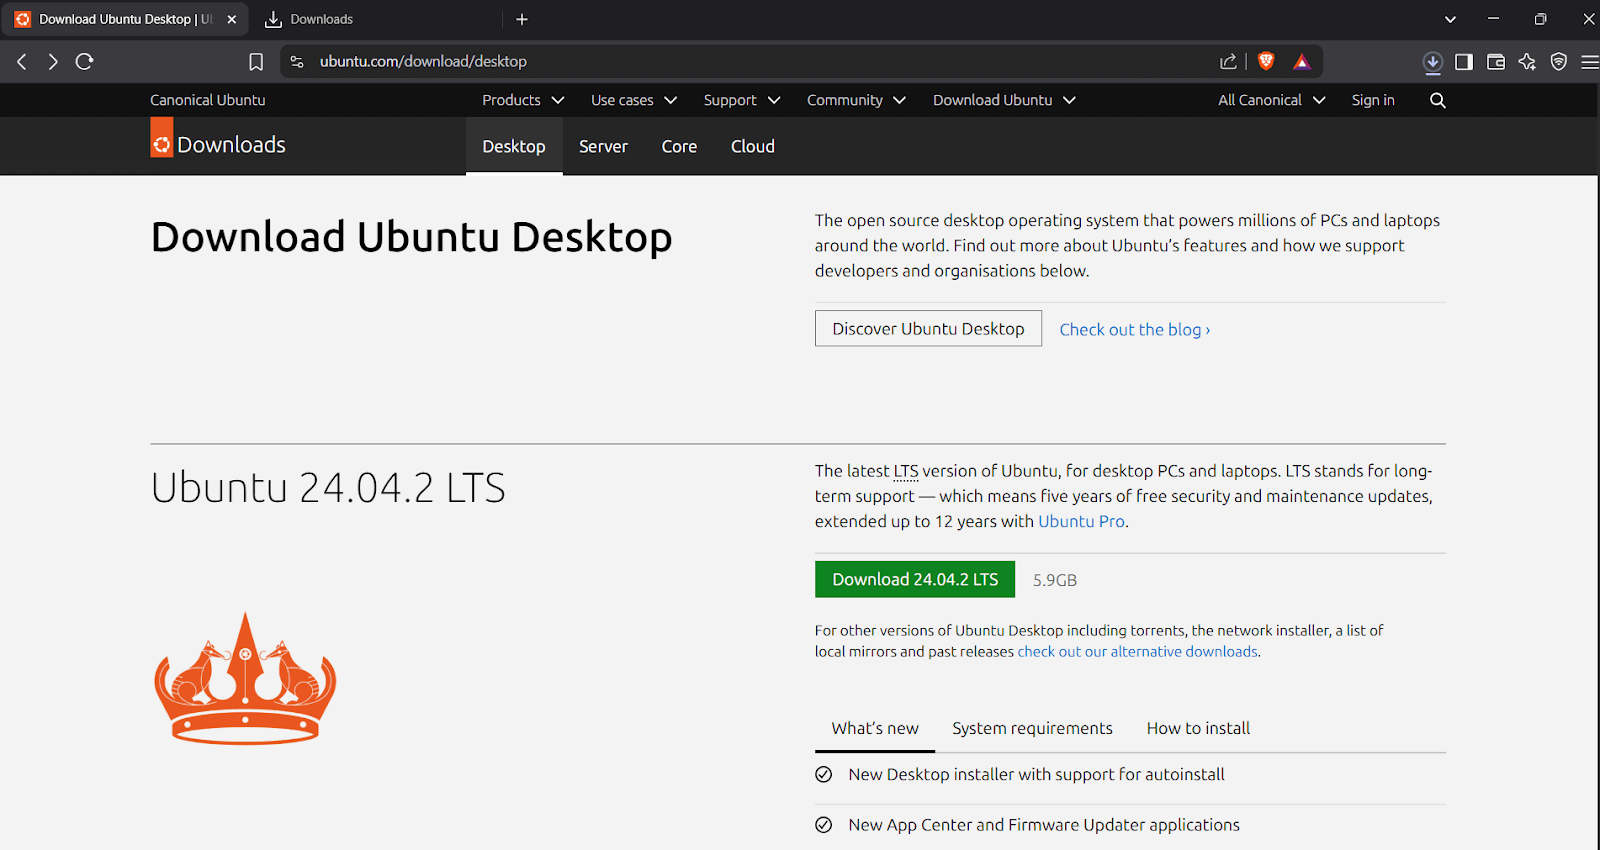
Figure 5. Download Ubuntu Desktop
4. Create a Bootable USB Drive
Use a tool like Rufus (on Windows) to create a bootable USB from the Ubuntu ISO file by following the next steps:
-
Insert your USB drive (at least 4 GB).
-
Open the Rufus application.
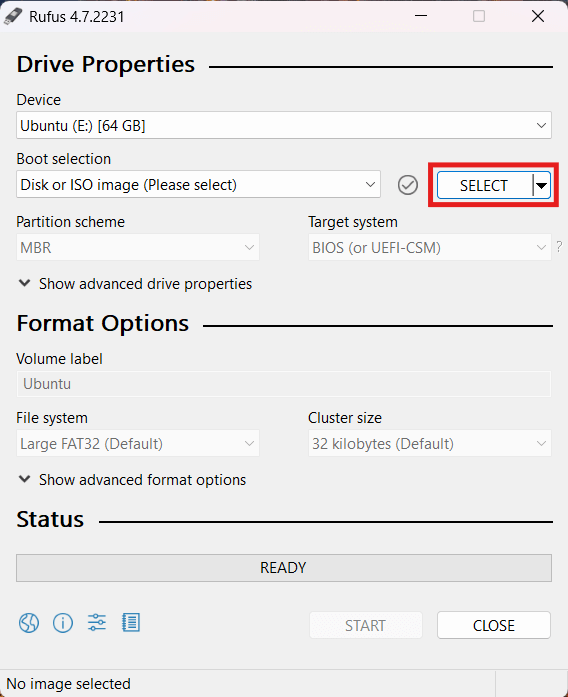
Figure 6. Rufus Interface with USB Selected
-
Select the ISO file and browse to your Ubuntu ISO file. Then click Open.
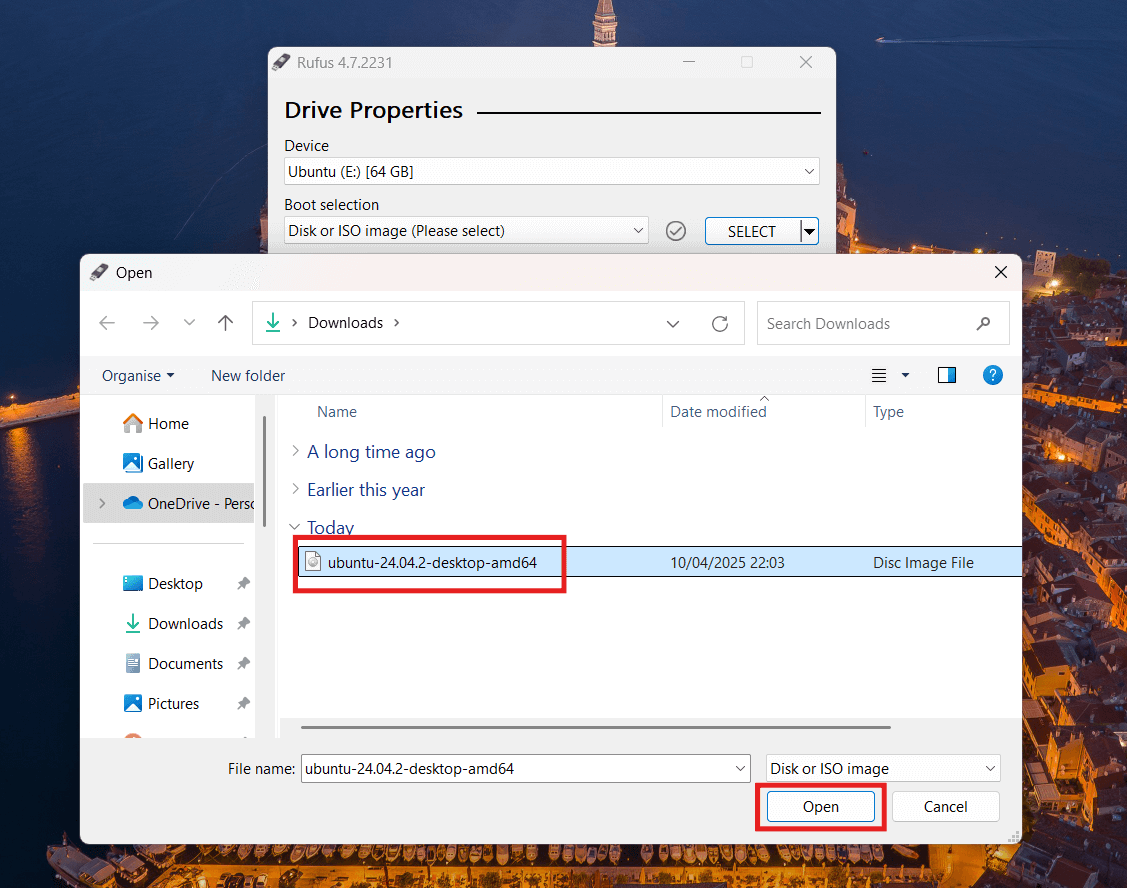
Figure 7. Select the ISO File
-
Once the ISO is loaded, Rufus may ask how to write the image. Select “Write in ISO Image mode (Recommended)” and click OK to continue.
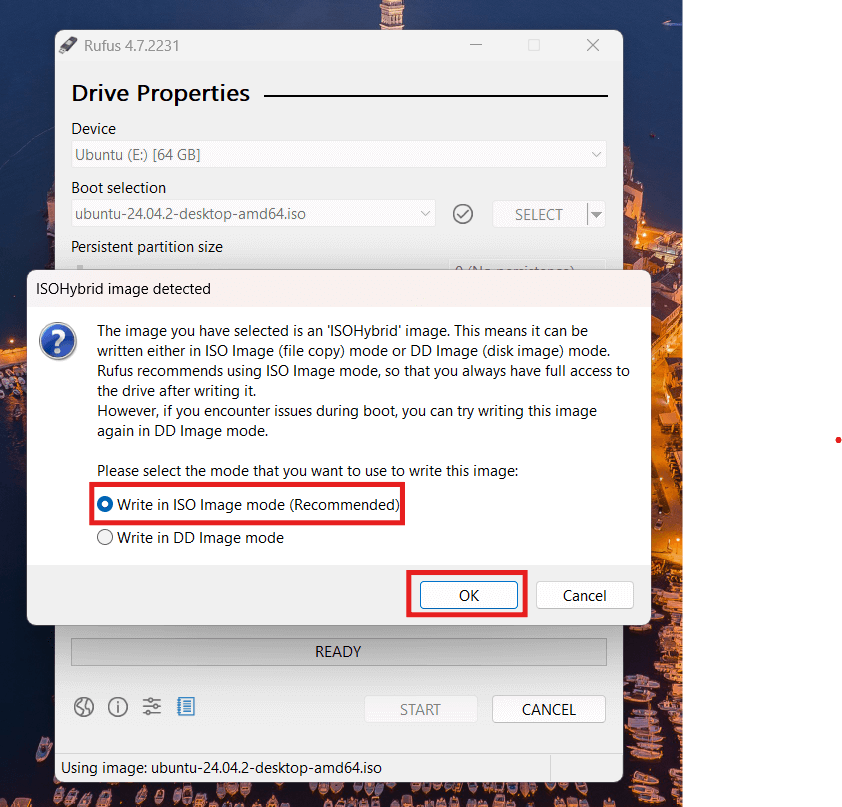
Figure 8. Write in ISO Image Mode
-
Rufus will warn you that all data on the USB will be erased. If you're sure the drive is safe to format, click OK
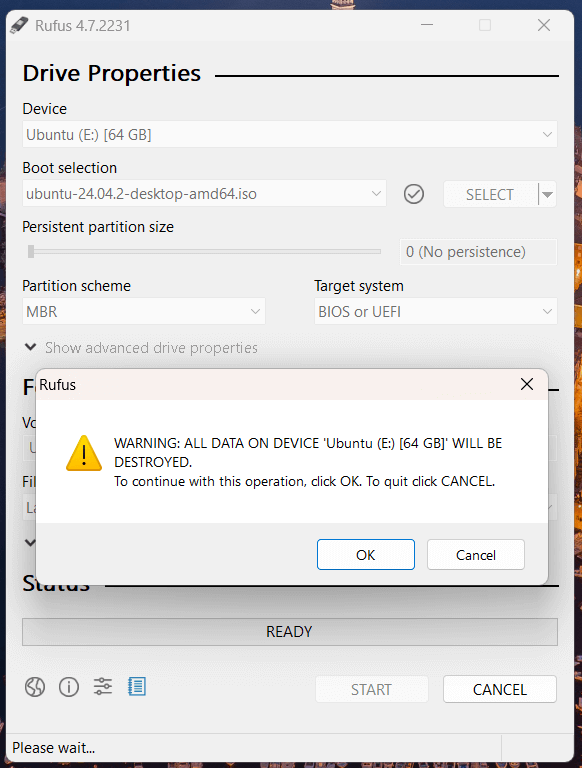
Figure 9. Warning
-
After confirming, click the Start button to begin writing the ISO file to the USB stick. The process may take a few minutes. When finished, you’ll have a bootable Ubuntu USB ready to use.
5. Disable Fast Startup (Windows Setting)
Fast Startup can cause issues with dual-booting. To disable fast startup on Windows, you may follow the next steps:
-
Go to Control Panel > Power Options > Choose what the power buttons do.
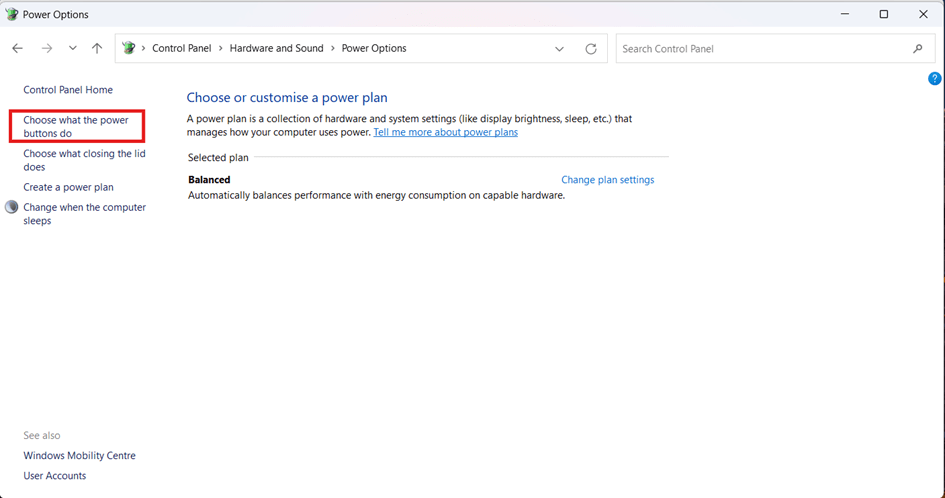
Figure 10. Power Options
-
Click Change settings that are currently unavailable
-
Uncheck "Turn on fast startup" and save.
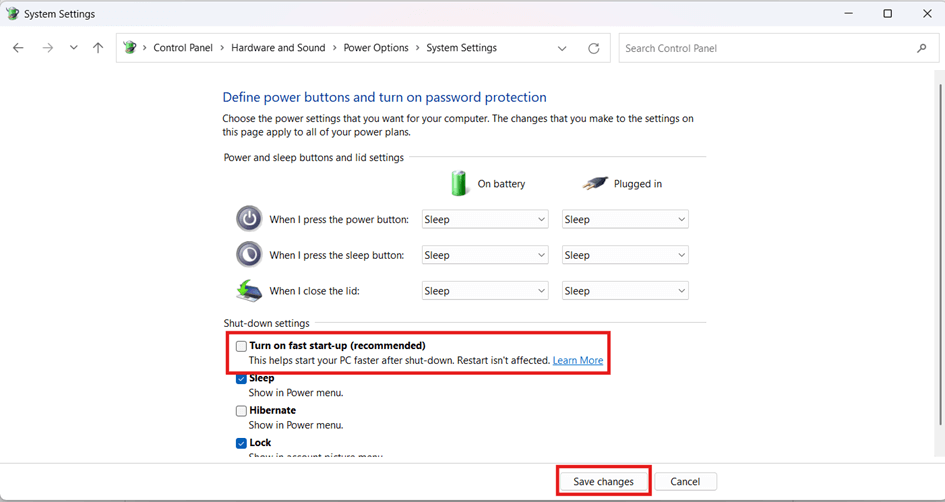
Figure 11. Uncheck "Turn on fast startup"
6. Disable Secure Boot (BIOS Setting)
Some systems require disabling Secure Boot to allow Ubuntu to load. Secure Boot can block non-Windows bootloaders, including Ubuntu, from loading. To turn it off safely, you may follow the next steps:
-
From Windows, hold the Shift key while clicking Restart for access Advanced Startup Options in Windows. This will take you to the Choose an option screen.
-
Select Troubleshoot to access advanced recovery settings.

Figure 12. Selecting “Troubleshoot” to Access Recovery and Firmware Settings.
-
Click Advanced options, then select UEFI Firmware Settings. This will restart your PC and take you directly to the BIOS (UEFI setup).

Figure 13. Selecting “Advanced Options”
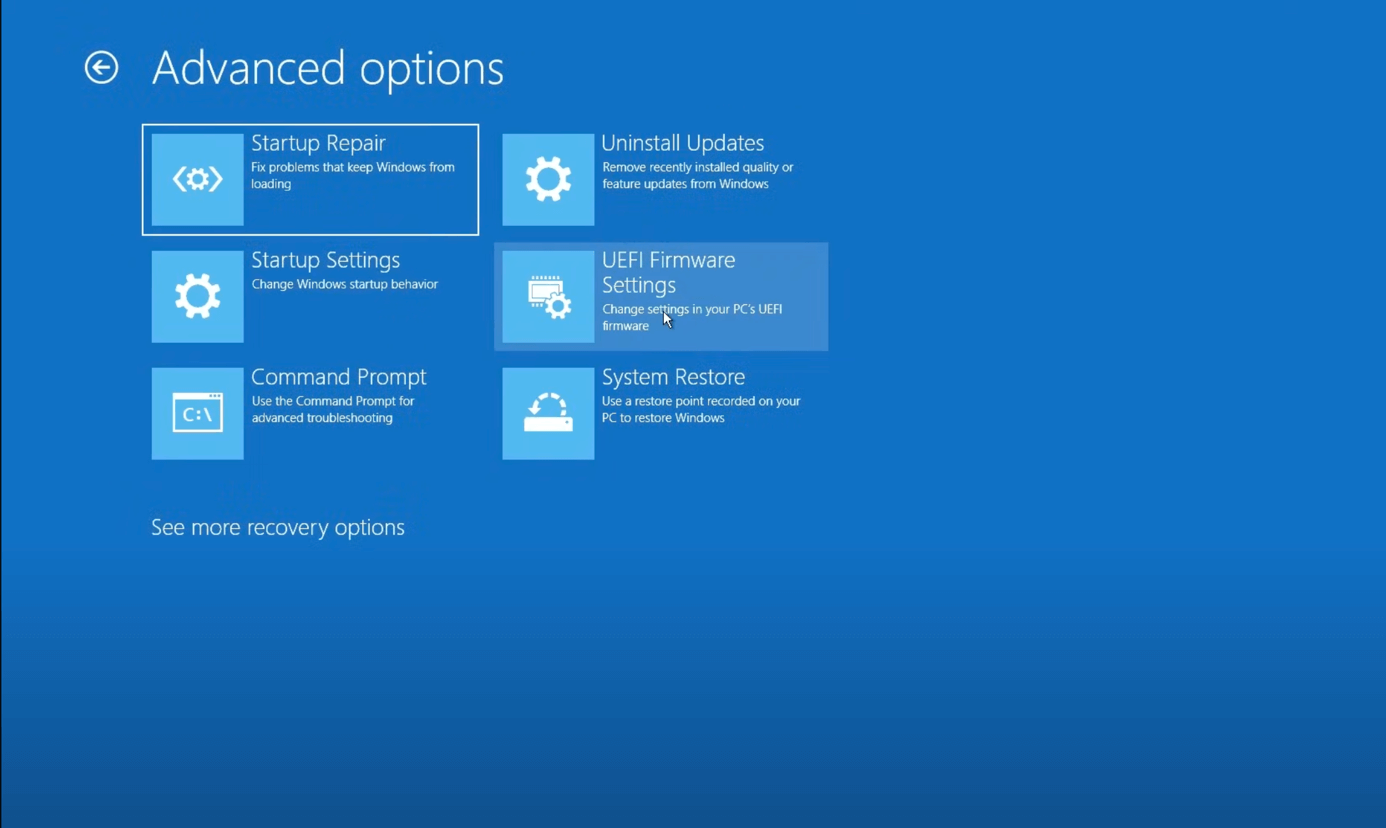
Figure 14. Choosing “UEFI Firmware Settings”
-
Once in the BIOS, use the → (right arrow) key to go to the Security tab. Scroll down and select Secure Boot.
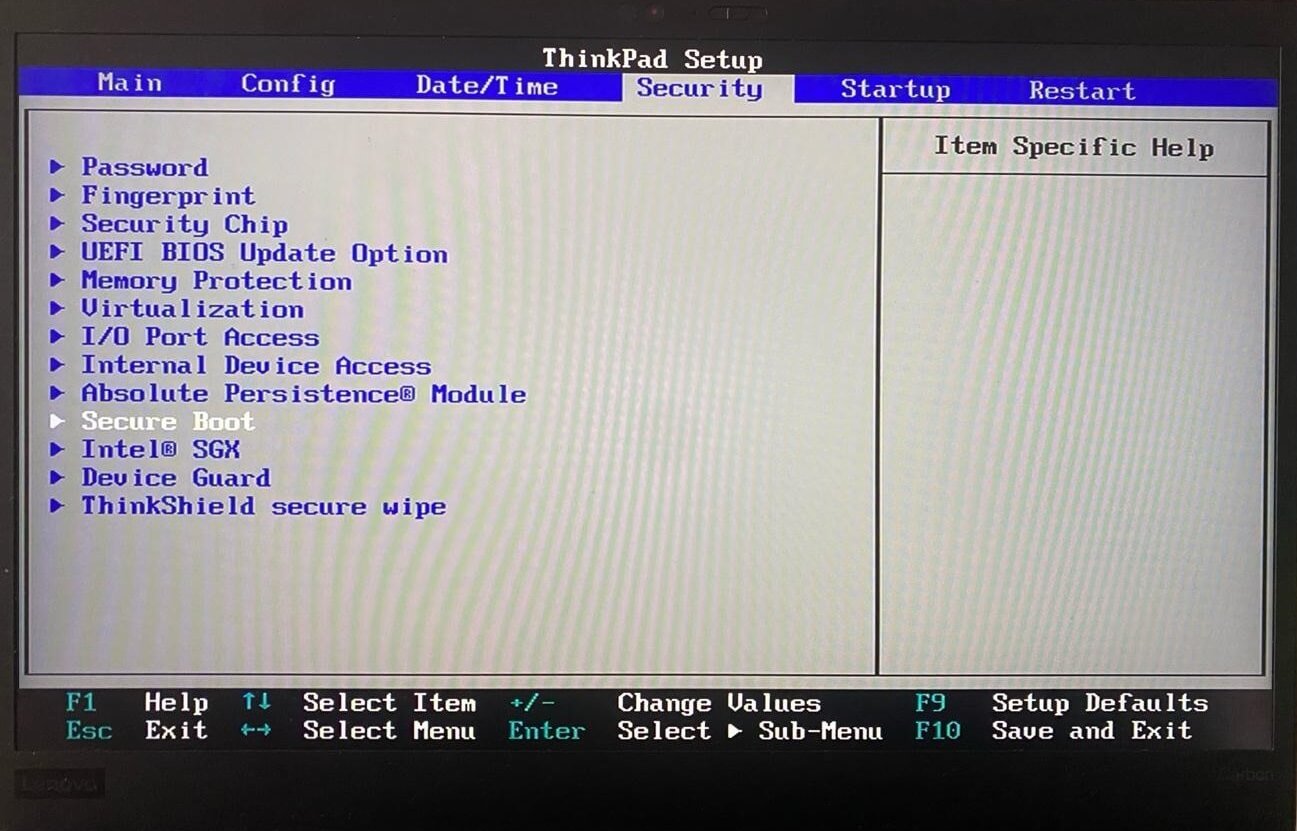
Figure 15. Security Tab
-
Press Enter on Secure Boot to open its configuration screen.
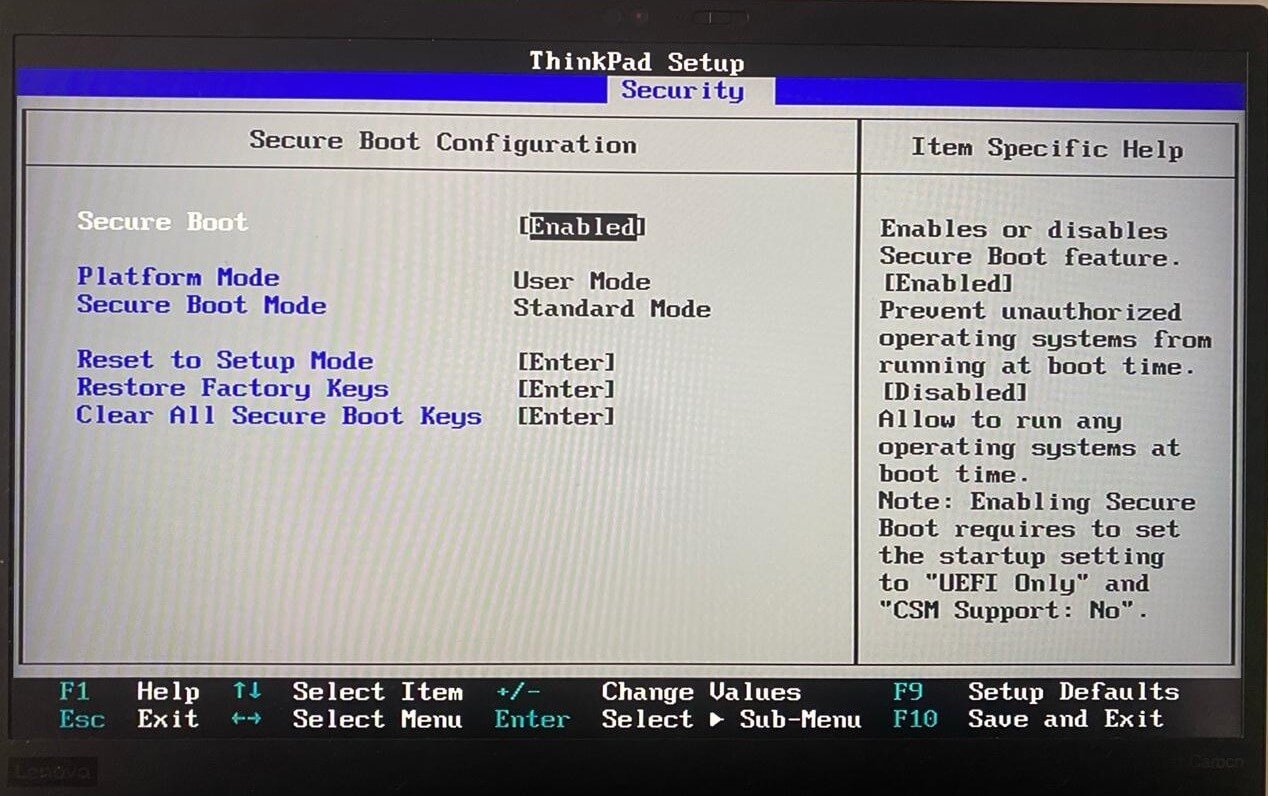
Figure 16. Secure Boot Configuration
-
Select the Secure Boot option. Press Enter and choose [Disabled].
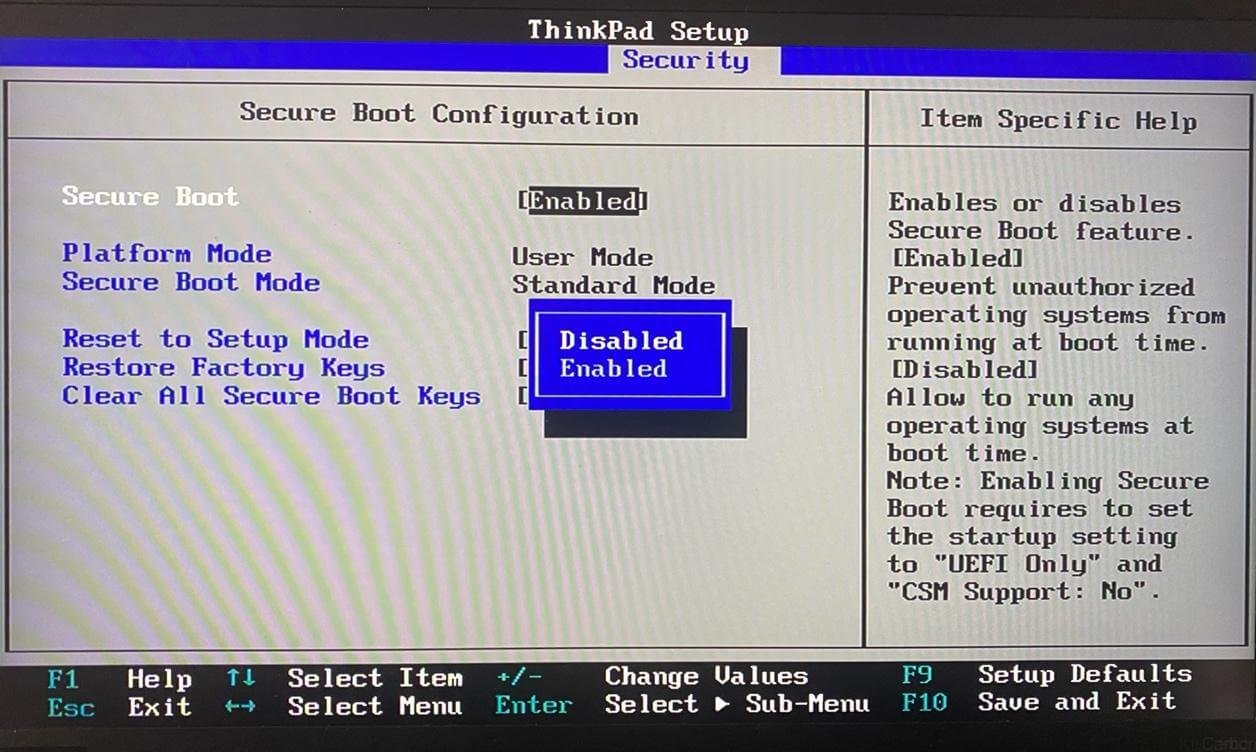
Figure 17. Disabling Secure Boot
-
Press F10 to save and exit. Confirm by selecting Yes.
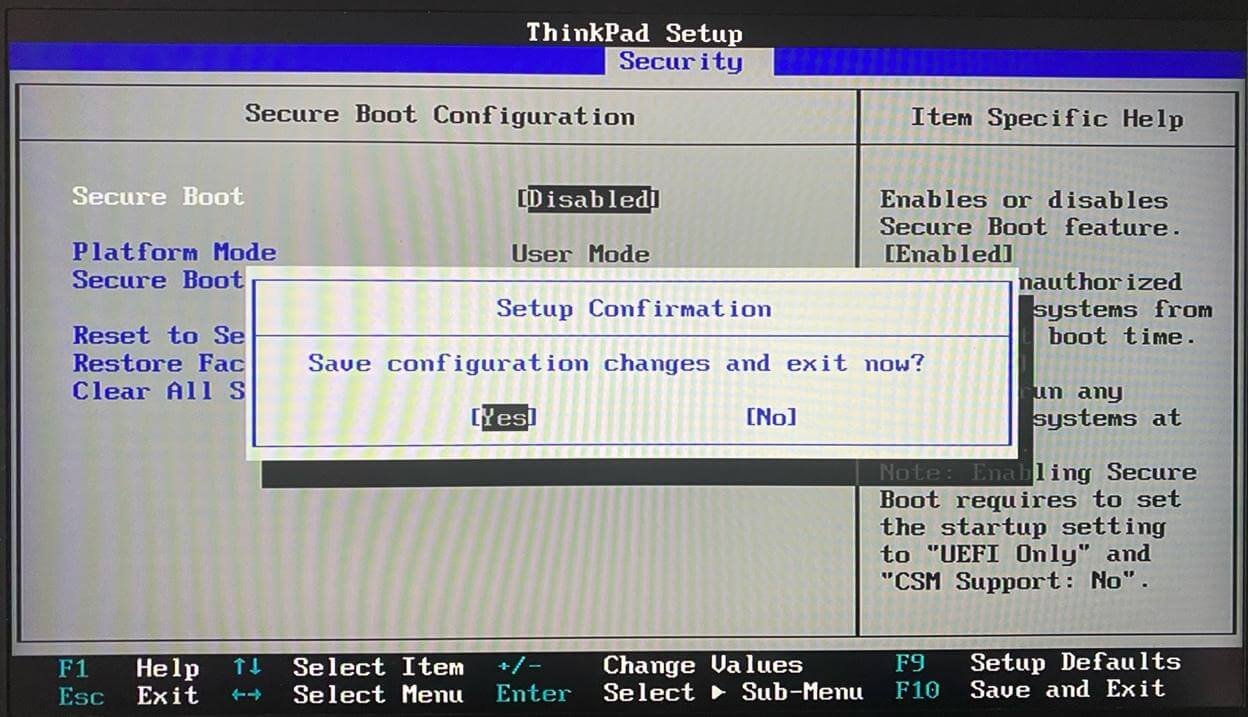
Figure 18. Confirmation Screen
Once all these steps are complete, you're ready to install Ubuntu alongside Windows!
7. Install Linux Alongside Windows (Step-by-Step)
Now that your system is ready, it's time to install Linux. Follow these steps carefully on Ubuntu Linux.
Step 1: Boot from the Ubuntu USB
In order to begin installing Ubuntu, your computer must boot from the USB device that contains the installer. Here’s how to start the process safely:
-
Insert the bootable USB drive into your computer.
-
With Windows running, hold the Shift key and click Restart
-
On the "Choose an option" screen, select Use a device
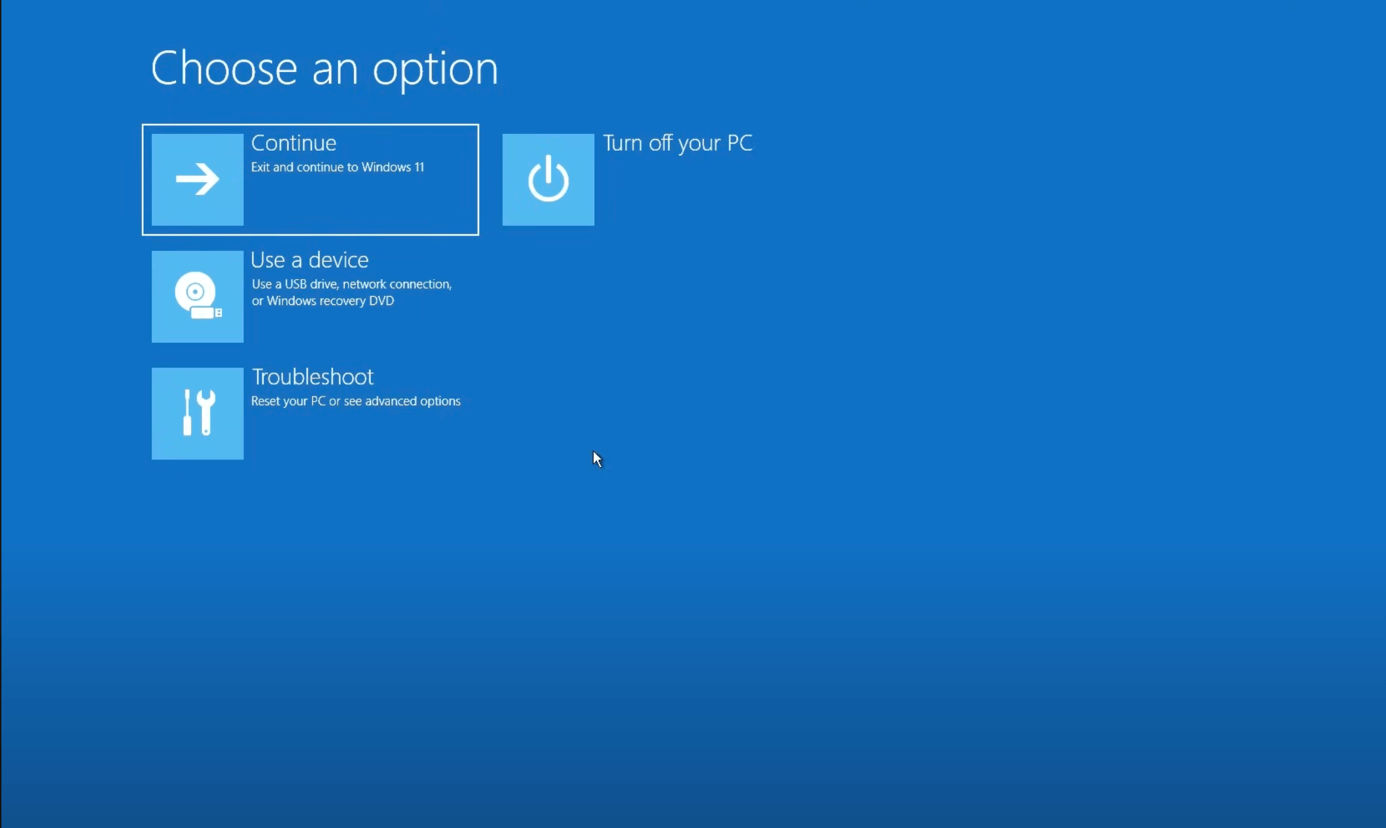
Figure 19. Use a Device
-
Choose your USB drive from the list.
-
Your computer will reboot and start from the Ubuntu USB.
You’ll see the Ubuntu loading screen in a few seconds.
Step 2: Choose Your Language and Keyboard Layout
Select your preferred language and keyboard layout (usually Ubuntu detects this automatically).
Click Next.
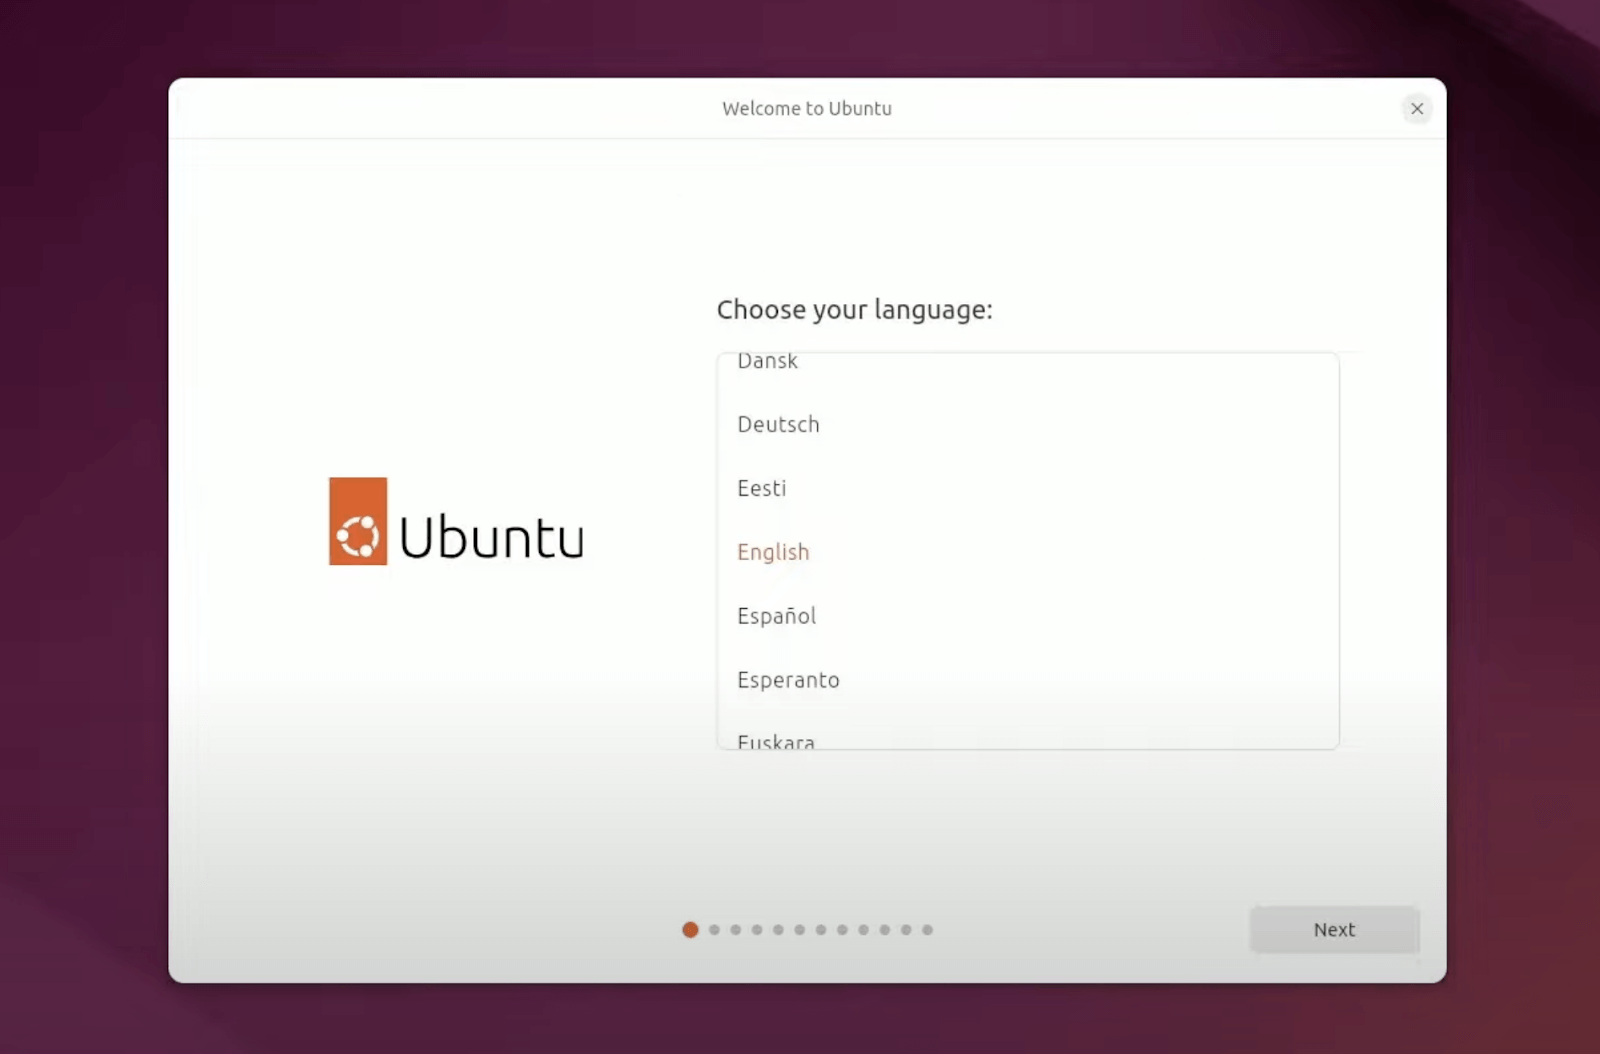
Figure 20. Choosing Language
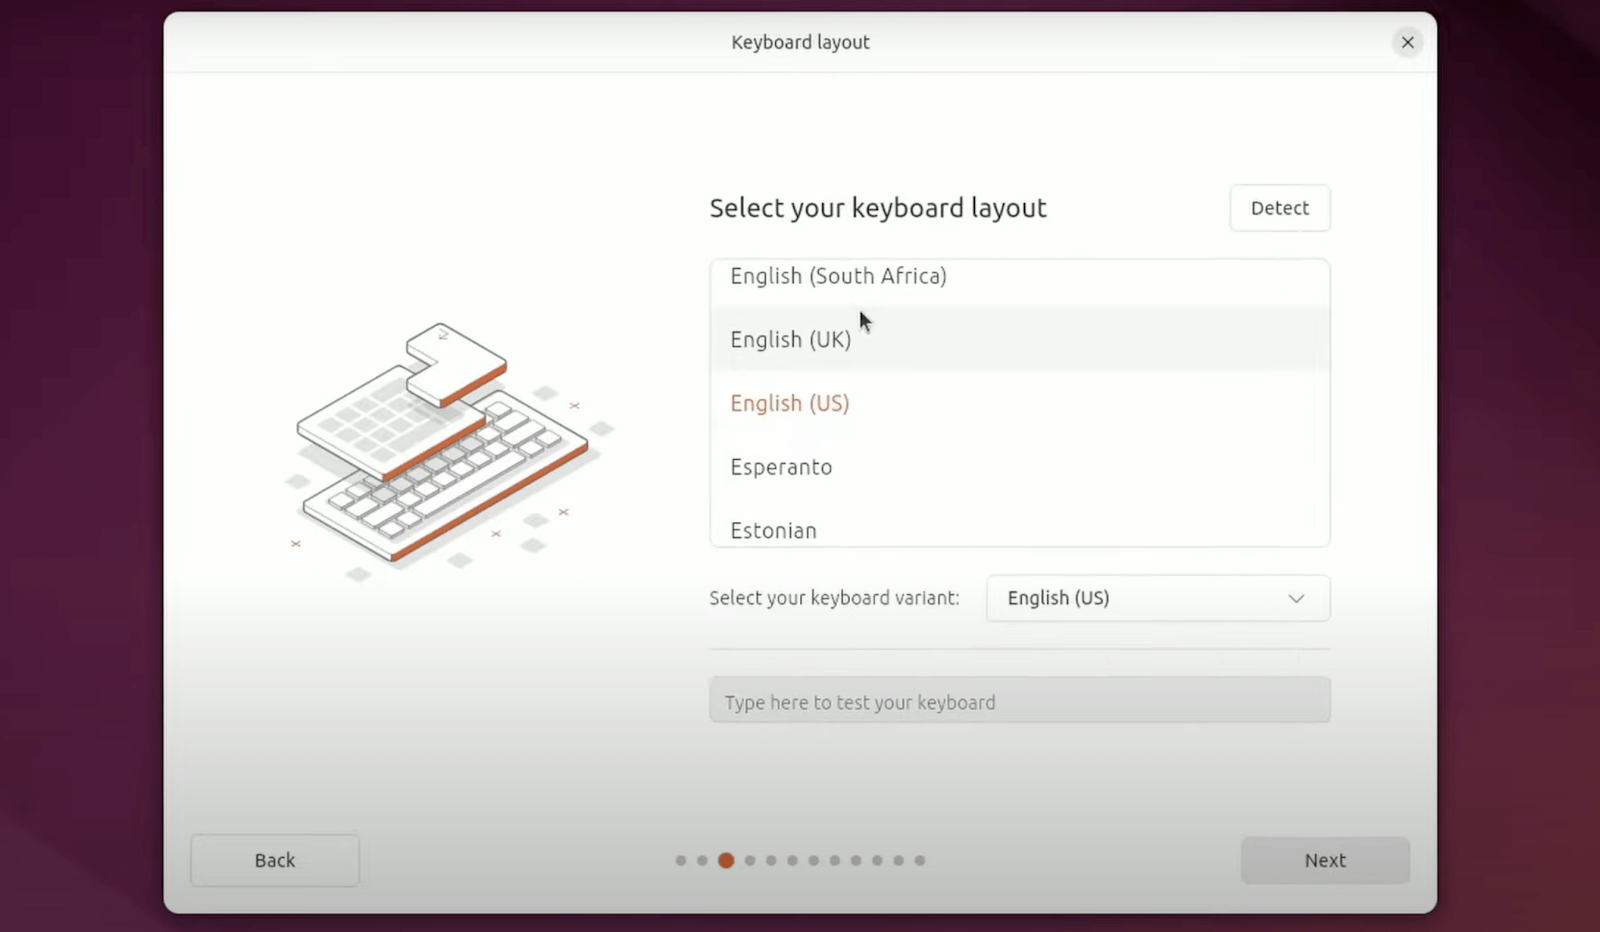
Figure 21. Selecting Keyboard Layout
Step 3: Connect to Wi-Fi
If you’re using a laptop, you can choose a Wi-Fi network now, or skip this step and connect later.
Step 4: Choose Installation Type
Ubuntu may ask how you would like to install it:
- Interactive installation: Step-by-step guided install
- Automated installation: Requires pre-configured YAML (advanced)
Select Interactive installation and click Next.
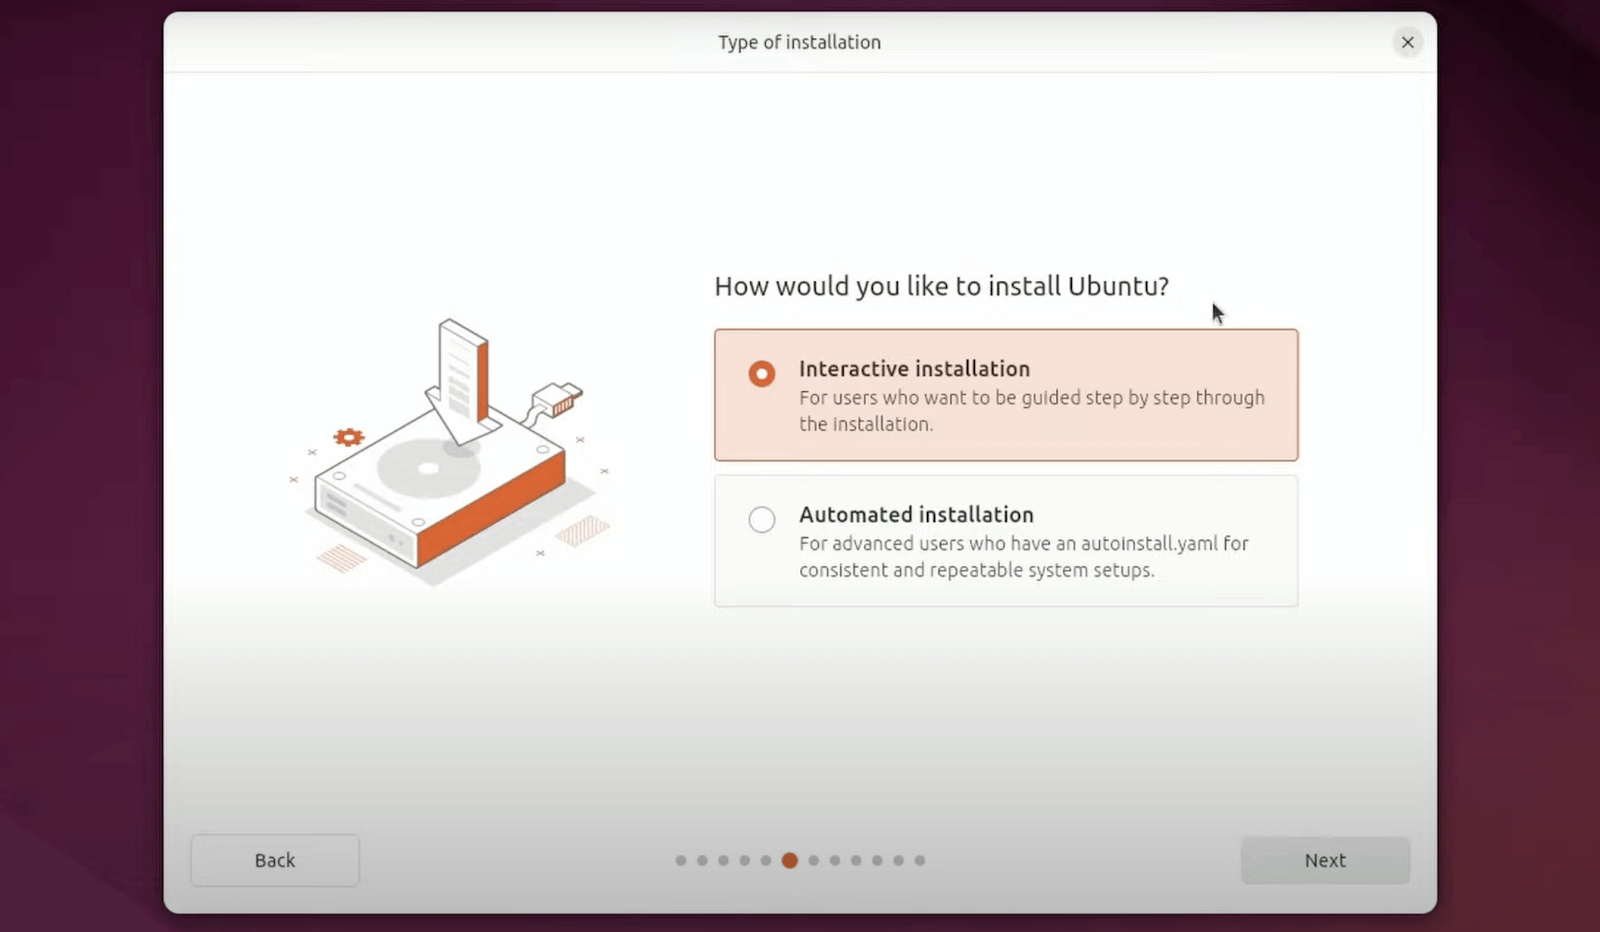
Figure 22. Type of Installation
Step 5: Application Selection
Ubuntu will ask what apps you want to install:
- Default selection: Essentials like browser and utilities.
- Extended selection: Includes offline office tools.
Choose Default selection for a lighter install.
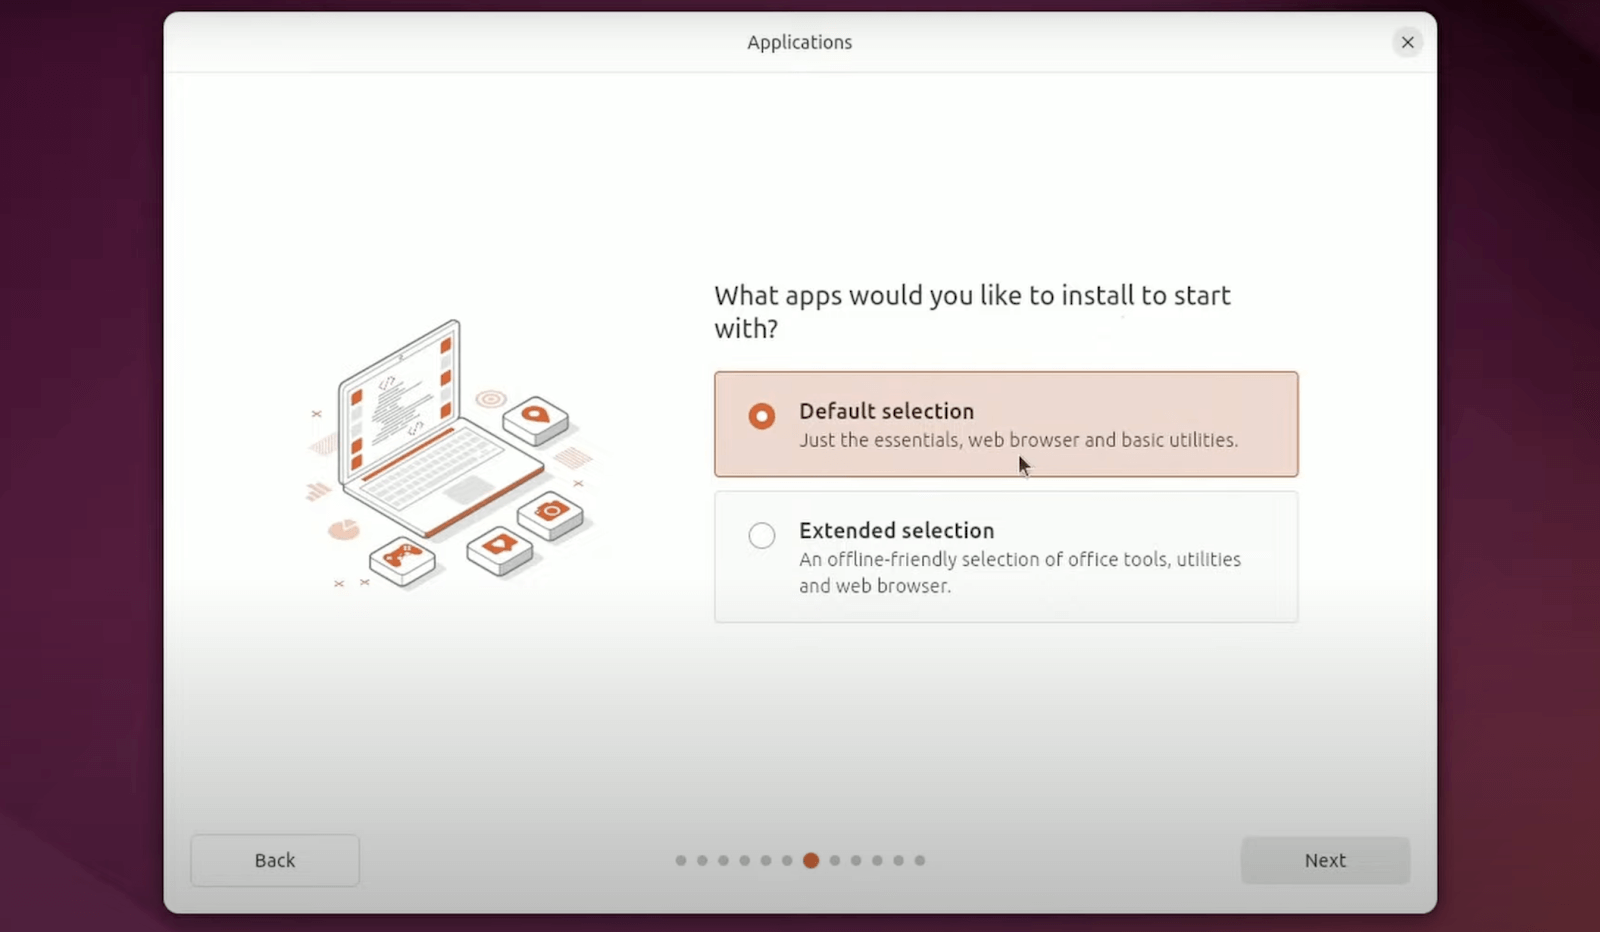
Figure 23. Applications
Step 6: Install Third-Party Software
Ubuntu offers to install:
- Graphics and Wi-Fi drivers (e.g., NVIDIA, Intel)
- Media codecs (MP3, MP4, etc.)
If you want full hardware/media support, check both boxes. Otherwise, skip and click Next.
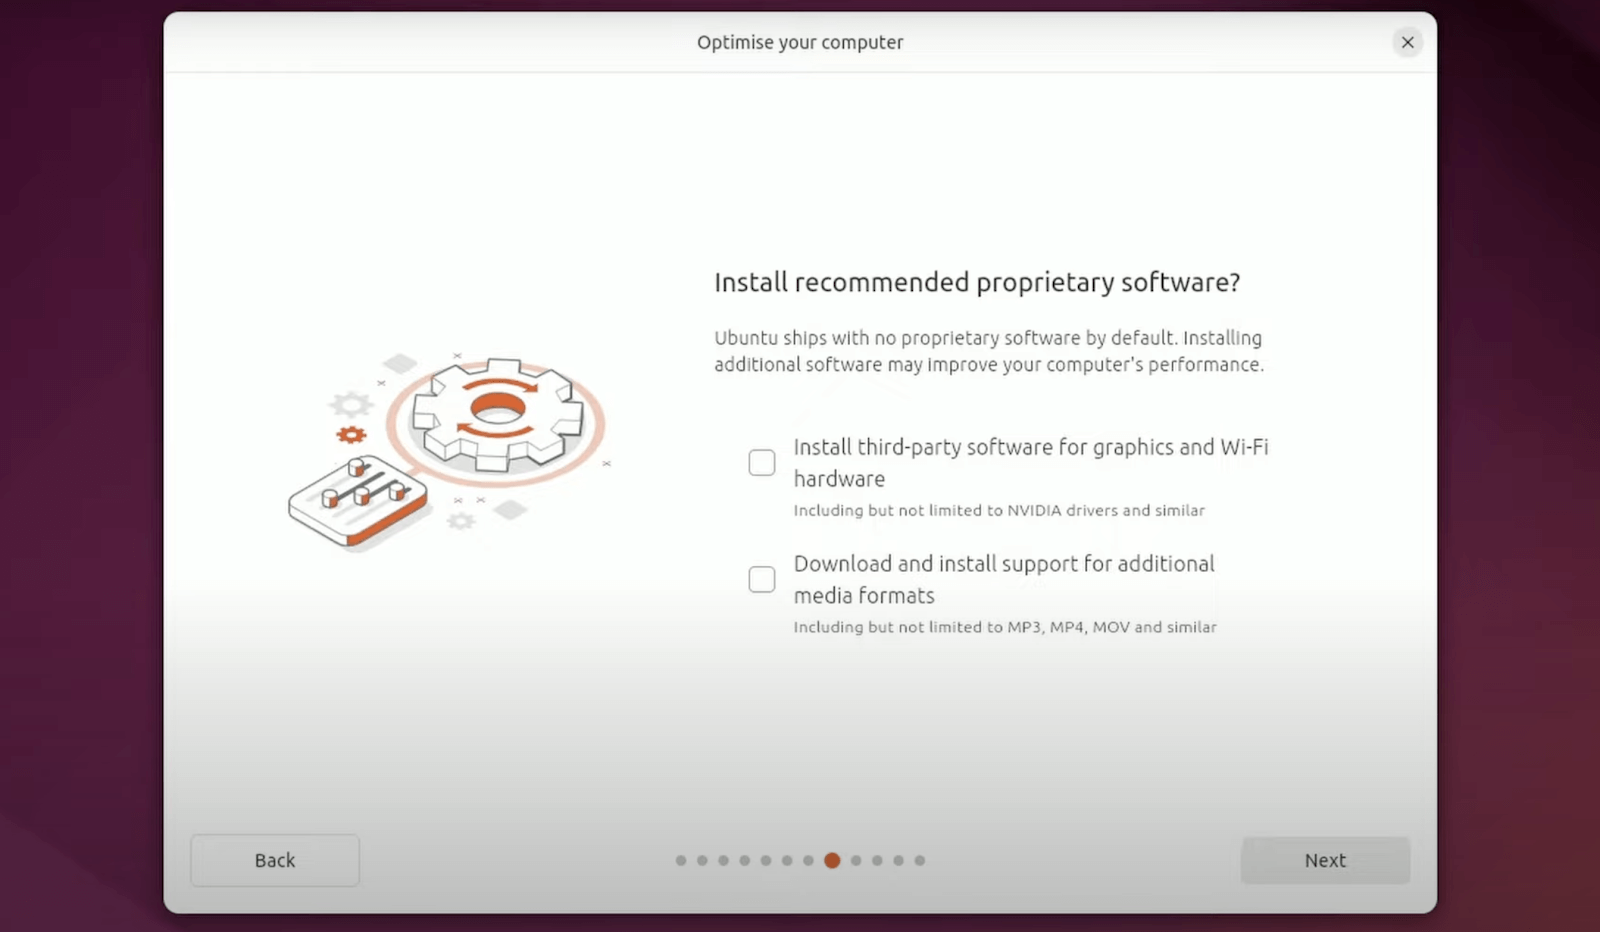
Figure 24. Optimise Your Computer
Step 7: Try or Install Ubuntu
Choose: "Try Ubuntu" if you want to test it without installing (optional).
"Install Ubuntu" to start the installation.
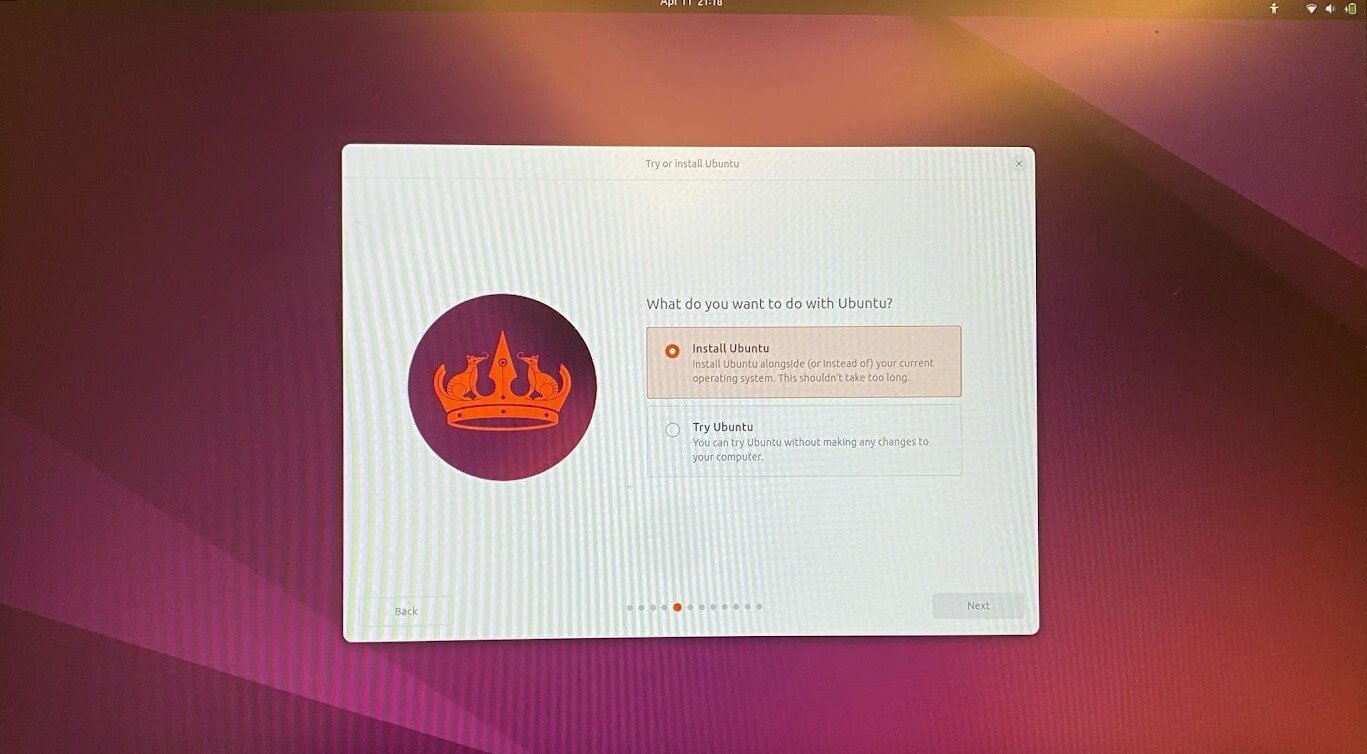
Figure 25. Try or Install Ubuntu
Step 8: Disk Setup
This is the most important step. Select how you want to install Ubuntu, choose:
Install Ubuntu alongside Windows Boot Manager and click Next
This option will automatically set up dual boot and keep your Windows system safe.
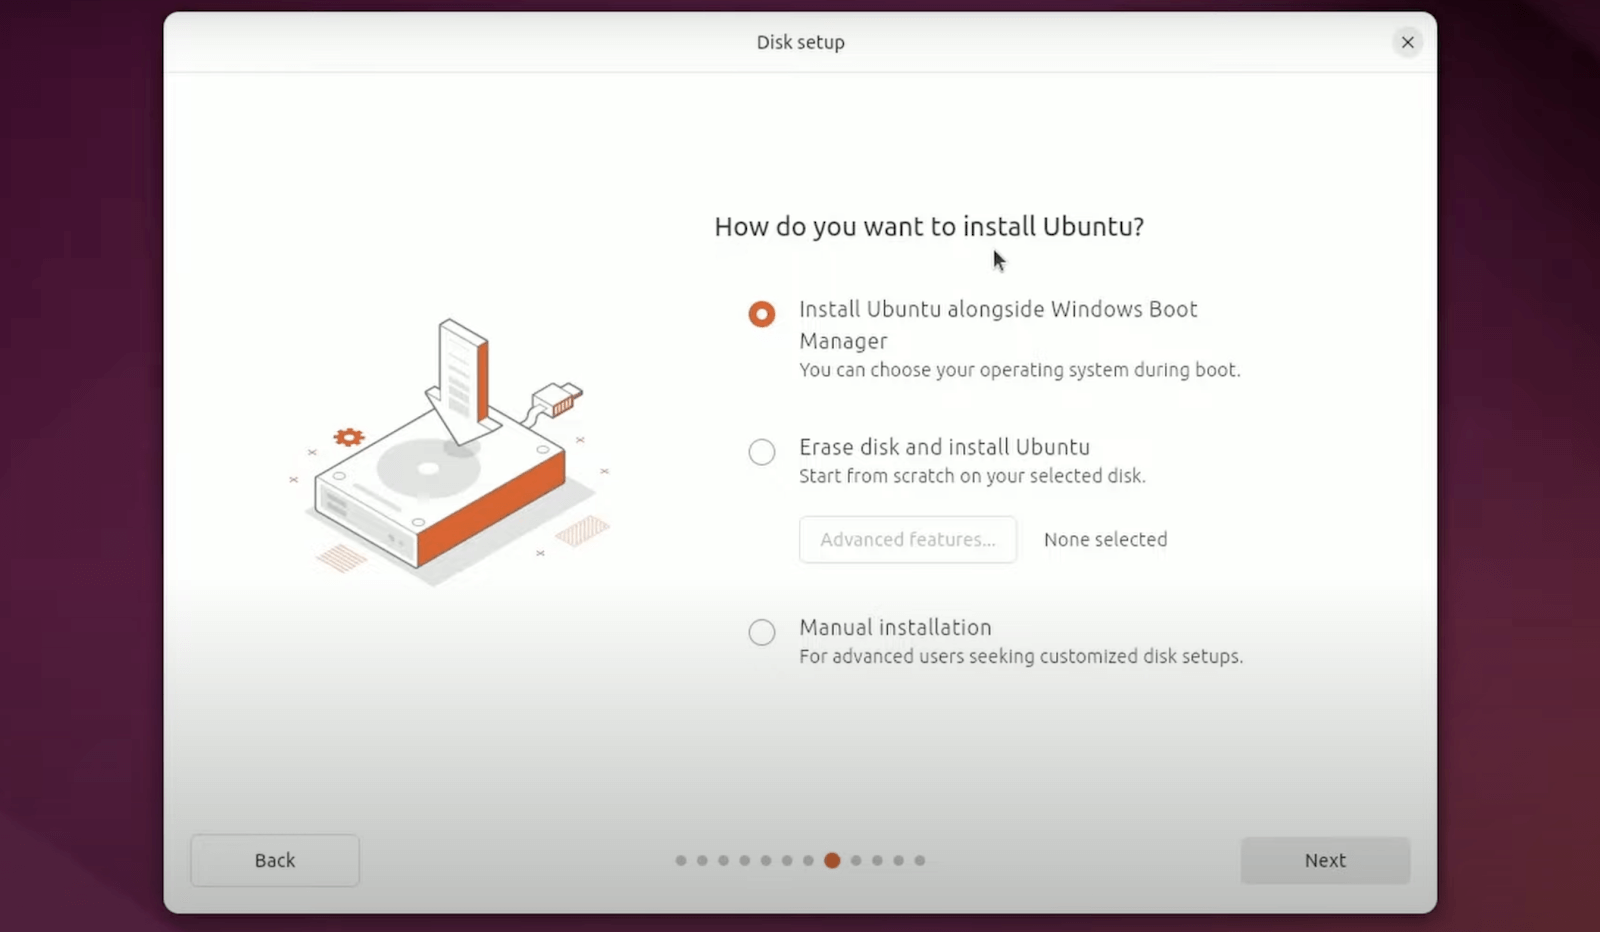
Figure 26. Disk Setup
Step 9: Create Your Account
Fill in the required fields:
-
Your name
-
Computer name
-
Username
-
Password
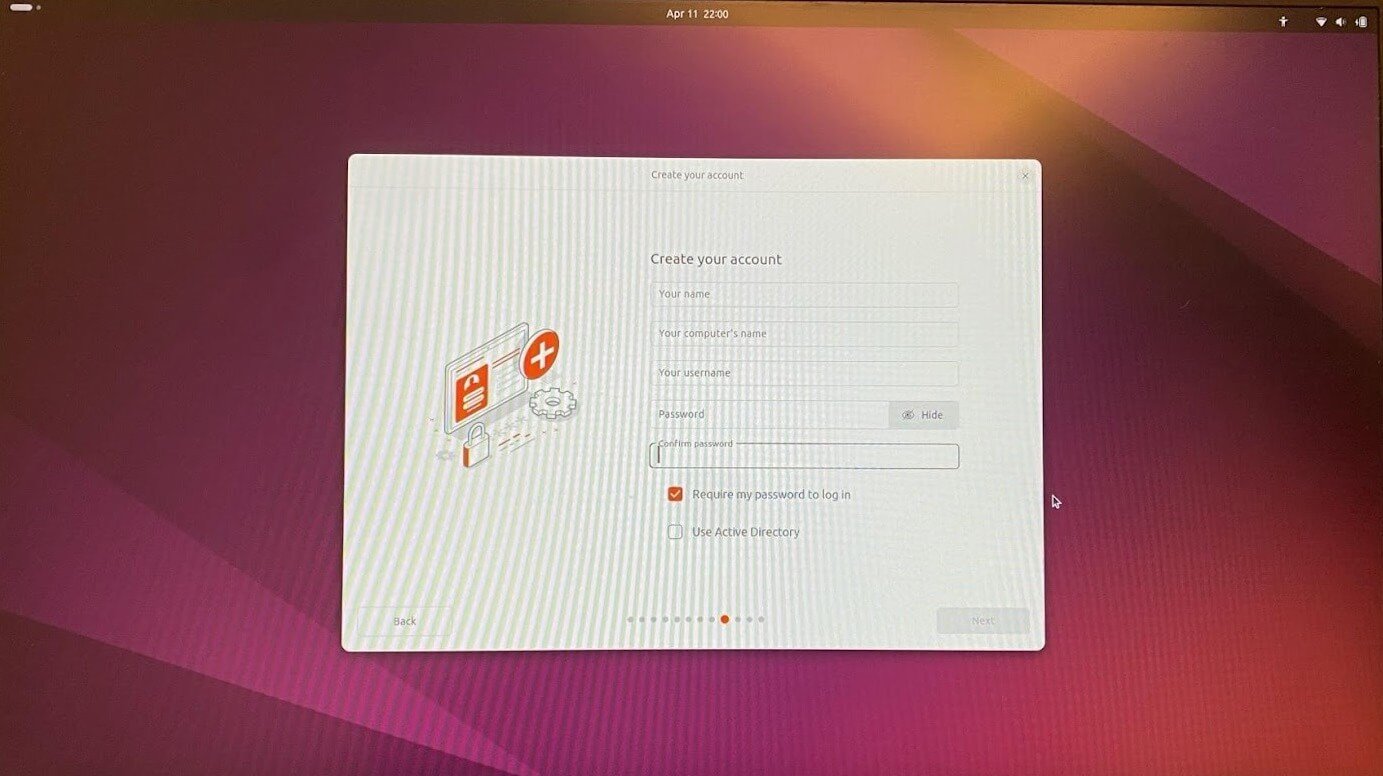
Figure 27. Create Your Account
Then click Next.
Step 10: Timezone Selection
A map will appear asking for your location.
-
Click your country or enter a nearby city (e.g., Istanbul).
-
Click Next.
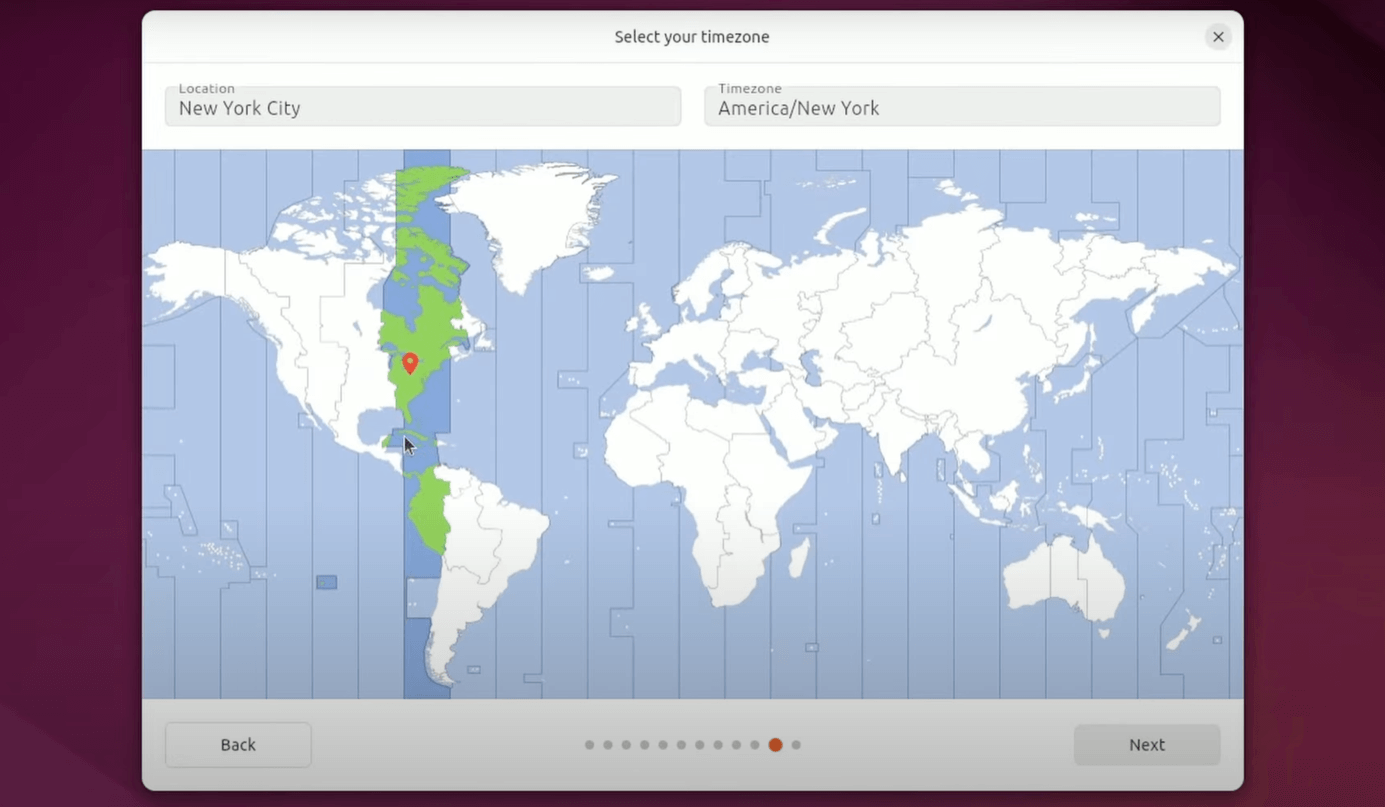
Figure 28. Timezone Selection
Step 11: Review and Install
Ubuntu will summarize your settings:
- Disk setup
- Selected disk and partitions
- Applications and drivers
If everything looks correct, click Install to begin.
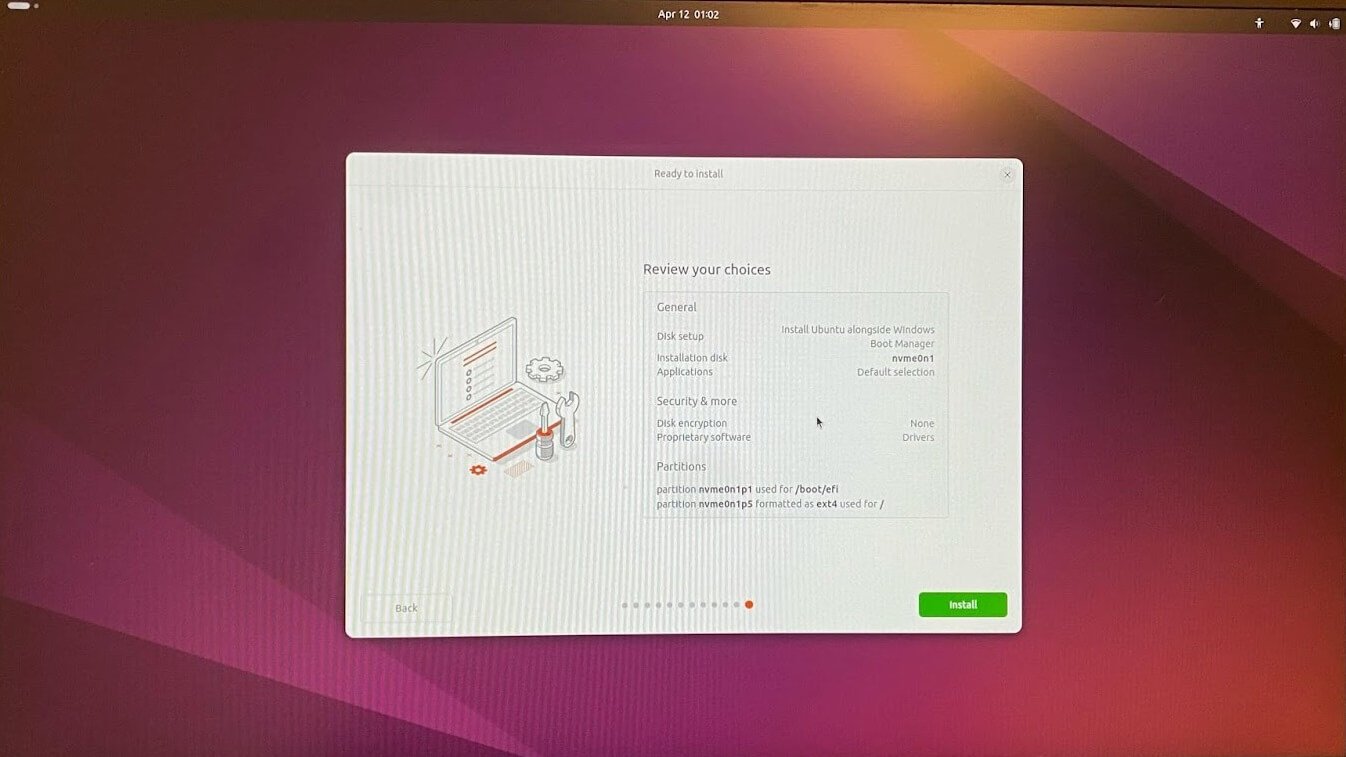
Figure 29. Review and Install
Step 12: Wait for Installation to Complete
The installer will copy files and set up your system. This usually takes 10–20 minutes. When it’s done, click Restart Now. Remove your USB stick when prompted.
Ubuntu and Windows are now set up in dual boot. On each restart, you’ll be able to choose which one to use!
8. Select the Operating System at Boot
On your next boot, you’ll see the GRUB menu — a list showing:
- Use the arrow keys to choose:
- Ubuntu to use Linux
- Windows Boot Manager to use Windows
- Press Enter.
If the GRUB menu doesn't show, hold the Shift key (for BIOS) or Esc key (for UEFI systems) right after powering on the computer.
Use the arrow keys to choose which system to boot into. You now have a fully working dual boot setup!
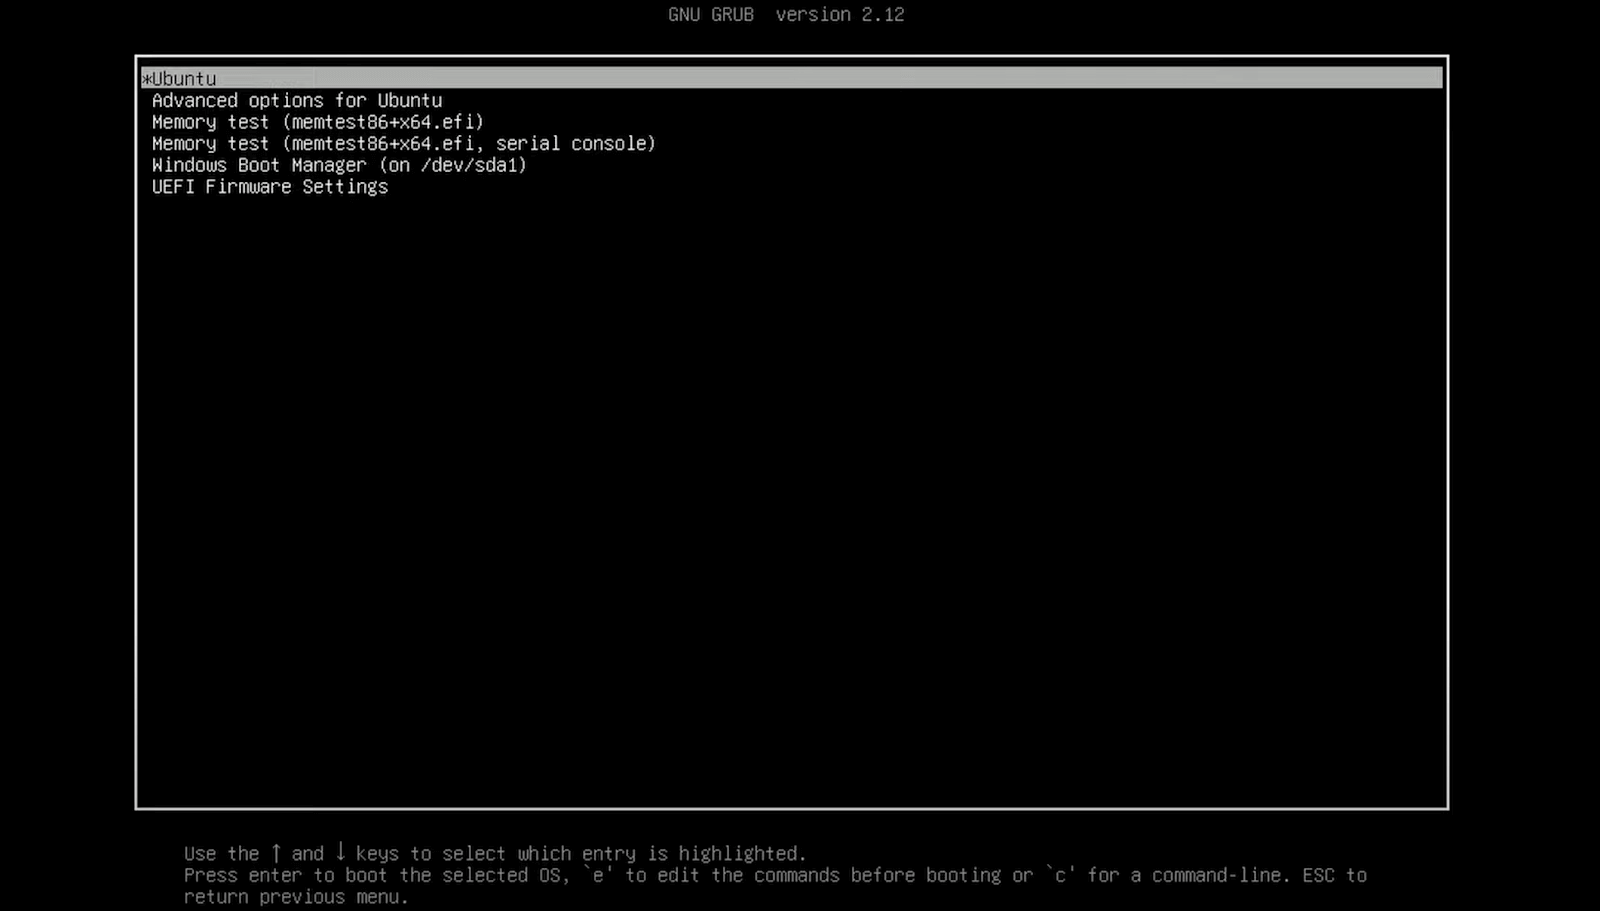
Figure 30. Choose Between Windows and Ubuntu
Here are a few helpful things to do after successfully installing Ubuntu:
Update Ubuntu
Right after installation, it’s a good idea to update the system. Open the Terminal (you can press Ctrl + Alt + T) and type:
sudo apt update && sudo apt upgrade
Enter your password and press Enter. This will install the latest updates.
Install Essential Software
Depending on what you’ll use Ubuntu for, you may want to install the following packages.
- Google Chrome or Firefox
- VS Code for programming
- GIMP for image editing
- LibreOffice for documents and presentations
You can install most of these from the Ubuntu Software Center.
Enable Dual Boot in BIOS (if needed)
If your computer keeps booting directly into Windows, you may need to:
- Enter BIOS/UEFI (usually by pressing F2, Del, or Esc at startup).
- Change the boot order and move Ubuntu (or GRUB) to the top of the list.
What is Dual Boot?
Dual boot is the process of installing two operating systems on a single computer and choosing between them when the computer starts. For example, you might have Windows and Linux installed, and each time you power on your computer, you decide which one you want to use.
This setup allows users to enjoy the strengths of both systems without having to give up one. It’s like having two computers in one, you just choose which “side” to use at startup.
How does Dual Booting Work?
When you set up a dual-boot system, your computer’s hard drive is divided into sections called partitions. Each operating system, Windows and Linux, is installed on its own partition. This means they stay completely separate and don’t interfere with each other.
Once the setup is complete, a special program called a bootloader (usually GRUB, which comes with Linux) is installed. The bootloader runs every time you turn on your computer and shows you a simple menu that lets you choose which system to start.
Here’s a simplified overview of how it works:
- You power on your computer.
- The bootloader appears with a menu (e.g., “Windows” or “Linux”).
- You choose the system you want to use.
- The selected operating system starts.
You can switch between systems anytime — just restart your computer and select the other one from the menu.
This setup gives both operating systems full control of the hardware when they are in use, unlike virtual machines, which share resources. It’s efficient, powerful, and gives you the best of both worlds.
What are the Requirements for Dual Booting Linux and Windows?
Before setting up a dual-boot system, you need to prepare a few things. Don’t worry, most of them are simple and easy to get. The requirements for dual-booting Linux and Windows are listed below.
- A Computer with Windows Installed: It’s perfectly fine if your computer already has Windows — in fact, it’s recommended to install Linux after Windows. That way, Linux can set up the bootloader properly.
- At Least 20 GB of Free Space: Linux doesn’t need much space, but for a smooth experience, you should have at least 20 GB of unallocated (empty) space on your hard drive. The more, the better.
- A USB Flash Drive (4 GB or more): You’ll use this to create a bootable Linux installer. Any standard USB stick will do.
- A Linux ISO File: Download the ISO (installer) file of the Linux distribution you want to install. You’ll find it on the official website of the distro (e.g., Ubuntu, Linux Mint).
- A Tool to Create a Bootable USB: You need a small program to turn your ISO file into a bootable USB. Popular options are Rufus (for Windows) and Balena Etcher (cross-platform).
- Backup of Your Important Files: Even though dual booting is usually safe, it’s always best to back up your important files. Better safe than sorry.
Setting up dual-booting is not difficult, but it involves multiple steps. Just take your time and follow the instructions carefully, you’ll be fine!
Which Linux Distributions are Best for Dual Booting with Windows?
For a smooth dual-boot experience, it’s best to choose a Linux distribution that is stable, user-friendly, and has good hardware compatibility. If you're a beginner, Ubuntu is one of the best choices. It’s easy to install, widely supported, and works well alongside Windows. Its clean interface and strong community make it ideal for users who are new to Linux. In this guide, we will use Ubuntu as the example Linux distribution for the dual boot setup, but the same steps generally apply to similar Linux distributions like Linux Mint or Zorin OS.
How to Switch Between Windows and Ubuntu
Switching between systems is simple:
- Restart your computer.
- The GRUB menu will appear.
- Use the arrow keys to choose:
- Ubuntu to use Linux
- Windows Boot Manager to use Windows
- Press Enter.
If the GRUB menu doesn't show, hold the Shiftkey (for BIOS) or Esc key (for UEFI systems) right after powering on the computer.
How to Troubleshoot Dual Boot Issues Between Linux and Windows?
If something goes wrong after setting up your dual-boot system, don’t worry — most problems have simple solutions. Below are the most common issues and easy steps to fix them, even if you're not a tech expert.
Problem 1: My computer starts directly into Windows. I don’t see the Ubuntu menu.
Your computer may be set to load Windows first and skip the Ubuntu menu. How to fix it:
- Restart your computer.
- As soon as it turns on, press the key for boot options or BIOS (usually F2, F12, Esc, or Del).
- Find the Boot Order setting.
- Move Ubuntu or GRUB (Ubuntu’s startup menu) to the top.
- Save and exit.
Still not working? You may also need to disable Secure Boot under BIOS settings.
Problem 2: Ubuntu disappeared after a Windows update
Sometimes Windows updates overwrite the startup menu, so your PC "forgets" Ubuntu. How to fix it:
- Plug in your Ubuntu USB and restart your computer.
- Choose Try Ubuntu from the menu.
- When the desktop loads, open the Terminal by pressing Ctrl + Alt + T.
- Type this command and press Enter:
This tells Ubuntu to look for Windows and add it back to the menu.
sudo update-grub - Then type the next command.
(This puts Ubuntu’s menu back on your hard drive. If your main drive is different, replace
sudo grub-install /dev/sda/dev/sdawith your actual drive name.) - Restart your computer. You should now see the dual-boot menu again.
Problem 3: Only Ubuntu shows up — I can’t see Windows in the menu.
Ubuntu doesn’t always detect Windows automatically. How to fix it:
- Boot into Ubuntu.
- Open the Terminal (Ctrl + Alt + T).
- Type these commands one by one:
sudo os-prober
sudo update-grub - Restart your computer — Windows should now appear in the boot menu.
Problem 4: It says “No bootable device found.” What now?
Your computer might not be using the right boot method (UEFI vs. Legacy), or the bootloader is missing. How to fix it:
- Enter your BIOS settings (press F2, Del, or Esc at startup).
- Check if UEFI or Legacy Boot is selected — try switching it.
- If it still doesn't work, use the Ubuntu USB and the Boot-Repair tool to fix the bootloader.
How can you Optimize Performance in a Linux and Windows Dual Boot Setup?
Dual-boot systems are powerful, but to get the most out of them, you need to make sure both Linux and Windows are running efficiently. Here’s how to boost speed, improve stability, and reduce load times on both systems.
On the Ubuntu (Linux) Side
Optimize your Ubuntu system by managing updates, startup programs, and system resources. These tips help you keep your Linux side fast, clean, and lightweight — perfect for development or daily use.
1. Keep Your System Updated
Regular updates ensure better performance, security, and stability on Ubuntu. Run this command regularly in the Terminal:
sudo apt update && sudo apt upgrade
This installs the latest security patches and software improvements.
2. Remove Unused Startup Programs
Go to Startup Applications and disable programs you don’t need at launch — this helps Ubuntu boot faster. Disabling unnecessary startup apps can significantly reduce boot time.
3. Use Lighter Desktop Environments (Optional)
If your system is slow, consider switching to a lighter version of Ubuntu like Xubuntu or Lubuntu — they use fewer resources.
4. Clean Up Unused Packages
Free up storage and improve speed by removing leftover software. Use simple terminal commands to clean up your system regularly.
You can free up space with this command:
sudo apt autoremove
On the Windows Side
Improve Windows performance in a dual-boot setup with simple cleanup and startup tweaks. These tips will help your Windows system stay responsive and efficient, especially if it's sharing space with Linux.
1. Disable Unnecessary Startup Apps
Speed up Windows boot time by turning off apps that load at startup. Fewer startup programs mean a faster and smoother Windows experience. Go to Task Manager > Startup tab and disable apps you don’t need right after login.
2. Run Disk Cleanup
Clean junk files to improve performance and reclaim storage space. The built-in Disk Cleanup tool is easy to use and highly effective.
3. Keep Antivirus Light
Avoid using heavy antivirus programs if Windows Defender is already active — it’s good enough for most users.
4. Defragment Your Drive (HDD only)
Defragmenting reorganizes data on your hard drive for faster access. Only do this if you’re using a traditional HDD, SSDs do not require defragging.
Do not delete or move system files from one operating system while using the other.
For example, don’t try to delete Windows folders while using Ubuntu, or vice versa.
This could cause serious errors and prevent your systems from working properly.
Only use shared partitions (like a separate data drive) to access and manage your personal files from both systems.
Is Dual Booting Better Than Using Virtualization for Running Linux on Windows?
Whether you should choose dual-booting or virtualization depends on how you plan to use Linux. Both methods let you run Linux on a Windows system, but they offer very different experiences in terms of performance, flexibility, and ease of setup.
Dual booting gives Linux full access to your computer’s hardware. This means better performance, especially for demanding tasks such as software development, using graphical tools, or running heavy programs. Since each operating system runs separately, there is no extra load on your system when Linux is in use. However, dual booting requires you to restart your computer each time you want to switch between Windows and Linux, and the setup process involves partitioning your hard drive, which can feel complicated for beginners.
On the other hand, virtualization lets you run Linux inside Windows using tools like VirtualBox or VMware. This method is easier to set up and doesn’t require restarting your system. You can test different Linux distributions, run simple applications, and explore the environment without making major changes to your system. However, since Linux runs “on top of” Windows, performance is usually lower, especially on machines with limited RAM or processing power. Hardware access, such as to graphics cards or USB devices, may be limited on virtualization.
If you are a beginner who just wants to explore Linux, virtualization is a safe and convenient option. But if you plan to use Linux seriously — for development, education, or daily use, then dual booting is a better long-term choice thanks to its performance advantages and direct hardware access.
Ultimately, your choice depends on your goals — try both and see what works best for you.
What Should You Do If You Want to Replace Windows with Linux on a Dual-Boot System?
If you've been using a dual-boot setup and decided that Linux alone meets your needs, you can remove Windows and let Linux take over your entire system. This process is straightforward but requires some caution, especially when it comes to data backup and disk formatting.
The first and most important step is to back up all important files from both operating systems. Even if you no longer plan to use Windows, make sure you copy any personal data from it before removing the partition.
Once your data is safe, you have two main options:
Option 1: Reinstall Linux and erase the entire disk.
This is the cleanest method. Simply boot from your Linux installation USB, choose “Erase disk and install Linux” during installation, and the system will automatically remove Windows and the old Linux partitions, creating a fresh setup.
Option 2: Remove the Windows partition manually.
If you prefer not to reinstall Linux, you can follow these steps.
- Boot into your current Linux system.
- Open the Disks application or GParted.
- Identify and delete the Windows partitions (usually labeled NTFS).
- Resize your Linux partition to use the newly freed space.
- Update the bootloader by running:
sudo update-grub
This will remove Windows and expand your Linux environment without reinstalling the OS.
After completing either method, your system will boot directly into Linux without showing the GRUB menu for Windows.
If you're unsure, the reinstall method is safer and usually results in a cleaner, faster system.
How to Use Linux on a Windows Machine Without Dual Booting?
If you're curious about Linux but don’t want to install it alongside Windows or make changes to your hard drive, don’t worry — there are other ways to use Linux safely and easily.
Here are the most common methods to use Linux on a Windows machine without dual booting.
1. Use a Live USB
The simplest way to try Linux is by creating a Live USB. This allows you to boot and run Linux directly from a USB stick — no installation required.
- Download a Linux ISO (e.g., Ubuntu)
- Use a tool like Rufus to create a bootable USB
- Restart your computer and boot from the USB
- Select "Try Linux without installing"
This method lets you explore Linux safely. When you're done, just reboot and remove the USB to return to Windows.
2. Use Linux in a Virtual Machine
Another beginner-friendly option is to run Linux inside Windows using a virtualization tool like VirtualBox (free and easy to use) or VMware Workstation Player.
With this setup:
- You install Linux as a "guest" system in a window.
- You don’t need to reboot or change your partitions.
- You can use Linux and Windows at the same time.
While it's slower than running Linux directly, it’s perfect for learning, testing, or casual use.
3. Use Windows Subsystem for Linux (WSL)
If you're using Windows 10 or 11, you can enable **Windows Subsystem for Linux (WSL). ** This allows you to run a real Linux environment directly in Windows, no virtual machines, no USBs.
Just follow these steps:
- Open PowerShell as Administrator
- Run the next command.
wsl --install - Restart your computer
- Choose a Linux distro (like Ubuntu) from the Microsoft Store
You can then run Linux commands directly inside a terminal window, which is ideal for developers and command-line users.
WSL is great for development, but it doesn’t have a graphical desktop like traditional Linux.
These methods are perfect for trying out Linux without changing your Windows setup. Once you're comfortable, you can always move on to a full installation or dual-boot setup.
Conclusion
Dual-booting Linux and Windows is a smart way to take advantage of the best features of both operating systems. Setting up a dual-boot system gives you full access to Linux’s power. Whether you're exploring Linux for the first time, switching for development purposes, or simply curious about open-source software, you don't have to give up Windows.
Throughout this guide, you've learned what dual booting is, how it works, what you need, and how to install Ubuntu step by step. We covered how to fix common problems, optimize your system’s performance, and even try Linux without installing it.
If you're not quite ready to dual-boot yet, don’t worry; tools like Live USBs, VirtualBox, or WSL let you experience Linux with zero risk. If you love it, you can replace Windows to make the switch permanent.
Regardless of your choice, keep in mind that learning Linux unlocks a vast realm of control, customization, and creativity. Give it a try, you might be surprised at what you can do.