How to Install DNSSEC on Ubuntu Linux
DNSSEC (Domain Name System Security Extensions) is a security enhancement designed to guarantee the integrity and authenticity of DNS requests. DNSSEC incorporates digital signatures into DNS answers, enabling clients to authenticate that the data remains unaltered. Hence, DNSSEC offers robust DNS security against threats like cache poisoning.
This tutorial offers detailed instructions for configuring DNSSEC on a BIND9 DNS server operating on Ubuntu 24.04 or later, including:
- Setting up BIND9 for zone signing, inline key management, and DNSSEC validation.
- Utilizing trustworthy cryptographic techniques to generate and manage Zone Signing Keys (ZSKs) and Key Signing Keys (KSKs).
- Establishing upward trust requires correctly sending DS records to the domain registrar and activating signed zones.
- Using tools such as dig and delv to validate DNSSEC signatures, including pre-deployment testing in disconnected settings.
- Using DNSsec-policy to automate key lifecycle operations, such as algorithm rotation, TTL management, and key rollover

Prerequisites & Environment Setup
To follow this DNSSEC guide, you should have an Ubuntu 24.04 LTS server with a static IP address and root or sudo access. An operable BIND9 DNS server must be configured with an authoritative zone to enable DNSSEC. Consult the DNS setup guide for comprehensive details on installing BIND9.
For DNSSEC configuration, the zone file must be located in a directory with write permissions for the BIND service, such as /var/lib/bind, rather than the default /etc/bind. You may set up a sample domain (example.internal) before configuring DNSSEC by following the next steps.
- Install BIND9 packages: This updates the package list and installs the BIND9 DNS server along with utilities, documentation, and DNS query tools like dig.
sudo apt update
sudo apt install bind9 bind9utils bind9-doc dnsutils –y - Move zone files to writable directory: This creates a writable directory for zone files, copies your existing zone file into it, and ensures the BIND service has ownership permissions for signing operations.
sudo mkdir -p /var/lib/bind/zones
sudo cp /etc/bind/zones/db.example.internal /var/lib/bind/zones/
sudo chown bind:bind /var/lib/bind/zones/db.example.internal
How DNSSEC Works
Consider DNSSEC as the implementation of a digital signature on DNS information. Traditional DNS indicates the IP address associated with a domain, such as, google.com, but it does not verify the reliability of this information. DNSSEC addresses the deficiency by authenticating the data with digital signatures.
The Issue: Conventional DNS lacks security. A malicious actor can compromise the DNS cache and reroute consumers to fraudulent websites.
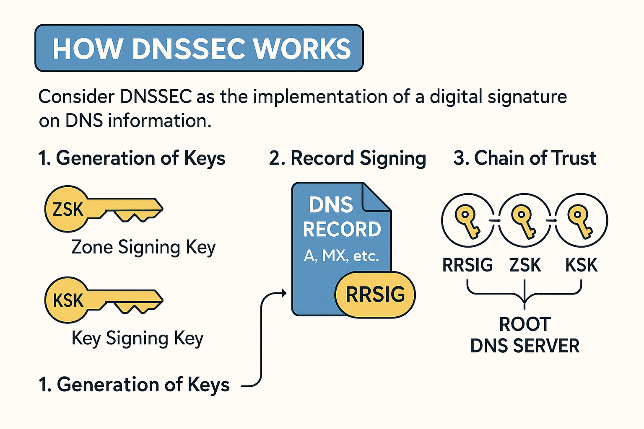
Figure 1. How DNSSEC Works
The Resolution: DNSSEC employs digital signatures to authenticate DNS records, enabling clients to cryptographically confirm that the answer originates from an authorized source.
Operational mechanisms of DNSSEC are as follows.
- Generation of Keys: Every DNSSEC-secured domain possesses two keys:
- The Zone Signing Key (ZSK) authenticates zone data.
- The Key Signing Key (KSK) authenticates the Zone Signing Key (ZSK).
- Record Signing: Each DNS record (A, MX, etc.) is authenticated with the ZSK, with signatures preserved in RRSIG entries.
- Chain of Trust: Chain of trust in DNSSEC service is as follows.
- The RRSIG is authenticated with the ZSK public key.
- The ZSK is authenticated using the KSK.
- The KSK is authenticated using a DS record in the parent zone.
- The root DNS servers function as the trust anchor acknowledged by clients.
DNSSEC does not provide data encryption. It alone guarantees that the data is genuine and has not been altered.
Enabling DNSSEC in BIND
Domain names are fundamental to the Internet. The DNS system, which converts these names into IP addresses, is inherently vulnerable by default. DNSSEC fortifies this system by facilitating digital trust.
Activating DNSSEC serves as both a security improvement and a method to demonstrate the authenticity of your data to users. The activation of DNSSEC has three primary steps.
- Configuring the Domain Name System server (e.g., BIND, cPanel)
- Creating signing keys for your domain
- Submitting the DS record to your domain registrar These steps are detailed below.
1. Prepare BIND for DNSSEC
You may prepare your BIND server for DNSSEC by following the next steps.
- Open the configuration file.
This opens the main options configuration file for BIND, where global DNS settings such as forwarding and DNSSEC validation are defined.
sudo nano /etc/bind/named.conf.options - Ensure the following line is inside the options block.
This setting tells BIND to automatically validate DNSSEC-signed responses using a built-in trust anchor for the root zone.
dnssec-validation auto; - Check the configuration and restart BIND.
The first command checks for syntax errors in the BIND configuration files. The second one restarts the BIND service to apply changes.
sudo named-checkconf
sudo systemctl restart bind9noteSetting
dnssec-validationtoyesinstead ofautorenders DNSSEC validation obligatory, resulting in the rejection of unsigned records.
2. Key Generation and Zone Signing
Each domain requires two types of DNSSEC keys: ZSK (Zone Signing Key) that signs DNS records and KSK (Key Signing Key) that signs the ZSK. You may follow the next steps to generate keys and sign the zone.
-
Run the next commands to create
.key(public) and.private(private) key files.cd /var/lib/bind
dnssec-keygen -a RSASHA256 -b 2048 -n ZONE example.com
dnssec-keygen -f KSK -a RSASHA256 -b 2048 -n ZONE example.comThe first command navigates to the working directory. The next two generate a 2048-bit RSA key for signing zone data (ZSK) and a second one with the -f KSK flag to act as the Key Signing Key.
-
Add the following lines to your zone file.
$INCLUDE "Kexample.com.+008+12345.key"
$INCLUDE "Kexample.com.+008+67890.key"
These lines include the public parts of the KSK and ZSK in your zone file, allowing BIND to use them during the signing process.
-
Sign the zone file by running the following command.
dnssec-signzone -A -3 $(head -c 1000 /dev/urandom | sha1sum | cut -b 1-16) \
-N increment -o example.com -t db.example.com
This command signs the zone file using the specified keys. The
-Aincludes DNSKEY records,-3adds NSEC3 salt for authenticated denial of existence, and-Nincrements updates the serial number. The output is a new signed zone file. This produces a signed file:db.example.com.signed. That file will now contain all your DNS records with corresponding cryptographic signatures.
3. Activating the Signed Zone on BIND
You may activate the signed zone on the BIND service by following the next steps.
- Update the zone definition in the BIND configuration.
This block tells BIND to load the signed zone file.
zone "example.com" {
type master;
file "/var/lib/bind/db.example.com.signed";
auto-dnssec maintain;
inline-signing yes;
};- type master specifies that this server is authoritative for the zone.
- auto-dnssec maintain enables automatic key maintenance.
- inline-signing yes allows BIND to sign new or updated records in the background transparently. This is especially useful for dynamic zones or when records are updated frequently.
- Restart the BIND service.
This command restarts the BIND9 service so it can load the new zone configuration and apply DNSSEC settings.
sudo systemctl restart bind9
4. Submitting DS Record
Generate the DS record from your KSK by running the next command.
dnssec-dsfromkey Kexample.com.+008+67890.key
This command generates a DS (Delegation Signer) record from the specified Key Signing Key (KSK). The DS record contains a hash of the DNSKEY and is required to establish a trust link between your domain and its parent zone.
Transmit the resultant DS record to your domain registrar. Once published by the parent zone, this enables full DNSSEC validation by clients.
In the absence of this delegation, the trust chain remains incomplete, resulting in clients' inability to trust your signatures.
DNSSEC Validation and Testing
DNSSEC verification is the procedure by which the client (usually a validating resolver) confirms the integrity and authenticity of DNS responses using digital signatures.
When a client queries example.com, the DNSSEC validation flow proceeds as follows:
- The resolver receives the DNS answer and the corresponding RRSIG (signature).
- It uses the DNSKEY (typically ZSK) to validate the signature in the RRSIG.
- The DNSKEY's authenticity is validated via the DS record (which originates from the KSK).
- This chain is verified recursively all the way up to the root zone.
- If any link is missing or invalid, the DNS response is rejected.
If DNSSEC validation fails, the DNS response is not delivered to the client. This can cause services to appear offline or inaccessible.
Chain of Trust
The Chain of Trust, a hierarchical paradigm where each DNS infrastructure layer vouches for the one below it, is the foundation of DNSSEC. Only when every link in this chain, from the root zone to individual domain names, is cryptographically confirmed using DNSKEY and DS records is the integrity of DNS data guaranteed. The entire trust breaks down, and the DNS answer is deemed unsafe if any links are absent or invalid.
With the help of the chain of trust model, clients and resolvers can verify that DNS records are authentic and originate from a reliable source. DNSSEC protects users from manipulation and forgery by establishing this trust.
Each DNS level must be validated by the level above:
www.example.comis validated byexample.com.example.comis validated by.com.comis validated by the root (.) The root is trusted implicitly by DNS resolvers and operating systems.
Testing DNSSEC Validation with dig
To test a DNSSEC-enabled domain using the dig tool, run the following command.
dig +dnssec example.com
Check for the ad (authenticated data) flag in the response:
;; flags: qr rd ra ad;
For a known invalid DNSSEC domain, a validating resolver should reject the answer and not return records.
dig +dnssec www.dnssec-failed.org
Consequences of DNSSEC Validation Failure
If a DNSSEC signature fails validation, websites may not load, e-mail servers may fail to connect, and applications may return 'host not found' or timeout errors.
Incorrect or missing DS records can break the trust chain and make your domain unreachable.
Validating a Signed Zone Before Launch
Signing a zone is not the final step; verifying that DNSSEC is properly functioning is crucial before going live. This ensures that your configuration, signatures, and keys are all valid.
Why Validate Before Launch?
A misconfigured DNSSEC-signed zone may include expired keys, broken signatures, or incorrect settings. If deployed prematurely, it can disrupt resolution for all users. Validating locally before publishing the DS record helps catch problems early.
Using delv for Offline Validation
delv is a DNSSEC-aware tool similar to dig, but with built-in validation. It uses the same logic as BIND's internal resolver, and can be pointed to a custom trust anchor without relying on the root DNS chain.
You may validate with delv by following the next steps.
- Copy the public key.
cp /var/cache/bind/Kexample.internal.+013+<key-tag>.key /tmp/example.key - Edit the file into this format.
trust-anchors {
example.internal. static-key 257 3 13 "BASE64_KEY_STRING";
}; - Run
delvto validate.delv @127.0.0.1 -a /tmp/example.key +root=example.internal noble.example.internal +multiline
If the zone is correctly signed, you will see the output similar to the one below.
; fully validated
noble.example.internal. 86400 IN A 192.168.1.11
noble.example.internal. 86400 IN RRSIG ...
The message ; fully validated confirms that BIND has validated the record using your trust anchor, even if the zone is not connected to its parent.
Only after successful delv validation should you proceed to publish your DS record. That step connects your zone to the public DNSSEC trust chain.
Using DNSSEC Policies (Automated Key Management)
The dnssec-policy directive can be used to automate and simplify DNSSEC maintenance starting with BIND 9.16. Administrators can specify which algorithms are utilized, how keys are generated, when they are rolled over, and how long each key is valid. Consistent, safe zone signing procedures are guaranteed by a clearly defined DNSSEC policy, which lowers the possibility of human error.
An example secure-policy block is given below.
options {
dnssec-policy "default-policy";
};
...
dnssec-policy "default-policy" {
keys {
ksk lifetime P2Y algorithm ecdsap256sha256;
zsk lifetime P90D algorithm ecdsap256sha256;
};
zone-signing yes;
key-directory "/var/lib/bind/keys";
};
An explanation of the DNSSEC policy parameter is given below.
- ksk lifetime P2Y: The Key Signing Key (KSK) is automatically rotated every 2 years.
- zsk lifetime P90D: The Zone Signing Key (ZSK) is rotated every 90 days to enhance security.
- algorithm: Defines the cryptographic algorithm used for key generation (e.g., ECDSA or ED25519).
- key-directory: Specifies the directory where generated DNSSEC keys are stored.
Manual processes like dnssec-keygen and dnssec-signzone are greatly reduced when a DNSSEC policy is used. It offers a reliable, automated framework for managing important life cycles and reduces the possibility of human error. For large-scale or enterprise-grade DNS infrastructures, where regular and ongoing key management is essential to preserving DNSSEC integrity, this is strongly advised.
Key Rollover, Lifetimes, Algorithm Control
Policy-based configuration in more recent BIND versions (9.16 and later) enables automatic DNSSEC maintenance. This change eliminates the need for manual intervention and enables reliable and secure operations.
- Key Rollover: To preserve cryptographic hygiene, keys need to be changed on a regular basis. BIND manages ZSK and KSK rollovers automatically with DNSSEC policies, removing the possibility of human error or outages brought on by expiration.
- Key Lifetime: The lifetime option can be used to provide a specific lifetime to each key. For instance, ZSK: ninety days and KSK: two years. This guarantees that out-of-date keys are automatically retired and replaced.
- Rotating Algorithms: If specified in the DNSSEC policy, BIND can manage algorithm rotation with ease when switching to more recent, secure algorithms (such as ED25519 from RSASHA256). This enables cryptographic standards to be future-proofed without interruption.
- Maximum TTL: This helps guarantee that new signatures propagate in a timely manner during rollovers by limiting the maximum TTL of zone records to a specified time, for example, one week for
max-zone-ttl 1W.
For automating DNSSEC with a policy in BIND, your named.conf options block is as follows.
options {
dnssec-policy "secure-policy";
key-directory "/var/lib/bind/keys";
};
Administrators can completely automate cryptographic lifetime management in BIND by utilizing a DNSSEC policy, guaranteeing compliance and continuity. Once a DNSSEC policy is applied, BIND automatically generates and manages the following key files. These reside in the configured key-directory and form the foundation of the signing process.
DNSSEC Keys
DNSSEC operates by using cryptographic key pairs to sign and verify DNS records. These keys are essential components in establishing trust between DNS clients and authoritative servers. In BIND9, these keys are automatically created, managed, and stored based on the defined DNSSEC policy.
By default, when using automatic DNSSEC management via dnssec-policy, BIND stores all keys in /var/cache/bind.
Example key files.
Kexample.com.+013+<key-tag>.key # Public key
Kexample.com.+013+<key-tag>.private # Private key
Kexample.com.+013+<key-tag>.state # Metadata and lifecycle tracking
These files are auto-managed by BIND and require no manual intervention.
When a DNSSEC policy is applied, BIND generates keys according to the algorithm and key lifetimes specified. Each key is uniquely identified by a key tag, algorithm code, and zone name.
When the following is added to a zone configuration
zone "example.com" {
type master;
file "/var/lib/bind/db.example.com";
dnssec-policy default;
inline-signing yes;
};
and reloaded with the sudo rndc reconfig command, BIND will automatically generate the necessary keys, sign the zone, update SOA serials, schedule key rollover events, and log the actions to journalctl.
Example log output is given below.
named[PID]: keymgr: DNSKEY example.com/<algorithm>/<key-tag> (CSK) created for policy default
named[PID]: DNSKEY example.com/<algorithm>/<key-tag> (CSK) is now published
named[PID]: DNSKEY example.com/<algorithm>/<key-tag> (CSK) is now active
named[PID]: zone example.com/IN (signed): sending notifies (serial <N>)
Key Lifecycle and Maintenance
BIND manages the pre-publication of new keys, activation/deactivation of keys, state tracking in .state files, and SOA serial bumps upon re-signing. This eliminates the need to manually run dnssec-keygen or dnssec-signzone for routine operations. As a best practice, you may perform the following tasks.
-
Define a
key-directoryin yournamed.conf.optionsto isolate keys:options {
key-directory "/var/lib/bind/keys";
}; -
Use
journalctl -u named.service -fto monitor key activity -
Periodically back up your key directory
In signed DNS zones, DNSSEC keys serve as the cornerstone of trust. BIND manages key creation, rollover, publication, and signing automatically using policy-based setup. This preserves robust cryptographic integrity while streamlining operations.