Ubuntu Set Static IP: Change IP Address for Ubuntu
Assigning a static IP address is one of the first steps in building a reliable and consistent network environment. Whether you’re configuring a server, setting up a VPN endpoint, or running services in a home lab, a static IP ensures the system is always reachable at the same address without relying on DHCP leases that may change after reboot.
This guide walks through the most common ways to configure a static IP address in Ubuntu 24.04 LTS, depending on whether you’re using the Server or Desktop edition. It covers both graphical and command-line methods, explains how to disable DHCP properly, and provides troubleshooting advice for common pitfalls like YAML formatting or misidentified interfaces.

What Are the Steps to Set a Static IP on Ubuntu?
A static IP address is a permanent network address manually assigned to a device, as opposed to one that changes dynamically. A static IP address is “hard-coded” so the device always has the same IP address on the network. This fixed address makes the device easy to locate and reach reliably. Static IPs are commonly used for servers and network devices, for example, web servers, file servers, databases, printers, and routers, because these services require a consistent address. You don’t have to update hosts or reconfigure routers when devices reboot; DNS servers, port forwards, and firewall rules stay valid. For example, without a static IP, a website hosted at home might go offline after a reboot due to changing DHCP leases. Static IP addresses are important for remote access. When you manage a computer or VPN from afar, a static IP ensures it doesn’t jump to a new address unexpectedly.
Use cases of static IP addresses are Web/email/FTP servers, database or VPN endpoints, VoIP and video conferencing systems, network printers, and any hardware that needs reliable remote access.
Ubuntu offers multiple ways to configure a static IP address.
-
Netplan (CLI): The default on modern Ubuntu Server (17.10 and later). You edit a YAML file under /etc/netplan/ and apply with netplan apply
-
Network Manager GUI: On Ubuntu Desktop, use the GNOME
Settings → Networkpanel to select “Manual” under IPv4 and enter the address, netmask, gateway, and DNS. This uses NetworkManager under the hood. -
nmcli (CLI for NetworkManager): A command-line interface for NetworkManager. You can run commands like
nmcli con mod <conn> ipv4.addresses ...andnmcli con mod <conn> ipv4.method manual toset IPs, gateway, DNS, and disable DHCP. -
nmtui (Terminal UI): A text-based curses interface
sudo nmtuithat lets you edit connections and set IPv4 to Manual. -
Legacy interfaces file: In older Ubuntu releases or if you install
ifupdown, static IPs can be set in/etc/network/interfaces. However, since Ubuntu 17.10, netplan replaces ifupdown by default, so/etc/network/interfacesis usually ignored unless netplan is removed.Method Ubuntu Server Ubuntu Desktop Complexity Recommended for Netplan via CLI YES YES Medium Servers NetworkManager via GUI NO YES Easy Desktop Users Nmcli Optional YES Medium CLI enthusiasts Nmtui Optional Optional Easy Quick CLI configs Table 1: Methods of Setting Static IP on Ubuntu Comparison
Each method ultimately does the same thing: it tells the system to stop using DHCP and to use your chosen address/gateway/DNS instead.
Ubuntu Server vs. Desktop Setup
Ubuntu Server (console, no GUI) and Desktop (GNOME GUI) versions handle networking slightly differently. By default, Ubuntu Server uses netplan with the systemd-networkd backend. You edit text files (/etc/netplan/*.yaml) and run commands in a shell. There is no graphical tool by default.
On the other hand, Ubuntu Desktop uses NetworkManager by default (via GUI and nmcli/nmtui). Netplan still exists under the hood (Netplan’s renderer is set to NetworkManager), but most users configure networking through Settings or NM tools. The GNOME Settings → Network panel provides checkboxes and entry fields for IPv4 on each connection.
In practice, if you install Ubuntu Server and later add a desktop, NetworkManager will take over. Conversely, on desktop installs, netplan is present, but it generates NM configs. The default tools reflect the use case: CLI/netplan for servers, GUI/nmcli for desktops
How Can You Configure a Static IP Address on Ubuntu Server?
You can configure static IP addresses on Ubuntu Server by following the next steps.
-
Identify the interface: Run
ip linkornmcli deviceto find the name of the Ethernet interface (e.g.enp0s3oreth0).
Figure 1. ip link output
-
Create/Edit netplan file: Open a YAML file under
/etc/netplan/. For example:sudo nano /etc/netplan/01-netcfg.yaml -
Enter static configuration: For example, to set interface
enp2s1to IP192.168.1.10/24, gateway192.168.1.1and DNS, you might put the following lines.network:
version: 2
renderer: networkd
ethernets:
ens33:
dhcp4: no
addresses:
- 192.168.1.10/24
gateway4: 192.168.1.1
nameservers:
addresses: [8.8.8.8, 8.8.4.4]Replace enp0s3 and IPs with your interface name and network values. The dhcp4: no line disables DHCP.
-
Apply changes: Save the file and run:
sudo netplan apply. This activates the new static IP settings. Use--debug applyif you need to troubleshoot. -
Verify: Check with
ip ato see if the interface now has the static address. You can ping the gateway or an external host to ensure connectivity.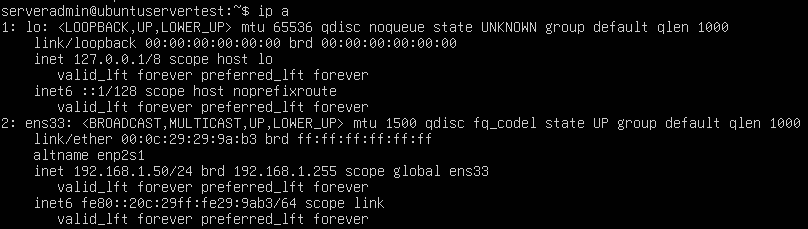
Figure 2. ip a output
What’s the Easiest Way to Set a Static IP on Ubuntu Using the Command Line?
The simplest command-line approach on Ubuntu Server or Desktop (with netplan) is essentially the same:
-
Edit the netplan YAML.
sudo nano /etc/netplan/01-netcfg.yaml -
Enter your static IP configuration.
-
Apply changes.
sudo netplan applyThis single file controls the static IP. Alternatively, if your desktop is managed by NetworkManager, you could use
nmclicommands but for most purposes netplan CLI is straightforward and works on all editions of Ubuntu 24.04.
How to Assign a Static IP Address in Ubuntu Without DHCP?
Dynamic Host Configuration Protocol (DHCP) automatically assigns addresses. To use a static address, you must turn off DHCP on that interface. Otherwise, the system will keep requesting a dynamic lease.
-
With netplan: In your YAML file under the interface,
set dhcp4: no(anddhcp6: noif IPv6). This tells netplan not to use DHCP, so your static addresses entry takes effect. -
With NetworkManager (nmcli): Change the IPv4 method to “manual” with
sudo nmcli con mod <connection> ipv4.method manual. You can also disable DHCP bynmcli con mod <connection> ipv4.dhcp noon some setups. In effect, settingmethod=manualtells NM to ignore DHCP. -
With NetworkManager (GUI): Edit the connection in Settings. In the IPv4 tab choose “Manual” instead of “Automatic (DHCP)”. This automatically disables DHCP and lets you enter fixed IP, gateway, and DNS.
-
Legacy (
/etc/network/interfaces): You would remove anyiface eth0 inet dhcpline or change it toiface eth0 inet static. Reminder, this only applies if you aren’t using netplan/NetworkManager.
After disabling DHCP, be sure to save/apply the config (sudo netplan apply or nmcli con up <name>). Now the interface will use only your static settings.
What Are the Key Configuration Files to Set a Static IP on Ubuntu?
Ubuntu’s network configuration is done via these main files.
-
Netplan YAML files: The primary configs live in
/etc/netplan/. You may see files like01-netcfg.yaml,50-cloud-init.yaml, or similar. Any.yamlfile here defines network settings. Netplan reads them in numeric order and applies the settings to eithersystemd-networkdServer orNetworkManagerDesktop version. -
Legacy
/etc/network/interfaces: In pre-17.10 Ubuntu, static IPs were set here. On current Ubuntu Server 24.04 LTS, this file is unused by default – instead, netplan is used. You would only edit this file if you deliberately removed netplan and installedifupdown. -
NetworkManager profiles: If using NetworkManager Desktop, connection profiles reside in
/etc/NetworkManager/system-connections/or accessible vianmcli/nmtuiThese can override or complement netplan settings if the netplan renderer is set to NetworkManager.
In short, for Ubuntu 24.04 LTS, the main IP address configuration file is in /etc/netplan/*.yaml. Older files like /etc/network/interfaces generally have no effect unless netplan is disabled.
How Can You Manually Set a Static IP Address on Ubuntu?
Manually setting each field means understanding and filling these key items.
-
IP Address and Netmask: In netplan YAML, use addresses: [IP/prefix] format (e.g. 192.168.1.10/24). The /24 is the subnet mask (255.255.255.0). In the GUI, there are separate “Address” and “Netmask” fields; combined, they identify your host on the LAN.
-
Gateway: This is the router’s address on your network. In netplan you can use gateway4: 192.168.1.1 or a routes section (to: default, via: ...). In NM GUI there’s a “Gateway” field. The gateway is needed to reach outside your local subnet.
-
DNS Servers: Either specify IPs (e.g. 8.8.8.8) or a domain name server. In netplan, put them under nameservers: addresses: [8.8.8.8,8.8.4.4]. In NM GUI/CLI there’s an IPv4 DNS field or nmcli ipv4.dns. Without DNS, your machine can’t resolve hostnames.
-
Apply and Verify: After setting these, run sudo netplan apply (or click “Apply” in the GUI) to activate. Then use ip a to check the IP, and try ping 8.8.8.8 and ping example.com to test connectivity.
As you fill each field, be careful with YAML syntax (indentation) and correct interface names. Once applied, ip addr show or nmcli device show should list the static IP.
How Do You Set Up a Static IP on Ubuntu Desktop?
On the Desktop edition you have two main options: GUI and CLI.
GUI (Settings)
You may set up a static IP on Ubuntu Desktop via the GUI by following these steps.
-
Go to Settings → Network and choose your connection (Ethernet or Wi-Fi).
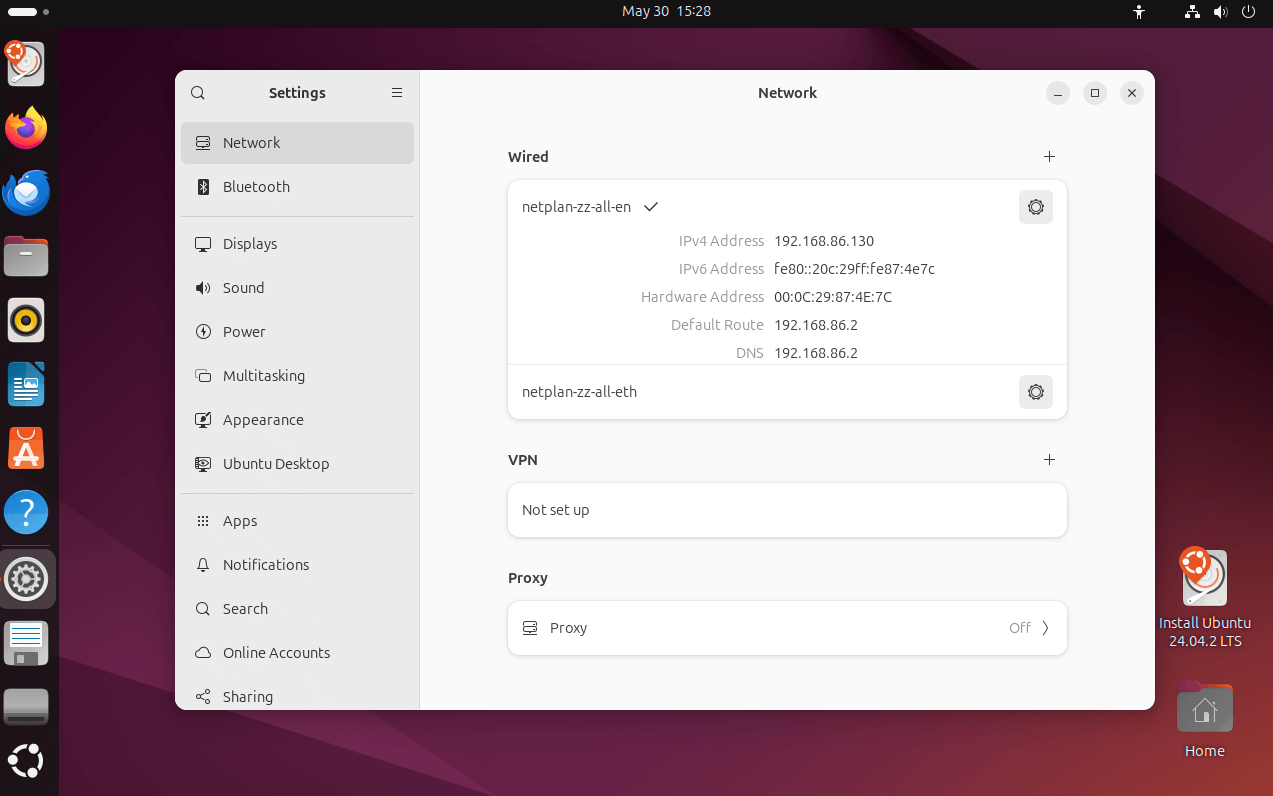
Figure 3. Setting -> Network on Ubuntu Desktop
-
Click the gear icon, then the IPv4 tab.
-
Change the Method to Manual, and enter the Address, Netmask/Prefix (e.g. /24), Gateway, and DNS in the fields provided.
For example, set Address to 192.168.1.50, Netmask to 255.255.255.0, Gateway to 192.168.1.1, etc.

Figure 4. Example on Network Settings on Desktop version
-
Hit Apply or Save.
The interface will switch from DHCP to the static values you entered
Example: In Ubuntu’s Network settings (IPv4 tab), switch to “Manual” and enter the static IP configuration.
Command Line (nmcli)
For setting a static IP address on Ubuntu 24.04, there is a new command line tool or utility known as nmcli. The main function of nmcli is managing the network settings. You may set up a static IP on Ubuntu Desktop via the CLI by following these steps.
-
Open a terminal and identify your connection name (nmcli con show).
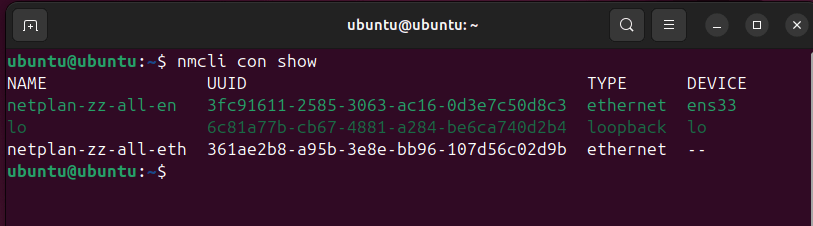
Figure 5. nmcli con show
-
Ensure that your desired static IP address is set with the connection name of the port your system is currently using. To set a static IP address, use the following commands.
sudo nmcli con mod wired ipv4.addresses <desired-ip-address>/<port-number>sudo nmcli con mod <name> ipv4.addresses 192.168.1.50/24 # set IP and netmask
sudo nmcli con mod <name> ipv4.gateway 192.168.1.1 # set gateway
sudo nmcli con mod <name> ipv4.dns 8.8.8.8 # set DNS server
sudo nmcli con mod <name> ipv4.method manual # disable DHCP
sudo nmcli con up <name> # bring up the connectionReplace
<name>with your connection’s name. These commands configure and activate the static IP in NetworkManager.Either way (GUI or CLI) achieves a static IP on Ubuntu Desktop.
Can You Set a Static IP on Ubuntu 24.04 Using Network Manager?
Yes. Ubuntu 24.04 Desktop includes NetworkManager by default, and you can use it to set a static IP. The graphical Settings panel is one interface for NM; using it is straightforward. You can use nmcli or nmtui on Desktop or Server (if NM is installed) to configure networking. In fact, on Ubuntu Desktop Netplan hands off control to NetworkManager (the “renderer” is NM), so NM is fully in charge of the connection. On Ubuntu Server (which uses netplan/networkd by default), NetworkManager isn’t typically used unless you install it. But on Desktop, NM is the normal way to configure a static IP.
What Are the Common Pitfalls When Setting a Static IP on Ubuntu?
Common configuration pitfalls when setting static IP addresses on Ubuntu are listed below.
-
YAML syntax/indentation: Netplan uses YAML, which is indentation-sensitive. All keys must be indented with spaces (no TABs) and proper nesting. A common error is mixing spaces/tabs or misaligning levels. Always use consistent two-space indents.
-
Wrong interface name: Make sure to use your actual network interface name (like eth0, enp3s0, etc.). Use
ip linkornmcli dto list them. A typo here means the config won’t apply. -
Forgetting
dhcp4: no: If you don’t disable DHCP, the interface may still get a lease alongside your static IP, causing conflicts. Always setdhcp4: nofor a static IPv4. -
Missing gateway or DNS: Omitting the gateway (default route) or DNS entries will make the network unusable (no internet or name resolution). Be sure to include
gateway4: x.x.x.x(or a routes block) and nameservers in netplan, or the equivalent in NM. -
Not applying the changes: After editing netplan files, run
sudo netplan apply(or--debug applyto see errors). Without this, the new IP won’t take effect. Similarly, after nmcli changes, bring up the connection (nmcli con up <name>) or restart NetworkManager. -
Cloud-init or existing files: On cloud/cloud-install images, a file like
50-cloud-init.yamlor 00-installer-config.yamlmight override your settings. Best practice is to create a new/etc/netplan/99-custom.yaml` or similar high-numbered file and avoid editing installer files. -
Overlapping configs: Don’t mix methods on the same interface (e.g. netplan + old
/etc/network/interfaces, or netplan + unmanaged DHCP client). Stick to one system.
Being careful with YAML formatting and applying the config usually avoids most issues.
How Can You Verify a Static IP Configuration on Ubuntu?
After setting the static IP on Ubuntu, verify it with these steps.
-
Check the interface: Run
ip addr show <iface>orip ato see the assigned IP address on the interface. It should match what you configured, gives an output as in this example below. -
Test connectivity: Ping the default gateway or another known host to ensure networking works. If pings succeed, the static setup is functioning. (If DNS fails but IP works, check your nameservers setting.
-
Use netplan try: Before a full apply, you can test the config with
sudo netplan try. This command will preview the new config and automatically roll back after 120 seconds if you don’t confirm. If no errors appear, runsudo netplan apply. -
Check NetworkManager (if used): On Desktop, you can run
nmcli device showornmcli con show <name>to see the IPv4 settings. -
Verify DNS resolution: Run
systemd-resolve --statusto inspect which DNS servers the system is using. -
Review routes: Use
ip routeto ensure there’s a default route via your gateway IP.You should see a line like “default via 192.168.1.1 dev eth0” matching your gateway.
These steps (particularly ip a and ping) confirm the static IP is active and that your system can reach the network. Remember, save and apply your config, then double-check with ip addr and ping to verify success.