How to Conduct Full TLS Inspection with Zenarmor SSE
Modern encryption protects data privacy but also creates security blind spots, leaving organizations vulnerable to hidden threats within encrypted traffic. Traditional security tools can only see destination IPs and domains, making it impossible to inspect the actual content passing through secure channels.
As more internet traffic is encrypted, traditional security tools struggle to inspect content, leaving organizations vulnerable to several cyber threats. TLS inspection solves this issue by decrypting traffic, analyzing its contents for threats, and then securely re-encrypting it before it reaches its destination. This process restores security visibility while maintaining data integrity and compliance with privacy regulations.
Zenarmor SSE’s Full TLS Inspection takes this a step further, providing deep visibility into encrypted traffic while seamlessly integrating with existing security policies. It enables organizations to detect and prevent:
- Malware hidden in HTTPS downloads.
- Data exfiltration attempts.
- Phishing content hiding behind encrypted websites.
- Full URL paths, not just domains.
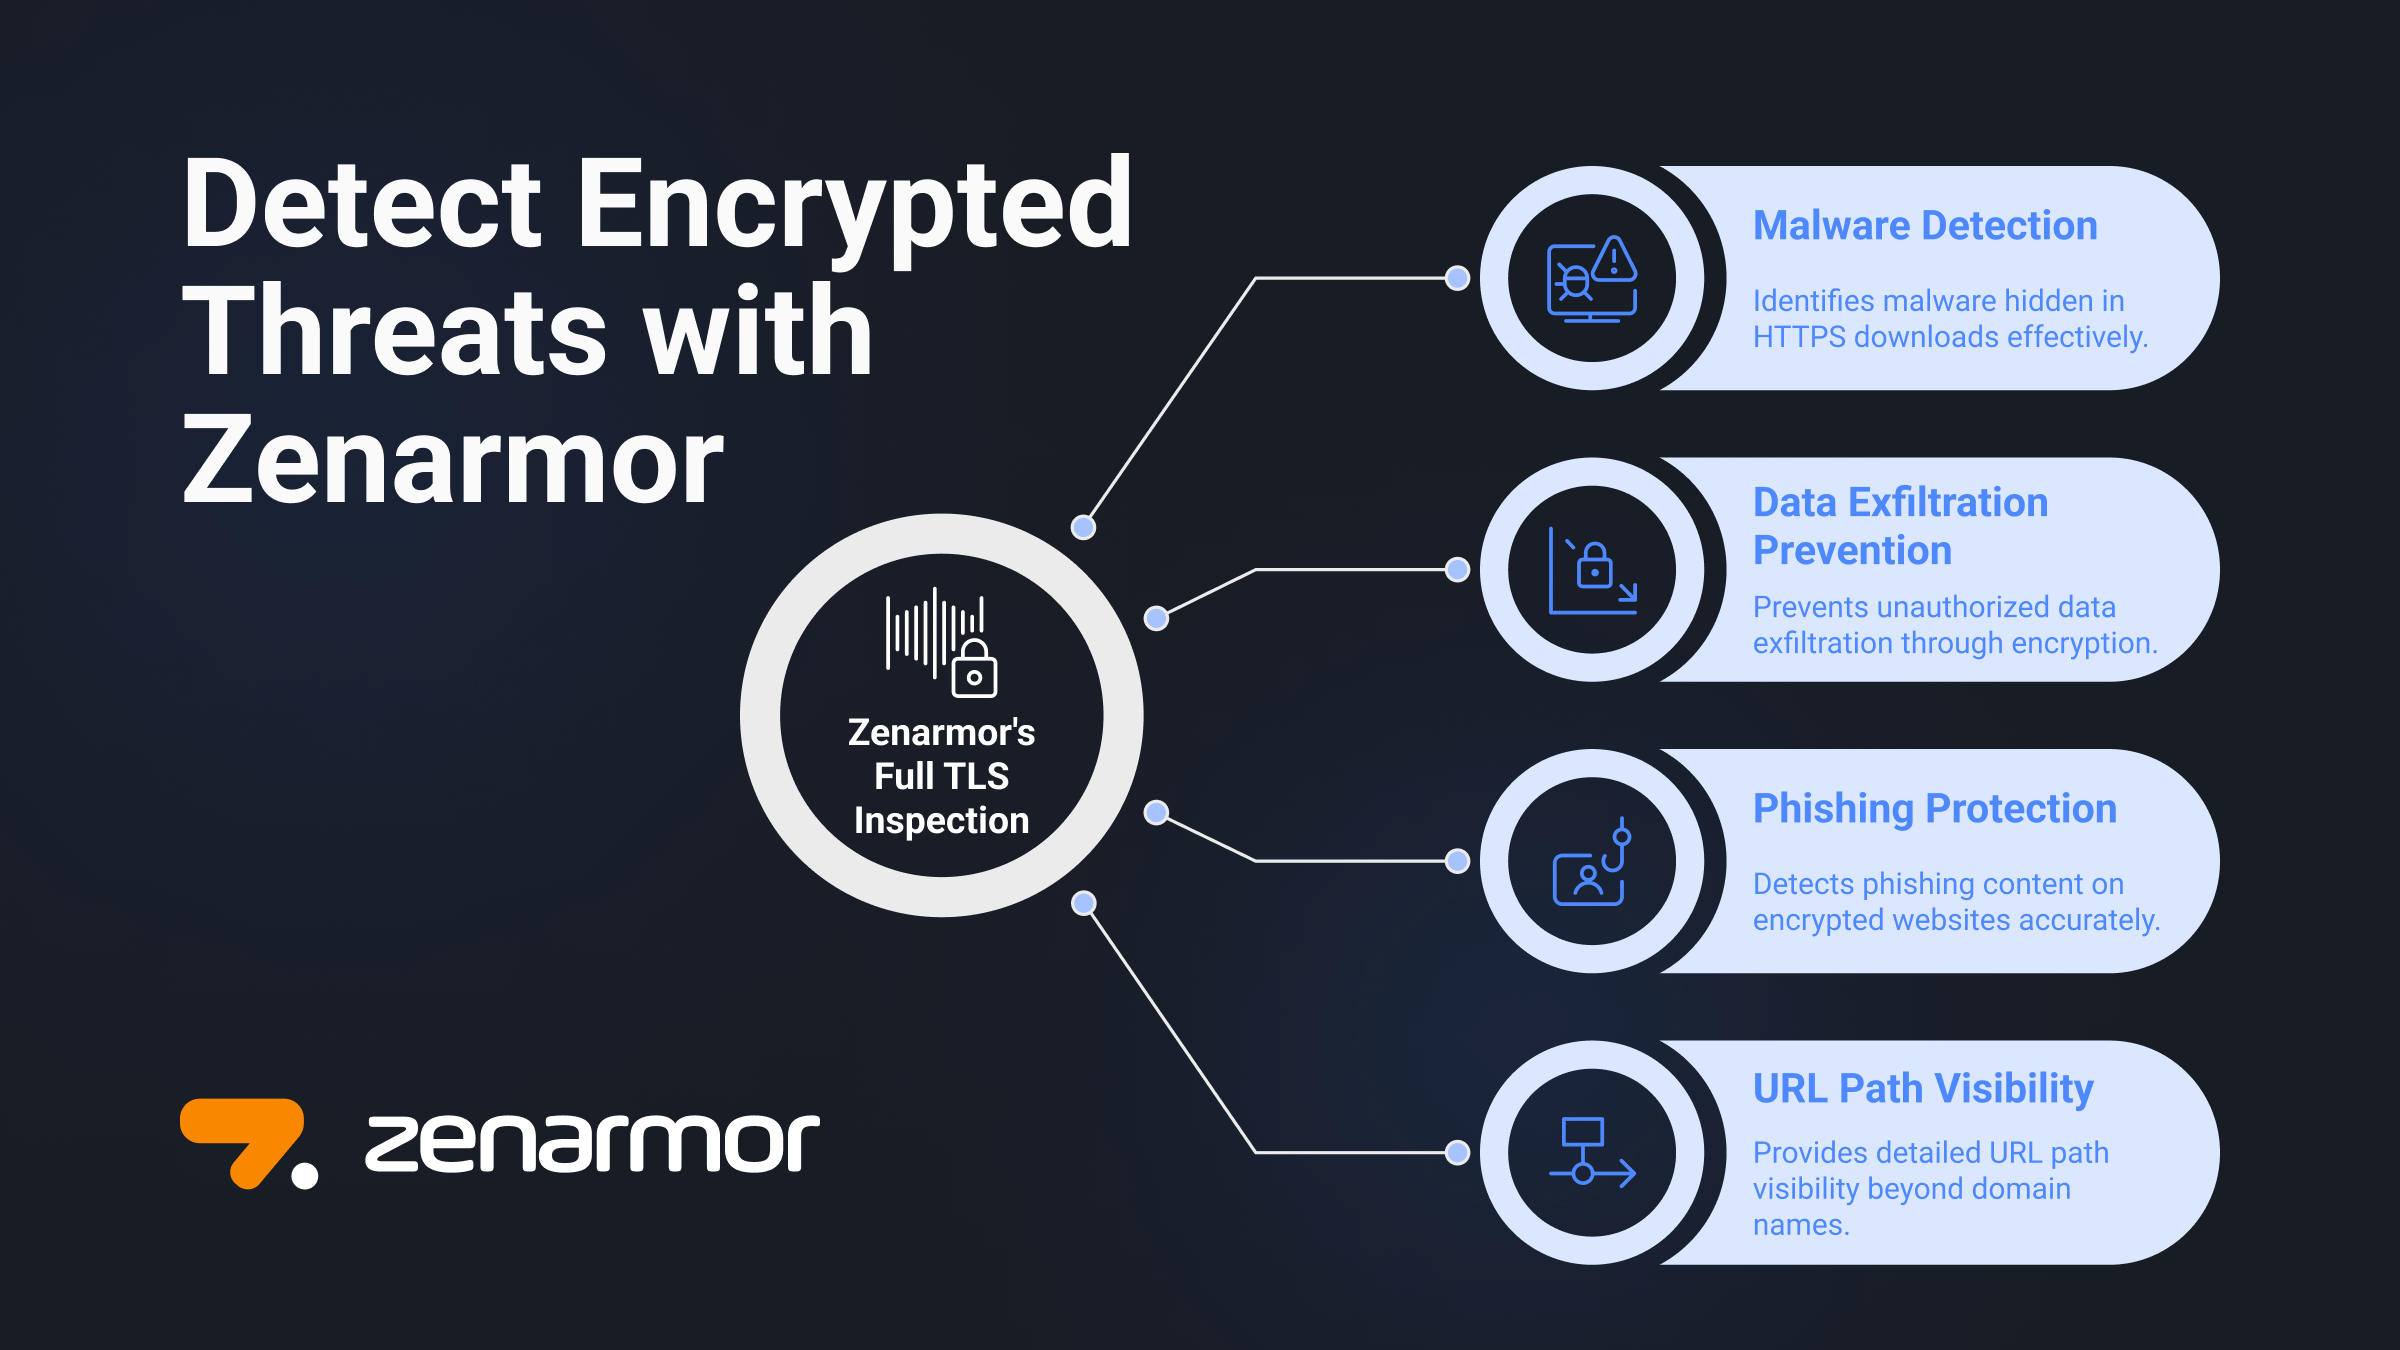
Figure 1. Encrypted Threat Detection with Zenarmor.
This inspection works in line with existing Zenarmor policies, ensuring content filtering, threat detection, and application controls all work at the page level inside encrypted flows.
For Zenarmor users, this means:
- Stronger threat detection.
- Granular content filtering.
- Full audit visibility for compliance (GDPR, PCI-DSS, HIPAA).
- Safer web browsing for all users, including guests.
With these benefits in place, organizations need an efficient way to manage and deploy TLS inspection across their infrastructure—this is where Zenarmor’s centralized management simplifies the process.
Simple Deployment with Centralized Management
Zenarmor SSE subscription via Zenconsole enables full TLS inspection to be straightforward, even for distributed networks, through a single, unified console. Security teams can efficiently enable and configure Zenarmor TLS inspection policies with minimal complexity, ensuring integration into their existing infrastructure. The platform provides real-time traffic analytics, allowing teams to monitor network activity and respond to threats proactively. Managing multiple enforcement points becomes effortless, as Zenarmor eliminates the need for additional hardware while maintaining a streamlined security posture.
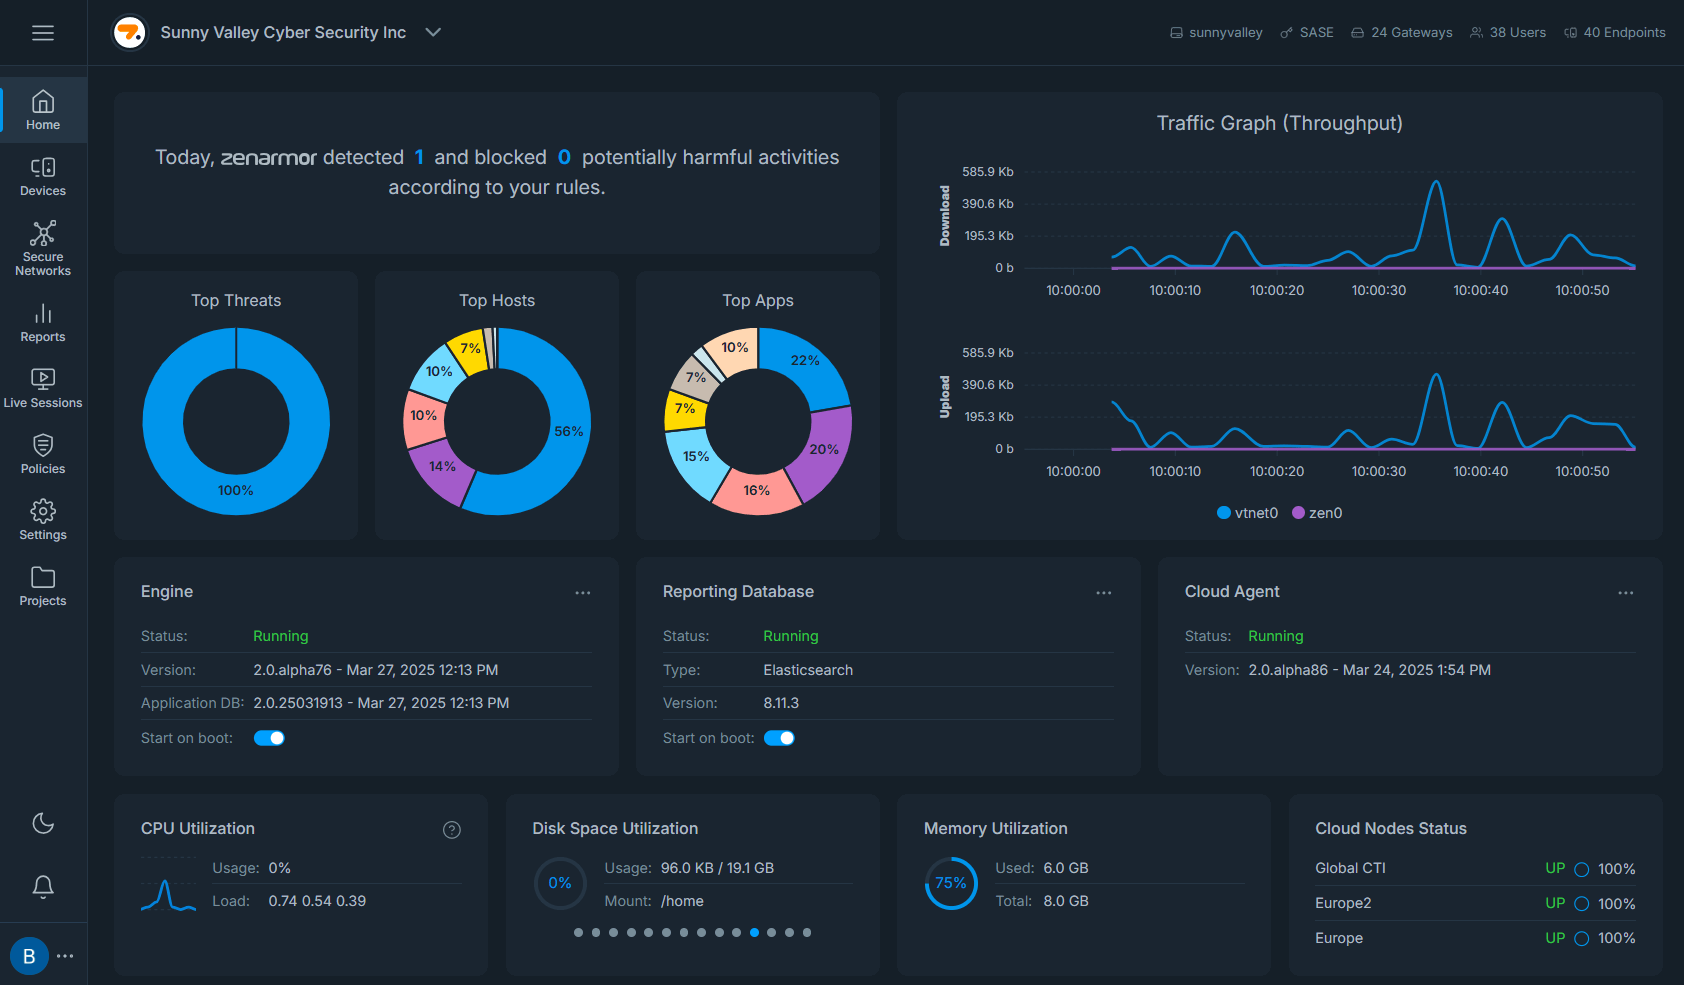
Figure 2. Zenarmor dashboard provides an overview of Zenarmor's real-time network activity, including detected threats, top hosts and applications, traffic throughput, and system resource utilization.
Prerequisites
Before enabling TLS Inspection, ensure you have:
-
A Zenarmor SSE account and a registered gateway node: Zenarmor relies on its cloud-based management console (Zenconsole), where you configure, monitor, and manage all policies and inspections. Each gateway (firewall, router, or security appliance) you want to monitor and protect must be registered as a node within Zenconsole.
-
A valid Zenarmor TLS CA Certificate: This certificate will be used by Zenarmor to re-sign decrypted traffic after inspection. Client devices (like user laptops or desktops) must trust this certificate to avoid browser security warnings.
-
Administrative access to your endpoints: This is critical to install the Zenarmor CA Certificate into the Trusted Root Certification Authorities store on Windows, macOS, Linux, or mobile devices. Without this, the inspected traffic will appear invalid to browsers and apps, triggering SSL/TLS errors.
Step 1: Installing the Zenarmor CA Certificate on Endpoints
Since Zenarmor performs Man-in-the-Middle (MITM) decryption, endpoints need to trust the Zenarmor-generated certificate to avoid browser warnings.
To Install the Certificate on Windows Machines:
-
Download the Zenarmor CA certificate from Zenconsole (either in PEM or CRT format).
-
On the Windows endpoint, run certlm.msc.
-
Import the Zenarmor CA certificate into the Trusted Root Certification Authorities store.
-
For maximum coverage, repeat the process on both the Current User and Local Computer.
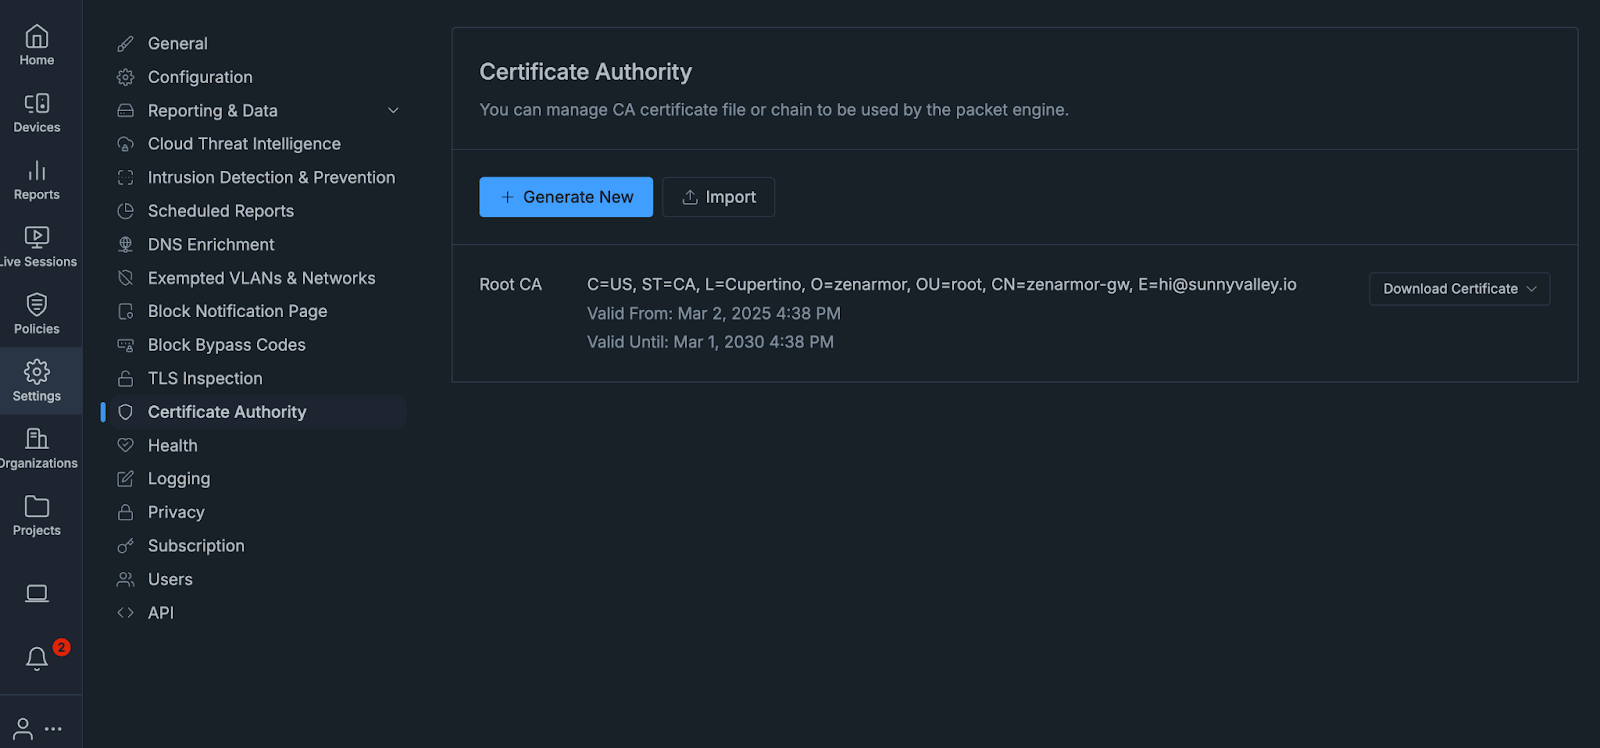
Figure 3. Manage and download the Zenarmor Root CA certificate for TLS inspection and secure traffic decryption.
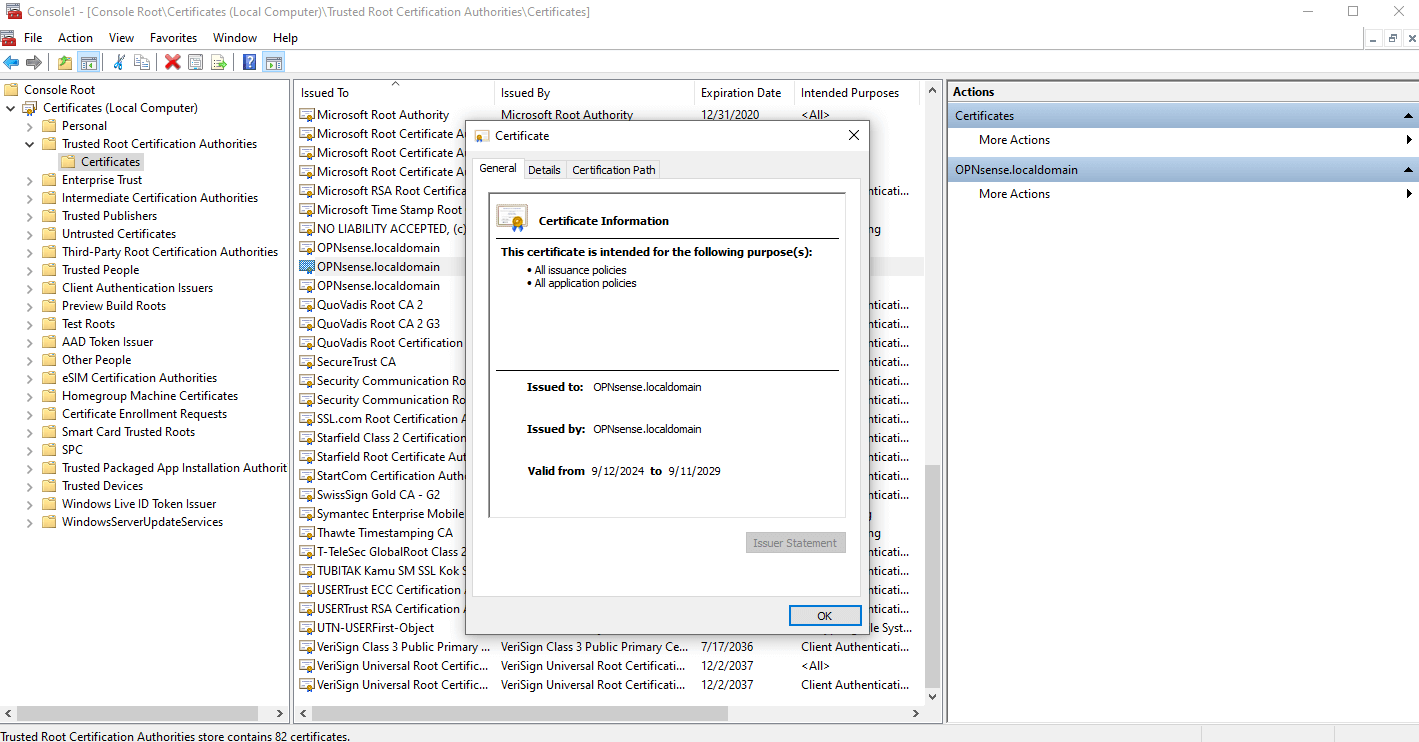
Figure 4. The Zenarmor Root CA certificate is successfully installed in the Trusted Root Certification Authorities store.
Step 2: Creating a Dedicated Policy for TLS Inspection
Zenarmor applies policies based on interfaces, VLANs, and traffic types. To conduct full TLS Inspection, the best practice is to create a dedicated policy specifically for TLS inspection traffic.
You may easily create a TLS Policy by following the next steps.
-
Go to the Policies tab in Zenconsole.
-
Click Create New Policy.
-
Name the policy (for example, TLS1).
-
Select the target interfaces (e.g., ens33 and ens37).
-
You may enable both Inbound and Outbound traffic inspection.
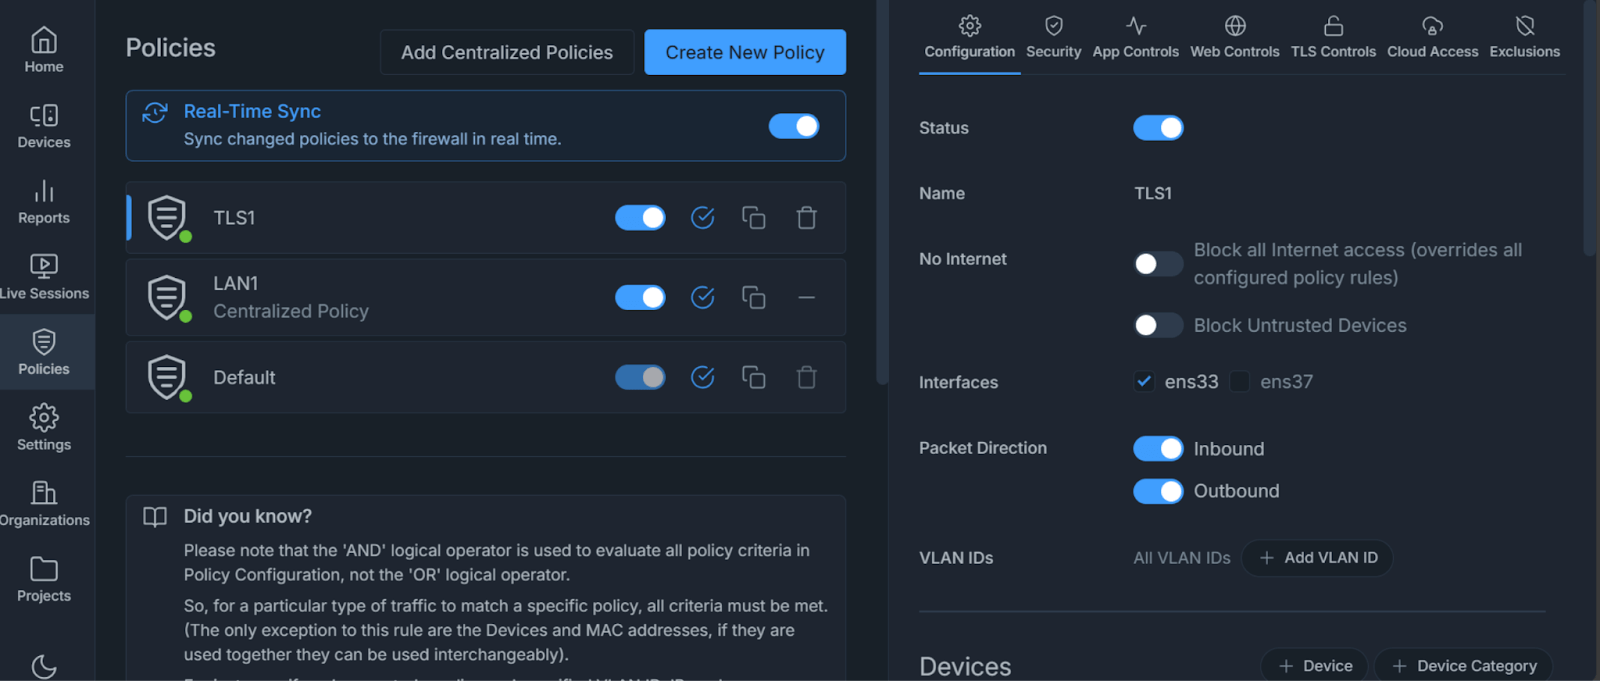
Figure 5. This pane illustrates the process of configuring a dedicated TLS Inspection policy in Zenarmor by selecting network interfaces, enabling inbound and outbound traffic inspection, and ensuring real-time policy synchronization
Step 3: Enabling Full TLS Inspection
Once the policy is created, you may enable full TLS inspection on your network by following the next steps.
-
Navigate to the TLS Controls tab under the policy, such as “TLS1”.
-
Toggle on Enable Full TLS Inspection (TLS decrypt/re-encrypt).
-
Optionally, you may manage exclusions for certificate-pinned websites or flows missing DNS data.
-
Activate the policy.
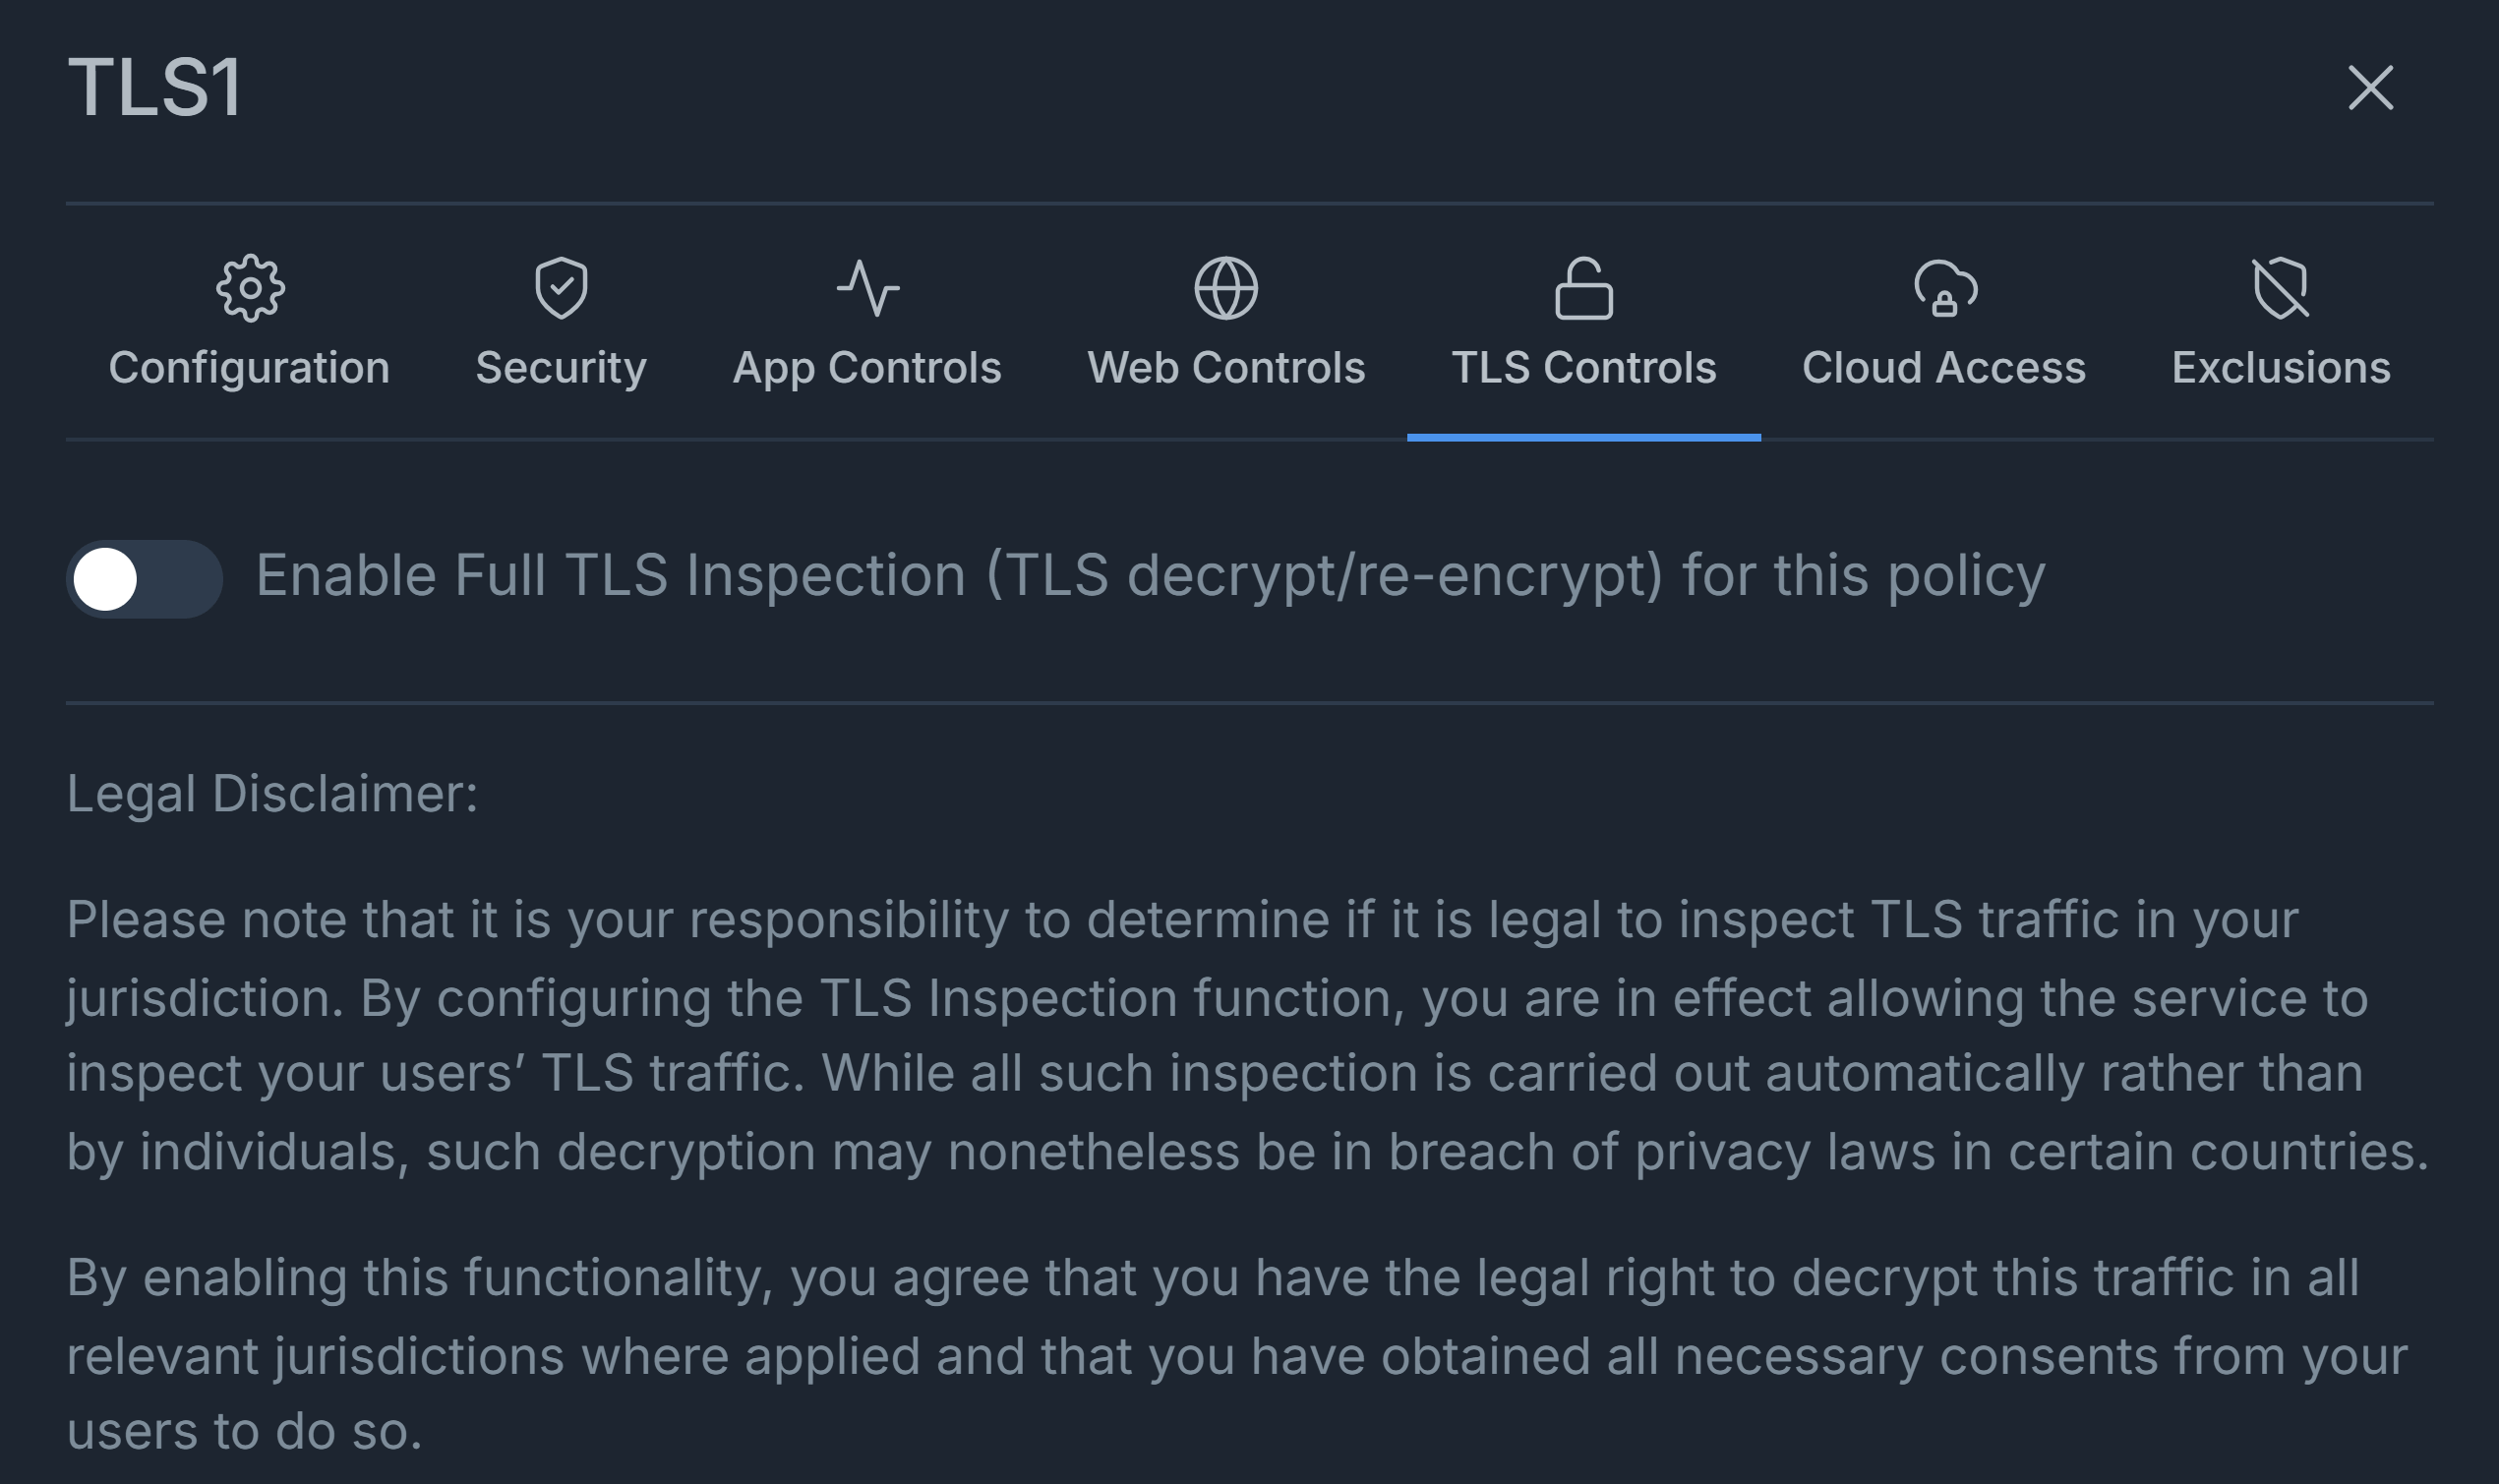
Figure 6. Enable or disable Full TLS Inspection for a specific policy to control encrypted traffic visibility.
Step 4: Testing TLS Inspection
Once configured, you can test whether full TLS inspection is working for your network
-
Browse to a test site, such as:
https://www.cnn.com -
Open Zenconsole > Live Sessions > TLS Tab.
-
Confirm Encryption field is TLS-Inspected.
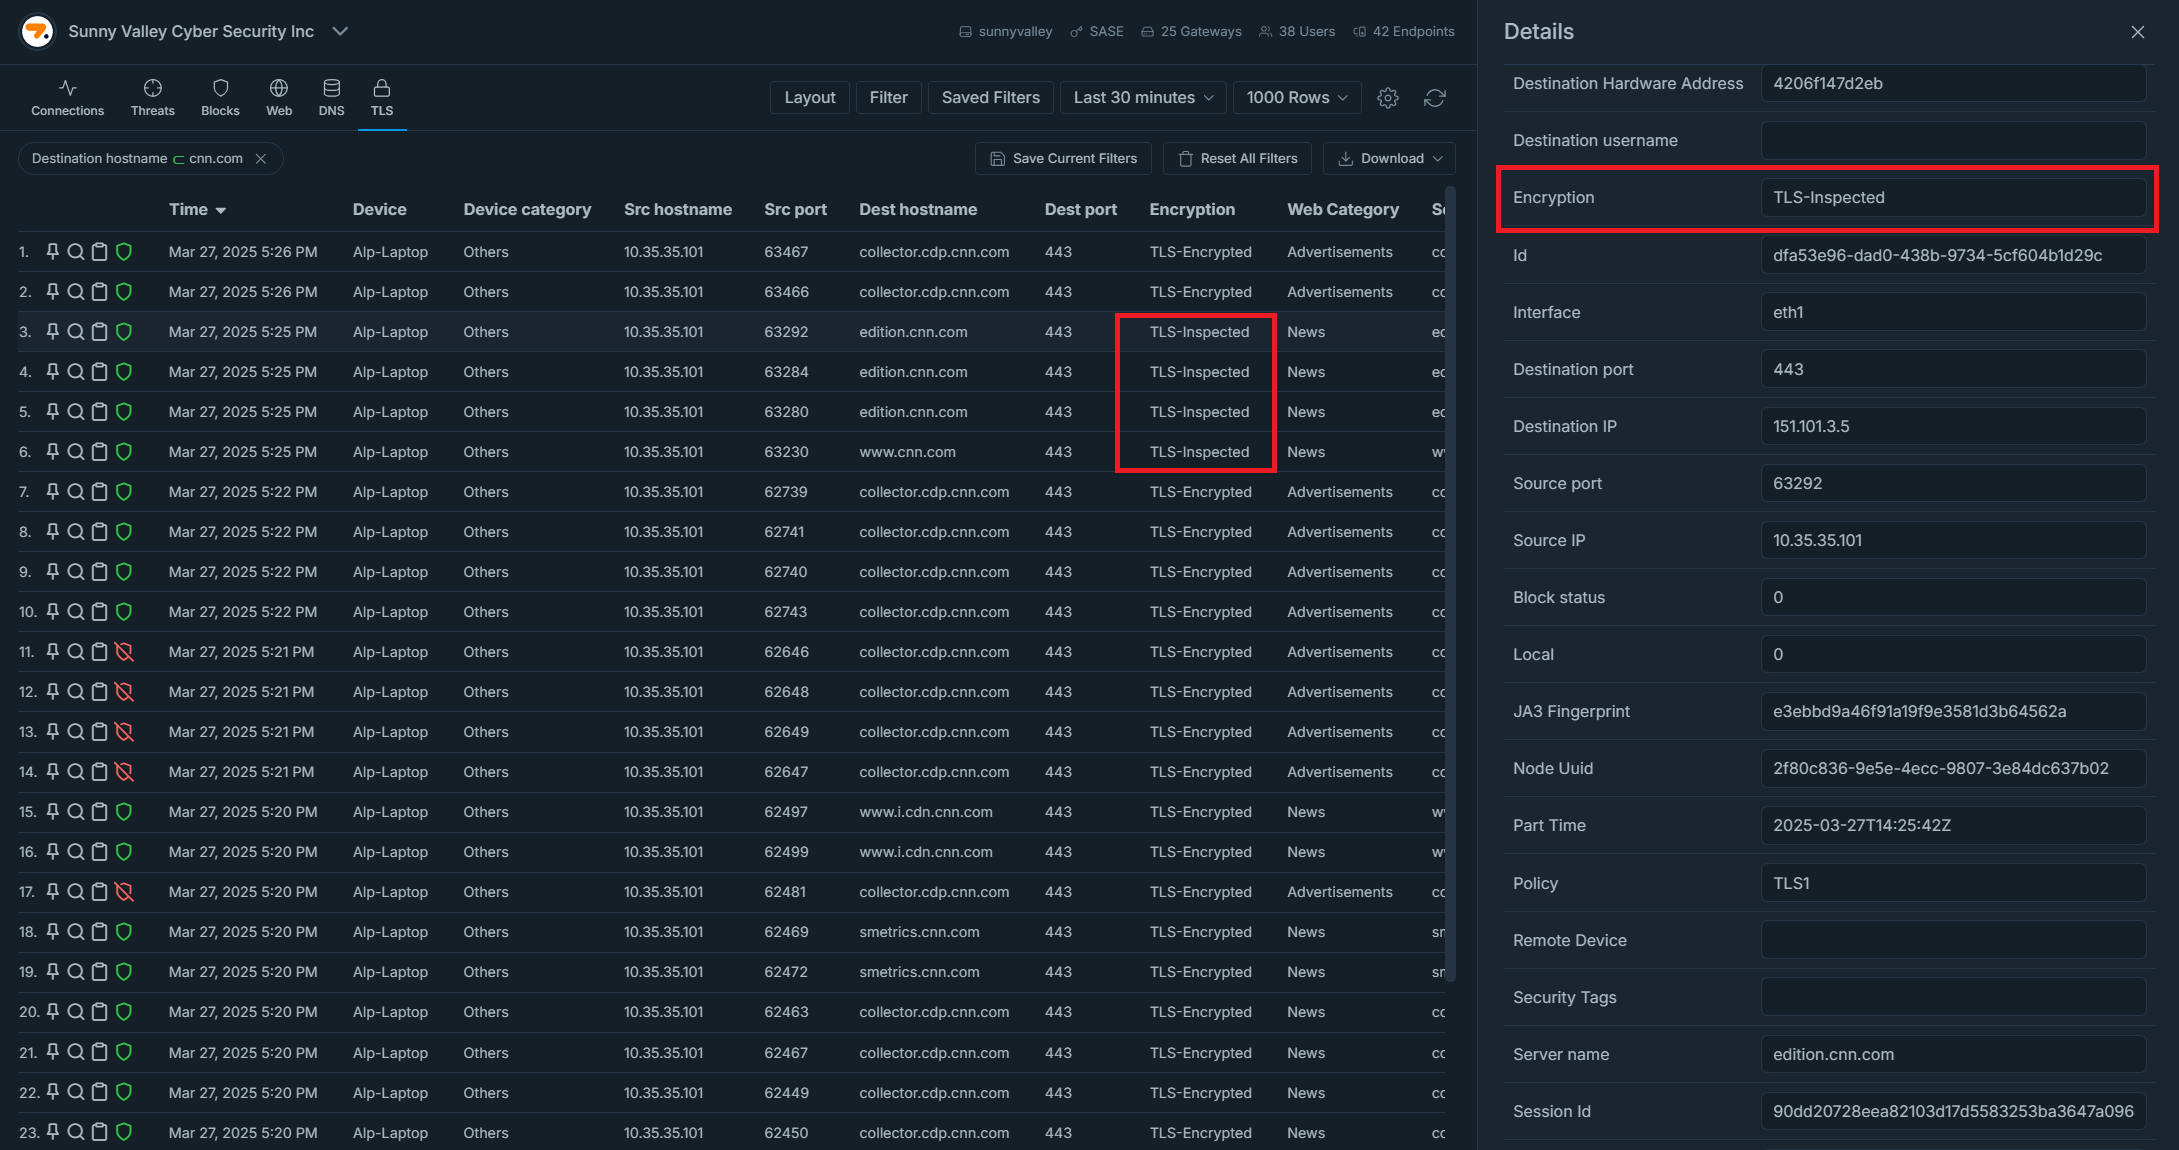
Figure 7. Having TLS Inspected in the Encryption field verifies that Full TLS Inspection.
-
Also, you may check the certificate on your browser by clicking on the “View site information” icon at the beginning of the address bar. This will open a menu.
-
Then, click on the Connection is secure menu item.
-
Click on the Certificate is valid link to view the certificate.
-
Verify that the Organization (O) is Zenarmor and Organizational Unit (OU) is root.
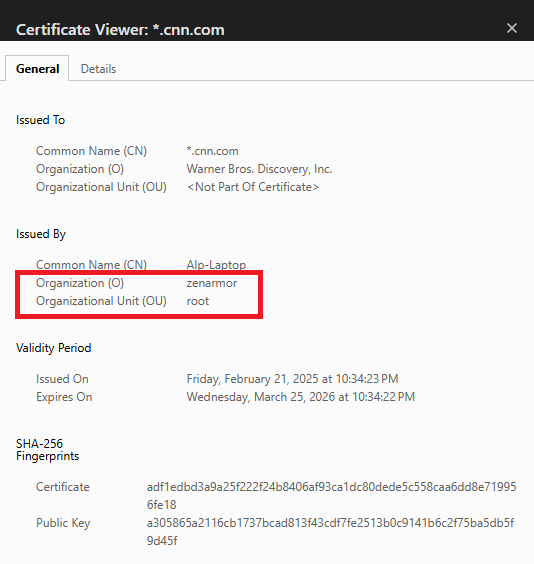
Figure 8. Viewing certificate on Chrome browser
-
When you navigate to the Details and click on the Issuer in the Certificate Fields, you should see that the Field Value appears as given below.
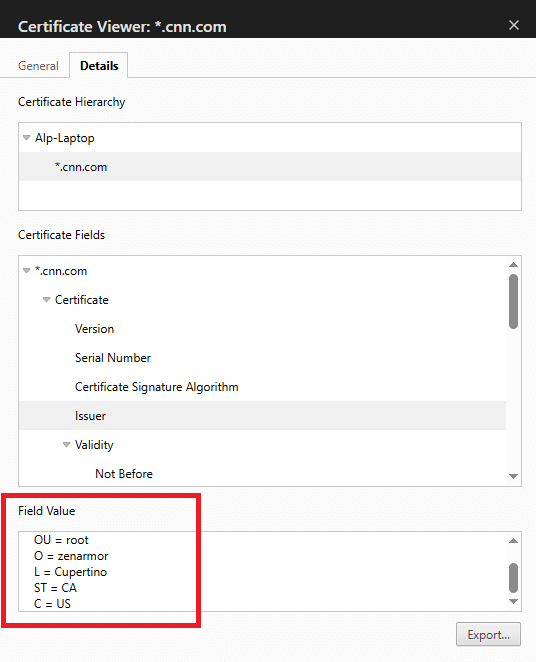
Figure 9. Viewing Certificate Details
Monitoring and Fine-Tuning
After enabling TLS Inspection, monitor traffic from the Reports and Live Sessions tabs.
You can fine-tune policies by:
- Blocking unwanted web categories like Adult, Gambling, and Malware.
- Allowlisting trusted apps to skip inspection if they break due to certificate pinning.
- Reviewing encryption levels and flagging outdated or weak ciphers.
Conclusion
Zenarmor SSE’s Full TLS Inspection is a critical feature for modern network security. It transforms encrypted traffic from a blind spot into a fully visible, controlled asset.
With TLS Inspection, Zenarmor provides:
- Full content visibility inside encrypted traffic.
- Malware and phishing detection inside HTTPS.
- Granular content filtering at the page level.
- Real-time application and file control.
- Compliance visibility for regulated industries (PCI, HIPAA, GDPR).
- Centralized policy management through Zenconsole.
For organizations concerned with compliance, visibility, and advanced threat detection, enabling Full TLS Inspection with Zenarmor SSE is not just a good practice; it’s becoming a necessity.
If you’re evaluating Zenarmor SSE for your environment, this is one feature you cannot afford to overlook.