How to Block Detected Threats via Dashboard or Live Sessions on Zenarmor
Zenarmor is a next-generation firewall solution designed to enhance network visibility and protect against cyber threats. It integrates advanced Deep Packet Inspection (DPI), real-time threat intelligence (CTI), and AI-powered anomaly detection to safeguard networks from evolving security risks.
With its Cyber Threat Intelligence (CTI) engine, Zenarmor continuously analyzes global threat data, identifying malware domains, phishing attempts, botnet activity, and other malicious traffic patterns. This intelligence is sourced from a combination of global threat intelligence feeds (updated in real-time) and AI-driven behavioral analysis to detect new and emerging threats. By utilizing real-time monitoring and reporting, administrators can detect security threats as they occur. However, not all detected threats are automatically blocked due to policy configurations, allowlists, or dynamic threat behavior.
Why Are Detected Threats Not Blocked Automatically?
Zenarmor detects potential threats using its security intelligence features, but certain threats may not be automatically blocked due to the following reasons.
- Policy misconfiguration: The matching policy may not have strict filtering enabled.
- Allow-listed domains/IPs: Some domains may be allowed due to your rules.
- Category-based filtering limitations: A threat might belong to a category that is not set to be blocked.
- Real-time decision making: Some threats require administrator intervention for immediate action.
Due to these factors, administrators may need to take manual action to mitigate threats. This is where Zenarmor’s advanced reporting features become invaluable—allowing administrators to block threats on the fly without the need for complex policy modifications.
Why is Monitoring Live Sessions Crucial?
Live Sessions provide real-time insights into network traffic, enabling administrators to detect and respond to malicious activity promptly. While some threats may be automatically blocked due to existing security policies, others may still appear as allowed in Live Sessions, requiring manual intervention. Regularly monitoring Live Sessions ensures that any unblocked threats are quickly identified and mitigated.
Blocking a Detected Malware Domain via the Zenarmor’s Dashboard and Live Sessions Explorer
After installing Zenarmor on your BSD-based or Linux-based gateway and completing the initial configuration, you can easily block threats and protect your users from malicious sites by following these steps.
Step 1: Identifying Suspicious Traffic
To effectively protect your network, the first step is identifying suspicious traffic. Follow these steps to detect potentially harmful connections.
-
Go to the Zenarmor Dashboard.
-
Navigate to the Dashboard on your Zenarmor node. The Threat Summary pane at the top displays detected and blocked threats.
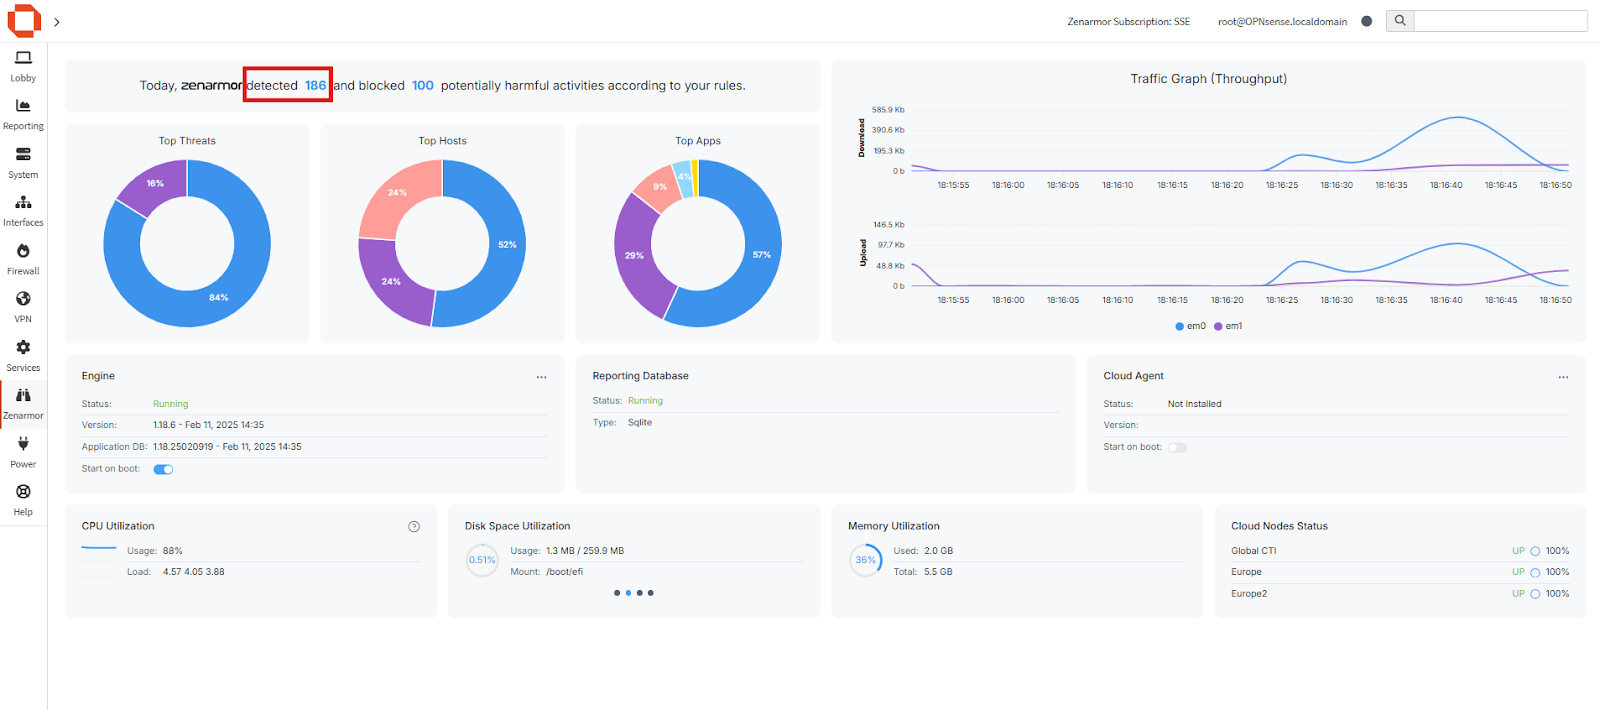
Figure 1. Zenarmor Dashboard
-
Check the total number of detected and blocked threats. Clicking on these values redirects you to the Threats Live Session Explorer, which provides real-time insights into all identified and blocked threats.
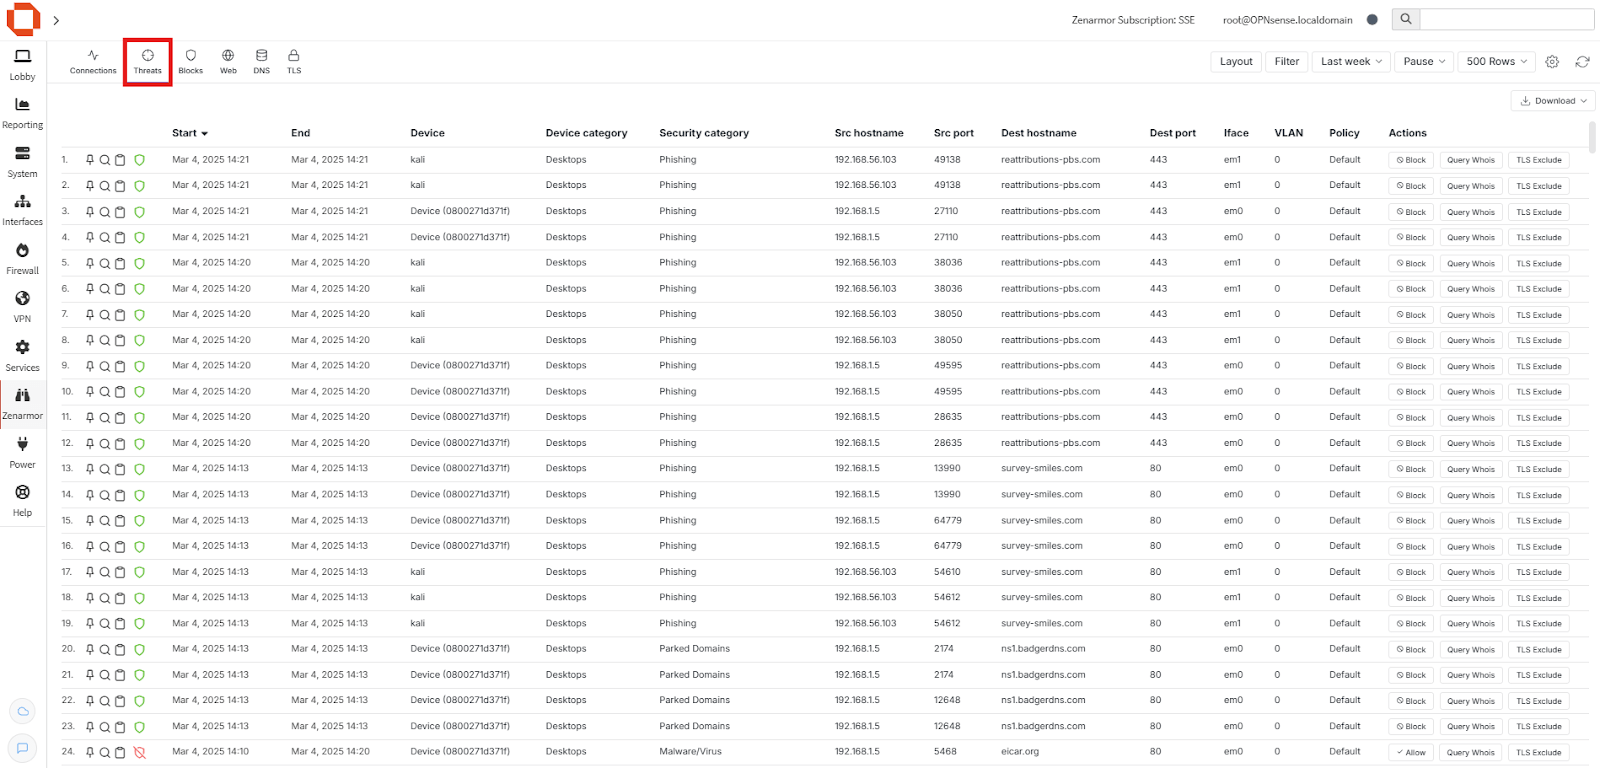
Figure 2. Threats Live Session Explorer
The Live Sessions page can be accessed on your OPNsense node by navigating to the Zenarmor > Live Sessions menu on the left sidebar. as well
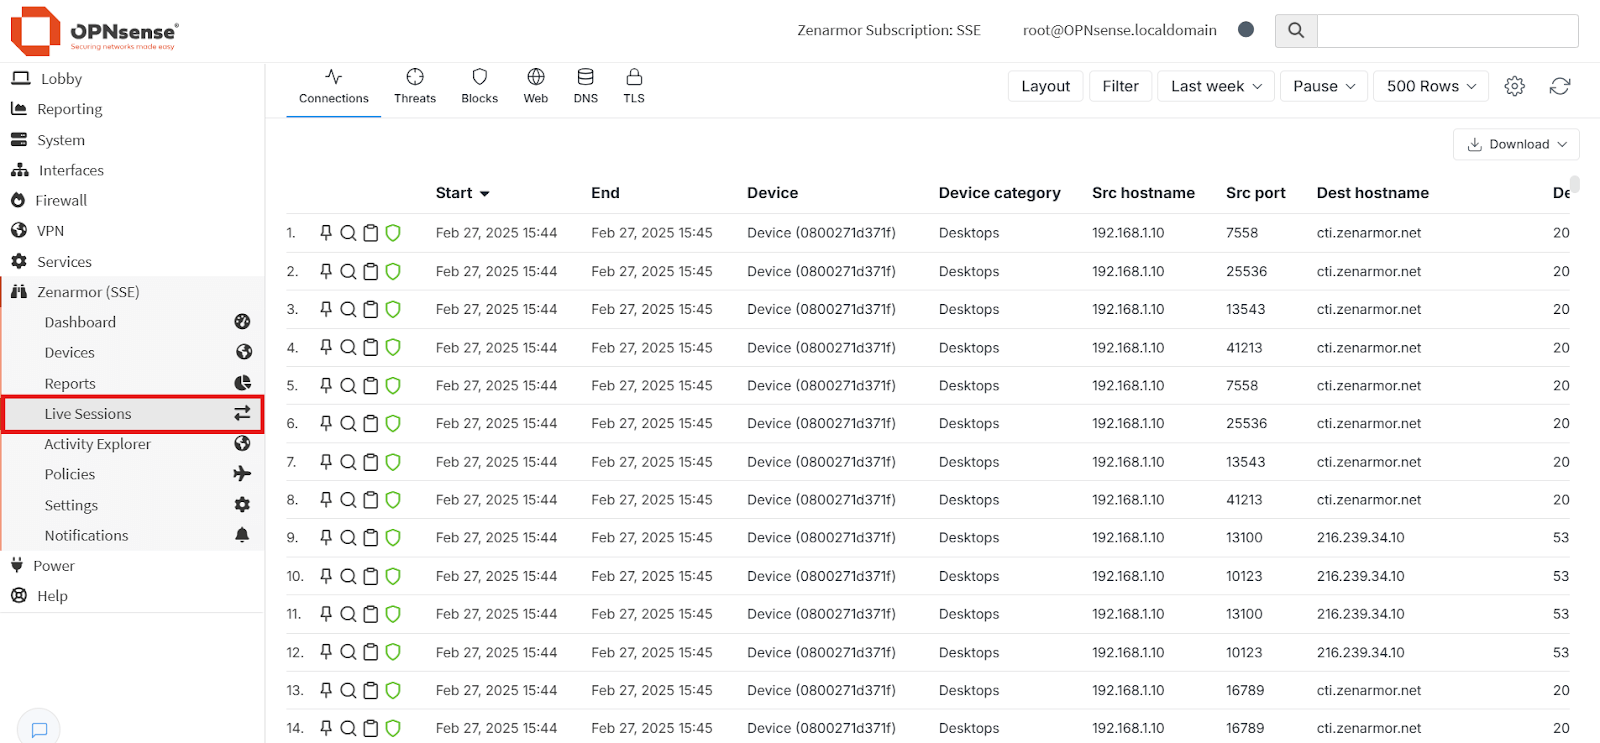
Figure 3. Accesing Live Sessions Page on OPNsense
-
When reviewing the logs under the Threats section in Live Sessions, potentially dangerous traffic that has not been automatically blocked can be identified. In this example, we have detected the domain
reattributions-pbs.comin the threat traffic logs. Although it has not been automatically blocked, it is flagged as malware-related, indicating that it may host harmful content or distribute malicious software.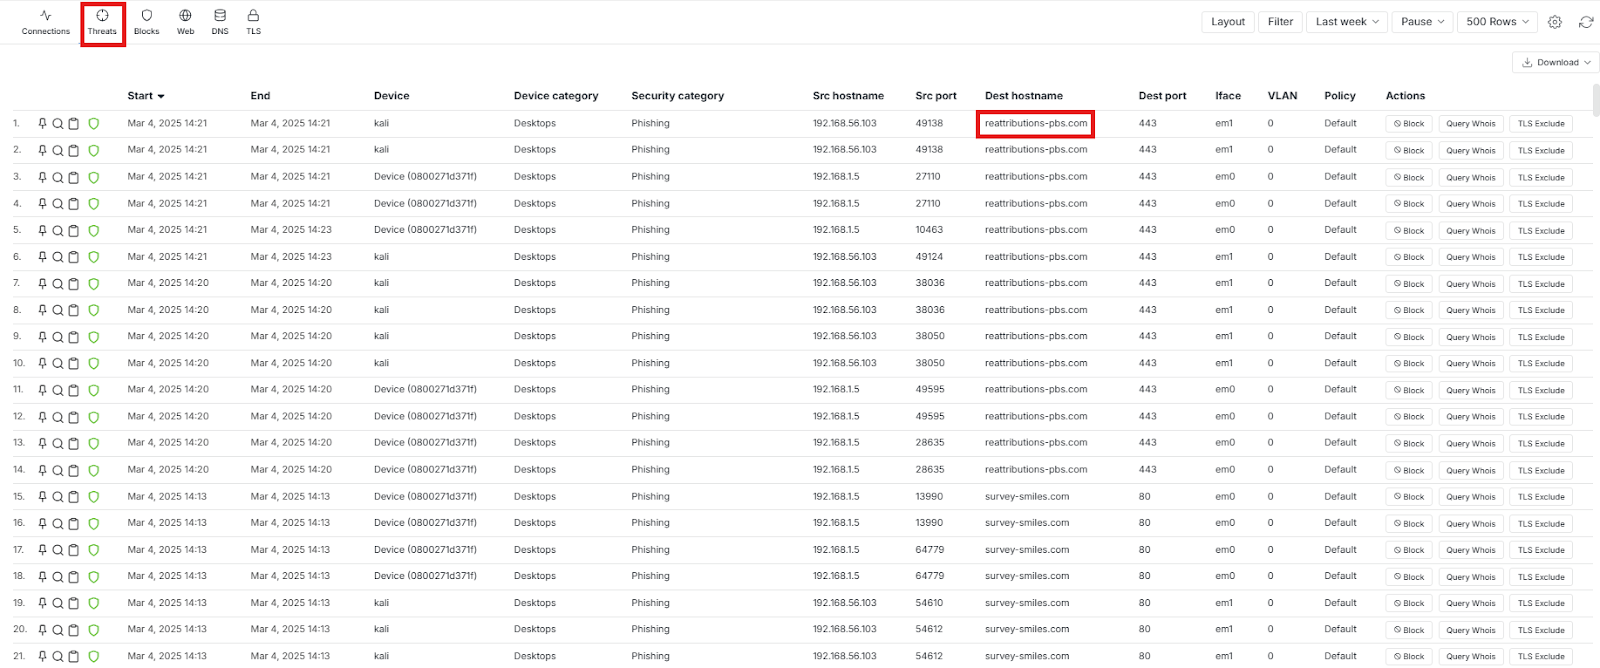
Figure 4. Identifying a Suspicious Domain in Live Sessions
-
To further analyze the domain, you can check the Security Category field, as shown in the image below. This domain falls under the Phishing security category, indicating that it may be involved in fraudulent activities designed to steal sensitive information.
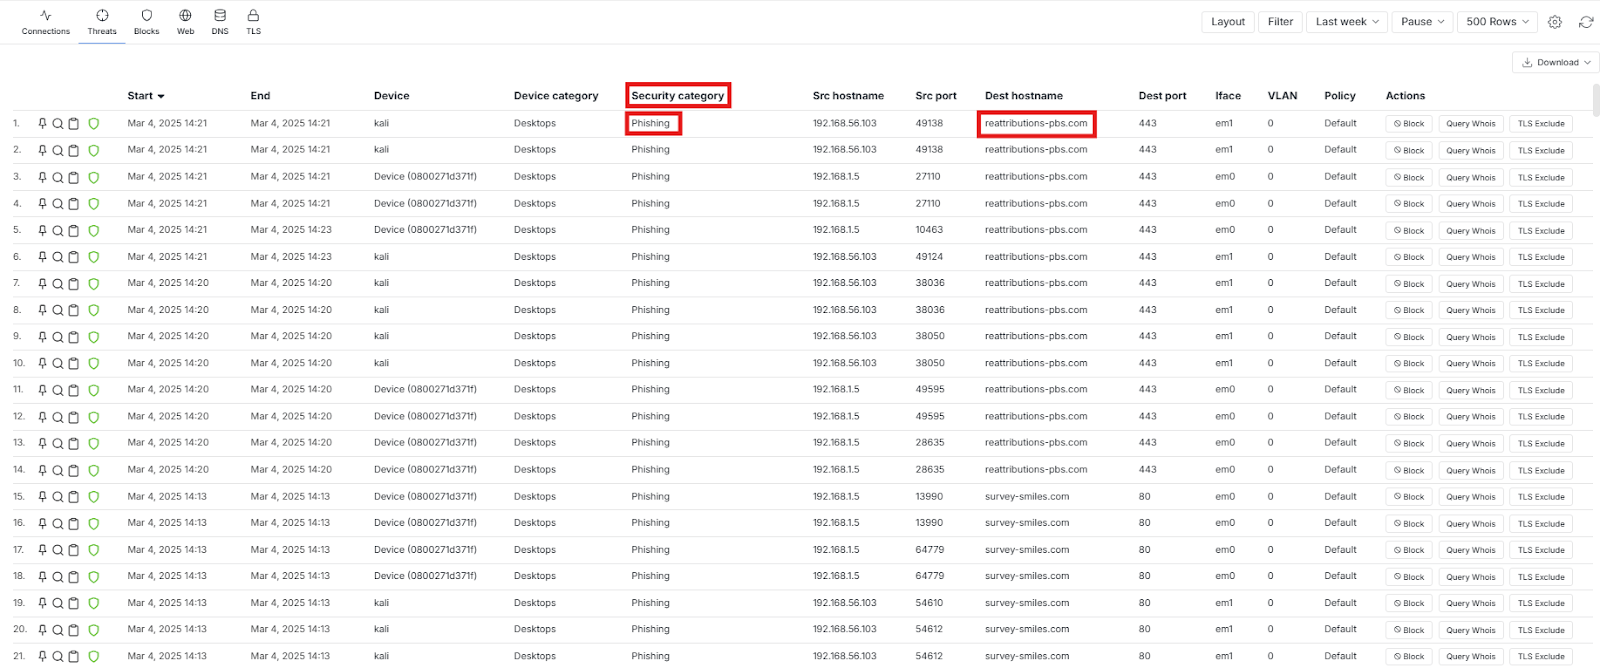
Figure 5. Identifying Security Category
-
Additionally, by clicking on the magnifying glass icon, you can access more details about the detected domain and its classification.
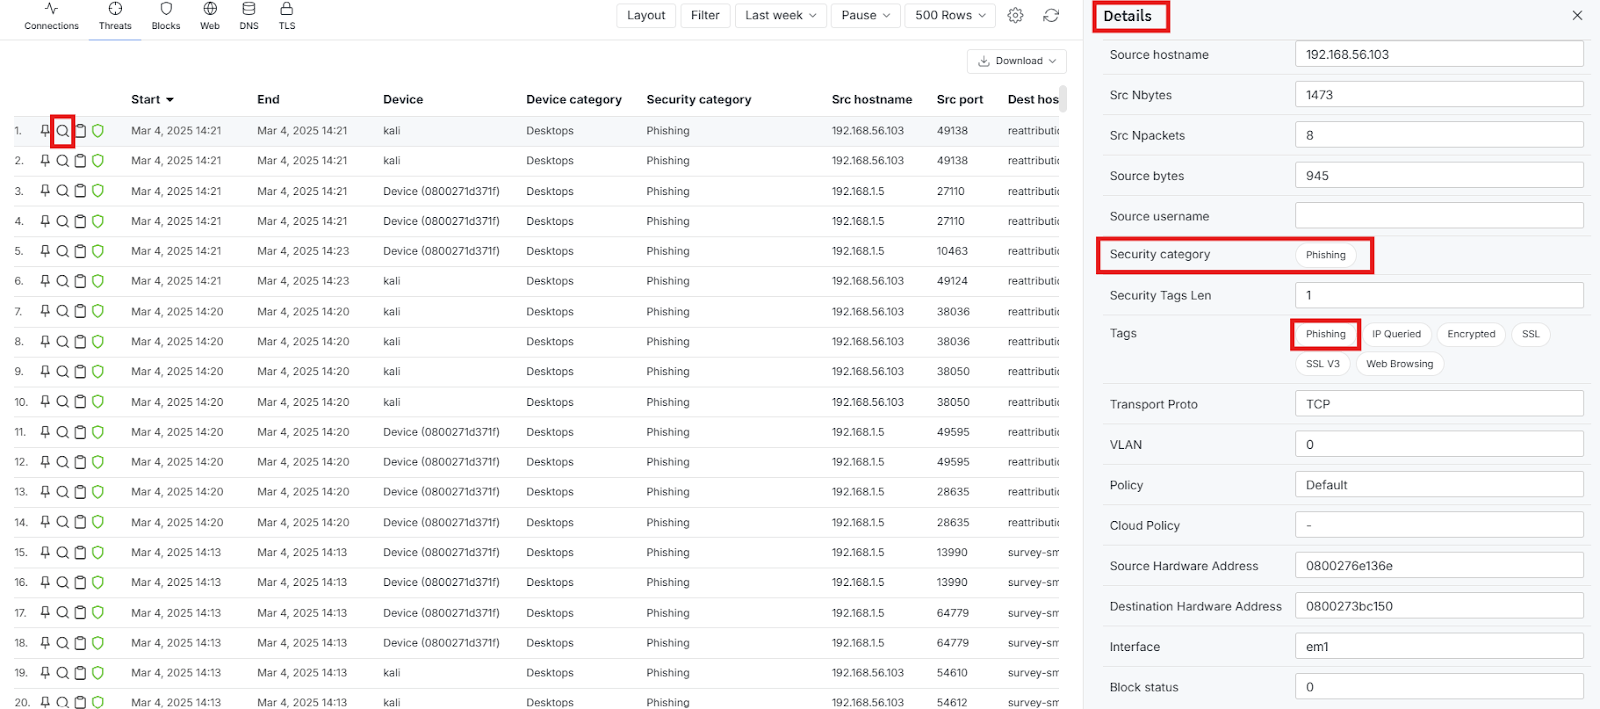
Figure 6. Viewing Traffic Details of Detected Domain
-
Before proceeding with blocking, it is recommended to perform a Whois query by clicking the Query Whois button under Action column. This allows you to gather more information about the domain, such as its registration details, ownership, and potential risks. By analyzing Whois data, you can make an informed decision before taking any action.
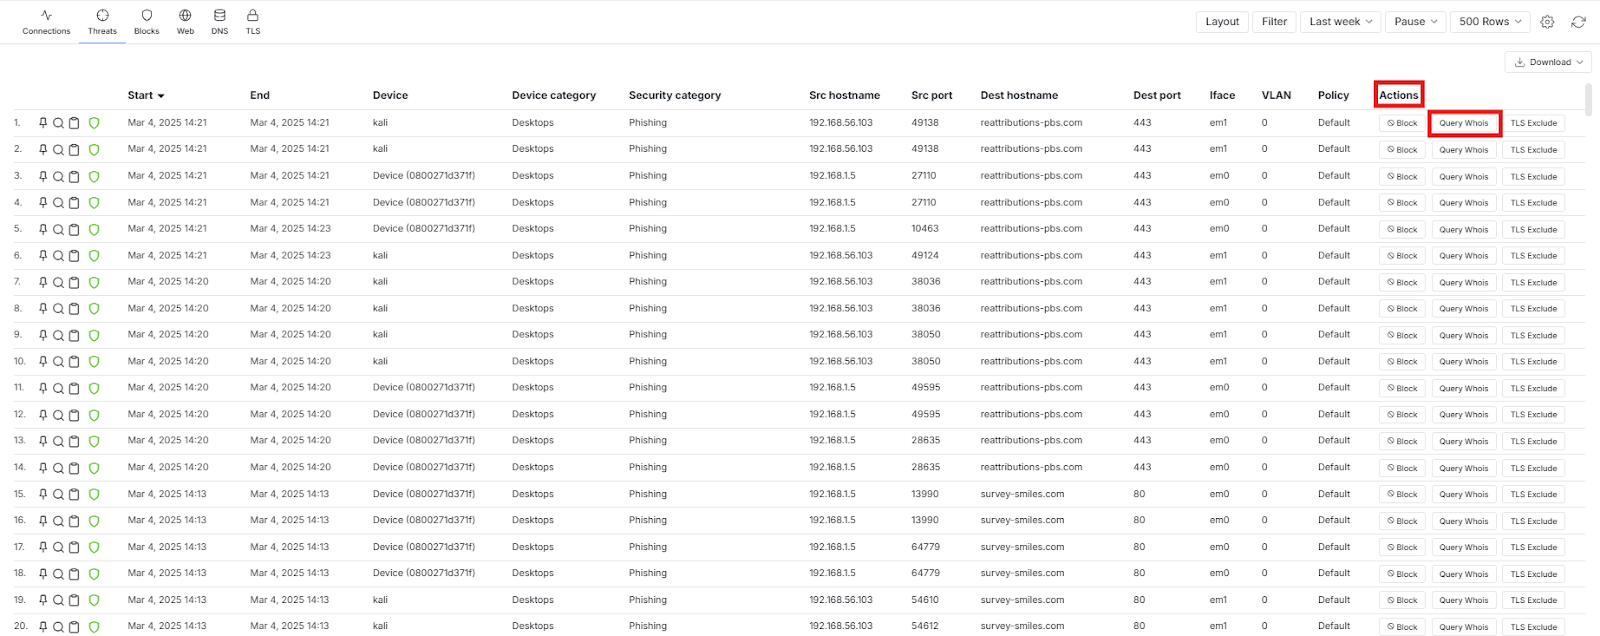
Figure 7. Zenarmor Threats Tab – Actions Menu View
-
Click on the Query Whois button to open a pop-up window displaying two options:
- Domain Name Whois Lookup: Retrieves registration details for the domain (e.g.,
reattributions-pbs.com). - IP Address Whois Lookup: Provides information about the hosting provider and network (e.g.,
179.43.152.166).
- Domain Name Whois Lookup: Retrieves registration details for the domain (e.g.,
-
Selecting either option and clicking Query will display details about the domain or IP, helping to assess its legitimacy before making a blocking decision.
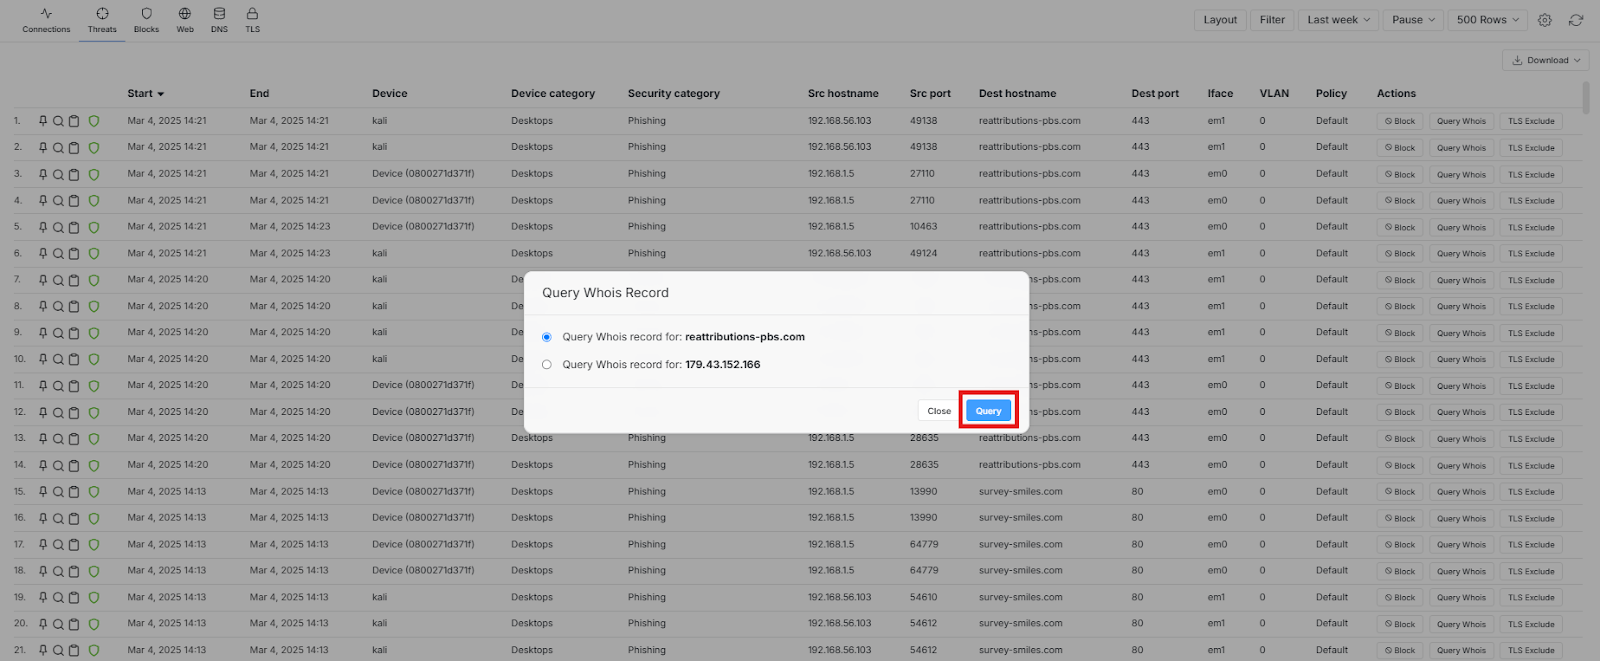
Figure 8. Query Whois Record Pop-up
Step 2: Blocking the Domain
Once a suspicious domain is identified, the next step is to block it to prevent unauthorized access. Follow these steps to ensure immediate mitigation.
-
Find the row where the harmful domain appears.
-
Click the Block button under the Actions column.
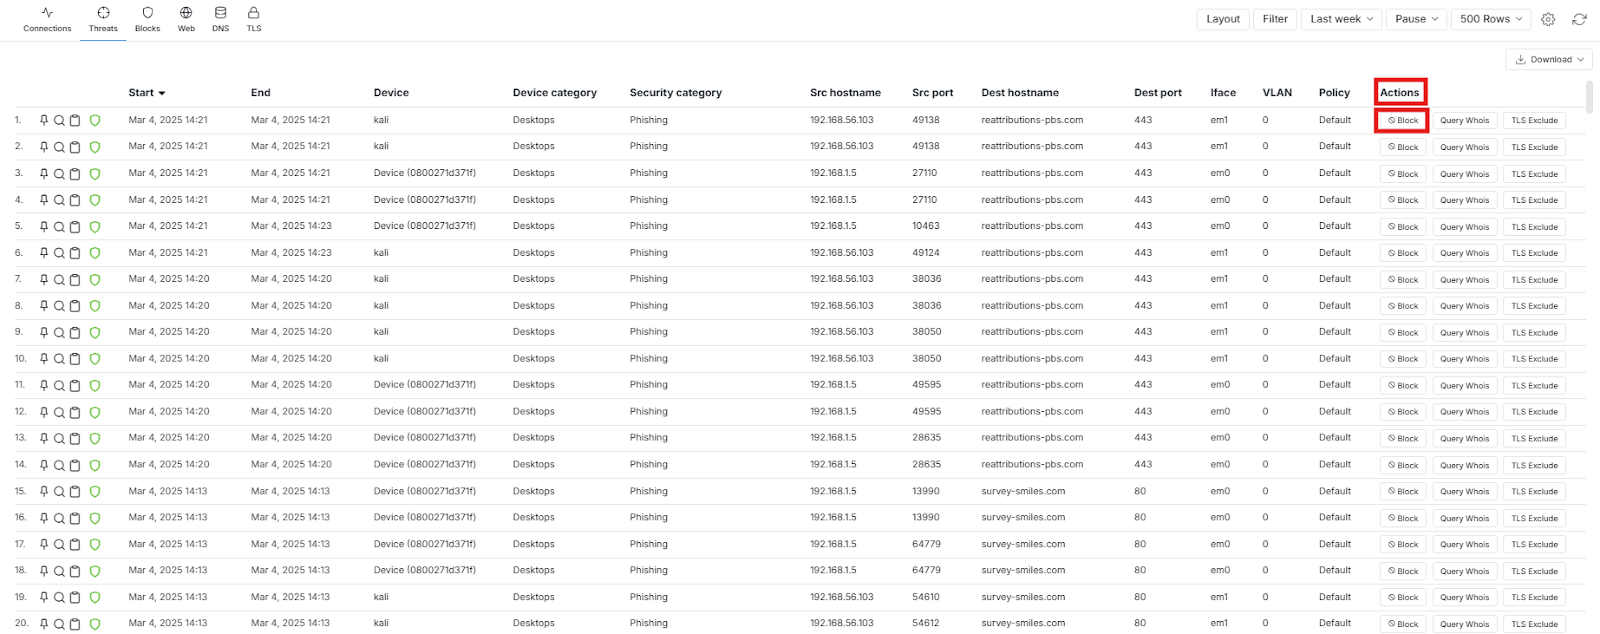
Figure 9. Block Action Button on Threats Live Session Explorer
-
To block the related domain, select the Block Hostname checkbox and click the Block button to complete the blocking process. Ensure that the Block this hostname globally option remains selected. This will enforce the blocking rule across all policies, ensuring that the domain is restricted system-wide.
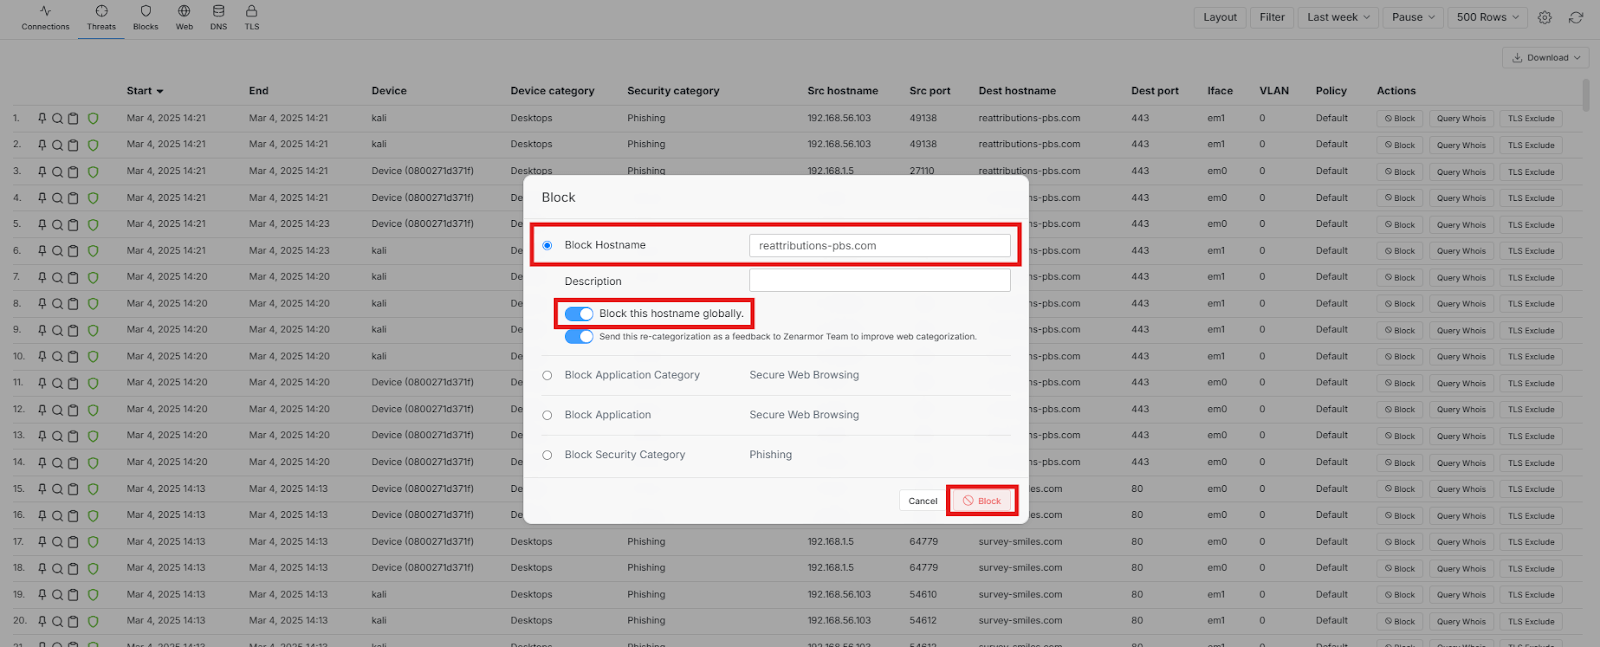
Figure 10. Blocking the Malicious Domain via "Actions" Menu
-
After the blocking is completed, you will see a confirmation message at the bottom of the page.
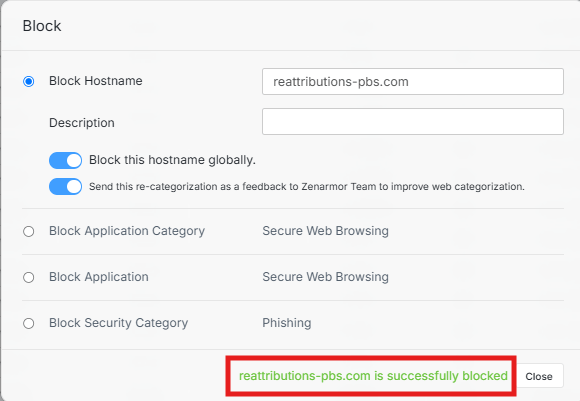
Figure 11. Domain Successfully Blocked
Step 3: Verifying the Block
To ensure the domain block is effective, verification is necessary. The steps below will help confirm that the threat is successfully restricted.
-
On a VM in your lab environment, open a web browser.
-
Attempt to access the blocked domain from a test machine.
-
The browser should display a security warning or a "This page is blocked!" message, indicating the connection was blocked.
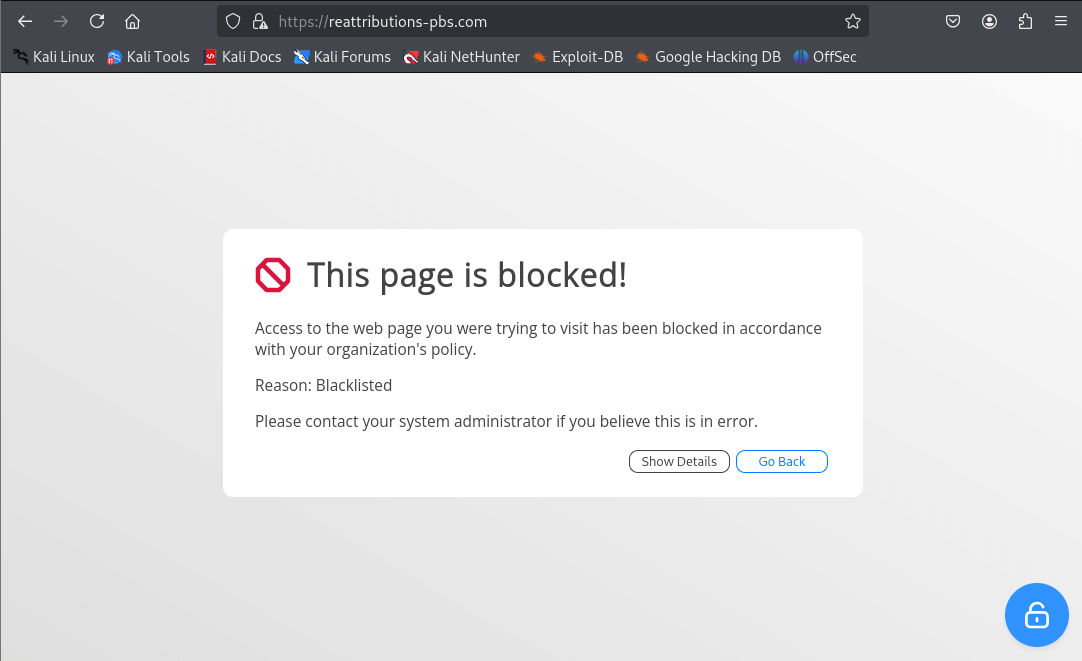
Figure 12. Block Notification Page for Forbidden Domain Access Attempt
-
Monitor Live Sessions to ensure traffic is being denied.

Figure 13. Blocked Domain Listed in Live Sessions Monitoring
-
In addition to blocking the domain via Live Sessions, it is important to verify that the domain/IP is correctly listed in the Exclusions - Blacklist settings to ensure persistent blocking. To do this, navigate to Policies > Exclusions and check the Blacklist section to confirm that the blocked domain/IP is listed. By verifying the Blacklist settings, administrators can ensure that even if policies change, the blocked domain remains restricted across the network.
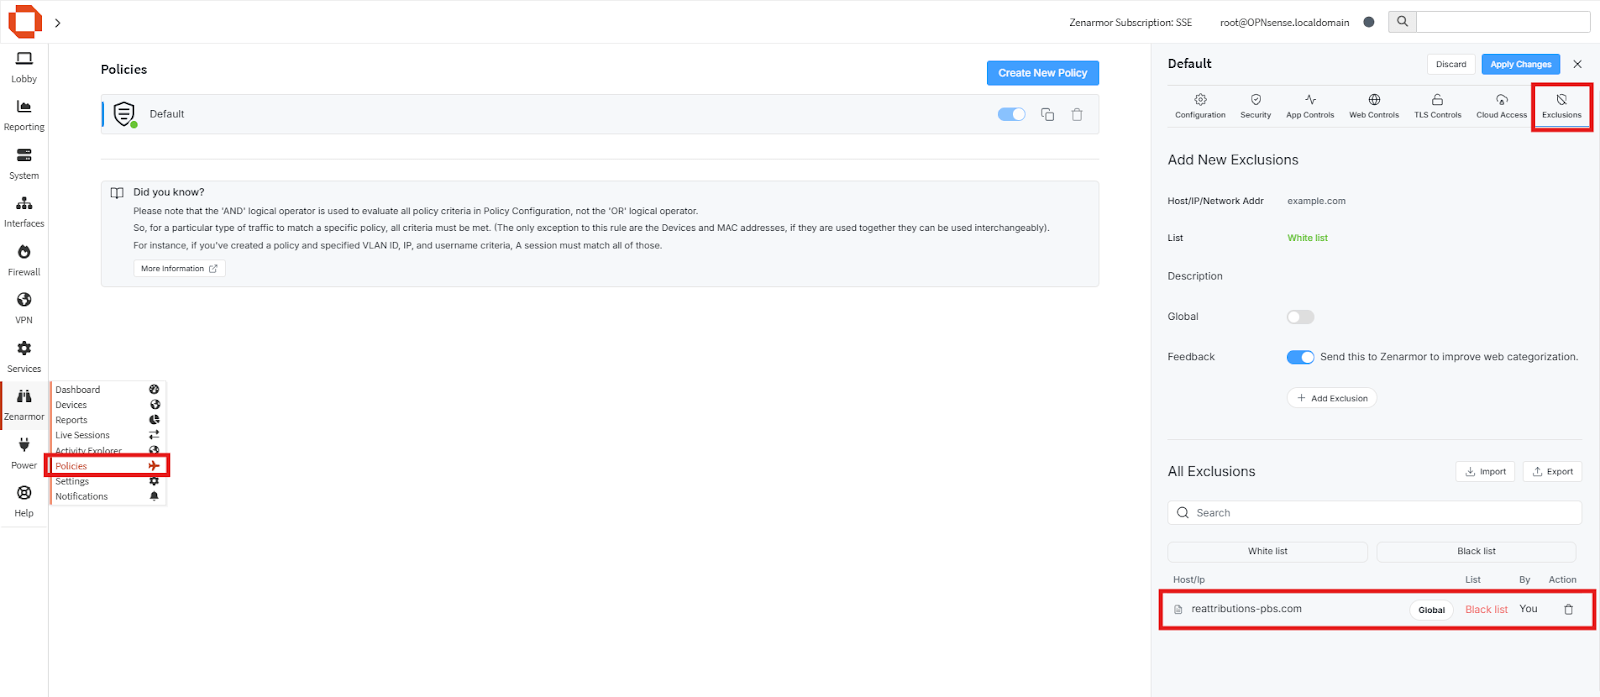
Figure 14. Exclusions with Blacklisted Domain
Blocking a Security Category via Live Sessions
Zenarmor allows you to block Security categories conveniently via Live Sessions. You may block or allow a Security category by following 3 main steps.
Step 1: Identifying Suspicious Traffic
Zenarmor provides real-time visibility into network activity, allowing you to spot suspicious connections. Use the following steps to analyze and detect potential threats.
-
Go to the Zenarmor Dashboard.
-
Navigate to Live Sessions page on your Zenarmor node.

Figure 15. Live Sessions Page
-
Analyze network traffic to identify suspicious domains or IP addresses.
-
Identify a domain that falls under a dangerous category (e.g., phishing sites or botnets). In our case, we have identified the domain
ns1.badgerdns.com, which appears in the traffic logs but has not been automatically blocked. This domain is flagged as a parked domain, meaning it could potentially host harmful content or distribute malicious software.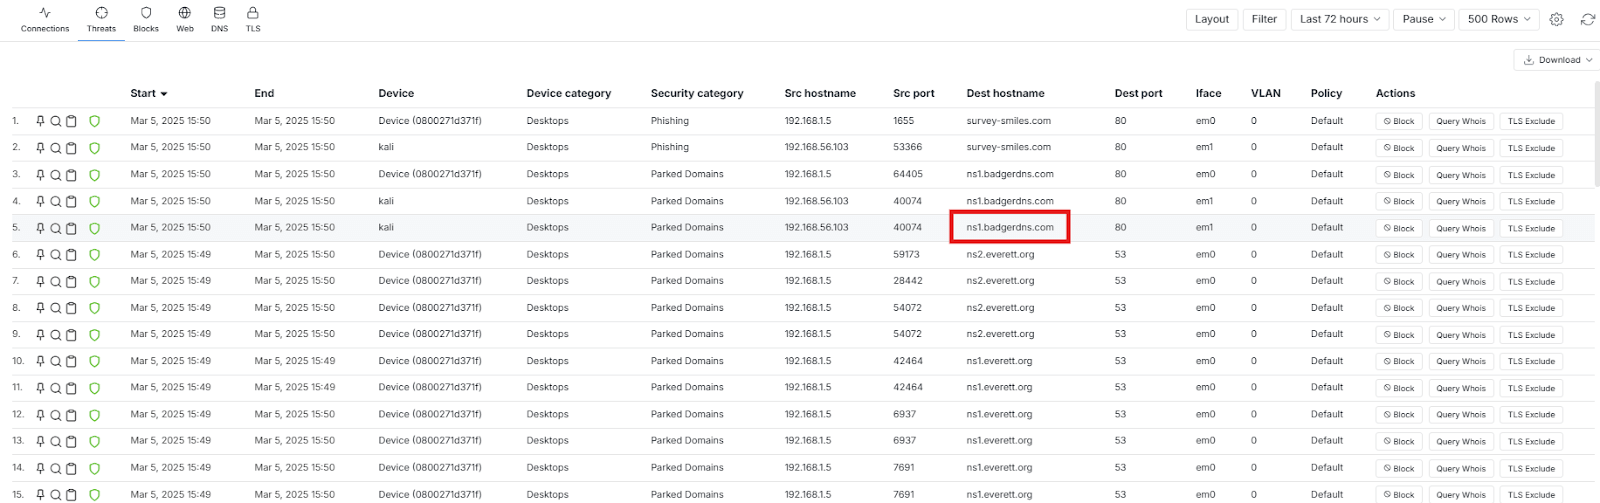
Figure 16. Identifying Suspicious Domain
-
For more details about the domain, check the Security Category field in the image below. This domain falls under the Parked Domain category, indicating potential involvement in fraudulent activities or misleading content.
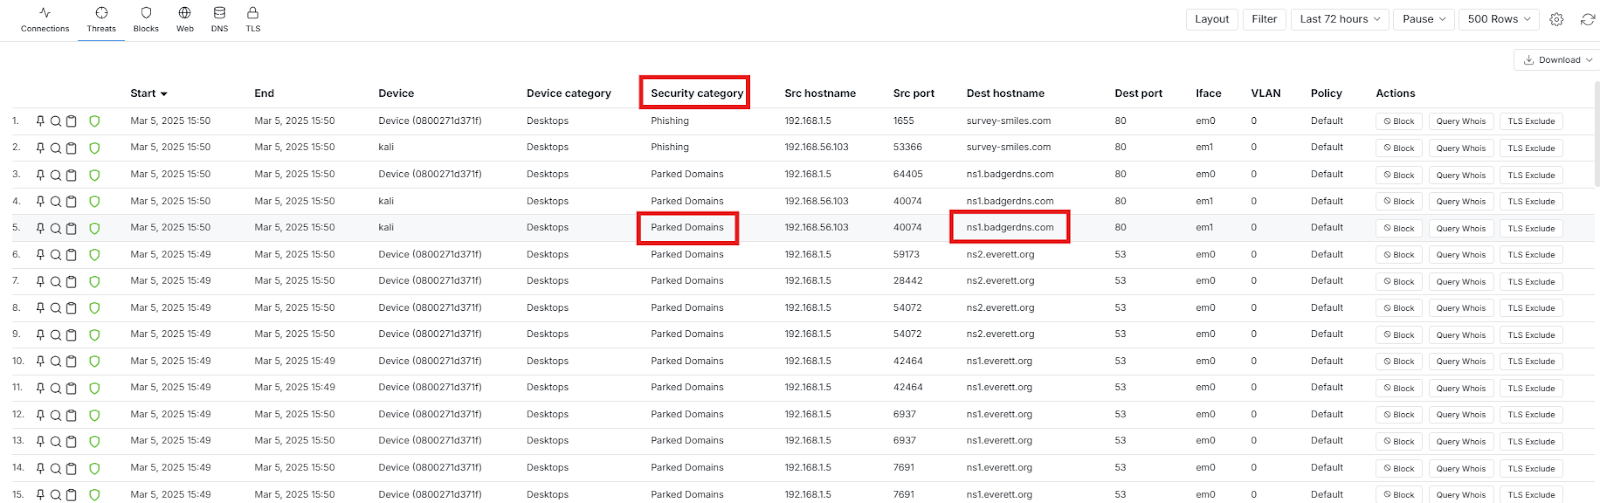
Figure 17. Identifying Security Category
-
By selecting the magnifying glass icon, you can access more comprehensive details regarding the detected domain and its classification.
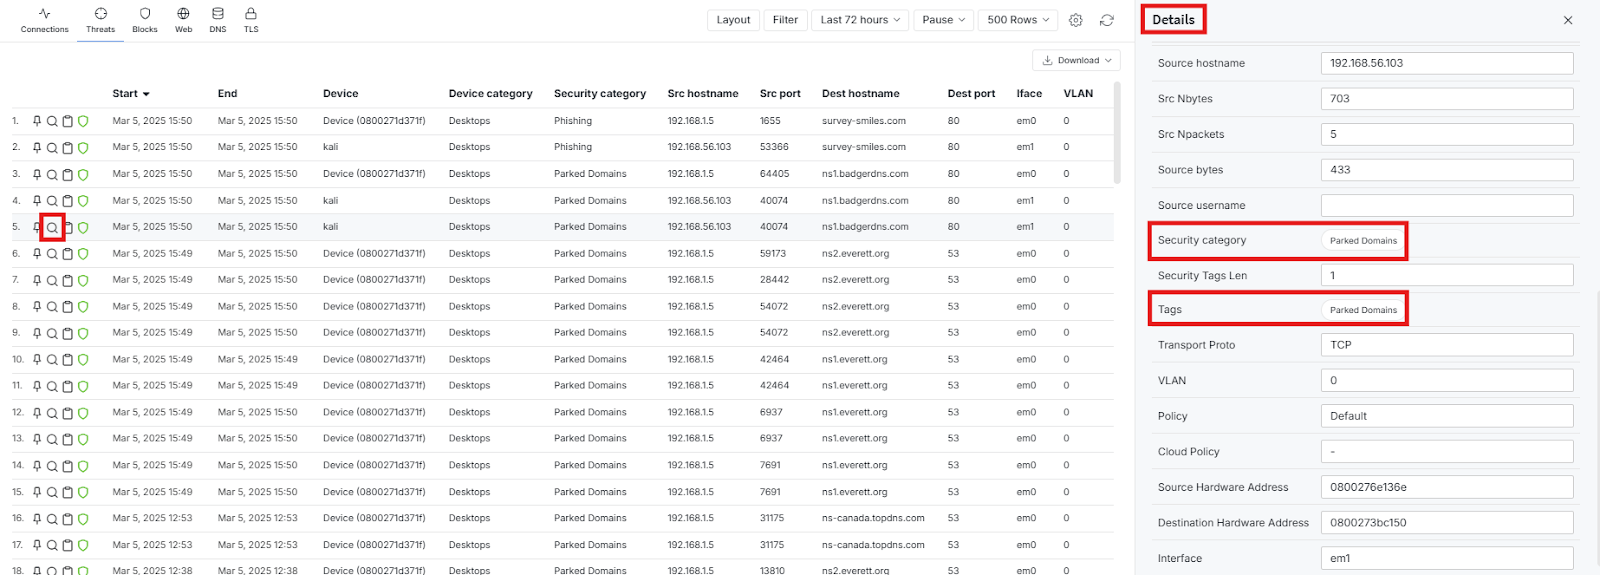
Figure 18. Viewing Session Details of a Detected Security Category
Step 2: Blocking the Category
After detecting a potential threat, it is crucial to take action by blocking. The following steps explain how to apply the necessary restrictions within Zenarmor.
-
Click the Block button in the Actions tab in the row where the domain marked as harmful is located.
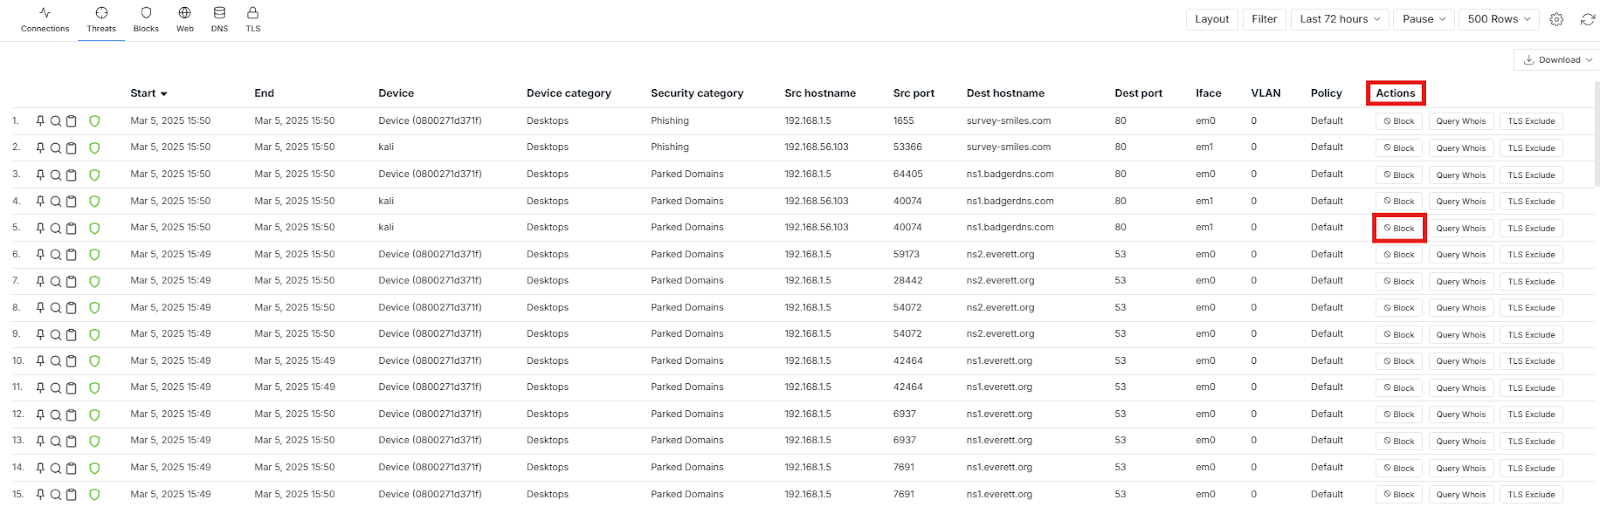
Figure 19. The Block button in the Actions Column
-
To block the related security category, check the Block Security Category checkbox and click the Block button to complete the blocking process. If a threat belongs to a broader risk category, blocking the entire category ensures all related threats are mitigated.

Figure 20. Block Security Category
Step 3: Verifying the Block
A proper verification process ensures that the blocked domain no longer poses a risk. The following steps will help you validate that the security measure is in place.
-
On a VM in your lab environment, open a web browser.
-
Attempt to access a website within the blocked category from the test machine.
-
The browser should display a security warning or a "The page is blocked!" message, indicating the connection was blocked.
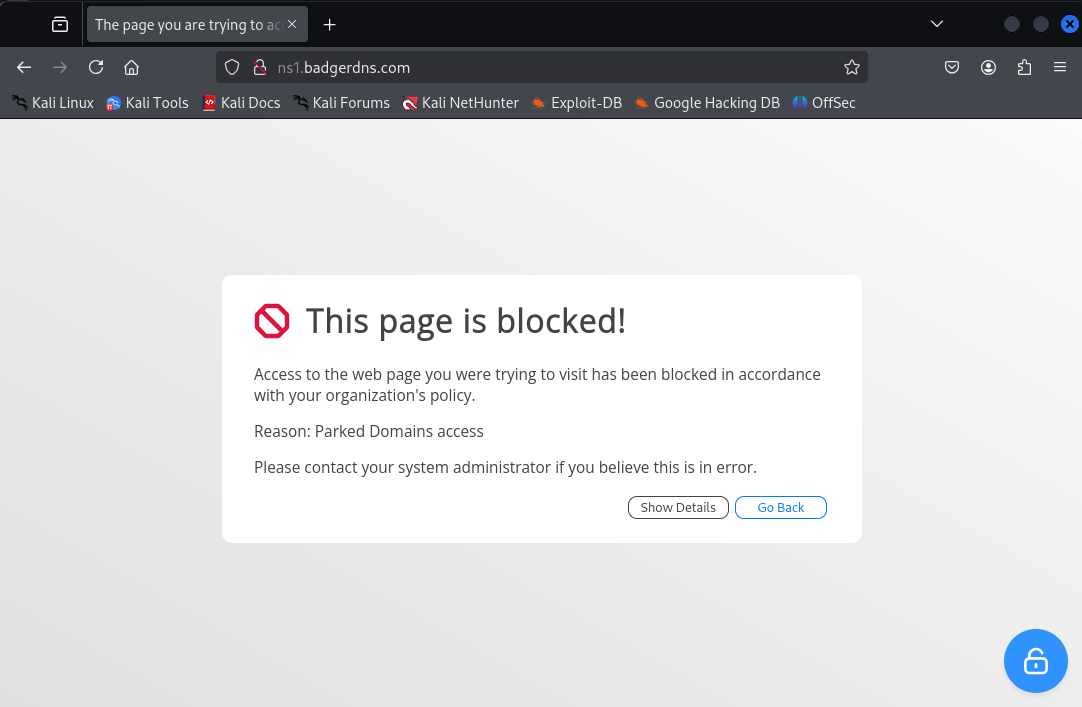
Figure 21. Block Notification Page for Forbidden Parked Domains
-
Monitor Blocks Live Sessions to ensure traffic is being denied.
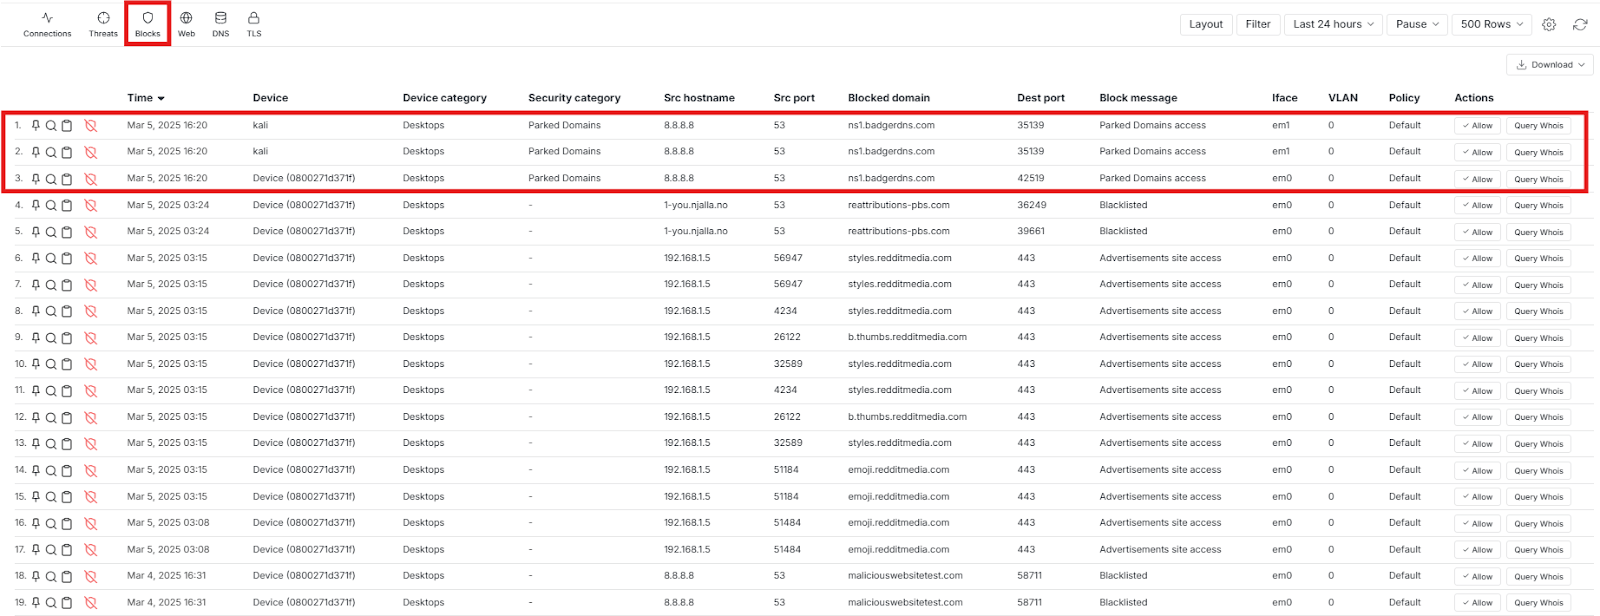
Figure 22. Blocked Security Category Listed in Live Sessions Monitoring
-
Additionally, navigate to the Policies section in Zenarmor and verify that the "Parked Domains" category is listed as blocked, as shown in the image below.
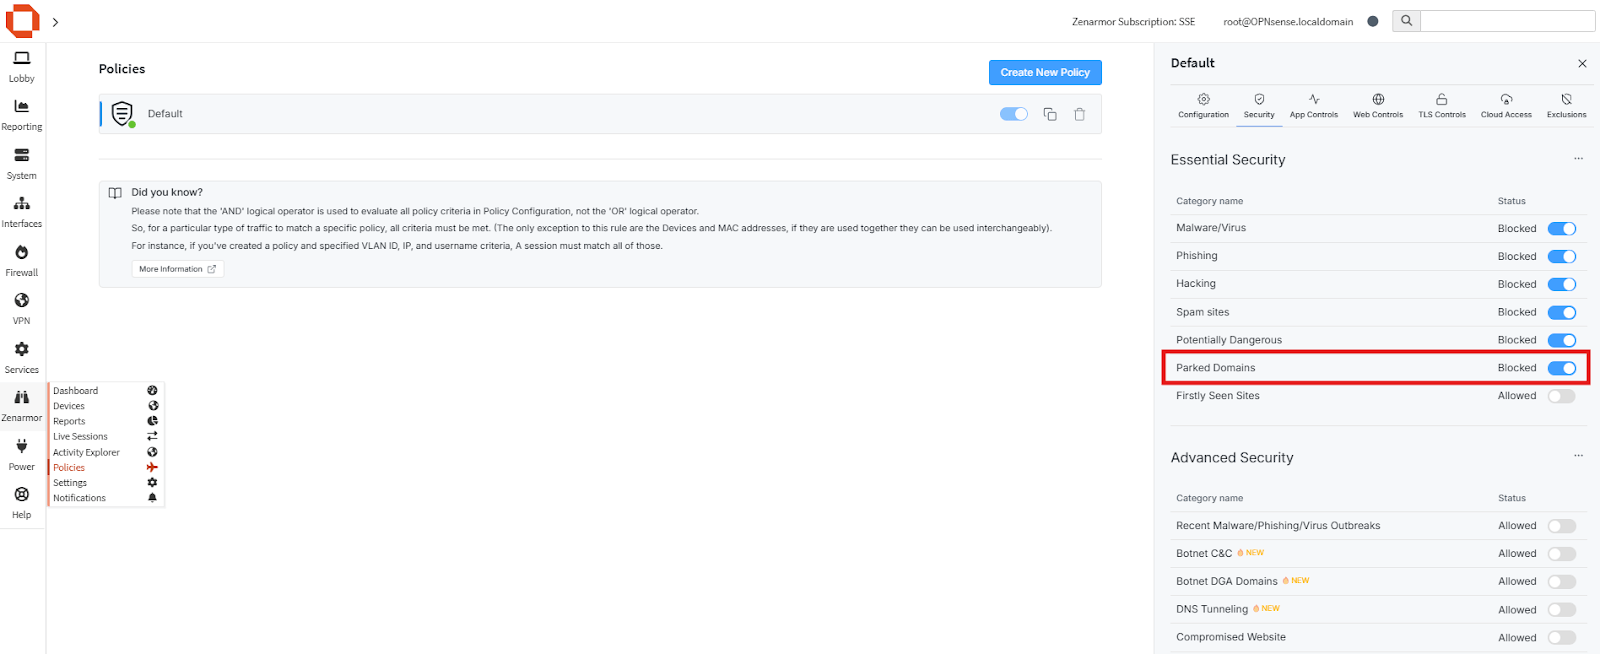
Figure 23. Parked Domains Blocked in Policies
Conclusion
By leveraging Zenarmor’s Dashboard and Live Sessions, administrators can efficiently block detected threats without needing to modify policy settings manually. Using these methods, network administrators can respond to threats quickly and effectively, ensuring a more secure environment without needing to reconfigure existing policies.