Managing Zero-Trust Networks on Zenconsole
Zenarmor SASE enables organizations to establish secure Zero-Trust Networks across distributed environments, remote users, gateways, cloud workloads, and branch offices.
Built on Zero Trust Network Access (ZTNA) principles, Zenarmor creates encrypted peer-to-peer mesh overlay networks that provide secure connectivity without the operational complexity of traditional VPN architectures.
Unlike conventional VPN solutions that route traffic through centralized data centers or points of presence (PoPs), Zenarmor allows direct peer-to-peer communication between trusted endpoints and gateways. This decentralized approach significantly reduces latency, improves performance, and eliminates unnecessary network backhauling.
Zenarmor follows a default-deny Zero Trust security model. All communications are blocked unless explicitly permitted through policy rules. Access decisions are fully context-aware and can be enforced based on identity, user groups, device posture, network location, applications, and other security criteria.
With Zenarmor, organizations can securely extend connectivity across multiple sites and environments without duplicating hardware infrastructure. Whether deployed in public cloud environments, on-premises data centers, branch offices, edge devices, or hybrid infrastructures, Zenarmor provides a scalable and performance-optimized Zero-Trust networking framework designed for modern enterprise environments.
Zenarmor’s Zero-Trust Networks are centrally managed through Zenconsole, enabling administrators to easily configure networks, onboard endpoints and gateways, manage policies, and monitor secure connectivity across the organization.
Managing Zero-Trust Networks in Zenconsole is simple and efficient. The setup process consists of three main steps:
- Create your Zero-Trust network by defining the network configuration and address range.
- Add gateways, endpoints, users, and groups that will participate in the mesh network.
- Create Zero Trust Network Access (ZTNA) policy rules to explicitly allow authorized communications between resources.
Additional advanced configurations such as advertised networks, failover priorities, identity-aware policies, and application-based access controls can also be configured to tailor secure connectivity requirements.
Within seconds, your Zero-Trust mesh overlay network becomes fully operational, delivering secure, scalable, and high-performance private connectivity across your organization.
Creating Zero-Trust Networks
To create your first Zero Trust Network, follow the steps below:
-
Open your browser and navigate to Zenconsole.
-
Sign in using your Zenconsole credentials.
-
Open the Zero Trust Networks section from the left navigation panel.
-
Click Create Zero-Trust Network to launch the Zero Trust Network setup wizard.

Figure 1. Create Zero-Trust Network
-
Configure the network in the Network Configuration step:
a. Enter a descriptive Network Name for the Zero Trust Network.
b. Configure the Network Slug if customization is required.
c. Enter the private Address Range (IPv4) in CIDR format that will be used within the Zero Trust network.warningPlease be aware that assigning a private IP address (such as RFC1918) may trigger DNS rebinding protection mechanisms in browsers and network security systems. This can lead to access being blocked or resolution failures occurring. Public DNS servers should not resolve to private IP ranges (for example, 10.0.0.0/8, 172.16.0.0/12, 192.168.0.0/16).
If you need to use non-public addresses, there are two recommended approaches:
-
Utilize CGNAT address space (100.64.0.0/10) instead of RFC1918 ranges. This can help avoid DNS rebinding protection issues while still allowing the use of non-public IPs.
-
Set up your own private DNS server for internal resolution.
If you plan to use RFC1918 addresses, ensure they are not used within your internal networks.
d. If required, enable the This is an Internet Gateway Network option.

Figure 2. Create Zero-Trust Network Wizard
noteInternet Gateway Networks are designed to securely route and inspect internet-bound traffic through designated Zenarmor gateways. This deployment model is especially useful for:
- Remote users
- Mobile devices
- iOS and Android endpoints
- Distributed or hybrid work environments
When enabled, connected endpoints securely route internet traffic through Zenarmor gateways where internet policies, filtering, DNS security, TLS inspection, and traffic inspection can be centrally enforced.
If the network is intended for secure private connectivity between gateways, users, and internal resources, this option can remain disabled.
-
-
After completing the network configuration, click Next to continue.
-
In the Add Gateways and Endpoints step:
a. Click the Add Gateway button and select the gateway instances that should participate in the Zero-Trust Network.
b. Click the Add Endpoint button and select the endpoints or mobile devices that should securely connect to the network.
c. Optionally, click the Add User or Add Group buttons to associate specific users or groups with the network.
d. If users or groups are not yet configured, they can be created and managed from the related menus under:
i. Settings → Users
ii. Settings → Groups
iii. Settings → IAM
e. If you do not want to assign gateways, endpoints, users, or groups during this step, click Skip Optional Steps and Create to create the network with the current configuration.
Figure 3. Create Zero-Trust Network Wizard - 2
-
After completing the deployment selection process, click Next to continue.
-
Create ZTNA Access Rules. In the Create ZTNA Access Rules step:
a. Configure the access rules that define communication permissions between users, groups, endpoints, gateways, and applications within the Zero Trust Network.
b. Click Create Access Rule to define the required Zero Trust access policies. -
Review the configured rules and complete the deployment by clicking Complete & Sync Now.

Figure 4. Create Zero-Trust Network Wizard - 3
Once the setup is completed, connected gateways and endpoints will begin securely communicating through the configured Zero Trust Network environment.
You may create multiple secure private networks within your organization. You'll find a complete list of all your private networks conveniently displayed on the left side of the Zero-Trust Networks page, making management effortless and efficient.
Managing Peers
Zenconsole allows you to manage gateways and endpoints participating in a Zero-Trust Network.
Peers represent devices that are connected to the Zero-Trust overlay network and can securely communicate according to the configured ZTNA access policies.
The following peer management operations are available:
-
Adding Endpoint Peers
-
Adding Gateway Peers
-
Removing Peers
-
Viewing Peers
-
Updating Peer Settings
-
Searching Peers
Adding EndPoint Peers
You can add an endpoint device to a Zero-Trust Network by following these steps:
-
Navigate to Zero-Trust Networks page of an organization on Zenconsole.
-
Select the Zero-Trust Network to which you want to add an endpoint.
-
Locate the Peers section.
-
Click + Add Endpoint button. This will display available endpoints in your organization. You may use Search tool to find a specific endpoint quickly.
-
Select the endpoint you want to add.
-
You may add as many endpoints as you want. All added endpoints will appear in the Peers pane. A message box will appear at the bottom right of the page for configuration updates.
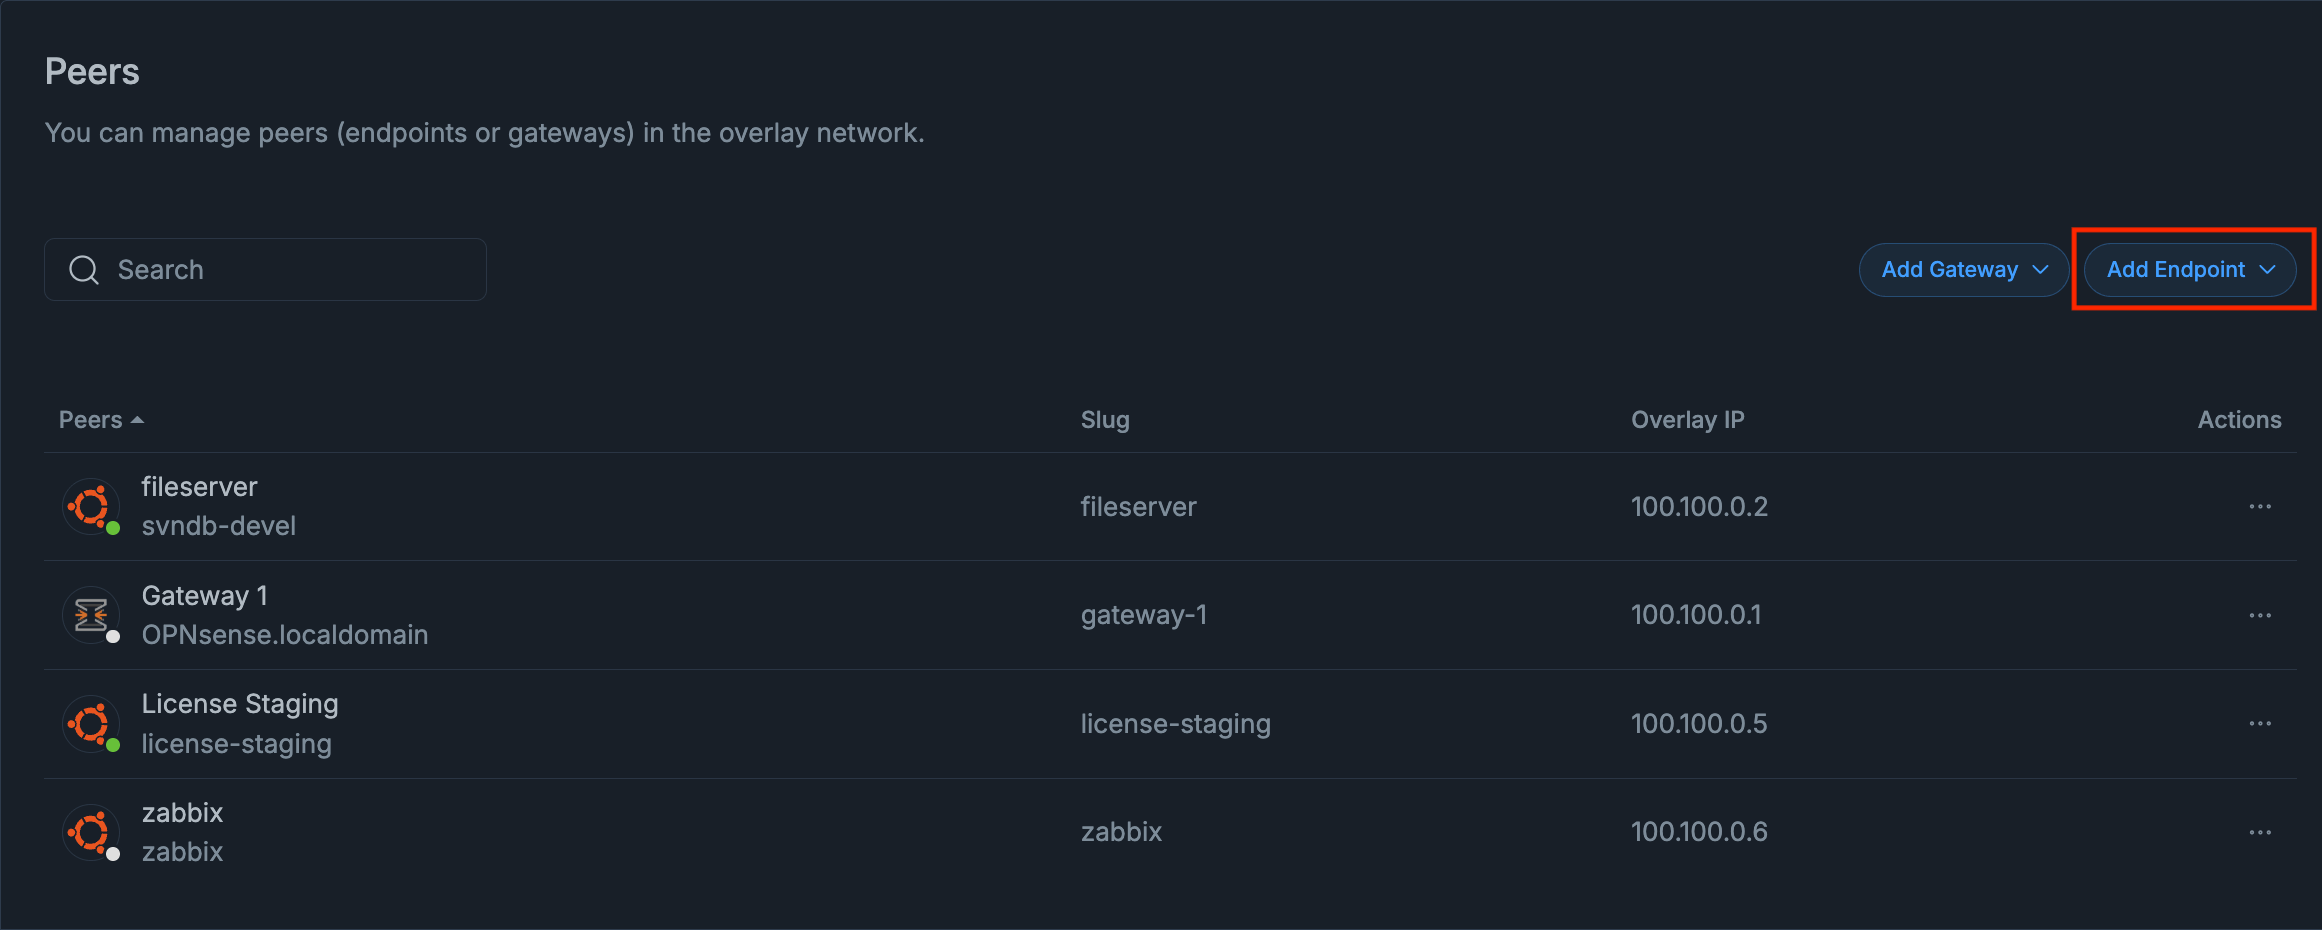
Figure 5. Add Endpoint Peer
-
Click Sync Now button for an immediate configuration update on all instances.
The newly added endpoints will appear in the Peers table.

Figure 6. Configuration Updated - Sync Now Popup
Adding Gateway Peers
You may add a gateway device to a Zero-Trust Network as a peer by following the next steps.
-
Navigate to Zero-Trust Networks page of an organization on Zenconsole.
-
Select the target Zero-Trust Network.
-
Locate the Peers pane on the selected zero-trust network page.
-
Click + Add Gateway button. This will display available gateways in your organization. You may use Search tool to find a specific gateway quickly.
-
Select the gateway you want to add.
-
You may add as many gateways as you want. All added gateway peers will appear in the Peers pane. A message box will appear at the bottom right of the page for configuration updates.

Figure 7. Add Gateway Peer
-
Click Sync Now button for an immediate configuration update on all instances.
The selected gateways will appear in the Peers table.
Figure 8. Configuration Updated - Sync Now Popup
Removing Peers
You may easily remove a peer from a Zero-Trust network by following the next steps.
-
Navigate to Zero-Trust Networks page of an organization on Zenconsole.
-
Select the Zero-Trust network from which you want to remove a peer.
-
Locate the Peers pane on the selected zero-trust page.
-
Locate the peer that you want to remove. You may use the search toolbox to find a peer.
-
Click Actions menu with the 3-dot icon. This will open a drop-down menu.
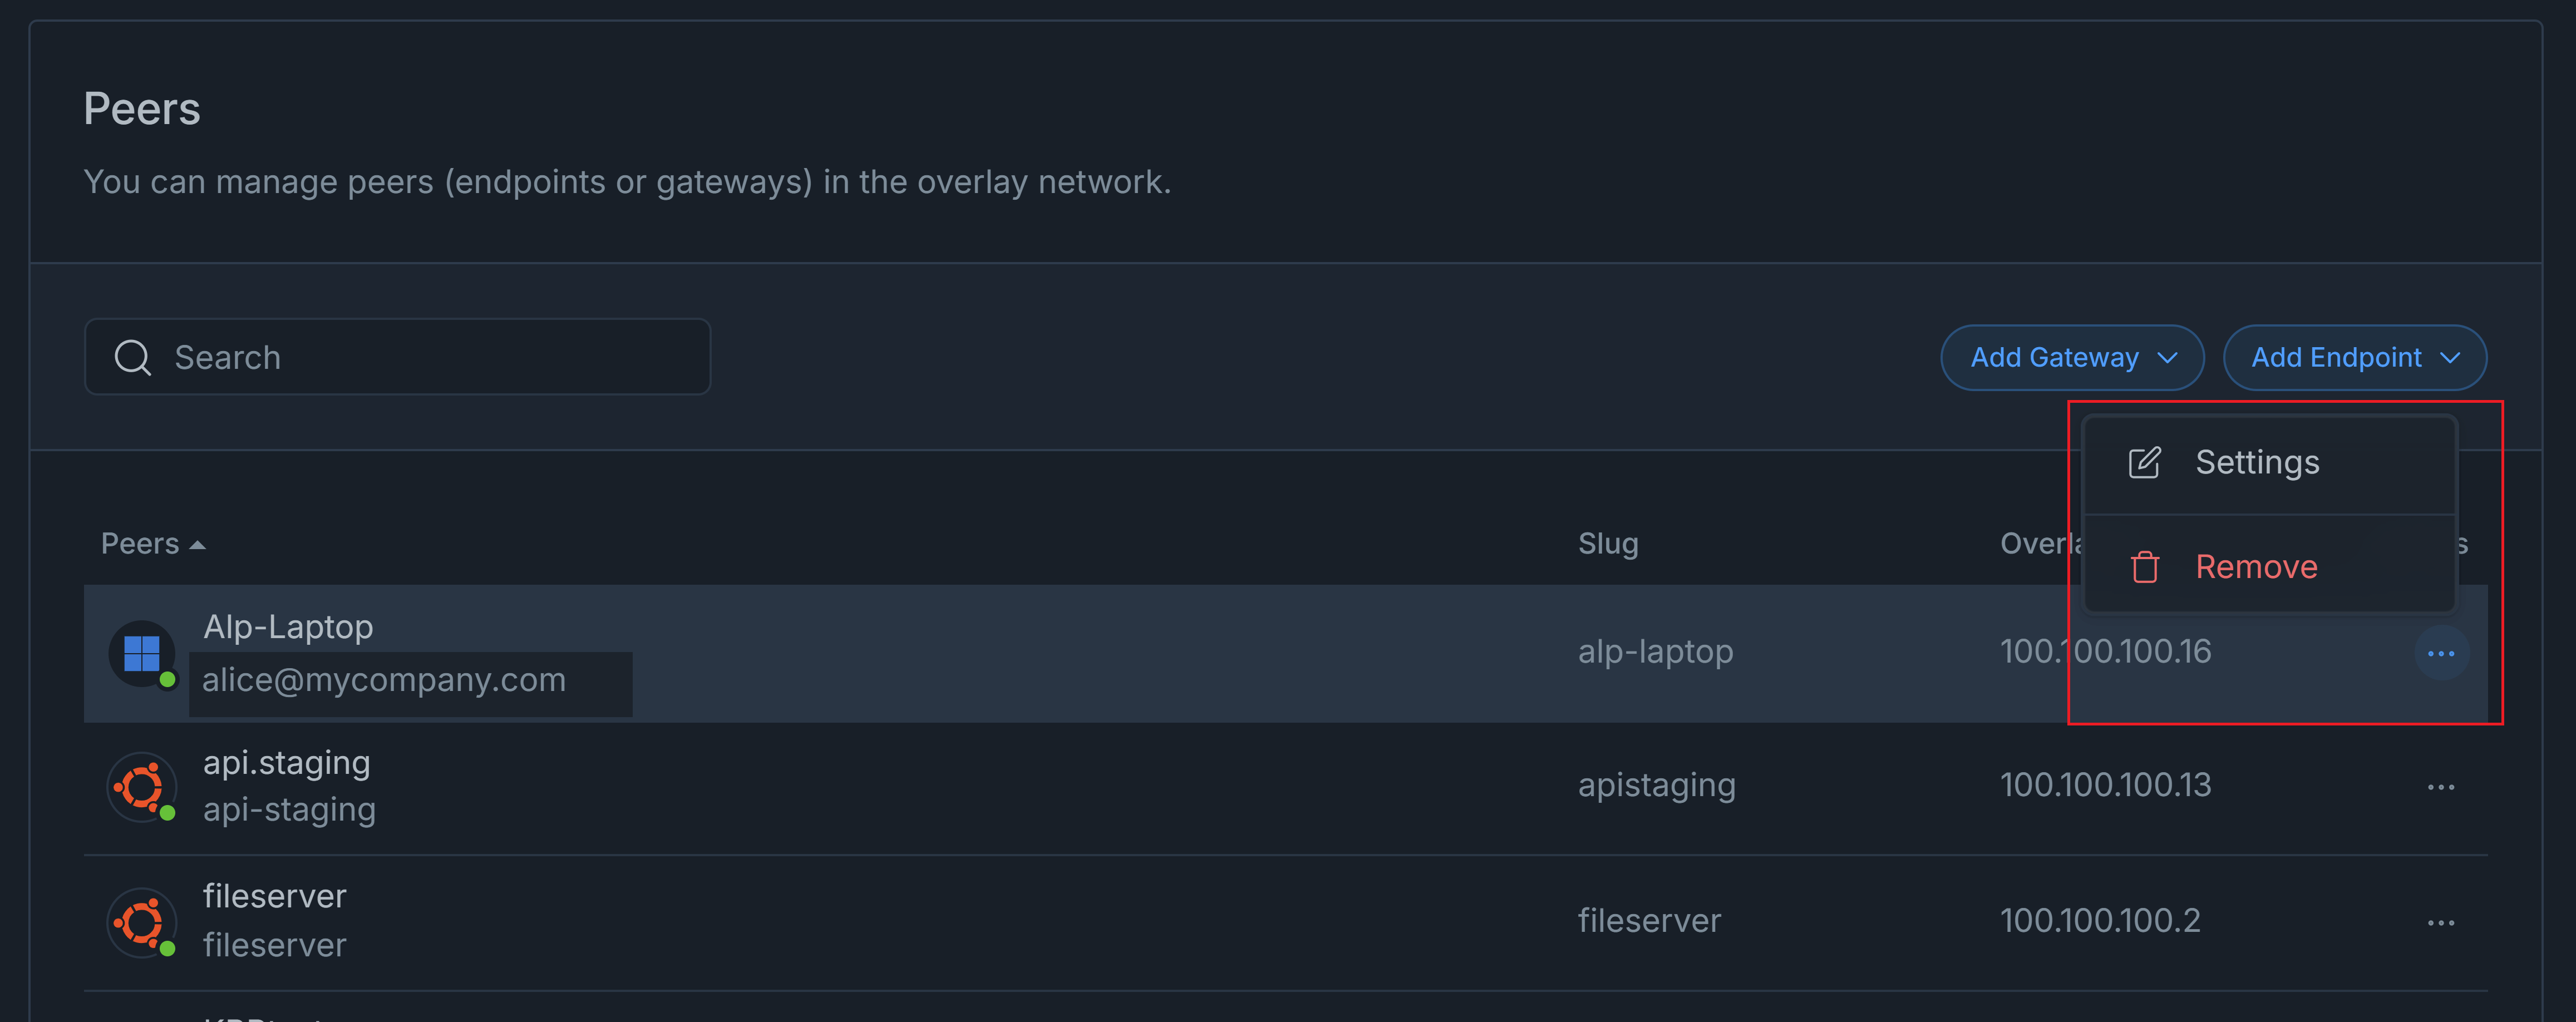
Figure 9. Remove Peer from Overlay
-
Click Remove button to delete the selected peer from the secure private network. This will display a notification window for confirmation.
-
Click Remove to approve the peer deletion. A message box will appear at the bottom right of the page for configuration updates.
-
Click Sync Now button for an immediate configuration update on all instances.
Figure 10. Configuration Updated - Sync Now Popup
Viewing Peers
The Peers section displays all gateways and endpoints currently participating in the selected Zero-Trust Network.
You may view all peers in a Zero-Trust network by following the next steps.
-
Navigate to Zero-Trust Networks page of an organization on Zenconsole.
-
Select the Zero-Trust network on which you want to view a peer.
-
Locate the Peers pane on the selected Zero-Trust page.
The following peer details are displayed.
- Peer Name
- Slug
- Overlay IP
- Actions
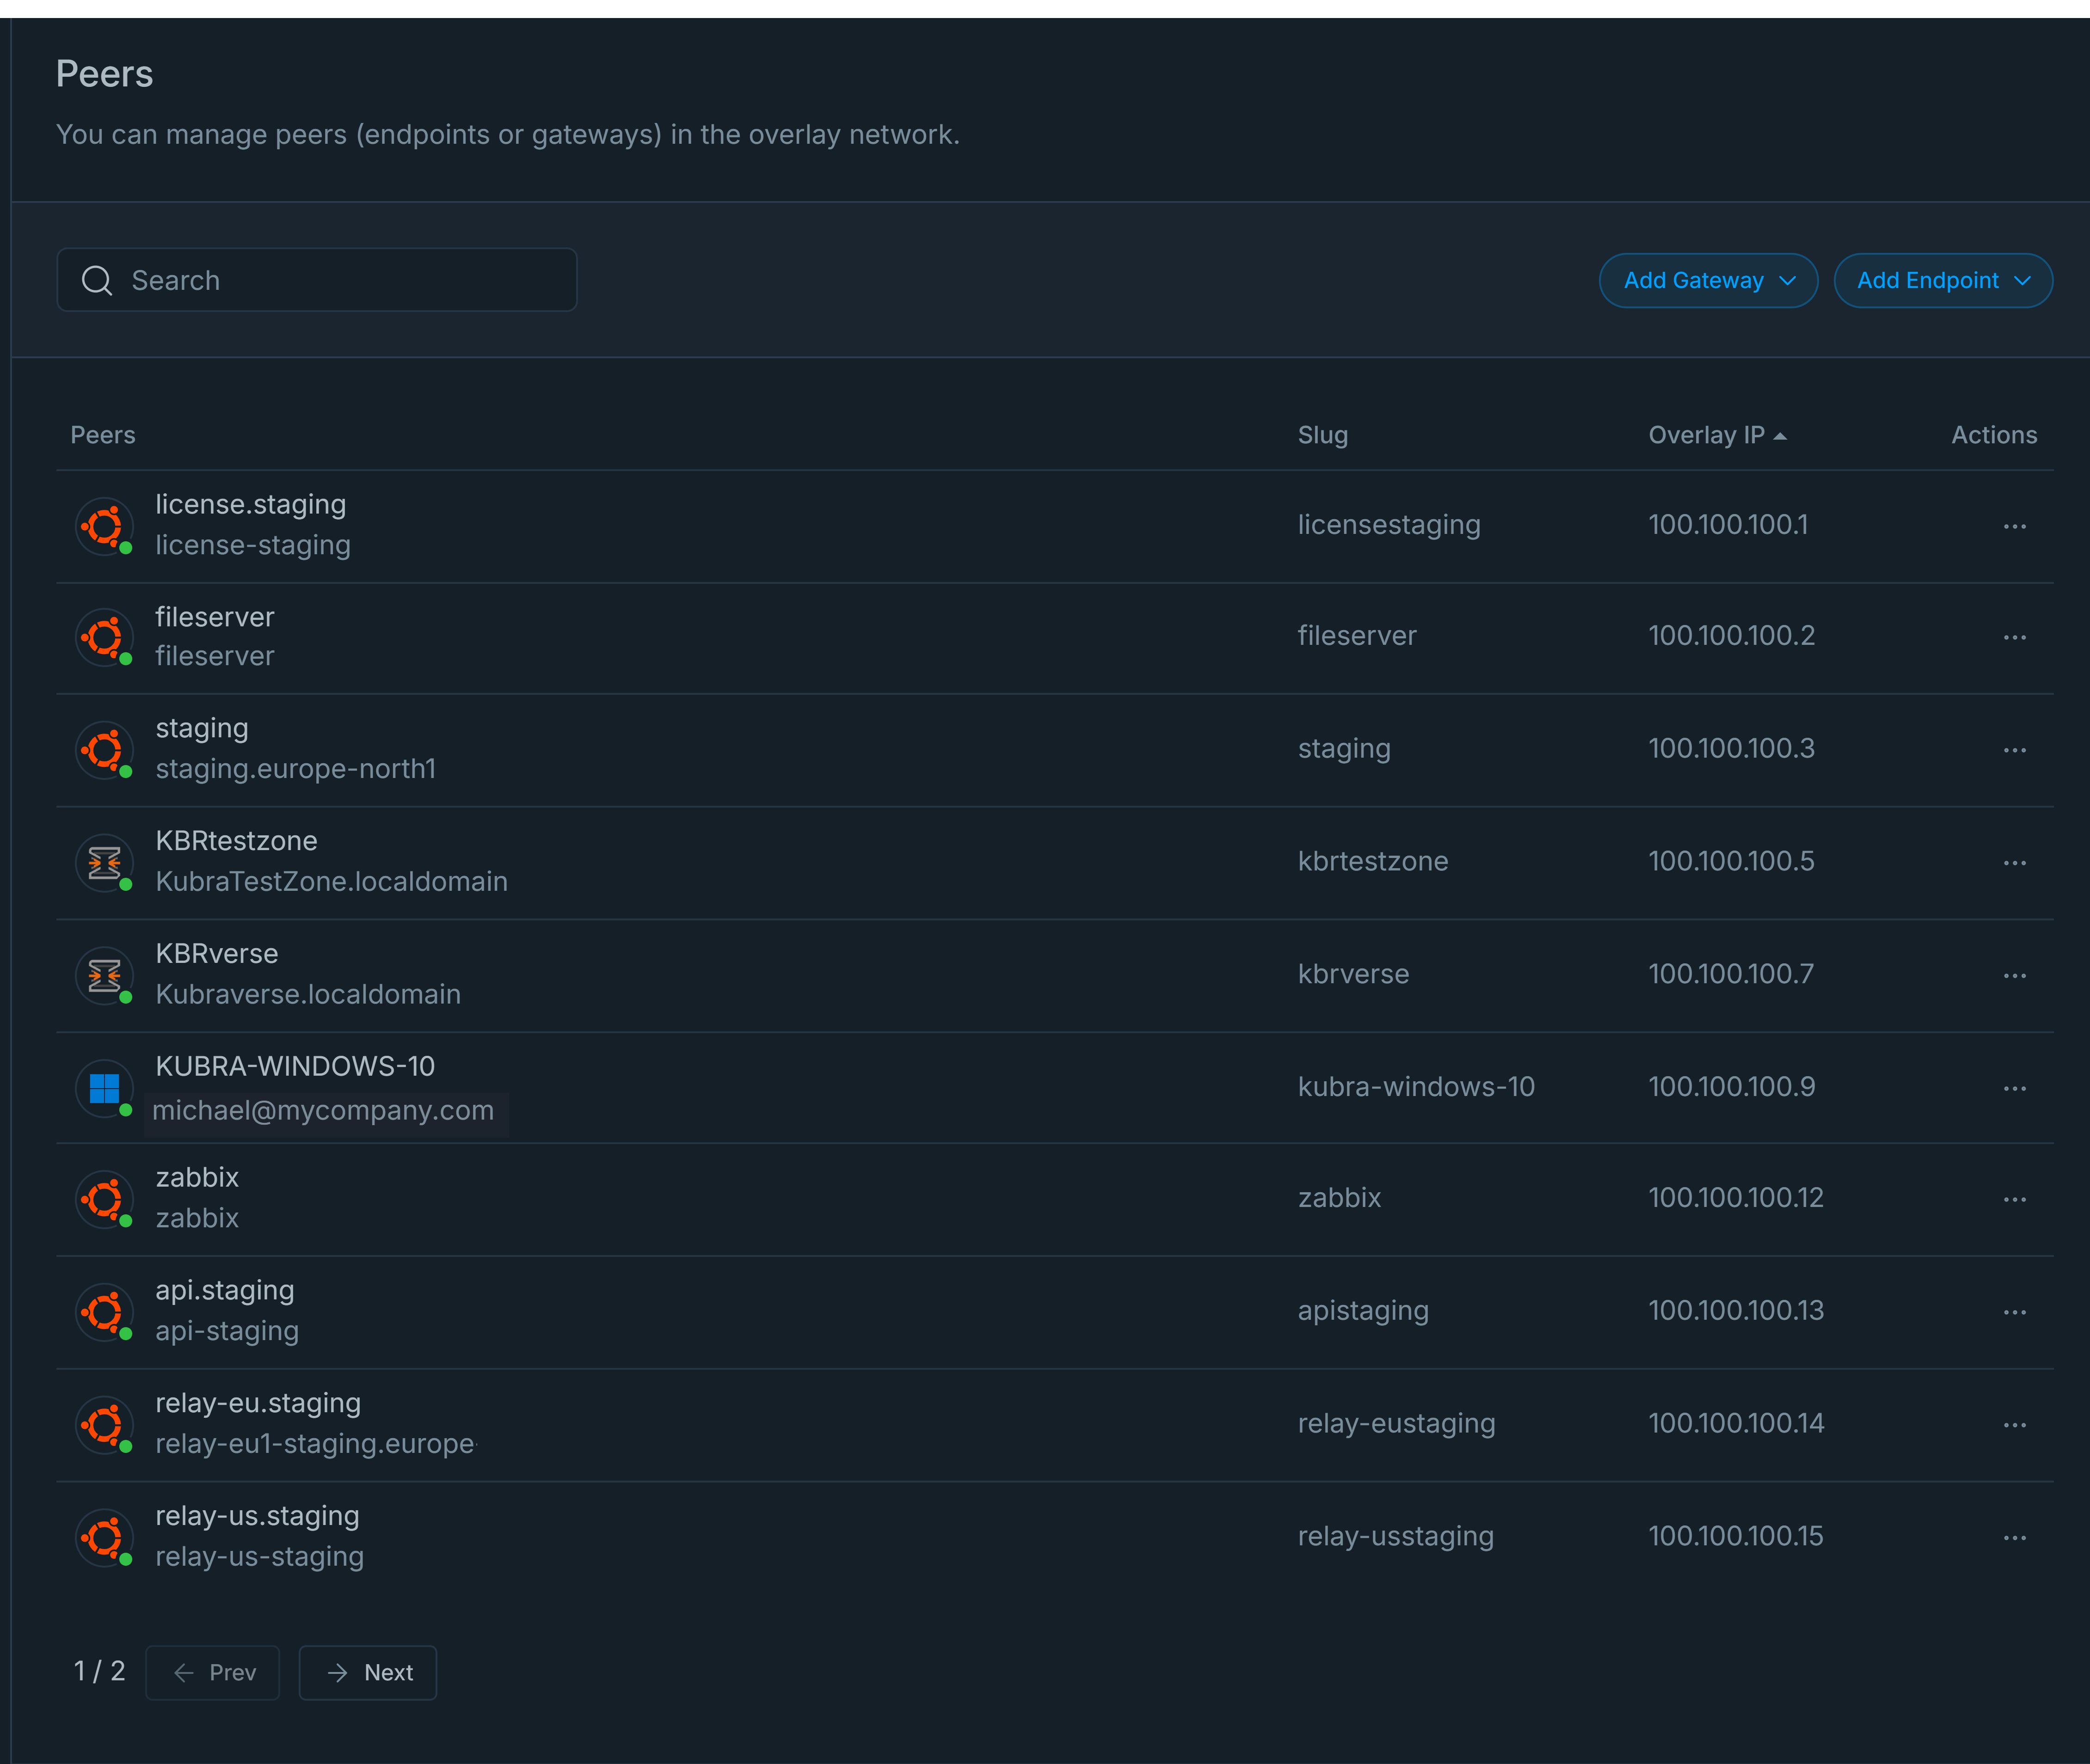
Figure 11. Peers List Sorted by Overlay IP
You can sort peers by their names and IP addresses. Click on the Peers or Overlay IP column to arrange the peers in either ascending or descending order.
Updating Peer Settings
Zenconsole allows you to update the IP address of a Zero-Trust Network peer or add an advertised network for a gateway peer manually. You may update these peer settings by following the next steps.
-
Navigate to Zero-Trust Networks page of an organization on Zenconsole.
-
Select the Zero-Trust network on which you want to view a peer.
-
Locate the Peers pane on the selected zero-trust page.
-
Locate the peer that you want to update. You may use the search toolbox to find a peer.
-
Click Actions menu with the 3-dot icon. This will open a drop-down menu.
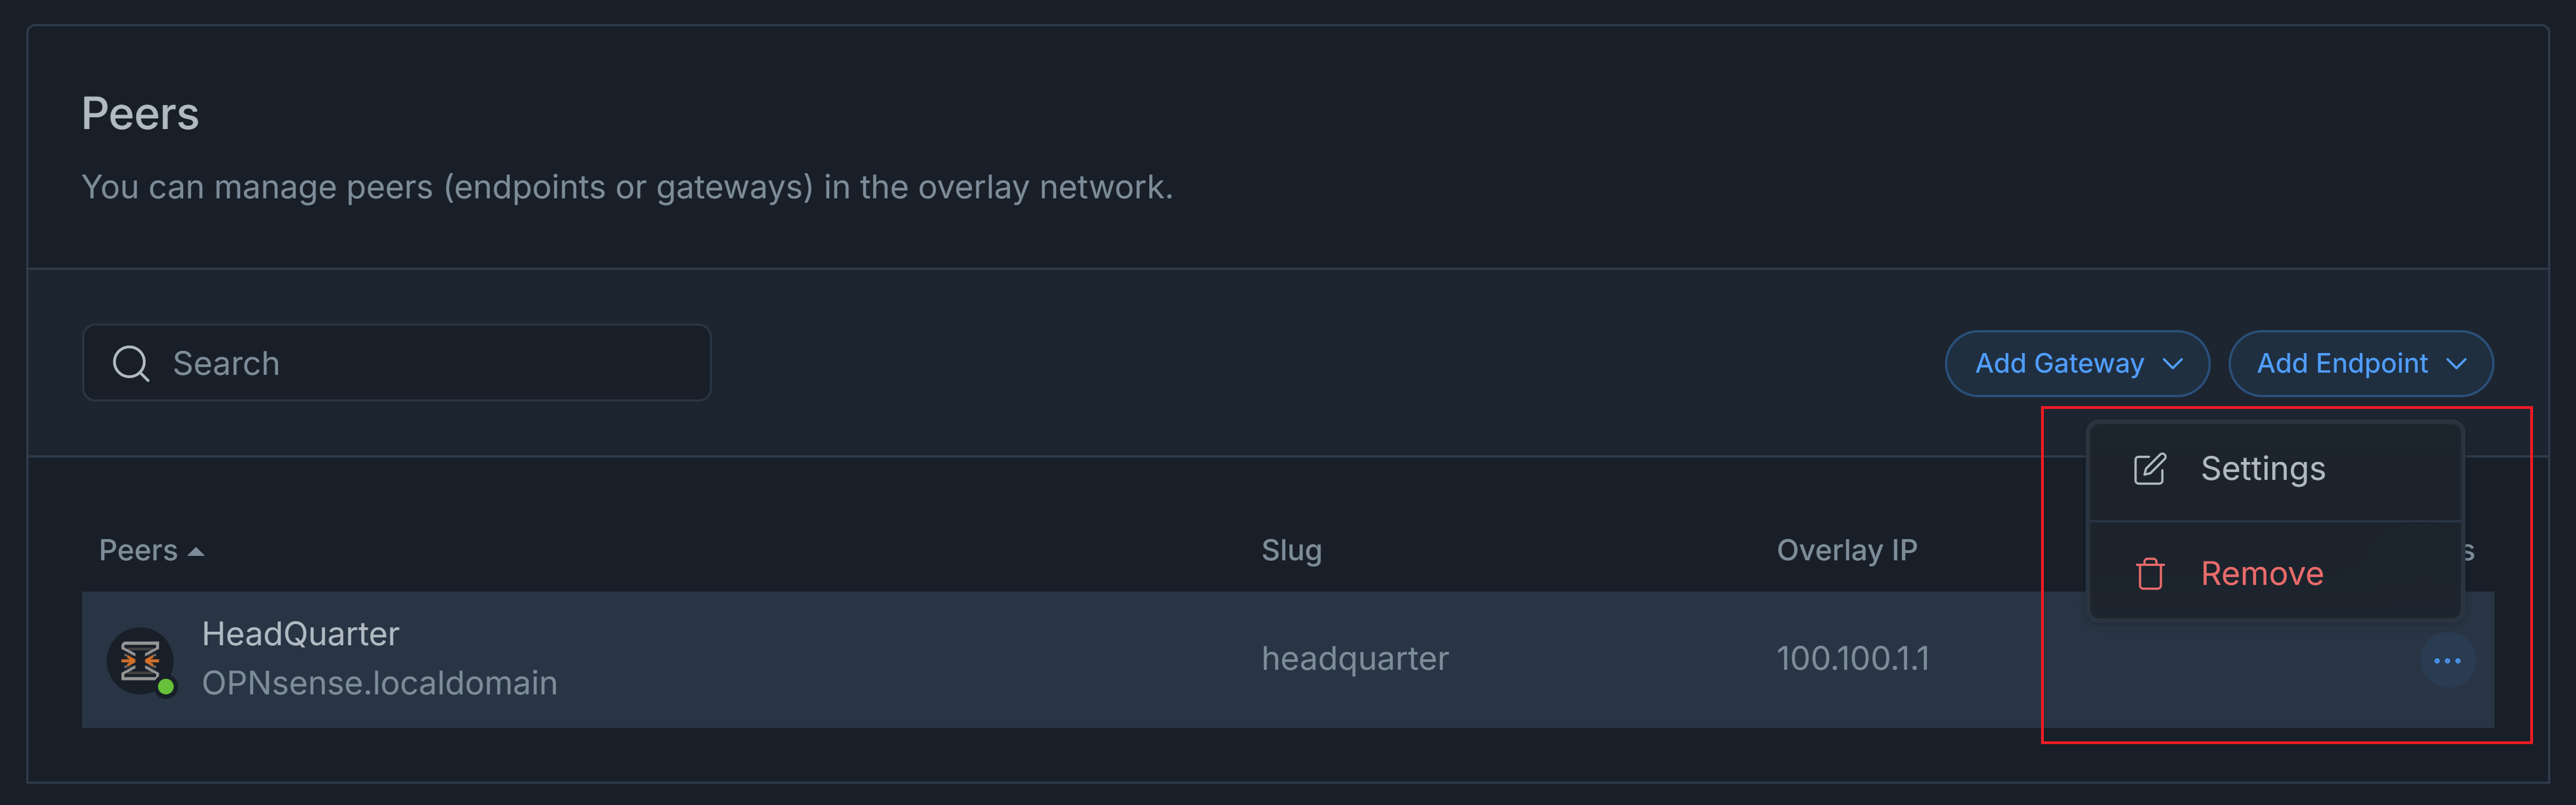
Figure 12. Access Peer Settings
-
Click Settings button to edit the selected secure private network peer. The peer settings window will appear on the right side of the page.
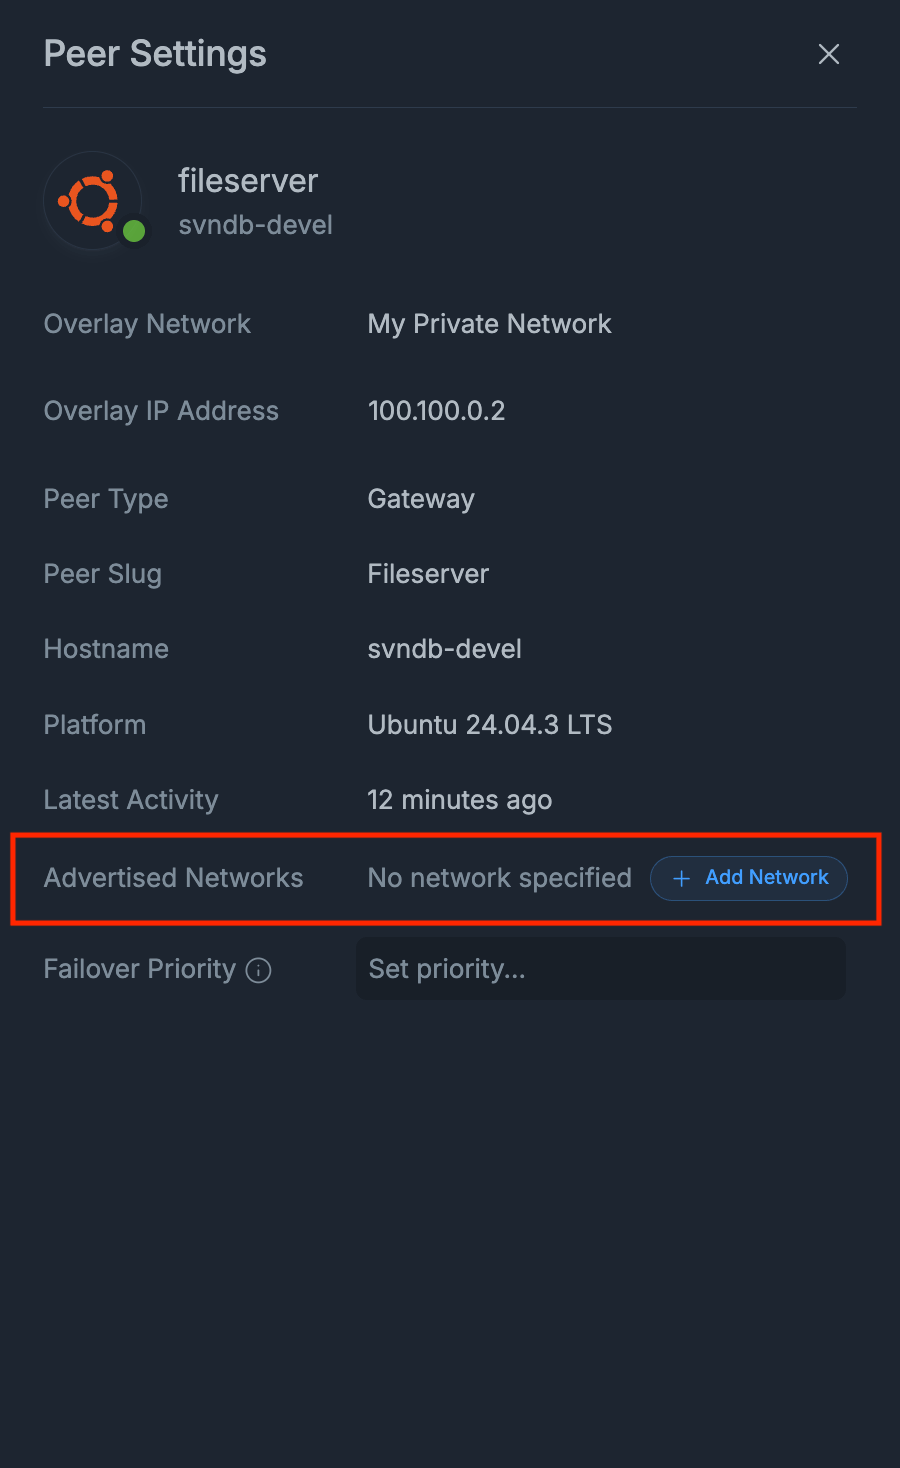
Figure 13. Peer Settings
-
You may type the new Overlay IP Address.
-
You may click + Add network button to define Advertised Networks, which will be routed by the gateway peer. This will open a dialog box.
-
Type the network address that will be advertised by the gateway peer.

Figure 14. Add Advertised Network
-
Click Add button. A message box will appear at the bottom right of the page for configuration updates.
-
Click Sync Now button for an immediate configuration update on all instances.
Searching Peers
Zenconsole enables you to seek a peer by its peer name, email address, or IP address. To locate a peer in your peers' list, enter their name or email address into the search field. This will automatically update the peers list below, and the peer you are seeking will be displayed.
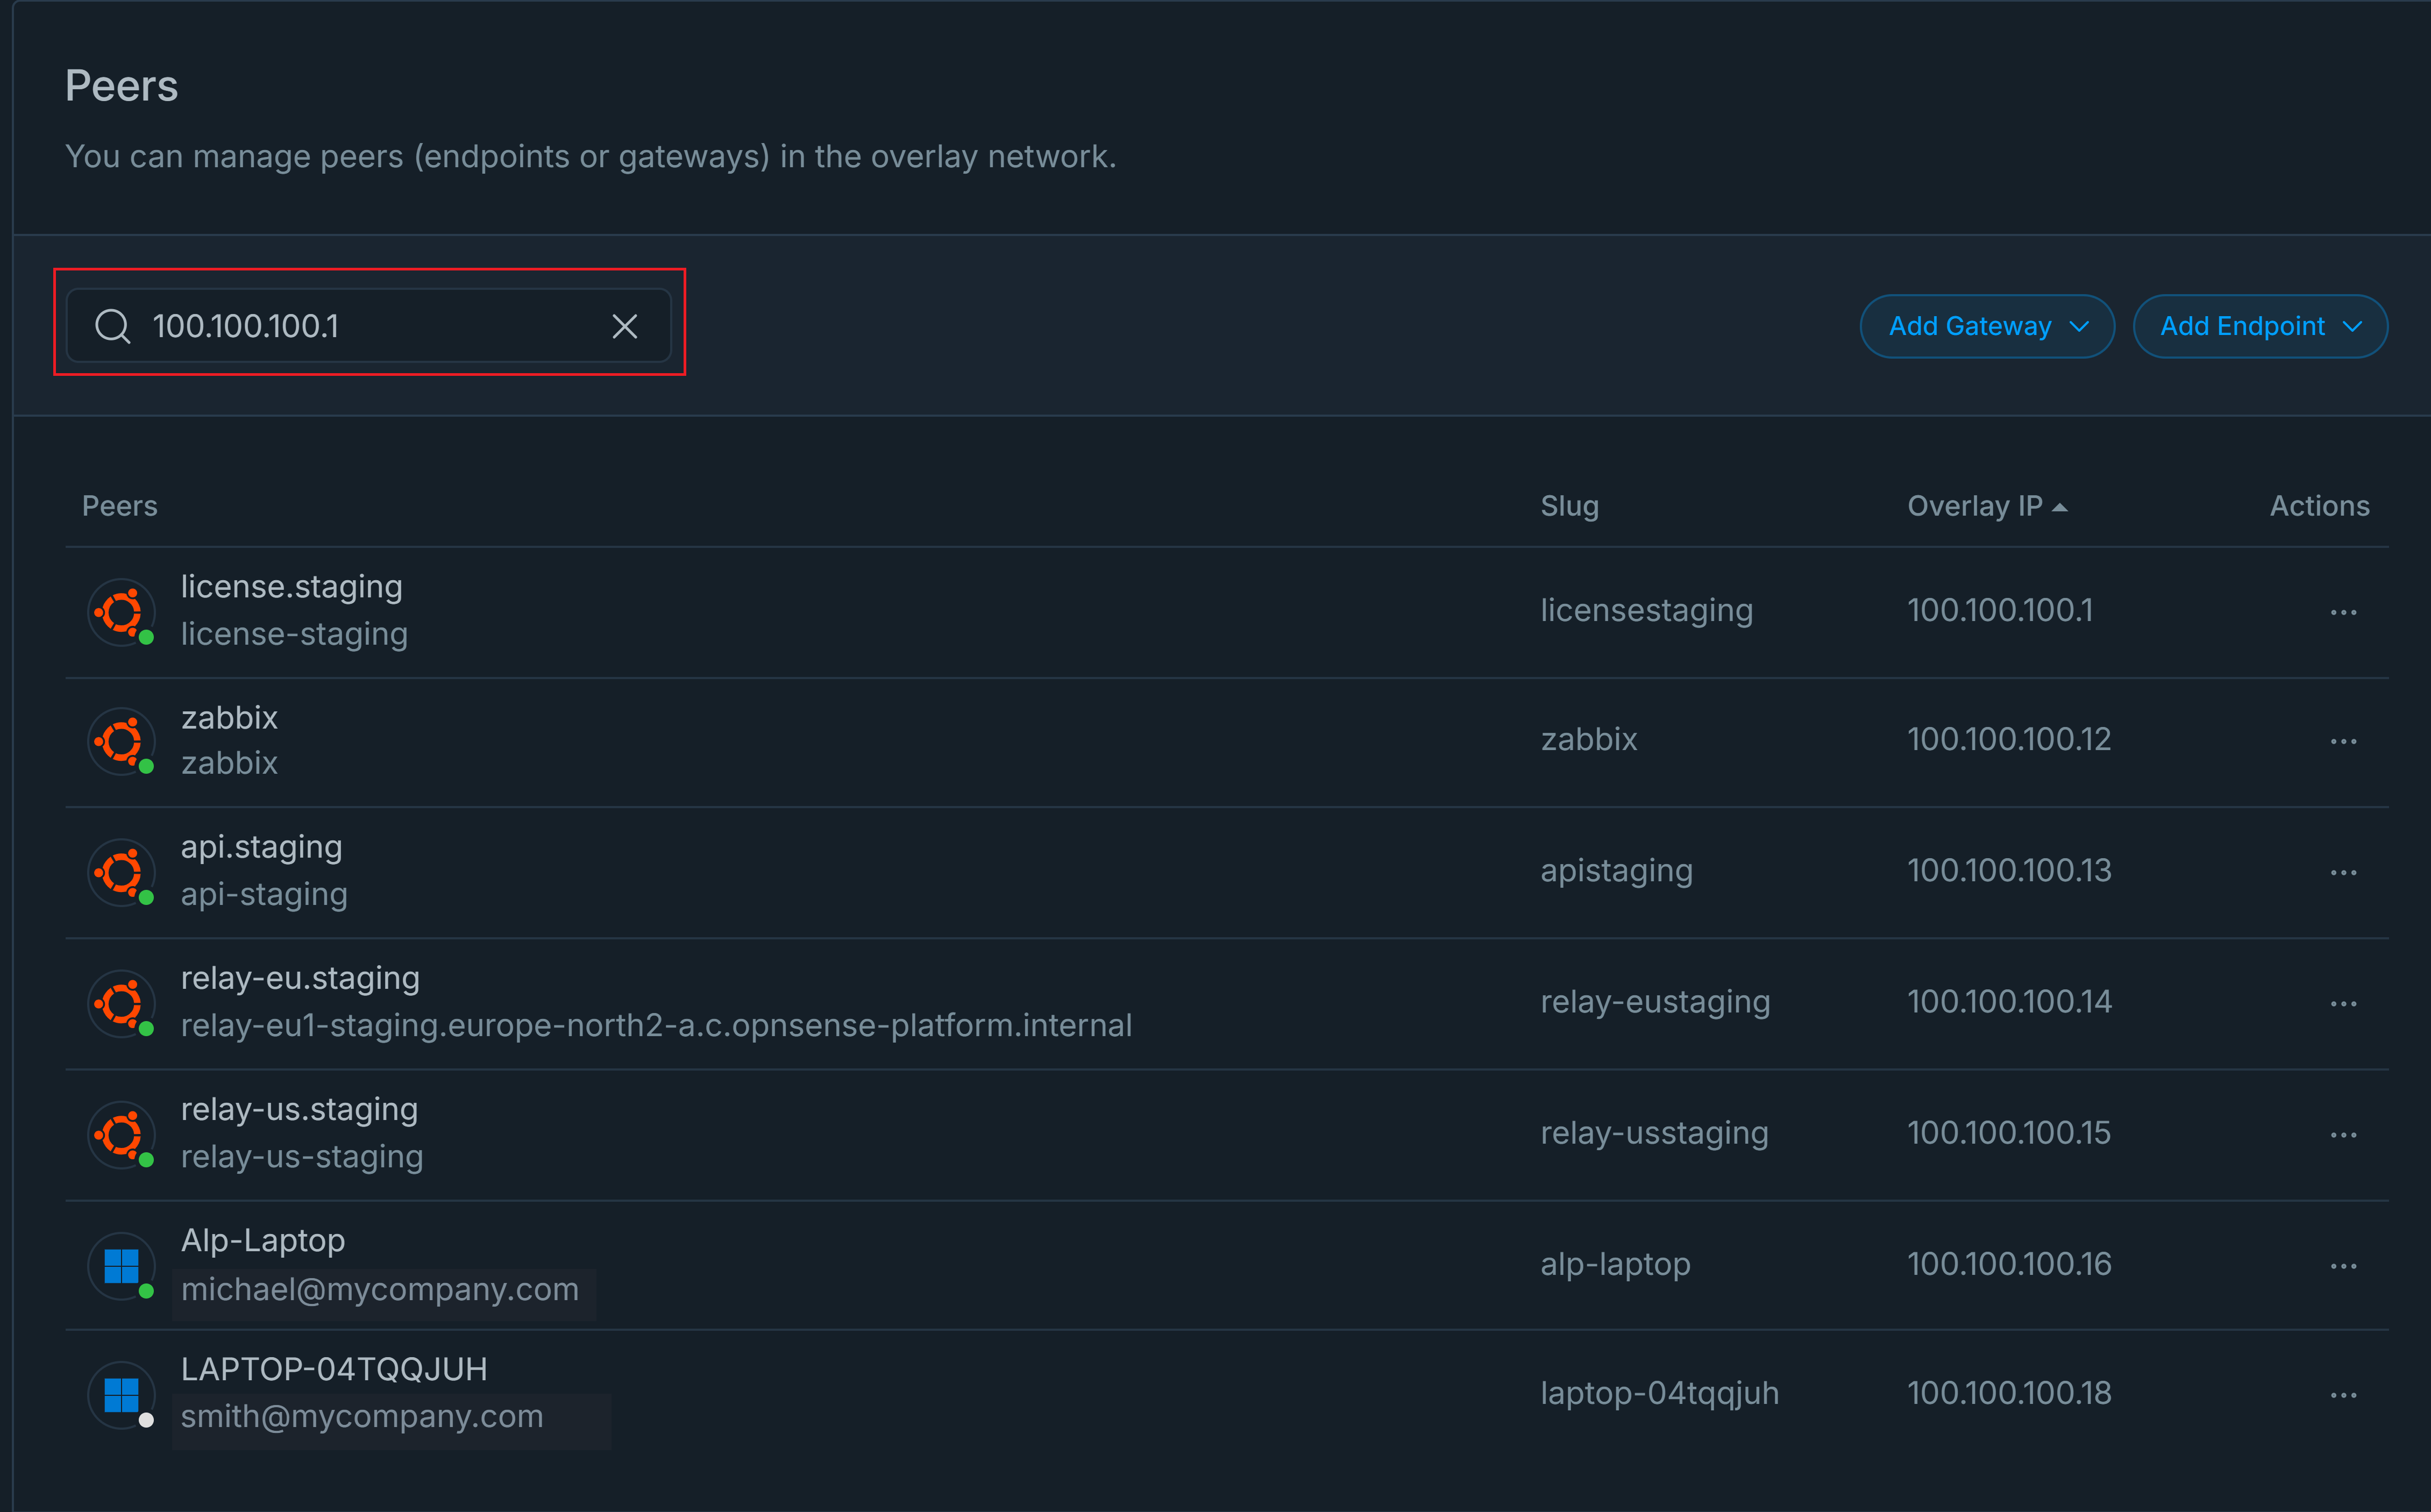
Figure 15. Searching Peer
Managing Advertised Networks & Failover Priority on Gateway Peers
Advertised networks define what is reachable, while failover priority defines how traffic behaves during failures. Together, they form the foundation of Zenarmor’s automatic failover mechanism.
If you are new to automatic failover or want to understand the underlying concepts and benefits, we recommend reading the following guide first: Automatic Failover for Advertised Networks
The following sections describe how to add, remove, and manage advertised networks, as well as assign failover priority using Zenconsole.
Before proceeding with the failover configuration, ensure that a secure private network already exists. Automatic failover operates only within a private network where gateway peers can communicate and advertise routes.
If you have not yet created a secure private network or added peers, refer to the following documentation: Creating Zero-Trust Private Networks, Managing Peers (Gateways and Endpoints)
Adding Advertised Networks on Gateway Peers
Advertised networks define which internal subnets (LANs) are reachable through a gateway. These are the networks that Zenarmor will route traffic to and protect.
Follow the steps below to enable and configure automatic failover:
-
Log in to your Zenconsole account.
-
Navigate to Zero-Trust Networks from the left-hand menu.
-
Click the Zero-Trust Network you want to configure (e.g., My Private Network).

Figure 16. Selecting a Zero-Trust Network for Configuration
-
Ensure that at least two gateway peers are added to the same secure private network.
noteEndpoints may exist in the Zero-Trust network, but do not participate in failover, as failover decisions are made only between gateway peers.
-
In the Peers list, click on a gateway.
-
The Peer Settings panel opens on the right-hand side of the screen.
-
Under Advertised Networks, click Add Network.

Figure 17. Peer Settings Page
-
An Add Advertised Network pop-up appears.
-
Enter the internal network that exists behind this gateway (for example: 192.168.1.0/24 or 10.10.10.0/24).
-
Click Add to save the network.
Figure 18. Add Advertised Network Popup
tipA single gateway can advertise multiple internal networks if it routes traffic to more than one internal subnet.
-
Repeat this step for all gateway peers that should advertise the same network range.
-
After the addition, a Peer settings has been updated success notification appears.
Figure 19. Success Popup
-
Also, a Configuration Updated notification appears in the bottom-right corner. You can click Sync Now to immediately synchronize the configuration across all gateway instances, or wait for the automatic synchronization, which runs every 15 minutes.
Figure 20. Configuration Updated - Sync Now Popup
After synchronization, the advertised networks and their associated gateway peers become visible in the Advertised Networks & Failover Priority section below.
From this section, you can review which gateways advertise each network and configure or update failover priorities as needed.

Figure 21. Advertised Networks & Failover Priority List View
Removing Advertised Networks from a Gateway
Advertised networks can be removed at any time if they are no longer reachable through a gateway or no longer required for routing and failover. To remove an advertised network, follow the steps below:
-
Log in to your Zenconsole account.
-
Navigate to Zero-Trust Networks from the left-hand menu in Zenconsole.
-
Click the Zero-Trust Network you are working with (for example, My Private Network).
-
Scroll down to the Advertised Networks & Failover Priority section.
-
Locate the gateway peer that advertises the network you want to remove.
-
Click on the gateway peer entry in the list. The Peer Settings panel opens on the right-hand side of the screen.
-
Under Advertised Networks, locate the network you want to remove.
-
Click the × (remove) icon next to the advertised network.

Figure 22. Removing Advertised Networks from a Gateway
-
After the removal, a Peer settings has been updated success notification appears.
-
Also, a Configuration Updated notification appears in the lower-right corner of the screen. You can click Sync Now to immediately synchronize the changes across all gateway instances, or wait for the automatic synchronization, which runs every 15 minutes.
Once removed, the network is no longer reachable through this gateway and is excluded from routing and failover decisions.
Assigning Failover Priority
Failover priority determines which gateway is preferred when multiple gateways advertise the same network.
It defines how traffic should behave during gateway failures and is a key component of Zenarmor’s automatic failover mechanism.
-
Higher priority → Preferred (primary) gateway
-
Lower priority → Fallback (secondary) gateway
Failover priority becomes effective only after the same network is advertised by multiple gateways. If a network is advertised by a single gateway, failover does not apply.
To assign failover priority to a gateway, follow the steps below:
-
Log in to your Zenconsole account.
-
Navigate to Zero-Trust Networks from the left-hand menu.
-
Click the Zero-Trust Network you are working with (for example, My Private Network).
-
Scroll down to the Advertised Networks & Failover Priority section.
-
Locate the gateway peer that advertises the target network.
-
Click on one of the gateway peers in the list. The Peer Settings panel opens on the right-hand side of the screen.
-
Just below the Advertised Networks section, locate Failover Priority.

Figure 23. Assigning Failover Priority
-
Click Set priority… and assign a numeric value:
-
Primary gateway → Set a higher priority (for example, 1)
-
Secondary gateway → Set a lower priority (for example, 2)
-
Repeat this step for all gateways advertising the same network, ensuring that each gateway has a distinct priority.
-
The change is saved automatically, and a success notification appears indicating Failover priority has been saved.
-
Also, a Configuration Updated notification appears in the lower-right corner of the screen. You can click Sync Now to immediately synchronize the changes across all gateway instances, or wait for the automatic synchronization, which runs every 15 minutes.
After assigning priorities, Zenarmor continuously monitors gateway health and automatically reroutes traffic when a failure is detected.
Once the configuration is synchronized, the updated failover priorities are reflected in the Advertised Networks & Failover Priority table, where you can review and modify gateway priorities at any time.

Figure 24. Viewing Failover Priority
Failover priority can be adjusted at any time. Changing priorities does not require re-advertising networks and takes effect as soon as the configuration is synchronized.
Searching and Filtering Advertised Networks
As environments grow, multiple gateways and advertised networks may appear in the list. Zenconsole provides filtering and search options to help you quickly locate specific advertised networks or gateway peers.
These tools improve visibility and make managing failover configurations easier.
To filter or search advertised networks, follow the steps below:
-
Log in to your Zenconsole account.
-
Navigate to Zero-Trust Networks from the left-hand menu.
-
Click the Zero-Trust Network you are working with.
-
Scroll down to the Advertised Networks & Failover Priority section.
-
To search, use the Search field to find a specific gateway peer by name. The list updates dynamically as you type.

Figure 25. Searching Advertised Networks
-
To filter the displayed networks, click All Advertised Networks in the upper-right corner of this section.
-
Select the advertised network you want to view from the dropdown list.
-
The table updates to display only the gateway peers advertising the selected network.

Figure 26. Filtering Advertised Networks
Filtering and search help you quickly identify gateways with missing or misconfigured failover priorities, making it easier to review and adjust failover behavior when managing multiple advertised networks.
Managing Membership
Zenconsole enables you to define which users and groups are associated with a Zero-Trust Network. By adding users or groups to a network's membership, all current and future endpoint devices belonging to those users are automatically included in the network.
Adding Users
To add users to a Zero-Trust Network, you may follow the next steps.
-
Navigate to Zero-Trust Networks page of an organization on Zenconsole.
-
Select the Zero-Trust Network to which you want to add users.
-
Scroll down the page to reach the Membership section and locate the Users pane.
-
Click + Add User button. This will display available users in your organization. You may use Search tool to find a specific user quickly.
-
Select the user you want to add.

Figure 27. Adding User
-
Repeat these steps to add additional users. All added users are displayed in the Users pane.
The selected users will appear in the Users list and automatically become members of the Zero-Trust Network.

Figure 28. Zero-Trust Network Users
Removing Users
To remove a user from a Zero-Trust Network, you may follow the next steps.
-
Navigate to Zero-Trust Networks page of an organization on Zenconsole.
-
Select the Zero-Trust Network to which you want to remove a user.
-
In the Users pane under Membership, locate the user you want to remove.
-
Click
Xicon next to the user. This will display a notification window for confirmation. -
Click Remove to delete the user from the overlay network.
The selected user will be removed from the network membership.

Figure 29. Delete User from the Zero-Trust Network
Adding Groups
To add groups to a Zero-Trust Network, you may follow the next steps.
-
Navigate to Zero-Trust Networks page of an organization on Zenconsole.
-
Select the Zero-Trust Network to which you want to add a group.
-
Scroll down the page to reach the Membership section and locate the Groups pane.
-
Click + Add Group button. This will display available groups in your organization. You may use Search tool to find a specific group quickly.
-
Select the group you want to add. You may add as many groups as you want.

Figure 30. Add Group
All added groups will appear in the Groups pane.

Figure 31. Groups List
Removing Groups
To remove a group from a Zero-Trust Network, you may follow the next steps.
-
Navigate to Zero-Trust Networks page of an organization on Zenconsole.
-
Select the Zero-Trust Network to which you want to delete a group.
-
In the Groups pane under Membership section, locate the group you want to remove.
-
Click
Xicon next to the group. This will display a notification window for confirmation. -
Click Remove to delete the group from the Zero-Trust Network. The selected group will be removed from the network membership.

Figure 32. Delete Group from Network
Deleting Zero-Trust Networks
You can permanently delete a Zero-Trust Network when it is no longer required.
To remove a Zero-Trust Network from your organization, you may follow the next steps.
-
Navigate to Zero-Trust Networks page of an organization on Zenconsole.
-
Select the Zero-Trust Network that you want to delete.
-
Scroll down to the Delete Network pane.
-
Click Delete Network button. This will display a dialog box for confirmation.

Figure 33. Delete Zero-Trust
-
Type the network name to approve the removal of the network.

Figure 34. Delete Zero-Trust Network Confirmation
-
Click Delete Network button. A message box will appear at the bottom right of the page for configuration updates.
-
Click Sync Now button for an immediate configuration update on all instances.
Figure 35. Configuration Updated - Sync Now Popup