TLS Inspection Rules on OPNsense
Using encryption methods guarantees the secrecy and accuracy of data sent during communication between the sender and receiver. SSL and its successor, Transport Layer Security (TLS), are protocols designed to guarantee the confidentiality and protection of Internet services. While these measures successfully protect information from illegal access, they also conceal possible threats to the user, device, and organization.
With more than 90% of global Internet traffic being encrypted, the use of encryption effectively prevents most attacks and makes them invisible unless integrated TLS inspection is used. Examining SSL and TLS encrypted communication is crucial in this particular situation.
Transport Layer Security Inspection is a security protocol that allows businesses to decrypt network traffic, examine the decrypted content for possible threats, and then encrypt the data again before it enters or leaves the network. There are two distinct approaches to TLS inspection, which vary in terms of the amount of information they provide and whether or not they involve decrypting the data.
-
Light-weight (or certificate-based) TLS Inspection: Zenarmor® does an analysis of the first stages of TLS sessions in either the lightweight or certificate-based inspection mode. The indicated sections are not encrypted and include crucial information, such as the distant hostname, web category, and remote application type. Administering certifications does not need any specific credentials since this service is currently available to all levels of membership. When studying lightweight TLS inspection, transparency is complete and unrestricted.
Light-weight TLS inspection is available for all Zenarmor subscription tiers, including the Free Edition.
However, due to the introduction of TLS 1.3 Encrypted Client Hello (ECH), modern browsers may hide the hostname (SNI) during the TLS handshake. In such cases, lightweight inspection cannot retrieve the hostname unless ECH is explicitly blocked. Zenarmor provides a “Block TLS Encrypted Client Hello (ECH)” option to restore visibility into encrypted metadata. For detailed configuration steps, please refer to the official documentation:Enabling/Disabling Block ECH
-
Full TLS Inspection (or TLS decrypt/reencrypt): The Full TLS Inspection technique involves Zenarmor intercepting the TLS connection, decrypting the packet contents, doing a comprehensive packet inspection, and then re-encrypting the packet contents. Zenarmor's Full TLS inspection capabilities enhance the capacity to monitor and regulate encrypted network traffic, hence providing a substantial security advantage. Attackers often use encrypted communications to conceal their malicious activities, due to its widespread use.
When used, Zenarmor's Full TLS inspection feature allows for strong threat identification and prevention by decrypting and examining incoming and outgoing TLS packets. This process strengthens network defense by implementing extensive monitoring, threat detection, and control mechanisms for encrypted communications. It effectively prevents the infiltration of dangerous information that may be concealed inside encrypted data flows, ensuring that security measures are not bypassed.

Figure 1. TLS Inspection Rules in a Policy
The full TLS inspection feature is available only for SSE, SASE, and ZTNA subscriptions.
You can easily configure the policy-based TLS Inspection feature by performing the following tasks explained in this guide:
- Enable/Disable Full TLS Inspection
- Enable/Disable Full TLS Inspection for Specific Sites
- Enable/Disable Full TLS Inspection for IP Flow without DNS Data
- Selecting TLS Traffic to Inspect
For inspecting TLS traffic or viewing the Zenarmor block notification page for TLS traffic, you need to install the Zenarmor internal CA certificate on your client devices as a trusted certificate.
Prior to implementing full TLS inspection on an organization, it is recommended to meticulously strategize the TLS inspection deployment and adhere to established best practices.
Enable/Disable Full TLS Inspection
Zenarmor provides a policy-based Full TLS inspection feature that you can easily enable or disable depending on your requirements. You may quickly enable the full TLS inspection feature on your network by following the next steps:
-
Navigate to the Zenarmor → Policies on your OPNsense web UI.
-
Select the policy that you want to enable TLS inspection.
-
Go to TLS Controls tab.

Figure 2. Enabling Full TLS Inspection
-
Click on the toggle bar next to the Enable Full TLS Inspection for this policy option. This will display the full TLS inspection settings below.
-
Click Apply Changes button to activate the full TLS Inspection for this policy after selecting the TLS inspection settings depending on your needs.
Please note that it is your responsibility to determine if it is legal to inspect TLS traffic in your jurisdiction. By configuring the TLS Inspection function, you are in effect allowing the service to inspect your users' TLS traffic. While all such inspection is carried out automatically rather than by individuals, such decryption may nonetheless be in breach of privacy laws in certain countries.
By enabling this functionality, you agree that you have the legal right to decrypt this traffic in all relevant jurisdictions where applied and that you have obtained all necessary consents from your users to do so.
QUIC is a recently developed secure network protocol for transporting data, which was first created by Google in 2012. This technology was developed specifically to enhance the efficiency of internet data transfer by minimizing latencies and offering additional capabilities such as establishing connections, managing numerous data streams, and achieving quicker connection setup compared to conventional TCP and TLS protocols. This may result in expedited page loading times and an enhanced user experience.
The QUIC protocol accomplishes this improvement by bypassing the TCP handshake and use UDP instead. Due to the reliance on TLS inspection on TCP session metadata, Zenarmor recommends prohibiting the use of the Google QUIC protocol. QUIC connections may be effectively blocked by using TLS Controls in a policy setting. When QUIC protocol is allowed in the policy, a notification message and a toggle bar are displayed allowing you to conveniently block QUIC UDP connections. If a browser or device cannot create a QUIC connection, it will use TCP connections as a substitute.
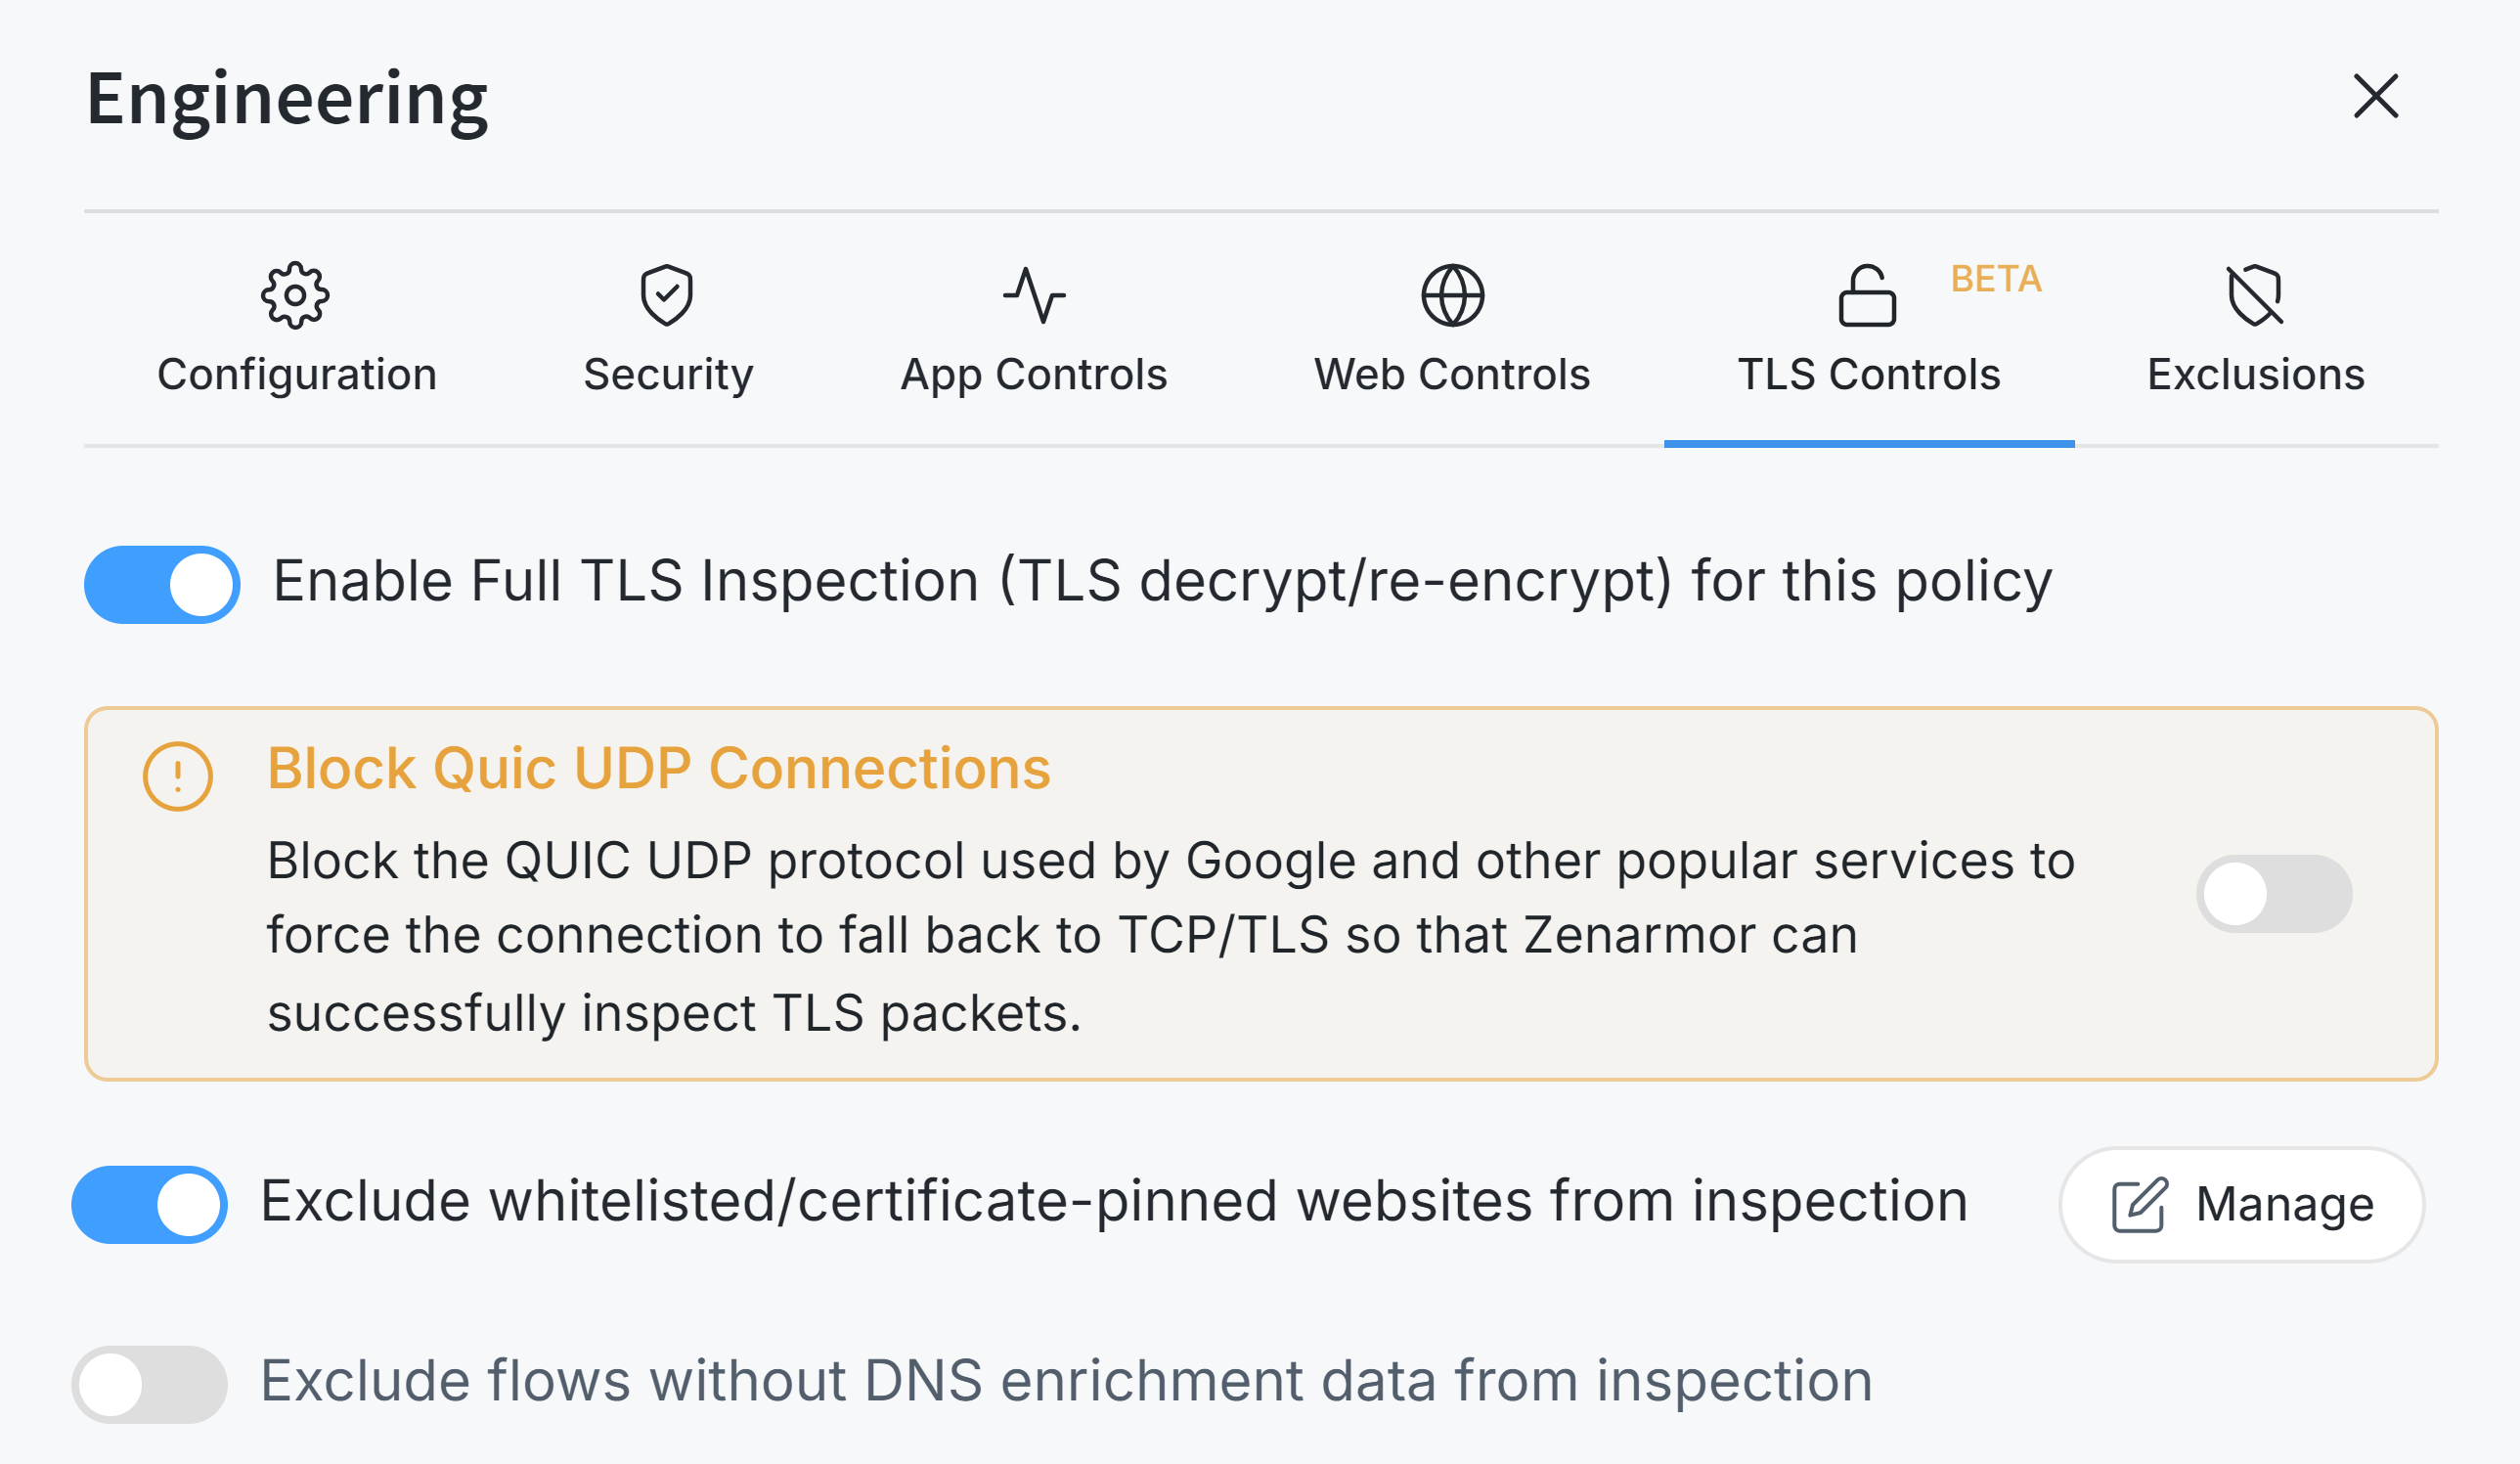
Figure 3. Blocking QUIC UDP Protocol
You may easily enable QUIC Protocol in the policy via the App Controls tab if you need to allow QUIC UDP connections.

Figure 4. Allowing QUIC UDP Protocol via the App Controls
Enable/Disable Full TLS Inspection for Specific Sites
Certain portions of the Transport Layer Security (TLS) traffic may be subject to legal protections that pertain to the confidentiality and secrecy of communications. Decrypting and analyzing this message might be considered unlawful in many areas. Depending on the specific sector, geographical region, regulatory requirements, the Sarbanes-Oxley Act (SOX), personally identifiable information (PII), and legal responsibilities, there may be some types of data flow that should not be deciphered, such as secret medical or financial information.
Therefore, it may be unnecessary to closely examine the Transport Layer Security (TLS) traffic for certain websites, despite Zenarmor's recommendation to scan as much information as feasible. In order to protect the privacy of these connections, it is crucial to implement filters and constraints for the TLS inspection configuration.
In addition, to prevent Man-in-the-Middle (MiTM) scrutiny, certain suppliers and developers use coding methods called certificate pinning. Zenarmor lacks the capability to examine SSL traffic that comes from websites or programs that use certificate pinning. This includes, but is not limited to, Adobe, Apple, Cisco WebEx, Microsoft Office 365, and the Dropbox app.
Zenarmor provides several websites that are automatically excluded from TLS Inspection. It also enables you to choose to designate websites and applications that will be exempt from scrutiny by your firewall on a global level.
You may easily exclude certificate-pinned and whitelisted websites from TLS inspection in a policy, by following the next steps:
-
Navigate to the Zenarmor → Policies on your OPNsense web UI.
-
Select the policy that you want to configure for TLS inspection.
-
Go to TLS Controls tab.
-
Click on the Exclude whitelisted/certificate-pinned websites from inspection option.
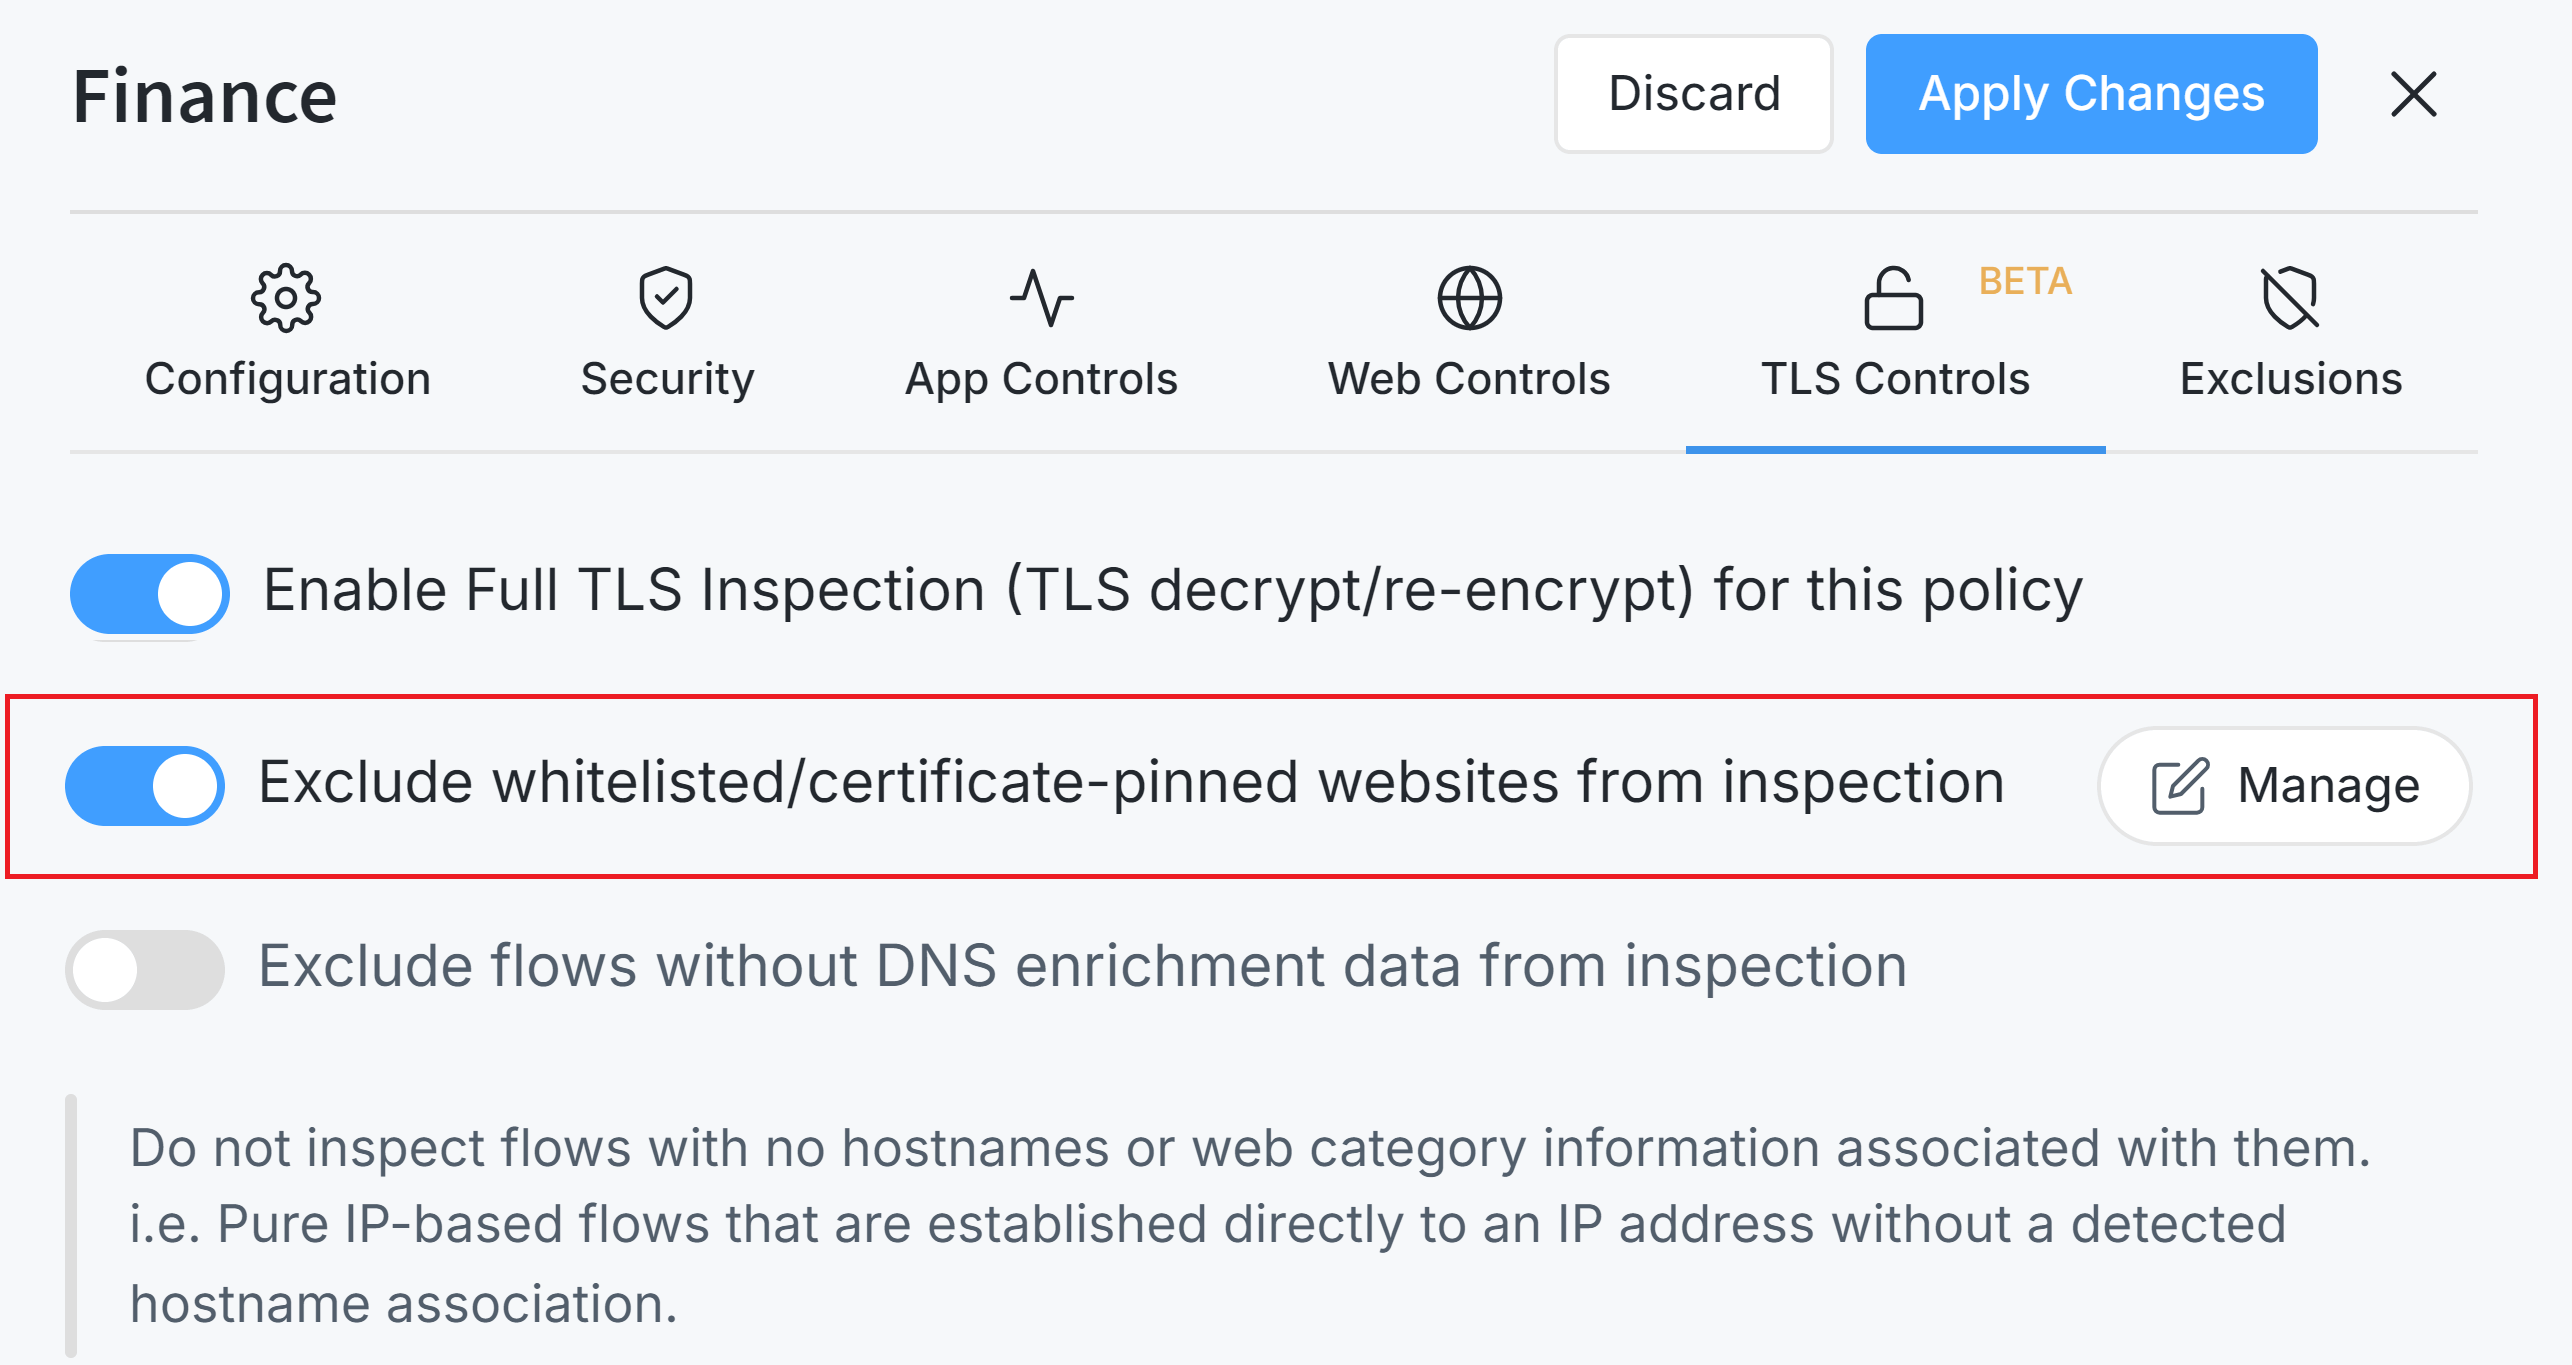
Figure 5. Excluding whitelisted/certificate-pinned websites from inspection
-
You may click Manage button to view and manage TLS Inspection bypassed websites on the global TLS Inspection settings page.
-
Click the Apply Changes button to activate the settings for the policy.
Enable/Disable Full TLS Inspection for IP Flow without DNS data
Zenarmor allows you to exclude TLS traffic flows that lack hostnames or web category information from inspection. To enable or disable full TLS inspection for flows that are only based on the IP address without any associated hostname, you may follow the next steps:
-
Navigate to the Zenarmor → Policies on your OPNsense web UI.
-
Select the policy that you want to configure for TLS inspection.
-
Go to TLS Controls tab.
-
Click on the Exclude flows without DNS enrichment data from inspection option.
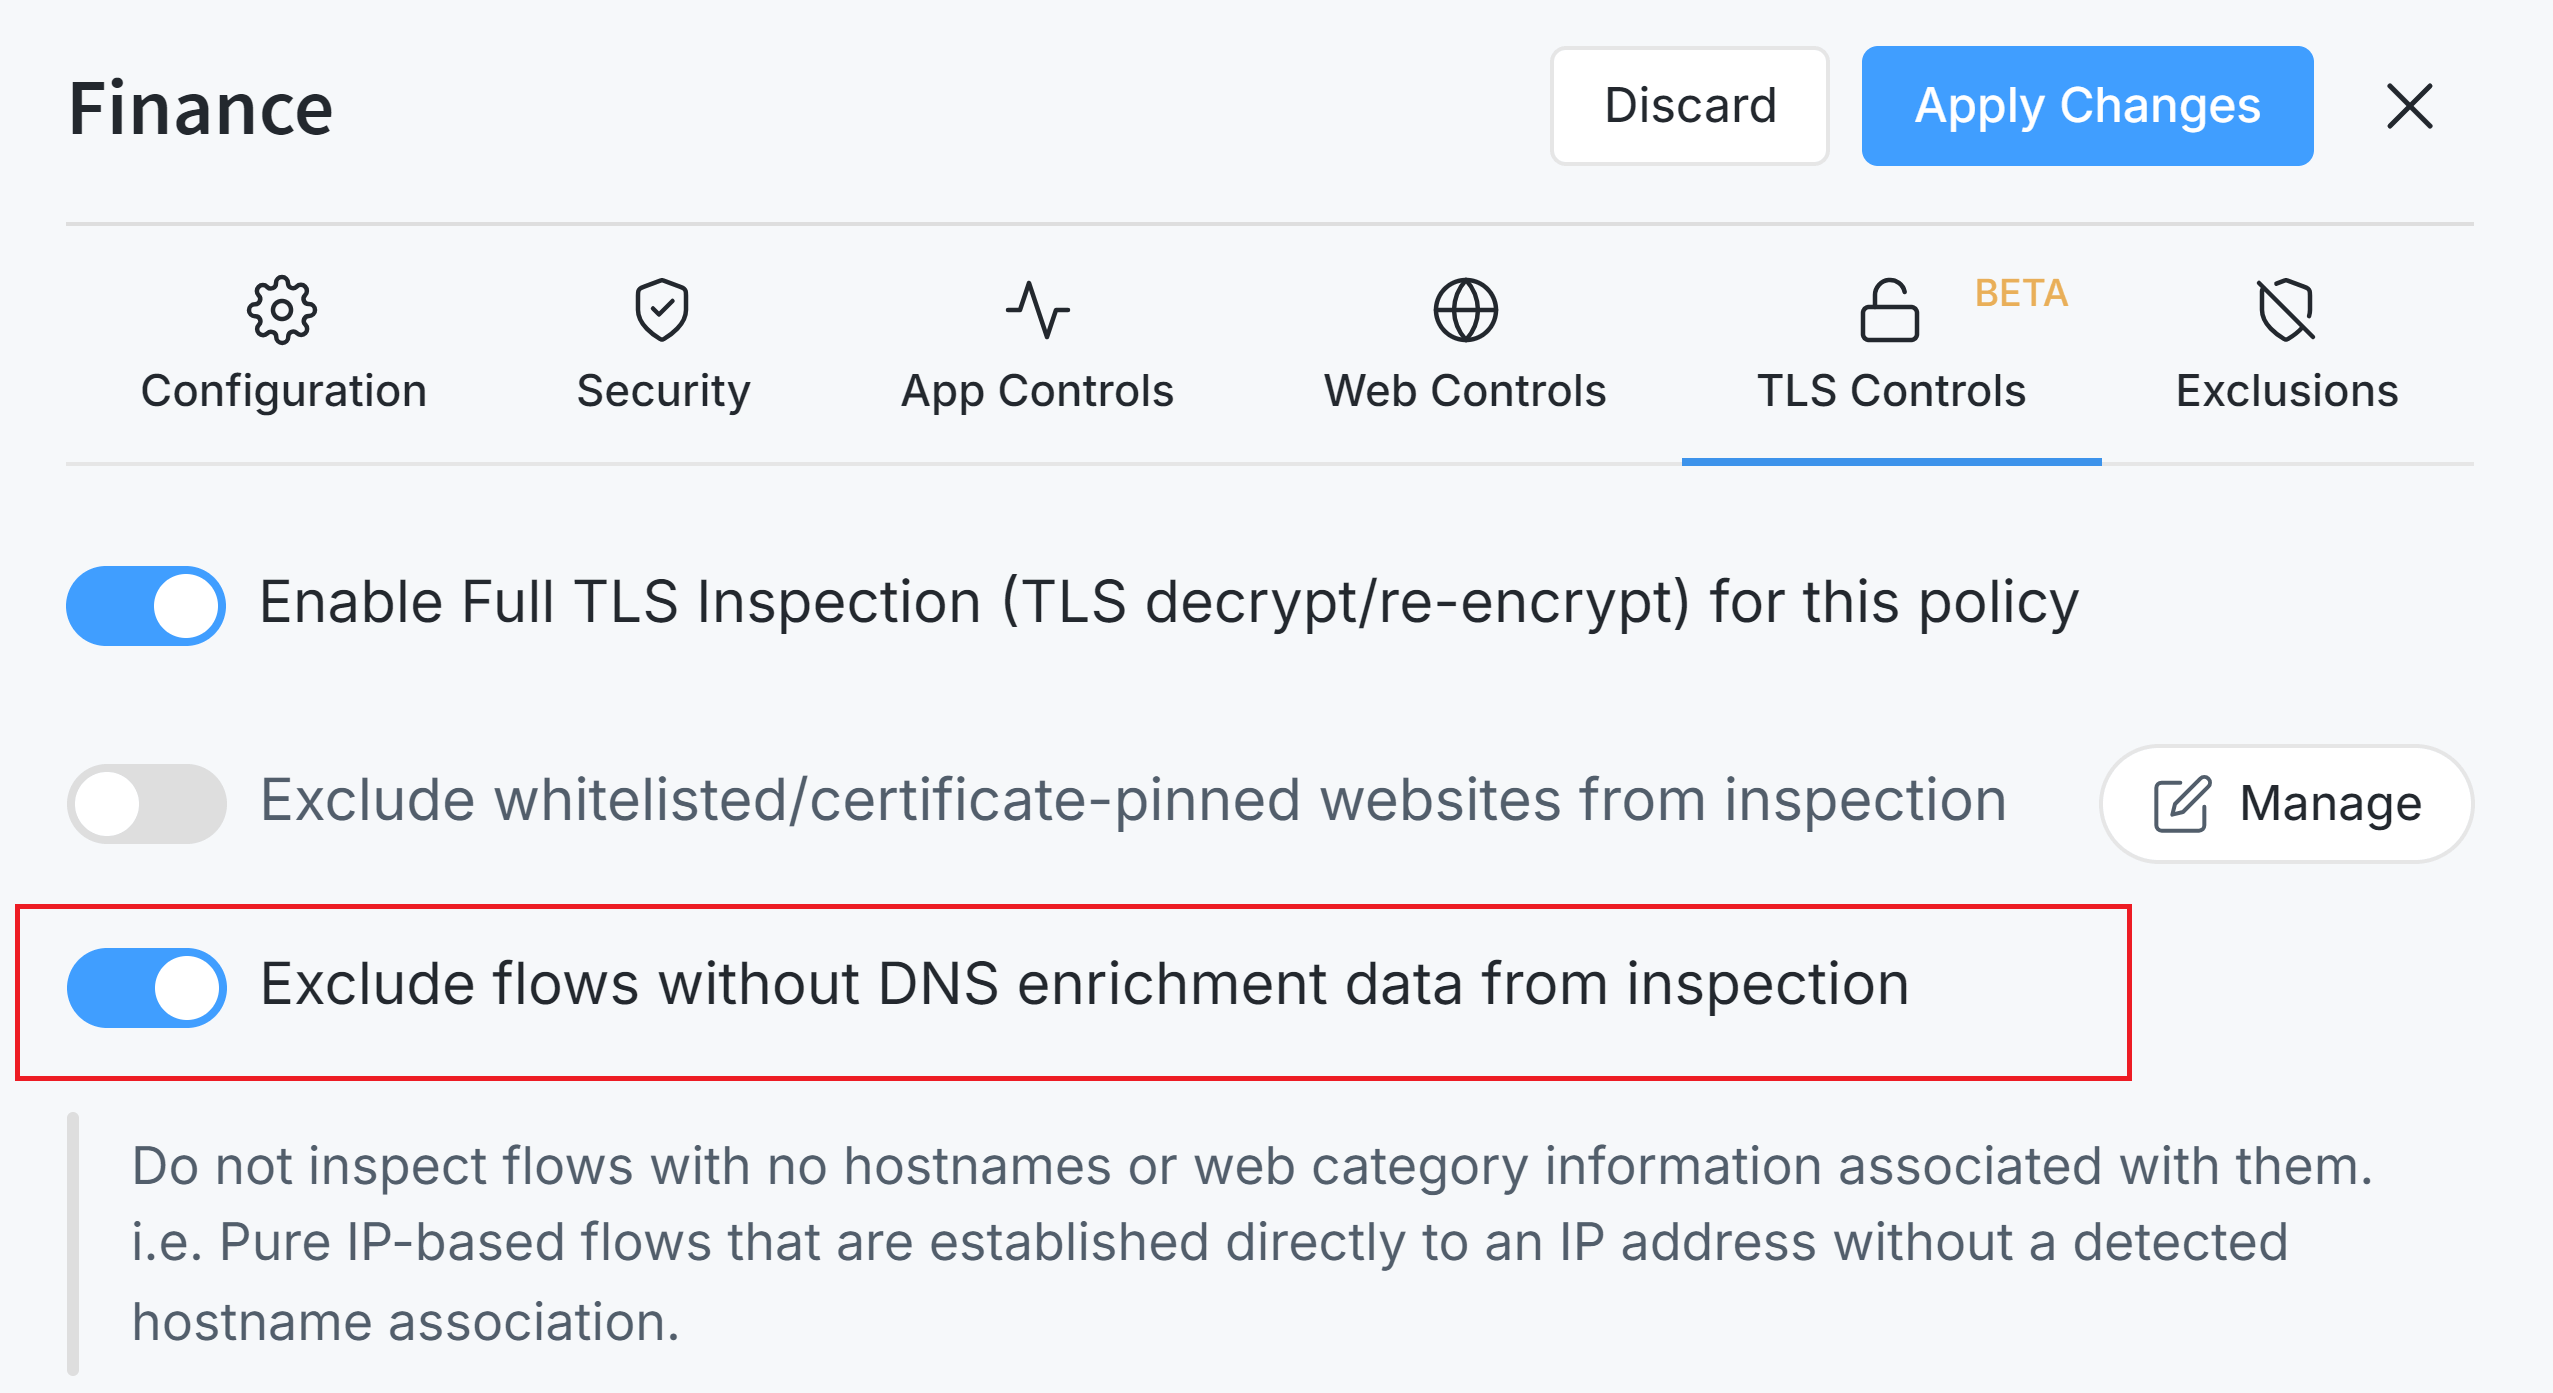
Figure 6. Excluding flows without DNS enrichment data from inspection
-
Click the Apply Changes button to activate the settings for the policy.
After enabling Full TLS Inspection and selecting the general inspection options (such as excluding certificate-pinned websites or IP flows without DNS enrichment data), the next step is choosing the specific types of HTTPS traffic Zenarmor should decrypt and inspect.
Zenarmor provides two flexible methods for selecting TLS traffic:
-
Category-Based TLS Inspection: inspect all HTTPS traffic or only selected web categories.
-
Site-Specific TLS Inspection: inspect traffic only for specific domains you define.
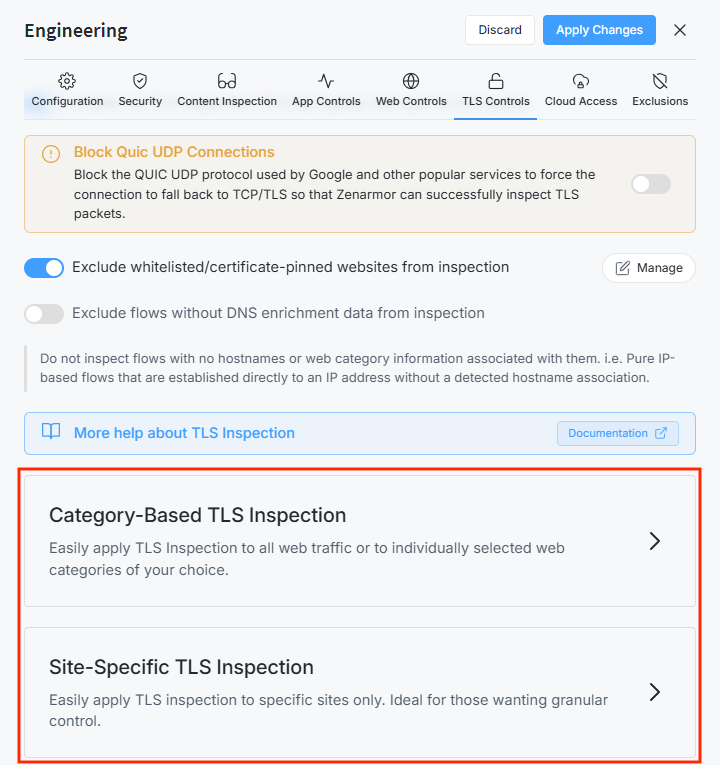
Figure 7. Two Methods for Selecting TLS Traffic
These options allow you to tailor Full TLS Inspection according to the security, performance, and privacy requirements of your organization.
Category-Based TLS Inspection
Category-Based TLS Inspection allows you to apply Full TLS Inspection across all HTTPS traffic or only for selected web categories. This method is ideal when traffic inspection needs to align with category-based security, compliance, or productivity policies.
Inspecting All Web Traffic
You can easily enable full TLS inspection for all HTTPS traffic that matches a policy by following the next steps:
-
Navigate to the Zenarmor → Policies on your OPNsense web UI.
-
Select the policy that you want to enable TLS inspection.
-
Go to TLS Controls tab.
-
Ensure that full TLS Inspection is enabled.
-
Scroll to the Category-Based TLS Inspection section and and click to expand it.
-
Click on the Inspect all web traffic toggle bar.

Figure 8. Inspecting All Web Traffic
-
Click Apply Changes button to activate the full TLS Inspection for the policy.
Inspecting Traffic for a Web Category
You can easily enable full TLS inspection for a web category traffic that matches a policy by following the next steps:
-
Navigate to the Zenarmor → Policies on your OPNsense web UI.
-
Select the policy that you want to configure for TLS inspection.
-
Go to TLS Controls tab.
-
Ensure that full TLS Inspection is enabled.
-
Scroll to the Category-Based TLS Inspection section and and click to expand it. Once expanded, the list of available web categories will appear.
-
Find the web categories that you want to inspect from the web category list at the bottom of the pane. You may also use the search bar to find the web category quickly.

Figure 9. Inspecting Web Category Traffic
-
Click on the toggle bar in the Status column next to the web category. This will change Status from Do not Inspect to Inspect.
-
You may repeat steps 5-6 for each web category traffic that you want to inspect.
-
Click the Apply Changes button to activate the full TLS Inspection for the policy.
Site-Specific TLS Inspection
Full TLS Inspection enables Zenarmor to decrypt and inspect encrypted HTTPS traffic, providing complete visibility into potential threats hidden within TLS sessions. However, enabling this feature globally may not always be necessary. Some organizations prefer to inspect only selected, high-risk, or business-critical domains.
Site-Specific Full TLS Inspection offers this flexibility. With this feature, you can apply full TLS inspection only to specific domains that you define, ensuring high security without affecting overall performance or privacy-sensitive environments.
You can easily enable Site-Specific Full TLS Inspection for selected domains in your policy by following the next steps:
-
Navigate to the Zenarmor → Policies on your OPNsense web UI.
-
Select the policy that you want to configure for TLS inspection.
-
Go to TLS Controls tab.
-
Ensure that full TLS Inspection is enabled.
-
Scroll to the Site-Specific TLS Inspection section and and click to expand it.
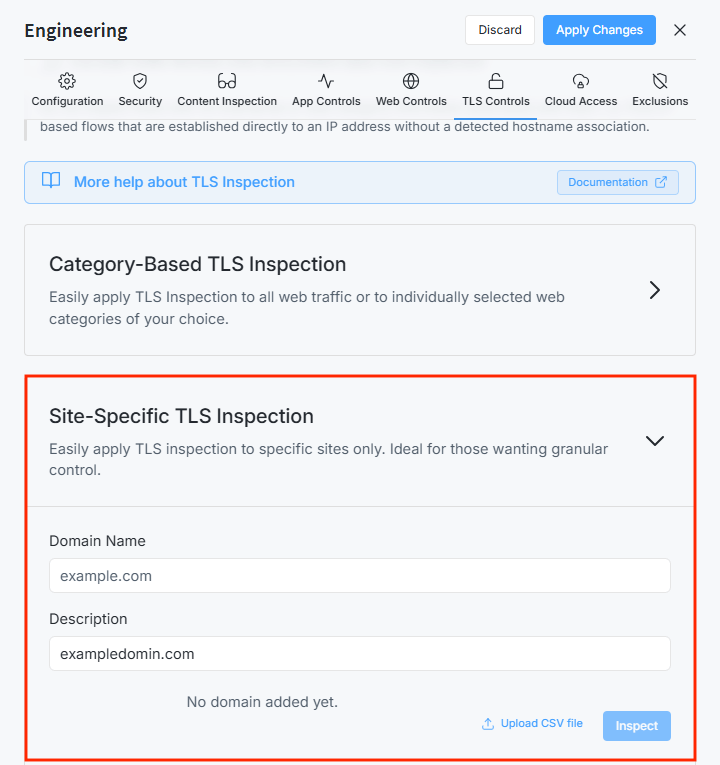
Figure 10. TLS Controls - Site-Specific TLS Inspection
-
In the Domain Name field, enter the domain you want to inspect.
-
Add a Description to document the domain’s purpose.
-
Click Inspect to add the domain to the inspection list.
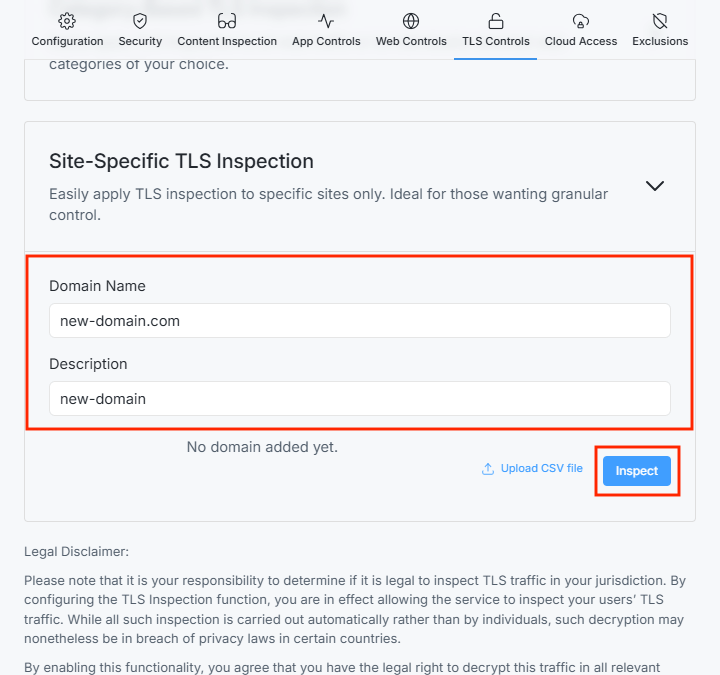
Figure 11. Adding a Domain for Inspection
-
After clicking Inspect, a confirmation message appears indicating that the domain was successfully added.
Once saved, the domain is added to the list and displayed with a green indicator showing that TLS inspection is enabled.
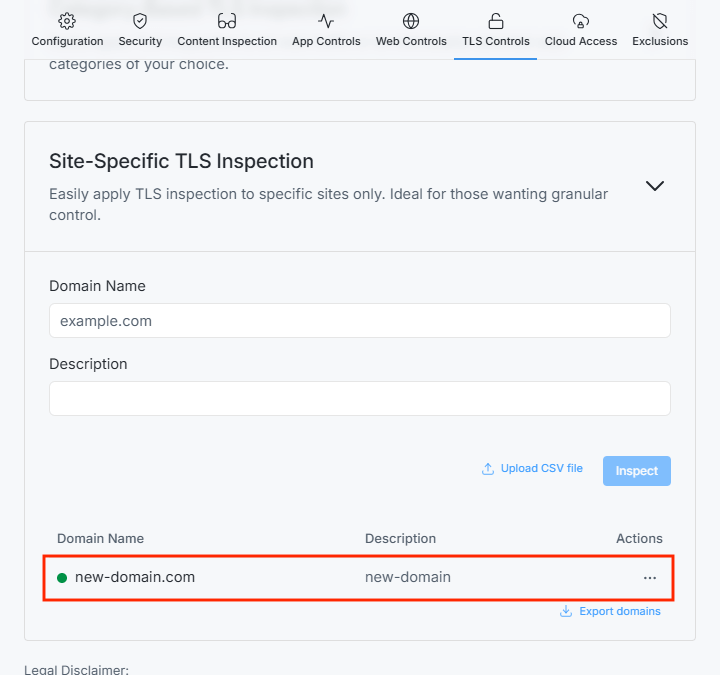
Figure 12. Domain Name List
You can add multiple domains or upload them in bulk using the Upload CSV file option.
Managing Existing Domains
Once a domain is added to the Site-Specific TLS Inspection list, you can modify or control it using the Actions (⋯) menu on the right side of each entry.
The following operations are available:
Editing an Existing Domain
You may update the domain name or description at any time. To update an existing domain, follow the steps below:
-
Click the ⋯ (Actions) menu next to the domain you want to modify.
-
Select Edit.

Figure 13. Editing a Domain Name
-
The Edit Domain Name dialog will appear. Update the Domain Name and/or Description fields as needed.
-
Click Save to confirm the changes.

Figure 14. Edit Domain Name - Popup
A confirmation message will appear indicating that the domain has been successfully updated. Your updated domain details will now appear in the list.
Disabling TLS Inspection for a Domain
Disabling stops TLS inspection for the selected domain without removing it from the list. This is useful if you temporarily want to exclude a domain from inspection.
-
Click the ⋯ (Actions) menu next to the domain you want to modify.
-
Select Disable.

Figure 15. Disabling TLS Inspection for a Domain
The domain's status indicator will turn inactive.

Figure 16. Domain’s Status Indicator
You can enable it again later by selecting Enable from the same menu.
Removing a Domain from the Inspection List
If you no longer want to inspect TLS traffic for a specific domain, you can remove it from the Site-Specific TLS Inspection list. Removing a domain will permanently delete it from the configuration.
Follow the steps below to remove a domain from the inspection list.
-
Click the ⋯ (Actions) menu next to the domain you want to delete.
-
Select Remove from the menu.

Figure 17. Removing a Domain from the Inspection List
-
A confirmation dialog will appear, click Remove to confirm, or Cancel to abort the action.

Figure 18. Warning
-
Once confirmed, a notification will appear indicating that the domain has been removed.
Exporting All Domains
For backups, audits, or policy documentation, you can export the full list of domains. To export all domains follow the steps below.
-
Scroll to the bottom-right of the domain list.
-
Click Export domains.

Figure 19. Export Domains