Managing Devices
You can easily manage your detected devices through the Device Details pane and perform the following tasks on them:
- Mark as Star
- Mark as Hidden
- Mark as Trusted or Untrusted
- Changing Device Name
- Changing Device Category
- Stop Automatic Identification
- Add a Child Device
- Merge with a Parent Device
- Delete Device
You may also perform the following tasks on your discovered devices by navigating to Zenarmor → Devices.
- Access Live Sessions report for a device
- Assign or Unassign a Device to/from an existing policy
- View Assigned Policies for a Device
- Delete Device
To access the Device Details pane for managing a device you may follow the following steps:
-
Navigate to the Zenarmor → Devices page on OPNsense UI.
-
Select a device list view based on the status or category that you want to view. By default, Active devices are listed automatically. You may click All to view all of your devices.
-
Click on the device that you want to see. The Device Details pane will be displayed on the right side of the Devices page.
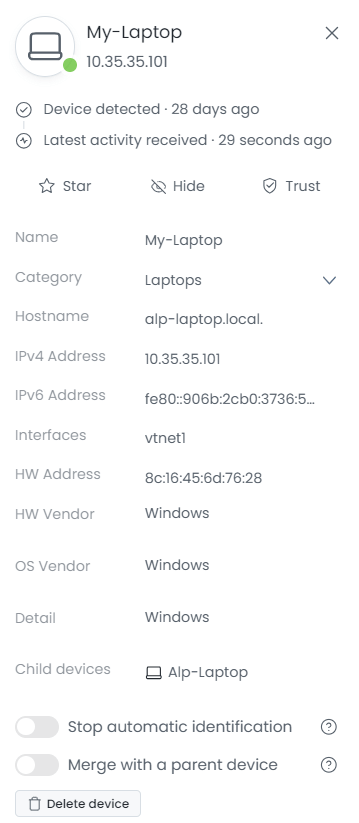
Figure 1. Device Details Pane on Zenarmor
You can now quickly manage your device.
Marking as Star
When you have a large number of devices, you may need to examine some of them more frequently than others due to their importance or suspicious activities. You may create a list with the name Starred for your favorite devices. To mark a device as Starred, you may follow the next steps:
-
Navigate to the Device Details pane of the device that you want to mark.
-
Click on the Star button with a star icon. This will automatically add the device to the Starred device list. Now, you can quickly access this device via the Starred list on the left-hand side of the Devices page.

Figure 2. Viewing Starred Device List on Zenarmor
Marking as Hidden
You may need to make some of your detected devices invisible in some cases. Zenarmor allows you to create a list with the name Hidden for your devices that you don't need to view. To mark a device as Hidden, you may follow the next steps:
-
Navigate to the Device Details pane of the device that you want to mark.
-
Click on the Hide button with an invisible icon. This will automatically add the device to the Hidden device list. Now, you can quickly access this device via the Hidden list on the left-hand side of the Devices page.

Figure 3. Viewing Hidden Device List on Zenarmor
Marking as Trusted or Untrusted
When Zenarmor® detects a new device on your network, it notifies you via the Devices page. All new devices are categorized as Untrusted until you acknowledge and mark them as Trusted. Moreover, you may need to update the trust classification of a previously verified device due to its abnormal network activities.
Zenarmor allows you to easily update the trust classification of a device via the Device Details pane.
To mark a device as Trusted, you may follow the next steps:
-
Navigate to the Device Details pane of the device that you want to mark.
-
Click on the Trust button. This will automatically add the device to the Trusted device list. Now, you can quickly access this device via the Trusted list on the left-hand side of the Devices page.

Figure 4. Viewing Trusted Device List on Zenarmor
To mark a device as Untrusted, you may follow the next steps:
-
Navigate to the Device Details pane of the device that you want to mark.
-
Click on the Trusted button. This will automatically add the device to the Untrusted device list. Now, you can quickly access this device via the Untrusted list on the left-hand side of the Devices page.

Figure 5. Viewing Untrusted Device List on Zenarmor
Changing Device Name
Zenarmor allows you to easily update the detected device's name. To change the name of a device, you may follow the next steps:
-
Navigate to the Device Details pane of the device that you want to update.
-
Type a new name you want in the name field.
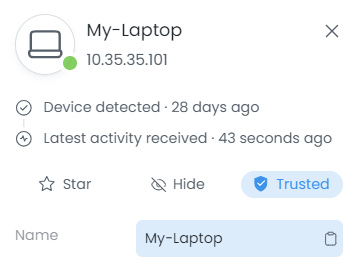
Figure 6. Updating Device Name on Zenarmor
Beware that when you change the detected name of a device, the Zenarmor device database is updated, and detected values are ignored. The displayed values are those that you manually set.
You may also quickly copy the device name onto the clipboard by clicking on the copy icon at the right side of the name field.
Changing Device Category
Zenarmor allows you to easily update the detected device's category. To change the category of a device, you may follow the next steps:
-
Navigate to the Device Details pane of the device that you want to update.
-
Click on the Device Category field. This will open a drop-down menu displaying the available device categories.
-
Select the correct category for your device.
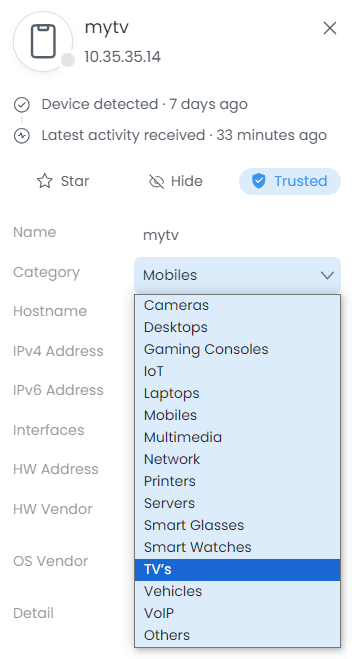
Figure 7. Updating Device Category on Zenarmor
Beware that when you change the detected category of a device, the Zenarmor device database is updated, and detected values are ignored. The displayed values are those that you manually set.
Stopping Automatic Identification
You can disable automated identification for a device if the information detected thus far is satisfactory and you do not wish for it to be updated going forward. To disable automatic device identification, you may follow the next steps:
-
Navigate to the Device Details pane of the device that you want to manage.
-
Click on the Stop automatic identification toggle button at the bottom of the Device Details pane.
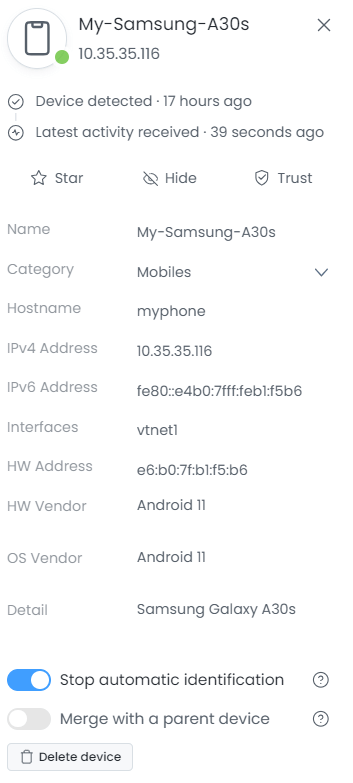
Figure 8. Disabling automatic device identification
Adding a Child Device
Zenarmor handles devices that have multiple network interfaces, such as a notebook with a 1000BaseT LAN adapter and a Wi-Fi adapter, as if they were distinct entities. It is advisable to merge devices that are currently classified as separate devices into one device as a unified entity.
Zenarmor Device Identification feature enables users to view and add child devices directly from parent device details, providing a comprehensive overview of device relationships and improving user experience.
To add a device as a child device from parent device details, you may follow the next steps:
-
Navigate to the Device Details pane of the parent device if you want to merge with a child device.
-
Click on the + Add Child Device drop-down menu under the Child Devices option. This will display the list of discovered devices.
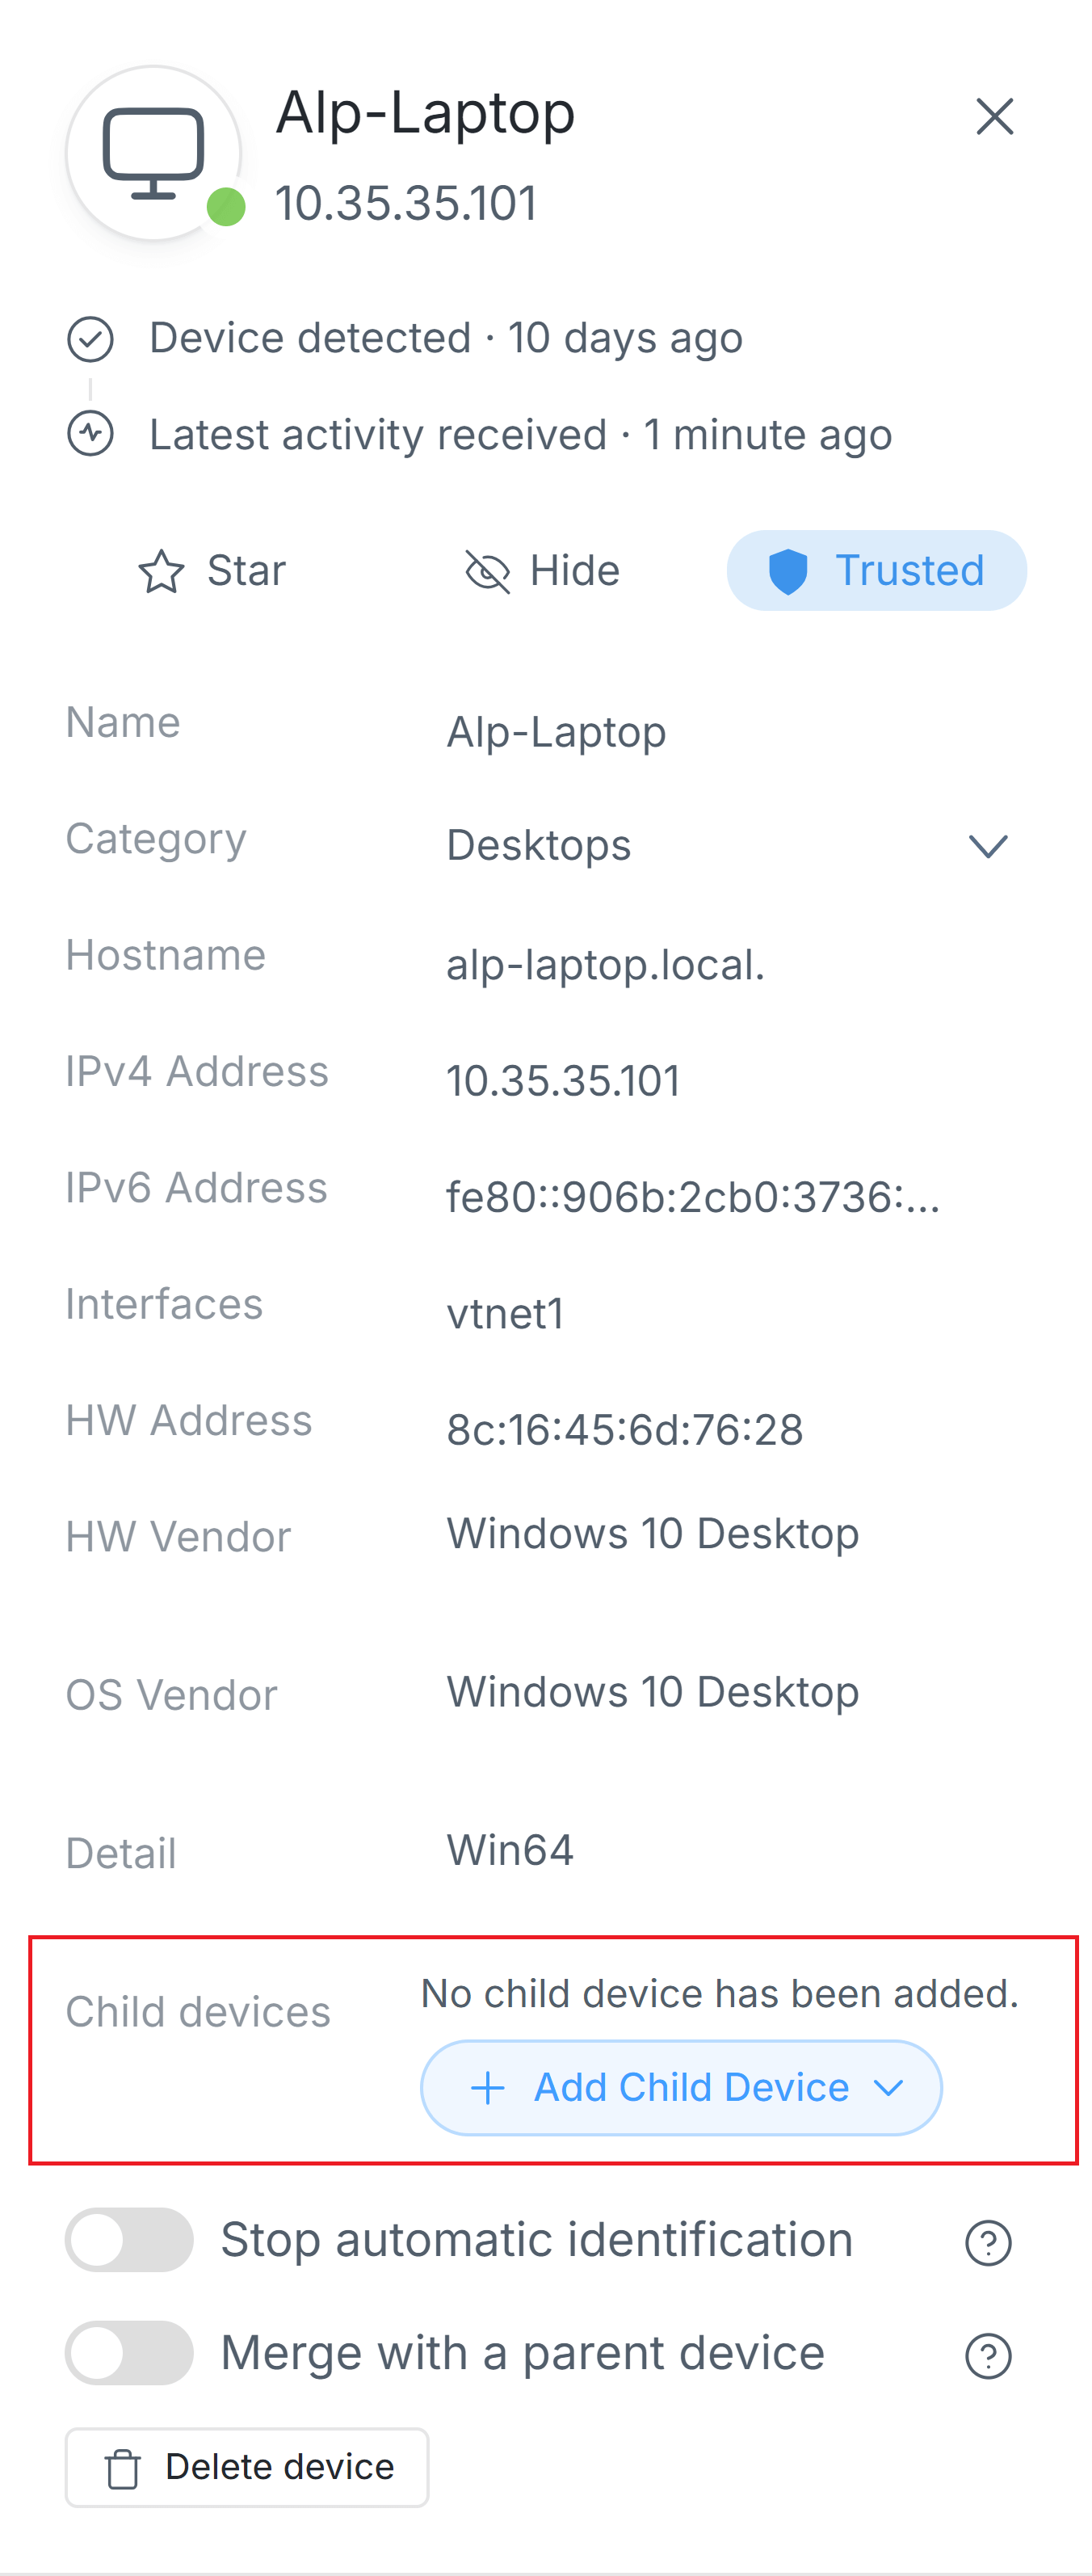
Figure 9. Adding a child device
-
Select the child device from the drop-down list of devices. Additionally, a search may be conducted via the search bar to locate the child device within the device list.
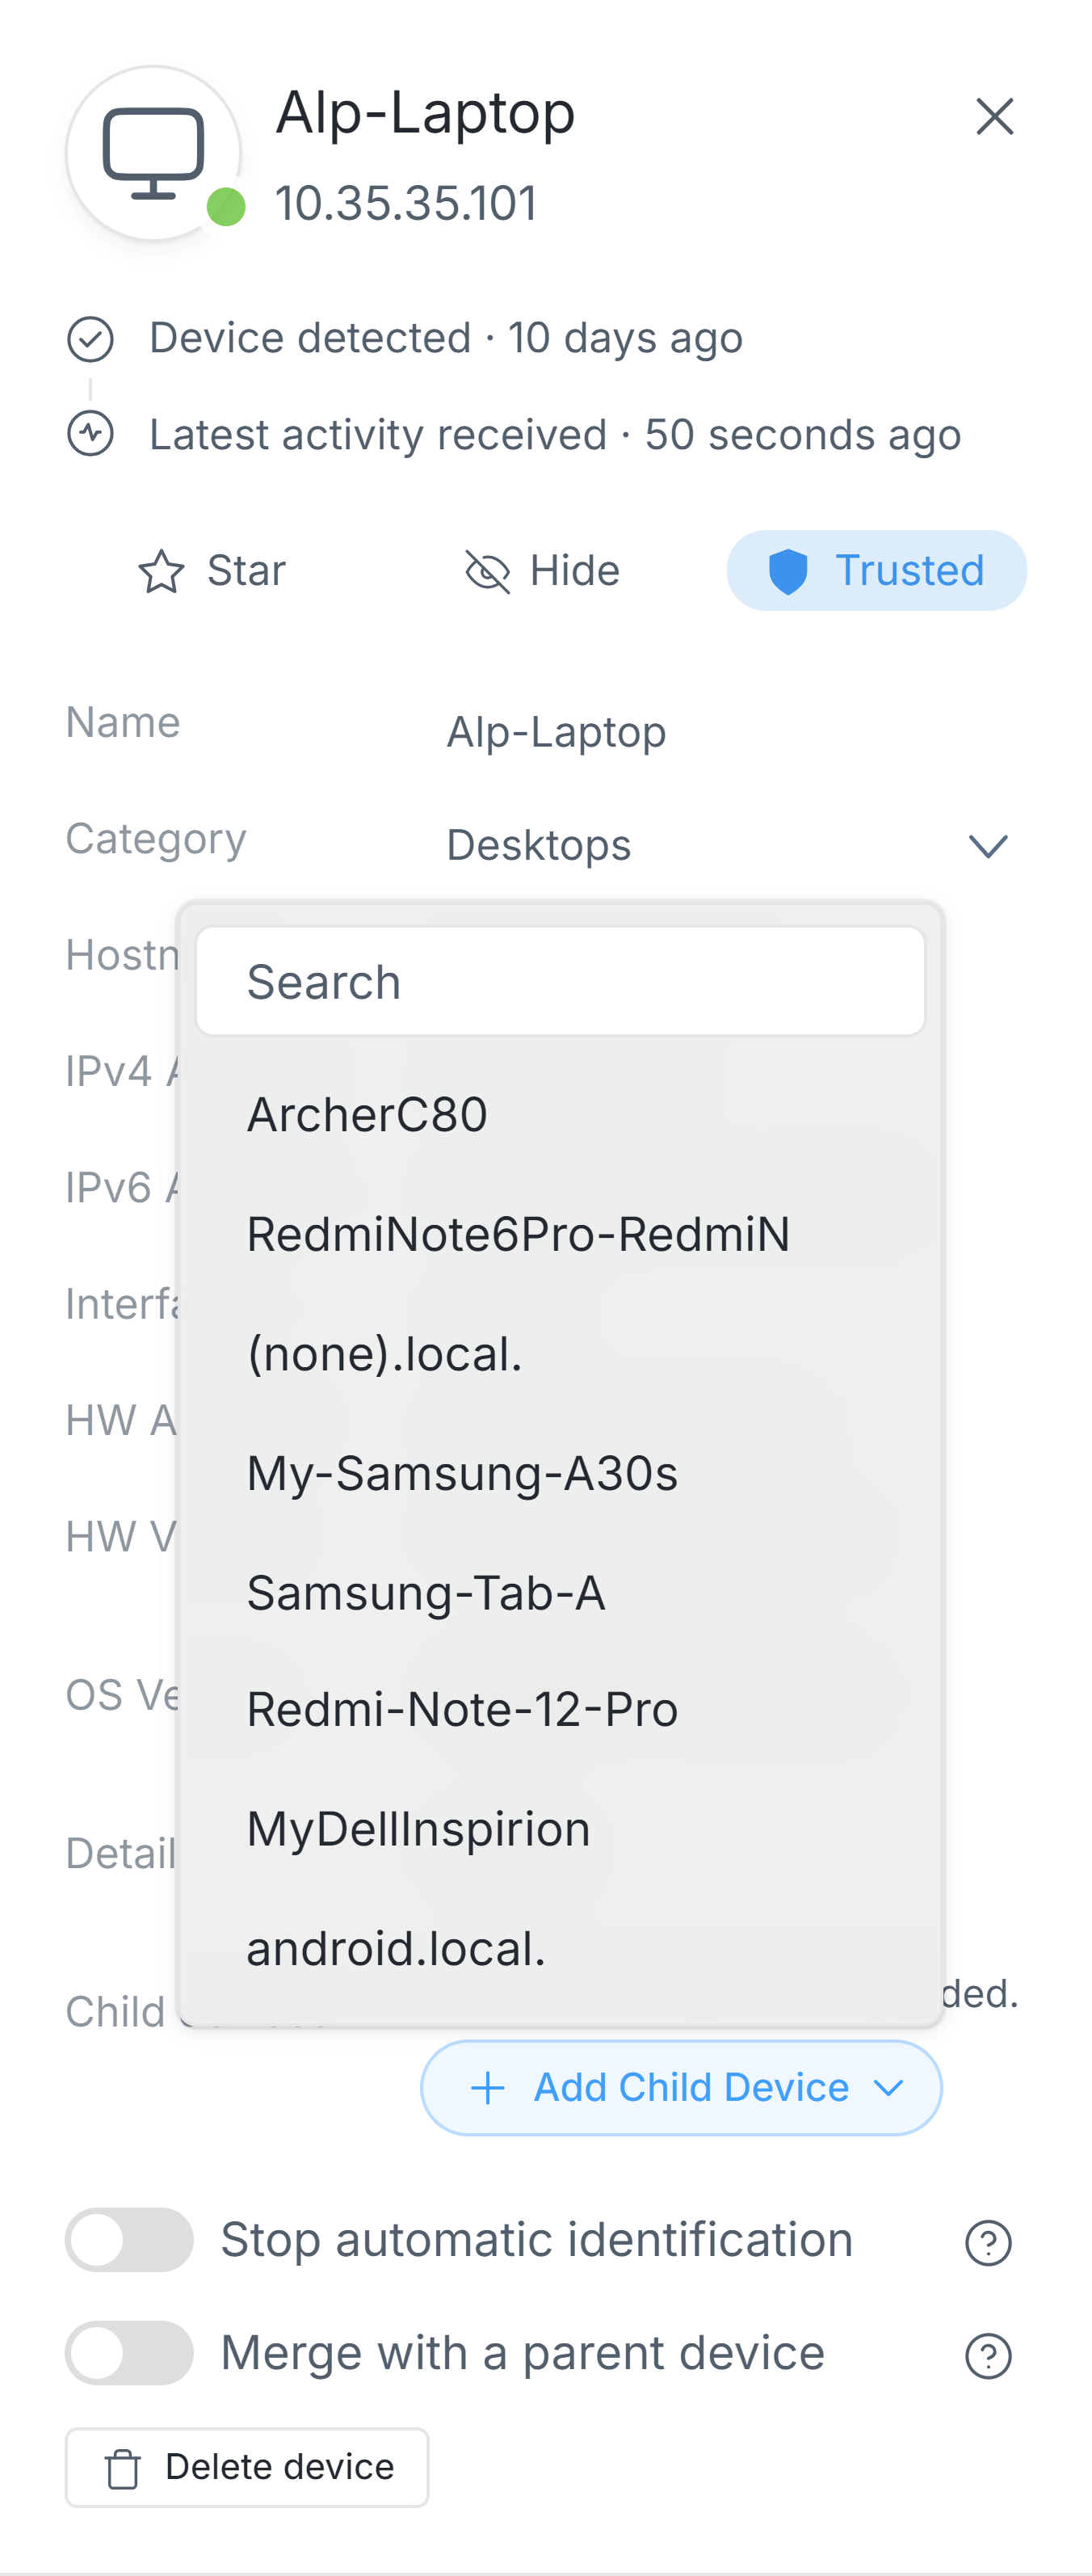
Figure 10. Selecting a child device
After choosing a child device, both child and parent devices are combined into the existing parent devices. In the list of devices, child devices are not shown as separate devices. In the Device Details pane of their parent devices, you can see which child devices are linked to. To conveniently display details of a child device, click the name of the device in the Child devices dropdown list. This will open the Device Details pane of the child device.

Figure 11. Viewing a child device
Merging with a Parent Device
When your device has multiple network interfaces, such as a notebook equipped with both a Wi-Fi adapter and a 1000BaseT LAN adapter, Zenarmor detects them as if they were two separate devices. It is recommended to combine such devices that are identified as distinct instruments into one in order to consider them as a single entity. This feature is beneficial in situations where your device has multiple network interfaces.
To merge a device with a parent device, you may follow the next steps:
-
Navigate to the Device Details pane of the child device that you want to merge with a parent device.
-
Click on the Merge with a parent device toggle button at the bottom of the Device Details pane. This will open a drop-down list of devices.
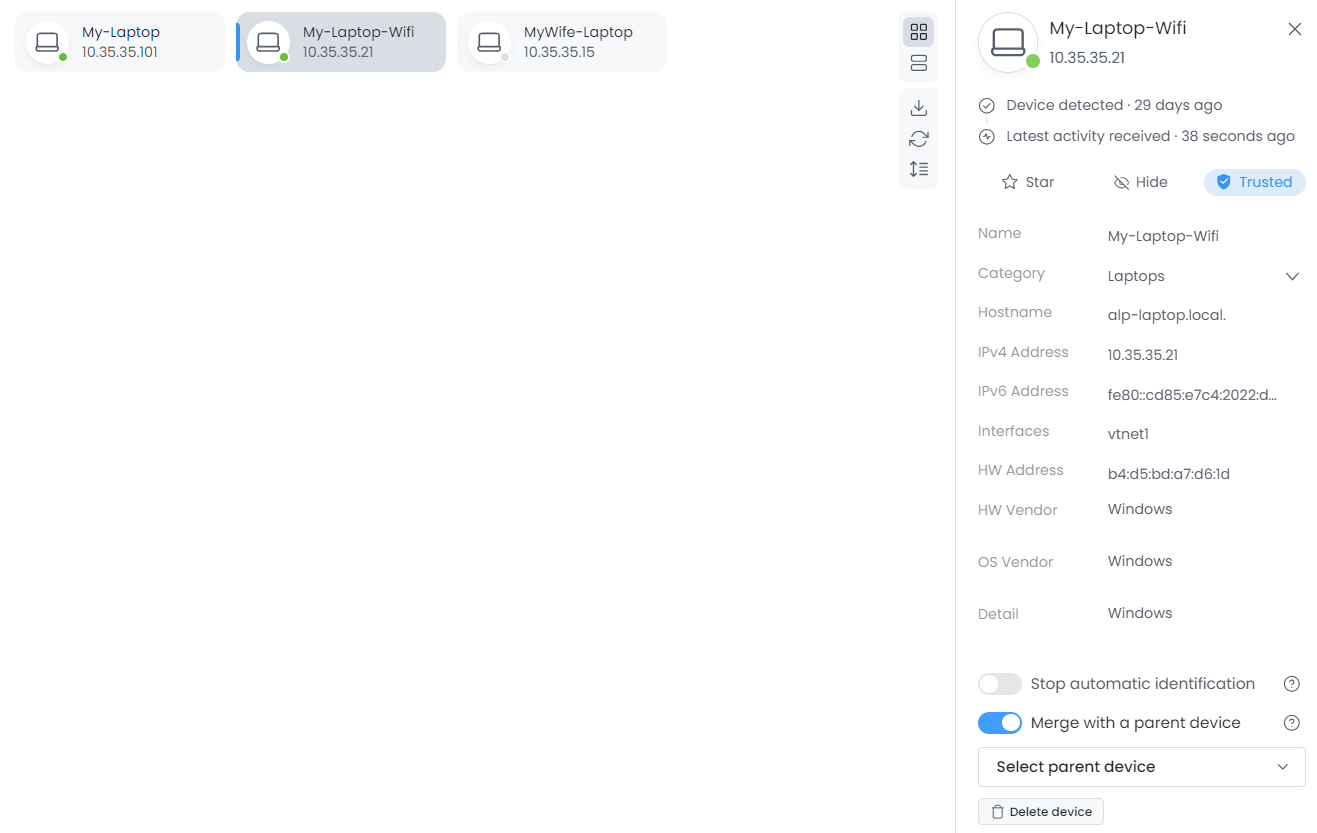
Figure 12. Merging a child device with a parent device
-
Select the parent device from the drop-down list of devices. You may also perform a search using the search bar to find the parent device in the device list.
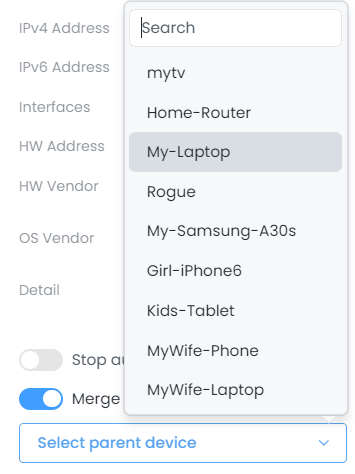
Figure 13. Selecting a parent device
After selecting a parent device, both child and parent devices are combined into the existing parent devices. Child devices are not displayed as distinct devices in the device lists. You can view child devices in the Device Details pane of their parent devices. To conveniently display details of a child device, click the name of the device in the Child devices dropdown list. This will open the Device Details pane of the child device.
Figure 14. Viewing a child device
A parent device cannot be assigned as a child to another device since it has a child device.
Removing a Child Device From a Parent Device
To remove a child device from a parent device, you may follow the next steps:
-
Navigate to the Device Details pane of the parent device that you want to remove from the child device.
-
Select the device from the Child Devices drop-down list at the bottom of the Device Details pane.
-
Click Remove from parent icon at the end of the child device.
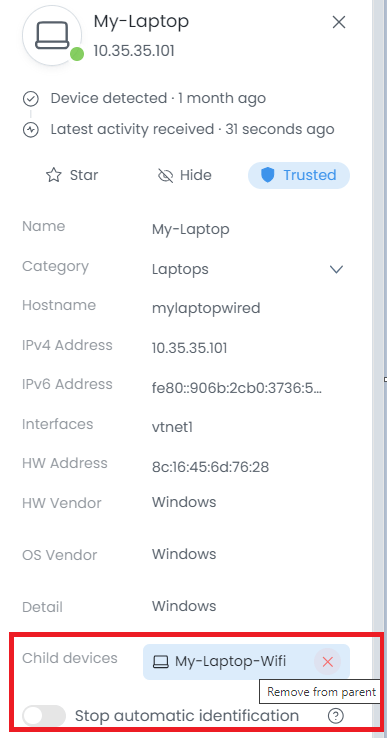
Figure 15. Removing a child device from a parent device
Marking as Router
Identifying router devices correctly will help in discovering new devices that communicate with it, enhancing network visibility and management. When Zenarmor identifies routers it notifies you on Devices page. You may also mark a device as a router manually. To mark a device as a Router, you may follow the next steps:
-
Navigate to the Device Details pane of the device that you want to mark.
-
Click on the Router device toggle button at the bottom of the Device Details pane.
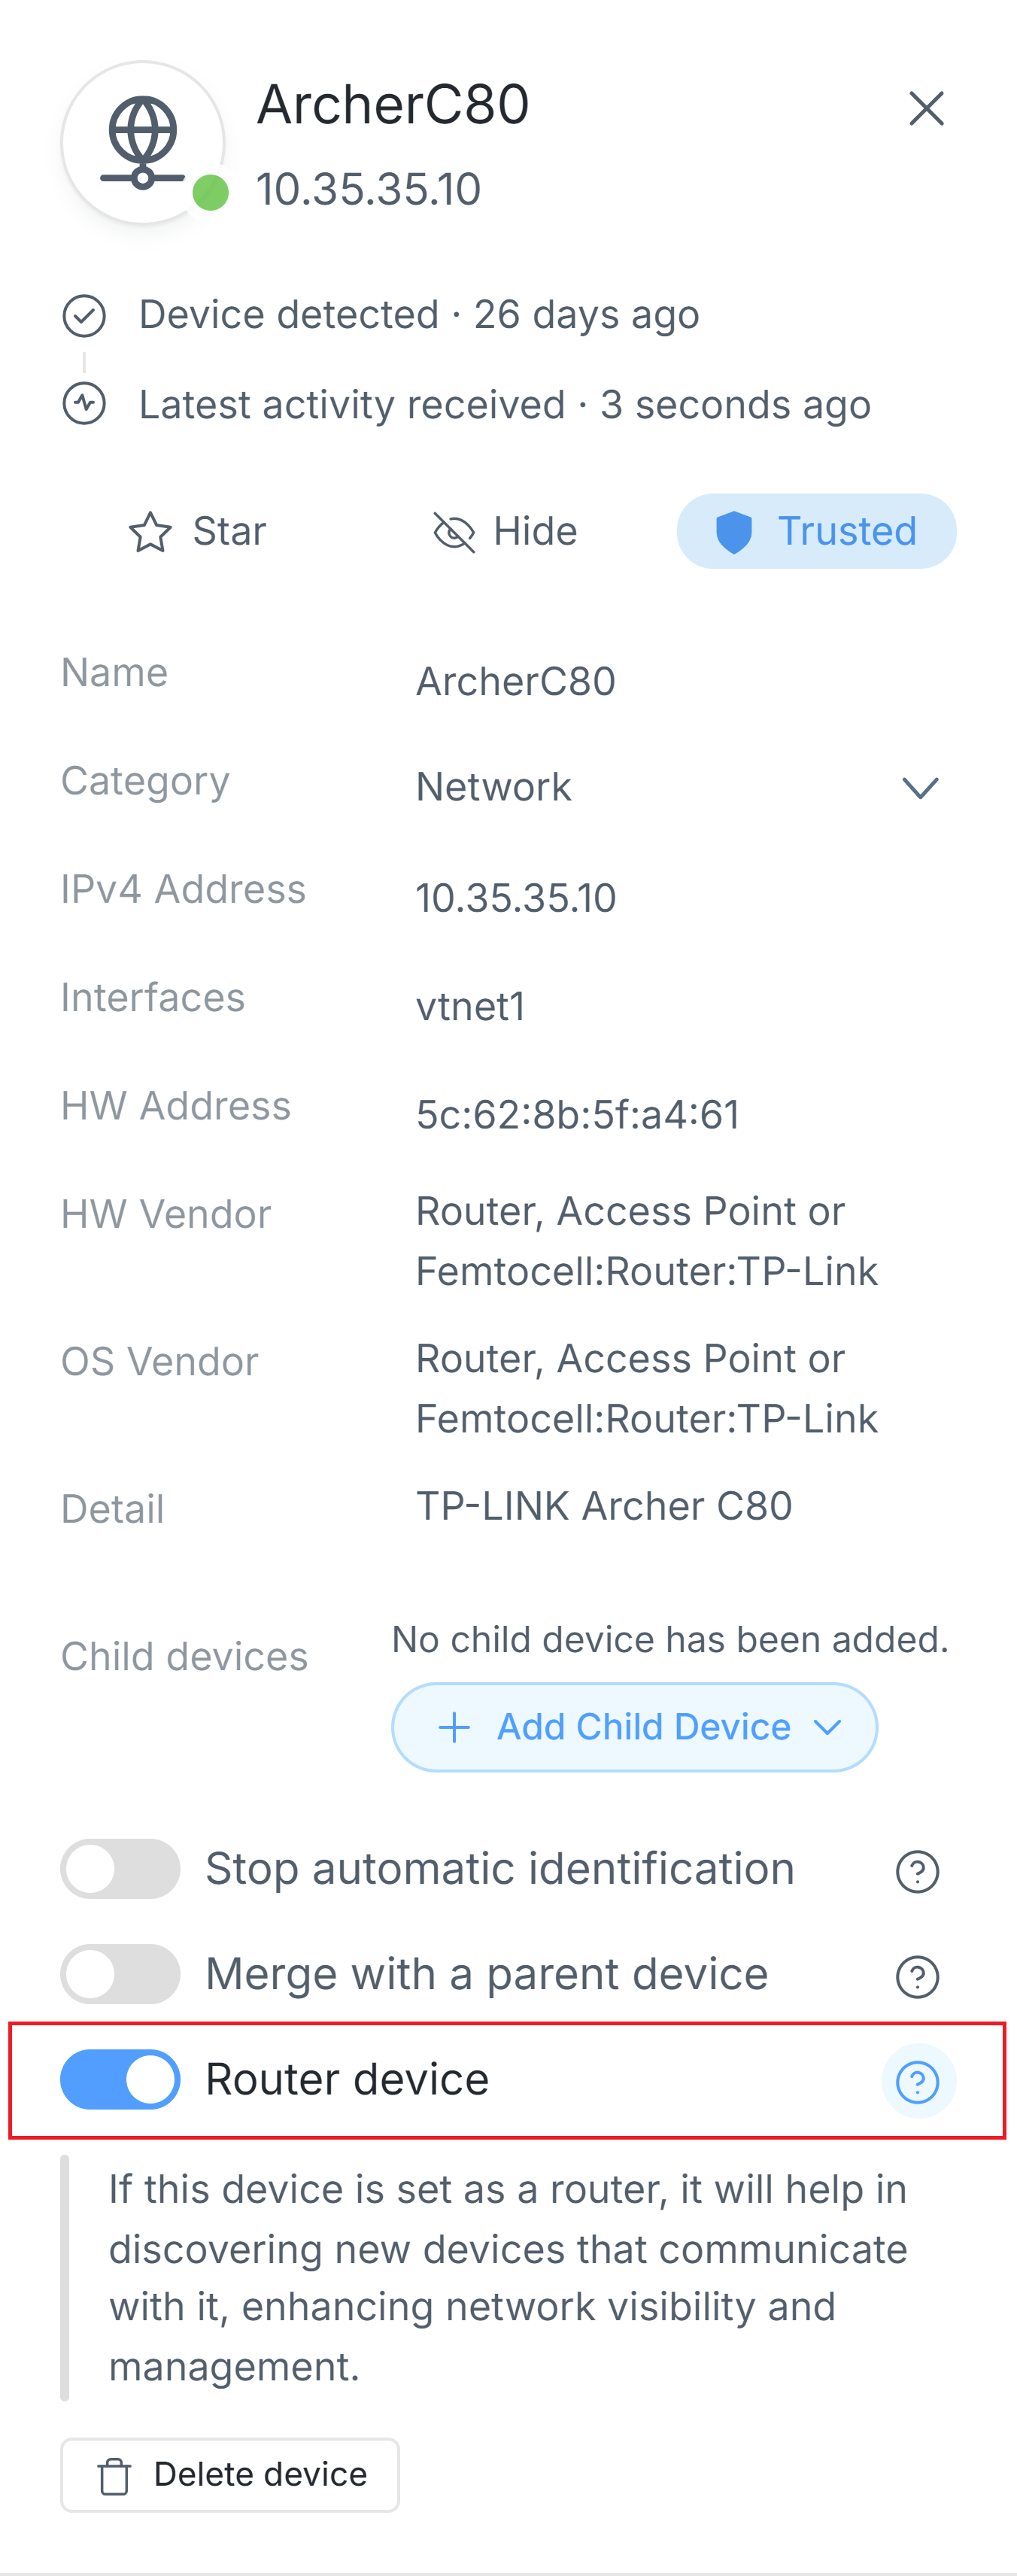
Figure 16. Marking as Router
When traffic passes through the L3 device, Zenarmor captures all traffic associated with its MAC address and different IP addresses. It consolidates this information into a single device entry, continuously updating the hostname and other details based on the most recent data. If you enable the Router Device option, Zenarmor will start identifying each device connected to it separately using their respective IP addresses.
Reporting Device Miscategorization
Zenarmor enables you to report a device that you believe has been incorrectly classified by Zenarmor. Your contribution will assist Zenarmor in improving its database for device identification and classification. None of the information you submit will be personally identifiable. To report a device miscategorization, you may follow the next steps.
-
Navigate to Zenarmor > Devices page on OPNsense UI.
-
Select the device that is miscategorized by clicking on it.
-
Click on the 3-dot
...menu icon at the right of the device pane. This will display a drop-down menu.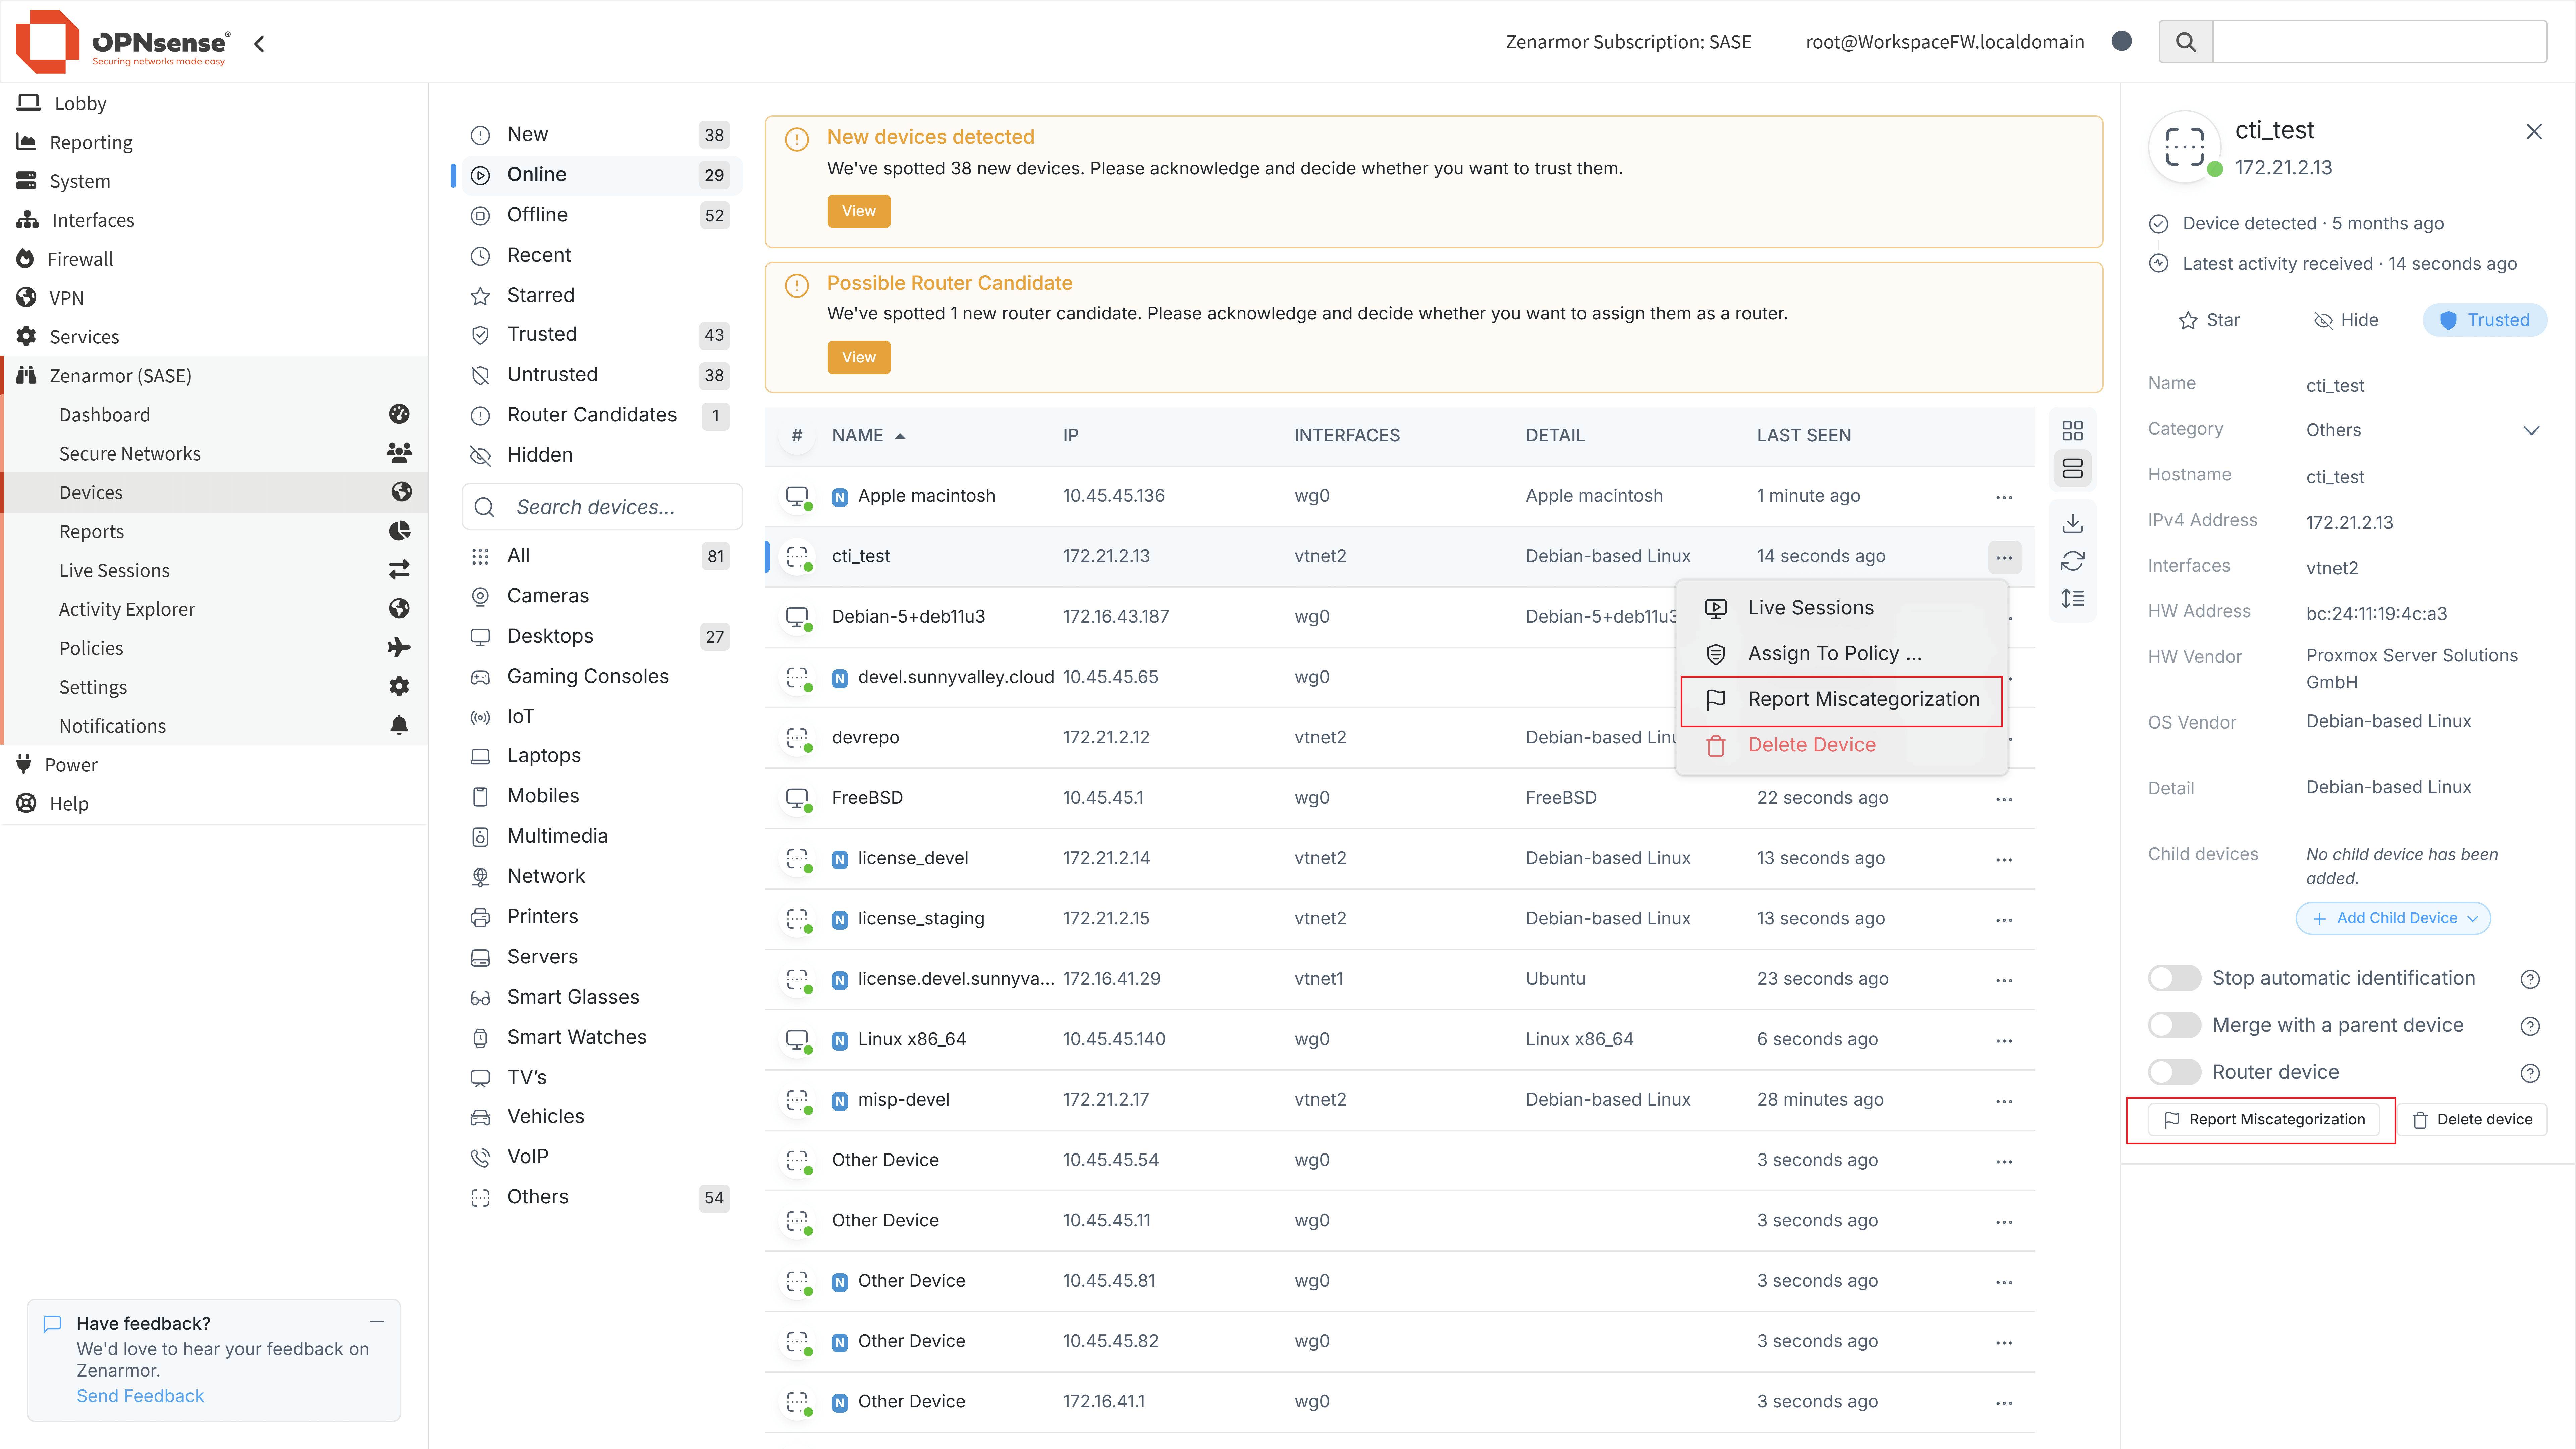
Figure 17. Reporting Device Miscategorization
-
Click on the Report Miscategorization menu. Or, you may also click Report Miscategorization button at the left bottom of the Device Details window. This will display a window where you can enter device details.
-
Click on the Delete button to confirm the device deletion.
-
You may type as many device information as you want in to the Device Detail field.
-
You may select a Device Category from the drop-down menu.
-
You may type your hardware vendor into the HW Vendor field.
-
You may type your OS Vendor.
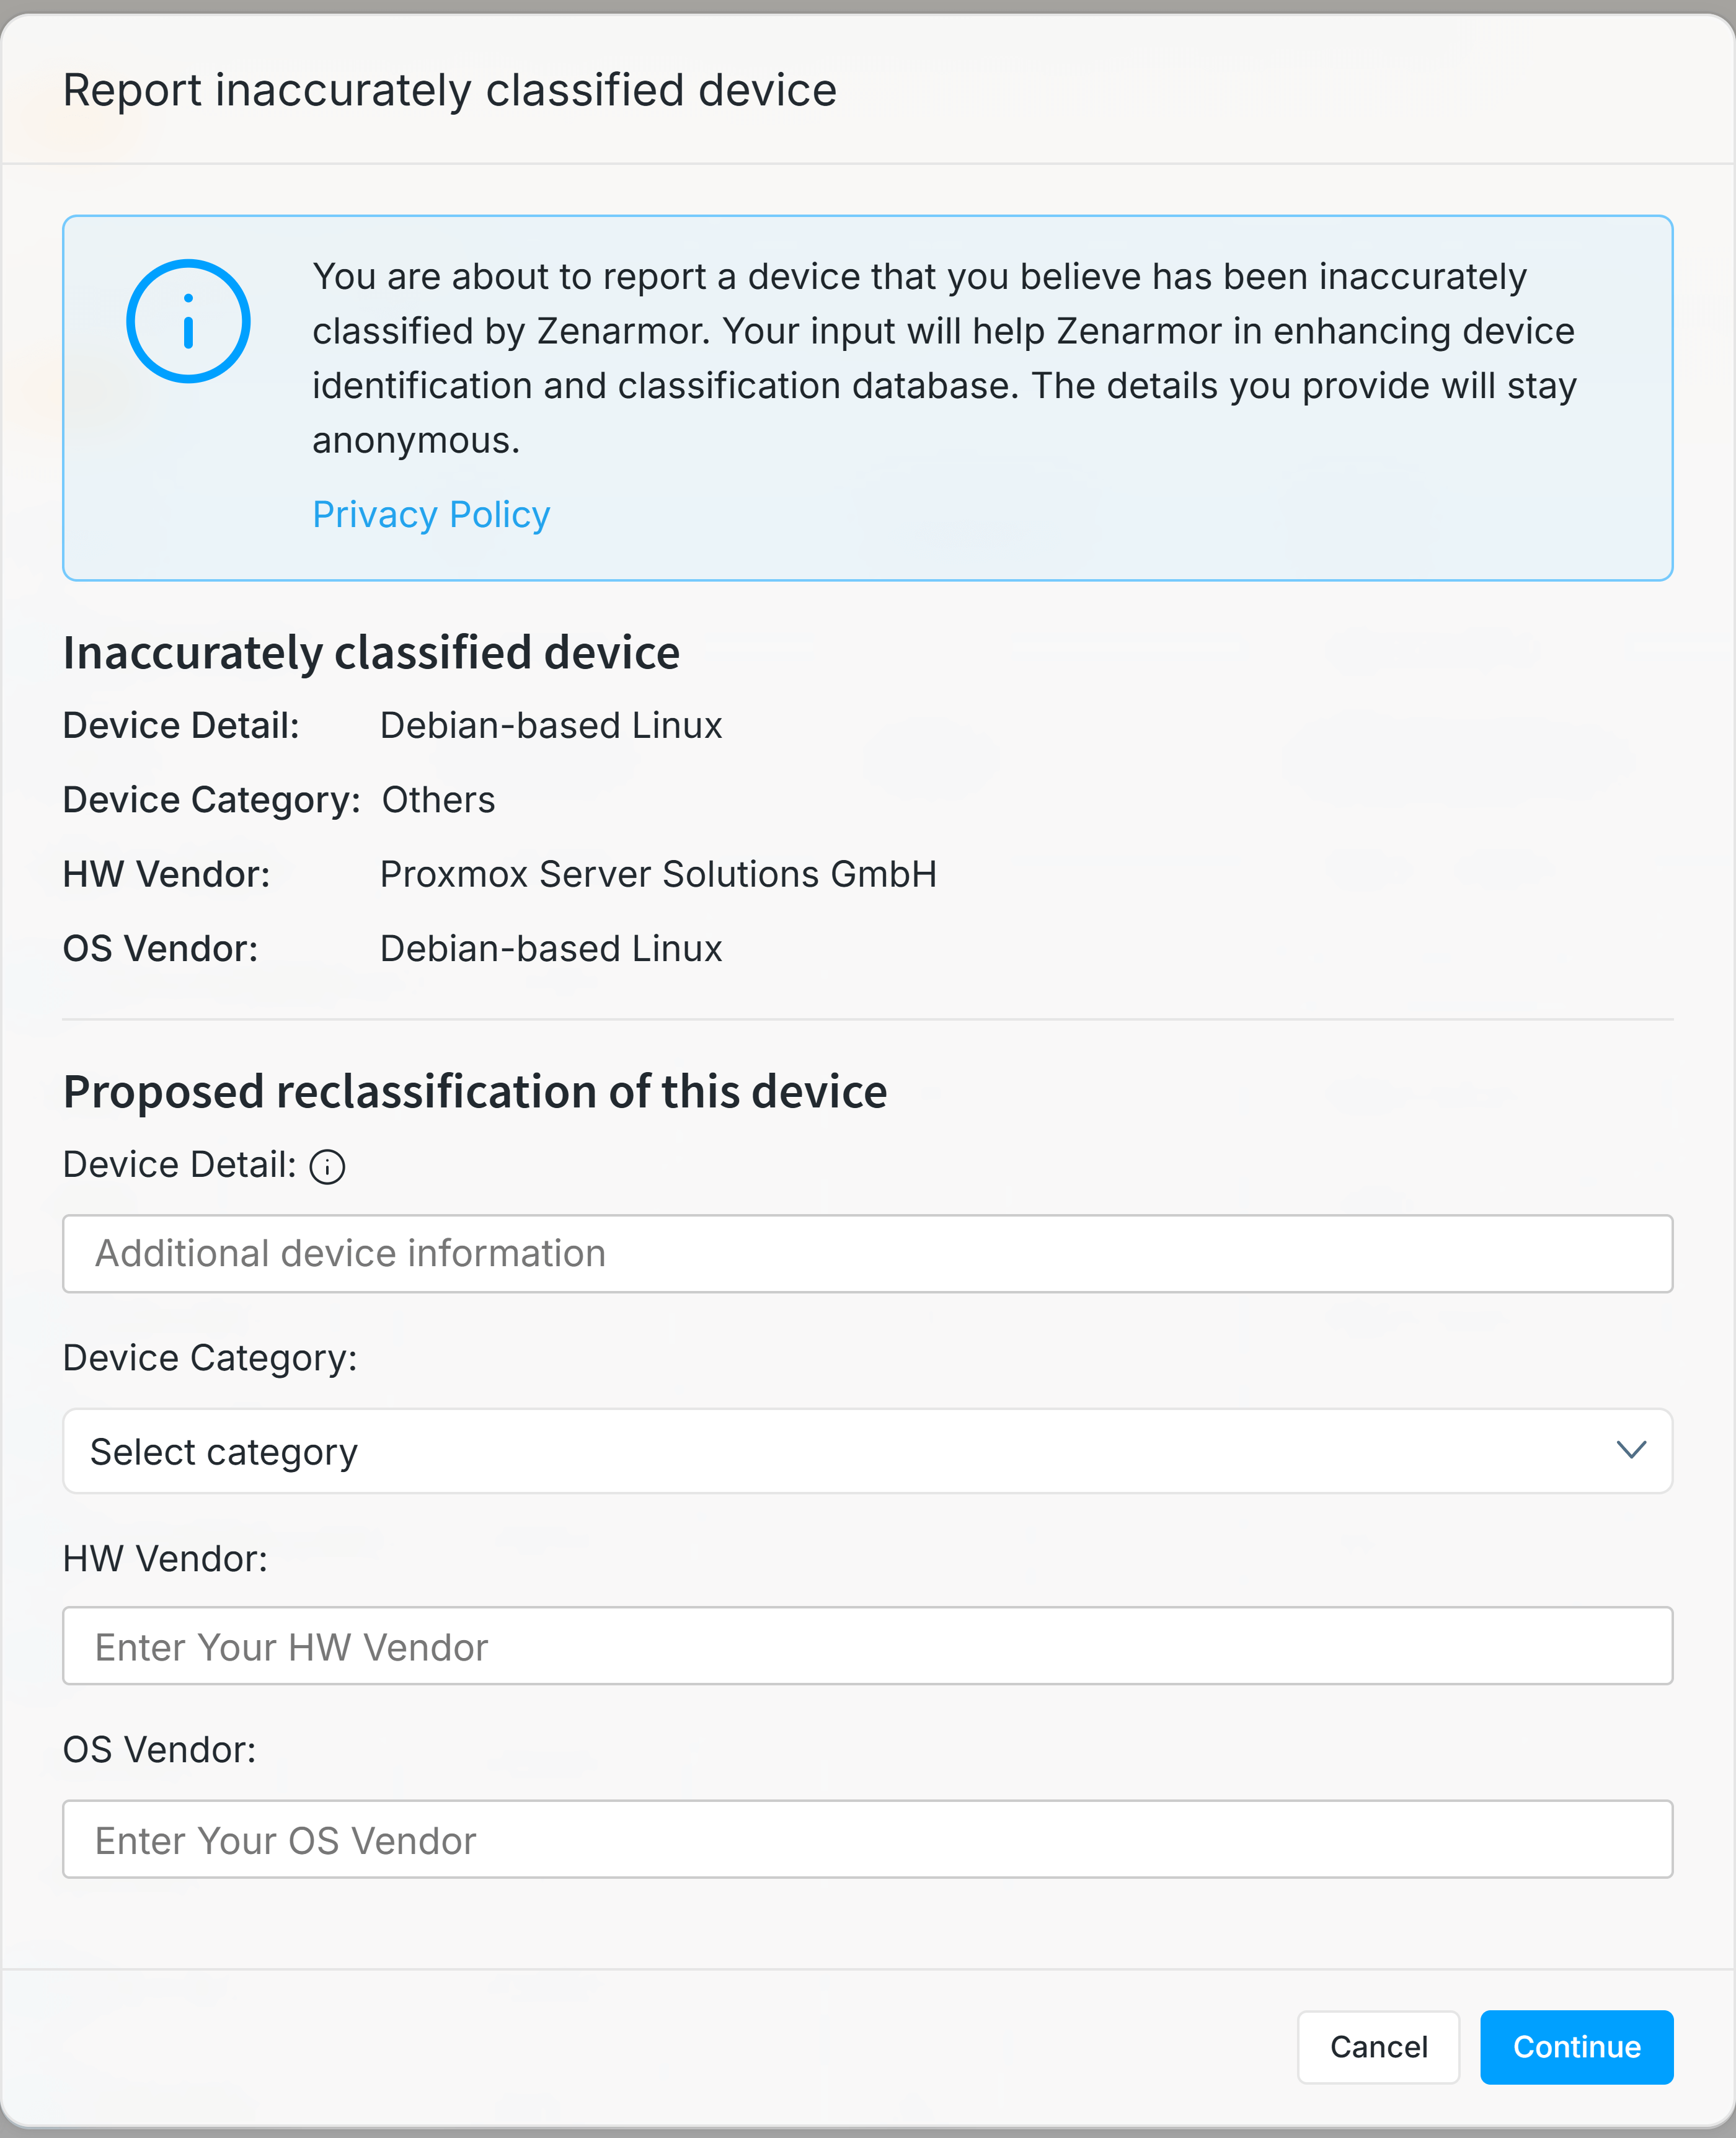
Figure 18. Sending Device Miscategorization Feedback
-
Click Continue. This will display a window for feedback confirmation.
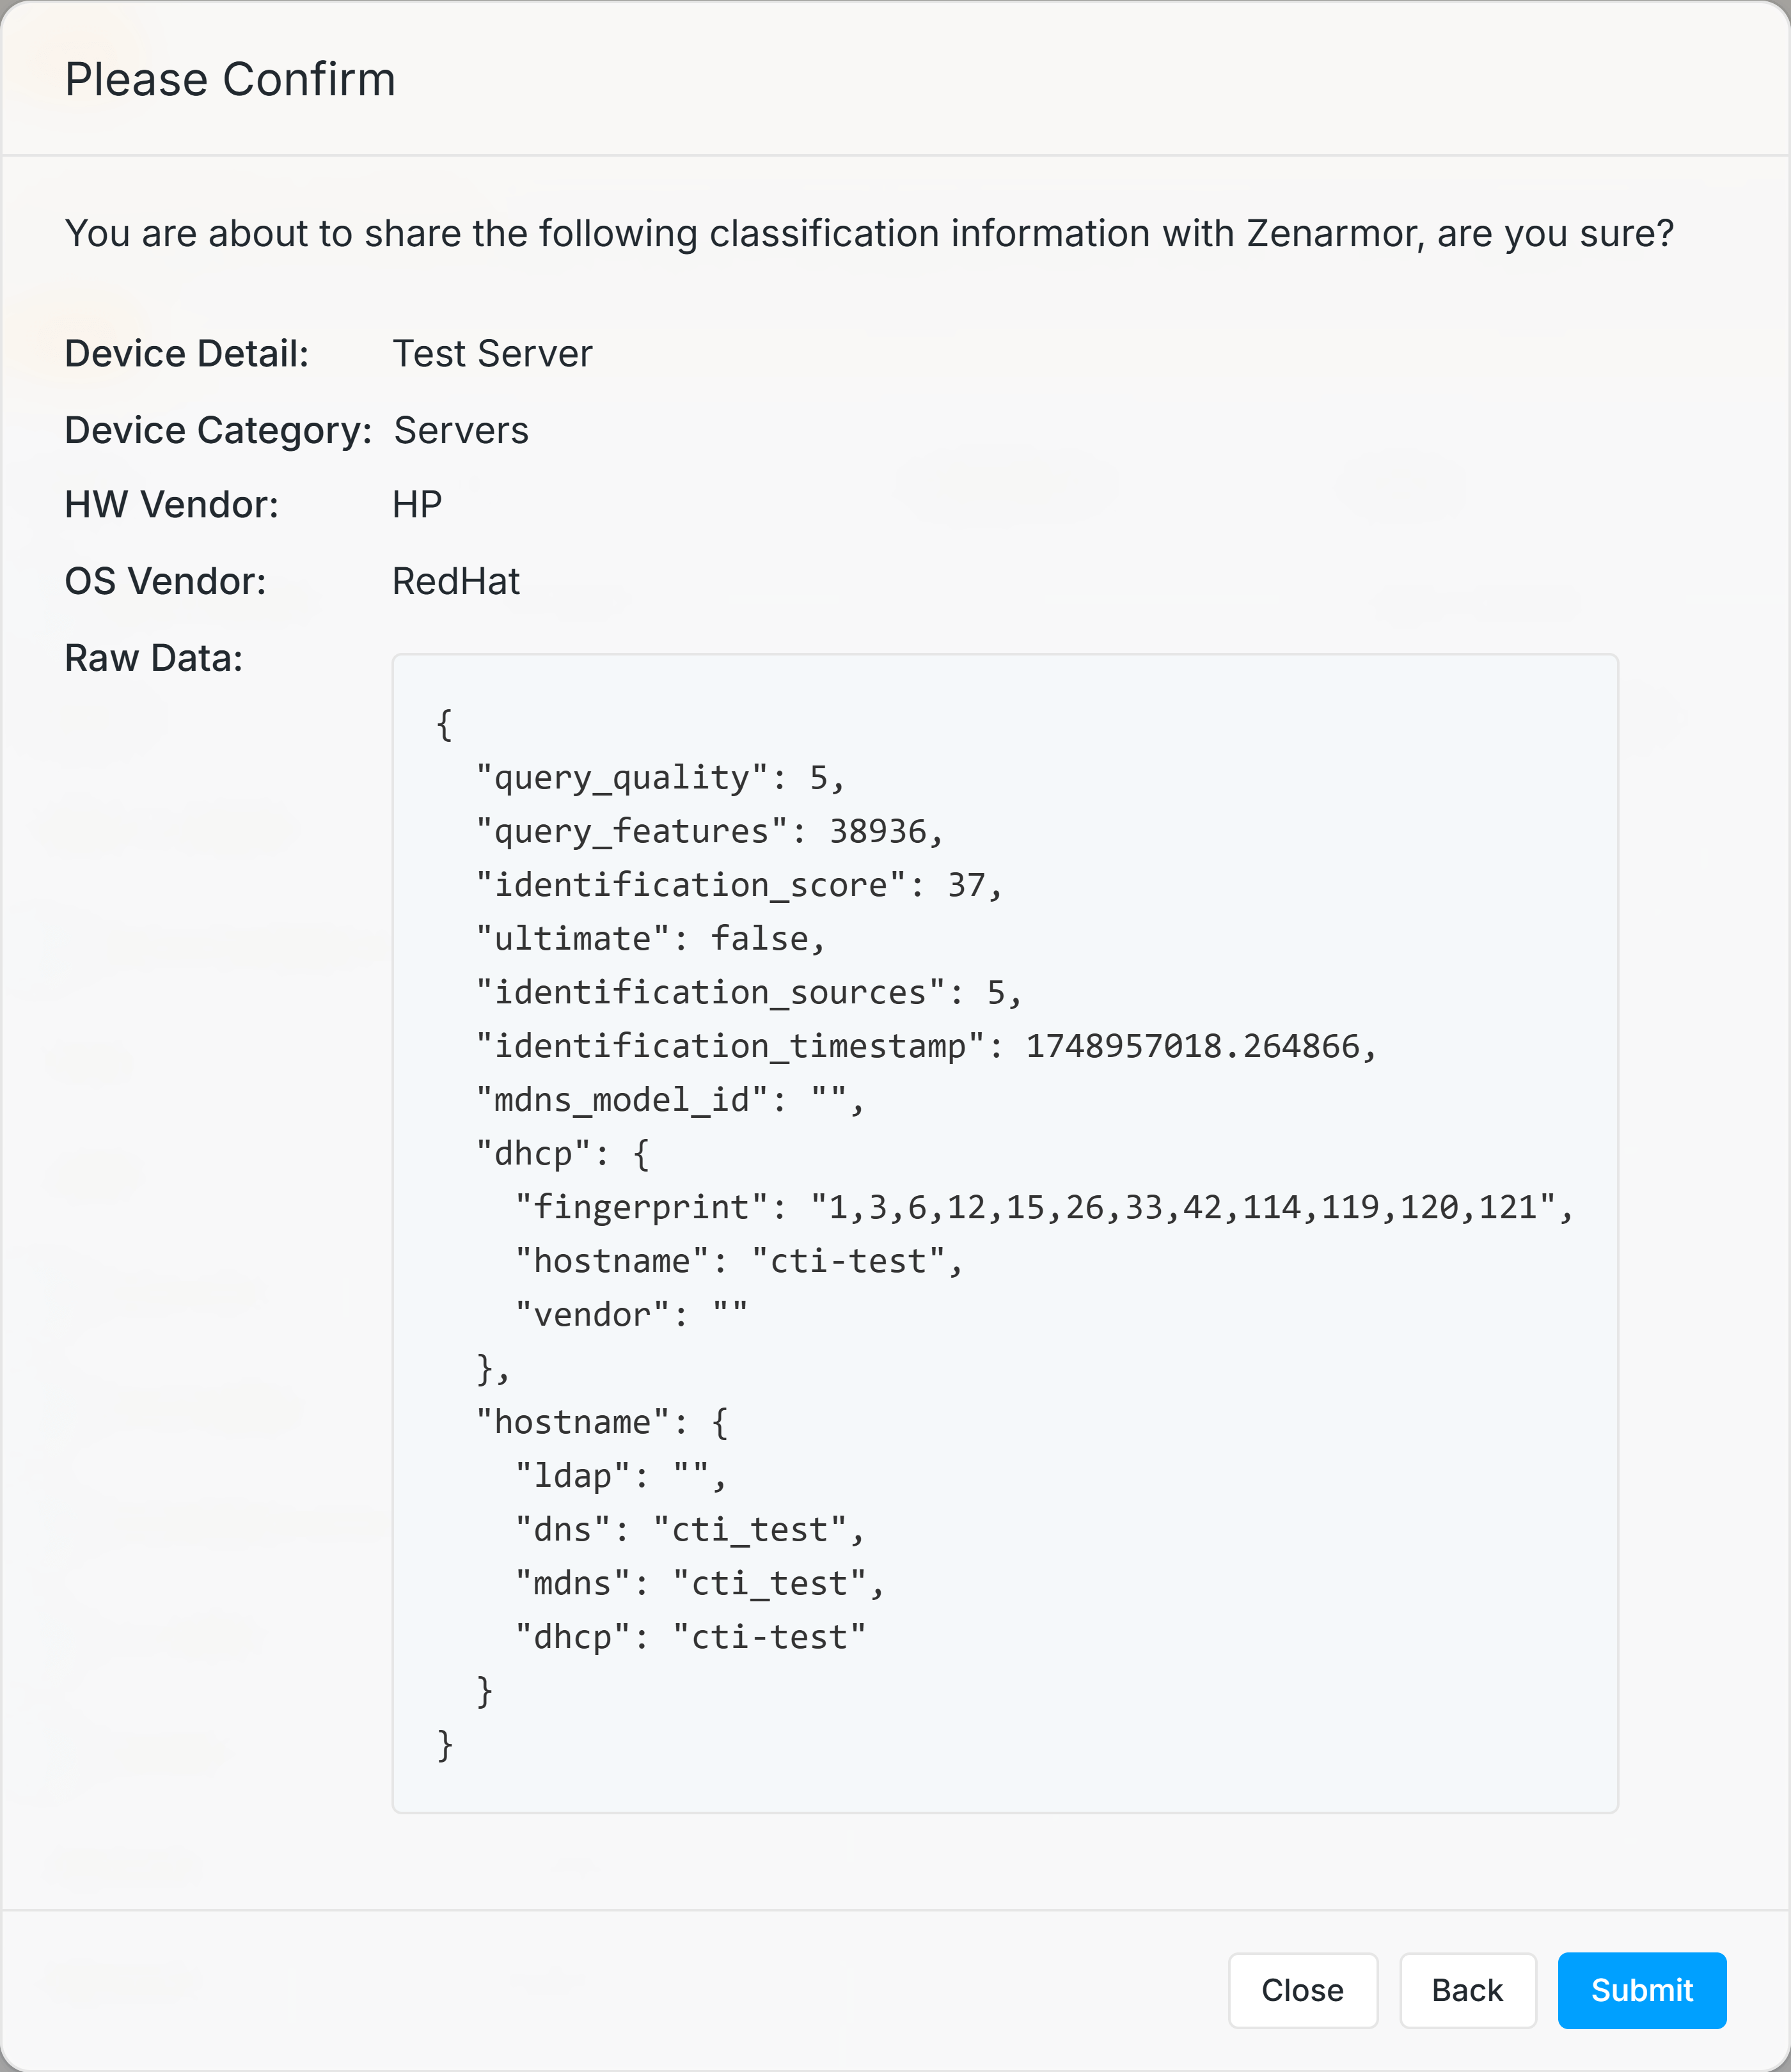
Figure 19. Confirming Device Miscategorization Feedback
-
Click Submit to send your device categorization feedback.
Deleting Device Individually
It may be better to remove devices that have been inactive for a long time to properly manage your IT assets. To delete a device from your device list, you may follow the next steps:
-
Navigate to the Device Details pane of the device that you want to remove.
-
Click on the Delete device button with a trash icon at the bottom of the Device Details pane.
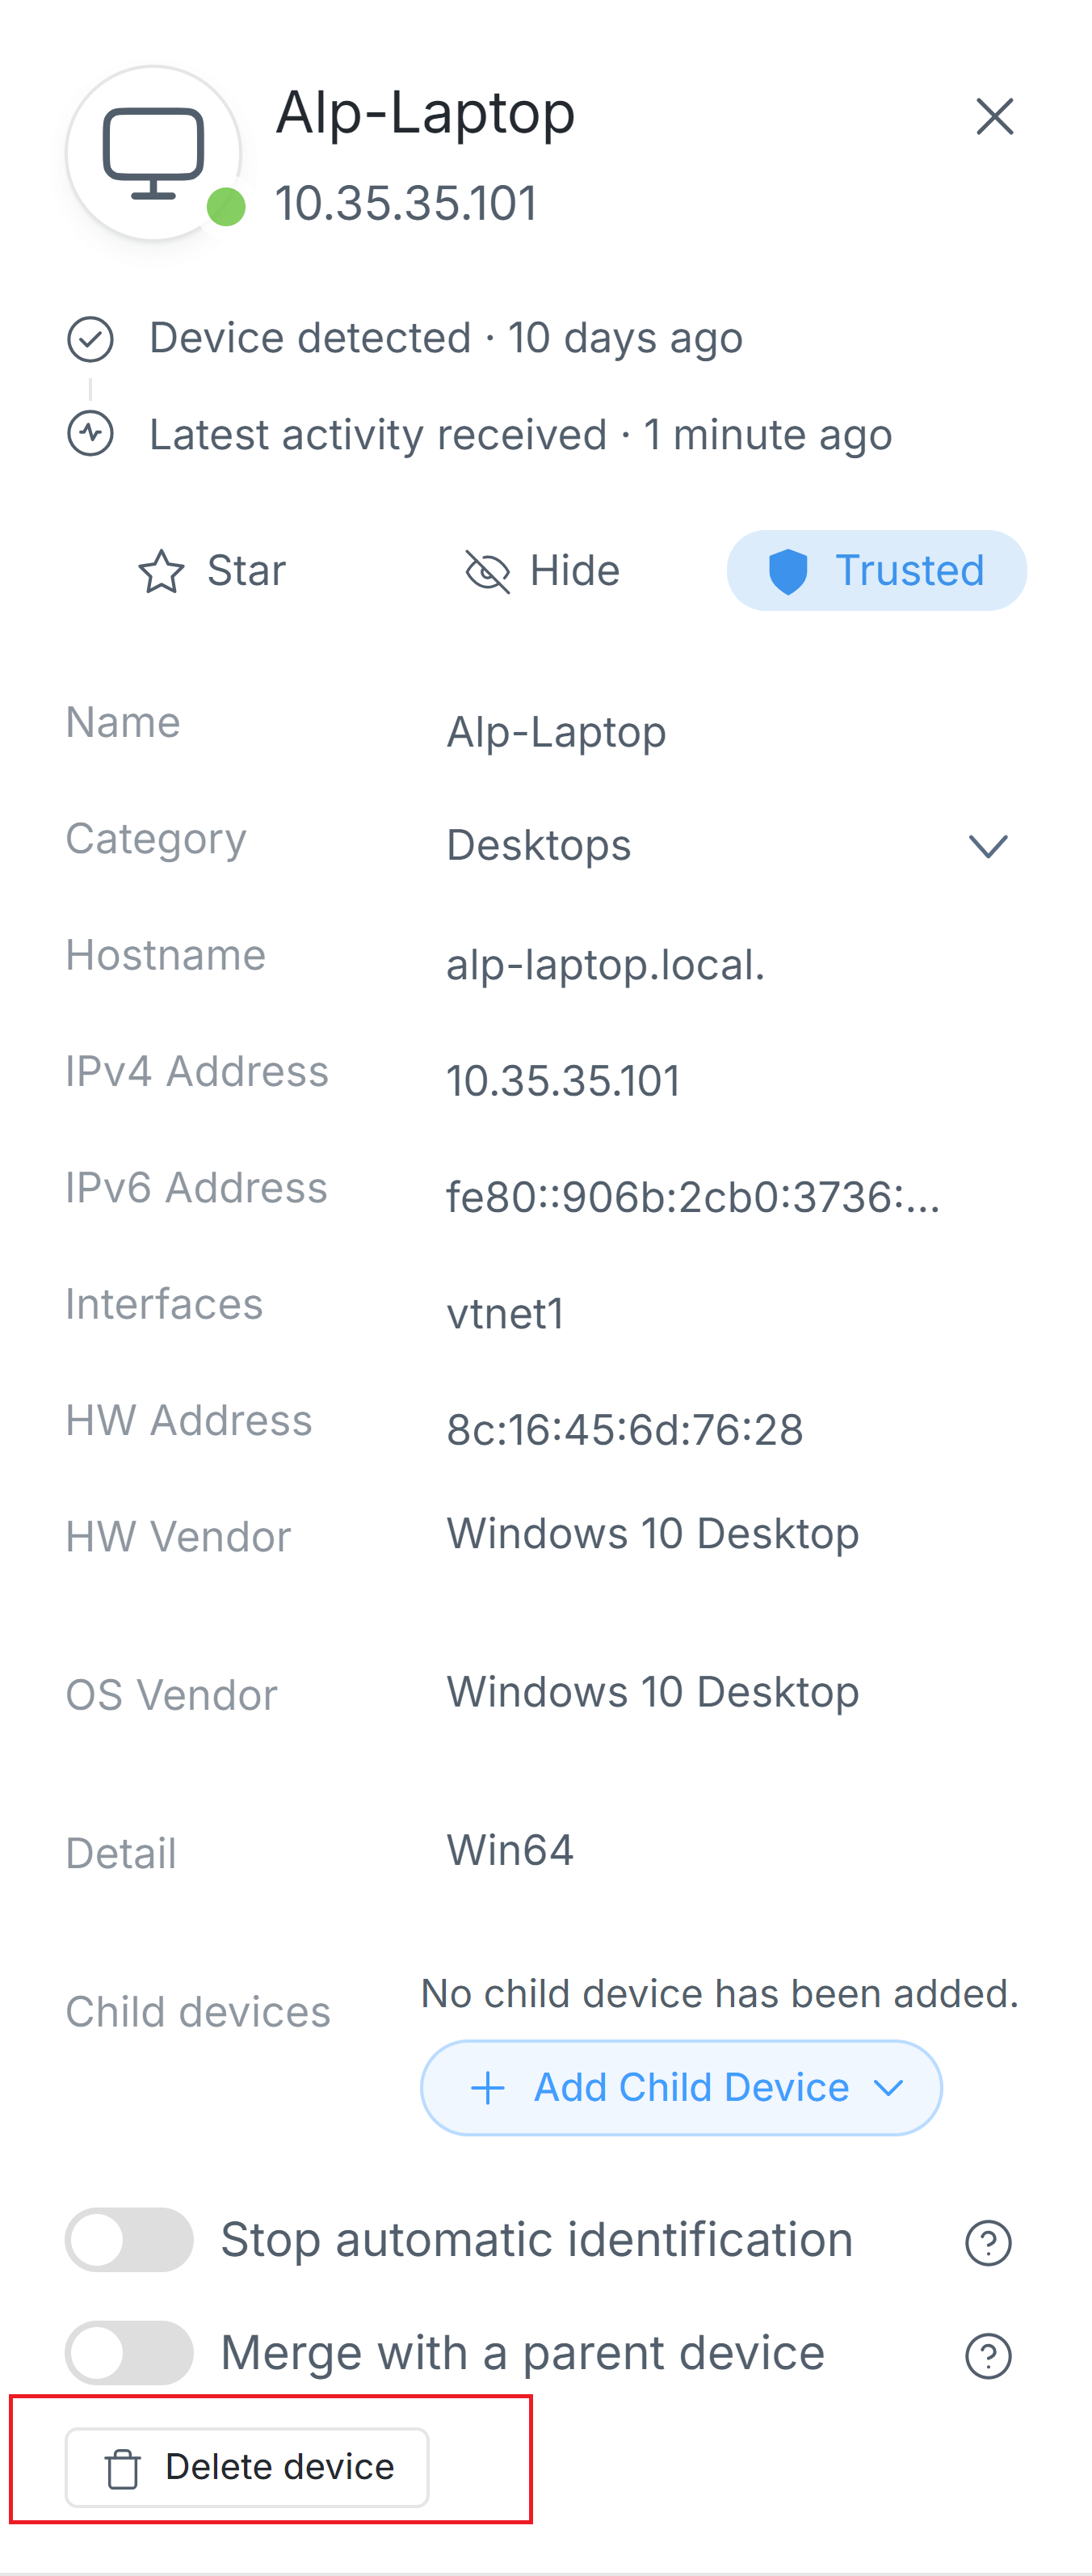
Figure 20. Deleting Device
-
Click on the Delete button to confirm the device deletion.
If you attempt to remove a device that has recently been seen, it will reappear on the next scan. Therefore, it is advised to hide online devices instead of deleting them.
Delete Device via Devices Dashboard
Zenarmor allows you to delete a device individually through the Devices dashboard by following the next steps:
-
Navigate to the Zenarmor → Devices page on your OPNsense UI.
-
Select the device that you want to remove by clicking on it.
-
Click on the 3-dot
...menu icon at the right of the device pane. This will display a drop-down menu.
Figure 21. Delete Device via Devices Page
-
Click on the Delete Device button with a trash icon.
-
Click on the Delete button to confirm the device deletion.
Deleting Device Database
Zenarmor allows you to delete all detected devices. You may easily remove the device database by following the steps given below:
-
Navigate to the Zenarmor → Settings → Reporting & Data → Device Identification page on your OPNsense UI.
-
Scroll down to the Clear Devices Database pane.

Figure 22. Deleting Devices Database
-
Click Clear Devices Database button. This will pop up a dialog box for confirmation.
-
Click Clear to confirm the removal of the reporting data.
Accessing Live Sessions for a Device
You may conveniently access the Live Sessions report for a device through the Devices dashboard by following the next steps:
-
Navigate to the Zenarmor → Devices page on your OPNsense UI.
-
Select the device where the Live Sessions report wishes to be displayed by clicking on it.
-
Click on the 3-dot
...menu icon at the right of the device pane. This will display a drop-down menu.Figure 23. Accessing Live Sessions via Devices Page
-
Click on the Live Sessions menu. This will open Connections Live Sessions report filtered by the selected device.
-
After examining the Connections report, you may return to the Devices dashboard by clicking on the close icon at the top right corner of the Live Sessions window.
Policy Assignment
Zenarmor allows you to assign/unassign a device to/from an existing policy through the Devices dashboard by following the next steps:
-
Navigate to the Zenarmor → Devices page on your OPNsense UI.
-
Select the device where the Live Sessions report wishes to be displayed by clicking on it.
-
Click on the 3-dot
...menu icon at the right of the device pane. This will display a drop-down menu.Figure 24. Policy Assignment via Devices Page
-
Click on the Assign to Policy menu. This will open a Policy Assignment window for the selected device. You may view the assigned policies for the device if any exist.
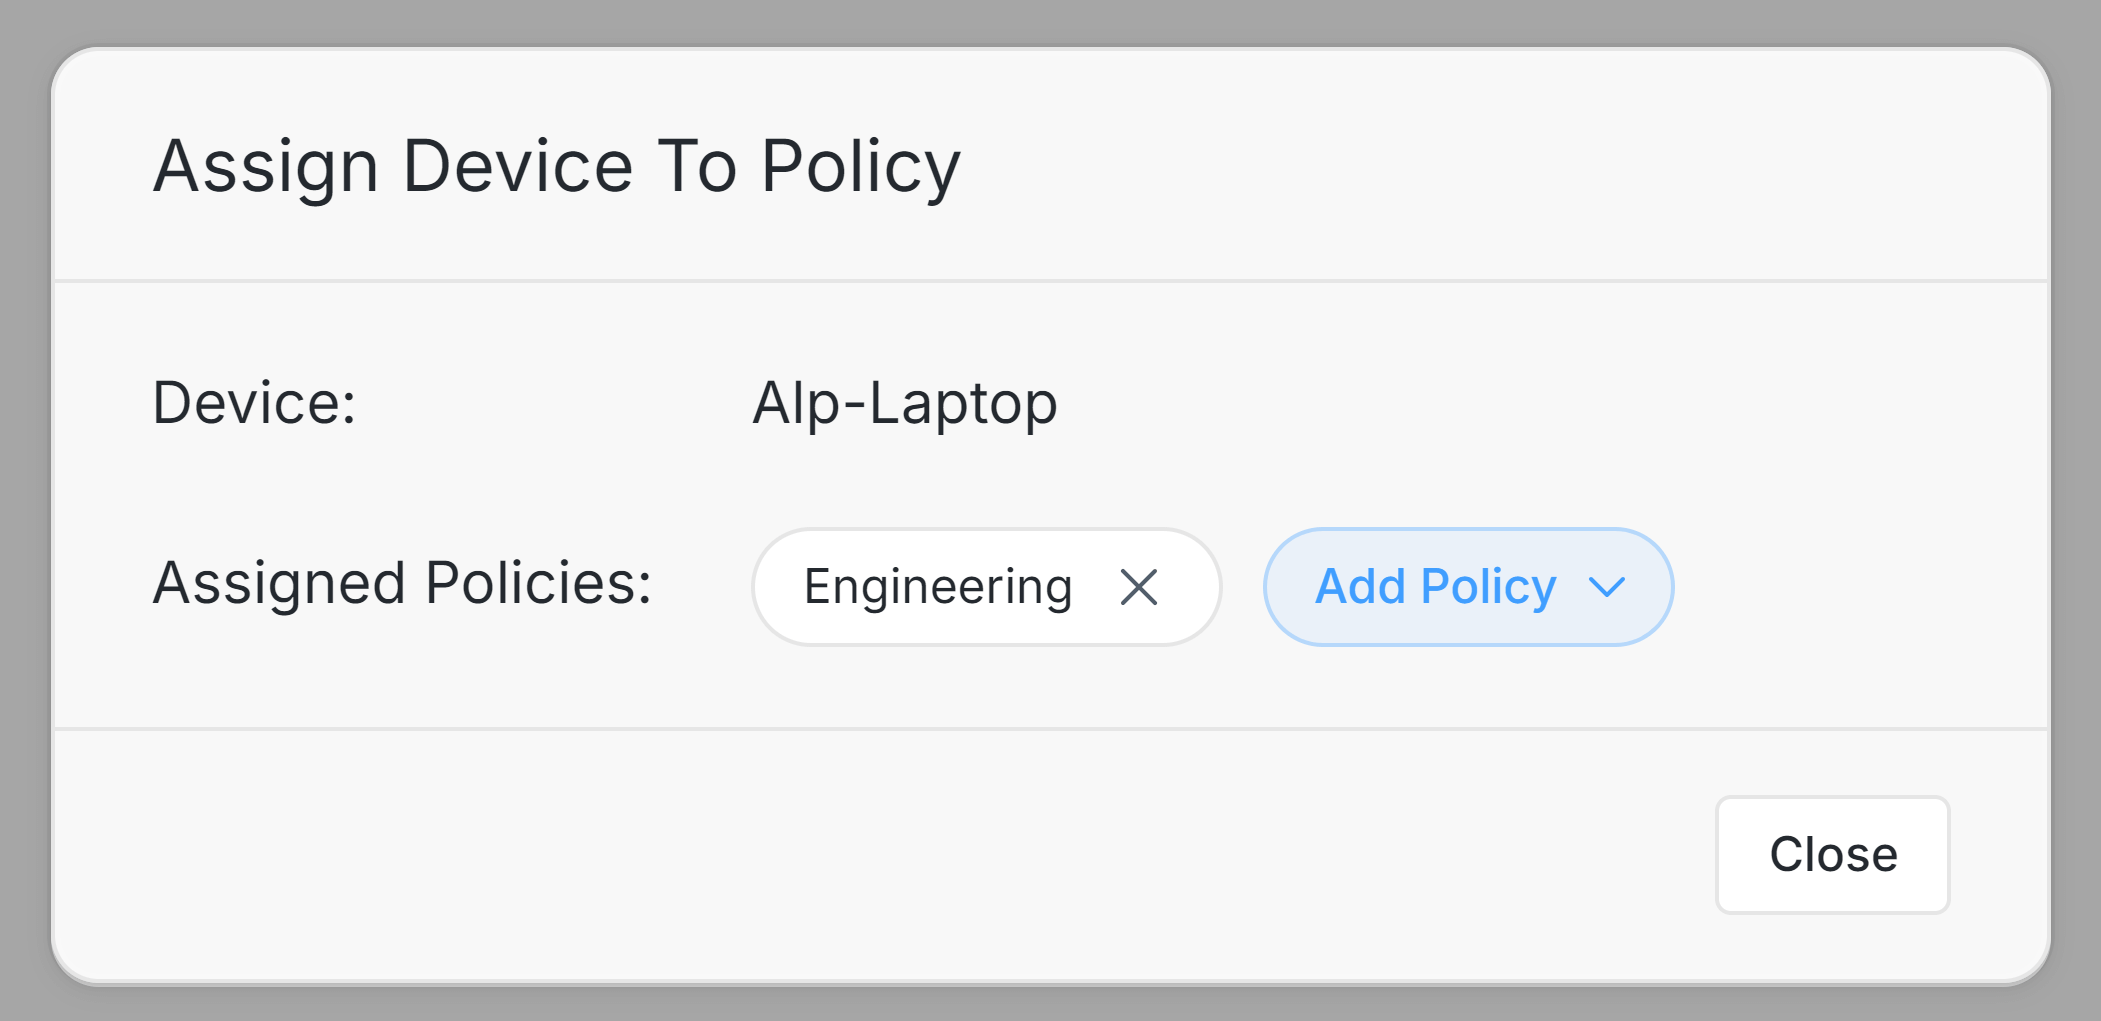
Figure 25. Policy Assignment Window
-
Click on the Add Policy drop-down menu. This will display the available policies that you can assign to the device.
-
Select the policy to apply for the device. New settings will be applied automatically.
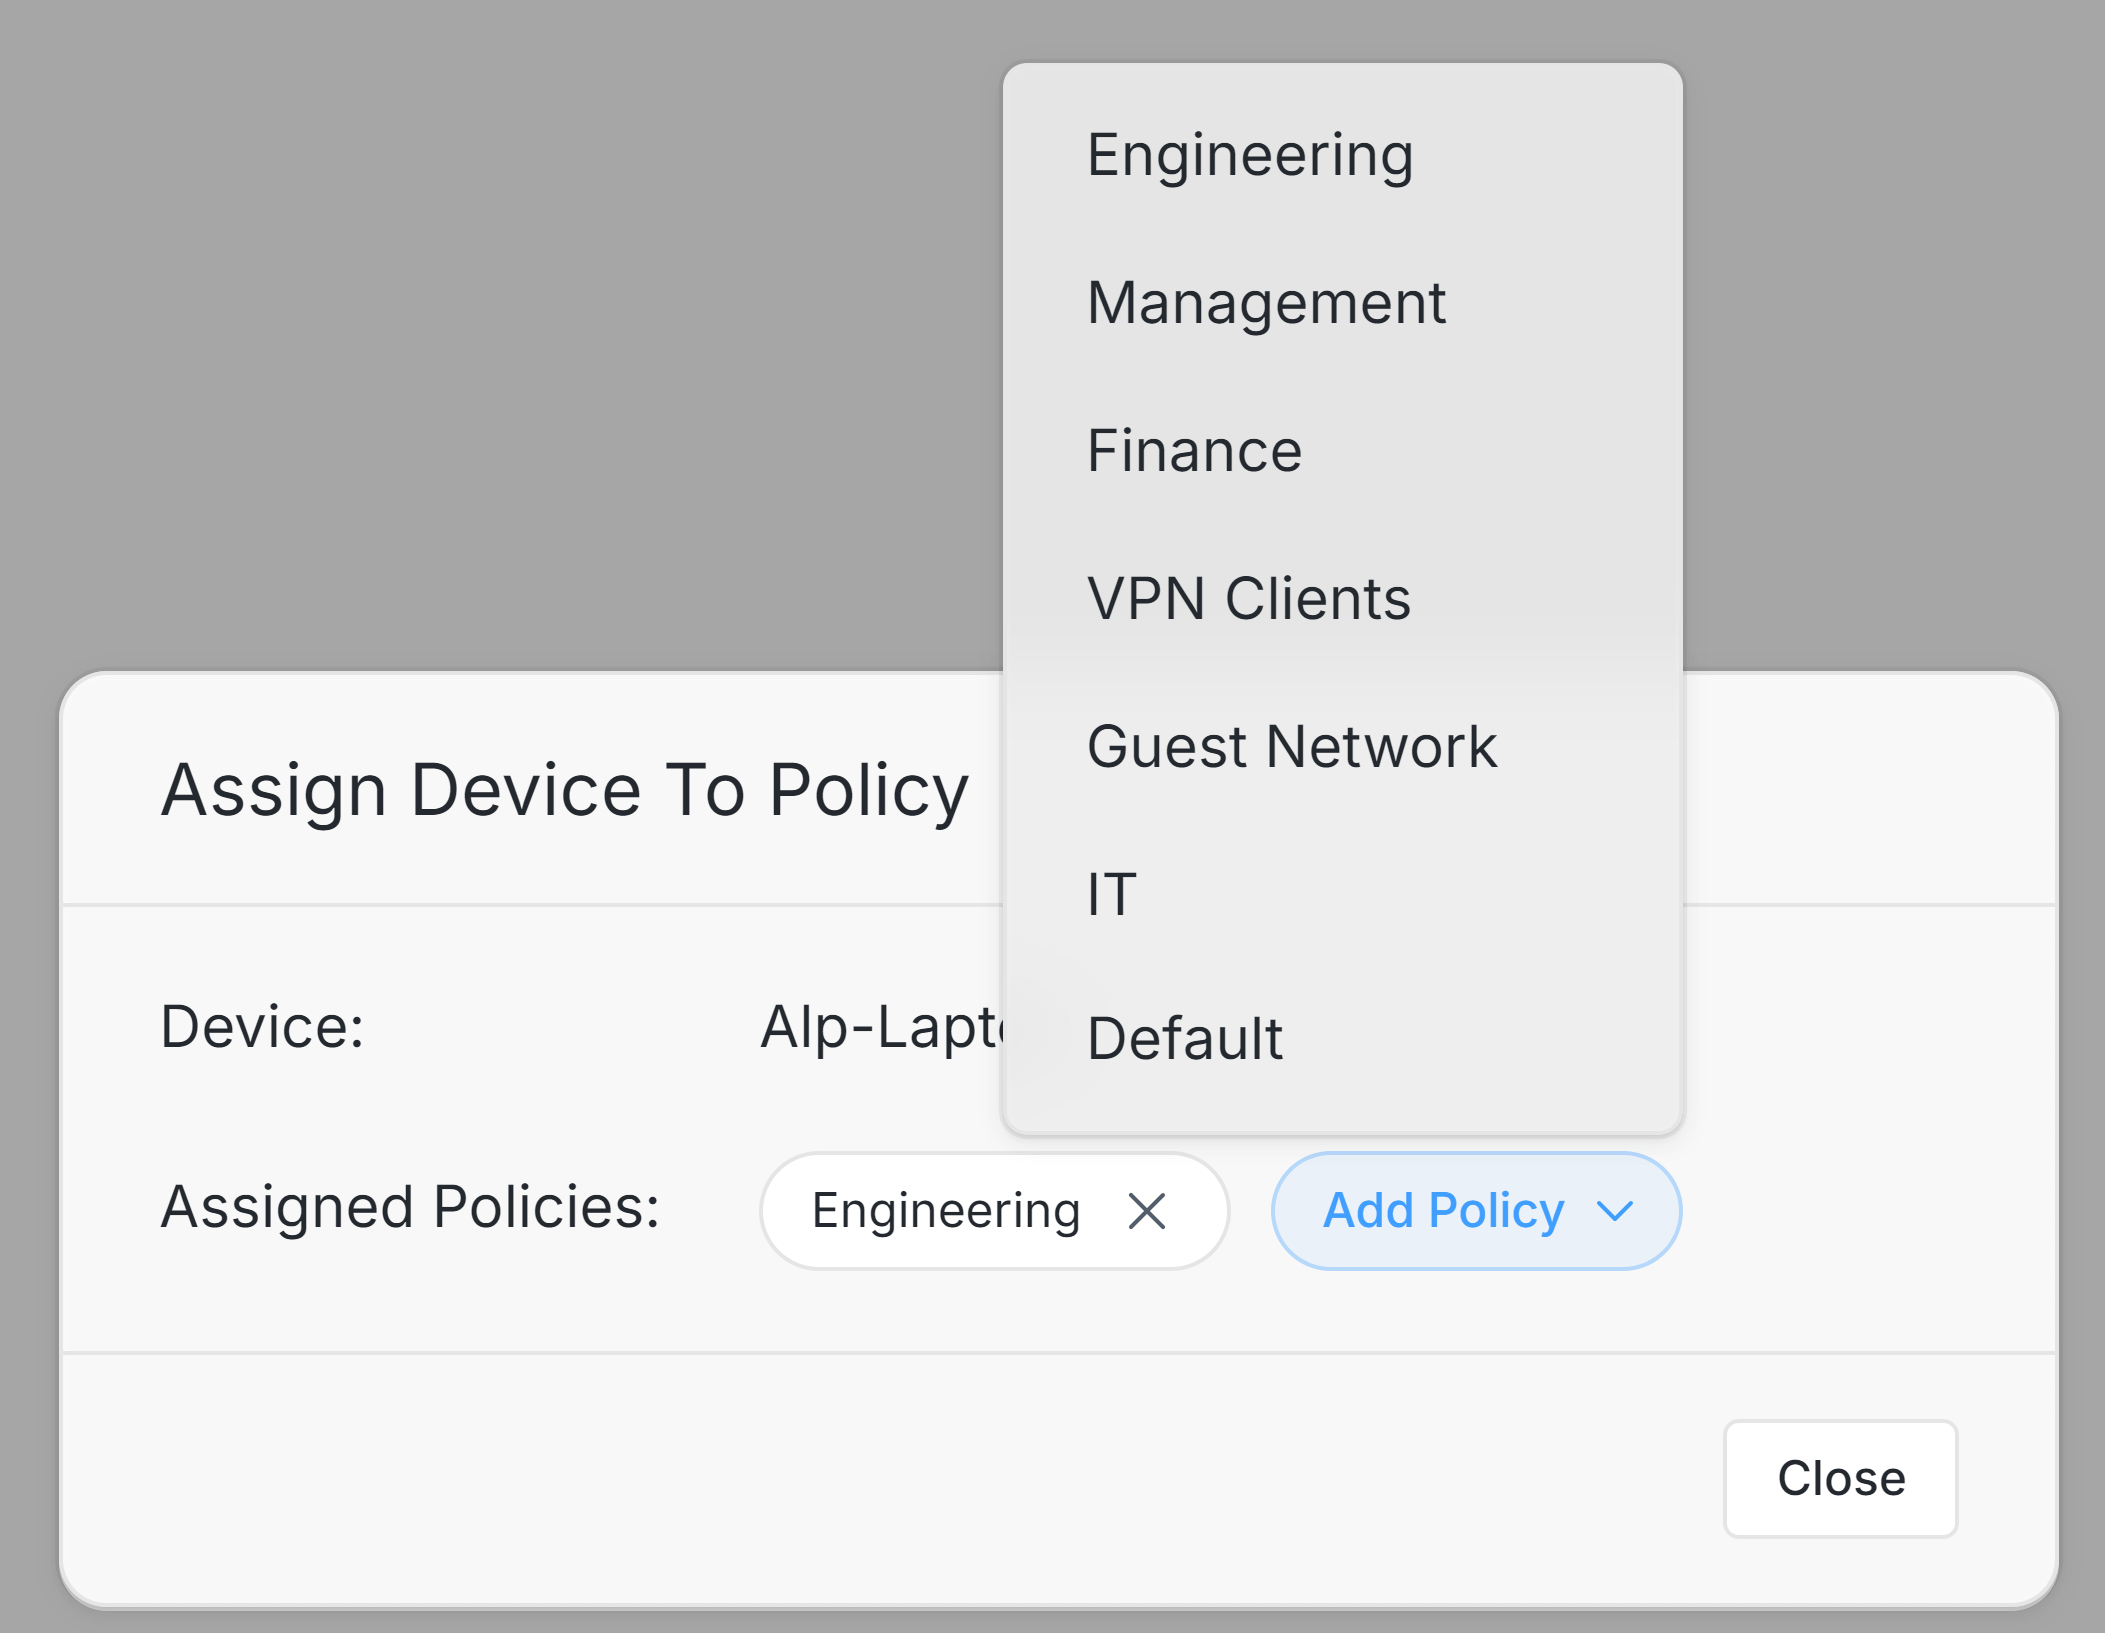
Figure 26. Selecting Policy via Devices Page
tipYou may easily unassign a device from a policy, by clicking on the remove button with the
xicon at the top right of the policy name in the policy assignment window of a device. -
Click Close to return to the Devices dashboard.