

Device Identification and Access Control were introduced along with other new capabilities in Zenarmor 1.16, and are available with all paid subscription plans. This capability was built keeping in mind the importance of IT asset management (ITAM) in any organization and is our simple approach to this process, which can sometimes be a mammoth task to accomplish without the correct tools. Since its introduction, this new Zenarmor engine capability has been received well by the general Zenarmor community.
Some of the immediate benefits you will receive by using Device ID and Access Control are:
-
Enhanced network visibility - Devices are now tracked in real-time as they connect to your network, which means you can easily, “weed out” the potentially risky untrusted, or rouge devices in between the trusted devices on your network.
-
Policy Enforcement & Access Control - Taking things a step further, you will not only be able to identify the devices, but also through Zenarmor policies, be able to control their access to your network resources which we will discuss in more detail in this article.
If you would like a more in-depth read about Zenarmors Device ID capabilities and a breakdown of additional benefits, please check out a previous article titled, “The Core of Network Security: Device Identification Defined”.
As promised in the title, the remainder of this article is a practical guide and we will be showcasing how Zenarmor Device ID and Access Control can be used to secure your network.
So without further ado, let’s get started.
The Devices Dashboard - A Quick Walkthrough
If you are on one of the Zenarmor paid subscription plans, the Devices menu option will be hard to miss. By simply clicking on it, the device management dashboard will be displayed which is designed to be intuitive. At first glance, the dashboard is broken down as follows:
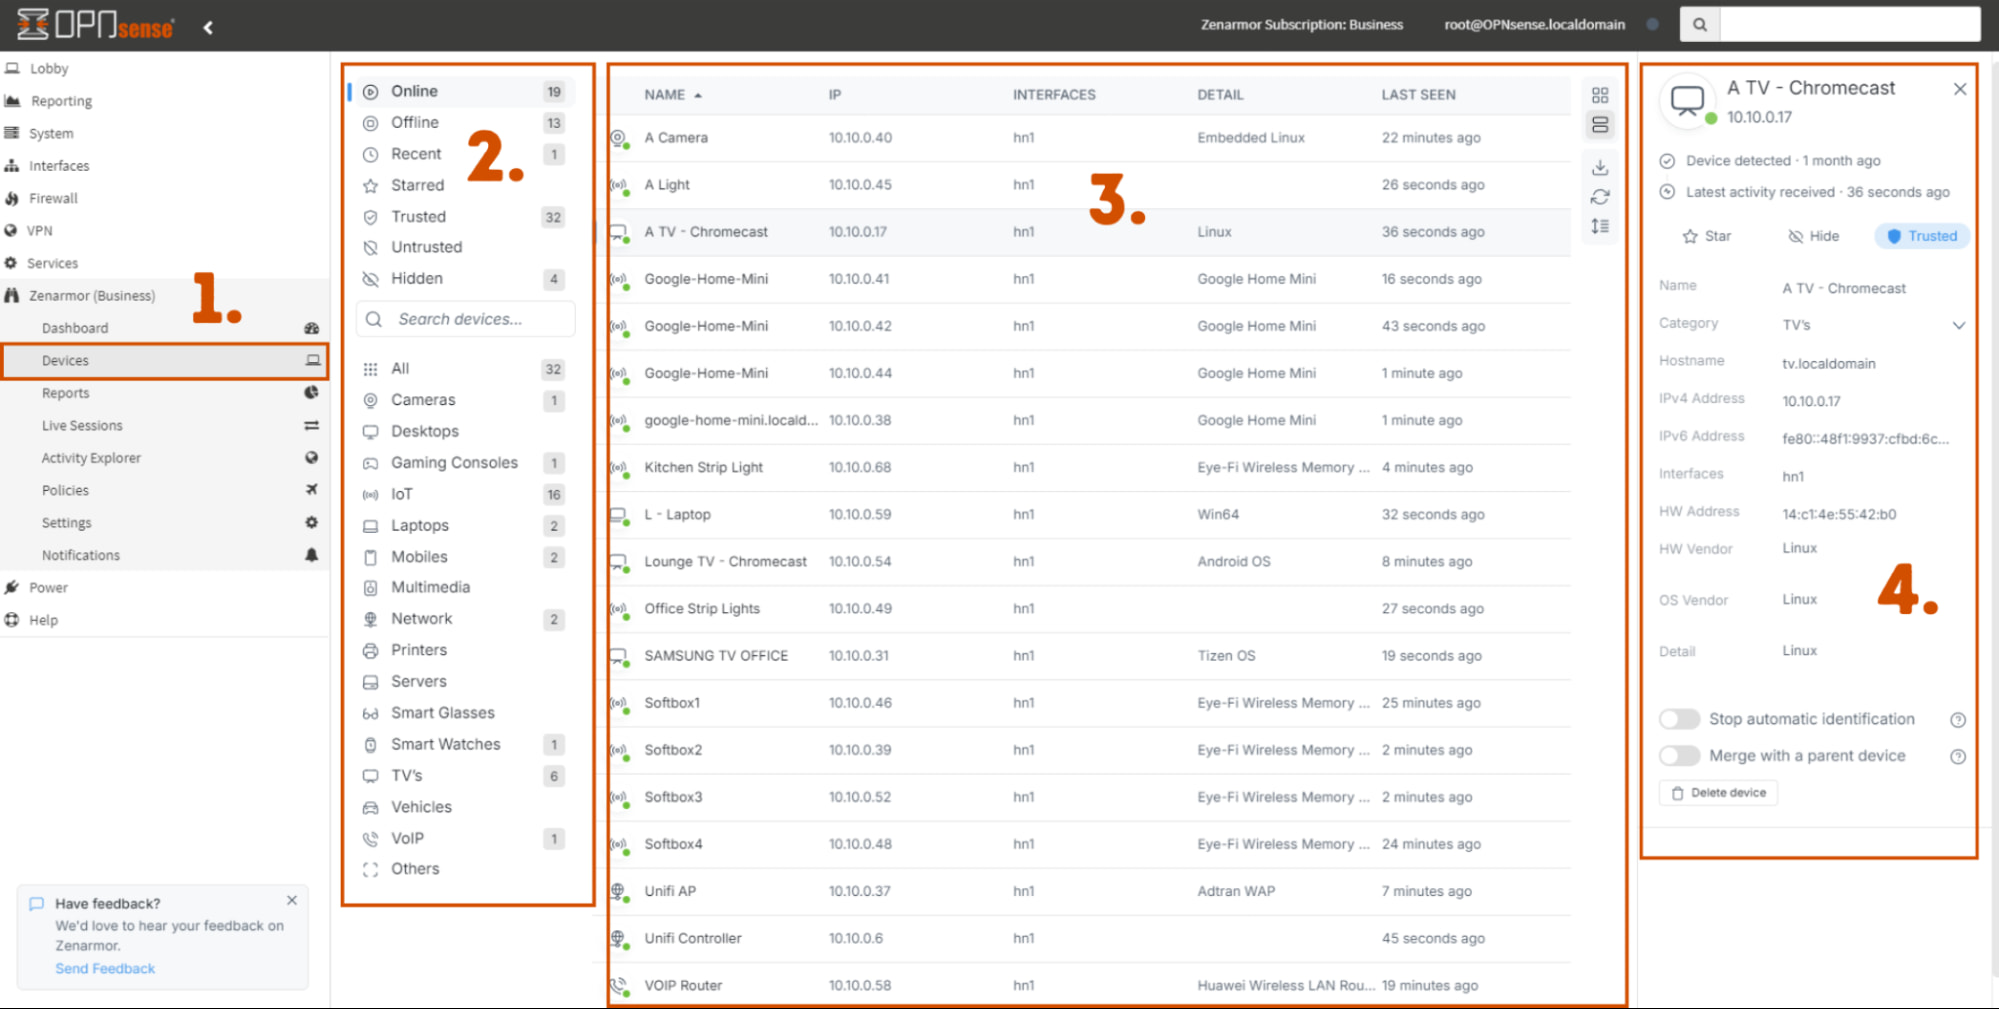 Figure 1: The Zenarmor Device Identification dashboard
- The Devices menu option is visible to all Zenarmor paid subscribers.
- Device Categories - A convenient way to sort through devices by type and their status.
- Device List - All the detected devices on your network will be listed here when they are discovered in real time. These can be arranged in a list or tiled view with various filtering options to suit your needs.
- Device details menu - Here you can see detailed information about the device you selected with the option to rename and recategorize it to your choosing. In this menu, you also can “star” the device as a favorite, “hide” it, and select if it’s “trusted” or “untrusted”.
All devices identified by Zenarmor will by default be untrusted until such a time you choose to trust the device. This default behavior is useful when using the Zenarmor policies to enforce device network access.
Policy Enforcement and Access Control
Building on this default behavior, one of the simplest ways you can start enforcing device access to your network is by using the built-in Zenarmor default policy and simply enabling the “Block Untrusted Devices” option. By doing this, any new device that joins the network will immediately have all its traffic blocked until such a time you decide to trust it.
This offers some immediate security benefits, let’s picture the following scenario, an employee brings their personal laptop or device to work and connects it to the corporate network without notifying IT about it, perhaps they figured out the Wifi password or plugged into an open LAN port in the office that someone in IT forgot to disable. Without Zenarmor access control policies in place, this device could have full internet and network access which could lead to productivity issues or worse, if that device has unknown malware “calling home” it could open a door for a potential bad actor to access the corporate network.
Figure 2: Zenarmor default policy to block all untrusted devices by default.
Stepping this up a gear, policy enforcement, and access control does not end here. Zenarmor also has the ability to create individual policies around certain devices or categories of your choosing.
To put it into a practical scenario let’s say you want to control all the mobile devices on your network blocking certain applications they are allowed access to. This is very simple to achieve with Zenarmor, you will simply need to create a “Mobile Device Policy” and under the criteria add the individual device or device category as depicted in the image below.
Figure 3: Creating a policy defined around device categories or individual devices.
Once this has been done, you can simply add other security, app, and web controls to this policy, the choice is yours. Like in most firewalls, policies are processed from top to bottom, and this is exactly the case in Zenarmor. Remember to place your policies in the stack in the correct order to be matched correctly.
Creating policies around devices and categories is as simple as that, however, this is not the only place where device identification is useful in Zenarmor.
Live Session and Reporting enhancements leveraging Zenarmor Device Identification
Device integration functionality has also been carried through into the Zenarmor Live Session and Reporting dashboards and at a glance you can easily identify the traffic for each device or category in near real-time. In addition to this, you can also easily filter by devices or device categories giving you ultimate visibility of your network traffic.
Figure 4: Live Session view showing device and device category columns with the ability to filter on these devices or respective categories.
If we head over to the Reports dashboard, you will notice that device identification has also been integrated into this dashboard. Here you can easily view Top devices and their respective device categories talking over your network. Filtering options have also been included here to help you easily drill down on individual devices giving you complete and granular information about which applications and websites they are accessing via your network.
Figure 5: Reporting dashboard showing top devices and device categories with controls to filter each respectively giving you ultimate network visibility.
So to wrap things up, we encourage you to get creative and start building your own policies around the devices attached to your network. Not only is this capability powerful it’s also easy to implement. If you are a freemium user or new to our community and would like to explore Zenarmor device identification as well as all the other amazing security capabilities on offer, we highly encourage you to try it on a free 15-day business edition trial that includes all this great functionality.
Alternatively, feel free to contact Zenamor at  and ask for assistance getting your free trial set up and started today. We’d love to hear from you!
